ESP32 마이크로파이썬 교통 신호등
이 튜토리얼은 ESP32와 MicroPython을 사용하여 신호등 모듈을 제어하는 방법을 안내합니다. 다음에 대해 논의할 것입니다:
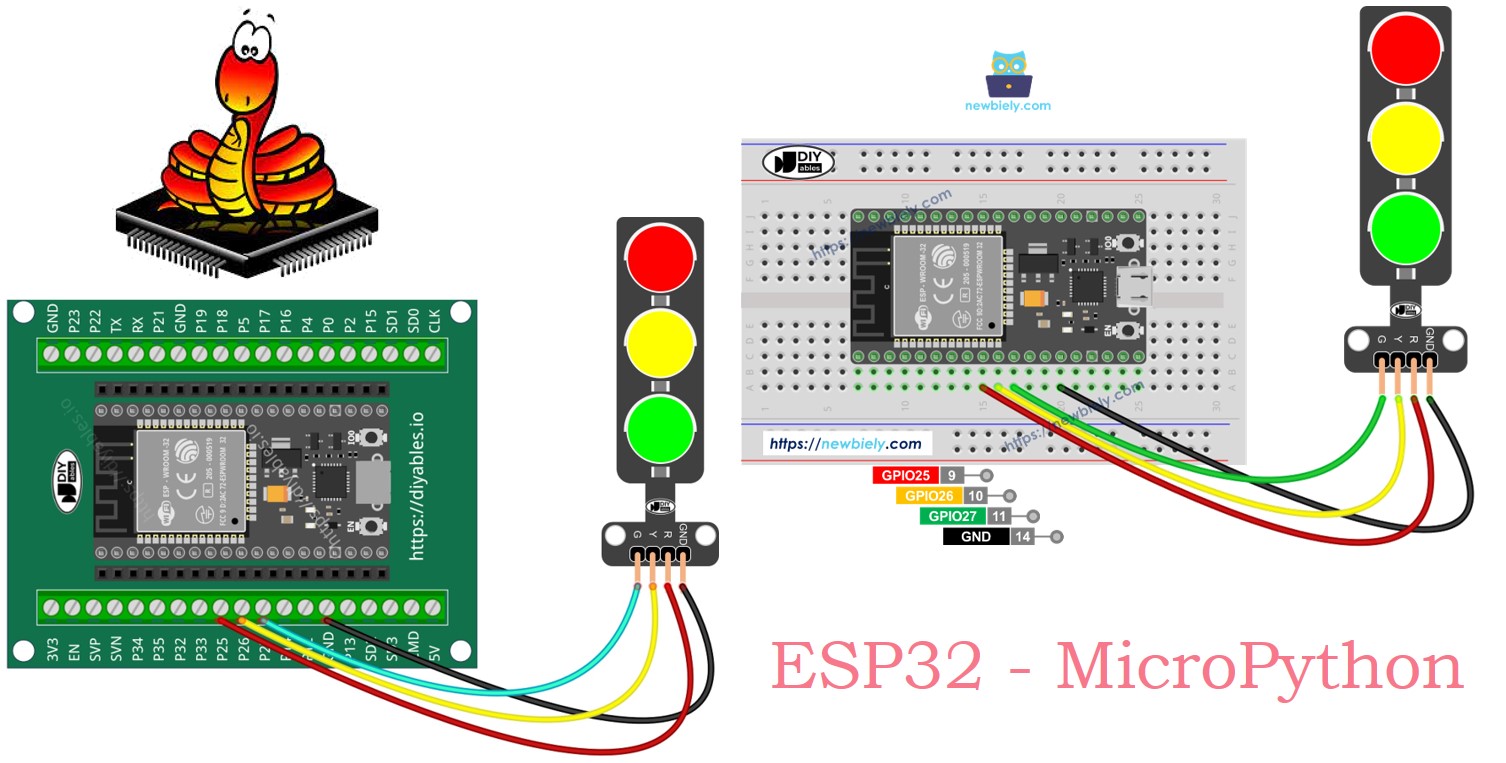
- ESP32에 신호등 모듈 연결하는 방법
- ESP32로 신호등 모듈 제어를 위한 MicroPython 코드 작성 방법
준비물
| 1 | × | 38-pin ESP32 ESP-WROOM-32 Dev Module - Narrow | 쿠팡 | 아마존 | |
| 1 | × | (또는) 38-pin ESP32 ESP-WROOM-32 Dev Module - Wide | 쿠팡 | 아마존 | |
| 1 | × | (또는) 30-pin ESP32 ESP-WROOM-32 Dev Module - Wide | 아마존 | |
| 1 | × | (또는) ESP32 Uno-form board | 아마존 | |
| 1 | × | (또는) ESP32 S3 Uno-form board | 아마존 | |
| 1 | × | USB 케이블 타입-A to 타입-C (USB-A PC용) | 쿠팡 | 아마존 | |
| 1 | × | USB 케이블 타입-C to 타입-C (USB-C PC용) | 아마존 | |
| 1 | × | 신호등 모듈 | 쿠팡 | 아마존 | |
| 1 | × | 점퍼케이블 | 쿠팡 | 아마존 | |
| 1 | × | (추천) ESP32용 스크루 터미널 확장 보드 | 쿠팡 | 아마존 | |
| 1 | × | (추천) Breakout Expansion Board for ESP32 | 쿠팡 | 아마존 | |
| 1 | × | (추천) ESP32용 전원 분배기 | 쿠팡 | 아마존 |
공개: 이 포스팅 에 제공된 일부 링크는 아마존 제휴 링크입니다. 이 포스팅은 쿠팡 파트너스 활동의 일환으로, 이에 따른 일정액의 수수료를 제공받습니다.
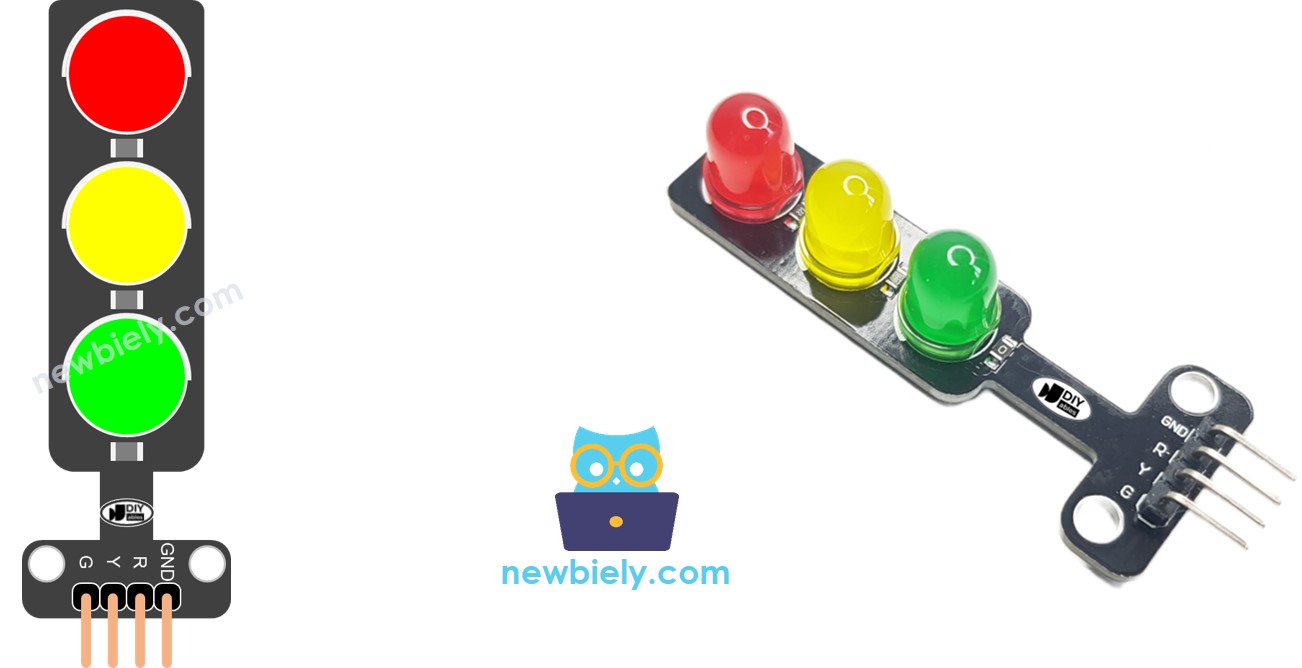
신호등 모듈 소개
핀아웃
교통 신호등 모듈에는 네 개의 핀이 있습니다.
- GND 핀: 이 접지 핀을 ESP32의 GND에 연결합니다.
- R 핀: 이 핀은 빨간 불빛을 작동합니다. ESP32의 디지털 출력에 연결합니다.
- Y 핀: 이 핀은 노란 불빛을 작동합니다. ESP32의 디지털 출력에 연결합니다.
- G 핀: 이 핀은 초록 불빛을 작동합니다. ESP32의 디지털 출력에 연결합니다.
작동 원리
선연결
- ESP32와 신호등을 브레드보드를 사용하여 연결하는 방법
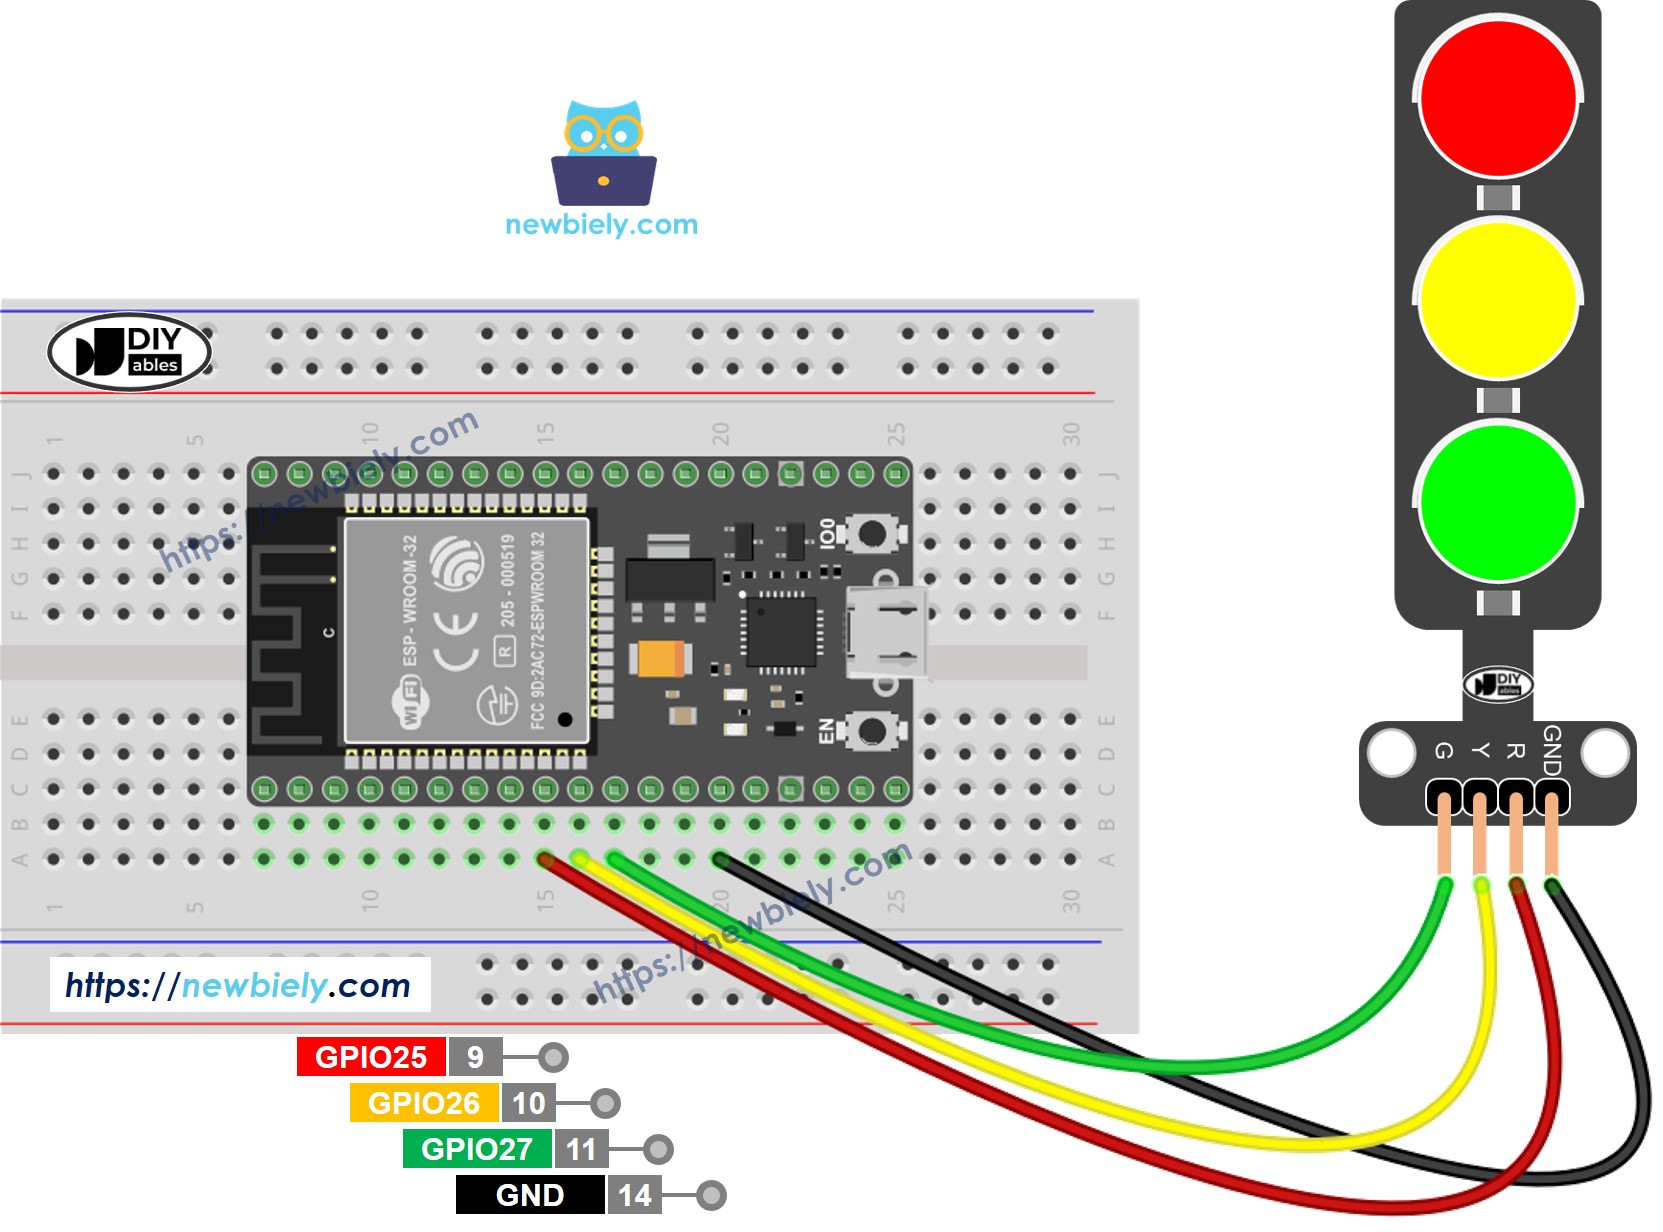
이 이미지는 Fritzing을 사용하여 만들어졌습니다. 이미지를 확대하려면 클릭하세요.
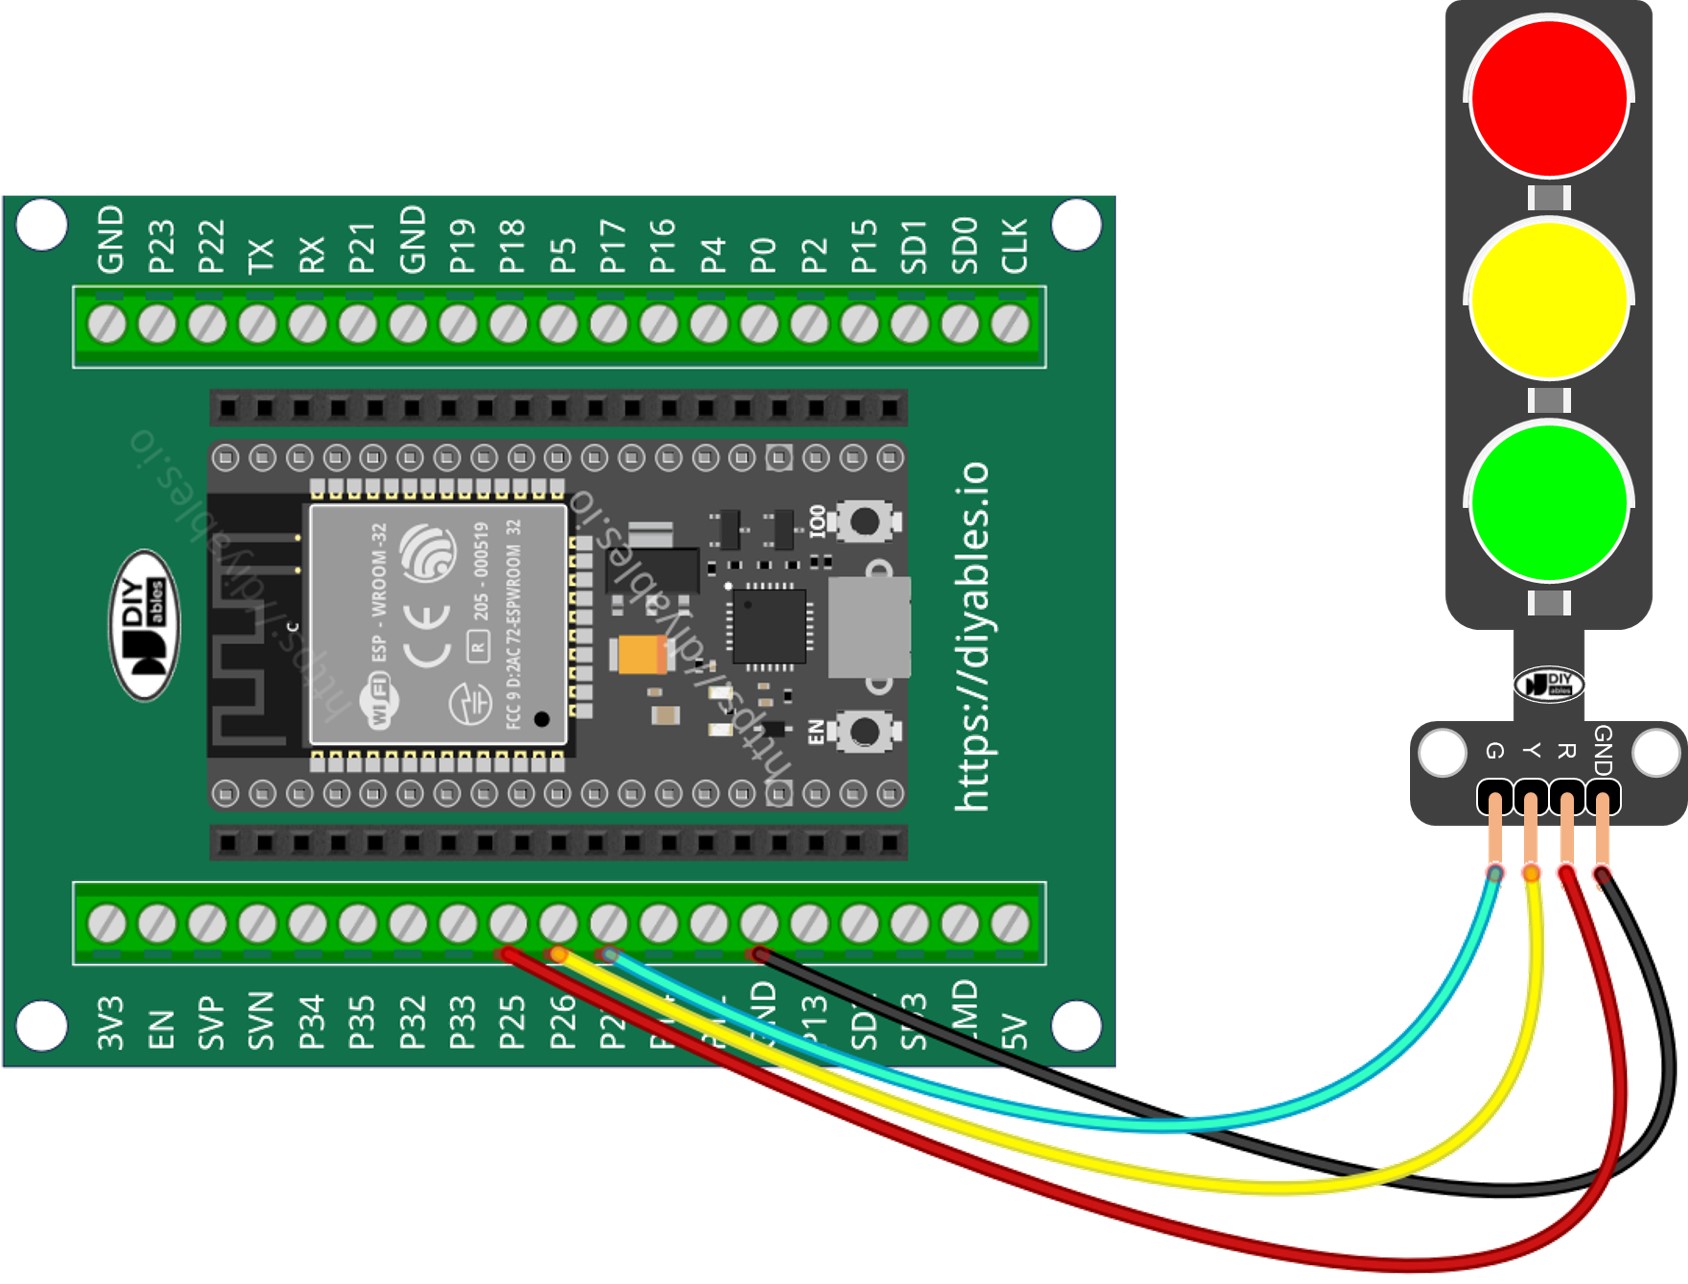
- ESP32와 신호등을 나사 터미널 블록 브레이크아웃 보드를 사용하여 연결하는 방법
ESP32 마이크로파이썬 코드
/*
* 이 ESP32 마이크로파이썬 코드는 newbiely.kr 에서 개발되었습니다
* 이 ESP32 마이크로파이썬 코드는 어떠한 제한 없이 공개 사용을 위해 제공됩니다.
* 상세한 지침 및 연결도에 대해서는 다음을 방문하세요:
* https://newbiely.kr/tutorials/esp32-micropython/esp32-micropython-traffic-light
*/
import machine
import time
# Define pin numbers (you can change these to match your wiring)
PIN_RED = 25 # The ESP32 pin GPIO25 connected to the traffic light module's red pin
PIN_YELLOW = 26 # The ESP32 pin GPIO26 connected to the traffic light module's yellow pin
PIN_GREEN = 27 # The ESP32 pin GPIO27 connected to the traffic light module's green pin
# Define times in seconds (MicroPython uses seconds for time.sleep)
RED_TIME = 4 # RED time in seconds
YELLOW_TIME = 4 # YELLOW time in seconds
GREEN_TIME = 4 # GREEN time in seconds
# Setup pins as output
red = machine.Pin(PIN_RED, machine.Pin.OUT)
yellow = machine.Pin(PIN_YELLOW, machine.Pin.OUT)
green = machine.Pin(PIN_GREEN, machine.Pin.OUT)
# Main loop
while True:
# Red light on
red.value(1) # turn on red
yellow.value(0) # turn off yellow
green.value(0) # turn off green
time.sleep(RED_TIME) # keep red light on for the defined period
# Yellow light on
red.value(0) # turn off red
yellow.value(1) # turn on yellow
green.value(0) # turn off green
time.sleep(YELLOW_TIME) # keep yellow light on for the defined period
# Green light on
red.value(0) # turn off red
yellow.value(0) # turn off yellow
green.value(1) # turn on green
time.sleep(GREEN_TIME) # keep green light on for the defined period
자세한 사용 방법
다음은 Thonny IDE를 사용하여 ESP32에서 MicroPython 코드를 설정하고 실행하는 방법에 대한 지침입니다:
- 컴퓨터에 Thonny IDE가 설치되어 있는지 확인합니다.
- ESP32 보드에 MicroPython 펌웨어가 로드되어 있는지 확인합니다.
- MicroPython을 사용한 ESP32를 처음 사용하는 경우, 단계별 지침을 제공하는 ESP32 마이크로파이썬 - 시작하기 가이드를 확인하세요.
- 제공된 다이어그램에 따라 ESP32 보드를 교통 신호 모듈에 연결합니다.
- USB 케이블을 사용하여 ESP32 보드를 컴퓨터에 연결합니다.
- 컴퓨터에서 Thonny IDE를 엽니다.
- Thonny IDE에서 Tools Options으로 이동합니다.
- Interpreter 탭에서 드롭다운 메뉴에서 MicroPython (ESP32)를 선택합니다.
- 올바른 포트가 선택되어 있는지 확인합니다. Thonny IDE가 보통 자동으로 감지하지만, 수동으로 선택해야 할 수도 있습니다(예: Windows에서는 COM12, Linux에서는 /dev/ttyACM0).
- 제공된 MicroPython 코드를 복사하여 Thonny의 에디터에 붙여넣습니다.
- ESP32에 코드를 저장하려면:
- Save 버튼을 클릭하거나 Ctrl+S를 누릅니다.
- 저장 대화 상자에서 MicroPython device를 선택합니다.
- 파일 이름을 main.py로 지정합니다.
- 스크립트를 실행하려면 초록색 Run 버튼을 클릭하거나 F5를 누릅니다.
- 교통 신호 상태를 확인합니다.
교통 신호등은 각 지역의 설계에 따라 다양한 방식으로 작동합니다. 여기 교통 신호등이 교통을 통제하는 방법에 대한 간단한 설명이 있습니다.
위의 코드는 각 조명을 하나씩 제어할 수 있도록 해줍니다. 이제 코드를 개선하여 더 잘 작동하도록 하겠습니다.
ESP32 MicroPython 코드 최적화
- 빛 관리를 위한 함수를 생성하여 코드를 개선합시다.
/*
* 이 ESP32 마이크로파이썬 코드는 newbiely.kr 에서 개발되었습니다
* 이 ESP32 마이크로파이썬 코드는 어떠한 제한 없이 공개 사용을 위해 제공됩니다.
* 상세한 지침 및 연결도에 대해서는 다음을 방문하세요:
* https://newbiely.kr/tutorials/esp32-micropython/esp32-micropython-traffic-light
*/
import machine
import time
# Define pin numbers (you can change these to match your wiring)
PIN_RED = 25 # The ESP32 pin GPIO25 connected to the traffic light module's red pin
PIN_YELLOW = 26 # The ESP32 pin GPIO26 connected to the traffic light module's yellow pin
PIN_GREEN = 27 # The ESP32 pin GPIO27 connected to the traffic light module's green pin
# Define times in seconds (MicroPython uses seconds for time.sleep)
RED_TIME = 2 # RED time in seconds
YELLOW_TIME = 1 # YELLOW time in seconds
GREEN_TIME = 2 # GREEN time in seconds
# Define indexes
RED = 0
YELLOW = 1
GREEN = 2
# Setup pins as output and store them in a list
pins = [
machine.Pin(PIN_RED, machine.Pin.OUT),
machine.Pin(PIN_YELLOW, machine.Pin.OUT),
machine.Pin(PIN_GREEN, machine.Pin.OUT)
]
# Define the times array
times = [RED_TIME, YELLOW_TIME, GREEN_TIME]
def trafic_light_on(light):
for i in range(RED, GREEN + 1):
if i == light:
pins[i].value(1) # turn on
else:
pins[i].value(0) # turn off
# Main loop
while True:
# Red light on
trafic_light_on(RED)
time.sleep(times[RED]) # keep red light on during a period of time
# Yellow light on
trafic_light_on(YELLOW)
time.sleep(times[YELLOW]) # keep yellow light on during a period of time
# Green light on
trafic_light_on(GREEN)
time.sleep(times[GREEN]) # keep green light on during a period of time
- For 루프를 사용하여 코드를 개선할 수 있습니다.
/*
* 이 ESP32 마이크로파이썬 코드는 newbiely.kr 에서 개발되었습니다
* 이 ESP32 마이크로파이썬 코드는 어떠한 제한 없이 공개 사용을 위해 제공됩니다.
* 상세한 지침 및 연결도에 대해서는 다음을 방문하세요:
* https://newbiely.kr/tutorials/esp32-micropython/esp32-micropython-traffic-light
*/
import machine
import time
# Define pin numbers (you can change these to match your wiring)
PIN_RED = 25 # The ESP32 pin GPIO25 connected to the traffic light module's red pin
PIN_YELLOW = 26 # The ESP32 pin GPIO26 connected to the traffic light module's yellow pin
PIN_GREEN = 27 # The ESP32 pin GPIO27 connected to the traffic light module's green pin
# Define times in milliseconds (MicroPython can handle time in milliseconds with time.sleep_ms)
RED_TIME = 2000 # RED time in milliseconds
YELLOW_TIME = 1000 # YELLOW time in milliseconds
GREEN_TIME = 2000 # GREEN time in milliseconds
# Define indexes
RED = 0
YELLOW = 1
GREEN = 2
# Setup pins as output and store them in a list
pins = [
machine.Pin(PIN_RED, machine.Pin.OUT),
machine.Pin(PIN_YELLOW, machine.Pin.OUT),
machine.Pin(PIN_GREEN, machine.Pin.OUT)
]
# Define the times array
times = [RED_TIME, YELLOW_TIME, GREEN_TIME]
def trafic_light_on(light):
for i in range(RED, GREEN + 1):
if i == light:
pins[i].value(1) # turn on
else:
pins[i].value(0) # turn off
# Main loop
while True:
for light in range(RED, GREEN + 1):
trafic_light_on(light)
time.sleep_ms(times[light]) # keep light on during a period of time
- time.sleep() 대신 millis() 함수를 사용하여 코드를 개선해 봅시다.
/*
* 이 ESP32 마이크로파이썬 코드는 newbiely.kr 에서 개발되었습니다
* 이 ESP32 마이크로파이썬 코드는 어떠한 제한 없이 공개 사용을 위해 제공됩니다.
* 상세한 지침 및 연결도에 대해서는 다음을 방문하세요:
* https://newbiely.kr/tutorials/esp32-micropython/esp32-micropython-traffic-light
*/
import machine
import time
# Define pin numbers (you can change these to match your wiring)
PIN_RED = 25 # The ESP32 pin GPIO25 connected to the traffic light module's red pin
PIN_YELLOW = 26 # The ESP32 pin GPIO26 connected to the traffic light module's yellow pin
PIN_GREEN = 27 # The ESP32 pin GPIO27 connected to the traffic light module's green pin
# Define times in milliseconds (MicroPython can handle time in milliseconds with time.sleep_ms)
RED_TIME = 2000 # RED time in milliseconds
YELLOW_TIME = 1000 # YELLOW time in milliseconds
GREEN_TIME = 2000 # GREEN time in milliseconds
# Define indexes
RED = 0
YELLOW = 1
GREEN = 2
# Setup pins as output and store them in a list
pins = [
machine.Pin(PIN_RED, machine.Pin.OUT),
machine.Pin(PIN_YELLOW, machine.Pin.OUT),
machine.Pin(PIN_GREEN, machine.Pin.OUT)
]
# Define the times array
times = [RED_TIME, YELLOW_TIME, GREEN_TIME]
# Initialize variables
last_time = time.ticks_ms()
light = RED # start with RED light
def trafic_light_on(light):
for i in range(RED, GREEN + 1):
if i == light:
pins[i].value(1) # turn on
else:
pins[i].value(0) # turn off
# Initialize the first light
trafic_light_on(light)
# Main loop
while True:
current_time = time.ticks_ms()
if time.ticks_diff(current_time, last_time) > times[light]:
light += 1
if light >= 3:
light = RED # reset to RED for a new cycle
trafic_light_on(light)
last_time = current_time
# TO DO: your other code
동영상
비디오 제작은 시간이 많이 걸리는 작업입니다. 비디오 튜토리얼이 학습에 도움이 되었다면, YouTube 채널 을 구독하여 알려 주시기 바랍니다. 비디오에 대한 높은 수요가 있다면, 비디오를 만들기 위해 노력하겠습니다.


