ESP32 MicroPython 미니 MP3 플레이어

ESP32는 Wi-Fi, Bluetooth, 다수의 하드웨어 UART 포트를 갖춘 다용도 3.3V 마이크로컨트롤러입니다. DIYables 미니 MP3 플레이어 모듈과 MicroPython을 결합하면 간단한 효과음 보드부터 Wi-Fi 제어 주크박스까지 다양한 것을 만들 수 있습니다.

이 튜토리얼에서 다루는 내용:

ESP32 마이크로파이썬 미니 mp3 플레이어

필요한 부품

1×38-pin ESP32 ESP-WROOM-32 Dev Module - Narrow 쿠팡 | 아마존
1×(또는) 38-pin ESP32 ESP-WROOM-32 Dev Module - Wide 쿠팡 | 아마존
1×(또는) 30-pin ESP32 ESP-WROOM-32 Dev Module - Wide 아마존
1×(또는) ESP32 Uno-form board 아마존
1×(또는) ESP32 S3 Uno-form board 아마존
1×USB 케이블 타입-A to 타입-C (USB-A PC용) 쿠팡 | 아마존
1×USB 케이블 타입-C to 타입-C (USB-C PC용) 아마존
1×DIYables Mini Mp3 Player module 아마존
1×마이크로 SD 카드 아마존
1×Speaker 아마존
1×브레드보드 쿠팡 | 아마존
1×점퍼케이블 쿠팡 | 아마존
1×(추천) ESP32용 스크루 터미널 확장 보드 쿠팡 | 아마존
1×(추천) Breakout Expansion Board for ESP32 쿠팡 | 아마존
1×(추천) ESP32용 전원 분배기 쿠팡 | 아마존
공개: 이 포스팅 에 제공된 일부 링크는 아마존 제휴 링크입니다. 이 포스팅은 쿠팡 파트너스 활동의 일환으로, 이에 따른 일정액의 수수료를 제공받습니다.

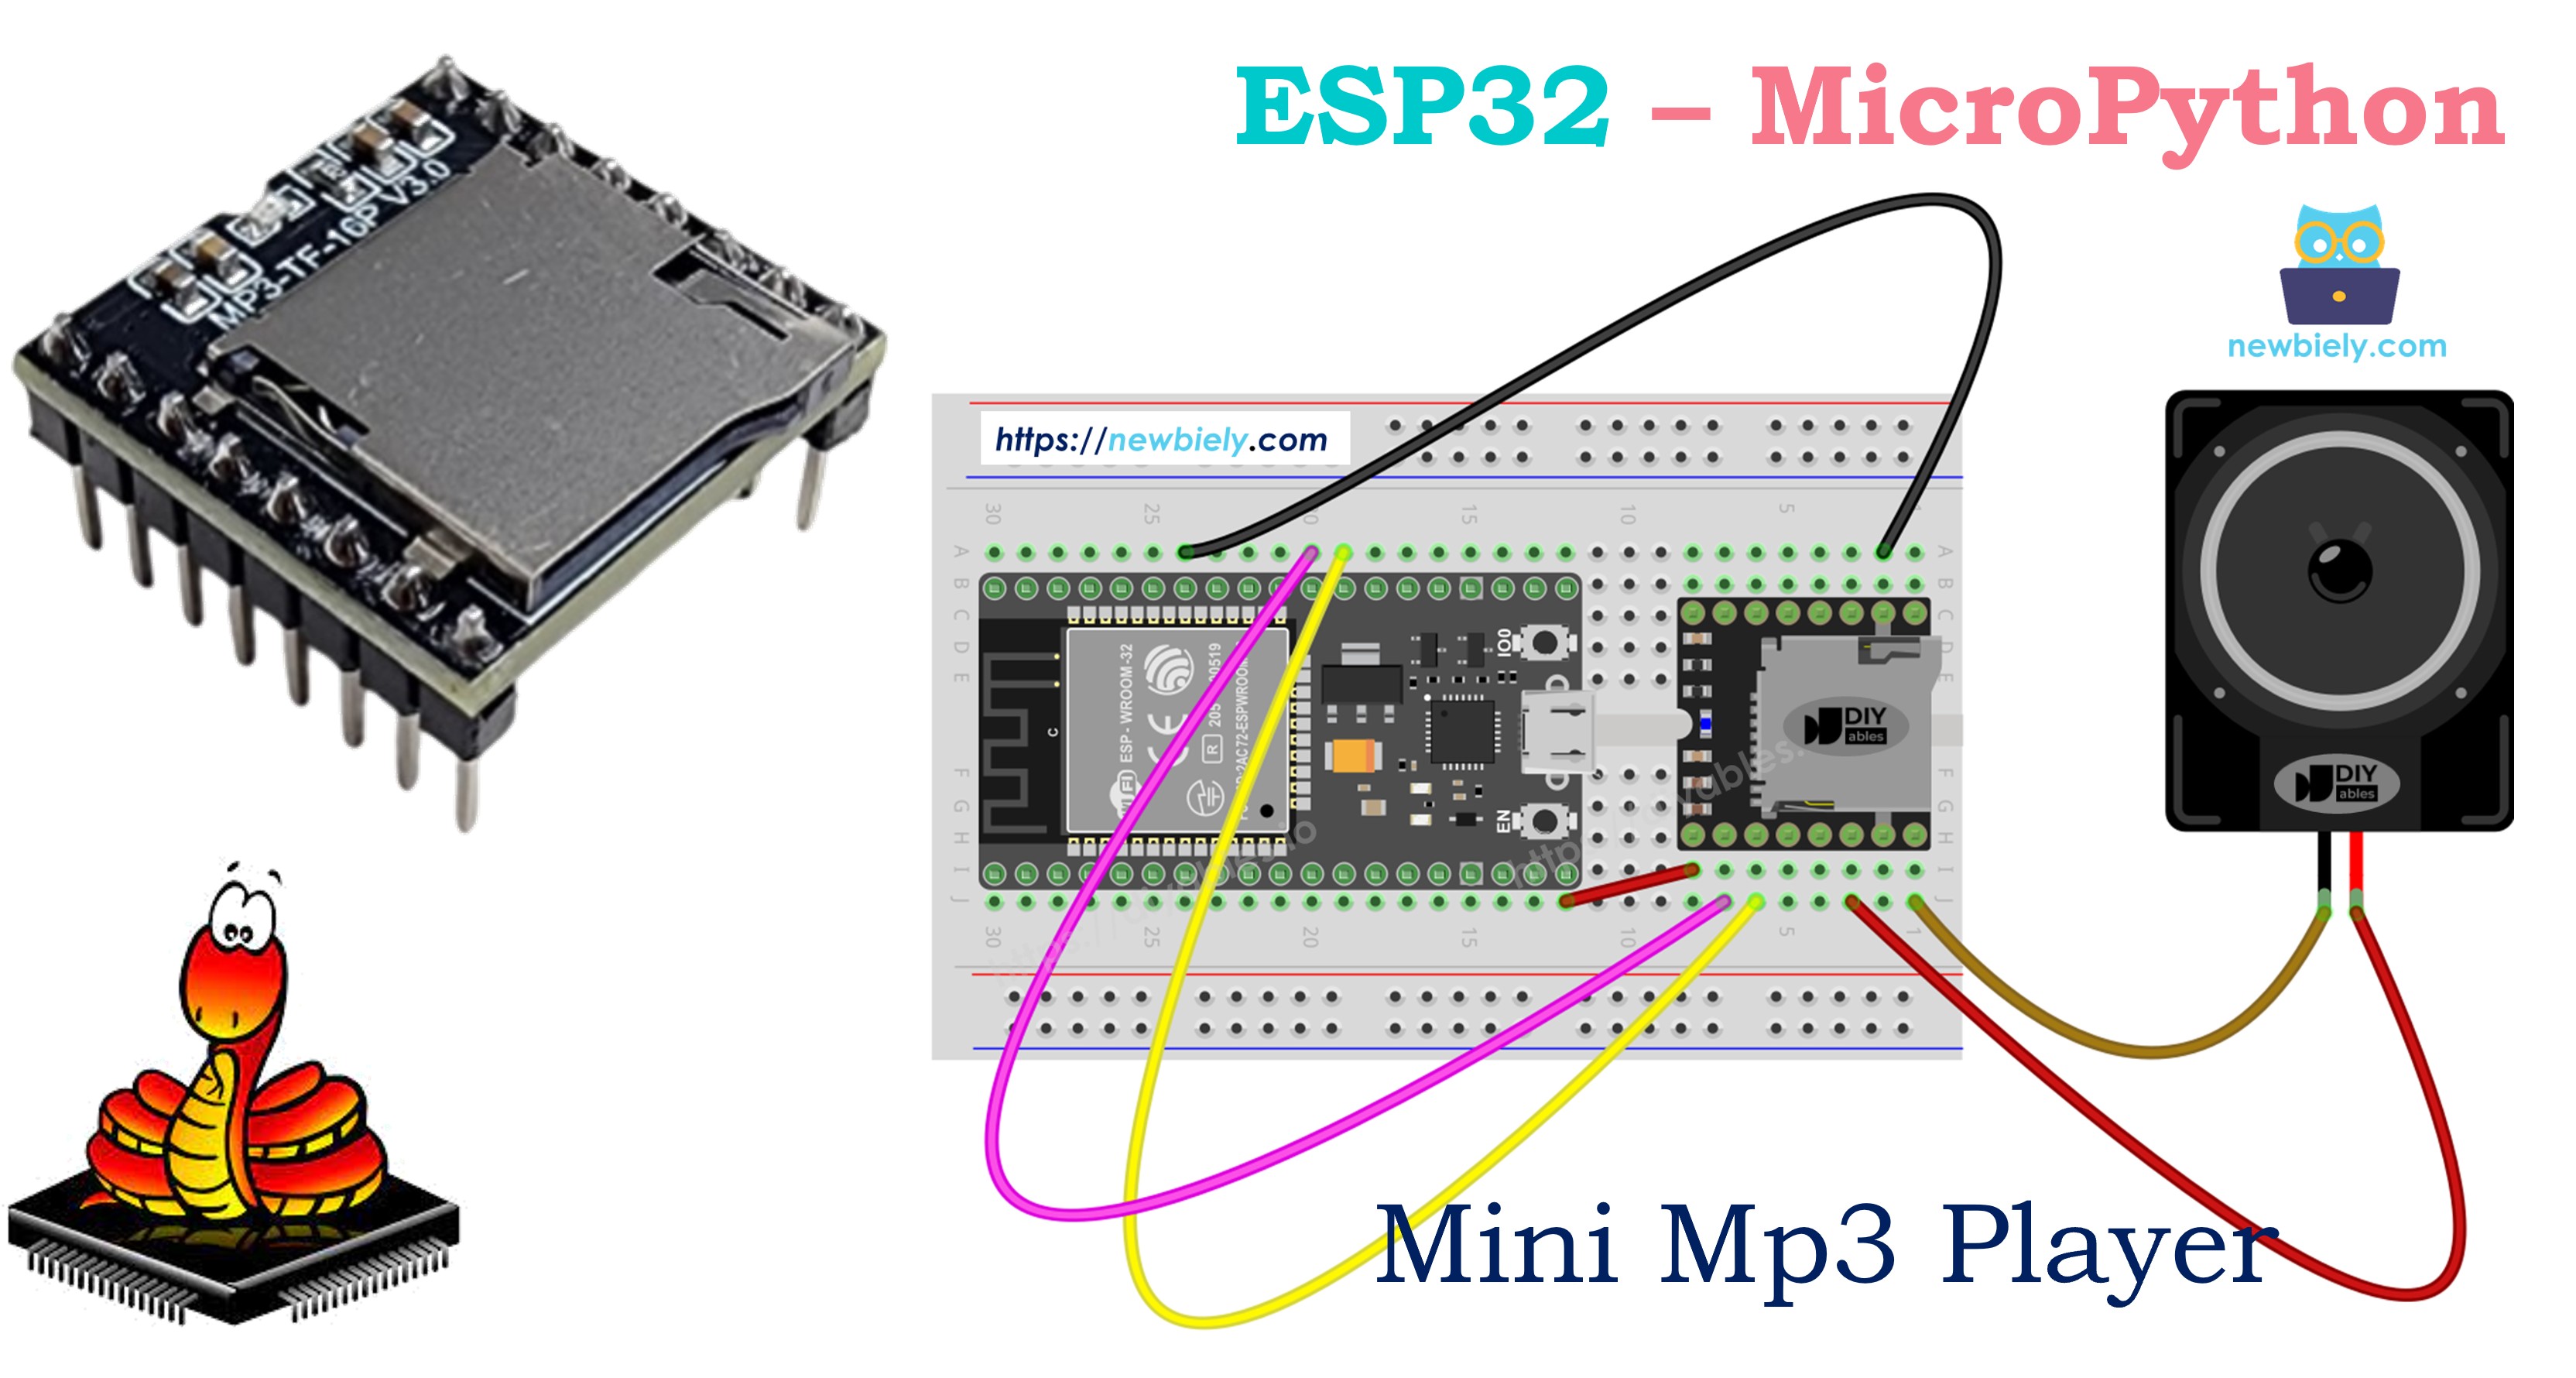
저항 불필요. ESP32는 3.3V로 동작하며 — 미니 MP3 플레이어의 UART가 기대하는 전압과 동일합니다.

미니 MP3 플레이어 모듈

DIYables 미니 MP3 플레이어는 YX5200-24SS 칩 기반의 소형 오디오 디코더 보드입니다. 마이크로 SD 카드에서 MP3 파일을 읽어 내장 3W 앰프를 통해 오디오를 출력하거나 외부 앰프용 DAC 핀을 통해 출력합니다.

ESP32는 UART 9600보드로 이 모듈과 통신합니다 — ESP32에는 하드웨어 UART 포트가 3개 있으므로 UART0을 MicroPython REPL 콘솔 전용으로 유지하면서 UART2를 MP3 모듈에 전용할 수 있습니다.

모듈은 풍부한 시리얼 명령을 지원합니다:

  • 재생: 재생, 일시정지, 재개, 중지, 다음, 이전
  • 볼륨: 31단계(0–30), 실시간 조절 가능
  • 이퀄라이저: 6가지 프리셋 — 일반, 팝, 록, 재즈, 클래식, 베이스
  • 반복 모드: 단일 트랙 반복, 폴더 반복, 전체 반복, 셔플
  • 폴더 재생: 번호가 매겨진 디렉토리의 오디오 구성
  • 광고: 현재 트랙을 공지로 중단하고 자동 재개
  • 상태 조회: 현재 트랙 번호, 볼륨 수준, 재생 상태, 파일 수 읽기
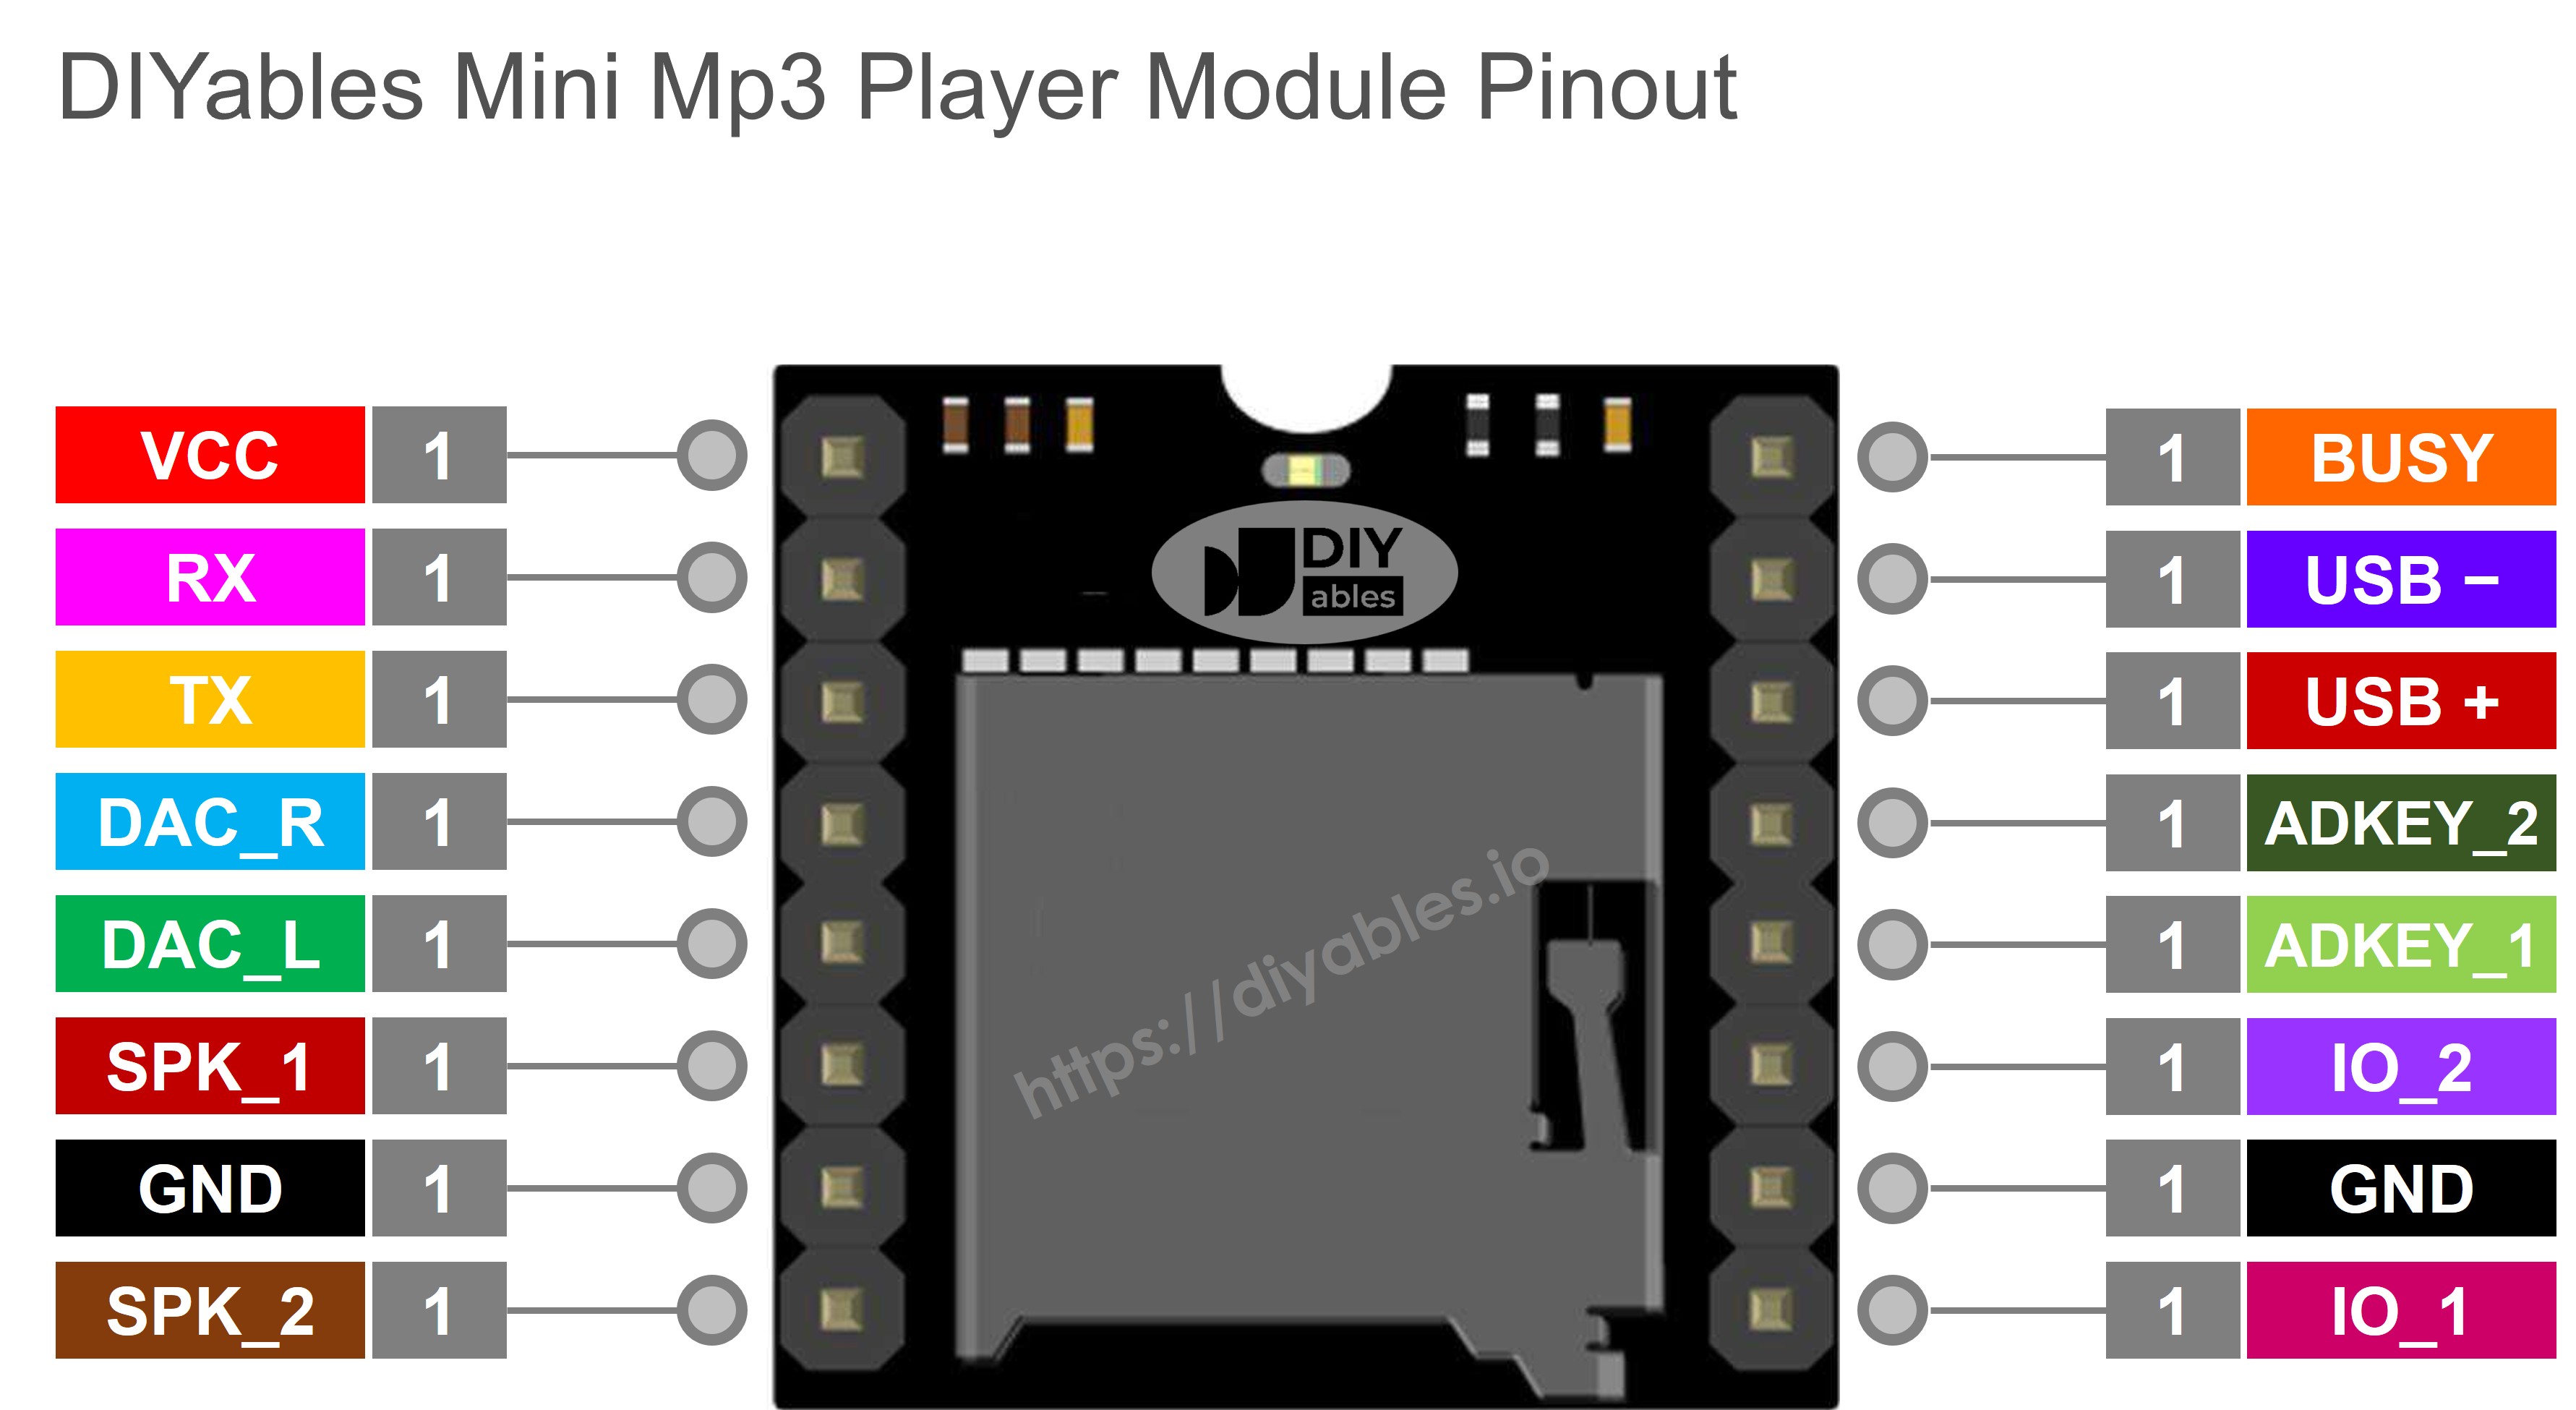
핀 설명

용도 ESP32 연결
VCC 3.2V~5.0V 전원 입력 ESP32 3.3V 또는 5V(VIN)에 연결
GND 접지 ESP32 GND에 연결
RX 시리얼 데이터 입력 ESP32 GPIO17(TX2)에 연결
TX 시리얼 데이터 출력 ESP32 GPIO16(RX2)에 연결
SPK_1 스피커 +(내장 앰프, 최대 3W) 스피커에 연결
SPK_2 스피커 − 스피커에 연결
DAC_R 오른쪽 채널 라인 출력 선택 사항 — 외부 앰프용
DAC_L 왼쪽 채널 라인 출력 선택 사항 — 외부 앰프용
BUSY LOW = 재생 중, HIGH = 중지 선택 사항 — GPIO로 읽기
IO_1 단기 누름 → 이전; 장기 누름 → 볼륨 다운 미사용 (UART로 제어)
IO_2 단기 누름 → 다음; 장기 누름 → 볼륨 업 미사용 (UART로 제어)
미니 mp3 플레이어 핀아웃

배선

ESP32는 기본적으로 3.3V 로직을 사용하므로 시리얼 라인을 직접 배선합니다 — 레벨 시프터나 저항이 필요 없습니다.

대부분의 ESP32 DevKit 보드에서 기본으로 제공되는 UART2 사용을 권장합니다:

미니 MP3 플레이어 ESP32 비고
VCC 3.3V 또는 VIN에서 5V
GND GND
RX GPIO 17 (TX2) 직접 연결
TX GPIO 16 (RX2) 직접 연결
SPK_1 스피커 +
SPK_2 스피커 −
ESP32 마이크로파이썬 미니 mp3 플레이어 배선도

이 이미지는 Fritzing을 사용하여 만들어졌습니다. 이미지를 확대하려면 클릭하세요.

팁: ESP32 변형 중 일부(일부 DevKit-C V4 보드는 PSRAM에 GPIO 16/17을 사용)에서 GPIO 16/17을 사용할 수 없는 경우, 코드에서 UART 핀을 재지정할 수 있습니다:

uart = UART(2, baudrate=9600, tx=4, rx=5)

SD 카드 준비

ESP32에 MicroPython 코드를 업로드하기 전에 마이크로 SD 카드를 준비합니다:

  1. 카드를 FAT16 또는 FAT32포맷합니다(컴퓨터의 디스크 유틸리티 사용).
  2. 루트 디렉토리에 0으로 채워진 이름으로 MP3 파일을 복사합니다:
/001.mp3 /002.mp3 /003.mp3
  1. 선택 사항으로, 다중 카테고리 재생을 위해 번호가 매겨진 폴더로 트랙을 구성합니다:
/01/001.mp3 ← folder 1, track 1 /01/002.mp3 ← folder 1, track 2 /02/001.mp3 ← folder 2, track 1

ESP32 + 미니 MP3 플레이어 설정의 핵심 규칙:

  • 트랙 번호는 1부터 시작합니다(0이 아님).
  • 모듈은 파일 이름이 아닌 파일이 복사된 순서로 트랙 순서를 결정합니다. 먼저 카드를 포맷한 후 파일을 순서대로 하나씩 복사합니다.
  • 폴더 이름은 2자리 0 채우기(01–99)여야 합니다. 폴더 내 파일 이름은 3자리 0 채우기(001–255)여야 합니다.
  • SD 카드는 ESP32 전원 공급 전에 미니 MP3 플레이어 모듈에 삽입합니다.

빠른 시작

Thonny IDE를 사용하여 ESP32에서 MicroPython 코드를 설정하고 실행하는 방법:

  • Thonny IDE가 컴퓨터에 설치되어 있는지 확인합니다.
  • ESP32 보드에 MicroPython 펌웨어가 로드되어 있는지 확인합니다.
  • ESP32에서 MicroPython을 처음 사용하는 경우, ESP32 마이크로파이썬 - 시작하기 가이드를 참조하세요.
  • 제공된 배선도에 따라 ESP32 보드를 미니 MP3 플레이어 모듈에 연결합니다.
  • USB 케이블로 ESP32 보드를 컴퓨터에 연결합니다.
  • 컴퓨터에서 Thonny IDE를 엽니다.
  • Thonny IDE에서 Tools Options로 이동합니다.
  • Interpreter 탭에서 드롭다운 메뉴의 MicroPython (ESP32)를 선택합니다.
  • 올바른 포트가 선택되어 있는지 확인합니다. Thonny IDE가 자동으로 감지하지만, 수동으로 선택해야 할 수도 있습니다(Windows에서는 COM12, Linux에서는 /dev/ttyACM0).
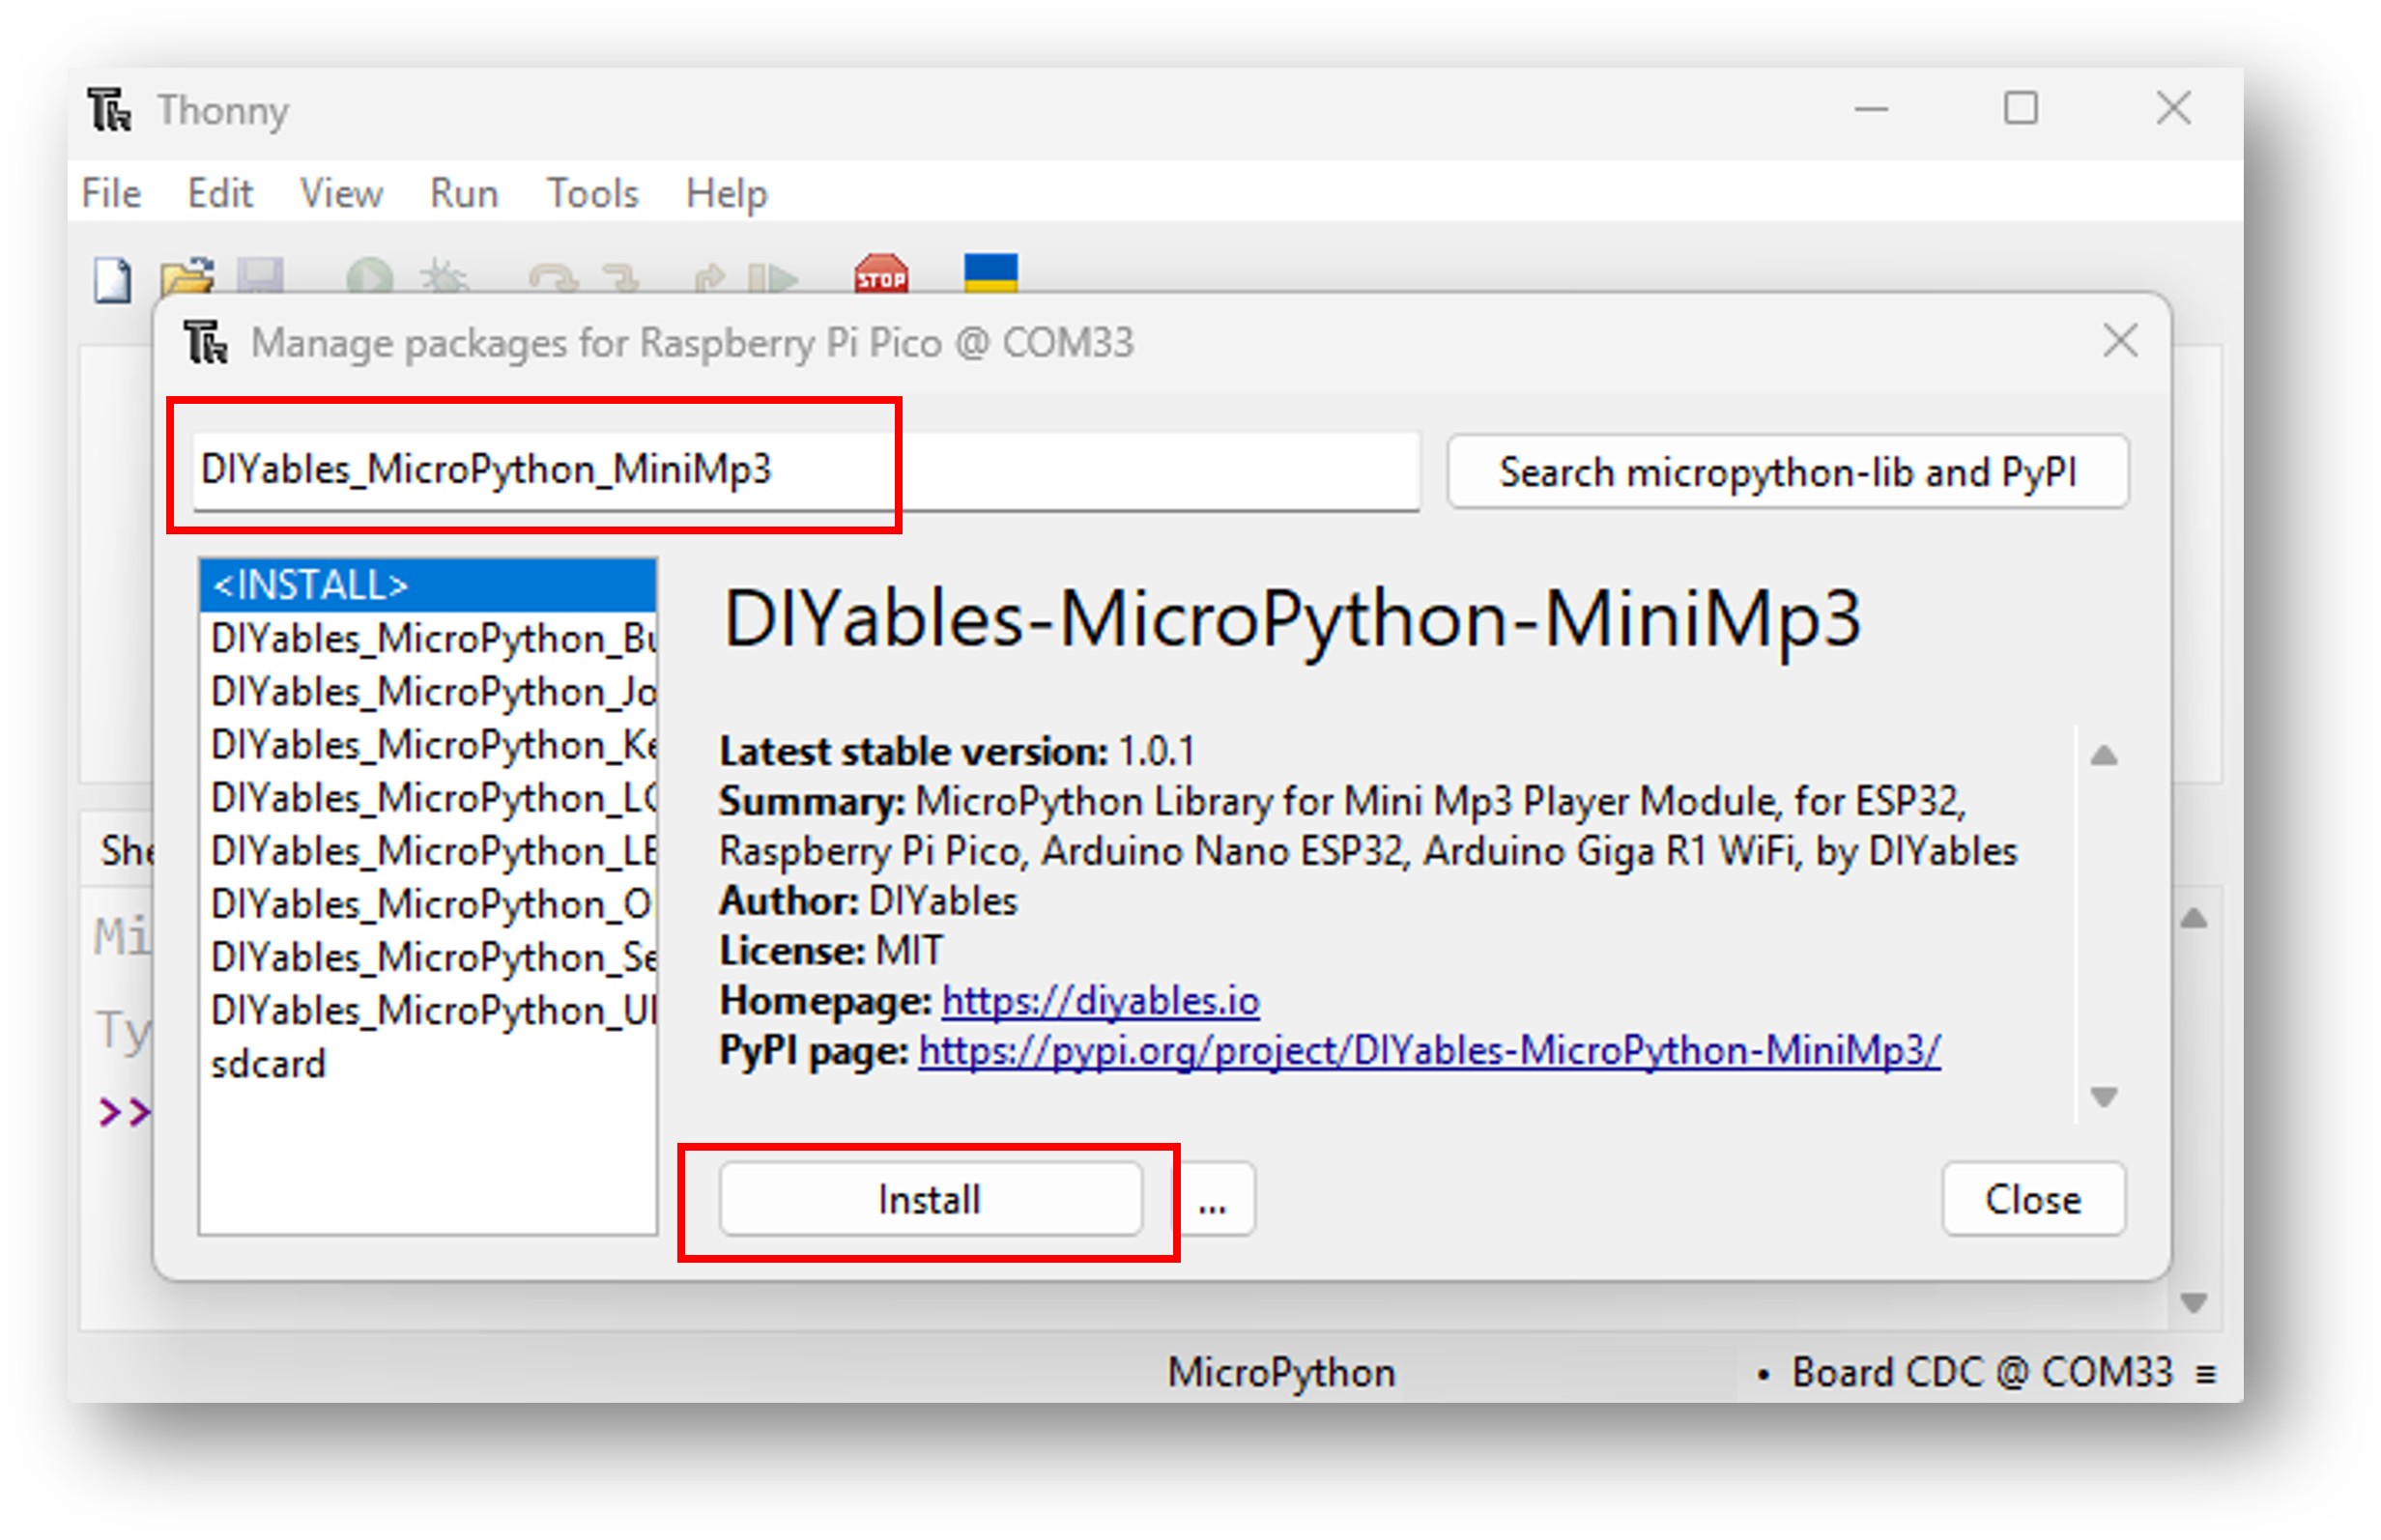
  • Thonny IDE의 Tools Manage packages로 이동합니다.
  • "DIYables-MicroPython-MiniMp3"를 검색하여 DIYables에서 만든 미니 MP3 플레이어 라이브러리를 찾습니다.
  • DIYables-MicroPython-MiniMp3를 클릭한 후 Install 버튼을 클릭하여 미니 MP3 플레이어 라이브러리를 설치합니다.
ESP32 마이크로파이썬 미니 mp3 플레이어 라이브러리
  • 제공된 MicroPython 코드를 복사하여 Thonny 편집기에 붙여넣습니다.
  • 다음 방법으로 코드를 ESP32에 저장합니다:
    • Save 버튼을 클릭하거나 Ctrl+S를 누릅니다.
    • 저장 대화상자에서 MicroPython device를 선택합니다.
    • 파일 이름을 main.py로 지정합니다.
  • 녹색 Run 버튼을 클릭하거나 F5를 눌러 스크립트를 실행합니다.
  • MP3 파일이 담긴 SD 카드를 미니 MP3 플레이어 모듈에 삽입합니다.
  • 연결된 스피커에서 오디오 재생을 확인합니다.

기본 코드 템플릿

from machine import UART import time from DIYables_MicroPython_MiniMp3 import MiniMp3Player uart = UART(2, baudrate=9600, tx=17, rx=16) mp3 = MiniMp3Player(uart) time.sleep(1) # Wait for the module to initialize mp3.set_volume(25) # 0 = silence, 30 = maximum

ESP32 MicroPython 코드 — 트랙 재생

""" * DIYables MicroPython Mini Mp3 Player - Play One Track * * This example plays one track once then stops. * * Product: DIYables Mini Mp3 Player Module * https://diyables.io/products/mini-mp3-player-module * * Wiring (ESP32): * Mini Mp3 RX -> ESP32 TX (GPIO17) * Mini Mp3 TX -> ESP32 RX (GPIO16) * Mini Mp3 VCC -> 3.3V * Mini Mp3 GND -> GND * Speaker connected to SPK_1 and SPK_2 pins * * Wiring (Raspberry Pi Pico): * Mini Mp3 RX -> Pico TX (GPIO4) * Mini Mp3 TX -> Pico RX (GPIO5) * Mini Mp3 VCC -> 3.3V * Mini Mp3 GND -> GND * Speaker connected to SPK_1 and SPK_2 pins * * Wiring (Arduino Nano ESP32): * Mini Mp3 RX -> D1 (GPIO43, TX) * Mini Mp3 TX -> D0 (GPIO44, RX) * Mini Mp3 VCC -> 3.3V * Mini Mp3 GND -> GND * Speaker connected to SPK_1 and SPK_2 pins * * Wiring (Arduino Giga R1 WiFi): * Mini Mp3 RX -> TX1 * Mini Mp3 TX -> RX1 * Mini Mp3 VCC -> 3.3V * Mini Mp3 GND -> GND * Speaker connected to SPK_1 and SPK_2 pins * * SD Card: Put mp3 files in root, named 001.mp3, 002.mp3, etc. """ from machine import UART import time from DIYables_MicroPython_MiniMp3 import MiniMp3Player # --- For ESP32 --- uart = UART(2, baudrate=9600, tx=17, rx=16) # --- For Raspberry Pi Pico (uncomment below, comment above) --- # uart = UART(1, baudrate=9600, tx=4, rx=5) # --- For Arduino Nano ESP32 (uncomment below, comment above) --- # uart = UART(1, baudrate=9600, tx=43, rx=44) # --- For Arduino Giga R1 WiFi (uncomment below, comment above) --- # uart = UART(1, baudrate=9600) mp3 = MiniMp3Player(uart) time.sleep(1) # Wait for the module to initialize mp3.set_volume(25) # Set volume (0 to 30) print("Playing track 1...") mp3.play(1) # Play track 001.mp3

실행해보기

  • SD 카드를 로드하고 모듈을 배선한 후 USB로 ESP32를 연결합니다.
  • Thonny IDE 또는 선호하는 MicroPython 도구로 코드를 업로드합니다.

재생 제어

모든 재생 명령은 논블로킹입니다 — ESP32가 UART2를 통해 명령을 보내고 즉시 반환하므로 MicroPython 코드가 계속 실행됩니다.

메서드 동작 코드 예제
play(n) 루트에서 n번 트랙 재생 mp3.play(1)
play_next() 다음 트랙으로 이동 mp3.play_next()
play_previous() 이전 트랙으로 이동 mp3.play_previous()
pause() 현재 위치에서 재생 일시정지 mp3.pause()
resume() 일시정지된 위치에서 계속 재생 mp3.resume()
stop() 재생 완전 중지 mp3.stop()

ESP32 MicroPython 코드 — 여러 트랙

""" * DIYables MicroPython Mini Mp3 Player - Play Multiple Tracks * * This example plays tracks one after another with a delay between them. * * Product: DIYables Mini Mp3 Player Module * https://diyables.io/products/mini-mp3-player-module * * Wiring (ESP32): * Mini Mp3 RX -> ESP32 TX (GPIO17) * Mini Mp3 TX -> ESP32 RX (GPIO16) * Mini Mp3 VCC -> 3.3V * Mini Mp3 GND -> GND * Speaker connected to SPK_1 and SPK_2 pins * * Wiring (Raspberry Pi Pico): * Mini Mp3 RX -> Pico TX (GPIO4) * Mini Mp3 TX -> Pico RX (GPIO5) * Mini Mp3 VCC -> 3.3V * Mini Mp3 GND -> GND * Speaker connected to SPK_1 and SPK_2 pins * * Wiring (Arduino Nano ESP32): * Mini Mp3 RX -> D1 (GPIO43, TX) * Mini Mp3 TX -> D0 (GPIO44, RX) * Mini Mp3 VCC -> 3.3V * Mini Mp3 GND -> GND * Speaker connected to SPK_1 and SPK_2 pins * * Wiring (Arduino Giga R1 WiFi): * Mini Mp3 RX -> TX1 * Mini Mp3 TX -> RX1 * Mini Mp3 VCC -> 3.3V * Mini Mp3 GND -> GND * Speaker connected to SPK_1 and SPK_2 pins * * SD Card: Put mp3 files in root, named 001.mp3, 002.mp3, 003.mp3 """ from machine import UART import time from DIYables_MicroPython_MiniMp3 import MiniMp3Player # --- For ESP32 --- uart = UART(2, baudrate=9600, tx=17, rx=16) # --- For Raspberry Pi Pico (uncomment below, comment above) --- # uart = UART(1, baudrate=9600, tx=4, rx=5) # --- For Arduino Nano ESP32 (uncomment below, comment above) --- # uart = UART(1, baudrate=9600, tx=43, rx=44) # --- For Arduino Giga R1 WiFi (uncomment below, comment above) --- # uart = UART(1, baudrate=9600) mp3 = MiniMp3Player(uart) time.sleep(1) # Wait for the module to initialize current_track = 1 total_tracks = 3 # Change this to match your SD card track_duration = 5000 # Wait 5 seconds between tracks (adjust as needed) mp3.set_volume(20) print("Playing track 1...") mp3.play(current_track) last_track_time = time.ticks_ms() while True: if time.ticks_diff(time.ticks_ms(), last_track_time) >= track_duration: current_track += 1 if current_track > total_tracks: current_track = 1 # Loop back to first track print("Playing track", current_track) mp3.play(current_track) last_track_time = time.ticks_ms()

ESP32 MicroPython 코드 — 볼륨 버튼

""" * DIYables MicroPython Mini Mp3 Player - Volume Control * * This example uses two buttons to increase/decrease the volume. * * Product: DIYables Mini Mp3 Player Module * https://diyables.io/products/mini-mp3-player-module * * Wiring (ESP32): * Mini Mp3 RX -> ESP32 TX (GPIO17) * Mini Mp3 TX -> ESP32 RX (GPIO16) * Mini Mp3 VCC -> 3.3V * Mini Mp3 GND -> GND * Speaker connected to SPK_1 and SPK_2 pins * Button UP -> GPIO1 (other leg to GND) * Button DOWN -> GPIO3 (other leg to GND) * * Wiring (Raspberry Pi Pico): * Mini Mp3 RX -> Pico TX (GPIO4) * Mini Mp3 TX -> Pico RX (GPIO5) * Mini Mp3 VCC -> 3.3V * Mini Mp3 GND -> GND * Speaker connected to SPK_1 and SPK_2 pins * Button UP -> GPIO2 (other leg to GND) * Button DOWN -> GPIO3 (other leg to GND) * * Wiring (Arduino Nano ESP32): * Mini Mp3 RX -> D1 (GPIO43, TX) * Mini Mp3 TX -> D0 (GPIO44, RX) * Mini Mp3 VCC -> 3.3V * Mini Mp3 GND -> GND * Speaker connected to SPK_1 and SPK_2 pins * Button UP -> D2 (GPIO5, other leg to GND) * Button DOWN -> D3 (GPIO6, other leg to GND) * * Wiring (Arduino Giga R1 WiFi): * Mini Mp3 RX -> TX1 * Mini Mp3 TX -> RX1 * Mini Mp3 VCC -> 3.3V * Mini Mp3 GND -> GND * Speaker connected to SPK_1 and SPK_2 pins * Button UP -> D2 (other leg to GND) * Button DOWN -> D3 (other leg to GND) * * SD Card: Put mp3 files in root, named 001.mp3, 002.mp3, etc. """ from machine import UART, Pin import time from DIYables_MicroPython_MiniMp3 import MiniMp3Player # --- For ESP32 --- uart = UART(2, baudrate=9600, tx=17, rx=16) button_up = Pin(1, Pin.IN, Pin.PULL_UP) button_down = Pin(3, Pin.IN, Pin.PULL_UP) # --- For Raspberry Pi Pico (uncomment below, comment above) --- # uart = UART(1, baudrate=9600, tx=4, rx=5) # button_up = Pin(2, Pin.IN, Pin.PULL_UP) # button_down = Pin(3, Pin.IN, Pin.PULL_UP) # --- For Arduino Nano ESP32 (uncomment below, comment above) --- # uart = UART(1, baudrate=9600, tx=43, rx=44) # button_up = Pin(5, Pin.IN, Pin.PULL_UP) # button_down = Pin(6, Pin.IN, Pin.PULL_UP) # --- For Arduino Giga R1 WiFi (uncomment below, comment above) --- # uart = UART(1, baudrate=9600) # button_up = Pin(2, Pin.IN, Pin.PULL_UP) # button_down = Pin(3, Pin.IN, Pin.PULL_UP) mp3 = MiniMp3Player(uart) time.sleep(1) # Wait for the module to initialize volume = 15 # Start at half volume mp3.set_volume(volume) mp3.loop_track(1) # Play track 1 on repeat print("Volume:", volume) while True: if button_up.value() == 0: if volume < 30: volume += 1 mp3.set_volume(volume) print("Volume:", volume) time.sleep_ms(200) # Simple debounce if button_down.value() == 0: if volume > 0: volume -= 1 mp3.set_volume(volume) print("Volume:", volume) time.sleep_ms(200) # Simple debounce

볼륨 API

ESP32는 볼륨을 0(음소거)에서 30(최대) 사이의 임의 수준으로 즉시 설정하거나 한 번에 한 단계씩 올리거나 내릴 수 있습니다 — 버튼 제어에 유용합니다.

메서드 동작 예제
set_volume(v) 특정 수준(0–30)으로 볼륨 설정 mp3.set_volume(20)
volume_up() 볼륨 한 단계 증가 mp3.volume_up()
volume_down() 볼륨 한 단계 감소 mp3.volume_down()
get_volume() 현재 볼륨 수준 조회 mp3.get_volume()

ESP32 MicroPython 코드 — 다음/이전

""" * DIYables MicroPython Mini Mp3 Player - Next/Previous with Buttons * * This example uses two buttons to play next/previous tracks. * * Product: DIYables Mini Mp3 Player Module * https://diyables.io/products/mini-mp3-player-module * * Wiring (ESP32): * Mini Mp3 RX -> ESP32 TX (GPIO17) * Mini Mp3 TX -> ESP32 RX (GPIO16) * Mini Mp3 VCC -> 3.3V * Mini Mp3 GND -> GND * Speaker connected to SPK_1 and SPK_2 pins * Button NEXT -> GPIO1 (other leg to GND) * Button PREV -> GPIO3 (other leg to GND) * * Wiring (Raspberry Pi Pico): * Mini Mp3 RX -> Pico TX (GPIO4) * Mini Mp3 TX -> Pico RX (GPIO5) * Mini Mp3 VCC -> 3.3V * Mini Mp3 GND -> GND * Speaker connected to SPK_1 and SPK_2 pins * Button NEXT -> GPIO2 (other leg to GND) * Button PREV -> GPIO3 (other leg to GND) * * Wiring (Arduino Nano ESP32): * Mini Mp3 RX -> D1 (GPIO43, TX) * Mini Mp3 TX -> D0 (GPIO44, RX) * Mini Mp3 VCC -> 3.3V * Mini Mp3 GND -> GND * Speaker connected to SPK_1 and SPK_2 pins * Button NEXT -> D2 (GPIO5, other leg to GND) * Button PREV -> D3 (GPIO6, other leg to GND) * * Wiring (Arduino Giga R1 WiFi): * Mini Mp3 RX -> TX1 * Mini Mp3 TX -> RX1 * Mini Mp3 VCC -> 3.3V * Mini Mp3 GND -> GND * Speaker connected to SPK_1 and SPK_2 pins * Button NEXT -> D2 (other leg to GND) * Button PREV -> D3 (other leg to GND) * * SD Card: Put mp3 files in root, named 001.mp3, 002.mp3, etc. """ from machine import UART, Pin import time from DIYables_MicroPython_MiniMp3 import MiniMp3Player # --- For ESP32 --- uart = UART(2, baudrate=9600, tx=17, rx=16) button_next = Pin(1, Pin.IN, Pin.PULL_UP) button_prev = Pin(3, Pin.IN, Pin.PULL_UP) # --- For Raspberry Pi Pico (uncomment below, comment above) --- # uart = UART(1, baudrate=9600, tx=4, rx=5) # button_next = Pin(2, Pin.IN, Pin.PULL_UP) # button_prev = Pin(3, Pin.IN, Pin.PULL_UP) # --- For Arduino Nano ESP32 (uncomment below, comment above) --- # uart = UART(1, baudrate=9600, tx=43, rx=44) # button_next = Pin(5, Pin.IN, Pin.PULL_UP) # button_prev = Pin(6, Pin.IN, Pin.PULL_UP) # --- For Arduino Giga R1 WiFi (uncomment below, comment above) --- # uart = UART(1, baudrate=9600) # button_next = Pin(2, Pin.IN, Pin.PULL_UP) # button_prev = Pin(3, Pin.IN, Pin.PULL_UP) mp3 = MiniMp3Player(uart) time.sleep(1) # Wait for the module to initialize mp3.set_volume(20) mp3.play(1) # Start with track 1 print("Press NEXT or PREV button to change track") while True: if button_next.value() == 0: print("Next track") mp3.play_next() time.sleep_ms(300) # Simple debounce if button_prev.value() == 0: print("Previous track") mp3.play_previous() time.sleep_ms(300) # Simple debounce

ESP32 MicroPython 코드 — 일시정지/재개

""" * DIYables MicroPython Mini Mp3 Player - Pause and Resume * * This example demonstrates pausing and resuming playback using a button. * Press the button to toggle between pause and resume. * * Product: DIYables Mini Mp3 Player Module * https://diyables.io/products/mini-mp3-player-module * * Wiring (ESP32): * Mini Mp3 RX -> ESP32 TX (GPIO17) * Mini Mp3 TX -> ESP32 RX (GPIO16) * Mini Mp3 VCC -> 3.3V * Mini Mp3 GND -> GND * Speaker connected to SPK_1 and SPK_2 pins * Button -> GPIO1 (other leg to GND) * * Wiring (Raspberry Pi Pico): * Mini Mp3 RX -> Pico TX (GPIO4) * Mini Mp3 TX -> Pico RX (GPIO5) * Mini Mp3 VCC -> 3.3V * Mini Mp3 GND -> GND * Speaker connected to SPK_1 and SPK_2 pins * Button -> GPIO2 (other leg to GND) * * Wiring (Arduino Nano ESP32): * Mini Mp3 RX -> D1 (GPIO43, TX) * Mini Mp3 TX -> D0 (GPIO44, RX) * Mini Mp3 VCC -> 3.3V * Mini Mp3 GND -> GND * Speaker connected to SPK_1 and SPK_2 pins * Button -> D2 (GPIO5, other leg to GND) * * Wiring (Arduino Giga R1 WiFi): * Mini Mp3 RX -> TX1 * Mini Mp3 TX -> RX1 * Mini Mp3 VCC -> 3.3V * Mini Mp3 GND -> GND * Speaker connected to SPK_1 and SPK_2 pins * Button -> D2 (other leg to GND) * * SD Card: Put mp3 files in root, named 001.mp3, 002.mp3, etc. """ from machine import UART, Pin import time from DIYables_MicroPython_MiniMp3 import MiniMp3Player # --- For ESP32 --- uart = UART(2, baudrate=9600, tx=17, rx=16) # --- For Raspberry Pi Pico (uncomment below, comment above) --- # uart = UART(1, baudrate=9600, tx=4, rx=5) # --- For Arduino Nano ESP32 (uncomment below, comment above) --- # uart = UART(1, baudrate=9600, tx=43, rx=44) # --- For Arduino Giga R1 WiFi (uncomment below, comment above) --- # uart = UART(1, baudrate=9600) mp3 = MiniMp3Player(uart) time.sleep(1) # Wait for the module to initialize button = Pin(1, Pin.IN, Pin.PULL_UP) paused = False mp3.set_volume(20) mp3.play(1) print("Playing. Press button to pause/resume.") while True: if button.value() == 0: # Button pressed (active LOW) if paused: mp3.resume() print("Resumed") else: mp3.pause() print("Paused") paused = not paused time.sleep_ms(300) # Simple debounce

ESP32 MicroPython 코드 — 트랙 반복

""" * DIYables MicroPython Mini Mp3 Player - Loop Track * * This example loops (repeats) a track continuously with EQ setting. * * Product: DIYables Mini Mp3 Player Module * https://diyables.io/products/mini-mp3-player-module * * Wiring (ESP32): * Mini Mp3 RX -> ESP32 TX (GPIO17) * Mini Mp3 TX -> ESP32 RX (GPIO16) * Mini Mp3 VCC -> 3.3V * Mini Mp3 GND -> GND * Speaker connected to SPK_1 and SPK_2 pins * * Wiring (Raspberry Pi Pico): * Mini Mp3 RX -> Pico TX (GPIO4) * Mini Mp3 TX -> Pico RX (GPIO5) * Mini Mp3 VCC -> 3.3V * Mini Mp3 GND -> GND * Speaker connected to SPK_1 and SPK_2 pins * * Wiring (Arduino Nano ESP32): * Mini Mp3 RX -> D1 (GPIO43, TX) * Mini Mp3 TX -> D0 (GPIO44, RX) * Mini Mp3 VCC -> 3.3V * Mini Mp3 GND -> GND * Speaker connected to SPK_1 and SPK_2 pins * * Wiring (Arduino Giga R1 WiFi): * Mini Mp3 RX -> TX1 * Mini Mp3 TX -> RX1 * Mini Mp3 VCC -> 3.3V * Mini Mp3 GND -> GND * Speaker connected to SPK_1 and SPK_2 pins * * SD Card file structure: * /001.mp3 * /002.mp3 * ... """ from machine import UART import time from DIYables_MicroPython_MiniMp3 import MiniMp3Player import DIYables_MicroPython_MiniMp3.DIYables_MicroPython_MiniMp3 as mp3_const # --- For ESP32 --- uart = UART(2, baudrate=9600, tx=17, rx=16) # --- For Raspberry Pi Pico (uncomment below, comment above) --- # uart = UART(1, baudrate=9600, tx=4, rx=5) # --- For Arduino Nano ESP32 (uncomment below, comment above) --- # uart = UART(1, baudrate=9600, tx=43, rx=44) # --- For Arduino Giga R1 WiFi (uncomment below, comment above) --- # uart = UART(1, baudrate=9600) mp3 = MiniMp3Player(uart) time.sleep(1) # Wait for the module to initialize mp3.set_volume(25) # Volume: 0 to 30 mp3.set_eq(mp3_const.EQ_NORMAL) print("Playing track 1 on loop...") mp3.loop_track(1)

반복 및 셔플

이 반복 모드는 MP3 모듈에서 완전히 실행됩니다 — ESP32는 명령을 한 번만 보내면 모듈이 자체적으로 연속 재생을 처리합니다.

메서드 동작 예제
loop_track(n) 트랙 하나를 무한 반복 mp3.loop_track(1)
loop_folder(f) 폴더의 모든 트랙 순환 재생 mp3.loop_folder(1)
loop_all() SD 카드의 모든 트랙을 재생 후 재시작 mp3.loop_all()
stop_loop() 현재 트랙 종료 후 반복 중지 mp3.stop_loop()
shuffle() 모든 트랙을 무작위 순서로 재생 mp3.shuffle()

ESP32 MicroPython 코드 — 폴더 재생

""" * DIYables MicroPython Mini Mp3 Player - Play from Folder * * This example plays tracks from specific folders on the SD card. * * Product: DIYables Mini Mp3 Player Module * https://diyables.io/products/mini-mp3-player-module * * Wiring (ESP32): * Mini Mp3 RX -> ESP32 TX (GPIO17) * Mini Mp3 TX -> ESP32 RX (GPIO16) * Mini Mp3 VCC -> 3.3V * Mini Mp3 GND -> GND * Speaker connected to SPK_1 and SPK_2 pins * * Wiring (Raspberry Pi Pico): * Mini Mp3 RX -> Pico TX (GPIO4) * Mini Mp3 TX -> Pico RX (GPIO5) * Mini Mp3 VCC -> 3.3V * Mini Mp3 GND -> GND * Speaker connected to SPK_1 and SPK_2 pins * * Wiring (Arduino Nano ESP32): * Mini Mp3 RX -> D1 (GPIO43, TX) * Mini Mp3 TX -> D0 (GPIO44, RX) * Mini Mp3 VCC -> 3.3V * Mini Mp3 GND -> GND * Speaker connected to SPK_1 and SPK_2 pins * * Wiring (Arduino Giga R1 WiFi): * Mini Mp3 RX -> TX1 * Mini Mp3 TX -> RX1 * Mini Mp3 VCC -> 3.3V * Mini Mp3 GND -> GND * Speaker connected to SPK_1 and SPK_2 pins * * SD Card file structure: * /01/001.mp3 <- play_folder(1, 1) * /01/002.mp3 <- play_folder(1, 2) * /02/001.mp3 <- play_folder(2, 1) * /02/002.mp3 <- play_folder(2, 2) """ from machine import UART import time from DIYables_MicroPython_MiniMp3 import MiniMp3Player # --- For ESP32 --- uart = UART(2, baudrate=9600, tx=17, rx=16) # --- For Raspberry Pi Pico (uncomment below, comment above) --- # uart = UART(1, baudrate=9600, tx=4, rx=5) # --- For Arduino Nano ESP32 (uncomment below, comment above) --- # uart = UART(1, baudrate=9600, tx=43, rx=44) # --- For Arduino Giga R1 WiFi (uncomment below, comment above) --- # uart = UART(1, baudrate=9600) mp3 = MiniMp3Player(uart) time.sleep(1) # Wait for the module to initialize mp3.set_volume(20) # Play track 1 from folder 01 print("Playing folder 01, track 001...") mp3.play_folder(1, 1) time.sleep(5) # Play track 2 from folder 01 print("Playing folder 01, track 002...") mp3.play_folder(1, 2) time.sleep(5) # Play track 1 from folder 02 print("Playing folder 02, track 001...") mp3.play_folder(2, 1)

폴더 API

폴더 기반 재생은 분류된 오디오가 필요한 ESP32 프로젝트에 유용합니다 — 예를 들어 다른 언어, 사운드 카테고리, 재생 목록.

메서드 설명 예제
play_folder(f, t) 폴더 f의 t번 트랙 재생(최대 99개 폴더, 각 255개 트랙) mp3.play_folder(1, 1)
play_large_folder(f, t) 대용량 폴더 모드(최대 15개 폴더, 각 3000개 트랙) mp3.play_large_folder(1, 2000)
play_from_mp3_folder(t) 특수 /mp3 폴더에서 재생(최대 9999개 트랙) mp3.play_from_mp3_folder(1)

ESP32 MicroPython 코드 — 시리얼 콘솔 제어

""" * DIYables MicroPython Mini Mp3 Player - Serial Command Control * * Control the Mp3 player by typing commands in the serial console. * Great for testing all functions without extra hardware. * * Commands (type in serial console, then press Enter): * 1-9 Play track 1 to 9 * + Volume up * - Volume down * p Pause * r Resume * s Stop * n Next track * b Previous track (back) * ? Show current status * * Product: DIYables Mini Mp3 Player Module * https://diyables.io/products/mini-mp3-player-module * * Wiring (ESP32): * Mini Mp3 RX -> ESP32 TX (GPIO17) * Mini Mp3 TX -> ESP32 RX (GPIO16) * Mini Mp3 VCC -> 3.3V * Mini Mp3 GND -> GND * Speaker connected to SPK_1 and SPK_2 pins * * Wiring (Raspberry Pi Pico): * Mini Mp3 RX -> Pico TX (GPIO4) * Mini Mp3 TX -> Pico RX (GPIO5) * Mini Mp3 VCC -> 3.3V * Mini Mp3 GND -> GND * Speaker connected to SPK_1 and SPK_2 pins * * Wiring (Arduino Nano ESP32): * Mini Mp3 RX -> D1 (GPIO43, TX) * Mini Mp3 TX -> D0 (GPIO44, RX) * Mini Mp3 VCC -> 3.3V * Mini Mp3 GND -> GND * Speaker connected to SPK_1 and SPK_2 pins * * Wiring (Arduino Giga R1 WiFi): * Mini Mp3 RX -> TX1 * Mini Mp3 TX -> RX1 * Mini Mp3 VCC -> 3.3V * Mini Mp3 GND -> GND * Speaker connected to SPK_1 and SPK_2 pins * * SD Card: Put mp3 files in root, named 001.mp3, 002.mp3, etc. """ import sys import select from machine import UART import time from DIYables_MicroPython_MiniMp3 import MiniMp3Player # --- For ESP32 --- uart = UART(2, baudrate=9600, tx=17, rx=16) # --- For Raspberry Pi Pico (uncomment below, comment above) --- # uart = UART(1, baudrate=9600, tx=4, rx=5) # --- For Arduino Nano ESP32 (uncomment below, comment above) --- # uart = UART(1, baudrate=9600, tx=43, rx=44) # --- For Arduino Giga R1 WiFi (uncomment below, comment above) --- # uart = UART(1, baudrate=9600) mp3 = MiniMp3Player(uart) time.sleep(1) # Wait for the module to initialize mp3.set_volume(20) print("=== DIYables Mini Mp3 Player ===") print("Commands:") print(" 1-9 Play track number") print(" + Volume up") print(" - Volume down") print(" p Pause") print(" r Resume") print(" s Stop") print(" n Next track") print(" b Previous track") print(" ? Show status") print("================================") poll = select.poll() poll.register(sys.stdin, select.POLLIN) while True: events = poll.poll(100) # 100ms timeout if events: cmd = sys.stdin.read(1) if cmd in '123456789': track = int(cmd) print("Playing track", track) mp3.play(track) elif cmd == '+': print("Volume up") mp3.volume_up() elif cmd == '-': print("Volume down") mp3.volume_down() elif cmd == 'p': print("Paused") mp3.pause() elif cmd == 'r': print("Resumed") mp3.resume() elif cmd == 's': print("Stopped") mp3.stop() elif cmd == 'n': print("Next track") mp3.play_next() elif cmd == 'b': print("Previous track") mp3.play_previous() elif cmd == '?': print("--- Status ---") vol = mp3.get_volume() print("Volume:", vol) track = mp3.get_current_track() print("Current track:", track) playing = mp3.is_playing() print("Playing:", "Yes" if playing else "No") total = mp3.get_track_count() print("Total tracks:", total) print("--------------")
명령 효과
1–9 트랙 재생
+ / − 볼륨
p / r / s 일시정지 / 재개 / 중지
n / b 다음 / 이전
? 상태

이퀄라이저 옵션

모듈에는 6가지 EQ 프리셋이 있는 내장 DSP가 있습니다. ESP32에서는 트랙 재생 중에도 실시간으로 EQ 모드를 전환할 수 있습니다.

상수 ID 사운드 프로파일
EQ_NORMAL 0 평탄 / 중립 응답
EQ_POP 1 밝은 보컬과 고음
EQ_ROCK 2 강한 중음과 저음
EQ_JAZZ 3 따뜻하고 부드러운 음색
EQ_CLASSIC 4 모든 주파수에서 균형

동영상

비디오 제작은 시간이 많이 걸리는 작업입니다. 비디오 튜토리얼이 학습에 도움이 되었다면, YouTube 채널 을 구독하여 알려 주시기 바랍니다. 비디오에 대한 높은 수요가 있다면, 비디오를 만들기 위해 노력하겠습니다.

댓글