이전 튜토리얼에서는 라즈베리 파이 피코 - 액추에이터에서 피드백 없이 리니어 액추에이터와 Raspberry Pi Pico를 함께 사용하는 방법에 대해 배웠습니다. 이번 튜토리얼에서는 피드백 기능이 있는 리니어 액추에이터와 Raspberry Pi Pico를 함께 사용하는 방법을 알아봅니다. 액추에이터의 피드백 신호는 움직임 중 자신의 위치를 제공하여 우리가 이동 경로를 제어하는 데 도움을 줍니다. 다음 내용을 살펴보겠습니다:
피드백 리니어 액추에이터가 작동하는 방식.
피드백 리니어 액추에이터의 위치를 읽도록 Raspberry Pi Pico를 프로그래밍하는 방법.
피드백 리니어 액추에이터의 위치를 제어하도록 Raspberry Pi Pico를 프로그래밍하는 방법.
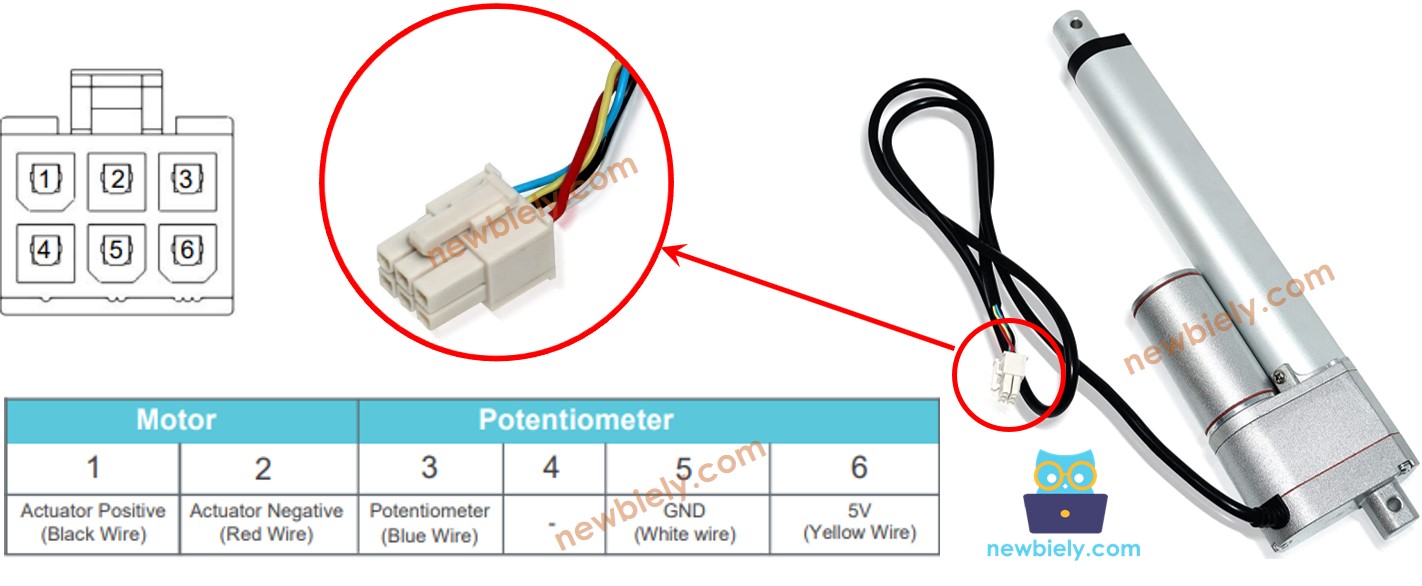
자를 사용하여 액추에이터가 얼마나 이동하는지 확인하거나 자세한 내용은 데이터시트를 참조하십시오.
리니어 액추에이터가 완전히 열리거나 닫힌 상태일 때의 값을 확인하려면 이 코드를 실행하십시오.
/* * 이 라즈베리 파이 피코 코드는 newbiely.kr 에서 개발되었습니다 * 이 라즈베리 파이 피코 코드는 어떠한 제한 없이 공개 사용을 위해 제공됩니다. * 상세한 지침 및 연결도에 대해서는 다음을 방문하세요: * https://newbiely.kr/tutorials/raspberry-pico/raspberry-pi-pico-actuator-with-feedback */from machine import Pin, ADCimport time# Define pinsENA_PIN = 5 # The Raspberry Pi Pico pin GP5 connected to the EN1 pin of L298NIN1_PIN = 4 # The Raspberry Pi Pico pin GP4 connected to the IN1 pin of L298NIN2_PIN = 3 # The Raspberry Pi Pico pin GP3 connected to the IN2 pin of L298NPOTENTIOMETER_PIN = 26 # The Raspberry Pi Pico pin GP26 (ADC0) connected to the potentiometer of the actuator# Initialize digital pins as outputsena = Pin(ENA_PIN, Pin.OUT)in1 = Pin(IN1_PIN, Pin.OUT)in2 = Pin(IN2_PIN, Pin.OUT)# Initialize the potentiometer as an ADC pinpotentiometer = ADC(Pin(POTENTIOMETER_PIN))# Set ENA_PIN to HIGH to enable the motor driverena.value(1)# Main loop to extend and retract the actuator with feedbackwhileTrue:# Extend the actuator in1.value(1) in2.value(0) time.sleep(20) # Wait for 20 seconds (20000 ms)# Read the potentiometer value after fully extending POTENTIOMETER_MAX = potentiometer.read_u16()print("POTENTIOMETER_MAX =", POTENTIOMETER_MAX)# Retract the actuator in1.value(0) in2.value(1) time.sleep(20) # Wait for 20 seconds (20000 ms)# Read the potentiometer value after fully retracting POTENTIOMETER_MIN = potentiometer.read_u16()print("POTENTIOMETER_MIN =", POTENTIOMETER_MIN)
MicroPython (Raspberry Pi Pico) • Board CDC @ COM29 ≡
이 값들을 입력하십시오.
최소 값이 최대 값보다 크면, IN1_PIN과 INI2_PIN의 값을 서로 교환하십시오.
다음 코드에서 세 개의 값을 변경하십시오.
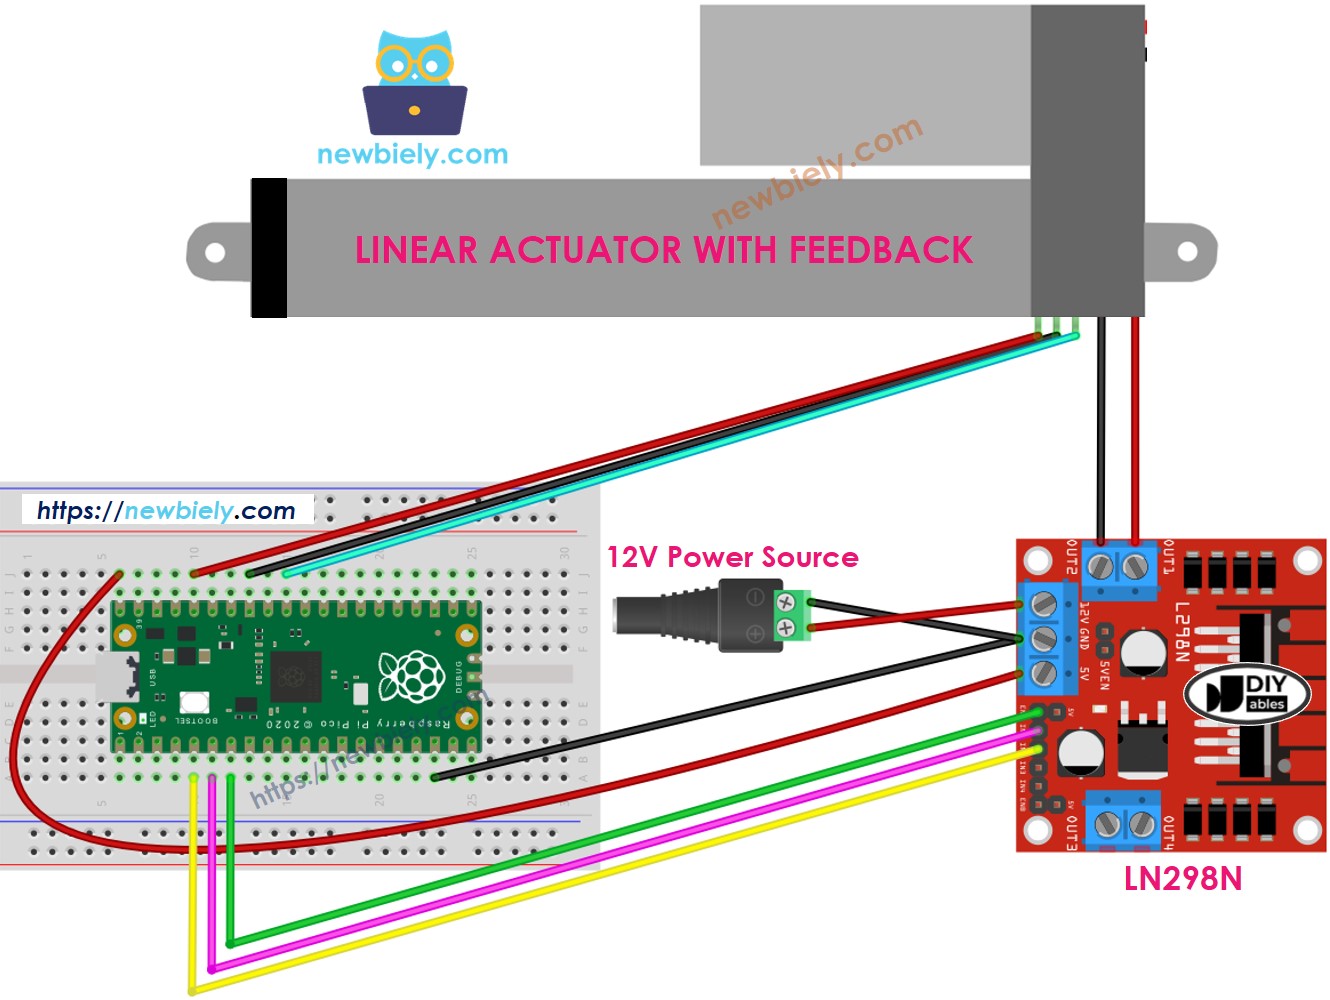
액추에이터의 위치를 계산하는 Raspberry Pi Pico 코드
/* * 이 라즈베리 파이 피코 코드는 newbiely.kr 에서 개발되었습니다 * 이 라즈베리 파이 피코 코드는 어떠한 제한 없이 공개 사용을 위해 제공됩니다. * 상세한 지침 및 연결도에 대해서는 다음을 방문하세요: * https://newbiely.kr/tutorials/raspberry-pico/raspberry-pi-pico-actuator-with-feedback */from machine import Pin, ADCimport time# Define pinsENA_PIN = 5 # The Raspberry Pi Pico pin GP5 connected to the EN1 pin of L298NIN1_PIN = 4 # The Raspberry Pi Pico pin GP4 connected to the IN1 pin of L298NIN2_PIN = 3 # The Raspberry Pi Pico pin GP3 connected to the IN2 pin of L298NPOTENTIOMETER_PIN = 26 # The Raspberry Pi Pico pin GP26 (ADC0) connected to the potentiometer of the actuator# Define constantsSTROKE_LENGTH = 102 # Stroke length in millimetersPOTENTIOMETER_MAX = 987 # Max potentiometer valuePOTENTIOMETER_MIN = 13 # Min potentiometer value# Initialize digital pins as outputsena = Pin(ENA_PIN, Pin.OUT)in1 = Pin(IN1_PIN, Pin.OUT)in2 = Pin(IN2_PIN, Pin.OUT)# Initialize the potentiometer as an ADC pinpotentiometer = ADC(Pin(POTENTIOMETER_PIN))# Set ENA_PIN to HIGH to enable the motor driverena.value(1)def map_value(x, in_min, in_max, out_min, out_max):# Map a value from one range to another.returnint((x - in_min) * (out_max - out_min) / (in_max - in_min) + out_min)# Main loop to extend the actuator and read the stroke positionwhileTrue:# Extend the actuator in1.value(1) in2.value(0)# Read the potentiometer value potentiometer_value = potentiometer.read_u16()# Map the potentiometer value to stroke position in millimeters stroke_pos = map_value(potentiometer_value, POTENTIOMETER_MIN, POTENTIOMETER_MAX, 0, STROKE_LENGTH)# Print the stroke position print("The stroke's position =", stroke_pos, "mm") time.sleep(1) # Wait for 1 second before the next reading
코드에서 변경된 세 값을 수정하세요.
코드를 Raspberry Pi Pico에 업로드하세요.
Thonny 하단의 Shell에서 결과를 확인하세요.
Shell x
>>> %Run -c $EDITOR_CONTENT
MPY: soft reboot
The stroke's position = 2 mm
The stroke's position = 35 mm
The stroke's position = 43 mm
The stroke's position = 60 mm
The stroke's position = 68 mm
The stroke's position = 79 mm
The stroke's position = 83 mm
The stroke's position = 96 mm
The stroke's position = 100 mm
MicroPython (Raspberry Pi Pico) • Board CDC @ COM29 ≡
선형 액추에이터를 특정 위치로 제어하는 방법
/* * 이 라즈베리 파이 피코 코드는 newbiely.kr 에서 개발되었습니다 * 이 라즈베리 파이 피코 코드는 어떠한 제한 없이 공개 사용을 위해 제공됩니다. * 상세한 지침 및 연결도에 대해서는 다음을 방문하세요: * https://newbiely.kr/tutorials/raspberry-pico/raspberry-pi-pico-actuator-with-feedback */from machine import Pin, ADCimport time# Define pinsENA_PIN = 5 # The Raspberry Pi Pico pin GP5 connected to the EN1 pin of L298NIN1_PIN = 4 # The Raspberry Pi Pico pin GP4 connected to the IN1 pin of L298NIN2_PIN = 3 # The Raspberry Pi Pico pin GP3 connected to the IN2 pin of L298NPOTENTIOMETER_PIN = 26 # The Raspberry Pi Pico pin GP26 (ADC0) connected to the potentiometer of the actuator# Define constantsSTROKE_LENGTH = 102 # Stroke length in millimetersPOTENTIOMETER_MAX = 987 # Max potentiometer valuePOTENTIOMETER_MIN = 13 # Min potentiometer valueTOLERANCE = 5 # Tolerance in millimeterstargetPosition_mm = 50 # Target position in millimeters# Initialize digital pins as outputsena = Pin(ENA_PIN, Pin.OUT)in1 = Pin(IN1_PIN, Pin.OUT)in2 = Pin(IN2_PIN, Pin.OUT)# Initialize the potentiometer as an ADC pinpotentiometer = ADC(Pin(POTENTIOMETER_PIN))# Set ENA_PIN to HIGH to enable the motor driverena.value(1)def map_value(x, in_min, in_max, out_min, out_max):# Map a value from one range to another.returnint((x - in_min) * (out_max - out_min) / (in_max - in_min) + out_min)def ACTUATOR_extend(): in1.value(1) in2.value(0)def ACTUATOR_retract(): in1.value(0) in2.value(1)def ACTUATOR_stop(): in1.value(0) in2.value(0)# Main loop to control the actuatorwhileTrue:# Read the potentiometer value potentiometer_value = potentiometer.read_u16()# Map the potentiometer value to stroke position in millimeters stroke_pos = map_value(potentiometer_value, POTENTIOMETER_MIN, POTENTIOMETER_MAX, 0, STROKE_LENGTH)# Print the stroke position print("The stroke's position =", stroke_pos, "mm")# Control the actuator based on the target position and toleranceif stroke_pos < (targetPosition_mm - TOLERANCE): ACTUATOR_extend()elif stroke_pos > (targetPosition_mm + TOLERANCE): ACTUATOR_retract()else: ACTUATOR_stop() time.sleep(0.1) # Small delay to avoid excessive CPU usage
동영상
비디오 제작은 시간이 많이 걸리는 작업입니다. 비디오 튜토리얼이 학습에 도움이 되었다면, YouTube 채널 을 구독하여 알려 주시기 바랍니다. 비디오에 대한 높은 수요가 있다면, 비디오를 만들기 위해 노력하겠습니다.