라즈베리 파이 피코 초음파 센서

이 가이드는 초음파 센서와 Raspberry Pi Pico를 사용하여 물체까지의 거리를 측정하는 방법을 보여줍니다. 우리는 다음에 대해 배울 것입니다:

라즈베리 파이 피코 초음파 센서

준비물

1×라즈베리 파이 피코 W 아마존
1×라즈베리 파이 피코 (또는) 아마존
1×마이크로 USB 케이블 아마존
1×초음파 센서 쿠팡 | 아마존
1×점퍼케이블 쿠팡 | 아마존
1×(추천) 라즈베리 파이 피코용 스크루 터미널 확장 보드 아마존
공개: 이 섹션에서 제공된 링크 중 일부는 제휴 링크입니다. 이 링크를 통해 구매한 경우 추가 비용없이 수수료를 받을 수 있습니다. 지원해 주셔서 감사합니다.

초음파 센서 소개

HC-SR04 초음파 센서는 음파를 사용하여 물체와의 거리를 계산합니다. 이 센서는 인간이 들을 수 없는 음파를 방출하고, 물체에 부딪혀 돌아오는 메아리를 기다립니다. 메아리가 돌아오는 데 걸리는 시간을 측정하여 센서는 물체까지의 거리를 계산합니다.

핀 배치

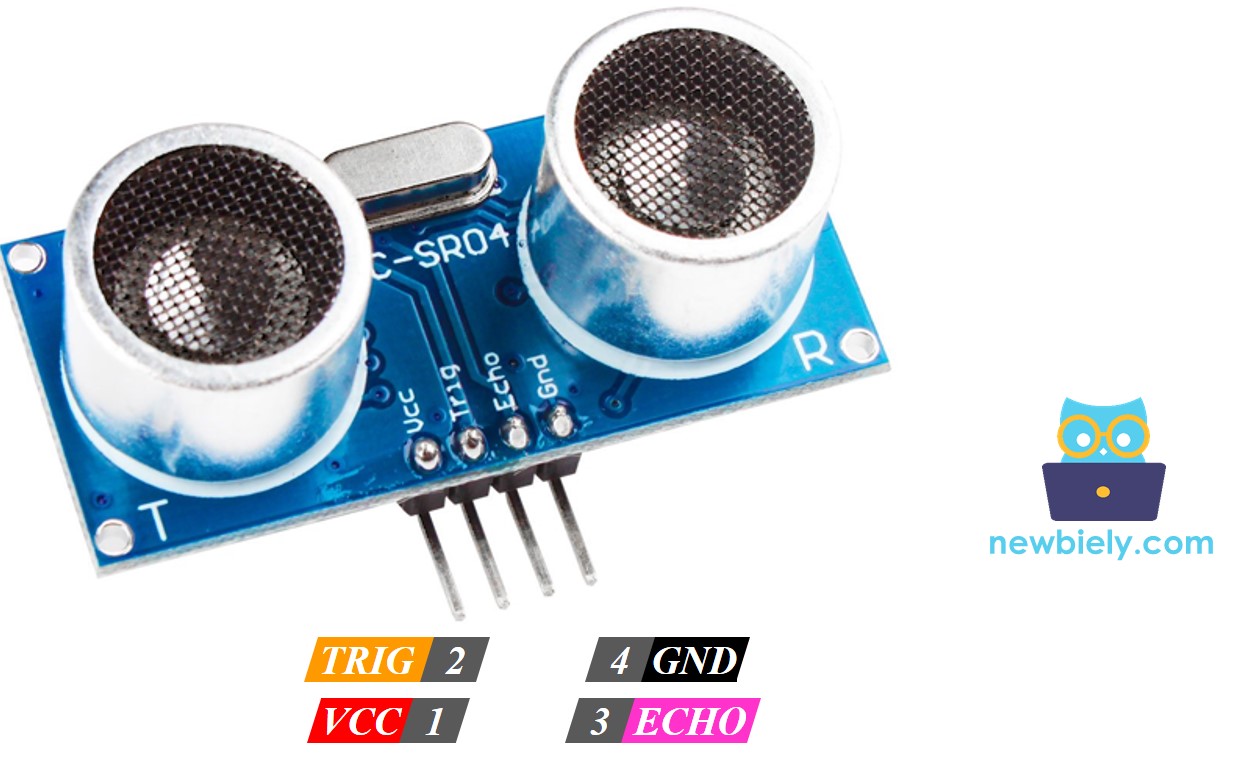
HC-SR04 초음파 센서에는 네 개의 핀이 있습니다.

  • VCC 핀: 이 핀을 VCC (5볼트)에 연결합니다.
  • GND 핀: 이 핀을 GND (0볼트)에 연결합니다.
  • TRIG 핀: 이 핀을 Raspberry Pi Pico에 연결하여 제어 신호를 전송합니다.
  • ECHO 핀: 이 핀은 Raspberry Pi Pico로 신호를 되돌려 보내며, 이를 측정하여 거리를 계산합니다.
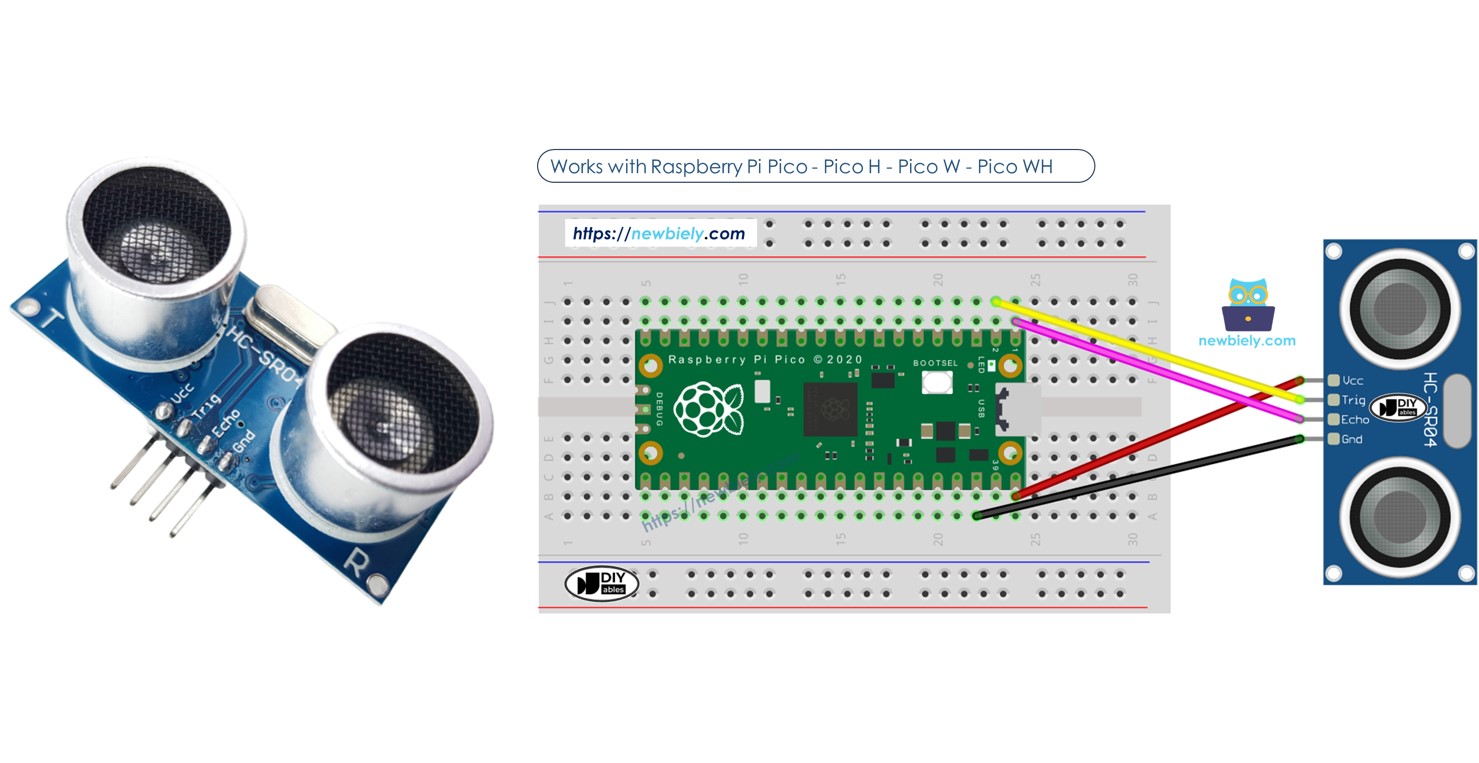
초음파 센서 핀아웃
image source: diyables.io

선연결

라즈베리 파이 피코 초음파 센서 배선도

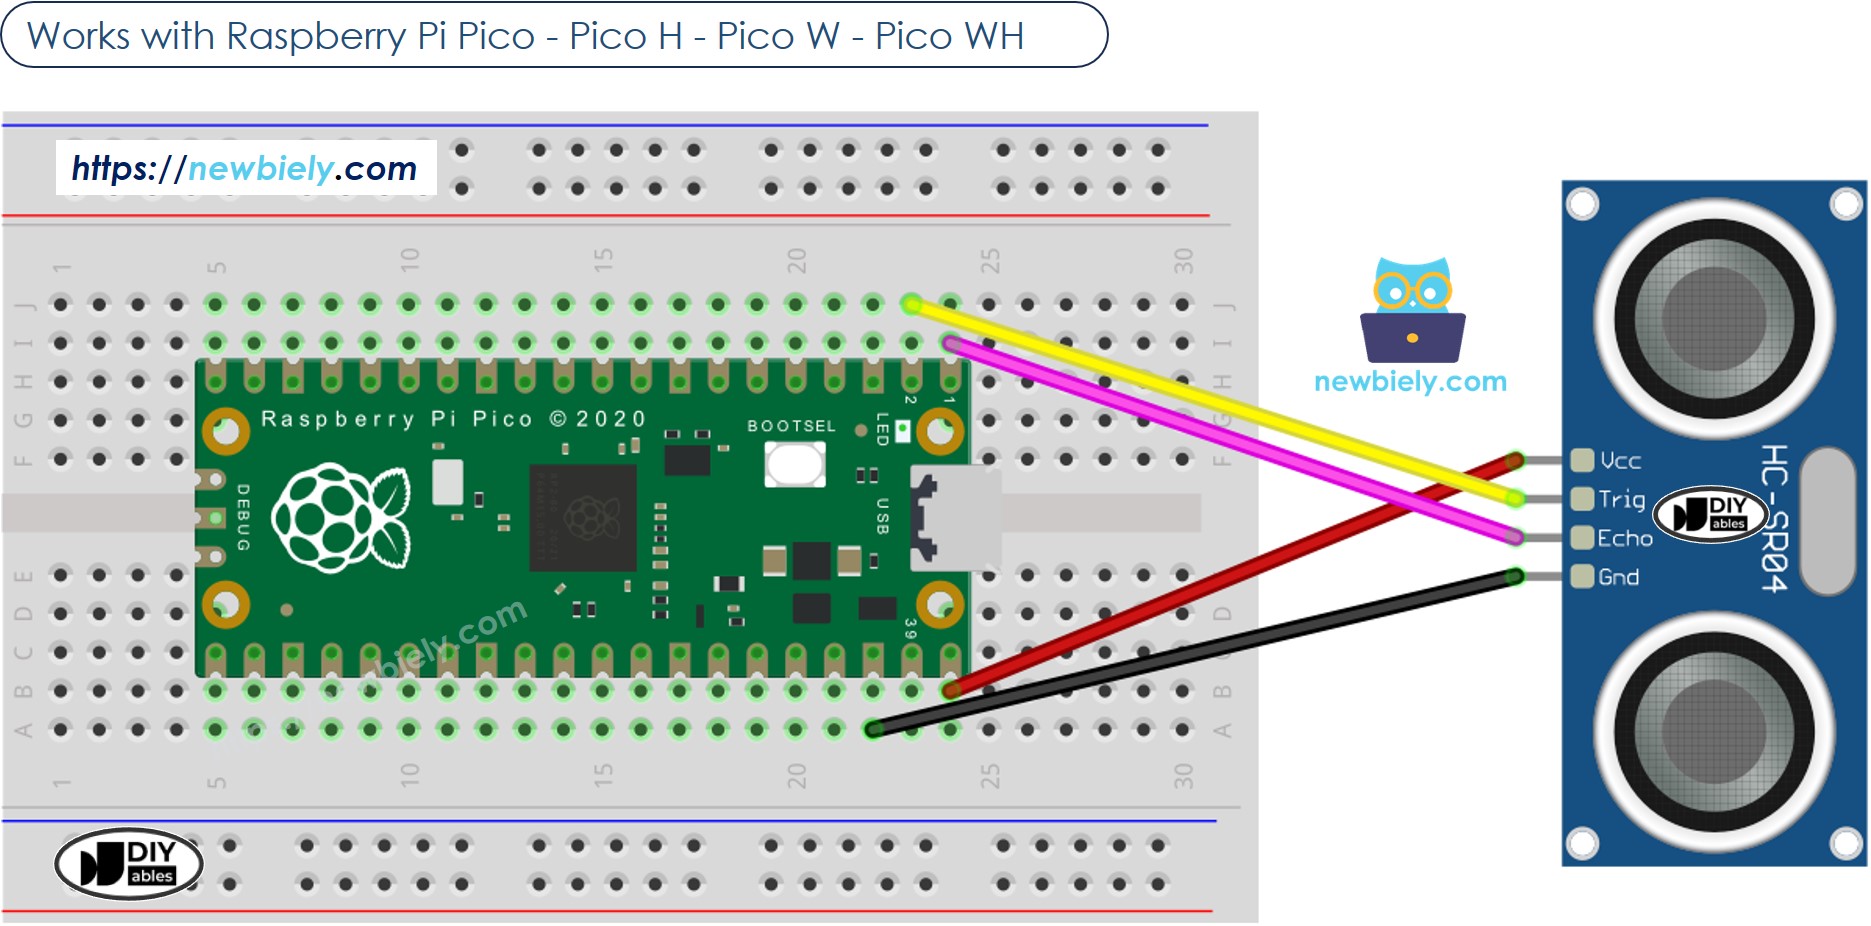
이 이미지는 Fritzing을 사용하여 만들어졌습니다. 이미지를 확대하려면 클릭하세요.

라즈베리 파이 피코 코드

초음파 센서 라이브러리를 사용하기 전에, 작동 원리를 이해하기 위해 라이브러리를 사용하지 않고 Raspberry Pi Pico를 프로그래밍해 볼 것입니다.

from machine import Pin, Timer import time # Define the pins for the trigger and echo trig = Pin(1, Pin.OUT) # The Raspberry Pi Pico pin (GP1) connected to TRIG pin of the ultrasonic sensor echo = Pin(0, Pin.IN) # The Raspberry Pi Pico pin (GP0) connected to ECHO pin of the ultrasonic sensor def read_distance(): # Ensure the trigger pin is low for a clean pulse trig.value(0) time.sleep_us(2) # Send a 10 microsecond pulse to start the measurement trig.value(1) time.sleep_us(10) trig.value(0) # Measure the duration of the echo pulse while echo.value() == 0: signal_off = time.ticks_us() while echo.value() == 1: signal_on = time.ticks_us() # Calculate the duration of the echo pulse time_passed = signal_on - signal_off # Calculate the distance in centimeters distance = (time_passed * 0.0343) / 2 return distance # Check the sensor every 1 seconds while True: distance = read_distance() print('Distance:', distance, 'cm') time.sleep(1)

자세한 사용 방법

다음 지시사항을 단계별로 따르십시오:

  • 컴퓨터에 Thonny IDE가 설치되어 있는지 확인하세요.
  • Raspberry Pi Pico에 MicroPython 펌웨어가 설치되어 있는지 확인하세요.
  • Raspberry Pi Pico를 처음 사용하는 경우, 라즈베리 파이 피코 - 시작하기 튜토리얼을 참조하세요.
  • 제공된 다이어그램에 따라 Raspberry Pi Pico를 초음파 센서에 연결하세요.
  • Raspberry Pi Pico를 USB 케이블로 컴퓨터에 연결하세요.
  • 컴퓨터에서 Thonny IDE를 실행하세요.
  • Thonny IDE에서 Tools Options 메뉴로 이동하여 MicroPython (Raspberry Pi Pico) 인터프리터를 선택하세요.
  • Interpreter 탭에서 드롭다운 메뉴에서 MicroPython (Raspberry Pi Pico)를 선택하세요.
  • 올바른 포트가 선택되었는지 확인하세요. Thonny IDE가 포트를 자동으로 감지해야 하지만, 수동으로 선택해야 할 수도 있습니다 (예: Windows에서는 COM3, Linux에서는 /dev/ttyACM0).
  • 위의 코드를 복사하여 Thonny IDE 에디터에 붙여넣으세요.
  • 다음 단계에 따라 Raspberry Pi Pico에 스크립트를 저장하세요:
    • 저장 버튼을 클릭하거나 Ctrl+S 키를 사용하세요.
    • 저장 대화 상자에서 'This computer'와 'Raspberry Pi Pico' 두 섹션 중 'Raspberry Pi Pico'를 선택하세요.
    • 파일을 main.py로 저장하세요.
  • 녹색 Run 버튼을 클릭하거나 F5 키를 눌러 스크립트를 실행하세요. 스크립트가 실행됩니다.
  • 초음파 센서 앞에서 손을 움직여 보세요.
  • Thonny 하단의 Shell에서 메시지를 확인하세요.
Shell x
>>> %Run -c $EDITOR_CONTENT
MPY: soft reboot Distance: 29.4 cm Distance: 27.6 cm Distance: 26.9 cm Distance: 17.4 cm Distance: 16.9 cm Distance: 14.3 cm Distance: 15.6 cm Distance: 13.1 cm
MicroPython (Raspberry Pi Pico) • Board CDC @ COM29 ≡

만약 스크립트 파일의 이름을 main.py로 지정하고 Raspberry Pi Pico의 루트 디렉터리에 저장하면, Pico의 전원이 켜지거나 리셋될 때마다 자동으로 실행됩니다. 이는 전원 공급 즉시 실행되어야 하는 독립 실행형 애플리케이션에 유용합니다. 스크립트의 이름을 main.py 이외의 다른 이름으로 지정한 경우, Thonnys의 Shell에서 수동으로 실행해야 합니다.

코드 설명

위의 Raspberry Pi Pico 코드의 주석에서 설명을 찾을 수 있습니다.

초음파 센서의 거리 측정 잡음 필터링 방법

초음파 센서의 데이터에는 잡음이라고 부르는 불필요한 추가 신호들이 포함되어 있습니다. 때때로 이 잡음은 센서가 잘못 작동하게 만들 수 있습니다. 다음 방법을 사용하여 이 잡음을 제거할 수 있습니다:

  • 여러 번 측정하고 이 측정값들을 목록에 저장합니다.
  • 목록을 가장 작은 값에서 가장 큰 값까지 순서대로 정렬합니다.
  • 잡음을 제거하여 데이터를 정리합니다:
    • 잡음으로 간주되는 가장 작은 값들은 무시합니다.
    • 잡음으로 간주되는 가장 큰 값들도 무시합니다.
    • 나머지 중간 값들의 평균을 구합니다.

    아래의 예제 코드는 20회의 측정을 수행합니다.

    • 잡음으로 간주되기 때문에 가장 작은 5개와 가장 큰 5개 샘플은 제외합니다. 5번째부터 14번째까지의 10개 중간 샘플의 평균을 계산합니다.

    아래의 MicroPython 코드는 위의 알고리즘을 구현합니다:

    /* * 이 라즈베리 파이 피코 코드는 newbiely.kr 에서 개발되었습니다 * 이 라즈베리 파이 피코 코드는 어떠한 제한 없이 공개 사용을 위해 제공됩니다. * 상세한 지침 및 연결도에 대해서는 다음을 방문하세요: * https://newbiely.kr/tutorials/raspberry-pico/raspberry-pi-pico-ultrasonic-sensor */ from machine import Pin, Timer import time # Define the pins for the trigger and echo trig = Pin(1, Pin.OUT) echo = Pin(0, Pin.IN) # Define an array to store measurements filter_array = [] def read_distance(): # Ensure the trigger pin is low for a clean pulse trig.value(0) time.sleep_us(2) # Send a 10 microsecond pulse to start the measurement trig.value(1) time.sleep_us(10) trig.value(0) # Measure the duration of the echo pulse while echo.value() == 0: signal_off = time.ticks_us() while echo.value() == 1: signal_on = time.ticks_us() # Calculate the duration of the echo pulse time_passed = signal_on - signal_off # Calculate the distance in centimeters distance = (time_passed * 0.0343) / 2 return distance def take_measurements(): global filter_array filter_array = [read_distance() for _ in range(20)] time.sleep_ms(30) # delay to avoid ultrasonic interference def filter_measurements(): global filter_array filter_array.sort() # Consider only the middle 10 samples middle_samples = filter_array[5:15] return sum(middle_samples) / len(middle_samples) while True: take_measurements() filtered_distance = filter_measurements() if filtered_distance > 140: print('No object detected within the set distance') else: # Print the distance formatted to two decimal places using format() print('Filtered distance: {:.2f} cm'.format(filtered_distance)) time.sleep(1)
    • 위의 코드를 복사하여 Thonny IDE의 에디터에 있는 main.py에 붙여넣습니다.
    • 스크립트를 Raspberry Pi Pico에 저장합니다.
    • 녹색 실행 버튼을 클릭하거나 F5 키를 눌러 스크립트를 실행합니다. 스크립트가 실행됩니다.
    • 초음파 센서 앞에서 손을 움직입니다.
    • Thonny 하단의 Shell에서 메시지를 확인합니다.
    Shell x
    >>> %Run -c $EDITOR_CONTENT
    MPY: soft reboot MPY: soft reboot No object detected within the set distance No object detected within the set distance No object detected within the set distance Filtered distance: 5.46 cm Filtered distance: 9.21 cm Filtered distance: 10.12 cm Filtered distance: 12.33 cm Filtered distance: 9.89 cm Filtered distance: 6.56 cm No object detected within the set distance No object detected within the set distance No object detected within the set distance No object detected within the set distance No object detected within the set distance
    MicroPython (Raspberry Pi Pico) • Board CDC @ COM29 ≡

라즈베리 파이 피코 - 초음파 센서 라이브러리

위 내용은 복잡해 보일 수 있지만, 다행히도 DIYables는 여러분이 쉽게 사용할 수 있도록 라이브러리를 개발했습니다. 초음파 센서 라이브러리를 사용하려면 아래 단계를 따르세요:

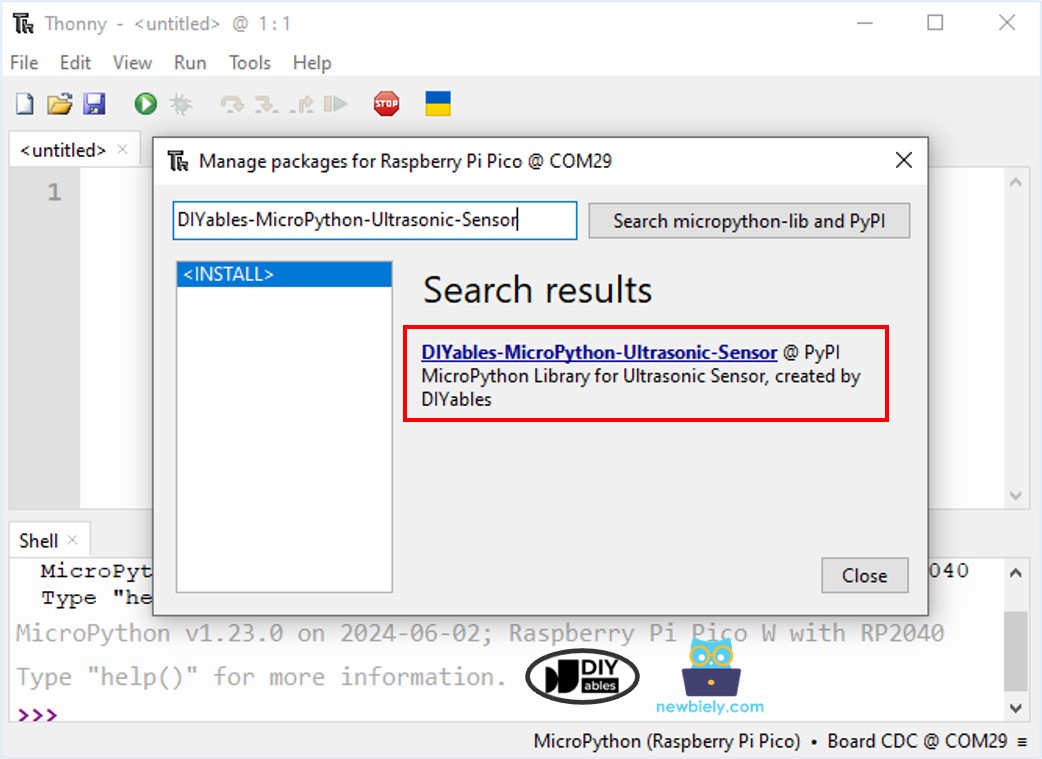
  • Thonny IDE에서 도구 패키지 관리로 이동하세요.
  • “DIYables-MicroPython-Ultrasonic-Sensor”를 검색한 후, DIYables가 만든 초음파 센서 라이브러리를 찾으세요.
  • DIYables-MicroPython-Ultrasonic-Sensor를 클릭한 다음, Install 버튼을 클릭하여 초음파 센서 라이브러리를 설치하세요.
라즈베리 파이 파이코 초음파 센서 라이브러리
  • 아래 코드를 복사하여 Thonny IDE의 에디터에 붙여넣으세요.
/* * 이 라즈베리 파이 피코 코드는 newbiely.kr 에서 개발되었습니다 * 이 라즈베리 파이 피코 코드는 어떠한 제한 없이 공개 사용을 위해 제공됩니다. * 상세한 지침 및 연결도에 대해서는 다음을 방문하세요: * https://newbiely.kr/tutorials/raspberry-pico/raspberry-pi-pico-ultrasonic-sensor */ # example_usage.py from DIYables_MicroPython_Ultrasonic_Sensor import UltrasonicSensor import time sensor = UltrasonicSensor(trig_pin=1, echo_pin=0) sensor.set_detection_threshold(140) # Set detection threshold to 140 cm sensor.enable_filter(num_samples=20) # Enable filtering and set number of samples to 20 while True: sensor.loop() # Perform measurement cycle distance = sensor.get_distance() if not distance: print('No object detected within the set distance') else: # Print the distance formatted to two decimal places using format() print('Filtered distance: {:.2f} cm'.format(distance)) time.sleep(1) # Reduced sleep time to enhance measurement responsiveness
  • Raspberry Pi Pico의 main.py에 스크립트를 저장합니다.
  • 스크립트를 실행하려면 초록색 실행 버튼을 클릭하거나 F5를 누릅니다. 스크립트가 실행됩니다.
  • 초음파 센서 앞에서 손을 움직입니다.
  • Thonny 하단의 쉘에서 메시지를 확인합니다.

동영상

비디오 제작은 시간이 많이 걸리는 작업입니다. 비디오 튜토리얼이 학습에 도움이 되었다면, YouTube 채널 을 구독하여 알려 주시기 바랍니다. 비디오에 대한 높은 수요가 있다면, 비디오를 만들기 위해 노력하겠습니다.

초음파 센서 응용

  • 충돌 방지
  • 가득 찼는지 확인
  • 높이 확인
  • 근접 감지