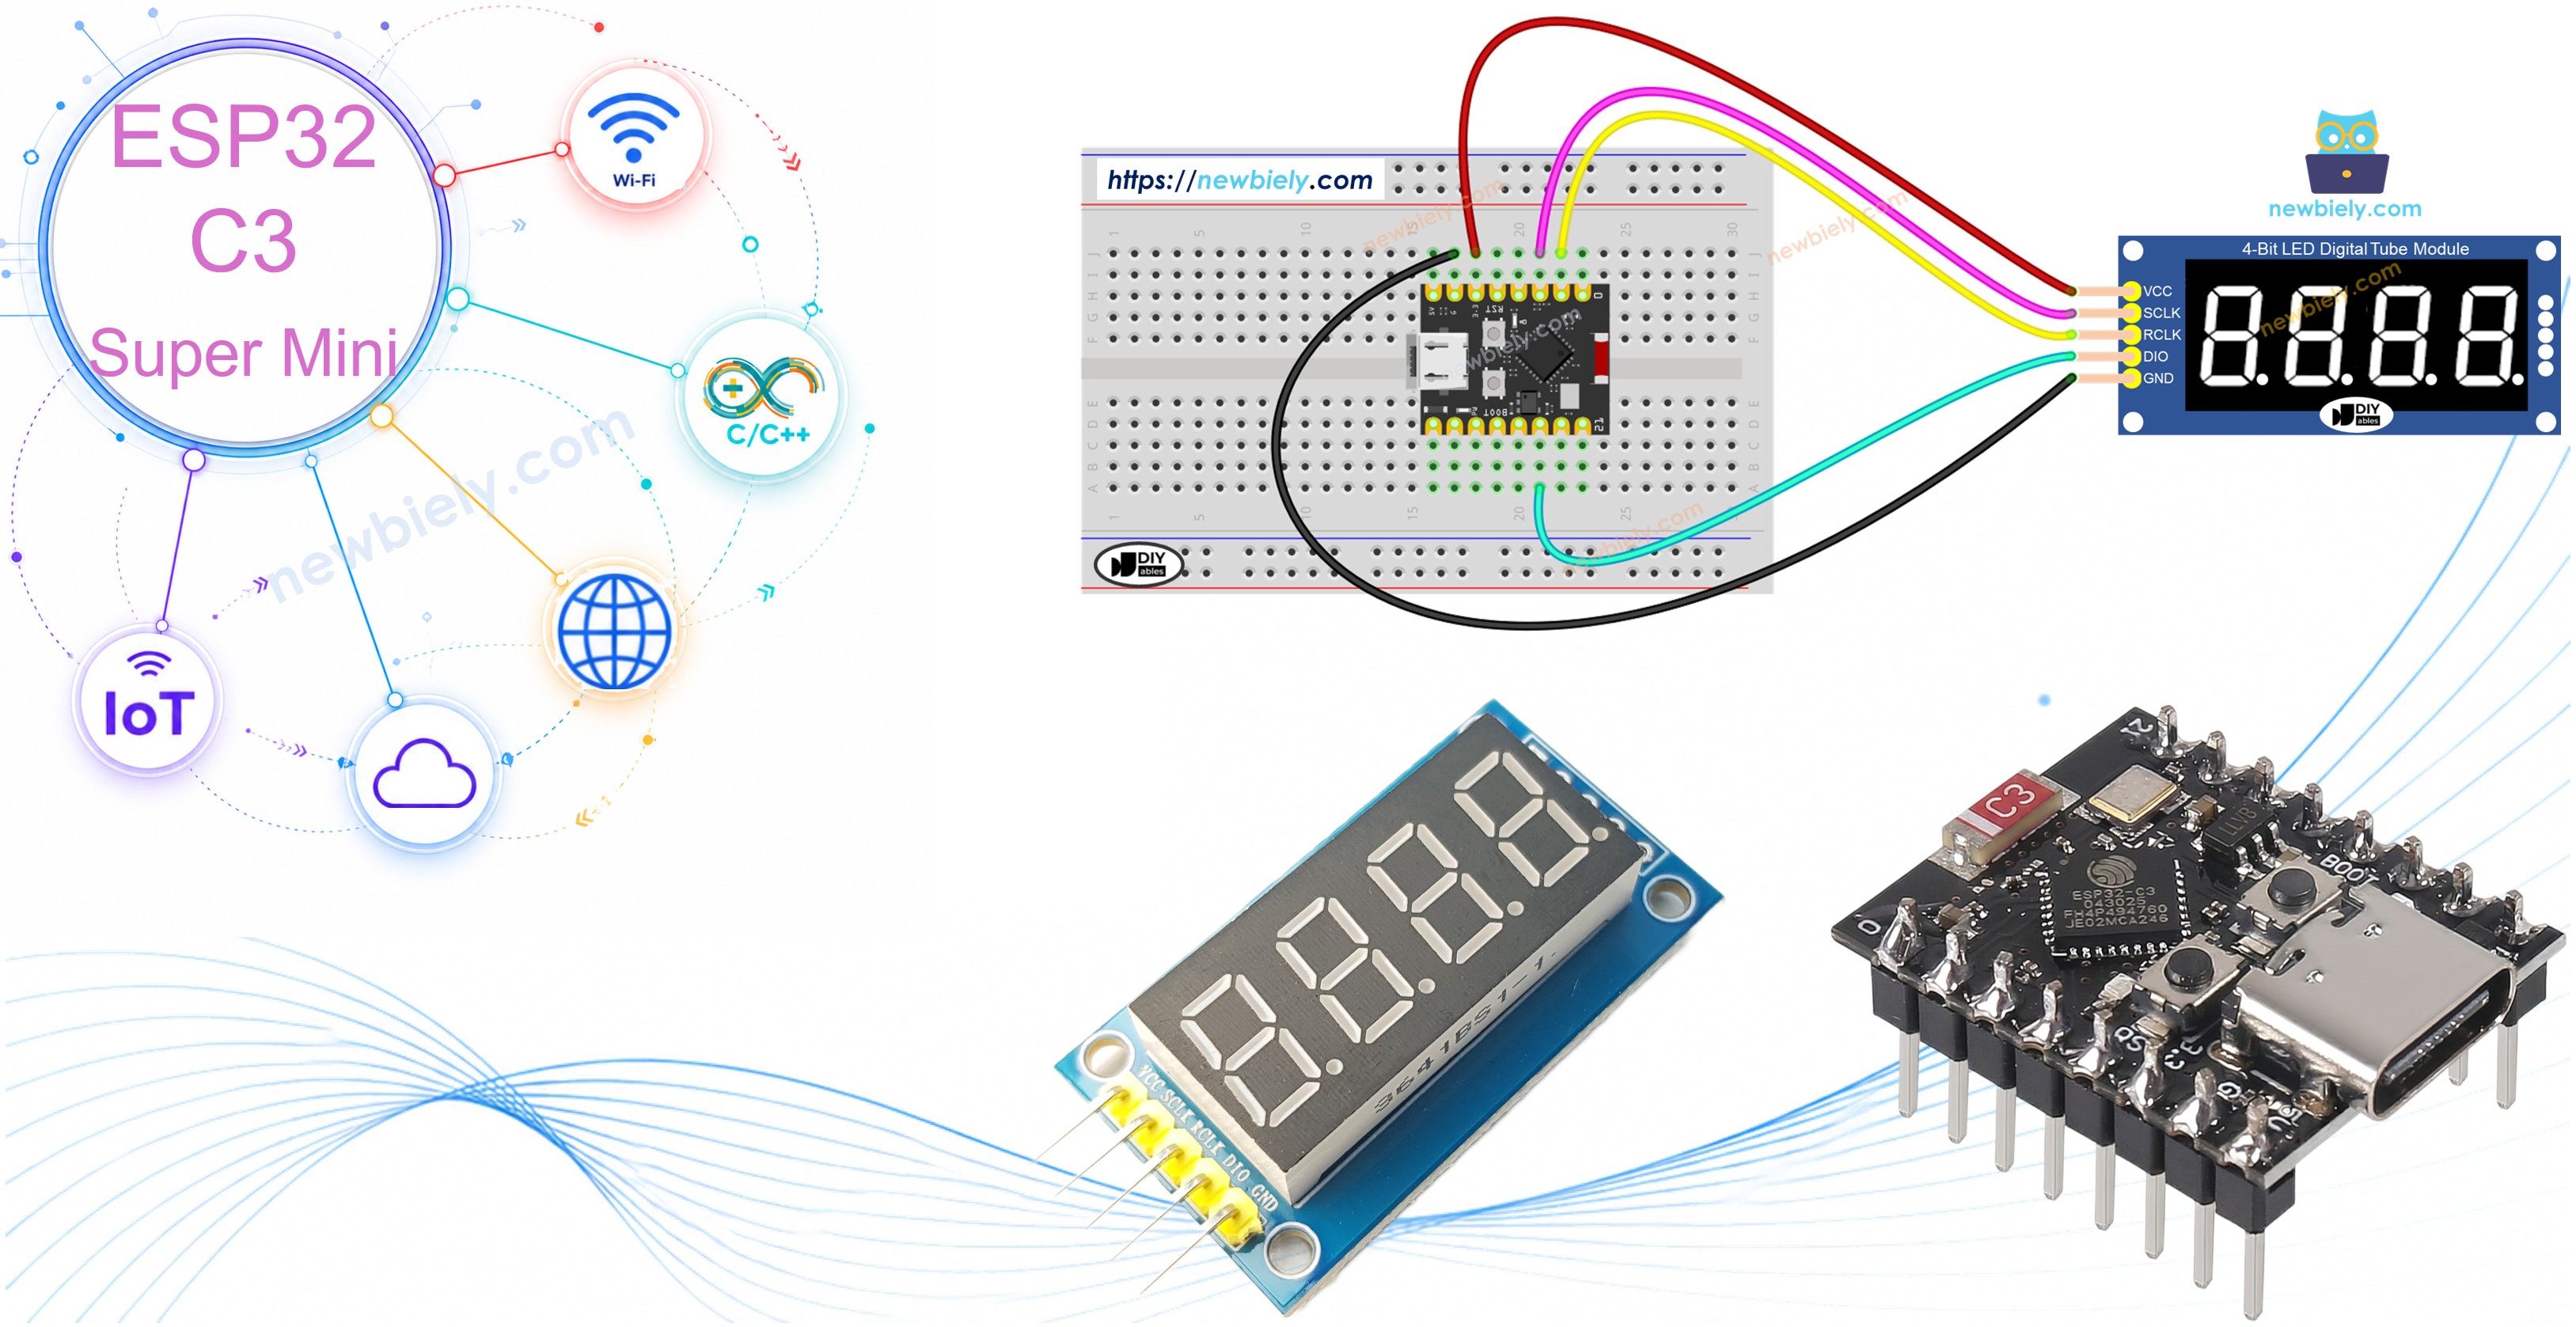
74HC595 4자리 7-세그먼트 디스플레이를 ESP32 C3 Super Mini에 연결하고 숫자, 텍스트 및 센서 판독값을 표시하는 방법을 배웁니다. 이 초보자 친화적인 튜토리얼은 단 3개의 GPIO 핀으로 디지털 시계, 온도 디스플레이 및 카운터를 만드는 데 필요한 모든 것을 보여줍니다.
display.loop()는 멀티플렉싱을 통해 디스플레이 밝기를 유지하기 위해 자주 호출되어야 합니다
표준 delay() 대신 display.delay()를 사용하여 대기 중 디스플레이를 새로고침하세요
loop()가 계속 실행되는 한 디스플레이는 마지막 print() 명령으로 켜진 상태 유지됩니다
워크숍 - 정수 표시
이 워크숍은 음수 및 0 패딩을 포함한 정수 값을 ESP32 C3 Super Mini 74HC595 4자리 7-세그먼트 디스플레이에 표시하는 방법을 보여줍니다.
/* * 이 ESP32 C3 Super Mini 코드는 newbiely.kr 에서 개발되었습니다 * 이 ESP32 C3 Super Mini 코드는 어떠한 제한 없이 공개 사용을 위해 제공됩니다. * 상세한 지침 및 연결도에 대해서는 다음을 방문하세요: * https://newbiely.kr/tutorials/esp32-c3/esp32-c3-super-mini-74hc595-4-digit-7-segment-display */#include <DIYables_4Digit7Segment_74HC595.h>// Pin configuration - change these to match your wiring#define SCLK_PIN 2 // The ESP32 C3 SuperMini pin connected to the Serial clock pin of 7-segment display#define RCLK_PIN 1 // The ESP32 C3 SuperMini pin connected to the Register clock / latch pin of 7-segment display#define DIO_PIN 10 // The ESP32 C3 SuperMini pin connected to the Data (DS) pin of 7-segment displayDIYables_4Digit7Segment_74HC595display(SCLK_PIN, RCLK_PIN, DIO_PIN);int numbers[] = {0, 42, 1234, -5, -123, 9999};int numCount = 6;int currentIndex = 0;bool showZeroPad = false;unsignedlong lastChange = 0;voidsetup() {Serial.begin(115200);display.begin();Serial.println("4-Digit 7-Segment 74HC595 - Integer Example");}voidloop() {display.loop(); // Must be called frequently to refresh the displayif (millis() - lastChange >= 2000) { lastChange = millis();if (!showZeroPad) {display.print(numbers[currentIndex]);Serial.print("Displaying: ");Serial.println(numbers[currentIndex]); currentIndex++;if (currentIndex >= numCount) { currentIndex = 0; showZeroPad = true; } } else {display.print(42, true); // Shows "0042"Serial.println("Displaying: 0042 (zero-padded)"); showZeroPad = false; } }}
빠른 단계
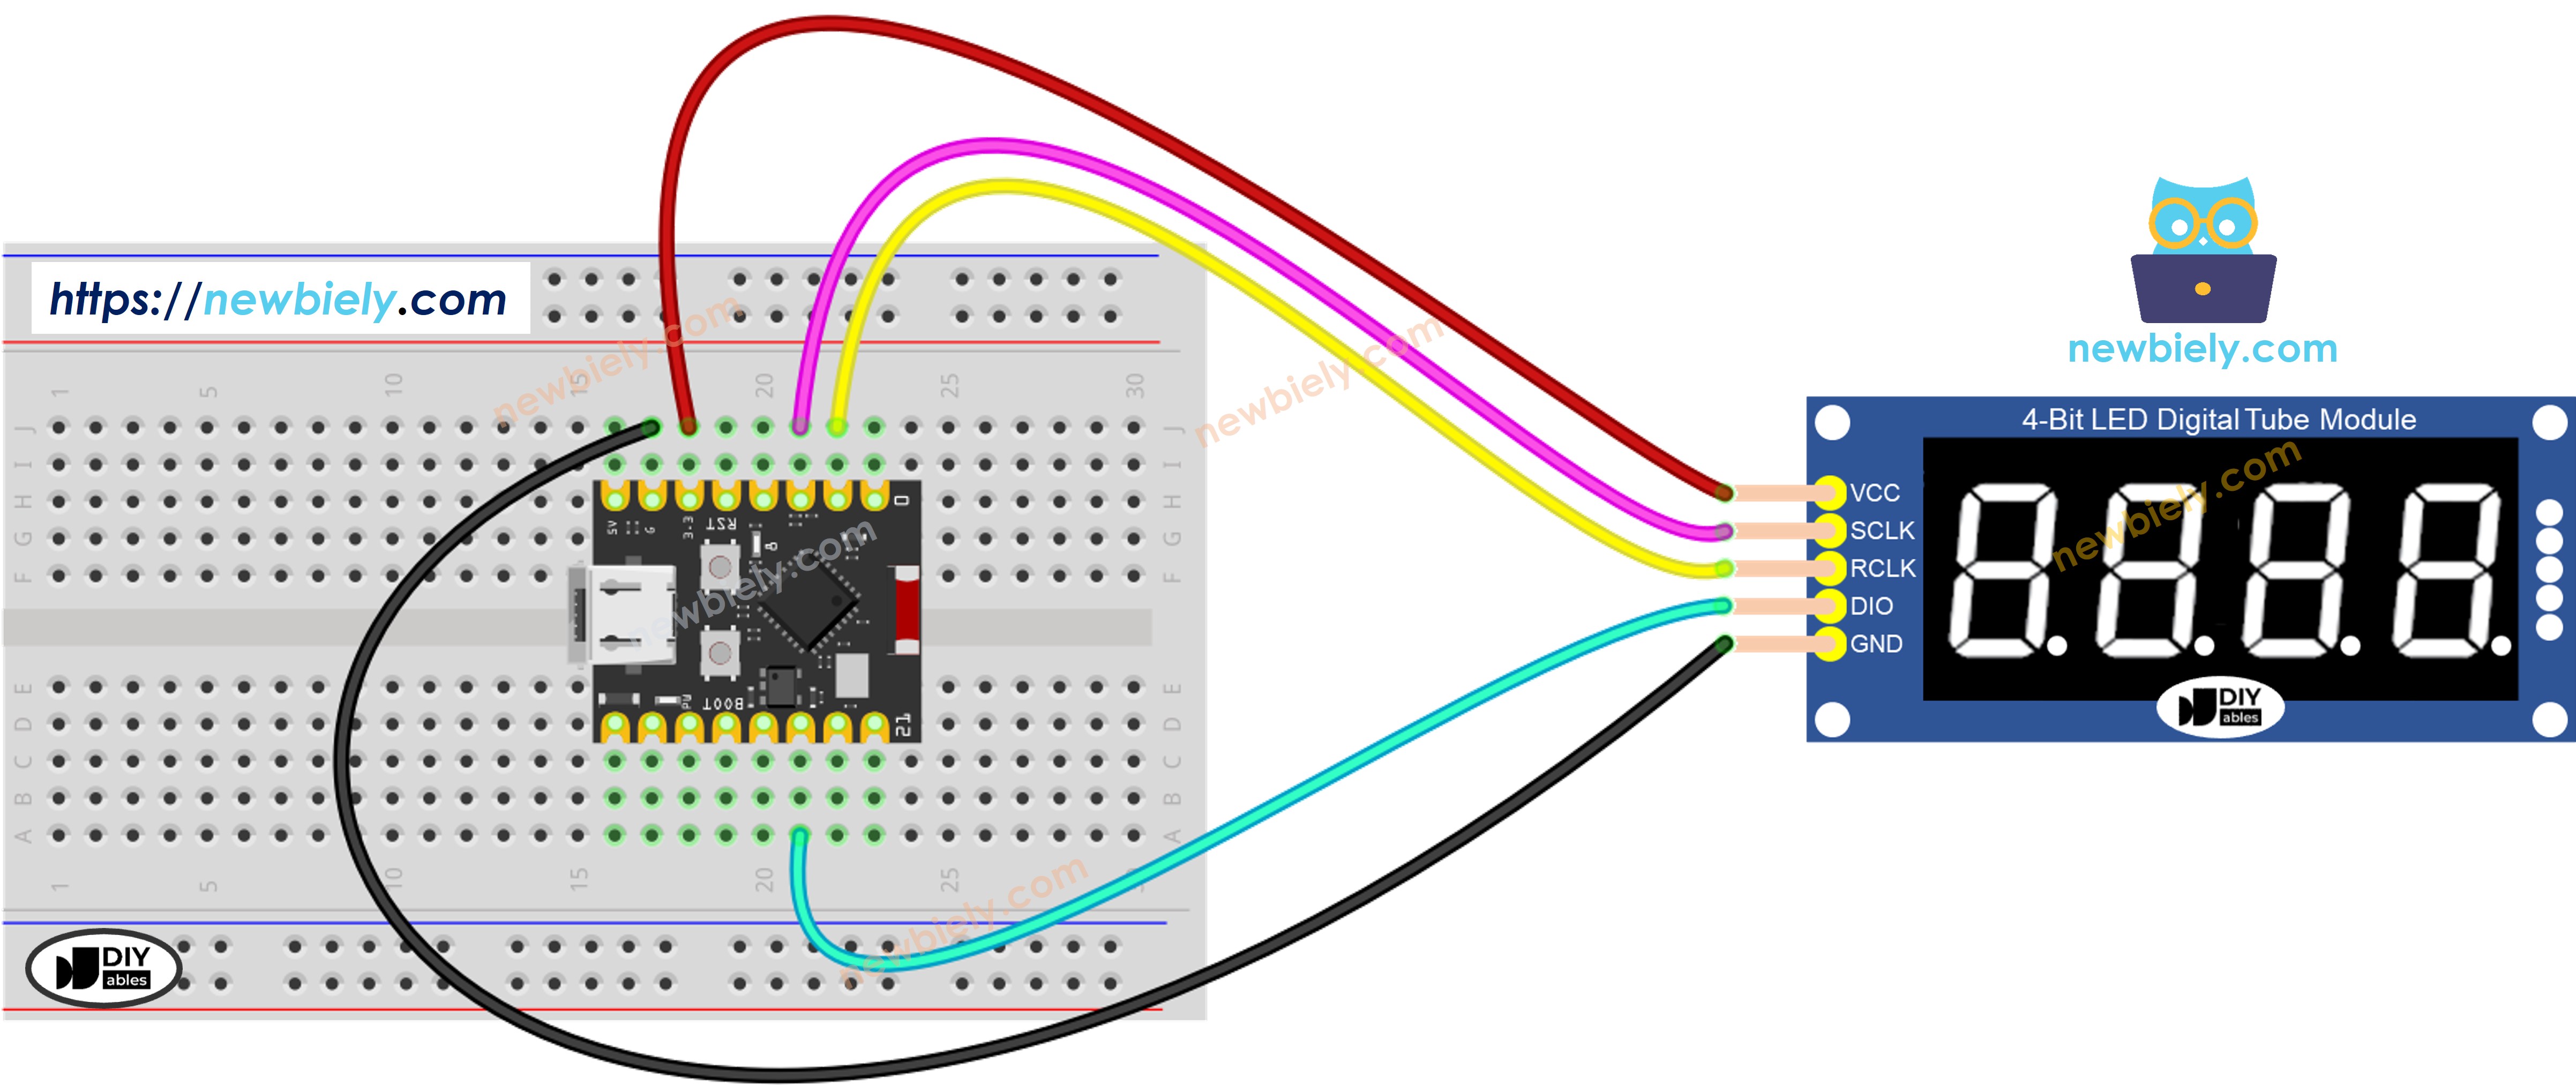
디스플레이 연결: 위의 배선 다이어그램에 따라 74HC595 모듈을 ESP32 C3 Super Mini에 연결합니다
컴퓨터에 연결: USB-C 케이블을 통해 ESP32 C3 Super Mini를 컴퓨터에 연결합니다
Arduino IDE 열기: Arduino IDE 소프트웨어를 실행합니다
보드 및 포트 선택: ESP32 C3 Super Mini와 올바른 COM 포트를 선택합니다
코드 복사: 정수 디스플레이 코드를 Arduino IDE에 붙여넣습니다
업로드:Upload 버튼을 클릭하여 코드를 보드로 전송합니다
Serial Monitor 열기: Serial Monitor 아이콘을 클릭하여 출력 메시지를 확인합니다
디스플레이 관찰: 7-세그먼트 디스플레이가 다양한 정수를 순환하는 것을 봅니다
Pro Tip:print(42, true)의 두 번째 매개변수는 0 패딩을 활성화하여 일관된 너비 디스플레이를 표시합니다
Serial Monitor 출력
Newbiely | Arduino IDE 2.3.8
──
☐
✕
File
Edit
Sketch
Tools
Help
ESP32C3 Dev Module
Newbiely.ino
···
8Serial.println("Hello World!");
Output
Serial Monitor
Message (Enter to send message to 'ESP32C3 Dev Module' on 'COM15')
디스플레이는 0, 양수, 음수, 최대값 및 0 패딩 형식을 포함한 다양한 정수를 순환합니다.
메서드 참조
Method
Action
Syntax
print(int)
정수 값 표시
display.print(1234)
print(int, true)
0 패딩과 함께 정수 표시
display.print(42, true)
loop()
디스플레이 멀티플렉싱 새로고침
display.loop()
begin()
디스플레이 핀 초기화
display.begin()
워크숍 - 실수 표시
이 워크숍은 자동 및 고정 소수 자릿수로 ESP32 C3 Super Mini에서 부동 소수점 수를 표시하는 방법을 보여줍니다.
/* * 이 ESP32 C3 Super Mini 코드는 newbiely.kr 에서 개발되었습니다 * 이 ESP32 C3 Super Mini 코드는 어떠한 제한 없이 공개 사용을 위해 제공됩니다. * 상세한 지침 및 연결도에 대해서는 다음을 방문하세요: * https://newbiely.kr/tutorials/esp32-c3/esp32-c3-super-mini-74hc595-4-digit-7-segment-display */#include <DIYables_4Digit7Segment_74HC595.h>// Pin configuration - change these to match your wiring#define SCLK_PIN 2 // The ESP32 C3 SuperMini pin connected to the Serial clock pin of 7-segment display#define RCLK_PIN 1 // The ESP32 C3 SuperMini pin connected to the Register clock / latch pin of 7-segment display#define DIO_PIN 10 // The ESP32 C3 SuperMini pin connected to the Data (DS) pin of 7-segment displayDIYables_4Digit7Segment_74HC595display(SCLK_PIN, RCLK_PIN, DIO_PIN);voidsetup() {Serial.begin(115200);display.begin();Serial.println("4-Digit 7-Segment 74HC595 - Float Example");}voidloop() {// Auto decimal placementdisplay.print(1.5); // Shows " 1.5"Serial.println("Auto decimal: 1.5");display.delay(2000);display.print(12.34); // Shows "12.34"Serial.println("Auto decimal: 12.34");display.delay(2000);display.print(3.141); // Shows "3.141"Serial.println("Auto decimal: 3.141");display.delay(2000);display.print(-1.2); // Shows "-1.20"Serial.println("Auto decimal: -1.20");display.delay(2000);display.print(0.5); // Shows " 0.5"Serial.println("Auto decimal: 0.5");display.delay(2000);// Fixed decimal placesdisplay.print(23.5, 1); // 1 decimal place: shows "23.5"Serial.println("1 decimal place: 23.5");display.delay(2000);display.print(1.5, 2); // 2 decimal places: shows "1.50"Serial.println("2 decimal places: 1.50");display.delay(2000);// Zero-paddeddisplay.print(1.5, 2, true); // Shows "01.50"Serial.println("2 decimal places, zero-padded: 01.50");display.delay(2000);}
빠른 단계
코드 업로드: 실수 표시 코드를 복사하고 ESP32 C3 Super Mini에 업로드합니다
Serial Monitor 열기: 직렬 출력을 보고 표시되는 내용을 추적합니다
디스플레이 관찰: 다양한 소수 자릿수 설정으로 실수를 봅니다
형식 지정 주의: 자동 소수가 고정 소수 자릿수와 어떻게 다른지 확인합니다
Pro Tip: 온도 또는 전압과 같은 일관된 센서 판독값의 경우 고정 소수 자릿수를 사용합니다
Serial Monitor 출력
Newbiely | Arduino IDE 2.3.8
──
☐
✕
File
Edit
Sketch
Tools
Help
ESP32C3 Dev Module
Newbiely.ino
···
8Serial.println("Hello World!");
Output
Serial Monitor
Message (Enter to send message to 'ESP32C3 Dev Module' on 'COM15')
이 워크숍은 텍스트 문자열, 도 기호가 있는 온도 판독값 및 ESP32 C3 Super Mini 7-세그먼트 디스플레이의 사용자 정의 문자를 표시하는 방법을 보여줍니다.
/* * 이 ESP32 C3 Super Mini 코드는 newbiely.kr 에서 개발되었습니다 * 이 ESP32 C3 Super Mini 코드는 어떠한 제한 없이 공개 사용을 위해 제공됩니다. * 상세한 지침 및 연결도에 대해서는 다음을 방문하세요: * https://newbiely.kr/tutorials/esp32-c3/esp32-c3-super-mini-74hc595-4-digit-7-segment-display */#include <DIYables_4Digit7Segment_74HC595.h>// Pin configuration - change these to match your wiring#define SCLK_PIN 2 // The ESP32 C3 SuperMini pin connected to the Serial clock pin of 7-segment display#define RCLK_PIN 1 // The ESP32 C3 SuperMini pin connected to the Register clock / latch pin of 7-segment display#define DIO_PIN 10 // The ESP32 C3 SuperMini pin connected to the Data (DS) pin of 7-segment displayDIYables_4Digit7Segment_74HC595display(SCLK_PIN, RCLK_PIN, DIO_PIN);const char* texts[] = {"HELP", "Hi", "COOL", "done"};int textCount = 4;int currentIndex = 0;int phase = 0;unsignedlong lastChange = 0;voidsetup() {Serial.begin(115200);display.begin();Serial.println("4-Digit 7-Segment 74HC595 - Text and Degree Example");}voidloop() {display.loop(); // Must be called frequently to refresh the displayif (millis() - lastChange >= 2000) { lastChange = millis();if (phase == 0) {// Display text stringsdisplay.print(texts[currentIndex]);Serial.print("Text: ");Serial.println(texts[currentIndex]); currentIndex++;if (currentIndex >= textCount) { currentIndex = 0; phase = 1; } } elseif (phase == 1) {// Display temperature 25 degrees Cdisplay.printTemperature(25, 'C');Serial.println("Temperature: 25 C"); phase = 2; } elseif (phase == 2) {// Display temperature 72 degrees Fdisplay.printTemperature(72, 'F');Serial.println("Temperature: 72 F"); phase = 3; } elseif (phase == 3) {// Display degree symbol using string with DEGREE_CHAR constantchar degStr[5]; degStr[0] = '2'; degStr[1] = '5'; degStr[2] = DEGREE_CHAR; degStr[3] = 'C'; degStr[4] = '\0';display.print(degStr);Serial.println("String with degree: 25 deg C"); phase = 4; } else {// Display string with dotsdisplay.print("1.2.3.4");Serial.println("Dots: 1.2.3.4"); phase = 0; } }}
빠른 단계
코드 업로드: 텍스트 및 온도 코드를 ESP32 C3 Super Mini로 전송합니다
Serial Monitor 열기: 표시되는 텍스트 및 기호를 추적합니다
텍스트 관찰: 7-세그먼트 디스플레이에 문자가 어떻게 나타나는지 봅니다
도 기호 확인: 온도 디스플레이를 위한 작은 도 원을 확인합니다
소수점 시도: 숫자 사이의 인라인 점을 확인합니다
Pro Tip: 모든 문자가 7-세그먼트에 명확하게 표시되지는 않습니다 - 최고의 결과를 위해 숫자, H, E, L, P, C, O 및 유사한 문자를 사용하세요
Serial Monitor 출력
Newbiely | Arduino IDE 2.3.8
──
☐
✕
File
Edit
Sketch
Tools
Help
ESP32C3 Dev Module
Newbiely.ino
···
8Serial.println("Hello World!");
Output
Serial Monitor
Message (Enter to send message to 'ESP32C3 Dev Module' on 'COM15')
이 워크숍은 HH.MM 형식과 깜박이는 콜론 구분 기호를 사용하여 ESP32 C3 Super Mini에서 디지털 시계 디스플레이를 만드는 방법을 보여줍니다.
/* * 이 ESP32 C3 Super Mini 코드는 newbiely.kr 에서 개발되었습니다 * 이 ESP32 C3 Super Mini 코드는 어떠한 제한 없이 공개 사용을 위해 제공됩니다. * 상세한 지침 및 연결도에 대해서는 다음을 방문하세요: * https://newbiely.kr/tutorials/esp32-c3/esp32-c3-super-mini-74hc595-4-digit-7-segment-display */#include <DIYables_4Digit7Segment_74HC595.h>// Pin configuration - change these to match your wiring#define SCLK_PIN 2 // The ESP32 C3 SuperMini pin connected to the Serial clock pin of 7-segment display#define RCLK_PIN 1 // The ESP32 C3 SuperMini pin connected to the Register clock / latch pin of 7-segment display#define DIO_PIN 10 // The ESP32 C3 SuperMini pin connected to the Data (DS) pin of 7-segment displayDIYables_4Digit7Segment_74HC595display(SCLK_PIN, RCLK_PIN, DIO_PIN);inthours = 12;intminutes = 30;bool colonOn = true;unsignedlong lastToggle = 0;voidsetup() {Serial.begin(115200);display.begin();Serial.println("4-Digit 7-Segment 74HC595 - Time Example");Serial.println("Displaying 12:30 with blinking dot separator");}voidloop() {display.loop(); // Must be called frequently to refresh the displayif (millis() - lastToggle >= 500) { lastToggle = millis();display.printTime(hours, minutes, colonOn); colonOn = !colonOn; // Toggle dot separator every 500ms for blinking effect }}
빠른 단계
코드 업로드: 시간 디스플레이 코드를 ESP32 C3 Super Mini로 전송합니다
Serial Monitor 열기: 타임스탐프 업데이트를 봅니다
디스플레이 관찰: HH.MM 형식의 시간을 깜박이는 구분 기호와 함께 봅니다
깜박임 속도 주의: 콜론이 실제 시계처럼 500ms마다 깜박입니다
Pro Tip: 실제 작동하는 시계 프로젝트를 위해 이것을 RTC 모듈과 결합합니다
Serial Monitor 출력
Newbiely | Arduino IDE 2.3.8
──
☐
✕
File
Edit
Sketch
Tools
Help
ESP32C3 Dev Module
Newbiely.ino
···
8Serial.println("Hello World!");
Output
Serial Monitor
Message (Enter to send message to 'ESP32C3 Dev Module' on 'COM15')
이 워크숍은 ESP32 C3 Super Mini에서 전체 디스플레이 콘텐츠를 켜고 끄는 방법을 보여줍니다.
/* * 이 ESP32 C3 Super Mini 코드는 newbiely.kr 에서 개발되었습니다 * 이 ESP32 C3 Super Mini 코드는 어떠한 제한 없이 공개 사용을 위해 제공됩니다. * 상세한 지침 및 연결도에 대해서는 다음을 방문하세요: * https://newbiely.kr/tutorials/esp32-c3/esp32-c3-super-mini-74hc595-4-digit-7-segment-display */#include <DIYables_4Digit7Segment_74HC595.h>// Pin configuration - change these to match your wiring#define SCLK_PIN 2 // The ESP32 C3 SuperMini pin connected to the Serial clock pin of 7-segment display#define RCLK_PIN 1 // The ESP32 C3 SuperMini pin connected to the Register clock / latch pin of 7-segment display#define DIO_PIN 10 // The ESP32 C3 SuperMini pin connected to the Data (DS) pin of 7-segment displayDIYables_4Digit7Segment_74HC595display(SCLK_PIN, RCLK_PIN, DIO_PIN);// States: 0 = blink int, 1 = blink float, 2 = blink textint phase = 0;int blinkCount = 0;boolisOn = true;unsignedlong lastAction = 0;unsignedlong pauseUntil = 0;voidsetup() {Serial.begin(115200);display.begin();Serial.println("4-Digit 7-Segment 74HC595 - Blink Example");display.print(1234);Serial.println("Blinking: 1234");}voidloop() {display.loop(); // Must be called frequently to refresh the displayunsignedlongnow = millis();// Pause between phasesif (now < pauseUntil) return;if (now - lastAction >= 300) { lastAction = now;if (isOn) {display.off();isOn = false; } else {display.on();isOn = true; blinkCount++;if (blinkCount >= 5) { blinkCount = 0; pauseUntil = now + 1000; phase++;if (phase > 2) phase = 0;switch (phase) {case 0:display.print(1234);Serial.println("Blinking: 1234");break;case 1:display.print(12.34);Serial.println("Blinking: 12.34");break;case 2:display.print("HELP");Serial.println("Blinking: HELP");break; } } } }}
빠른 단계
코드 업로드: 깜박임 데모 코드를 ESP32 C3 Super Mini로 전송합니다
Serial Monitor 열기: 깜박임 사이클 및 콘텐츠 변경을 추적합니다
디스플레이 관찰: 숫자, 소수점 및 텍스트가 켜고 꺼지는 것을 봅니다
깜박임 계산: 각 콘텐츠 유형은 전환되기 전에 5번 깜박입니다
Pro Tip: 프로젝트에서 경보 조건 또는 중요한 알림에 주의를 끌기 위해 깜박임을 사용합니다
Serial Monitor 출력
Newbiely | Arduino IDE 2.3.8
──
☐
✕
File
Edit
Sketch
Tools
Help
ESP32C3 Dev Module
Newbiely.ino
···
8Serial.println("Hello World!");
Output
Serial Monitor
Message (Enter to send message to 'ESP32C3 Dev Module' on 'COM15')