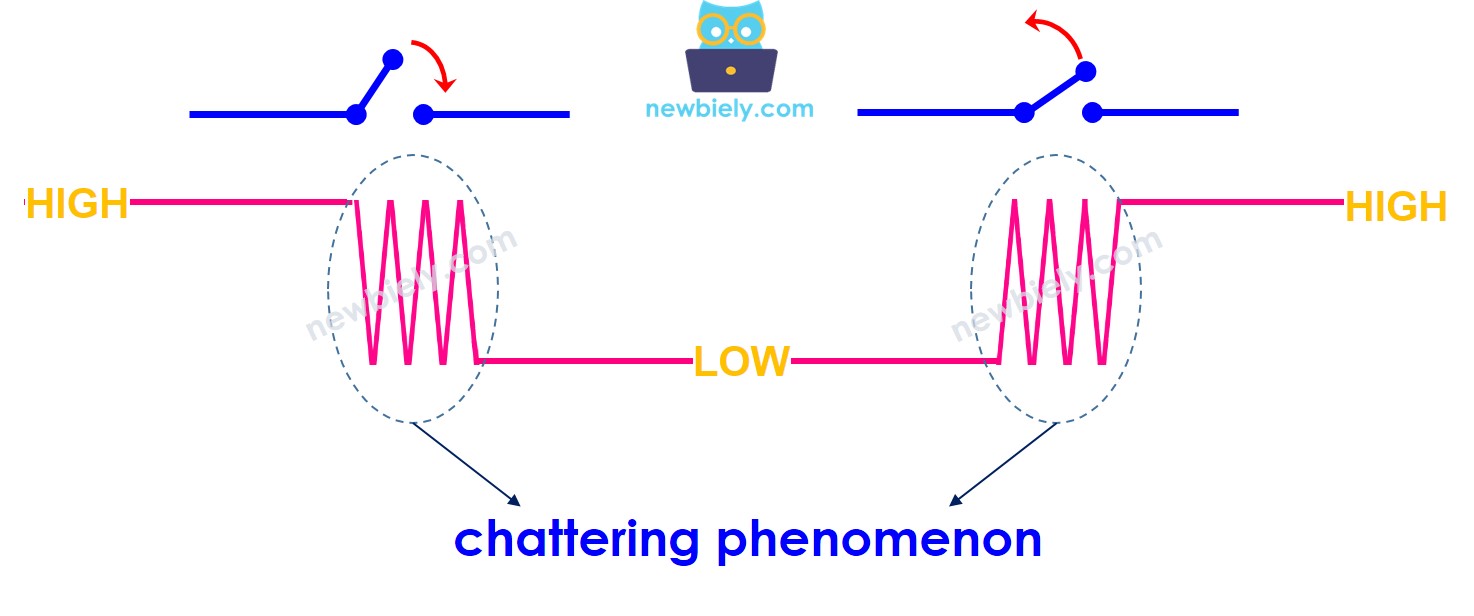
버튼이 눌리거나 해제되거나 스위치가 전환될 때, 초보자들은 종종 상태가 단순히 LOW에서 HIGH로, 혹은 HIGH에서 LOW로 변경된다고 생각합니다. 실제로는 그렇지 않습니다. 기계적 및 물리적 특성 때문에 버튼(또는 스위치)의 상태는 LOW와 HIGH 사이에서 여러 번 전환될 수 있습니다. 이러한 현상을 채터링이라고 합니다. 채터링은 한 번의 누름이 여러 번의 누름으로 인식되어 특정 응용 프로그램에서 오작동을 초래할 수 있습니다.
이 문제를 방지하는 방법은 디바운싱(debouncing) 또는 디바운스(debounce)라고 합니다. 이 튜토리얼은 Raspberry Pi와 버튼을 사용할 때 이를 수행하는 방법을 알려줍니다. 우리는 아래 단계들을 통해 배울 것입니다:
Python 스크립트 파일 button_without_debounce.py을(를) 생성하고 다음 코드를 추가하세요:
/* * 이 라즈베리 파이 코드는 newbiely.kr 에서 개발되었습니다 * 이 라즈베리 파이 코드는 어떠한 제한 없이 공개 사용을 위해 제공됩니다. * 상세한 지침 및 연결도에 대해서는 다음을 방문하세요: * https://newbiely.kr/tutorials/raspberry-pi/raspberry-pi-button-debounce */import RPi.GPIOasGPIOimport time# Set the GPIO mode to BCMGPIO.setmode(GPIO.BCM)# Define the GPIO pin for your buttonBUTTON_PIN = 16# Set the initial state and pull-up resistor for the buttonGPIO.setup(BUTTON_PIN, GPIO.IN, pull_up_down=GPIO.PUD_UP)# Initialize the button statebutton_state = GPIO.input(BUTTON_PIN)try:# Main loopwhileTrue:# Read the current button state current_state = GPIO.input(BUTTON_PIN)# Check if the button state has changed and print when it doesif current_state != button_state:if current_state == GPIO.HIGH:print("Button released")else:print("Button pressed") button_state = current_state time.sleep(0.1) # Adjust the sleep time as neededexceptKeyboardInterrupt:# Clean up GPIO on exitGPIO.cleanup()
파일을 저장하고 터미널에서 다음 명령을 실행하여 Python 스크립트를 실행하십시오:
python3 button_without_debounce.py
스크립트는 터미널에서 Ctrl + C를 누를 때까지 무한 루프로 계속 실행됩니다.
버튼을 몇 초간 눌렀다가 놓으세요.
터미널에서 결과를 확인하세요.
PuTTY - Raspberry Pi
Button pressed
Button pressed
Button pressed
Button released
Button released
때때로 버튼을 한 번만 눌렀다 놓았을 때도 라즈베리 파이는 이를 여러 번 눌렀다 놓은 것으로 인식합니다. 이것이 튜토리얼의 시작 부분에서 언급된 채터링 현상입니다. 다음 부분에서 이를 해결하는 방법을 알아보겠습니다.
버튼 읽기와 디바운스
자세한 사용 방법
Python 스크립트 파일 button_debounce.py을(를) 생성하고 다음 코드를 추가하세요:
/* * 이 라즈베리 파이 코드는 newbiely.kr 에서 개발되었습니다 * 이 라즈베리 파이 코드는 어떠한 제한 없이 공개 사용을 위해 제공됩니다. * 상세한 지침 및 연결도에 대해서는 다음을 방문하세요: * https://newbiely.kr/tutorials/raspberry-pi/raspberry-pi-button-debounce */import RPi.GPIOasGPIO# Set the GPIO mode to BCMGPIO.setmode(GPIO.BCM)# Define the GPIO pin for your buttonBUTTON_PIN = 16# Define debounce time in millisecondsDEBOUNCE_TIME_MS = 200 # 200 milliseconds# Set the initial state and pull-up resistor for the buttonGPIO.setup(BUTTON_PIN, GPIO.IN, pull_up_down=GPIO.PUD_UP)# Initialize the button state and previous statebutton_state = GPIO.input(BUTTON_PIN)prev_button_state = button_state# Define a function to handle button pressesdef button_callback(channel):global button_state button_state = GPIO.input(BUTTON_PIN)# Add an event listener for the button pressGPIO.add_event_detect(BUTTON_PIN, GPIO.BOTH, callback=button_callback, bouncetime=DEBOUNCE_TIME_MS)try:# Main loopwhileTrue:# Check if the button state has changedif button_state != prev_button_state:if button_state == GPIO.HIGH:print("Button released")else:print("Button pressed") prev_button_state = button_stateexceptKeyboardInterrupt:# Clean up GPIO on exitGPIO.cleanup()
파일을 저장하고 터미널에서 다음 명령어를 실행하여 Python 스크립트를 실행하세요:
python3 button_debounce.py
버튼을 몇 초 동안 누르고 있다가 놓으세요.
결과를 확인하려면 터미널을 확인하세요.
PuTTY - Raspberry Pi
Button pressed
Button released
보시다시피 버튼을 한 번만 눌렀다가 뗐습니다. 라즈베리 파이는 이를 단일 누름 및 뗌으로 감지하여 불필요한 잡음을 제거합니다.
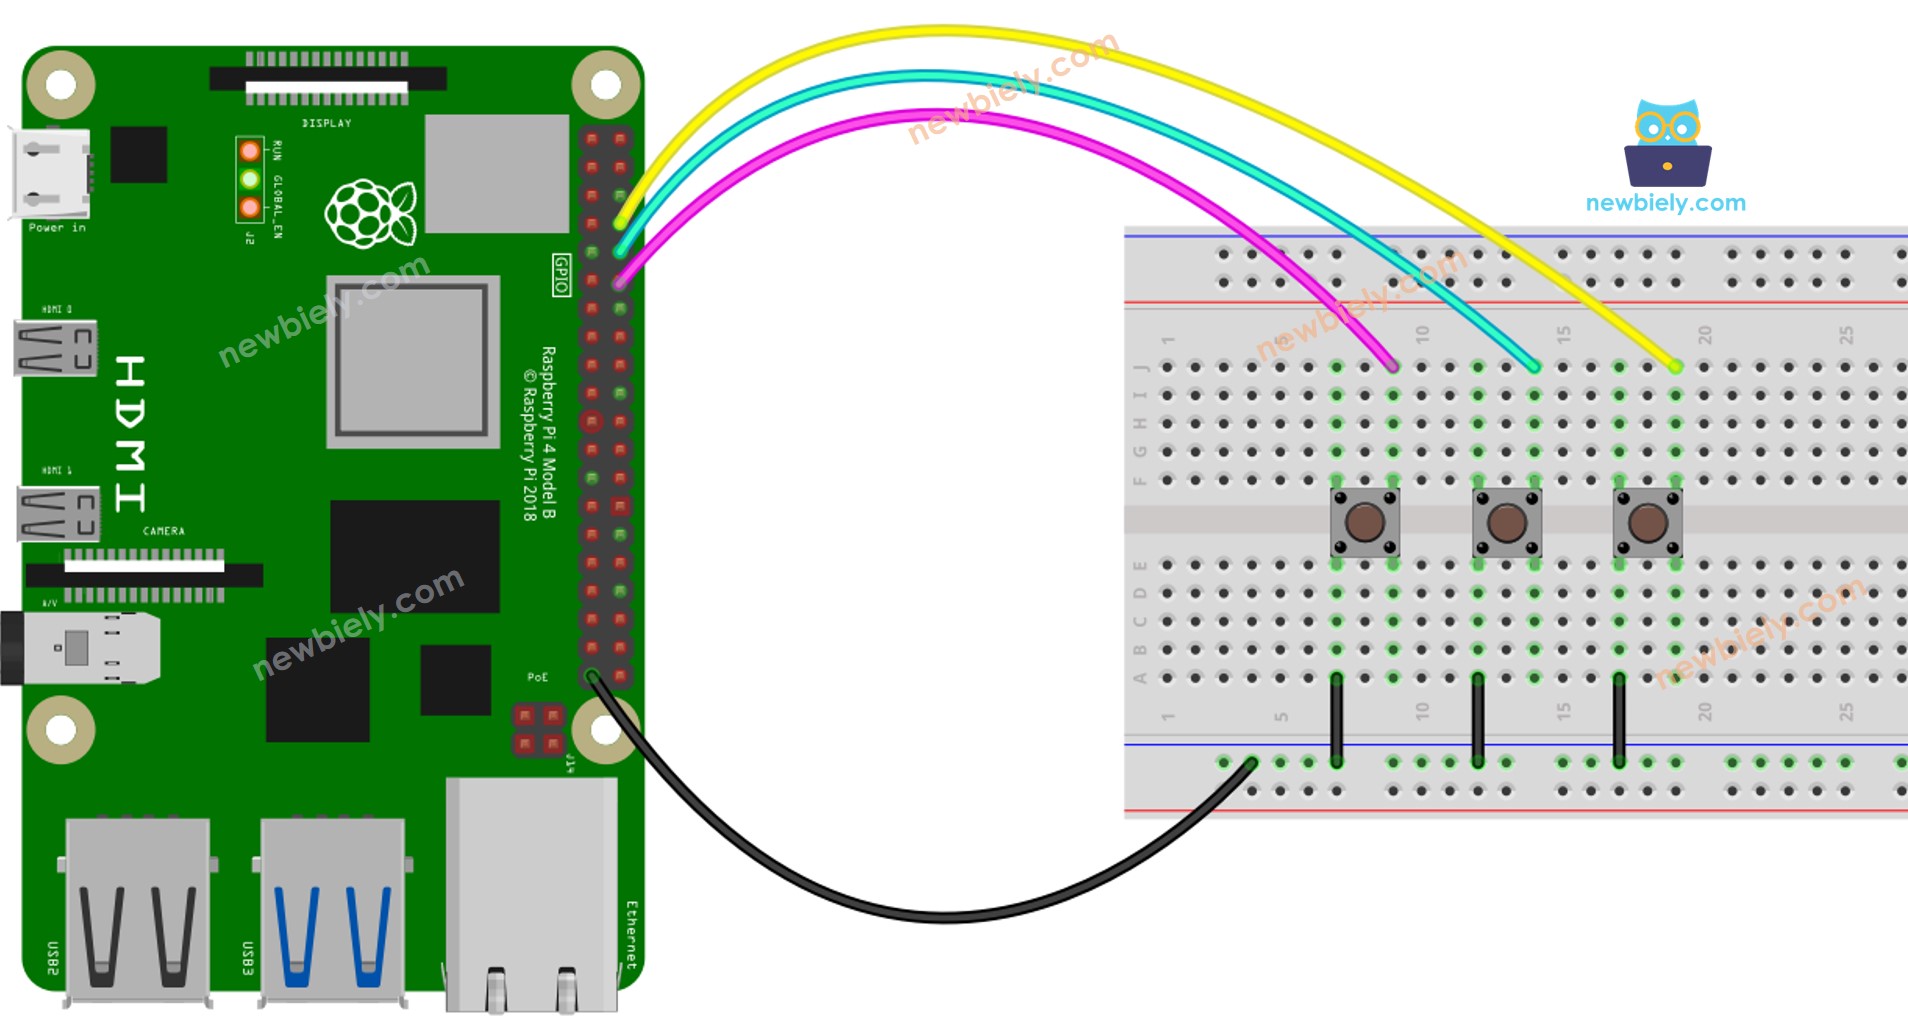
여러 버튼의 Raspberry Pi 버튼 디바운스
/* * 이 라즈베리 파이 코드는 newbiely.kr 에서 개발되었습니다 * 이 라즈베리 파이 코드는 어떠한 제한 없이 공개 사용을 위해 제공됩니다. * 상세한 지침 및 연결도에 대해서는 다음을 방문하세요: * https://newbiely.kr/tutorials/raspberry-pi/raspberry-pi-button-debounce */import RPi.GPIOasGPIO# Set the GPIO mode to BCMGPIO.setmode(GPIO.BCM)# Define the GPIO pins for your buttonsBUTTON_PIN_1 = 14BUTTON_PIN_2 = 15BUTTON_PIN_3 = 18# Define debounce time in millisecondsDEBOUNCE_TIME_MS = 200 # 200 milliseconds# Set the initial state and pull-up resistor for the buttonsGPIO.setup(BUTTON_PIN_1, GPIO.IN, pull_up_down=GPIO.PUD_UP)GPIO.setup(BUTTON_PIN_2, GPIO.IN, pull_up_down=GPIO.PUD_UP)GPIO.setup(BUTTON_PIN_3, GPIO.IN, pull_up_down=GPIO.PUD_UP)# Initialize the button states and previous states for all buttonsbutton_state_1 = GPIO.input(BUTTON_PIN_1)button_state_2 = GPIO.input(BUTTON_PIN_2)button_state_3 = GPIO.input(BUTTON_PIN_3)prev_button_state_1 = button_state_1prev_button_state_2 = button_state_2prev_button_state_3 = button_state_3# Define a function to handle button pressesdef button_callback_1(channel):global button_state_1 button_state_1 = GPIO.input(BUTTON_PIN_1)def button_callback_2(channel):global button_state_2 button_state_2 = GPIO.input(BUTTON_PIN_2)def button_callback_3(channel):global button_state_3 button_state_3 = GPIO.input(BUTTON_PIN_3)# Add event listeners for the buttonsGPIO.add_event_detect(BUTTON_PIN_1, GPIO.BOTH, callback=button_callback_1, bouncetime=DEBOUNCE_TIME_MS)GPIO.add_event_detect(BUTTON_PIN_2, GPIO.BOTH, callback=button_callback_2, bouncetime=DEBOUNCE_TIME_MS)GPIO.add_event_detect(BUTTON_PIN_3, GPIO.BOTH, callback=button_callback_3, bouncetime=DEBOUNCE_TIME_MS)try:# Main loopwhileTrue:# Check if the button states have changed and print when they doif button_state_1 != prev_button_state_1:if button_state_1 == GPIO.HIGH:print("Button 1 released")else:print("Button 1 pressed") prev_button_state_1 = button_state_1if button_state_2 != prev_button_state_2:if button_state_2 == GPIO.HIGH:print("Button 2 released")else:print("Button 2 pressed") prev_button_state_2 = button_state_2if button_state_3 != prev_button_state_3:if button_state_3 == GPIO.HIGH:print("Button 3 released")else:print("Button 3 pressed") prev_button_state_3 = button_state_3exceptKeyboardInterrupt:# Clean up GPIO on exitGPIO.cleanup()