라즈베리 파이 난방 시스템
이 튜토리얼은 라즈베리 파이, 가열 요소 및 DS18B20 온도 센서를 사용하여 실내 온도를 조절하는 방법을 안내합니다.
- 온도가 너무 낮으면 라즈베리 파이가 히터를 작동시킬 것입니다.
- 온도가 충분히 따뜻해지면 라즈베리 파이가 히터를 비활성화할 것입니다.
또한, 코드는 DS18B20 센서 대신 DHT11 또는 DHT22, LM35와 같은 다른 온도 센서에 맞게 조정할 수 있습니다.
준비물
| 1 | × | 라즈베리 파이 5 | 쿠팡 | 아마존 | |
| 1 | × | DS18B20 온도 센서 (어댑터 포함) | 쿠팡 | 아마존 | |
| 1 | × | DS18B20 온도 센서(어댑터 없음) | 아마존 | |
| 1 | × | 4.7 kΩ Resistor | 아마존 | |
| 1 | × | 릴레이 | 아마존 | |
| 1 | × | 가열 소자 | 아마존 | |
| 1 | × | 12V 전원 어댑터 | 아마존 | |
| 1 | × | DC 커넥터 전원 연결 잭 플러그 소켓 | 쿠팡 | 아마존 | |
| 1 | × | 점퍼케이블 | 쿠팡 | 아마존 | |
| 1 | × | (추천) 라즈베리 파이용 스크루 터미널 블록 쉴드 | 쿠팡 | 아마존 | |
| 1 | × | (추천) 라즈베리 파이 프로토타이핑 베이스 플레이트 & 브레드보드 키트 | 아마존 | |
| 1 | × | (추천) 라즈베리 파이용 HDMI 터치 스크린 모니터 | 아마존 |
히팅 요소 및 DS18B20 온도 센서에 대하여
이 튜토리얼에서 사용된 히팅 엘리먼트는 12v 전원 공급이 필요합니다. 히팅 엘리먼트에 전원이 공급되면 열이 발생합니다. Raspberry Pi로 히팅 엘리먼트를 제어하려면 그 사이에 릴레이를 삽입해야 합니다.
온도 센서 및 가열 요소(핀아웃, 작동 방식, 프로그래밍 방법 등)에 익숙하지 않은 경우 다음의 튜토리얼이 도움이 될 수 있습니다:
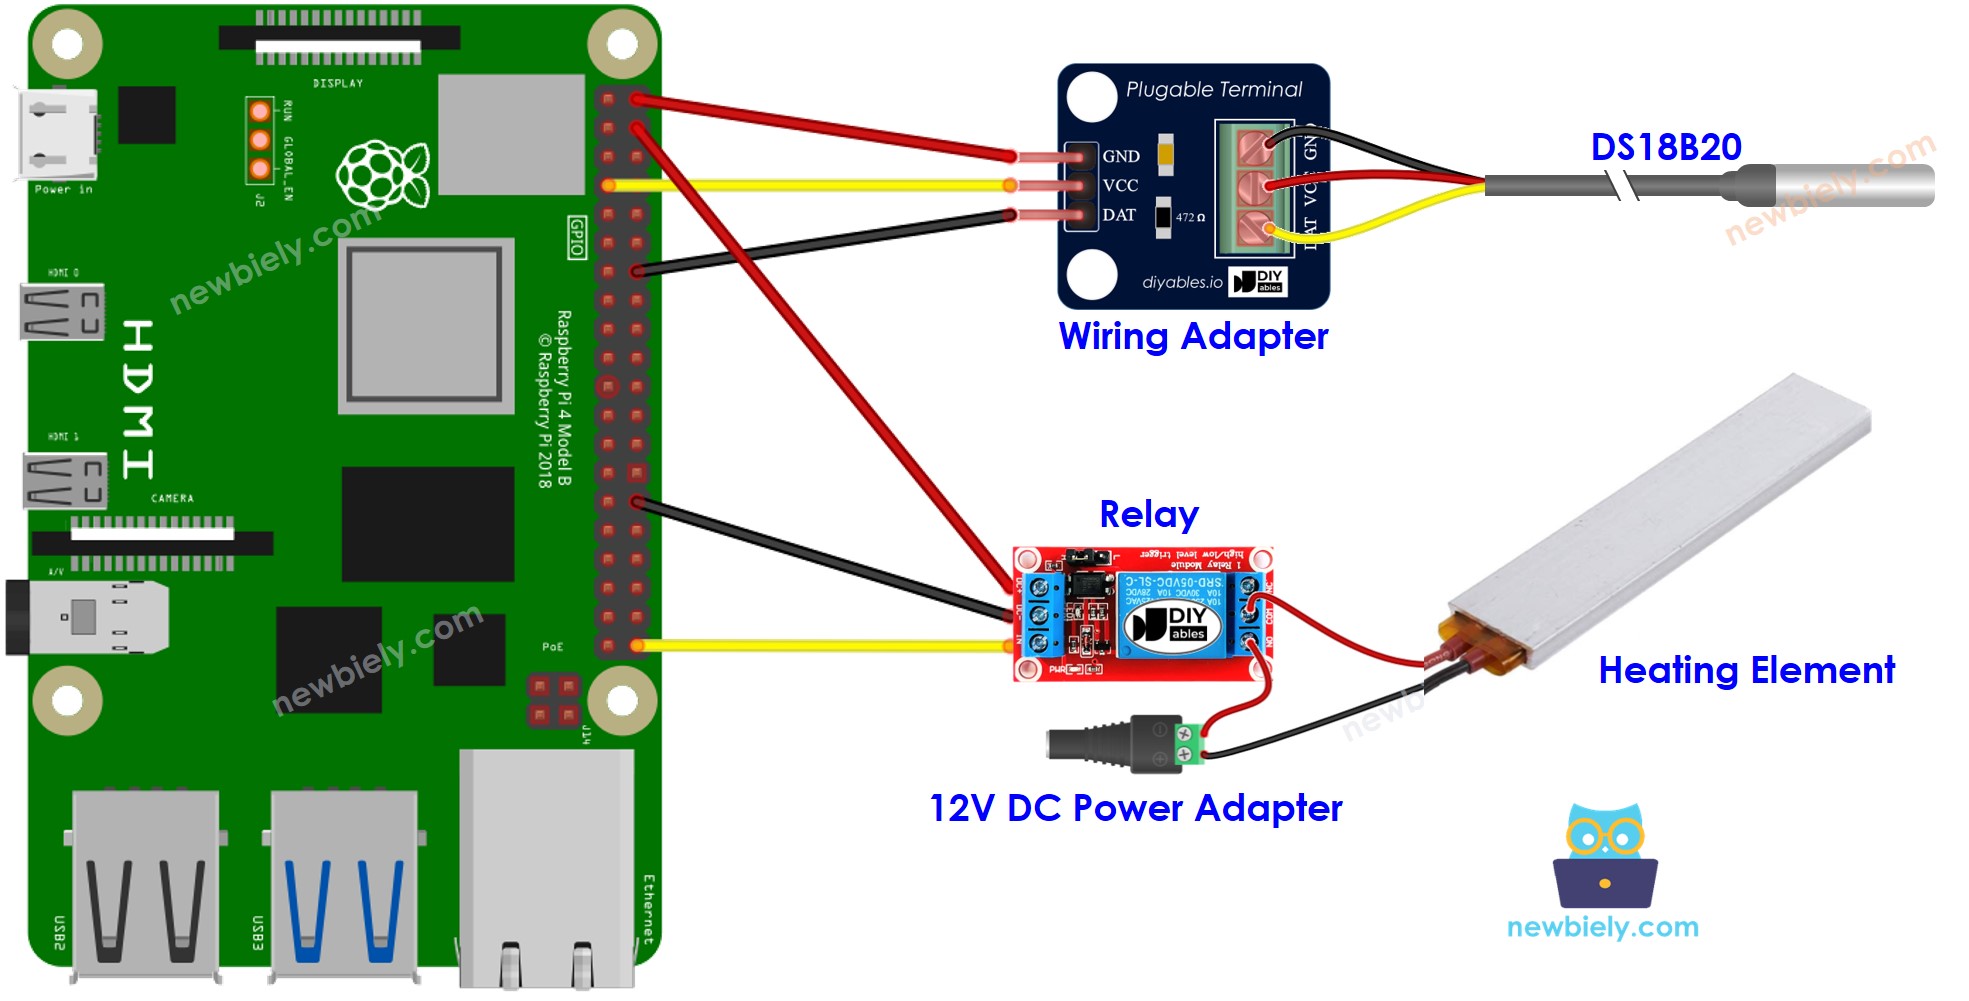
선연결

이 이미지는 Fritzing을 사용하여 만들어졌습니다. 이미지를 확대하려면 클릭하세요.
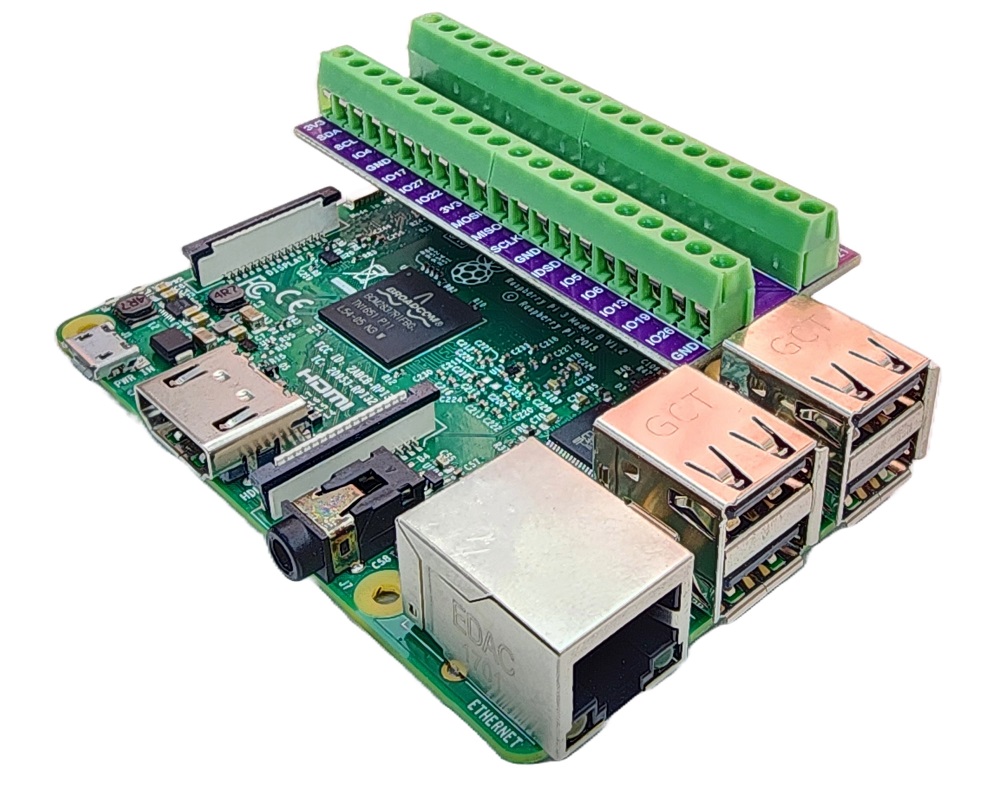
배선 구성을 간단하고 체계적으로 만들기 위해, Raspberry Pi용 스크루 터미널 블록 실드 사용을 권장합니다. 이 실드는 아래와 같이 더욱 안정적이고 관리하기 쉬운 연결을 제공합니다:

시스템 작동 방식
- 라즈베리 파이는 온도 센서로부터 온도를 얻습니다.
- 온도가 일정한 하한선 아래로 떨어지면 라즈베리 파이는 히팅 요소를 활성화합니다.
- 온도가 일정한 상한선을 초과하면 라즈베리 파이는 히팅 요소를 비활성화합니다.
루프가 끝없이 반복됩니다.
DS18B20 센서를 이용한 냉각 시스템을 위한 Raspberry Pi 코드
위 코드에서 온도가 15°C 이하로 떨어지면 Raspberry Pi는 난방 요소를 활성화합니다. 온도가 20°C 이상으로 오를 때까지 활성 상태를 유지합니다.
자세한 사용 방법
- Raspberry Pi에 Raspbian 또는 다른 Raspberry Pi 호환 운영 체제가 설치되어 있는지 확인하세요.
- Raspberry Pi가 PC와 동일한 로컬 네트워크에 연결되어 있는지 확인하세요.
- 라이브러리를 설치해야 하는 경우 Raspberry Pi가 인터넷에 연결되어 있는지 확인하세요.
- Raspberry Pi를 처음 사용하는 경우, 라즈베리 파이 - 소프트웨어 설치을 참조하세요.
- Linux 및 macOS에서는 기본 SSH 클라이언트를 사용하거나 Windows에서는 PuTTY를 사용하여 SSH를 통해 PC를 Raspberry Pi에 연결하세요. PC를 SSH를 통해 Raspberry Pi에 연결하는 방법을 참조하세요.
- RPi.GPIO 라이브러리가 설치되어 있는지 확인하세요. 설치되어 있지 않다면 다음 명령어를 사용하여 설치하세요:
- Raspberry Pi에서 DS18B20 온도 센서를 사용하기 전에 Raspberry Pi에서 1-Wire 인터페이스를 활성화해야 합니다. Raspberry Pi에서 1-Wire 인터페이스 활성화 방법을 참조하세요.
- 다음 명령어를 실행하여 DS18B20 온도 센서용 라이브러리를 설치하세요:
- Python 스크립트 파일 heating.py을(를) 생성하고 다음 코드를 추가하세요:
- 파일을 저장하고 터미널에서 다음 명령어를 실행하여 Python 스크립트를 실행하십시오:
스크립트는 터미널에서 Ctrl + C를 누를 때까지 계속 무한 루프로 실행됩니다.
- 센서 주변 지역의 온도를 변경하세요.
- 히팅 요소와 방의 온도를 확인하세요.
고급 지식
위 기술은 신호기 또는 "뱅뱅" 컨트롤러라고도 하는 온오프 컨트롤러입니다. 이 방법은 실행하기 매우 쉽습니다.
PID 컨트롤러라는 대체 접근 방식이 존재합니다. 이 온도 조절 방법은 더 안정적이지만 복잡하고 널리 사용되지 않습니다. 따라서 PID 컨트롤러는 온도 조절에 인기 있는 선택이 아닙니다.
