라즈베리 파이 버튼 LED
이 튜토리얼은 Raspberry Pi와 버튼을 사용하여 LED를 제어하는 방법을 안내합니다. 우리는 두 가지 다른 응용 프로그램을 배울 것입니다:
애플리케이션 1 - LED 상태는 버튼 상태와 동기화됩니다. 자세히:
- 라즈베리 파이는 버튼이 눌릴 때 LED를 켭니다.
- 라즈베리 파이는 버튼이 눌리지 않을 때 LED를 끕니다.
응용 프로그램 2 - 버튼을 누를 때마다 LED 상태가 전환됩니다. 보다 구체적으로:
- 라즈베리 파이가 버튼이 눌렸음을 감지하면(HIGH 상태에서 LOW 상태로 변경됨), 현재 LED가 꺼져 있으면 켜고, 켜져 있으면 끕니다.
- 버튼을 놓는 것은 LED 상태에 영향을 미치지 않습니다.
응용 프로그램 2에서는 버튼이 제대로 작동하도록 디바운스를 실행해야 합니다. 버튼을 디바운스했을 때와 하지 않았을 때, Raspberry Pi 코드로 LED가 어떻게 작동하는지 비교하여 그 중요성을 알아보겠습니다.
준비물
| 1 | × | 라즈베리 파이 5 | 쿠팡 | 아마존 | |
| 1 | × | 캡이 있는 버튼 | 쿠팡 | 아마존 | |
| 1 | × | 버튼 키트 | 쿠팡 | 아마존 | |
| 1 | × | 패널 장착 푸시 버튼 | 아마존 | |
| 1 | × | 푸시 버튼 모듈 | 아마존 | |
| 1 | × | LED | 쿠팡 | 아마존 | |
| 1 | × | LED Module | 아마존 | |
| 1 | × | 220Ω Resistor | 아마존 | |
| 1 | × | 브레드보드 | 쿠팡 | 아마존 | |
| 1 | × | 점퍼케이블 | 쿠팡 | 아마존 | |
| 1 | × | (추천) 라즈베리 파이용 스크루 터미널 블록 쉴드 | 쿠팡 | 아마존 | |
| 1 | × | (추천) 라즈베리 파이 프로토타이핑 베이스 플레이트 & 브레드보드 키트 | 아마존 | |
| 1 | × | (추천) 라즈베리 파이용 HDMI 터치 스크린 모니터 | 아마존 |
공개: 이 포스팅 에 제공된 일부 링크는 아마존 제휴 링크입니다. 이 포스팅은 쿠팡 파트너스 활동의 일환으로, 이에 따른 일정액의 수수료를 제공받습니다.
LED 및 버튼에 대하여
LED와 버튼에 대해 잘 모른다면(핀배열, 작동, 프로그래밍 포함) 다음 튜토리얼들이 도움이 될 수 있습니다:
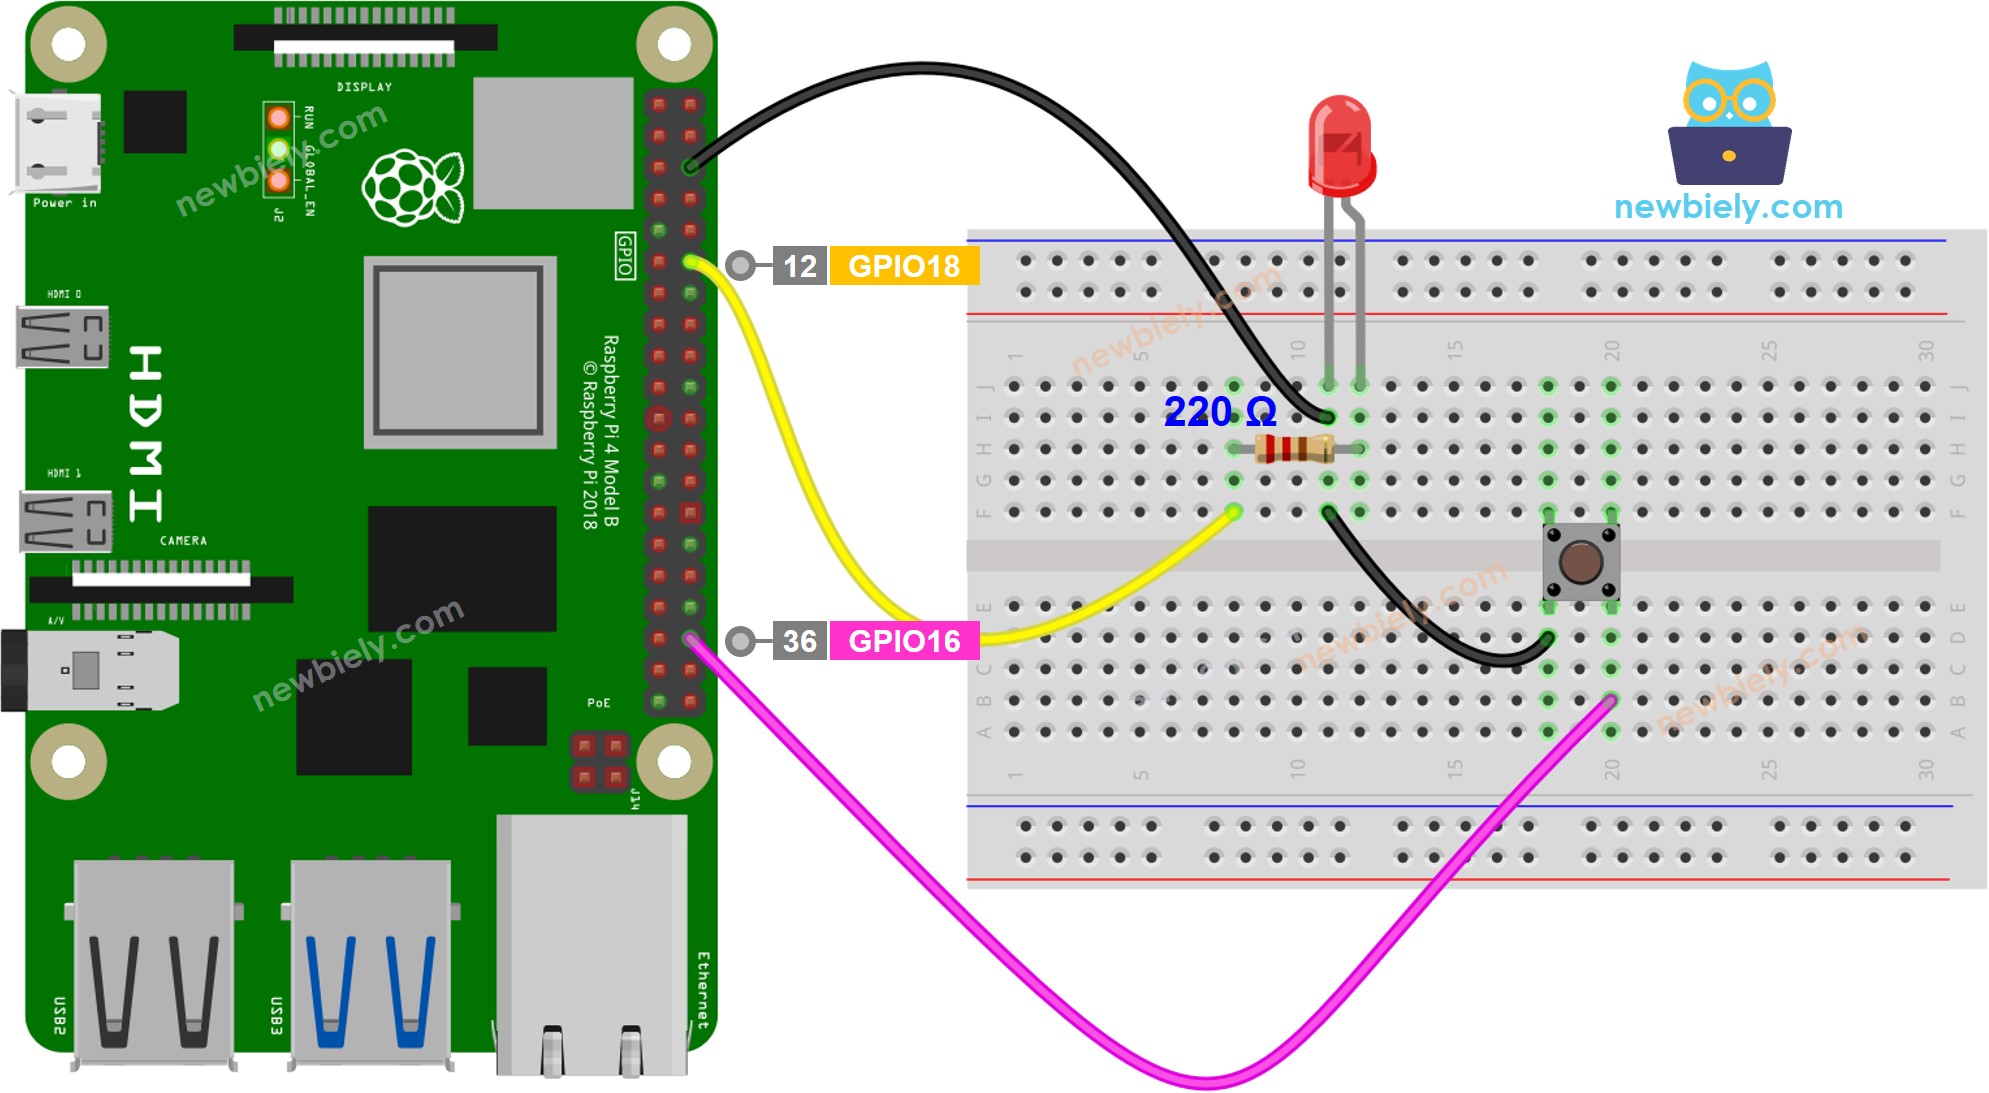
선연결

이 이미지는 Fritzing을 사용하여 만들어졌습니다. 이미지를 확대하려면 클릭하세요.
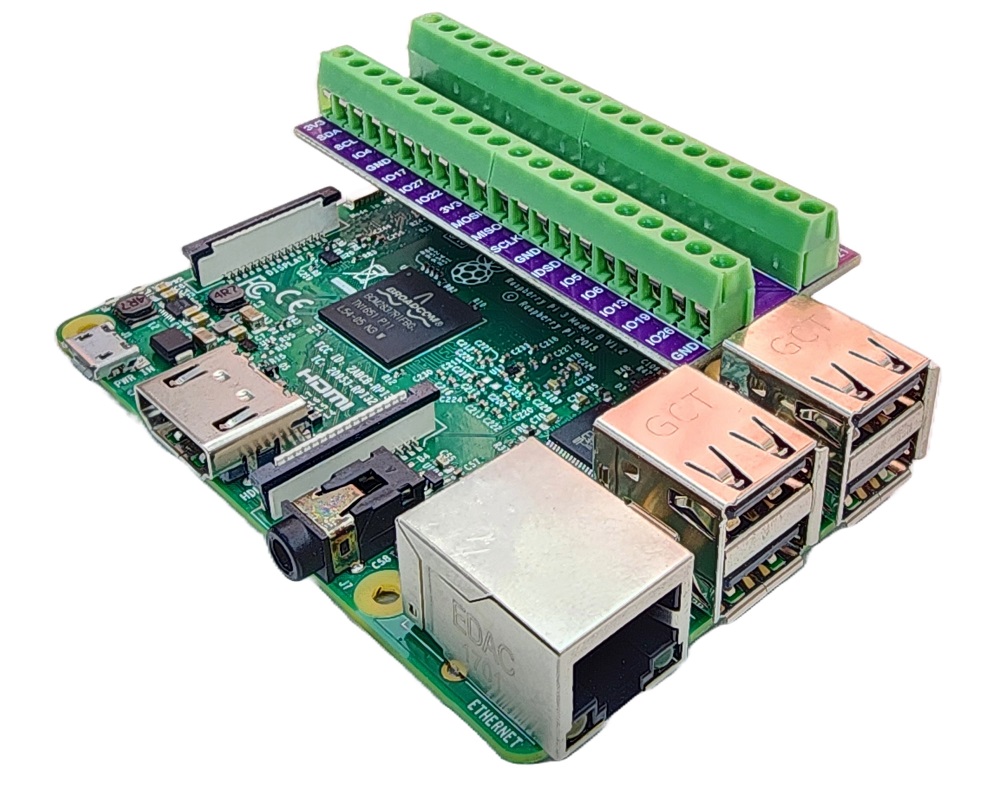
배선 구성을 간단하고 체계적으로 만들기 위해, Raspberry Pi용 스크루 터미널 블록 실드 사용을 권장합니다. 이 실드는 아래와 같이 더욱 안정적이고 관리하기 쉬운 연결을 제공합니다:

애플리케이션 1 - LED 상태는 버튼 상태와 동기화됩니다.
자세한 사용 방법
- Raspberry Pi에 Raspbian 또는 기타 Raspberry Pi 호환 운영 체제가 설치되어 있는지 확인하세요.
- Raspberry Pi가 PC와 동일한 로컬 네트워크에 연결되어 있는지 확인하세요.
- 라이브러리를 설치해야 하는 경우 Raspberry Pi가 인터넷에 연결되어 있는지 확인하세요.
- Raspberry Pi를 처음 사용하는 경우, 라즈베리 파이 - 소프트웨어 설치을 참조하세요.
- Linux와 macOS에서는 기본 SSH 클라이언트를 사용하고 Windows에서는 PuTTY를 사용하여 SSH를 통해 PC를 Raspberry Pi에 연결합니다. SSH를 통해 PC를 Raspberry Pi에 연결하는 방법에 대한 정보는 PC에서 Raspberry Pi에 SSH로 연결하는 방법을 참조하세요.
- RPi.GPIO 라이브러리가 설치되어 있는지 확인하세요. 설치되어 있지 않은 경우 다음 명령어를 사용하여 설치하세요:
sudo apt-get update
sudo apt-get install python3-rpi.gpio
- Python 스크립트 파일 button_led.py을(를) 만들고 다음 코드를 추가하세요:
/*
* 이 라즈베리 파이 코드는 newbiely.kr 에서 개발되었습니다
* 이 라즈베리 파이 코드는 어떠한 제한 없이 공개 사용을 위해 제공됩니다.
* 상세한 지침 및 연결도에 대해서는 다음을 방문하세요:
* https://newbiely.kr/tutorials/raspberry-pi/raspberry-pi-button-led
*/
import RPi.GPIO as GPIO
# Constants won't change. They're used here to set pin numbers:
BUTTON_PIN = 16 # The number of the pushbutton pin
LED_PIN = 18 # The number of the LED pin
# Variables will change:
button_state = 0 # Variable for reading the pushbutton status
# Set up GPIO
GPIO.setmode(GPIO.BCM) # Use BCM GPIO numbering
GPIO.setup(LED_PIN, GPIO.OUT) # Initialize the LED pin as an output
GPIO.setup(BUTTON_PIN, GPIO.IN, pull_up_down=GPIO.PUD_UP) # Initialize the pushbutton pin as a pull-up input
try:
while True:
# Read the state of the pushbutton value:
button_state = GPIO.input(BUTTON_PIN)
# Control LED according to the state of the button
if button_state == GPIO.LOW: # If the button is pressed
GPIO.output(LED_PIN, GPIO.HIGH) # Turn on LED
else: # Otherwise, the button is not pressed
GPIO.output(LED_PIN, GPIO.LOW) # Turn off LED
except KeyboardInterrupt:
# Clean up GPIO on program exit
GPIO.cleanup()
- 파일을 저장하고 터미널에서 다음 명령어를 실행하여 Python 스크립트를 실행하세요:
python3 button_led.py
- 버튼을 누른 상태로 몇 초간 유지하세요.
- LED 상태의 변화를 확인하세요. 버튼 상태와 LED 상태가 동기화된 것을 볼 수 있습니다.
스크립트는 터미널에서 Ctrl + C를 누를 때까지 무한 루프로 계속 실행됩니다.
코드 설명
소스 코드 주석에 포함된 자세한 설명을 확인하세요!
애플리케이션 2 - 버튼으로 LED 토글
자세한 사용 방법
- Python 스크립트 파일 button_toggle_led.py을 생성하고 다음 코드를 추가하십시오:
/*
* 이 라즈베리 파이 코드는 newbiely.kr 에서 개발되었습니다
* 이 라즈베리 파이 코드는 어떠한 제한 없이 공개 사용을 위해 제공됩니다.
* 상세한 지침 및 연결도에 대해서는 다음을 방문하세요:
* https://newbiely.kr/tutorials/raspberry-pi/raspberry-pi-button-led
*/
import RPi.GPIO as GPIO
import time
# Constants won't change
BUTTON_PIN = 16 # The number of the pushbutton pin
LED_PIN = 18 # The number of the LED pin
# Variables will change
led_state = GPIO.LOW # The current state of the LED
prev_button_state = GPIO.LOW # The previous state of the button
button_state = GPIO.LOW # The current state of the button
# Set up GPIO
GPIO.setmode(GPIO.BCM) # Use BCM GPIO numbering
GPIO.setup(LED_PIN, GPIO.OUT) # Initialize the LED pin as an output
GPIO.setup(BUTTON_PIN, GPIO.IN, pull_up_down=GPIO.PUD_UP) # Initialize the pushbutton pin as a pull-up input
try:
while True:
# Read the state of the pushbutton value
prev_button_state = button_state # Save the last state
button_state = GPIO.input(BUTTON_PIN) # Read new state
if prev_button_state == GPIO.HIGH and button_state == GPIO.LOW:
time.sleep(0.1) # 100 milliseconds debounce time
print("The button is pressed")
# Toggle the state of the LED
if led_state == GPIO.LOW:
led_state = GPIO.HIGH
else:
led_state = GPIO.LOW
# Control LED according to the toggled state
GPIO.output(LED_PIN, led_state)
except KeyboardInterrupt:
# Clean up GPIO on program exit
GPIO.cleanup()
- 파일을 저장하고 터미널에서 다음 명령어를 실행하여 Python 스크립트를 실행하세요.
python3 button_toggle_led.py
- 버튼을 여러 번 눌렀다 놓으세요.
- LED의 상태 변화를 확인하세요. 버튼을 누를 때마다 LED의 상태가 변하는 것을 볼 수 있습니다.
코드 설명
소스 코드의 주석에 포함된 줄별 설명을 확인해 보세요!
동영상
비디오 제작은 시간이 많이 걸리는 작업입니다. 비디오 튜토리얼이 학습에 도움이 되었다면, YouTube 채널 을 구독하여 알려 주시기 바랍니다. 비디오에 대한 높은 수요가 있다면, 비디오를 만들기 위해 노력하겠습니다.
