라즈베리 파이 가변저항 피에조 버저
이 튜토리얼은 Raspberry Pi와 가변 저항기를 사용하여 피에조 부저를 제어하는 방법을 안내합니다. 자세히:
- 라즈베리 파이는 가변 저항기의 아날로그 값이 임계값 이상 또는 이하인지 판단하고 이에 따라 소리를 냅니다.
- 라즈베리 파이는 가변 저항기의 출력 전압이 임계값 이상 또는 이하인지 판단하고 이에 따라 소리를 냅니다.
- 가변 저항기의 출력 전압이 임계값보다 크면, 라즈베리 파이는 곡의 멜로디를 재생할 수도 있습니다.
준비물
| 1 | × | 라즈베리 파이 5 | 쿠팡 | 아마존 | |
| 1 | × | 포텐셔미터 | 쿠팡 | 아마존 | |
| 1 | × | 노브가 있는 포텐셔미터 모듈 | 쿠팡 | 아마존 | |
| 1 | × | ADS1115 ADC 모듈 | 아마존 | |
| 1 | × | 3-24V 능동 피에조 버저 (Active Piezo Buzzer) | 쿠팡 | 아마존 | |
| 1 | × | 능동 피에조 버저 모듈 (Active Piezo Buzzer) | 쿠팡 | 아마존 | |
| 1 | × | 수동 피에조 버저 모듈 (Passive Piezo Buzzer Module) | 쿠팡 | 아마존 | |
| 1 | × | 브레드보드 | 쿠팡 | 아마존 | |
| 1 | × | 점퍼케이블 | 쿠팡 | 아마존 | |
| 1 | × | (추천) 라즈베리 파이용 스크루 터미널 블록 쉴드 | 쿠팡 | 아마존 | |
| 1 | × | (추천) 라즈베리 파이 프로토타이핑 베이스 플레이트 & 브레드보드 키트 | 아마존 | |
| 1 | × | (추천) 라즈베리 파이용 HDMI 터치 스크린 모니터 | 아마존 |
공개: 이 포스팅 에 제공된 일부 링크는 아마존 제휴 링크입니다. 이 포스팅은 쿠팡 파트너스 활동의 일환으로, 이에 따른 일정액의 수수료를 제공받습니다.
피에조 버저 및 가변 저항기에 대하여
피에조 버저와 가변 저항기(핀 배치, 작동, 프로그래밍 포함)에 익숙하지 않다면, 다음 튜토리얼이 도움이 될 수 있습니다:
선연결
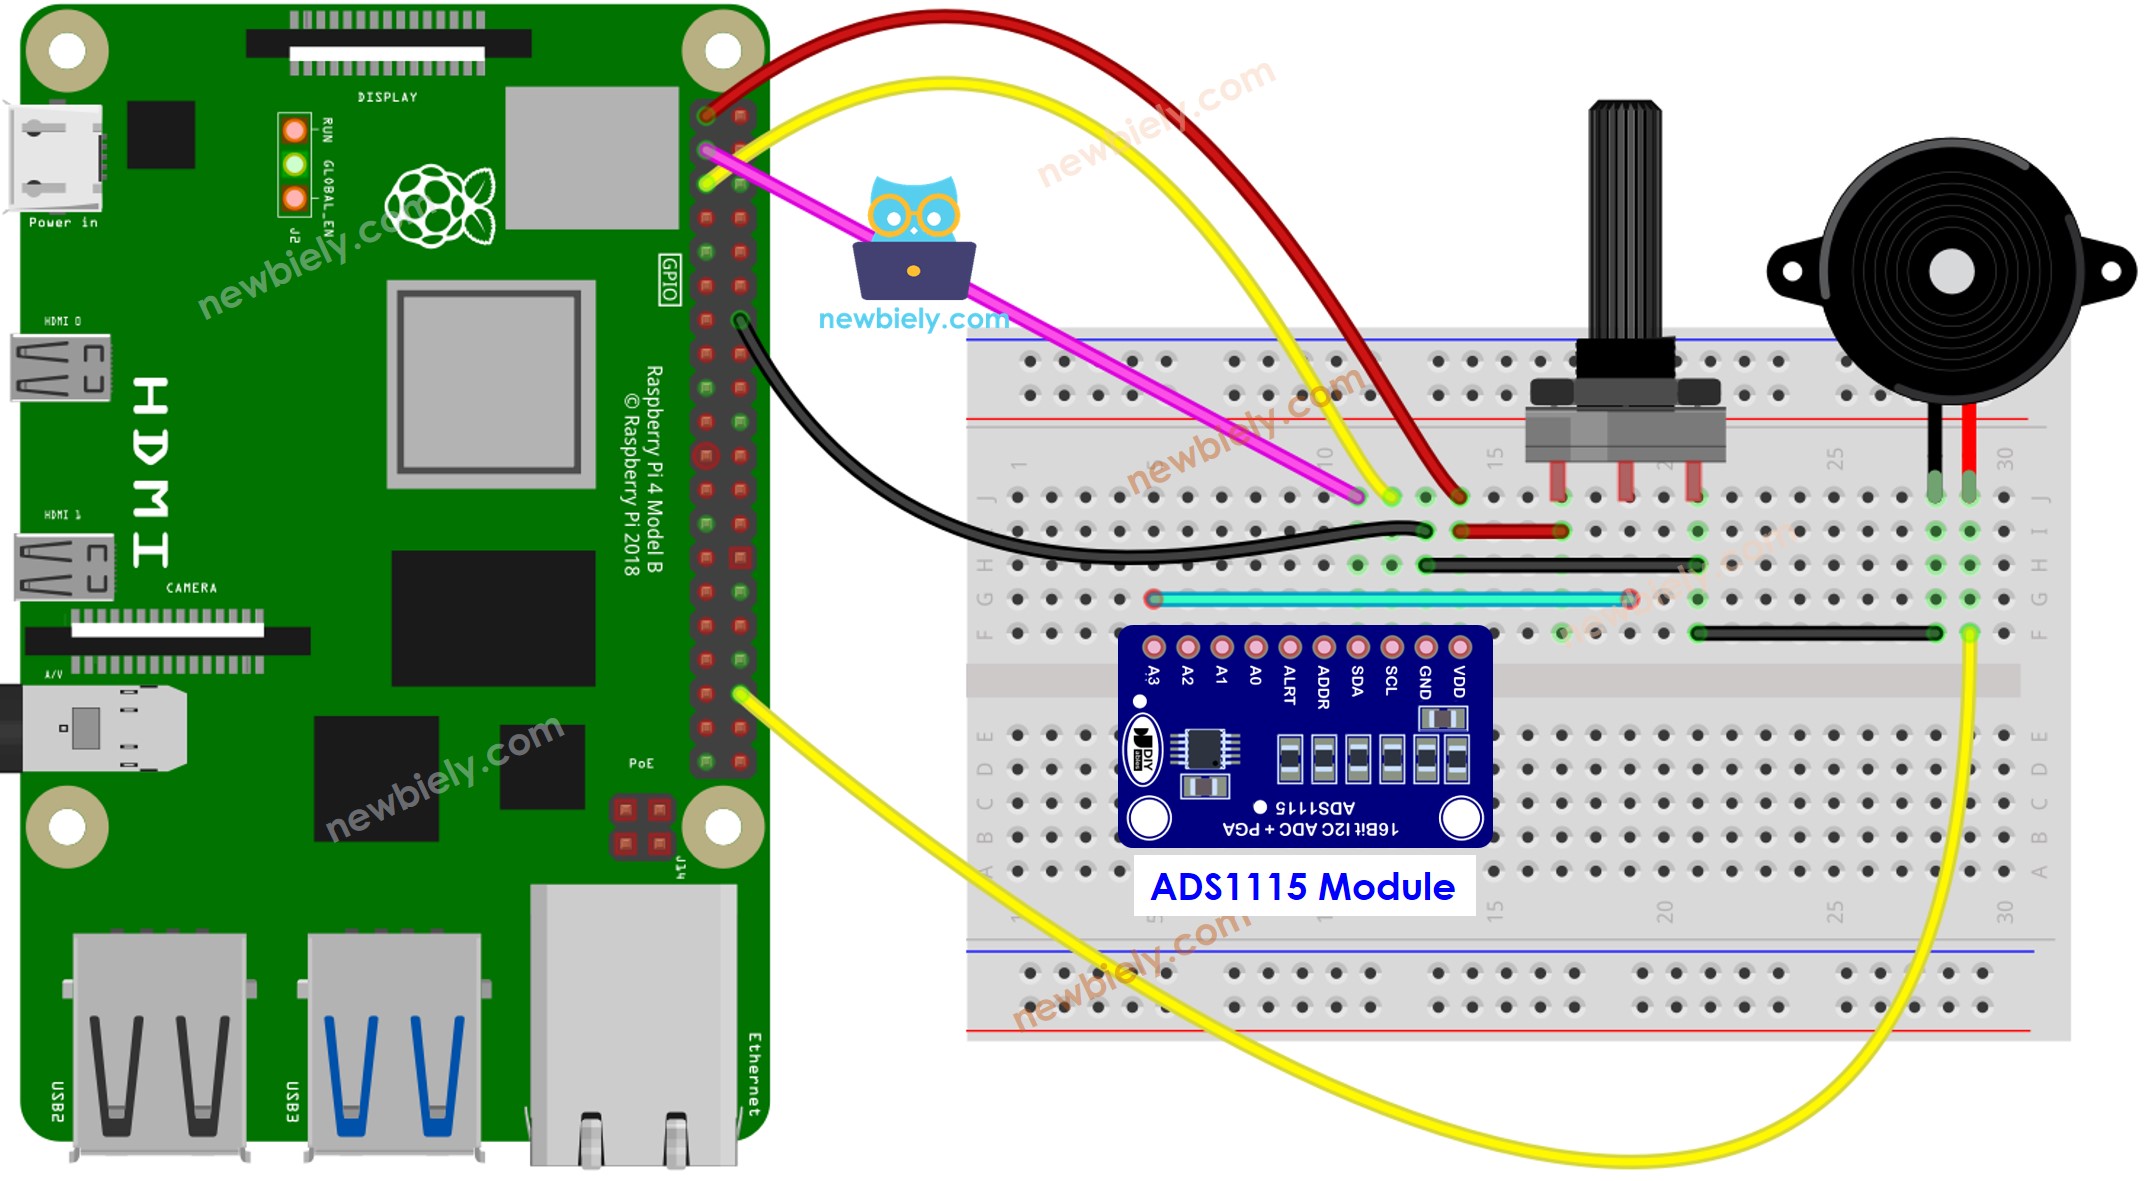
이 이미지는 Fritzing을 사용하여 만들어졌습니다. 이미지를 확대하려면 클릭하세요.
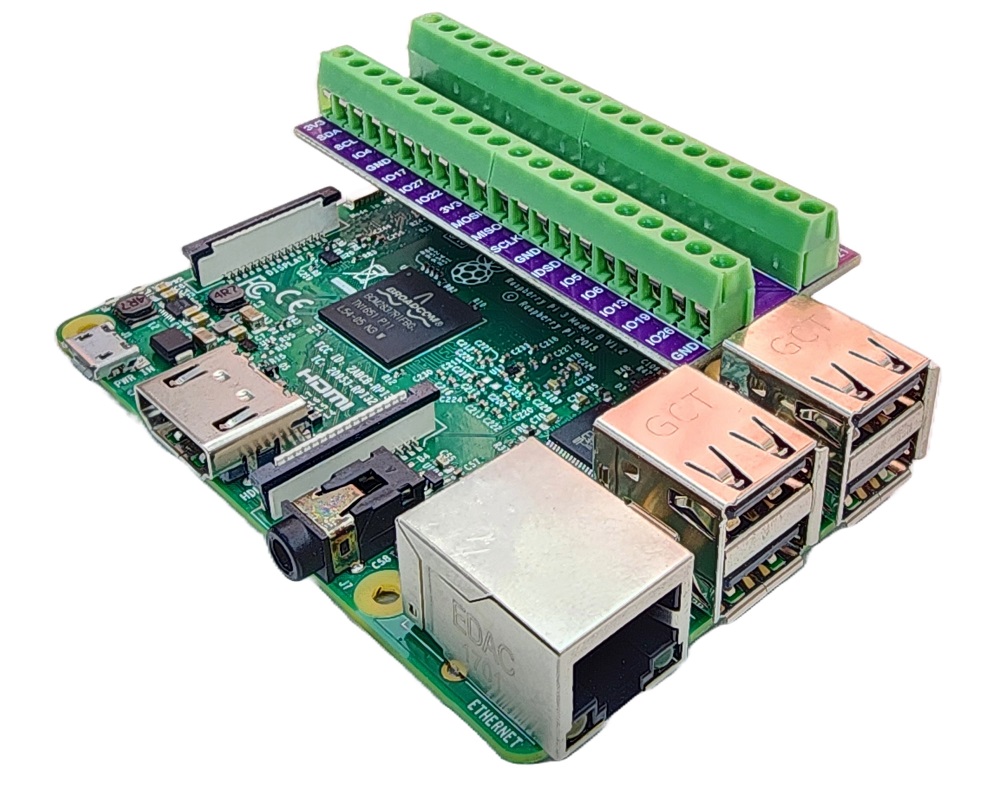
배선 구성을 간단하고 체계적으로 만들기 위해, Raspberry Pi용 스크루 터미널 블록 실드 사용을 권장합니다. 이 실드는 아래와 같이 더욱 안정적이고 관리하기 쉬운 연결을 제공합니다:
라즈베리 파이 코드 - 간단한 사운드
자세한 사용 방법
- Raspberry Pi에 Raspbian 또는 다른 호환 운영 체제가 설치되어 있는지 확인하세요.
- Raspberry Pi가 PC와 동일한 로컬 네트워크에 연결되어 있는지 확인하세요.
- 라이브러리를 설치해야 하는 경우 Raspberry Pi가 인터넷에 연결되어 있는지 확인하세요.
- Raspberry Pi를 처음 사용하는 경우, 라즈베리 파이 - 소프트웨어 설치을 참조하세요.
- Linux 및 macOS의 내장 SSH 클라이언트 또는 Windows의 PuTTY를 사용하여 SSH를 통해 PC를 Raspberry Pi에 연결하세요. SSH를 통해 PC를 Raspberry Pi에 연결하는 방법을 참조하세요.
- RPi.GPIO 라이브러리가 설치되어 있는지 확인하세요. 설치되어 있지 않으면 다음 명령어를 사용하여 설치하세요:
sudo apt-get update
sudo apt-get install python3-rpi.gpio
- Raspberry Pi 터미널에서 다음 명령어를 실행하여 Adafruit_ADS1x15 라이브러리를 설치합니다:
sudo pip install Adafruit-ADS1x15
- Python 스크립트 파일 potentiometer_buzzer.py을 생성하고 다음 코드를 추가하세요:
/*
* 이 라즈베리 파이 코드는 newbiely.kr 에서 개발되었습니다
* 이 라즈베리 파이 코드는 어떠한 제한 없이 공개 사용을 위해 제공됩니다.
* 상세한 지침 및 연결도에 대해서는 다음을 방문하세요:
* https://newbiely.kr/tutorials/raspberry-pi/raspberry-pi-potentiometer-piezo-buzzer
*/
import time
import RPi.GPIO as GPIO
import Adafruit_ADS1x15
# Constants
ADC_CHANNEL = 0 # Analog channel on ADS1015
GAIN = 1 # Gain (1, 2/3, 1, 2, 4, 8, 16)
BUZZER_PIN = 23 # Raspberry Pi GPIO pin connected to the piezo buzzer
# Threshold for triggering the buzzer
THRESHOLD = 700 # Adjust this value based on your requirement
# Setup GPIO
GPIO.setmode(GPIO.BCM)
GPIO.setup(BUZZER_PIN, GPIO.OUT)
# Create ADS1x15 instance
ads = Adafruit_ADS1x15.ADS1015()
try:
while True:
# Read the raw ADC value from the potentiometer
pot_value = ads.read_adc(ADC_CHANNEL, gain=GAIN)
# Trigger the buzzer if the analog value is greater than the threshold
if pot_value > THRESHOLD:
GPIO.output(BUZZER_PIN, GPIO.HIGH)
else:
GPIO.output(BUZZER_PIN, GPIO.LOW)
print(f"Potentiometer Value: {pot_value}")
time.sleep(0.1)
except KeyboardInterrupt:
GPIO.output(BUZZER_PIN, GPIO.LOW) # Turn off the buzzer before cleanup
GPIO.cleanup()
- 파일을 저장하고 터미널에서 다음 명령을 실행하여 Python 스크립트를 실행하세요:
python3 potentiometer_buzzer.py
- 가변저항 노브를 돌리세요.
- 피에조 버저에서 나오는 소리를 들으세요.
스크립트는 터미널에서 Ctrl + C를 누를 때까지 무한 루프로 계속 실행됩니다.
코드 설명
소스 코드의 주석에 포함된 한 줄씩 설명을 확인하세요!
라즈베리 파이가 노래 멜로디를 연주합니다.
포텐셔미터가 임계값으로 회전되면 "징글벨" 멜로디를 재생합시다.
자세한 사용 방법
- 파이썬 스크립트 파일 potentiometer_buzzer_song.py을 생성하고 다음 코드를 추가하십시오.
/*
* 이 라즈베리 파이 코드는 newbiely.kr 에서 개발되었습니다
* 이 라즈베리 파이 코드는 어떠한 제한 없이 공개 사용을 위해 제공됩니다.
* 상세한 지침 및 연결도에 대해서는 다음을 방문하세요:
* https://newbiely.kr/tutorials/raspberry-pi/raspberry-pi-potentiometer-piezo-buzzer
*/
import time
import RPi.GPIO as GPIO
import Adafruit_ADS1x15
# Constants
ADC_CHANNEL = 0 # Analog channel on ADS1015
GAIN = 1 # Gain (1, 2/3, 1, 2, 4, 8, 16)
BUZZER_PIN = 23 # Raspberry Pi GPIO pin connected to the piezo buzzer
# Threshold for triggering the buzzer
THRESHOLD = 700 # Adjust this value based on your requirement
# Setup GPIO
GPIO.setmode(GPIO.BCM)
GPIO.setup(BUZZER_PIN, GPIO.OUT)
# Create ADS1x15 instance
ads = Adafruit_ADS1x15.ADS1015()
# Constants for note names and their corresponding frequencies
C4 = 261
D4 = 293
E4 = 329
F4 = 349
G4 = 392
A4 = 440
B4 = 493
# Dictionary to map numeric values to note names
note_names = {
C4: "C4",
D4: "D4",
E4: "E4",
F4: "F4",
G4: "G4",
A4: "A4",
B4: "B4",
}
# List of notes in the "Jingle Bells" melody
melody = [
E4, E4, E4, E4, E4, E4, E4, G4, C4, D4, E4, F4, F4, F4, F4, F4, E4, E4, E4, E4, E4, D4, D4, E4, D4, G4
]
# List of note durations (in milliseconds)
note_durations = [
200, 200, 400, 200, 200, 400, 200, 200, 200, 200, 200, 200, 200, 400, 200, 200, 200, 200, 200, 200, 200, 200, 200, 400, 200, 200
]
# Pause duration between notes (in milliseconds)
pause_duration = 300
def play_tone(pin, frequency, duration):
# Calculate the period based on the frequency
period = 1.0 / frequency
# Calculate the time for half of the period
half_period = period / 2.0
# Calculate the number of cycles for the given duration
cycles = int(duration / period)
for _ in range(cycles):
# Set the GPIO pin to HIGH
GPIO.output(pin, GPIO.HIGH)
# Wait for half of the period
time.sleep(half_period)
# Set the GPIO pin to LOW
GPIO.output(pin, GPIO.LOW)
# Wait for the other half of the period
time.sleep(half_period)
def play_jingle_bells():
for i in range(len(melody)):
note_duration = note_durations[i] / 1000.0
note_freq = melody[i]
note_name = note_names.get(note_freq, "Pause")
print(f"Playing {note_name} (Frequency: {note_freq} Hz) for {note_duration} seconds")
play_tone(BUZZER_PIN, note_freq, note_duration)
time.sleep(pause_duration / 1000.0)
GPIO.output(BUZZER_PIN, GPIO.LOW)
try:
while True:
# Read the raw ADC value from the potentiometer
pot_value = ads.read_adc(ADC_CHANNEL, gain=GAIN)
# Trigger the buzzer if the analog value is greater than the threshold
if pot_value > THRESHOLD:
GPIO.output(BUZZER_PIN, GPIO.HIGH)
else:
GPIO.output(BUZZER_PIN, GPIO.LOW)
print(f"Potentiometer Value: {pot_value}")
time.sleep(0.1)
except KeyboardInterrupt:
GPIO.output(BUZZER_PIN, GPIO.LOW) # Turn off the buzzer before cleanup
GPIO.cleanup()
- 파일을 저장하고 터미널에서 다음 명령어를 실행하여 Python 스크립트를 실행하세요:
python3 potentiometer_buzzer_song.py
- 가변 저항기를 돌리세요.
- 피에조 버저에서 나오는 노래를 들으세요.
코드 설명
소스 코드 주석에 포함된 한 줄씩 설명을 확인해 보세요!
동영상
비디오 제작은 시간이 많이 걸리는 작업입니다. 비디오 튜토리얼이 학습에 도움이 되었다면, YouTube 채널 을 구독하여 알려 주시기 바랍니다. 비디오에 대한 높은 수요가 있다면, 비디오를 만들기 위해 노력하겠습니다.


