라즈베리 파이 피에조 부저
이 자습서는 라즈베리 파이를 사용하여 피에조 부저를 제어하는 방법을 설명합니다. 자세히 알아볼 내용은 다음과 같습니다:
- 피에조 버저의 작동 원리
- 피에조 버저를 라즈베리 파이 보드에 연결하는 방법
- 피에조 버저가 소리를 내도록 라즈베리 파이를 프로그래밍하는 방법
- 피에조 버저가 노래 멜로디를 재생하도록 라즈베리 파이를 프로그래밍하는 방법
준비물
| 1 | × | 라즈베리 파이 5 | 쿠팡 | 아마존 | |
| 1 | × | 3-24V 능동 피에조 버저 (Active Piezo Buzzer) | 쿠팡 | 아마존 | |
| 1 | × | 능동 피에조 버저 모듈 (Active Piezo Buzzer) | 쿠팡 | 아마존 | |
| 1 | × | 수동 피에조 버저 모듈 (Passive Piezo Buzzer Module) | 쿠팡 | 아마존 | |
| 1 | × | 브레드보드 | 쿠팡 | 아마존 | |
| 1 | × | 점퍼케이블 | 쿠팡 | 아마존 | |
| 1 | × | (추천) 라즈베리 파이용 스크루 터미널 블록 쉴드 | 쿠팡 | 아마존 | |
| 1 | × | (추천) 라즈베리 파이 프로토타이핑 베이스 플레이트 & 브레드보드 키트 | 아마존 | |
| 1 | × | (추천) 라즈베리 파이용 HDMI 터치 스크린 모니터 | 아마존 |
공개: 이 포스팅 에 제공된 일부 링크는 아마존 제휴 링크입니다. 이 포스팅은 쿠팡 파트너스 활동의 일환으로, 이에 따른 일정액의 수수료를 제공받습니다.
피에조 부저에 대하여
피에조 부저는 소리, 비프음, 또는 노래의 멜로디를 생성하는 데 사용됩니다.
시장에는 두 가지 용도로 사용될 수 있는 3V-24V 능동 부저가 있습니다: 3-5V 능동 부저 및 고전압 부저(12V 이상)로 기능합니다.
- 이 버저를 Arduino 핀에 직접 연결하면 표준 소리가 나며, 키패드 소리와 같은 소리 지시기에 이상적입니다.
- 반면, 릴레이를 통해 높은 전압에 연결하면 큰 소리가 나서 경고 신호에 적합합니다.
압전 버저 핀아웃
피에조 버저는 일반적으로 두 개의 핀이 있습니다:
- 음수 (-) 핀은 GND(0V)에 연결해야 합니다.
- 양수 (+) 핀은 Raspberry Pi로부터 제어 신호를 받습니다 (직접적으로 또는 릴레이를 통해 간접적으로).

피에조 버저의 작동 원리
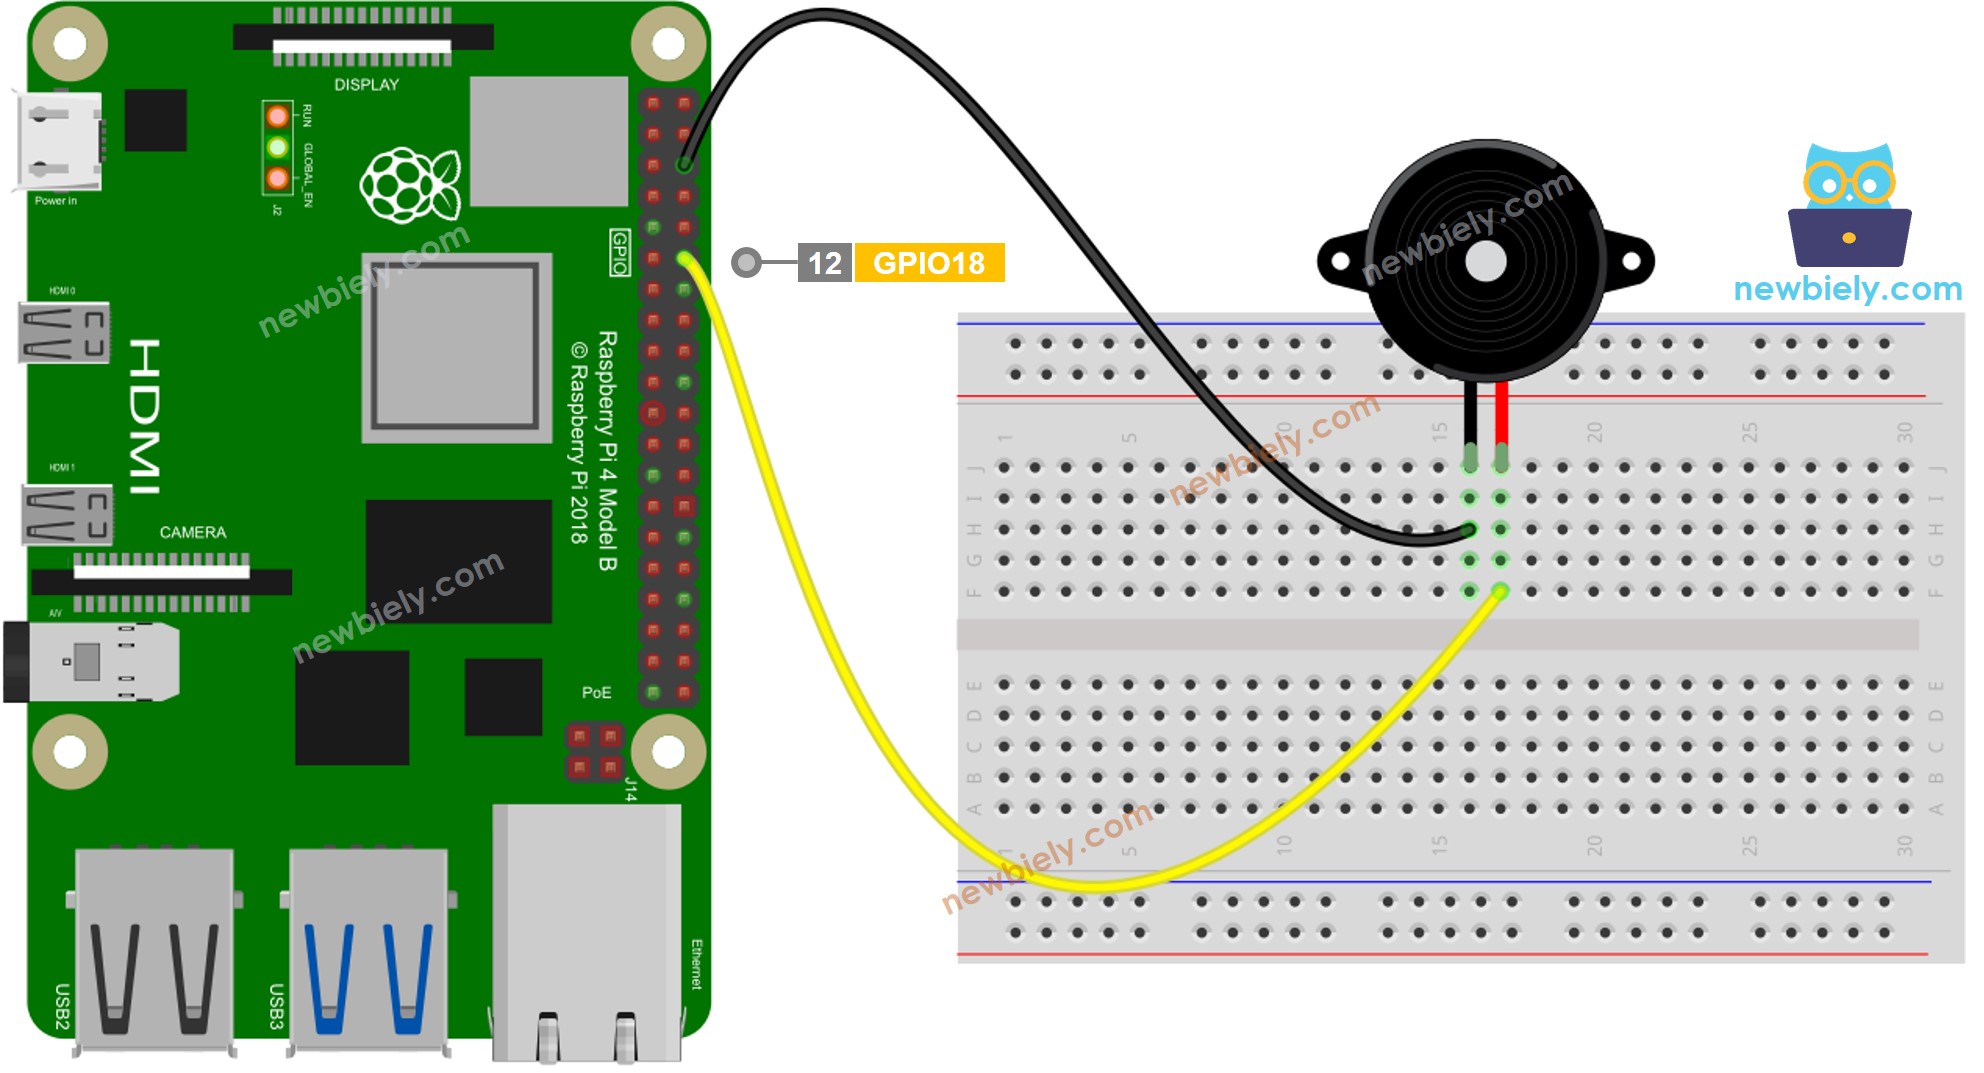
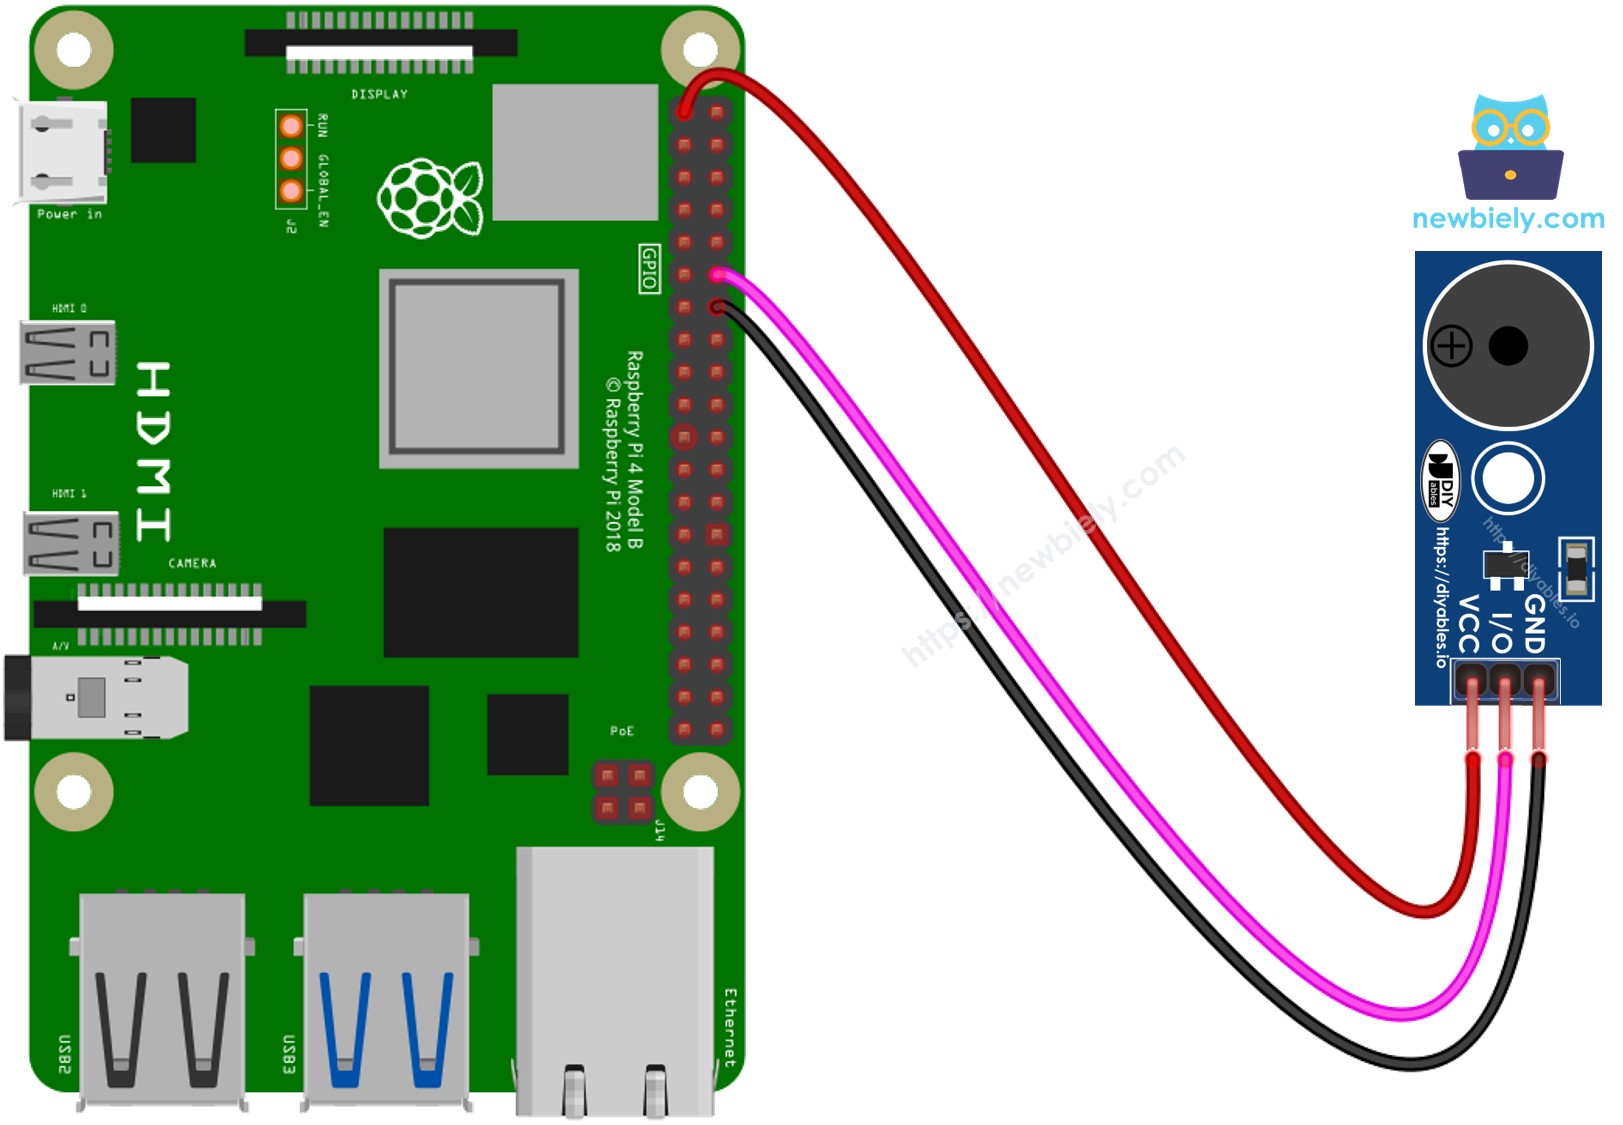
선연결
- 라즈베리 파이와 피에조 버저 간의 배선도

이 이미지는 Fritzing을 사용하여 만들어졌습니다. 이미지를 확대하려면 클릭하세요.
- 라즈베리 파이와 피에조 버저 모듈 간의 배선도

이 이미지는 Fritzing을 사용하여 만들어졌습니다. 이미지를 확대하려면 클릭하세요.
배선 구성을 간단하고 체계적으로 만들기 위해, Raspberry Pi용 스크루 터미널 블록 실드 사용을 권장합니다. 이 실드는 아래와 같이 더욱 안정적이고 관리하기 쉬운 연결을 제공합니다:

라즈베리 파이 코드
자세한 사용 방법
- 라즈비안 또는 기타 Raspberry Pi 호환 운영 체제가 Pi에 설치되어 있는지 확인하세요.
- 당신의 PC와 동일한 로컬 네트워크에 Raspberry Pi가 연결되어 있는지 확인하세요.
- 일부 라이브러리를 설치해야 하는 경우 Raspberry Pi가 인터넷에 연결되어 있는지 확인하세요.
- Raspberry Pi를 처음 사용하는 경우, 라즈베리 파이 - 소프트웨어 설치을 참조하세요.
- Linux와 macOS에서는 내장된 SSH 클라이언트 또는 Windows에서는 PuTTY를 사용하여 SSH를 통해 PC를 Raspberry Pi에 연결하세요. SSH를 통해 PC를 Raspberry Pi에 연결하는 방법을 참조하세요.
- RPi.GPIO 라이브러리가 설치되어 있는지 확인하세요. 설치되지 않았다면, 다음 명령을 사용하여 설치하세요.
sudo apt-get update
sudo apt-get install python3-rpi.gpio
- Python 스크립트 파일 buzzer.py을(를) 만들고 다음 코드를 추가하세요:
/*
* 이 라즈베리 파이 코드는 newbiely.kr 에서 개발되었습니다
* 이 라즈베리 파이 코드는 어떠한 제한 없이 공개 사용을 위해 제공됩니다.
* 상세한 지침 및 연결도에 대해서는 다음을 방문하세요:
* https://newbiely.kr/tutorials/raspberry-pi/raspberry-pi-piezo-buzzer
*/
import RPi.GPIO as GPIO
import time
# Set the GPIO mode (BCM or BOARD)
GPIO.setmode(GPIO.BCM)
# Define the GPIO pin number to which the buzzer is connected
BUZZER_PIN = 18
# Set up the GPIO pin as an output
GPIO.setup(BUZZER_PIN, GPIO.OUT)
# Constants for note names and their corresponding frequencies
C4 = 261
G3 = 196
A3 = 220
B3 = 247
# Dictionary to map numeric values to note names
note_names = {
C4: "C4",
G3: "G3",
A3: "A3",
B3: "B3",
}
# List of notes in the melody
melody = [
C4, G3, G3, A3, G3, 0, B3, C4
]
# List of note durations (in milliseconds)
note_durations = [
400, 200, 200, 400, 400, 400, 400, 400
]
# Pause duration between notes (in milliseconds)
pause_duration = 300
def play_tone(pin, frequency, duration):
# Calculate the period based on the frequency
period = 1.0 / frequency
# Calculate the time for half of the period
half_period = period / 2.0
# Calculate the number of cycles for the given duration
cycles = int(duration / period)
for _ in range(cycles):
# Set the GPIO pin to HIGH
GPIO.output(pin, GPIO.HIGH)
# Wait for half of the period
time.sleep(half_period)
# Set the GPIO pin to LOW
GPIO.output(pin, GPIO.LOW)
# Wait for the other half of the period
time.sleep(half_period)
try:
while True: # Infinite loop
# Iterate over the notes of the melody
for i in range(len(melody)):
# To calculate the note duration, take the value from the list and divide it by 1,000 (convert to seconds)
note_duration = note_durations[i] / 1000.0
note_freq = melody[i]
note_name = note_names.get(note_freq, "Pause")
print(f"Playing {note_name} (Frequency: {note_freq} Hz) for {note_duration} seconds")
# Play the tone
play_tone(BUZZER_PIN, note_freq, note_duration)
# Add a brief pause between notes (optional)
time.sleep(pause_duration / 1000.0)
# Stop the tone playing (optional)
GPIO.output(BUZZER_PIN, GPIO.LOW)
# Allow the user to stop the buzzer by pressing Ctrl+C
except KeyboardInterrupt:
GPIO.output(BUZZER_PIN, GPIO.LOW)
GPIO.cleanup()
- 파일을 저장하고 터미널에서 다음 명령을 실행하여 파이썬 스크립트를 실행하세요:
python3 buzzer.py
- 피에조 버저에서 나오는 노래의 멜로디를 들어보세요.
스크립트는 터미널에서 Ctrl + C를 누를 때까지 무한 루프로 계속 실행됩니다.
라즈베리 파이 코드 수정
이제 "징글 벨스" 노래를 연주하도록 코드를 수정하겠습니다.
- Python 스크립트 파일 buzzer_Jingle_Bells.py을(를) 만들고 다음 코드를 추가하세요:
/*
* 이 라즈베리 파이 코드는 newbiely.kr 에서 개발되었습니다
* 이 라즈베리 파이 코드는 어떠한 제한 없이 공개 사용을 위해 제공됩니다.
* 상세한 지침 및 연결도에 대해서는 다음을 방문하세요:
* https://newbiely.kr/tutorials/raspberry-pi/raspberry-pi-piezo-buzzer
*/
import RPi.GPIO as GPIO
import time
# Set the GPIO mode (BCM or BOARD)
GPIO.setmode(GPIO.BCM)
# Define the GPIO pin number to which the buzzer is connected
BUZZER_PIN = 18
# Set up the GPIO pin as an output
GPIO.setup(BUZZER_PIN, GPIO.OUT)
# Constants for note names and their corresponding frequencies
C4 = 261
D4 = 293
E4 = 329
F4 = 349
G4 = 392
A4 = 440
B4 = 493
# Dictionary to map numeric values to note names
note_names = {
C4: "C4",
D4: "D4",
E4: "E4",
F4: "F4",
G4: "G4",
A4: "A4",
B4: "B4",
}
# List of notes in the "Jingle Bells" melody
melody = [
E4, E4, E4, E4, E4, E4, E4, G4, C4, D4, E4, F4, F4, F4, F4, F4, E4, E4, E4, E4, E4, D4, D4, E4, D4, G4
]
# List of note durations (in milliseconds)
note_durations = [
200, 200, 400, 200, 200, 400, 200, 200, 200, 200, 200, 200, 200, 400, 200, 200, 200, 200, 200, 200, 200, 200, 200, 400, 200, 200
]
# Pause duration between notes (in milliseconds)
pause_duration = 300
def play_tone(pin, frequency, duration):
# Calculate the period based on the frequency
period = 1.0 / frequency
# Calculate the time for half of the period
half_period = period / 2.0
# Calculate the number of cycles for the given duration
cycles = int(duration / period)
for _ in range(cycles):
# Set the GPIO pin to HIGH
GPIO.output(pin, GPIO.HIGH)
# Wait for half of the period
time.sleep(half_period)
# Set the GPIO pin to LOW
GPIO.output(pin, GPIO.LOW)
# Wait for the other half of the period
time.sleep(half_period)
try:
while True: # Infinite loop
# Iterate over the notes of the melody
for i in range(len(melody)):
# To calculate the note duration, take the value from the list and divide it by 1,000 (convert to seconds)
note_duration = note_durations[i] / 1000.0
note_freq = melody[i]
note_name = note_names.get(note_freq, "Pause")
print(f"Playing {note_name} (Frequency: {note_freq} Hz) for {note_duration} seconds")
# Play the tone
play_tone(BUZZER_PIN, note_freq, note_duration)
# Add a brief pause between notes (optional)
time.sleep(pause_duration / 1000.0)
# Stop the tone playing (optional)
GPIO.output(BUZZER_PIN, GPIO.LOW)
# Allow the user to stop the buzzer by pressing Ctrl+C
except KeyboardInterrupt:
GPIO.output(BUZZER_PIN, GPIO.LOW)
GPIO.cleanup()
- 파일을 저장하고 터미널에서 다음 명령을 실행하여 Python 스크립트를 실행하세요:
python3 buzzer_Jingle_Bells.py
- 이 코드를 이전 코드와 비교하여 차이점을 확인할 수 있습니다.
이 수정을 통해 코드가 이제 Raspberry Pi에 연결된 피에조 버저를 사용하여 "징글벨" 멜로디를 연주할 것입니다. 축제의 선율을 즐기세요!
동영상
비디오 제작은 시간이 많이 걸리는 작업입니다. 비디오 튜토리얼이 학습에 도움이 되었다면, YouTube 채널 을 구독하여 알려 주시기 바랍니다. 비디오에 대한 높은 수요가 있다면, 비디오를 만들기 위해 노력하겠습니다.
자신을 도전하세요
- 피에조 버저를 사용하여 좋아하는 노래를 연주하세요.
- Raspberry Pi 모션 센서를 활용하여 귀중품 근처에 사람이 있을 때 자동으로 알람을 울리세요. 자세한 내용은 라즈베리 파이 - 모션 센서를 참조하세요.
