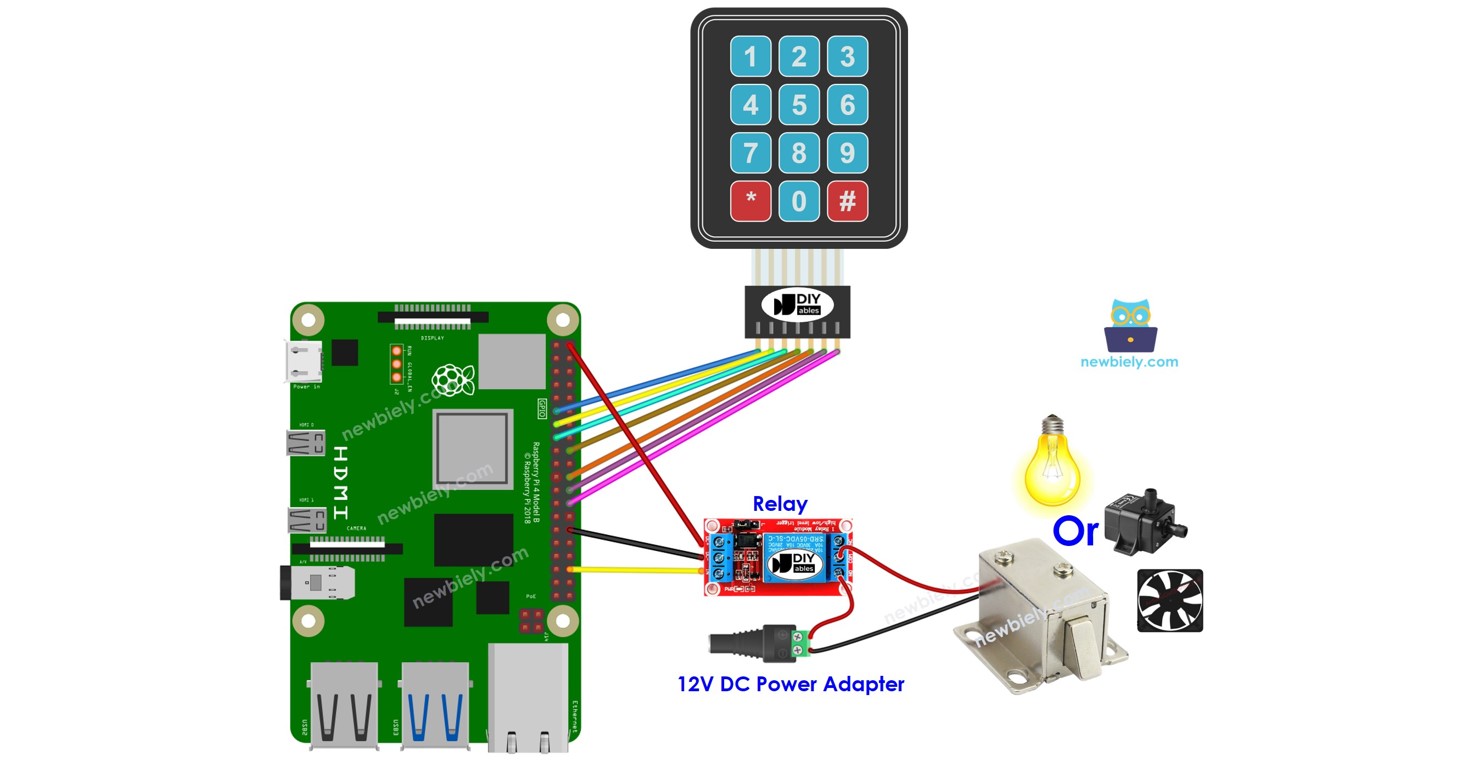
Python 스크립트 파일 keypad_relay.py를 생성하고 다음 코드를 추가하세요:
/* * 이 라즈베리 파이 코드는 newbiely.kr 에서 개발되었습니다 * 이 라즈베리 파이 코드는 어떠한 제한 없이 공개 사용을 위해 제공됩니다. * 상세한 지침 및 연결도에 대해서는 다음을 방문하세요: * https://newbiely.kr/tutorials/raspberry-pi/raspberry-pi-keypad-relay */import RPi.GPIOasGPIOimport time# Define keypad layoutKEYPAD = [ [1, 2, 3], [4, 5, 6], [7, 8, 9], ['*', 0, '#']]# Define GPIO pins for rows, columns, and relayROW_PINS = [17, 27, 22, 24]COL_PINS = [25, 8, 7]RELAY_PIN = 16 # Adjust this to the actual GPIO pin connected to the relay# Password to unlockPASSWORD = [1, 2, 3, 4]# Initialize GPIOGPIO.setmode(GPIO.BCM)# Set up row pins as inputs with pull-up resistorsfor row_pin in ROW_PINS:GPIO.setup(row_pin, GPIO.IN, pull_up_down=GPIO.PUD_UP)# Set up column pins as outputsfor col_pin in COL_PINS:GPIO.setup(col_pin, GPIO.OUT)GPIO.output(col_pin, GPIO.HIGH)# Set up relay pin as an outputGPIO.setup(RELAY_PIN, GPIO.OUT)GPIO.output(RELAY_PIN, GPIO.LOW) # Initially, keep the relay offdef get_key(): key = None# Scan each columnfor col_num, col_pin inenumerate(COL_PINS):GPIO.output(col_pin, GPIO.LOW)# Check each rowfor row_num, row_pin inenumerate(ROW_PINS):ifGPIO.input(row_pin) == GPIO.LOW: key = KEYPAD[row_num][col_num]# Wait for key releasewhileGPIO.input(row_pin) == GPIO.LOW: time.sleep(0.05)GPIO.output(col_pin, GPIO.HIGH)return keydef check_password(input_password):return input_password == PASSWORDentered_keys = []try:whileTrue: pressed_key = get_key()if pressed_key isnotNone:print(f"Pressed: {pressed_key}")if pressed_key == '*': entered_keys = [] # reset the input password elif pressed_key == '#':if check_password(entered_keys):print("Password correct! Access granted.")GPIO.output(RELAY_PIN, GPIO.HIGH) # Activate the relaybreakelse:print("Incorrect password. Try again.") entered_keys = [] # reset the input passwordelse: entered_keys.append(pressed_key) time.sleep(0.1)exceptKeyboardInterrupt:GPIO.cleanup()
파일을 저장하고 터미널에서 다음 명령을 실행하여 Python 스크립트를 실행하세요:
python3 keypad_relay.py
9765를 입력한 후 # 키를 누르고, 1234를 입력한 후 # 키를 누르세요.
결과와 릴레이의 상태를 확인하려면 터미널을 확인하세요.
PuTTY - Raspberry Pi
The incorrect password! try again
The correct password! Turning ON relay
스크립트는 터미널에서 Ctrl + C를 누를 때까지 무한 루프 계속 실행됩니다.
코드 설명
Raspberry Pi 코드에서 허가된 비밀번호는 사전에 정의되어 있습니다. 사용자에 의해 입력된 비밀번호는 입력 문자열이라 불리는 문자열에 저장됩니다. 키패드에서는 두 개의 키 (* 및 #)가 특별한 용도로 사용됩니다: 비밀번호 삭제 및 비밀번호 종료. 키패드의 키가 눌리면:
두 개의 특수 키가 아닌 키가 눌리면 입력 문자열 에 추가됩니다.
눌린 키가 *인 경우 입력 문자열 이 지워집니다. 이는 비밀번호 입력을 시작하거나 다시 시작하는 데 사용될 수 있습니다.
눌린 키가 #인 경우:
Raspberry Pi는 입력 문자열 이 사전 정의된 비밀번호 중 하나와 일치하는지 확인하고, 릴레이가 켜집니다.
비밀번호가 맞든 틀리든 상관없이 입력 문자열 은 다음 입력을 위해 지워집니다.
라즈베리 파이 코드 - 비밀번호가 맞다면 일정 시간 동안 릴레이를 켭니다.
암호가 올바르면, 릴레이가 5초 동안 켜집니다. 그런 다음, 꺼집니다.
/* * 이 라즈베리 파이 코드는 newbiely.kr 에서 개발되었습니다 * 이 라즈베리 파이 코드는 어떠한 제한 없이 공개 사용을 위해 제공됩니다. * 상세한 지침 및 연결도에 대해서는 다음을 방문하세요: * https://newbiely.kr/tutorials/raspberry-pi/raspberry-pi-keypad-relay */import RPi.GPIOasGPIOimport time# Define keypad layoutKEYPAD = [ [1, 2, 3], [4, 5, 6], [7, 8, 9], ['*', 0, '#']]# Define GPIO pins for rows, columns, and relayROW_PINS = [17, 27, 22, 24]COL_PINS = [25, 8, 7]RELAY_PIN = 16 # Adjust this to the actual GPIO pin connected to the relay# Password to unlockPASSWORD = [1, 2, 3, 4]# Initialize GPIOGPIO.setmode(GPIO.BCM)# Set up row pins as inputs with pull-up resistorsfor row_pin in ROW_PINS:GPIO.setup(row_pin, GPIO.IN, pull_up_down=GPIO.PUD_UP)# Set up column pins as outputsfor col_pin in COL_PINS:GPIO.setup(col_pin, GPIO.OUT)GPIO.output(col_pin, GPIO.HIGH)# Set up relay pin as an outputGPIO.setup(RELAY_PIN, GPIO.OUT)GPIO.output(RELAY_PIN, GPIO.LOW) # Initially, keep the relay offdef get_key(): key = None# Scan each columnfor col_num, col_pin inenumerate(COL_PINS):GPIO.output(col_pin, GPIO.LOW)# Check each rowfor row_num, row_pin inenumerate(ROW_PINS):ifGPIO.input(row_pin) == GPIO.LOW: key = KEYPAD[row_num][col_num]# Wait for key releasewhileGPIO.input(row_pin) == GPIO.LOW: time.sleep(0.05)GPIO.output(col_pin, GPIO.HIGH)return keydef check_password(input_password):return input_password == PASSWORDentered_keys = []try:whileTrue: pressed_key = get_key()if pressed_key isnotNone:print(f"Pressed: {pressed_key}")if pressed_key == '*': entered_keys = [] # reset the input password elif pressed_key == '#':if check_password(entered_keys):print("Password correct! Access granted.")GPIO.output(RELAY_PIN, GPIO.HIGH) # Activate the relay time.sleep(5) # Wait for 5 secondsGPIO.output(RELAY_PIN, GPIO.LOW) # Deactivate the relaybreakelse:print("Incorrect password. Try again.") entered_keys = [] # reset the input passwordelse: entered_keys.append(pressed_key) time.sleep(0.1)exceptKeyboardInterrupt:GPIO.cleanup()
동영상
비디오 제작은 시간이 많이 걸리는 작업입니다. 비디오 튜토리얼이 학습에 도움이 되었다면, YouTube 채널 을 구독하여 알려 주시기 바랍니다. 비디오에 대한 높은 수요가 있다면, 비디오를 만들기 위해 노력하겠습니다.