아두이노 우노 R4 - 버튼 - 디바운스

Arduino Uno R4를 프로그래밍하여 버튼 누름 이벤트를 감지할 때, 한 번의 눌림이 여러 번 감지되는 경우가 있습니다. 이는 기계적인 요인으로 인해 버튼이나 스위치가 LOWHIGH 사이를 여러 번 빠르게 전환할 수 있기 때문입니다. 이를 "채터링"이라고 합니다. 채터링은 한 번의 버튼 눌림이 여러 번 눌린 것으로 감지되게 하여 일부 애플리케이션에서 오류를 발생시킬 수 있습니다. 이 튜토리얼은 이 문제를 해결하는 방법을 설명하며, 이는 버튼을 디바운싱하는 과정으로 알려져 있습니다.
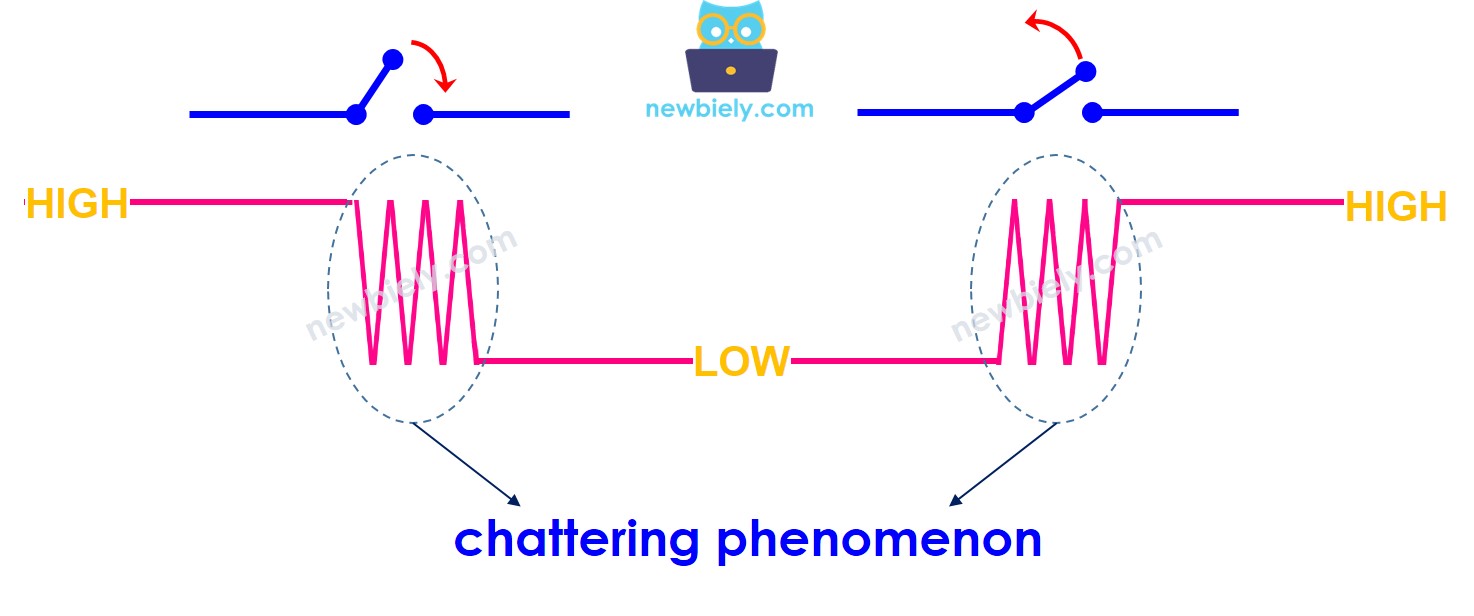
Arduino UNO R4 채터링 현상

Hardware Preparation

1×Arduino UNO R4 WiFi Amazon
1×Arduino UNO R4 Minima (Alternatively) Amazon
1×USB Cable Type-C 쿠팡 | Amazon
1×Breadboard-mount Button with Cap 쿠팡 | Amazon
1×Breadboard-mount Button Kit 쿠팡 | Amazon
1×Panel-mount Push Button Amazon
1×Breadboard 쿠팡 | Amazon
1×Jumper Wires Amazon
1×(Recommended) Screw Terminal Block Shield for Arduino UNO R4 쿠팡 | Amazon
1×(Recommended) Breadboard Shield For Arduino UNO R4 쿠팡 | Amazon
1×(Recommended) Enclosure For Arduino UNO R4 Amazon
1×(Recommended) Power Splitter For Arduino UNO R4 Amazon
공개: 이 섹션에서 제공된 링크 중 일부는 제휴 링크입니다. 이 링크를 통해 구매한 경우 추가 비용없이 수수료를 받을 수 있습니다. 지원해 주셔서 감사합니다.

버튼 정보

해당 튜토리얼에서 버튼에 대해 알아보세요(핀아웃, 작동, 프로그래밍). 버튼에 익숙하지 않다면 다음 내용을 참고하세요:

Wiring Diagram

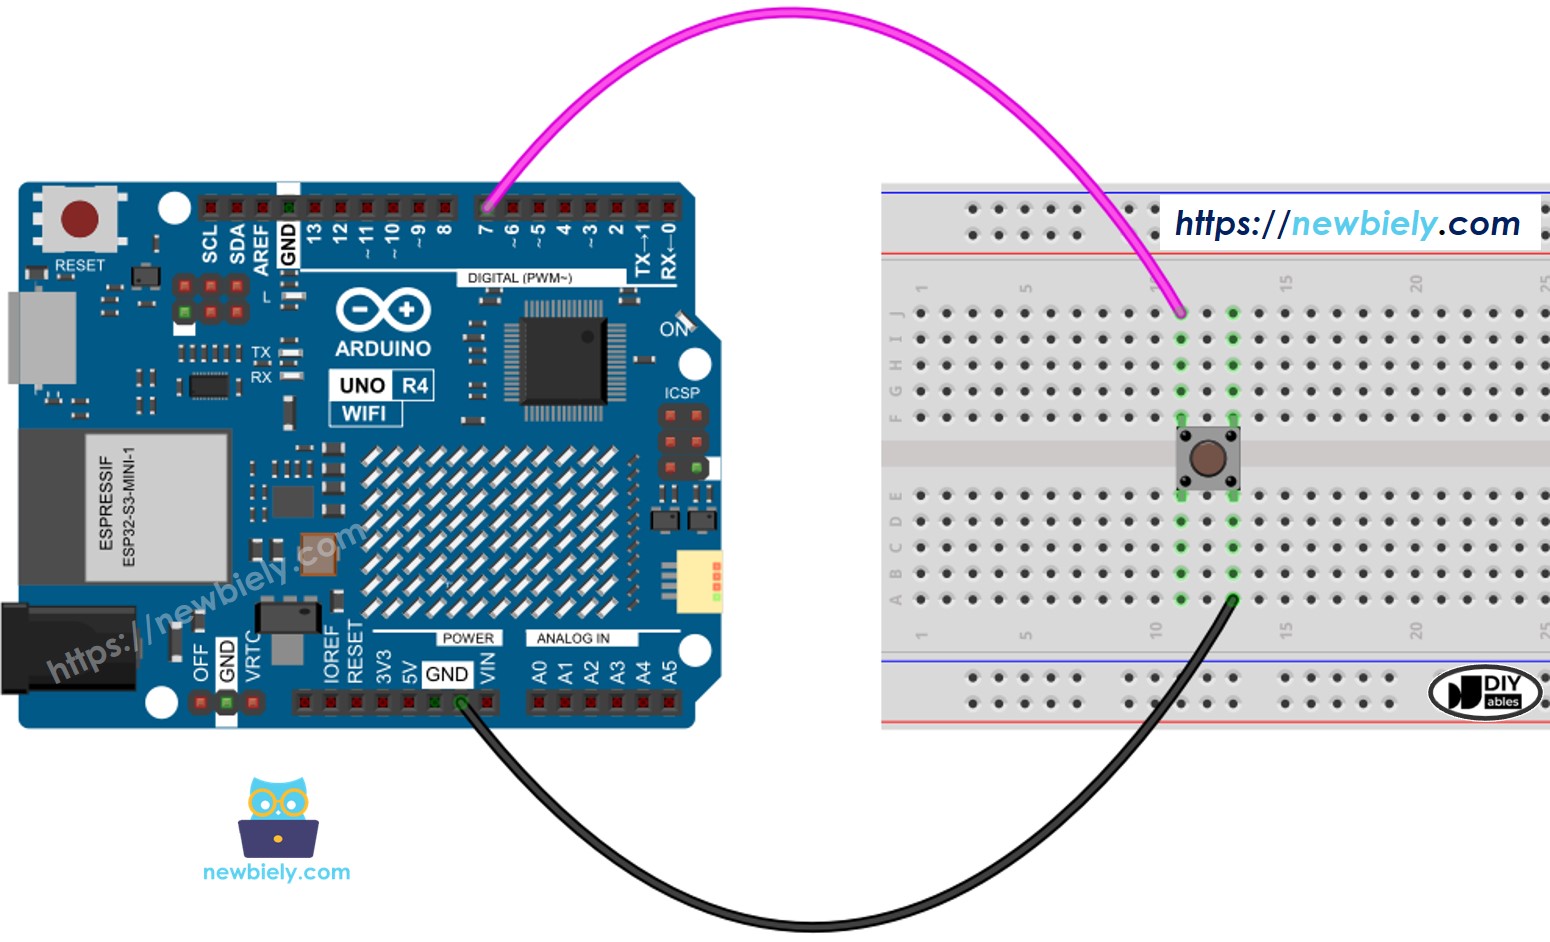
Arduino UNO R4 버튼 배선도

이 이미지는 Fritzing을 사용하여 만들어졌습니다. 이미지를 확대하려면 클릭하세요.

Arduino UNO R4 코드에서 디바운스 없이와 함께하는 경우를 살펴보고 비교하여 그 동작을 관찰해 봅시다.

Arduino Uno R4 - 디바운스 없는 버튼

디바운스를 배우기 전에, 디바운스를 사용하지 않은 코드를 보고 그 동작을 살펴봅시다.

/* * 이 Arduino UNO R4 코드는 newbiely.kr 에서 개발되었습니다 * 이 Arduino UNO R4 코드는 어떠한 제한 없이 공개 사용을 위해 제공됩니다. * 상세한 지침 및 연결도에 대해서는 다음을 방문하세요: * https://newbiely.kr/tutorials/arduino-uno-r4/arduino-uno-r4-button-debounce */ #define BUTTON_PIN 7 // The Arduino UNO R4 pin connected to the button int button_state; // the current state of button int prev_button_state = LOW; // the previous state of button void setup() { // initialize serial communication at 9600 bits per second: Serial.begin(9600); // initialize the pushbutton pin as a pull-up input pinMode(BUTTON_PIN, INPUT_PULLUP); } void loop() { // read the state of the switch/button: button_state = digitalRead(BUTTON_PIN); if (prev_button_state == HIGH && button_state == LOW) Serial.println("The button is pressed"); else if (prev_button_state == LOW && button_state == HIGH) Serial.println("The button is released"); // save the last state prev_button_state = button_state; }

Detailed Instructions

다음 지침을 단계별로 따르세요:

  • Arduino Uno R4 WiFi/Minima를 처음 사용하는 경우, Arduino IDE에서 Arduino Uno R4 WiFi/Minima 환경 설정하기 튜토리얼을 참조하세요.
  • 제공된 다이어그램에 따라 부품을 연결하세요.
  • USB 케이블을 사용하여 Arduino Uno R4 보드를 컴퓨터에 연결하세요.
  • 컴퓨터에서 Arduino IDE를 실행하세요.
  • 적절한 Arduino Uno R4 보드(예: Arduino Uno R4 WiFi)와 COM 포트를 선택하세요.
  • 위 코드를 복사하여 Arduino IDE에 열어보세요.
  • Arduino IDE에서 코드를 Arduino UNO R4로 전송하려면 Upload 버튼을 클릭하세요.
Arduino IDE 코드 업로드
  • 시리얼 모니터를 여세요.
  • 버튼을 몇 초 동안 눌렀다가 놓으세요.
  • 결과를 시리얼 모니터에서 확인하세요.
COM6
Send
The button is pressed The button is pressed The button is pressed The button is released The button is released
Autoscroll Show timestamp
Clear output
9600 baud  
Newline  

보시다시피 버튼을 한 번만 눌렀다 놓았습니다. 그러나 아두이노는 이를 여러 번의 눌림과 릴리스로 인식합니다.

※ NOTE THAT:

DEBOUNCE_TIME의 값은 다양한 애플리케이션에 따라 달라집니다. 각 애플리케이션은 고유한 값을 사용할 수 있습니다.

아두이노 우노 R4 - 디바운스 버튼

/* * 이 Arduino UNO R4 코드는 newbiely.kr 에서 개발되었습니다 * 이 Arduino UNO R4 코드는 어떠한 제한 없이 공개 사용을 위해 제공됩니다. * 상세한 지침 및 연결도에 대해서는 다음을 방문하세요: * https://newbiely.kr/tutorials/arduino-uno-r4/arduino-uno-r4-button-debounce */ #define BUTTON_PIN 7 // The Arduino UNO R4 pin connected to the button #define DEBOUNCE_TIME 50 // The debounce time; increase if the output flickers int last_steady_state = LOW; // the previous steady state from the input pin int last_flickerable_state = LOW; // the previous flickerable state from the input pin int current_state; // the current reading from the input pin unsigned long last_debounce_time = 0; // the last time the output pin was toggled void setup() { // initialize serial communication at 9600 bits per second: Serial.begin(9600); // initialize the pushbutton pin as a pull-up input pinMode(BUTTON_PIN, INPUT_PULLUP); } void loop() { // read the state of the switch/button: current_state = digitalRead(BUTTON_PIN); // If the switch/button changed, due to noise or pressing: if (current_state != last_flickerable_state) { // reset the debouncing timer last_debounce_time = millis(); // save the the last flickerable state last_flickerable_state = current_state; } if ((millis() - last_debounce_time) > DEBOUNCE_TIME) { // if the button state has changed: if (last_steady_state == HIGH && current_state == LOW) Serial.println("The button is pressed"); else if (last_steady_state == LOW && current_state == HIGH) Serial.println("The button is released"); // save the the last steady state last_steady_state = current_state; } }

Detailed Instructions

  • 위의 코드를 복사하여 Arduino IDE로 엽니다.
  • Arduino IDE에서 Upload 버튼을 눌러 코드를 Arduino UNO R4에 전송합니다.
  • 시리얼 모니터를 엽니다.
  • 버튼을 몇 초간 누른 상태에서 손을 뗍니다.
  • 시리얼 모니터를 확인합니다.
COM6
Send
The button is pressed The button is released
Autoscroll Show timestamp
Clear output
9600 baud  
Newline  

보시다시피, 버튼을 한 번 눌렀다가 놓았습니다. Arduino는 이를 올바르게 하나의 누름과 놓음으로 감지하여 채터링을 제거합니다.

우리는 간단하게 만들었습니다: 라이브러리를 사용한 Arduino UNO R4 버튼 디바운스 코드

버튼을 많이 사용하는 초보자들을 위해 ezButton이라는 라이브러리를 만들어 더 간단한 방법을 제공했습니다. ezButton 라이브러리에 대한 자세한 내용은 여기에서 확인할 수 있습니다.

몇 가지 예제 코드를 봅시다.

아두이노 UNO R4 단일 버튼 디바운스 코드

/* * Created by ArduinoGetStarted.com * * This example code is in the public domain * * Tutorial page: https://arduinogetstarted.com/tutorials/arduino-button-library * * This example reads the state of a button with debounce and print it to Serial Monitor. */ #include <ezButton.h> ezButton button(7); // create ezButton object that attach to pin 7; void setup() { Serial.begin(9600); button.setDebounceTime(50); // set debounce time to 50 milliseconds } void loop() { button.loop(); // MUST call the loop() function first if(button.isPressed()) Serial.println("The button is pressed"); if(button.isReleased()) Serial.println("The button is released"); }

아두이노 UNO R4 다중 버튼 바운스 방지 코드

세 개의 버튼에 대해 디바운싱을 해봅시다. 아래는 Arduino UNO R4와 세 개의 버튼 간의 배선도입니다:
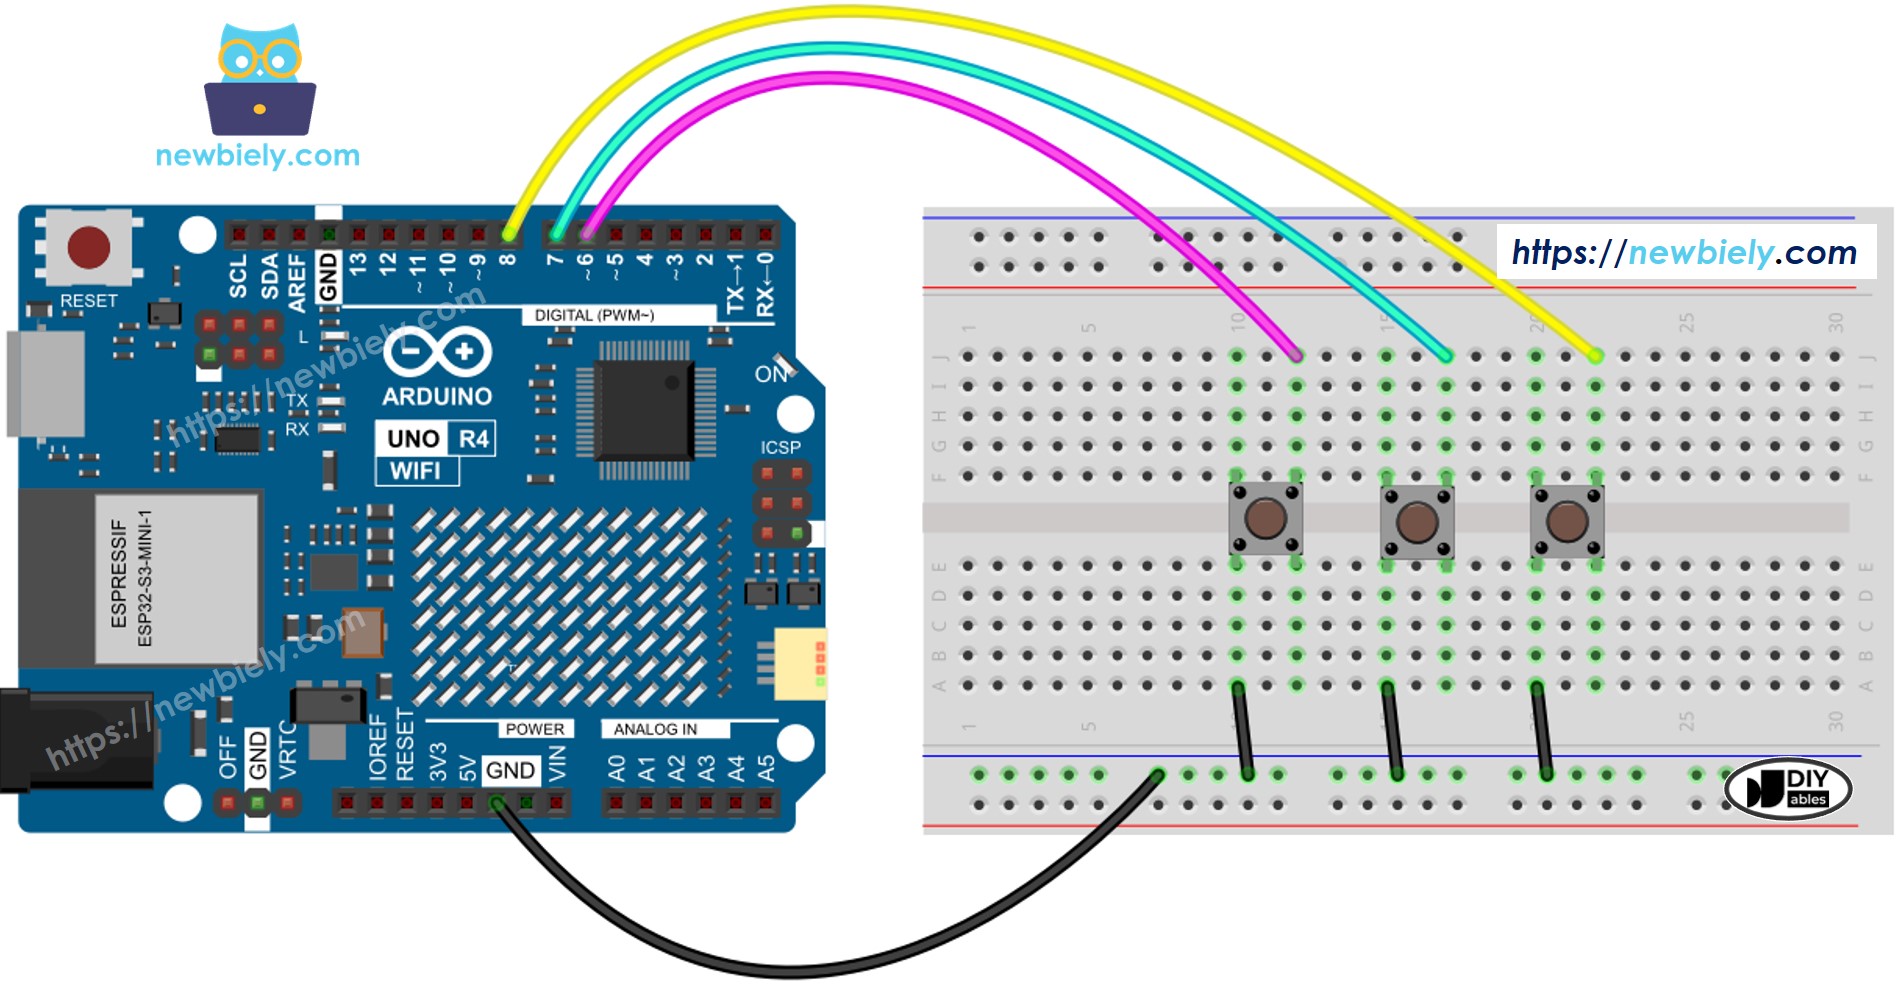
아두이노 UNO R4 버튼 라이브러리 배선도

이 이미지는 Fritzing을 사용하여 만들어졌습니다. 이미지를 확대하려면 클릭하세요.

/* * 이 Arduino UNO R4 코드는 newbiely.kr 에서 개발되었습니다 * 이 Arduino UNO R4 코드는 어떠한 제한 없이 공개 사용을 위해 제공됩니다. * 상세한 지침 및 연결도에 대해서는 다음을 방문하세요: * https://newbiely.kr/tutorials/arduino-uno-r4/arduino-uno-r4-button-debounce */ #include <ezButton.h> ezButton button_1(6); // 핀 6에 연결된 ezButton 객체 초기화 ezButton button_2(7); // 핀 7에 연결된 ezButton 객체 초기화 ezButton button_3(8); // 핀 8에 연결된 ezButton 객체 초기화 void setup() { Serial.begin(9600); button_1.setDebounceTime(50); // button_1의 디바운스 시간을 50ms로 설정 button_2.setDebounceTime(50); // button_2의 디바운스 시간을 50ms로 설정 button_3.setDebounceTime(50); // button_3의 디바운스 시간을 50ms로 설정 } void loop() { button_1.loop(); // button_1 상태 업데이트 button_2.loop(); // button_2 상태 업데이트 button_3.loop(); // button_3 상태 업데이트 if(button_1.isPressed()) Serial.println("The button 1 is pressed"); if(button_1.isReleased()) Serial.println("The button 1 is released"); if(button_2.isPressed()) Serial.println("The button 2 is pressed"); if(button_2.isReleased()) Serial.println("The button 2 is released"); if(button_3.isPressed()) Serial.println("The button 3 is pressed"); if(button_3.isReleased()) Serial.println("The button 3 is released"); }

Video Tutorial

비디오 제작은 시간이 많이 걸리는 작업입니다. 비디오 튜토리얼이 학습에 도움이 되었다면, YouTube 채널 을 구독하여 알려 주시기 바랍니다. 비디오에 대한 높은 수요가 있다면, 비디오를 만들기 위해 노력하겠습니다.

※ OUR MESSAGES

  • Please feel free to share the link of this tutorial. However, Please do not use our content on any other websites. We invested a lot of effort and time to create the content, please respect our work!