아두이노 우노 R4 키패드 4x4
이 튜토리얼은 Arduino UNO R4와 4x4 키패드를 사용하는 방법을 가르쳐 드립니다. 우리는 다음 단계를 다룰 것입니다:
- 4x4 키패드를 Arduino UNO R4에 연결하기.
- Arduino UNO R4를 프로그래밍하여 4x4 키패드에서 어떤 키가 눌렸는지 읽기.
- 4x4 키패드를 사용하여 입력된 비밀번호 확인하기.

준비물
| 1 | × | Arduino UNO R4 WiFi or Arduino UNO R4 Minima | ||
| 1 | × | (또는) DIYables STEM V4 IoT, Compatible with Arduino Uno R4 WiFi | 쿠팡 | 아마존 | |
| 1 | × | USB 케이블 타입-A to 타입-C (USB-A PC용) | 쿠팡 | 아마존 | |
| 1 | × | USB 케이블 타입-C to 타입-C (USB-C PC용) | 아마존 | |
| 1 | × | 키패드 4x4 | 쿠팡 | 아마존 | |
| 1 | × | 점퍼케이블 | 쿠팡 | 아마존 | |
| 1 | × | (추천) 아두이노 우노 R4용 스크루 터미널 블록 쉴드 | 쿠팡 | 아마존 | |
| 1 | × | (추천) 아두이노 우노 R4용 브레드보드 쉴드 | 쿠팡 | 아마존 | |
| 1 | × | (추천) 아두이노 우노 R4용 케이스 | 쿠팡 | 아마존 | |
| 1 | × | (추천) 아두이노 우노 R4용 전원 분배기 | 쿠팡 | 아마존 | |
| 1 | × | (추천) 아두이노 우노용 프로토타이핑 베이스 플레이트 & 브레드보드 키트 | 아마존 |
공개: 이 포스팅 에 제공된 일부 링크는 아마존 제휴 링크입니다. 이 포스팅은 쿠팡 파트너스 활동의 일환으로, 이에 따른 일정액의 수수료를 제공받습니다.
4x4 키패드에 대하여
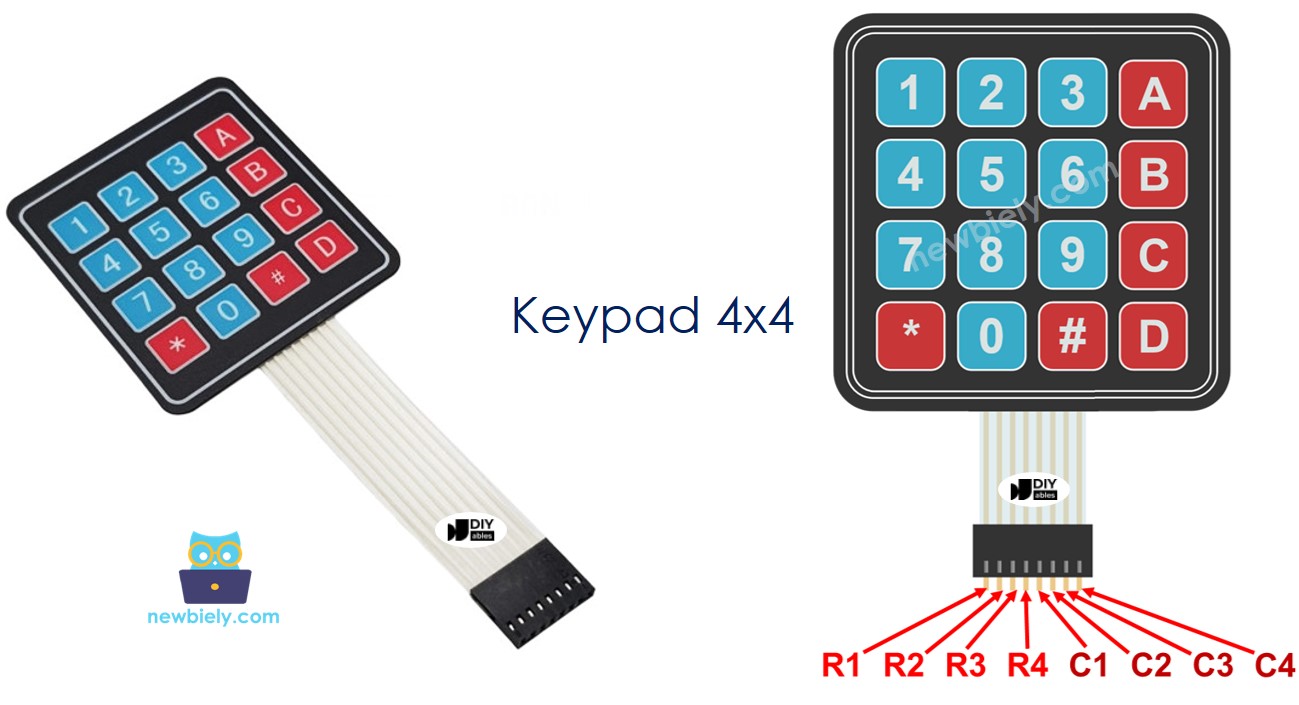
키패드는 매트릭스로 알려진 행과 열에 배열된 16개의 멤브레인 버튼을 가지고 있습니다. 각 버튼은 키라고 불립니다.
핀아웃
4x4 키패드는 행과 열 두 가지 범주로 나눠진 8개의 핀이 있습니다.
4개의 핀은 행(R1, R2, R3, R4)을 위한 것입니다.
4개의 핀은 열(C1, C2, C3, C4)을 위한 것입니다.

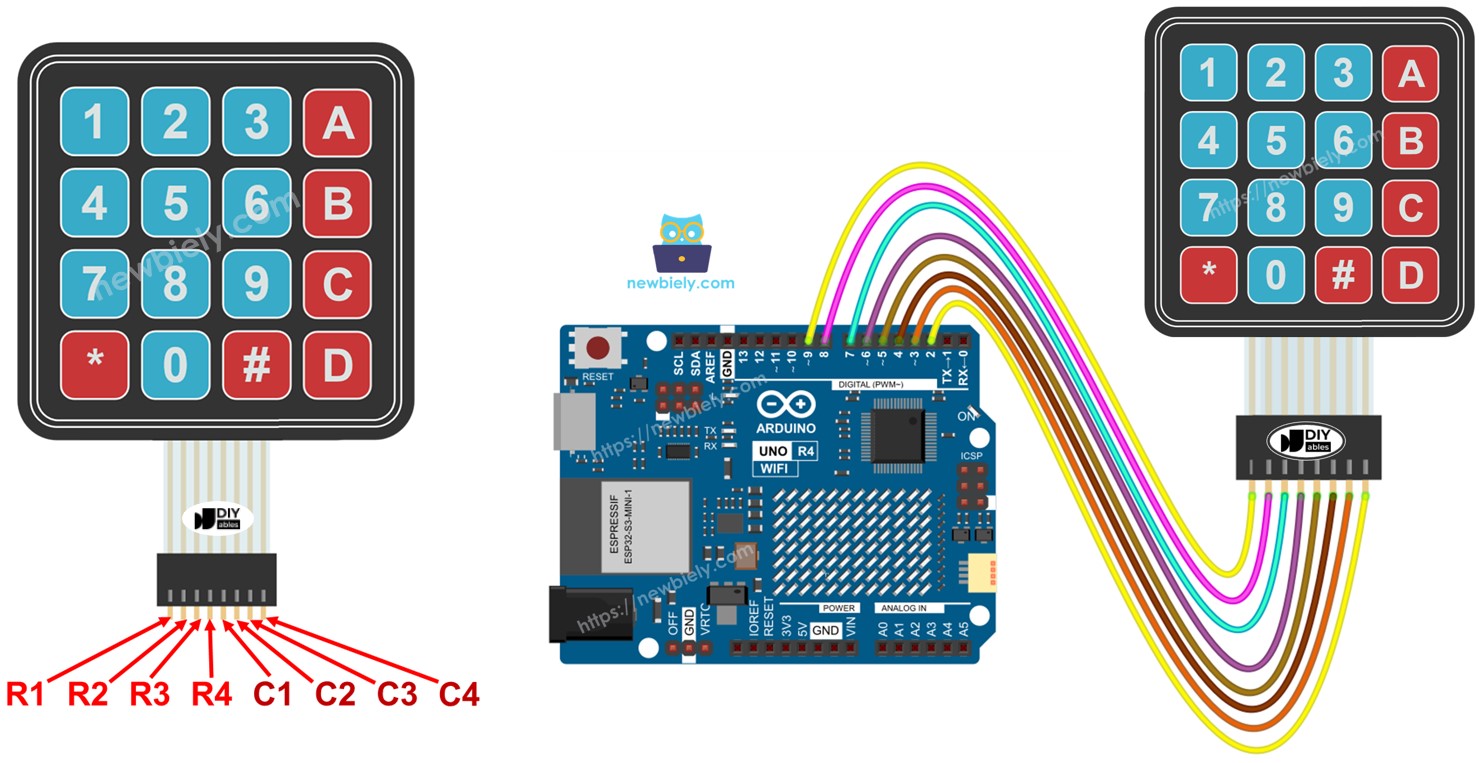
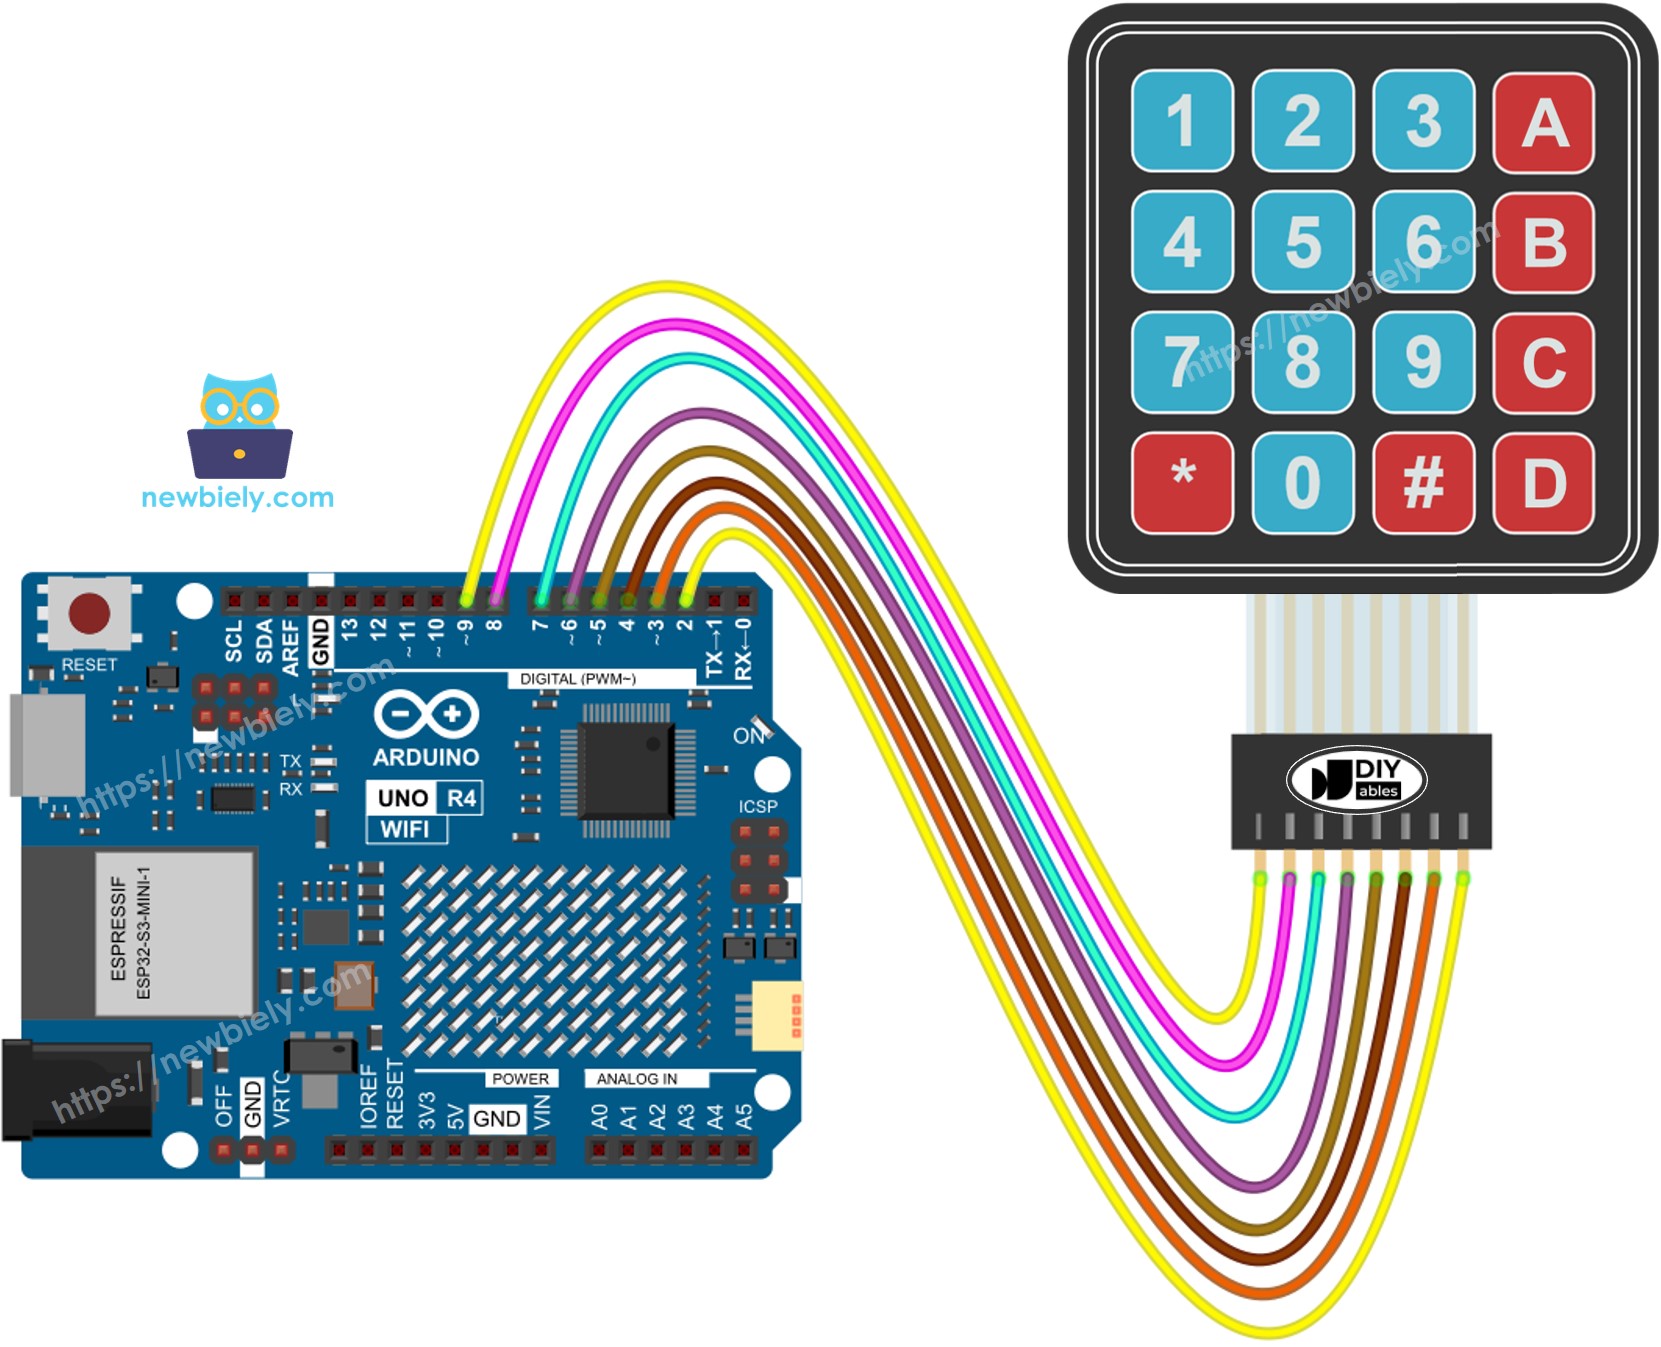
선연결

이 이미지는 Fritzing을 사용하여 만들어졌습니다. 이미지를 확대하려면 클릭하세요.
Arduino Uno R4와 기타 부품에 전원을 공급하는 가장 효과적인 방법을 확인하시려면, 아래 링크를 참조하세요: 아두이노 우노 R4 전원 공급 방법.
아두이노 UNO R4 코드
#include <DIYables_Keypad.h> // DIYables_Keypad library
const int ROW_NUM = 4; // four rows
const int COLUMN_NUM = 4; // four columns
char keys[ROW_NUM][COLUMN_NUM] = {
{'1','2','3', 'A'},
{'4','5','6', 'B'},
{'7','8','9', 'C'},
{'*','0','#', 'D'}
};
byte pin_rows[ROW_NUM] = {9, 8, 7, 6}; //connect to the row pinouts of the keypad
byte pin_column[COLUMN_NUM] = {5, 4, 3, 2}; //connect to the column pinouts of the keypad
DIYables_Keypad keypad = DIYables_Keypad( makeKeymap(keys), pin_rows, pin_column, ROW_NUM, COLUMN_NUM );
void setup(){
Serial.begin(9600);
delay(1000);
Serial.println("Keypad 4x4 example");
}
void loop(){
char key = keypad.getKey();
if (key){
Serial.println(key);
}
}
자세한 사용 방법
다음 지침을 단계별로 따르세요:
- Arduino Uno R4 WiFi/Minima를 처음 사용하는 경우, 아두이노 우노 R4 - 소프트웨어 설치에 관한 튜토리얼을 참고하세요.
- 제공된 다이어그램에 따라 4x4 키패드를 Arduino Uno R4에 연결합니다.
- USB 케이블을 사용하여 Arduino Uno R4를 컴퓨터에 연결합니다.
- 컴퓨터에서 Arduino IDE를 실행합니다.
- 적절한 Arduino Uno R4 보드(예: Arduino Uno R4 WiFi)와 COM 포트를 선택합니다.
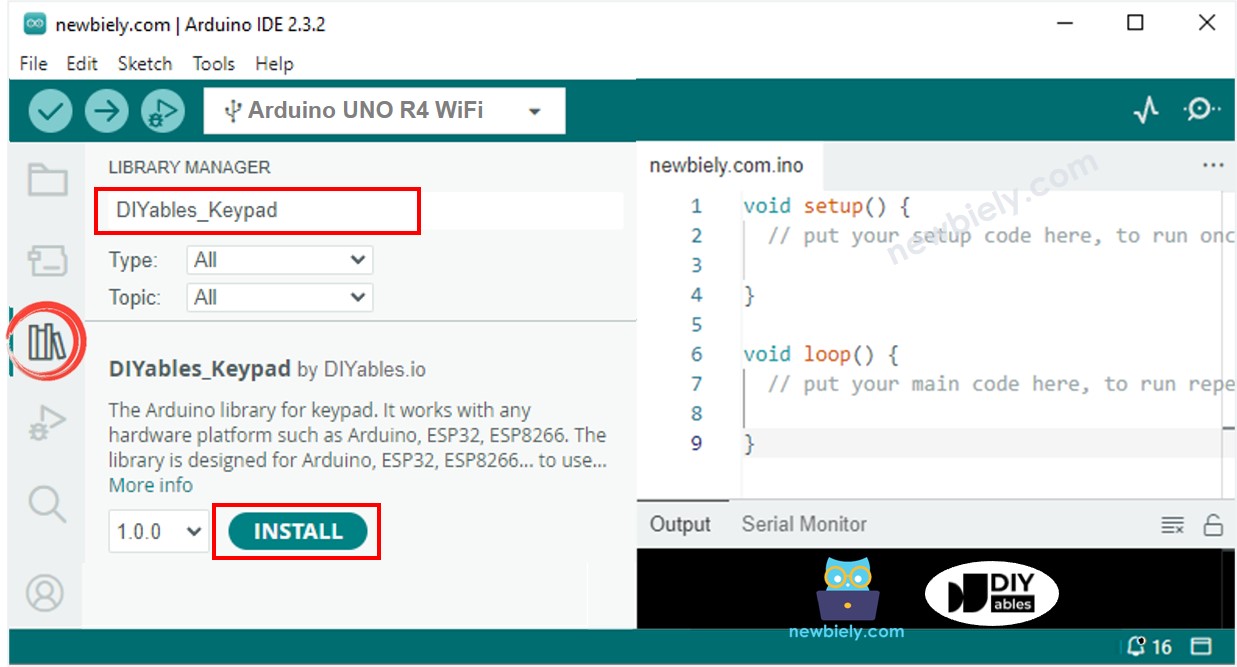
- Arduino IDE 왼쪽의 Libraries 아이콘으로 이동합니다.
- 검색 상자에 DIYables_Keypad를 입력하고, DIYables.io의 키패드 라이브러리를 찾습니다.
- Install 버튼을 눌러 키패드 라이브러리를 설치합니다.

- 위 코드를 복사하여 Arduino IDE에서 엽니다.
- Arduino IDE에서 Upload 버튼을 클릭하여 코드를 Arduino UNO R4에 업로드합니다.
- 시리얼 모니터를 엽니다.
- 키패드에서 몇 개의 키를 눌러보세요.
- 시리얼 모니터에서 결과를 확인하세요.
COM6
1
2
3
4
A
B
C
*
#
Autoscroll
Clear output
9600 baud
Newline
키패드와 비밀번호
키패드의 일반적인 사용 용도는 비밀번호 입력입니다. 이 경우, 우리는 두 개의 특수 키를 사용합니다:
- 비밀번호 입력을 시작하거나 다시 시작하는 키. 예를 들어, "*" 키.
- 비밀번호 입력을 완료하는 키. 예를 들어, "#" 키.
비밀번호는 두 개의 특수 키를 제외한 다른 키들로 구성될 것입니다. 키가 눌렸을 때:
- 키가 "*" 또는 "#"이 아니면, 사용자가 입력 중인 비밀번호에 키를 추가합니다.
- 키가 "#"이면 입력한 비밀번호가 설정된 비밀번호와 일치하는지 확인한 후, 입력한 비밀번호를 지웁니다.
- 키가 "*"이면 입력한 비밀번호를 지웁니다.
키패드 - 비밀번호 코드
/*
* 이 아두이노 우노 R4 코드는 newbiely.kr 에서 개발되었습니다
* 이 아두이노 우노 R4 코드는 어떠한 제한 없이 공개 사용을 위해 제공됩니다.
* 상세한 지침 및 연결도에 대해서는 다음을 방문하세요:
* https://newbiely.kr/tutorials/arduino-uno-r4/arduino-uno-r4-keypad-4x4
*/
#include <DIYables_Keypad.h> // DIYables_Keypad library
const int ROW_NUM = 4; // four rows
const int COLUMN_NUM = 4; // four columns
char keys[ROW_NUM][COLUMN_NUM] = {
{'1','2','3', 'A'},
{'4','5','6', 'B'},
{'7','8','9', 'C'},
{'*','0','#', 'D'}
};
byte pin_rows[ROW_NUM] = {9, 8, 7, 6}; // connect to the row pinouts of the keypad
byte pin_column[COLUMN_NUM] = {5, 4, 3, 2}; // connect to the column pinouts of the keypad
DIYables_Keypad keypad = DIYables_Keypad( makeKeymap(keys), pin_rows, pin_column, ROW_NUM, COLUMN_NUM );
const String password = "1234A"; // change your password here
String input_password;
void setup(){
Serial.begin(9600);
Serial.println("Keypad 4x4 password");
input_password.reserve(32); // maximum input characters is 33, change if needed
}
void loop(){
char key = keypad.getKey();
if (key){
Serial.println(key);
if(key == '*') {
input_password = ""; // clear input password
} else if(key == '#') {
if(password == input_password) {
Serial.println("password is correct");
// DO YOUR WORK HERE
} else {
Serial.println("password is incorrect, try again");
}
input_password = ""; // clear input password
} else {
input_password += key; // append new character to input password string
}
}
}
- 위의 제공된 코드를 실행하세요.
- 시리얼 모니터를 여세요.
- "1234BC"를 입력한 후 "#"을 누르세요.
- "1234A"를 입력한 후 "#"을 누르세요.
- 시리얼 모니터에서 결과를 확인하세요.
COM6
password is incorrect, try again
password is correct
Autoscroll
Clear output
9600 baud
Newline
동영상
비디오 제작은 시간이 많이 걸리는 작업입니다. 비디오 튜토리얼이 학습에 도움이 되었다면, YouTube 채널 을 구독하여 알려 주시기 바랍니다. 비디오에 대한 높은 수요가 있다면, 비디오를 만들기 위해 노력하겠습니다.
