아두이노 우노 R4 - MP3 플레이어

이 튜토리얼은 Arduino UNO R4, MP3 플레이어 모듈, Micro SD 카드 및 스피커를 사용하여 MP3 플레이어를 만드는 방법을 안내합니다. MP3 플레이어는 Micro SD 카드에서 음악이나 오디오 녹음을 불러옵니다. Arduino UNO R4는 MP3 플레이어 모듈을 제어하여 카드에서 노래를 선택하고 재생하며, 이를 오디오 신호로 변환하여 스피커로 전송합니다. 우리는 이러한 단계를 자세히 다룰 것입니다.

그런 다음, 전위차계나 로터리 엔코더를 포함하여 볼륨을 조절할 수 있도록 코드를 변경할 수 있습니다.
아두이노 UNO R4 mp3 플레이어

Hardware Preparation

1×Arduino UNO R4 WiFi Amazon
1×Arduino UNO R4 Minima (Alternatively) Amazon
1×USB Cable Type-C 쿠팡 | Amazon
1×Serial MP3 Player Module 쿠팡 | Amazon
1×Micro SD Card Amazon
1×3.5mm Aux Speaker Amazon
1×Jumper Wires Amazon
1×(Recommended) Screw Terminal Block Shield for Arduino UNO R4 쿠팡 | Amazon
1×(Recommended) Breadboard Shield For Arduino UNO R4 쿠팡 | Amazon
1×(Recommended) Enclosure For Arduino UNO R4 Amazon
1×(Recommended) Power Splitter For Arduino UNO R4 Amazon
공개: 이 섹션에서 제공된 링크 중 일부는 제휴 링크입니다. 이 링크를 통해 구매한 경우 추가 비용없이 수수료를 받을 수 있습니다. 지원해 주셔서 감사합니다.

직렬 MP3 플레이어 모듈 및 스피커에 대하여

직렬 MP3 플레이어 모듈 핀아웃

직렬 MP3 플레이어 모듈은 세 가지 인터페이스를 포함합니다:

  • Arduino UNO R4와의 인터페이스: 네 개의 핀이 있습니다:
    • RX 핀: 데이터용으로, 하드웨어 또는 소프트웨어 시리얼을 사용하여 Arduino UNO R4의 TX 핀에 연결해야 합니다.
    • TX 핀: 이것도 데이터용으로, 하드웨어 또는 소프트웨어 시리얼을 통해 Arduino UNO R4의 RX 핀에 연결해야 합니다.
    • VCC 핀: 전원용으로, VCC (5V)에 연결해야 합니다.
    • GND 핀: 접지 핀으로, GND (0V)에 연결해야 합니다.
  • 스피커와의 인터페이스: 3.5mm Aux 출력 여성 잭.
  • 마이크로 SD 카드와의 인터페이스: 모듈 뒷면에 위치한 마이크로 SD 카드 소켓.
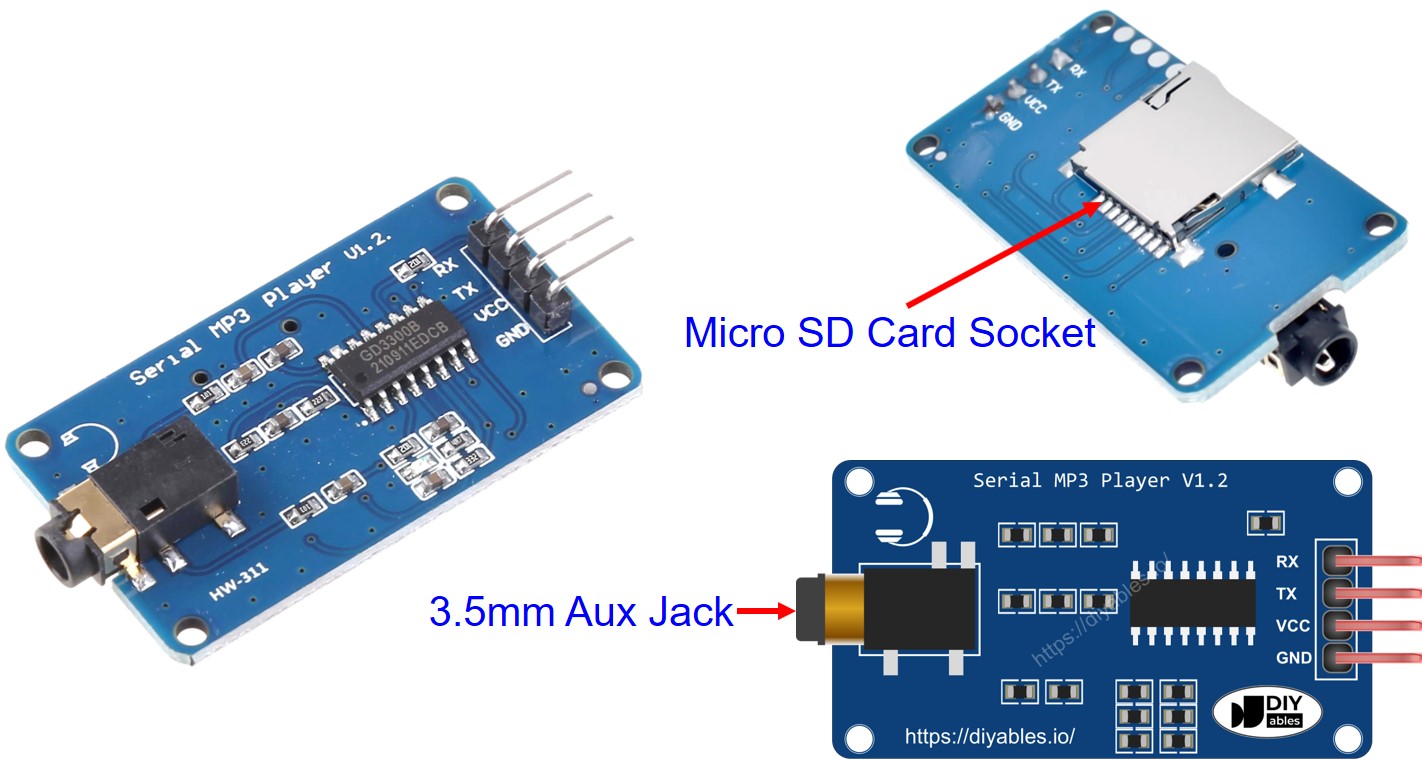
시리얼 MP3 플레이어 모듈 핀배열
image source: diyables.io

스피커 핀아웃

스피커는 일반적으로 두 개의 연결 지점을 가지고 있습니다.

  • 오디오 연결: 3.5mm Aux 수 커넥터를 사용하여 MP3 플레이어에 연결합니다.
  • 전원 연결: USB, 5V 전원 어댑터, 또는 다른 유형의 전원 연결을 사용할 수 있습니다.

작동 방식

준비해야 할 것:

  • 노래 또는 녹음 목록을 마이크로 SD 카드에 저장합니다.
  • 마이크로 SD 카드를 MP3 플레이어 모듈에 삽입합니다.
  • MP3 플레이어 모듈을 Arduino UNO R4에 연결합니다.
  • MP3 플레이어 모듈을 스피커에 연결합니다.
  • 스피커를 전원에 연결합니다.

Micro SD 카드의 모든 MP3 파일에는 노래의 순서를 나타내는 0부터 시작하는 번호가 있습니다.

그런 다음 아두이노 UNO R4를 설정하여 MP3 플레이어 모듈에 명령을 보내도록 할 수 있습니다. 이 모듈은 다음 명령을 처리할 수 있습니다:

  • 시작하기
  • 정지
  • 다음 곡 재생
  • 이전 곡 재생
  • 볼륨 조절

MP3 플레이어 모듈은 마이크로 SD 카드에 저장된 MP3 파일을 재생하고, 이를 오디오 신호로 변환하여 3.5mm Aux 인터페이스를 통해 스피커로 보냅니다.

Wiring Diagram

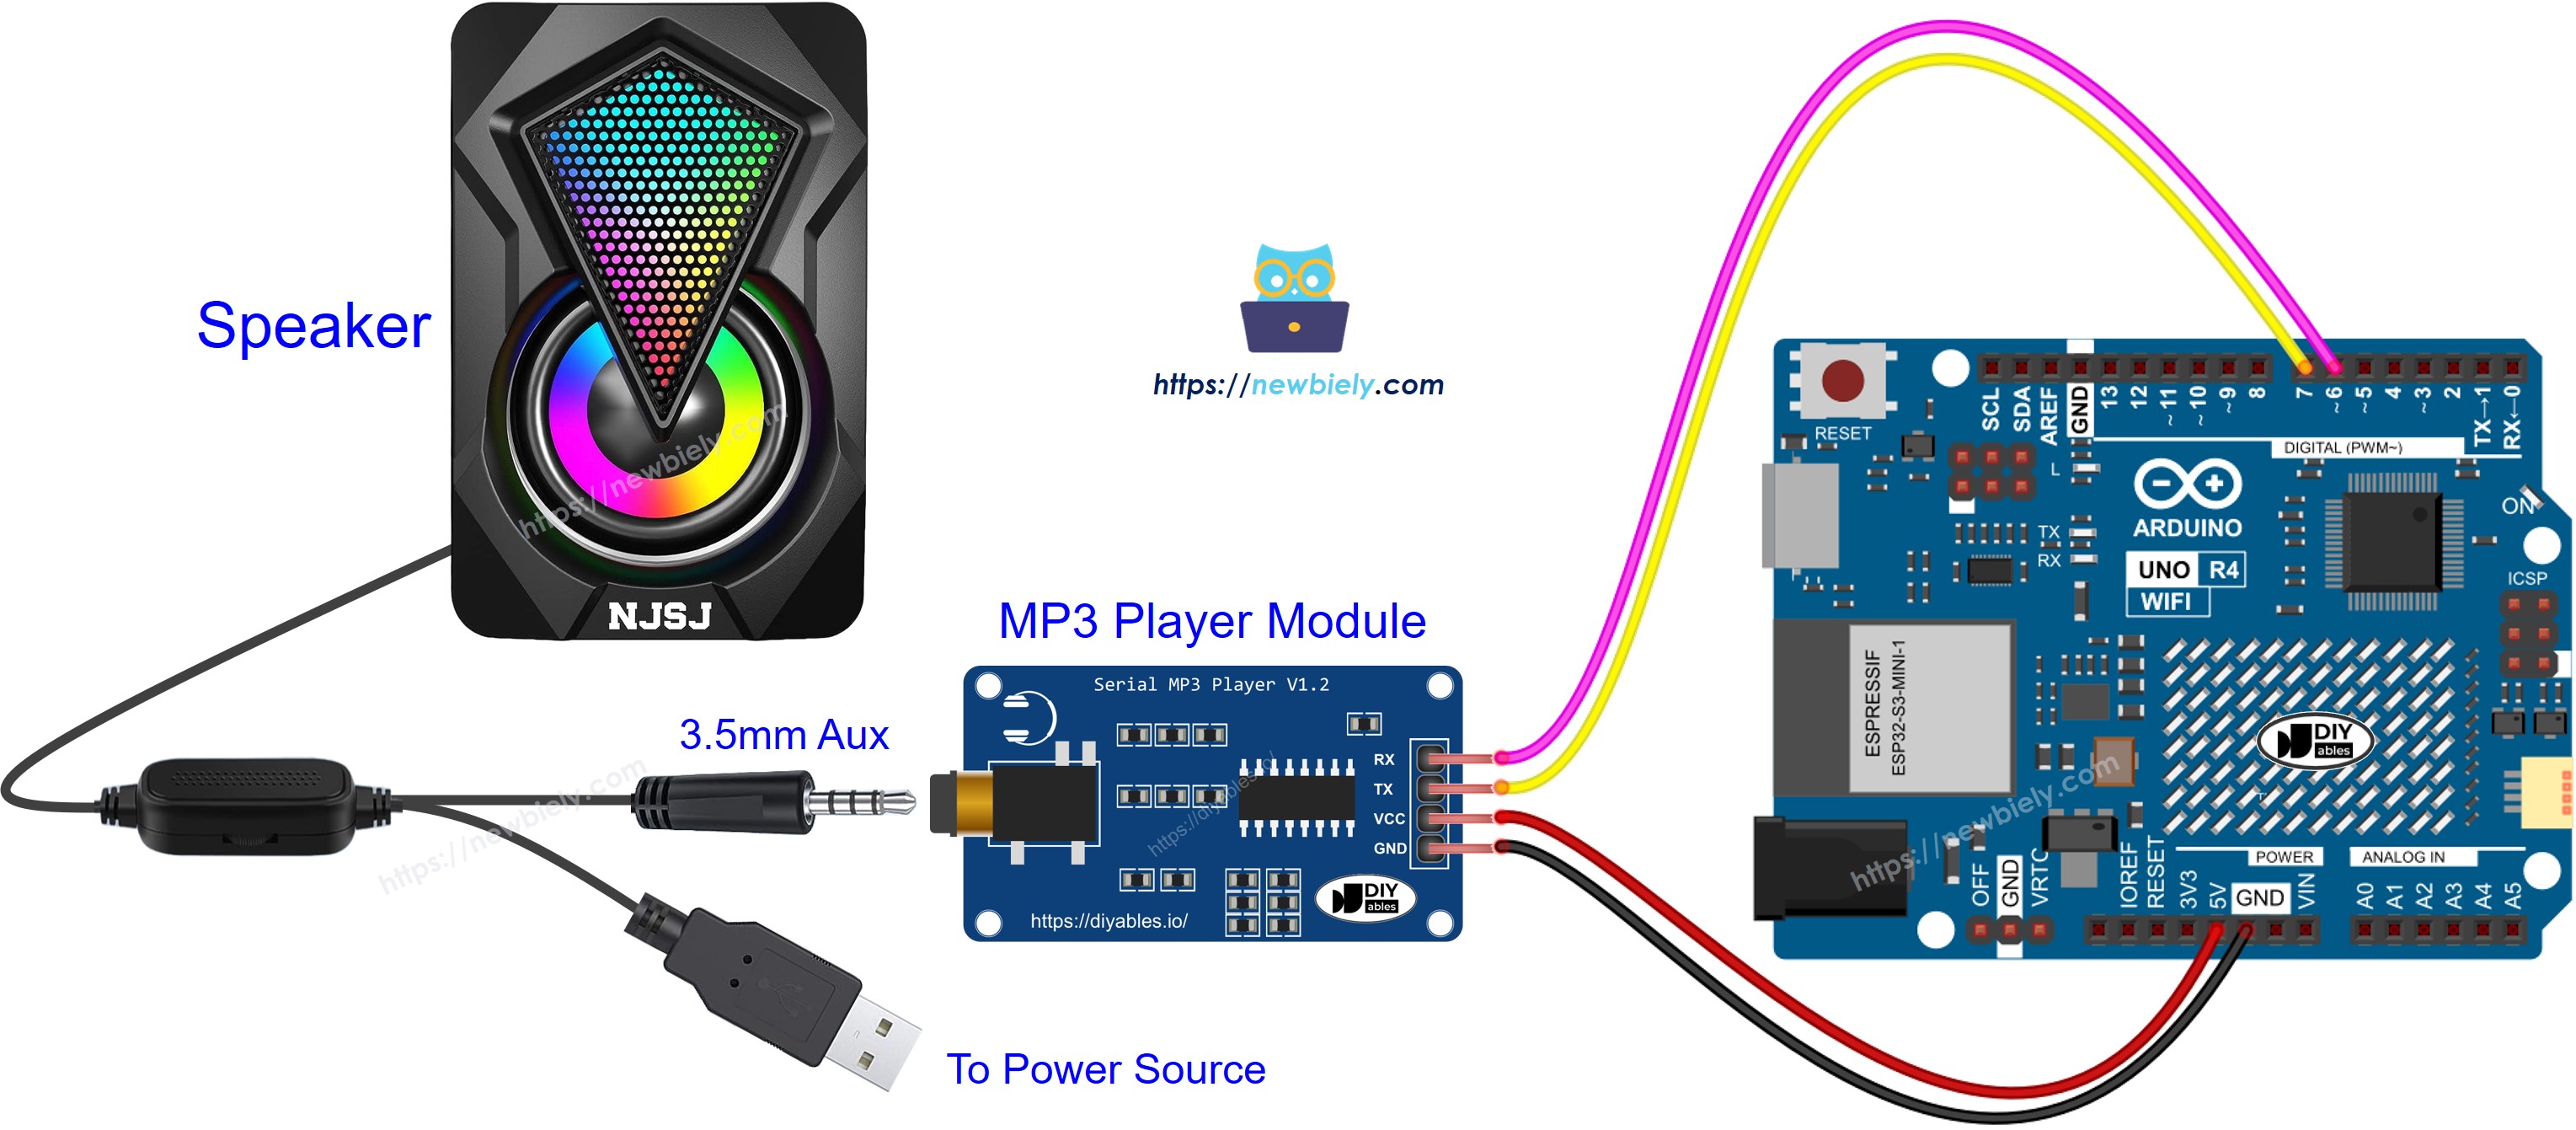
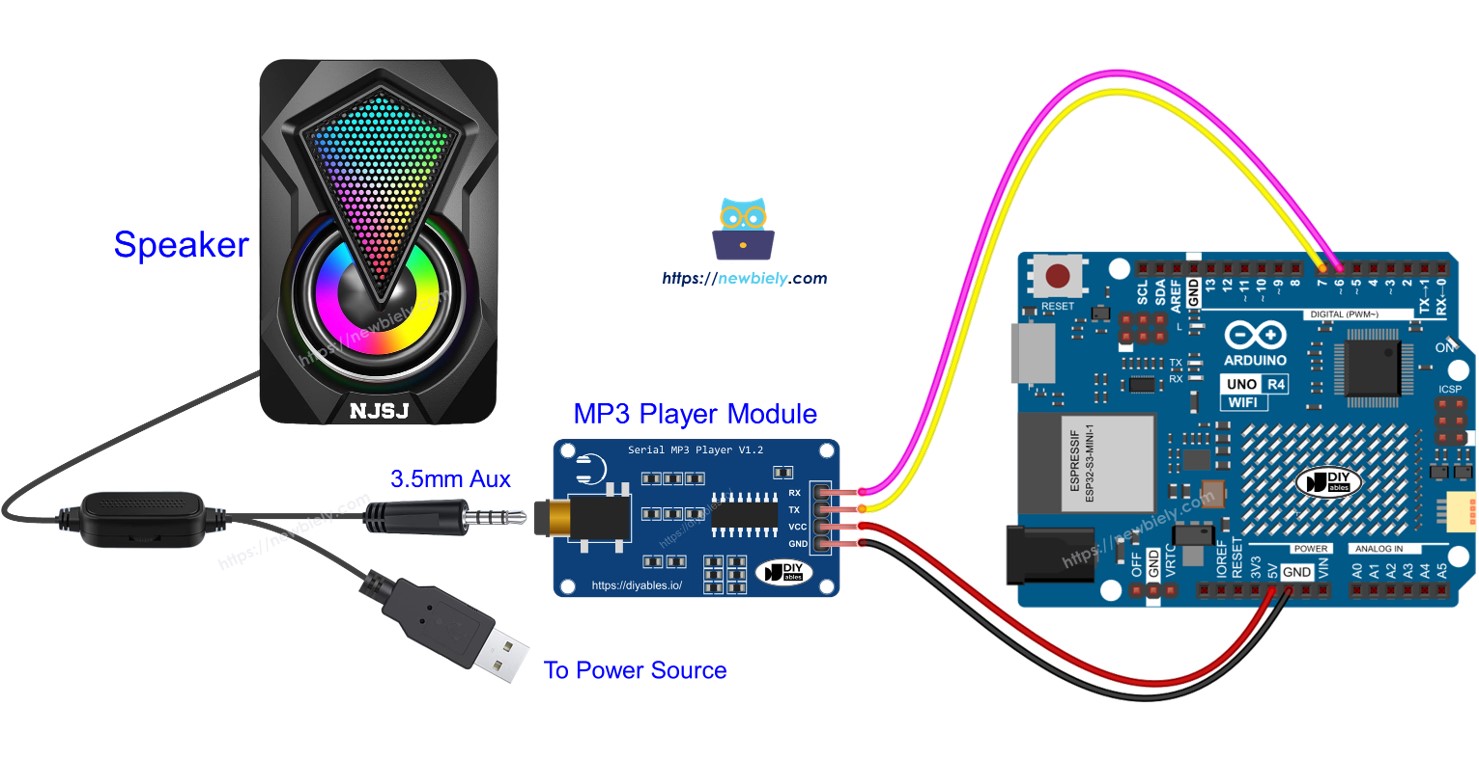
아두이노 UNO R4 MP3 플레이어 모듈 배선도

이 이미지는 Fritzing을 사용하여 만들어졌습니다. 이미지를 확대하려면 클릭하세요.

Arduino UNO R4 코드 - 음악 재생

아래 코드가 마이크로 SD 카드에 저장된 첫 번째 노래를 재생하기 시작합니다.

/* * 이 Arduino UNO R4 코드는 newbiely.kr 에서 개발되었습니다 * 이 Arduino UNO R4 코드는 어떠한 제한 없이 공개 사용을 위해 제공됩니다. * 상세한 지침 및 연결도에 대해서는 다음을 방문하세요: * https://newbiely.kr/tutorials/arduino-uno-r4/arduino-uno-r4-mp3-player */ #include <SoftwareSerial.h> #define CMD_PLAY_NEXT 0x01 #define CMD_PLAY_PREV 0x02 #define CMD_PLAY_W_INDEX 0x03 #define CMD_SET_VOLUME 0x06 #define CMD_SEL_DEV 0x09 #define CMD_PLAY_W_VOL 0x22 #define CMD_PLAY 0x0D #define CMD_PAUSE 0x0E #define CMD_SINGLE_CYCLE 0x19 #define DEV_TF 0x02 #define SINGLE_CYCLE_ON 0x00 #define SINGLE_CYCLE_OFF 0x01 #define ARDUINO_RX 7 // The Arduino UNO R4 pin connected to the TX of the Serial MP3 Player module #define ARDUINO_TX 6 // The Arduino UNO R4 pin connected to the RX of the Serial MP3 Player module SoftwareSerial mp3(ARDUINO_RX, ARDUINO_TX); void setup() { Serial.begin(9600); mp3.begin(9600); delay(500); // wait chip initialization is complete mp3_command(CMD_SEL_DEV, DEV_TF); // select the TF card delay(200); // wait for 200ms mp3_command(CMD_PLAY, 0x0000); // Play mp3 //mp3_command(CMD_PAUSE, 0x0000); // Pause mp3 //mp3_command(CMD_PLAY_NEXT, 0x0000); // Play next mp3 //mp3_command(CMD_PLAY_PREV, 0x0000); // Play previous mp3 //mp3_command(CMD_SET_VOLUME, 30); // Change volume to 30 } void loop() { } void mp3_command(int8_t command, int16_t dat) { int8_t frame[8] = { 0 }; frame[0] = 0x7e; // starting byte frame[1] = 0xff; // version frame[2] = 0x06; // the number of bytes of the command without starting byte and ending byte frame[3] = command; // frame[4] = 0x00; // 0x00 = no feedback, 0x01 = feedback frame[5] = (int8_t)(dat >> 8); // data high byte frame[6] = (int8_t)(dat); // data low byte frame[7] = 0xef; // ending byte for (uint8_t i = 0; i < 8; i++) { mp3.write(frame[i]); } }

Detailed Instructions

이 단계별 지침을 따르세요:

  • Arduino Uno R4 WiFi/Minima를 처음 사용하는 경우, Arduino IDE에서 Arduino Uno R4 WiFi/Minima 환경 설정 튜토리얼을 참조하십시오.
  • 제공된 다이어그램에 따라 부품을 연결하십시오.
  • USB 케이블을 사용하여 Arduino Uno R4 보드를 컴퓨터에 연결하십시오.
  • 컴퓨터에서 Arduino IDE를 실행하십시오.
  • 적절한 Arduino Uno R4 보드(예: Arduino Uno R4 WiFi)와 COM 포트를 선택하십시오.
  • 작동 원리 섹션의 단계를 따르십시오.
  • 제공된 코드를 복사하여 Arduino IDE에서 사용하십시오.
  • Arduino IDE에서 코드 전송을 위해 Upload 버튼을 누르십시오.
  • 음악을 즐기십시오.

Arduino UNO R4 코드 - 버튼으로 음악 재생

아래 코드는 이전 코드의 개선된 버전입니다. MP3 플레이어를 제어할 수 있는 네 개의 버튼이 포함되어 있습니다.

/* * 이 Arduino UNO R4 코드는 newbiely.kr 에서 개발되었습니다 * 이 Arduino UNO R4 코드는 어떠한 제한 없이 공개 사용을 위해 제공됩니다. * 상세한 지침 및 연결도에 대해서는 다음을 방문하세요: * https://newbiely.kr/tutorials/arduino-uno-r4/arduino-uno-r4-mp3-player */ #include <SoftwareSerial.h> #include <ezButton.h> #define CMD_PLAY_NEXT 0x01 #define CMD_PLAY_PREV 0x02 #define CMD_PLAY_W_INDEX 0x03 #define CMD_SET_VOLUME 0x06 #define CMD_SEL_DEV 0x09 #define CMD_PLAY_W_VOL 0x22 #define CMD_PLAY 0x0D #define CMD_PAUSE 0x0E #define CMD_SINGLE_CYCLE 0x19 #define DEV_TF 0x02 #define SINGLE_CYCLE_ON 0x00 #define SINGLE_CYCLE_OFF 0x01 #define ARDUINO_RX 7 // The Arduino UNO R4 pin connected to the TX of the Serial MP3 Player module #define ARDUINO_TX 6 // The Arduino UNO R4 pin connected to the RX of the Serial MP3 Player module SoftwareSerial mp3(ARDUINO_RX, ARDUINO_TX); ezButton button_play(2); // create ezButton object that attach to pin 2 ezButton button_pause(3); // create ezButton object that attach to pin 3 ezButton button_next(4); // create ezButton object that attach to pin 4 ezButton button_prev(5); // create ezButton object that attach to pin 5 void setup() { Serial.begin(9600); mp3.begin(9600); delay(500); // wait chip initialization is complete mp3_command(CMD_SEL_DEV, DEV_TF); // select the TF card delay(200); // wait for 200ms button_play.setDebounceTime(50); // set debounce time to 50 milliseconds button_pause.setDebounceTime(50); // set debounce time to 50 milliseconds button_next.setDebounceTime(50); // set debounce time to 50 milliseconds button_prev.setDebounceTime(50); // set debounce time to 50 milliseconds } void loop() { button_play.loop(); // MUST call the loop() function first button_pause.loop(); // MUST call the loop() function first button_next.loop(); // MUST call the loop() function first button_prev.loop(); // MUST call the loop() function first if (button_play.isPressed()) { Serial.println("Play mp3"); mp3_command(CMD_PLAY, 0x0000); } if (button_pause.isPressed()) { Serial.println("Pause mp3"); mp3_command(CMD_PAUSE, 0x0000); } if (button_next.isPressed()) { Serial.println("Play next mp3"); mp3_command(CMD_PLAY_NEXT, 0x0000); } if (button_prev.isPressed()) { Serial.println("Play previous mp3"); mp3_command(CMD_PLAY_PREV, 0x0000); } } void mp3_command(int8_t command, int16_t dat) { int8_t frame[8] = { 0 }; frame[0] = 0x7e; // starting byte frame[1] = 0xff; // version frame[2] = 0x06; // the number of bytes of the command without starting byte and ending byte frame[3] = command; // frame[4] = 0x00; // 0x00 = no feedback, 0x01 = feedback frame[5] = (int8_t)(dat >> 8); // data high byte frame[6] = (int8_t)(dat); // data low byte frame[7] = 0xef; // ending byte for (uint8_t i = 0; i < 8; i++) { mp3.write(frame[i]); } }

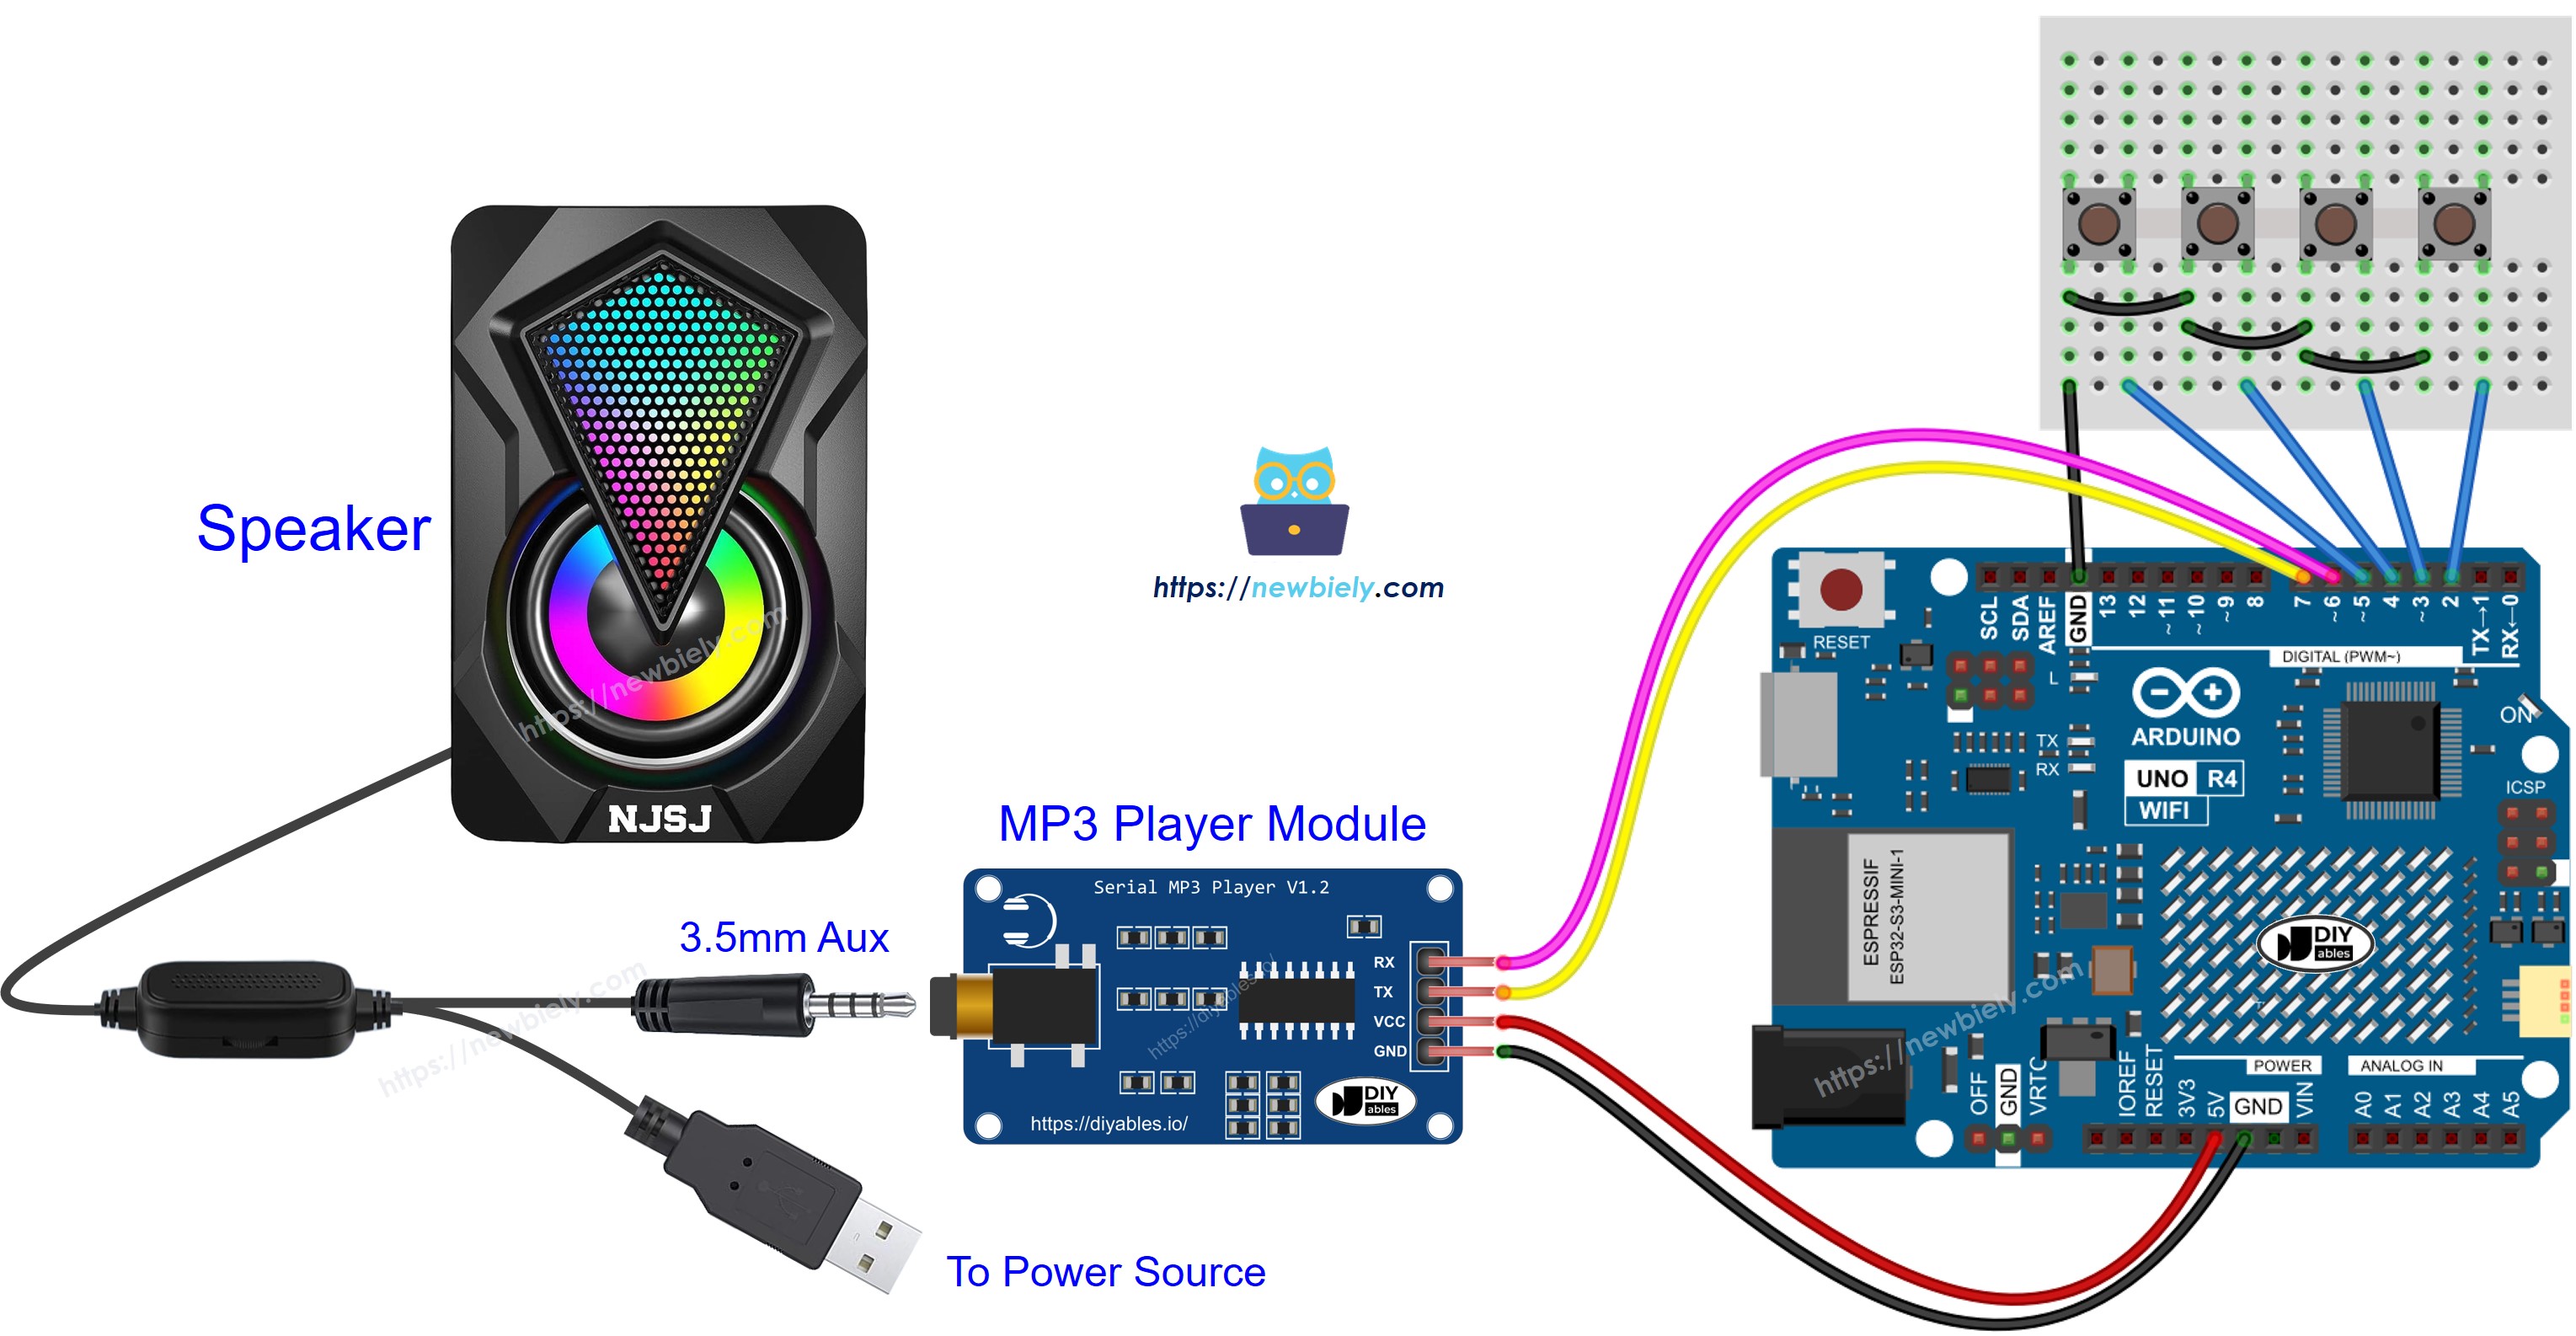
언급된 코드의 배선 연결:

아두이노 UNO R4 MP3 플레이어 스피커 배선도

이 이미지는 Fritzing을 사용하여 만들어졌습니다. 이미지를 확대하려면 클릭하세요.

이제 프로젝트에 더 많은 기능을 포함하도록 변경할 수 있습니다. 예를 들면:

  • 볼륨을 조절할 수 있는 가변 저항기를 포함하십시오. 자세한 지침은 Arduino UNO R4 Potentiometer 튜토리얼을 참조하십시오.
  • Arduino UNO R4 IR Remote Controller 튜토리얼을 따라 IR 리모컨을 통합하십시오.
  • RFID MP3 플레이어를 만들기 위해 RFID 리더기와 카드를 추가하십시오. 자세한 내용은 Arduino UNO R4 RFID 튜토리얼을 방문하십시오.

Video Tutorial

비디오 제작은 시간이 많이 걸리는 작업입니다. 비디오 튜토리얼이 학습에 도움이 되었다면, YouTube 채널 을 구독하여 알려 주시기 바랍니다. 비디오에 대한 높은 수요가 있다면, 비디오를 만들기 위해 노력하겠습니다.

※ OUR MESSAGES

  • Please feel free to share the link of this tutorial. However, Please do not use our content on any other websites. We invested a lot of effort and time to create the content, please respect our work!