
아두이노 우노 R4 신호등
이 가이드에서는 Arduino UNO R4를 사용하여 신호등 모듈을 제어하는 방법을 배웁니다. 우리는 다음을 다룰 것입니다:
- 트래픽 라이트 모듈을 Arduino UNO R4에 연결하는 방법
- Arduino UNO R4를 프로그래밍하여 트래픽 라이트 모듈을 제어하는 방법
- Delay() 함수를 사용하지 않고 Arduino UNO R4를 프로그래밍하여 트래픽 라이트 모듈을 제어하는 방법

준비물
| 1 | × | Arduino UNO R4 WiFi or Arduino UNO R4 Minima | ||
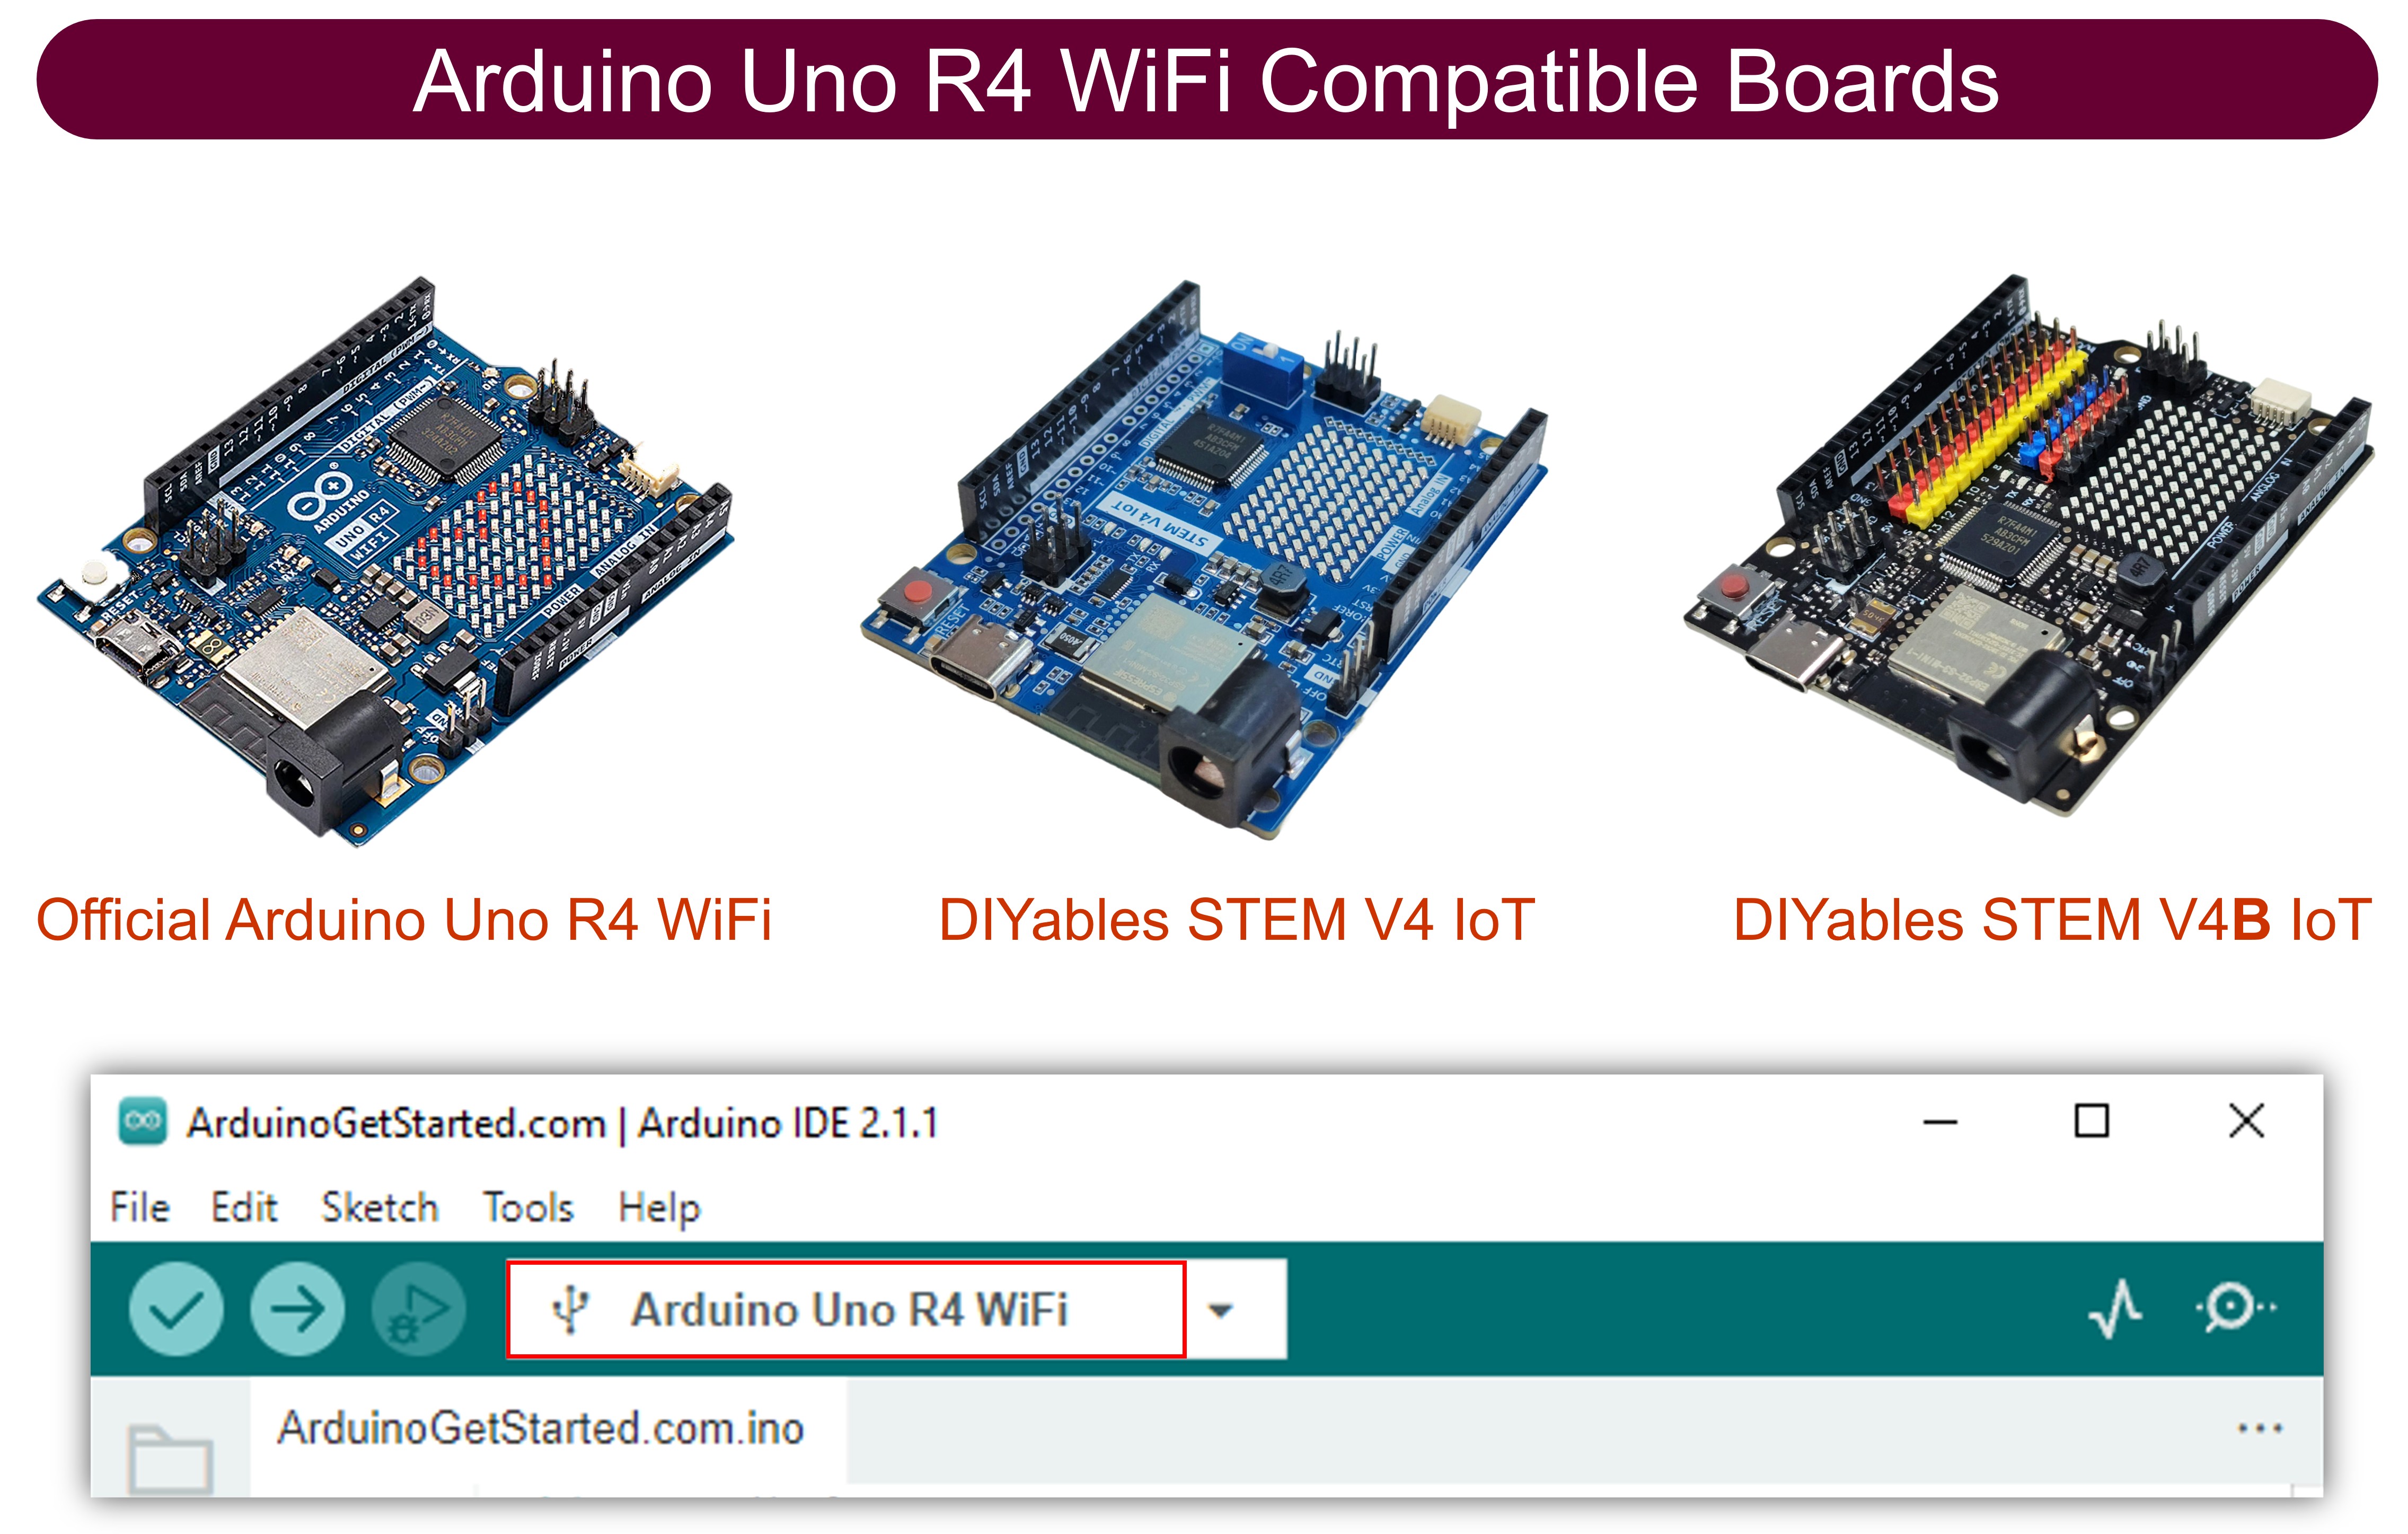
| 1 | × | (또는) DIYables STEM V4 IoT, Compatible with Arduino Uno R4 WiFi | 쿠팡 | 아마존 | |
| 1 | × | USB 케이블 타입-A to 타입-C (USB-A PC용) | 쿠팡 | 아마존 | |
| 1 | × | USB 케이블 타입-C to 타입-C (USB-C PC용) | 아마존 | |
| 1 | × | 신호등 모듈 | 쿠팡 | 아마존 | |
| 1 | × | 점퍼케이블 | 쿠팡 | 아마존 | |
| 1 | × | (추천) 아두이노 우노 R4용 스크루 터미널 블록 쉴드 | 쿠팡 | 아마존 | |
| 1 | × | (추천) Sensors/Servo Expansion Shield for Arduino UNO R4 | 쿠팡 | 아마존 | |
| 1 | × | (추천) 아두이노 우노 R4용 브레드보드 쉴드 | 쿠팡 | 아마존 | |
| 1 | × | (추천) 아두이노 우노 R4용 케이스 | 쿠팡 | 아마존 | |
| 1 | × | (추천) 아두이노 우노 R4용 전원 분배기 | 쿠팡 | 아마존 | |
| 1 | × | (추천) 아두이노 우노용 프로토타이핑 베이스 플레이트 & 브레드보드 키트 | 아마존 |
공개: 이 포스팅 에 제공된 일부 링크는 아마존 제휴 링크입니다. 이 포스팅은 쿠팡 파트너스 활동의 일환으로, 이에 따른 일정액의 수수료를 제공받습니다.
교통 신호 모듈에 대하여
핀아웃
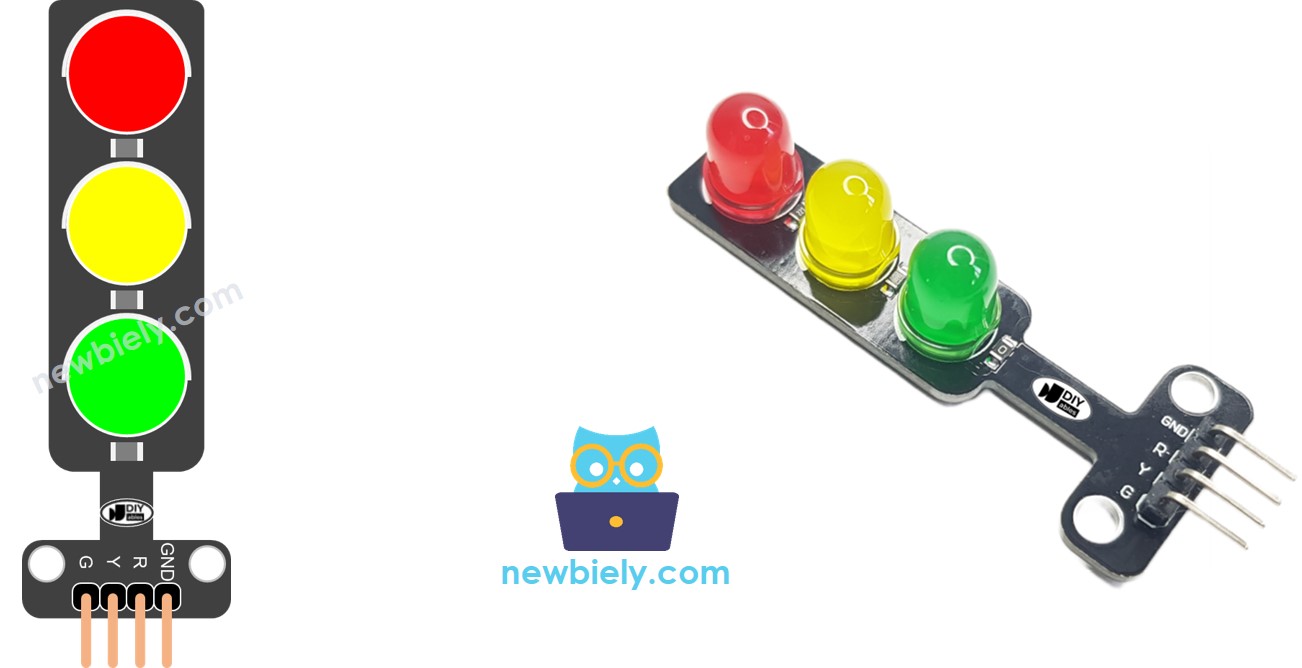
교통 신호 모듈에는 4개의 핀이 있습니다.
- GND 핀: 이 핀은 접지 핀입니다. 이를 Arduino UNO R4의 GND에 연결하십시오.
- R 핀: 이 핀은 빨간 불을 제어합니다. 이를 Arduino UNO R4의 디지털 출력에 연결하십시오.
- Y 핀: 이 핀은 노란 불을 제어합니다. 이를 Arduino UNO R4의 디지털 출력에 연결하십시오.
- G 핀: 이 핀은 초록 불을 제어합니다. 이를 Arduino UNO R4의 디지털 출력에 연결하십시오.
작동 방식
선연결

이 이미지는 Fritzing을 사용하여 만들어졌습니다. 이미지를 확대하려면 클릭하세요.
더 깔끔하고 안전한 구성을 원하시나요? Proto Screw Terminal Block Shield 또는 Screw Shield V2로 이 문제를 해결할 수 있습니다. Arduino UNO R4에 꽂고 전선을 나사로 고정하세요. 다음은 Screw Shield V2를 통해 배선한 같은 회로입니다:
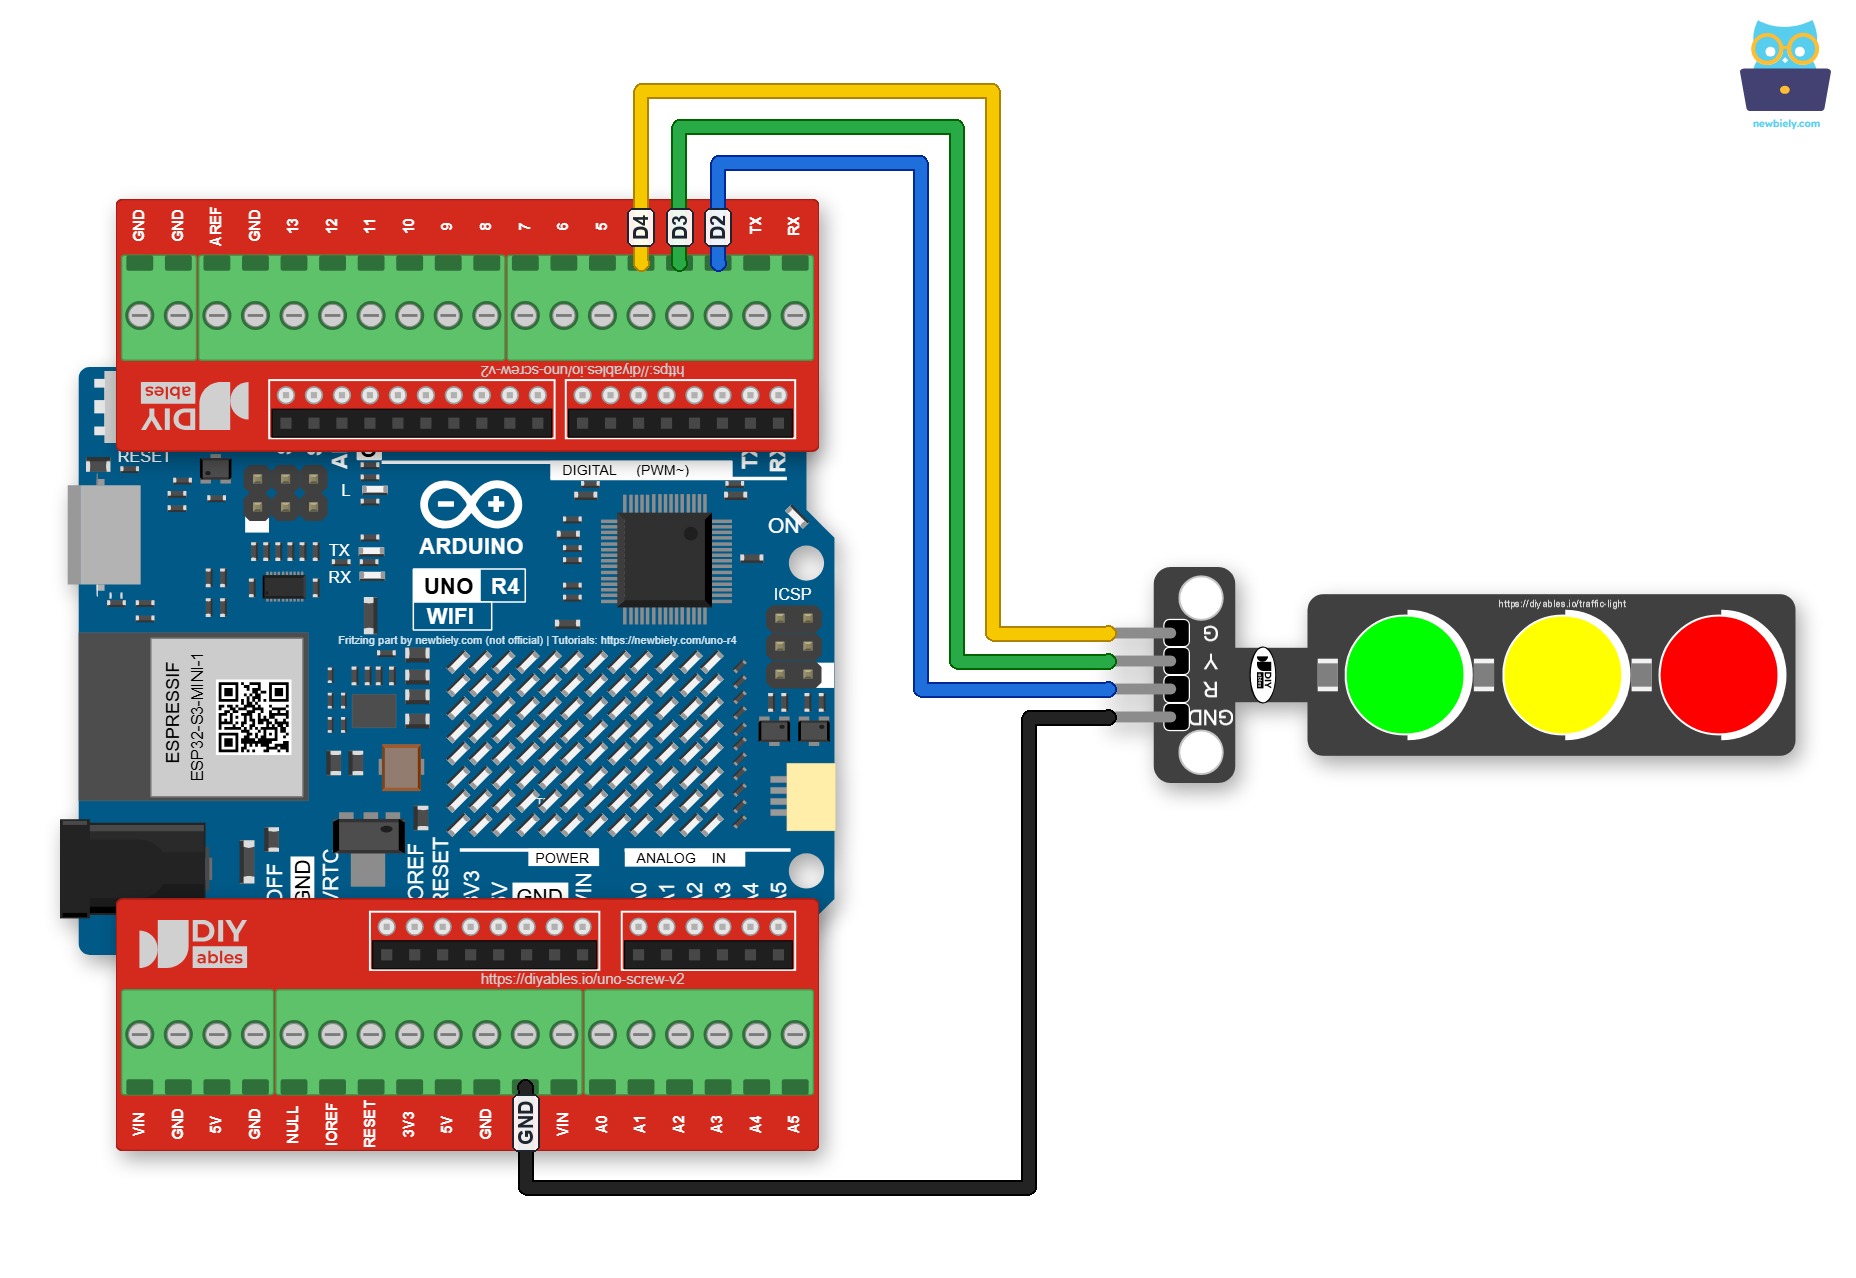
이 이미지는 Fritzing을 사용하여 만들어졌습니다. 이미지를 확대하려면 클릭하세요.
Arduino Uno R4와 기타 부품에 전원을 공급하는 가장 효과적인 방법을 확인하시려면, 아래 링크를 참조하세요: 아두이노 우노 R4 전원 공급 방법.
교통 신호 모듈을 프로그래밍하는 방법
- Arduino UNO R4의 핀을 pinMode() 함수를 사용하여 디지털 출력으로 설정합니다.
pinMode(PIN_RED, OUTPUT);
pinMode(PIN_YELLOW, OUTPUT);
pinMode(PIN_GREEN, OUTPUT);
- digitalWrite() 함수를 사용하여 빨간 불을 활성화하는 프로그램:
digital-Write(PIN_RED, HIGH); // RED LED를 켭니다
digitalWrite(PIN_YELLOW, LOW); // YELLOW LED를 끕니다
digitalWrite(PIN_GREEN, LOW); // GREEN LED를 끕니다
delay(RED_TIME); // RED_TIME으로 정의된 시간 동안 RED LED가 켜진 상태를 유지합니다
아두이노 UNO R4 코드
/*
* 이 아두이노 우노 R4 코드는 newbiely.kr 에서 개발되었습니다
* 이 아두이노 우노 R4 코드는 어떠한 제한 없이 공개 사용을 위해 제공됩니다.
* 상세한 지침 및 연결도에 대해서는 다음을 방문하세요:
* https://newbiely.kr/tutorials/arduino-uno-r4/arduino-uno-r4-traffic-light
*/
#define PIN_RED 2 // The Arduino UNO R4 pin connected to R pin of traffic light module
#define PIN_YELLOW 3 // The Arduino UNO R4 pin connected to Y pin of traffic light module
#define PIN_GREEN 4 // The Arduino UNO R4 pin connected to G pin of traffic light module
#define RED_TIME 4000 // RED time in millisecond
#define YELLOW_TIME 4000 // YELLOW time in millisecond
#define GREEN_TIME 4000 // GREEN time in millisecond
void setup() {
pinMode(PIN_RED, OUTPUT);
pinMode(PIN_YELLOW, OUTPUT);
pinMode(PIN_GREEN, OUTPUT);
}
// the loop function runs over and over again forever
void loop() {
// red light on
digitalWrite(PIN_RED, HIGH); // turn on
digitalWrite(PIN_YELLOW, LOW); // turn off
digitalWrite(PIN_GREEN, LOW); // turn off
delay(RED_TIME); // keep red light on during a period of time
// yellow light on
digitalWrite(PIN_RED, LOW); // turn off
digitalWrite(PIN_YELLOW, HIGH); // turn on
digitalWrite(PIN_GREEN, LOW); // turn off
delay(YELLOW_TIME); // keep yellow light on during a period of time
// green light on
digitalWrite(PIN_RED, LOW); // turn off
digitalWrite(PIN_YELLOW, LOW); // turn off
digitalWrite(PIN_GREEN, HIGH); // turn on
delay(GREEN_TIME); // keep green light on during a period of time
}
자세한 사용 방법
이 지침을 단계별로 따르세요:
- 만약 Arduino Uno R4 WiFi/Minima를 처음 사용하신다면, 아두이노 우노 R4 - 소프트웨어 설치 튜토리얼을 참조하세요.
- 주어진 다이어그램에 따라 교통 신호등 모듈을 Arduino Uno R4에 연결하세요.
- USB 케이블을 사용하여 Arduino Uno R4 보드를 컴퓨터에 연결하세요.
- 컴퓨터에서 Arduino IDE를 실행하세요.
- 적절한 Arduino Uno R4 보드(예: Arduino Uno R4 WiFi) 및 COM 포트를 선택하세요.
- 코드를 복사하여 Arduino IDE에서 엽니다.
- Arduino IDE에서 Upload 버튼을 클릭하여 코드를 Arduino UNO R4에 업로드하세요.
- 교통 신호등 모듈을 확인하세요.
신호등은 각 지역에서 사용되는 설계에 따라 다르게 작동합니다. 여기에서 제공되는 정보는 신호등이 어떻게 교통을 제어하는지에 대한 기본적인 아이디어를 제공합니다.
위에 표시된 코드는 각 조명을 개별적으로 제어할 수 있게 합니다. 이제 우리는 코드의 성능을 향상시키겠습니다.
Arduino UNO R4 코드 최적화
- 코드 개선을 위해 조명을 제어할 수 있는 기능을 추가합시다.
/*
* 이 아두이노 우노 R4 코드는 newbiely.kr 에서 개발되었습니다
* 이 아두이노 우노 R4 코드는 어떠한 제한 없이 공개 사용을 위해 제공됩니다.
* 상세한 지침 및 연결도에 대해서는 다음을 방문하세요:
* https://newbiely.kr/tutorials/arduino-uno-r4/arduino-uno-r4-traffic-light
*/
#define PIN_RED 2 // The Arduino UNO R4 pin connected to R pin of traffic light module
#define PIN_YELLOW 3 // The Arduino UNO R4 pin connected to Y pin of traffic light module
#define PIN_GREEN 4 // The Arduino UNO R4 pin connected to G pin of traffic light module
#define RED_TIME 2000 // RED time in millisecond
#define YELLOW_TIME 1000 // YELLOW time in millisecond
#define GREEN_TIME 2000 // GREEN time in millisecond
#define RED 0 // Index in array
#define YELLOW 1 // Index in array
#define GREEN 2 // Index in array
const int pins[] = { PIN_RED, PIN_YELLOW, PIN_GREEN };
const int times[] = { RED_TIME, YELLOW_TIME, GREEN_TIME };
void setup() {
pinMode(PIN_RED, OUTPUT);
pinMode(PIN_YELLOW, OUTPUT);
pinMode(PIN_GREEN, OUTPUT);
}
// the loop function runs over and over again forever
void loop() {
// red light on
trafic_light_on(RED);
delay(times[RED]); // keep red light on during a period of time
// yellow light on
trafic_light_on(YELLOW);
delay(times[YELLOW]); // keep yellow light on during a period of time
// green light on
trafic_light_on(GREEN);
delay(times[GREEN]); // keep green light on during a period of time
}
void trafic_light_on(int light) {
for (int i = RED; i <= GREEN; i++) {
if (i == light)
digitalWrite(pins[i], HIGH); // turn on
else
digitalWrite(pins[i], LOW); // turn off
}
}
- 우리는 for 루프를 사용하여 코드를 더 좋게 만들 수 있습니다.
/*
* 이 아두이노 우노 R4 코드는 newbiely.kr 에서 개발되었습니다
* 이 아두이노 우노 R4 코드는 어떠한 제한 없이 공개 사용을 위해 제공됩니다.
* 상세한 지침 및 연결도에 대해서는 다음을 방문하세요:
* https://newbiely.kr/tutorials/arduino-uno-r4/arduino-uno-r4-traffic-light
*/
#define PIN_RED 2 // The Arduino UNO R4 pin connected to R pin of traffic light module
#define PIN_YELLOW 3 // The Arduino UNO R4 pin connected to Y pin of traffic light module
#define PIN_GREEN 4 // The Arduino UNO R4 pin connected to G pin of traffic light module
#define RED_TIME 2000 // RED time in millisecond
#define YELLOW_TIME 1000 // YELLOW time in millisecond
#define GREEN_TIME 2000 // GREEN time in millisecond
#define RED 0 // Index in array
#define YELLOW 1 // Index in array
#define GREEN 2 // Index in array
const int pins[] = {PIN_RED, PIN_YELLOW, PIN_GREEN};
const int times[] = {RED_TIME, YELLOW_TIME, GREEN_TIME};
void setup() {
pinMode(PIN_RED, OUTPUT);
pinMode(PIN_YELLOW, OUTPUT);
pinMode(PIN_GREEN, OUTPUT);
}
// the loop function runs over and over again forever
void loop() {
for (int light = RED; light <= GREEN; light ++) {
trafic_light_on(light);
delay(times[light]); // keep light on during a period of time
}
}
void trafic_light_on(int light) {
for (int i = RED; i <= GREEN; i ++) {
if (i == light)
digitalWrite(pins[i], HIGH); // turn on
else
digitalWrite(pins[i], LOW); // turn off
}
}
- 코드 개선을 위해 delay() 대신 millis() 함수를 사용합시다.
/*
* 이 아두이노 우노 R4 코드는 newbiely.kr 에서 개발되었습니다
* 이 아두이노 우노 R4 코드는 어떠한 제한 없이 공개 사용을 위해 제공됩니다.
* 상세한 지침 및 연결도에 대해서는 다음을 방문하세요:
* https://newbiely.kr/tutorials/arduino-uno-r4/arduino-uno-r4-traffic-light
*/
#define PIN_RED 2 // The Arduino UNO R4 pin connected to R pin of traffic light module
#define PIN_YELLOW 3 // The Arduino UNO R4 pin connected to Y pin of traffic light module
#define PIN_GREEN 4 // The Arduino UNO R4 pin connected to G pin of traffic light module
#define RED_TIME 2000 // RED time in millisecond
#define YELLOW_TIME 1000 // YELLOW time in millisecond
#define GREEN_TIME 2000 // GREEN time in millisecond
#define RED 0 // Index in array
#define YELLOW 1 // Index in array
#define GREEN 2 // Index in array
const int pins[] = { PIN_RED, PIN_YELLOW, PIN_GREEN };
const int times[] = { RED_TIME, YELLOW_TIME, GREEN_TIME };
unsigned long last_time = 0;
int light = RED; // start with RED light
void setup() {
pinMode(PIN_RED, OUTPUT);
pinMode(PIN_YELLOW, OUTPUT);
pinMode(PIN_GREEN, OUTPUT);
trafic_light_on(light);
last_time = millis();
}
// the loop function runs over and over again forever
void loop() {
if ((millis() - last_time) > times[light]) {
light++;
if (light >= 3)
light = RED; // new circle
trafic_light_on(light);
last_time = millis();
}
// TO DO: your other code
}
void trafic_light_on(int light) {
for (int i = RED; i <= GREEN; i++) {
if (i == light)
digitalWrite(pins[i], HIGH); // turn on
else
digitalWrite(pins[i], LOW); // turn off
}
}
동영상
비디오 제작은 시간이 많이 걸리는 작업입니다. 비디오 튜토리얼이 학습에 도움이 되었다면, YouTube 채널 을 구독하여 알려 주시기 바랍니다. 비디오에 대한 높은 수요가 있다면, 비디오를 만들기 위해 노력하겠습니다.


