아두이노 WebRTC 예제 실시간 시계 인터페이스 튜토리얼
개요
WebRTC 예제는 Arduino 프로젝트를 위한 포괄적인 실시간 시계 인터페이스를 제공합니다. Arduino Uno R4 WiFi 및 DIYables STEM V4 IoT에 맞춰 설계된 교육 플랫폼으로, 내장 RTC 기능, 향상된 시간 관리 기능 및 교육 생태계와의 원활한 통합을 갖추고 있습니다. 실시간 시계 정보를 표시하고, 웹 브라우저에서 Arduino로 시간을 동기화하며, 직관적인 웹 인터페이스를 통해 시간 차이를 모니터링할 수 있습니다.
특징
- 실시간 시계 표시: 자동 업데이트로 현재 Arduino RTC 시간을 표시합니다
- 장치 시간 비교: 웹 브라우저 및 장치 시간을 Arduino 시간과 함께 표시합니다
- 원클릭 시간 동기화: 웹 브라우저 시간과 Arduino RTC를 즉시 동기화합니다
- 시각적 시간 차이 표시: 장치 간 시간 차이를 분 단위로 표시합니다
- 두 줄 시간 형식: 전체 날짜 표시가 포함된 12시간제 AM/PM 형식
- 현대적 그라데이션 UI: 카드 스타일의 레이아웃과 반응형 디자인
- 웹소켓 통신: 페이지 새로고침 없이 실시간 양방향 업데이트
- 시간대 인식 동기화: 정확한 동기화를 위해 로컬 디바이스 시간을 사용합니다
- 연결 상태 모니터링: 웹소켓 연결 상태에 대한 시각적 표시
- 자동 시간 요청: 페이지 로드 시 현재 Arduino 시간을 요청합니다
- 플랫폼 확장성: 현재 Arduino Uno R4 WiFi에 대해 구현되어 있지만 다른 하드웨어 플랫폼으로 확장할 수 있습니다. 자세한 내용은 DIYables_WebApps_ESP32를 참조하십시오.
준비물
| 1 | × | 아두이노 우노 R4 와이파이 | 쿠팡 | 아마존 | |
| 1 | × | (또는) DIYables STEM V4 IoT | 쿠팡 | 아마존 | |
| 1 | × | USB 케이블 타입-A to 타입-C (USB-A PC용) | 쿠팡 | 아마존 | |
| 1 | × | USB 케이블 타입-C to 타입-C (USB-C PC용) | 아마존 | |
| 1 | × | (추천) 아두이노 우노 R4용 스크루 터미널 블록 쉴드 | 쿠팡 | 아마존 | |
| 1 | × | (추천) Sensors/Servo Expansion Shield for Arduino UNO R4 | 쿠팡 | 아마존 | |
| 1 | × | (추천) 아두이노 우노 R4용 브레드보드 쉴드 | 쿠팡 | 아마존 | |
| 1 | × | (추천) 아두이노 우노 R4용 케이스 | 쿠팡 | 아마존 | |
| 1 | × | (추천) 아두이노 우노 R4용 전원 분배기 | 쿠팡 | 아마존 | |
| 1 | × | (추천) 아두이노 우노용 프로토타이핑 베이스 플레이트 & 브레드보드 키트 | 아마존 |
공개: 이 포스팅 에 제공된 일부 링크는 아마존 제휴 링크입니다. 이 포스팅은 쿠팡 파트너스 활동의 일환으로, 이에 따른 일정액의 수수료를 제공받습니다.
설정 지침
빠른 단계들
다음 지침을 단계별로 따라가십시오:
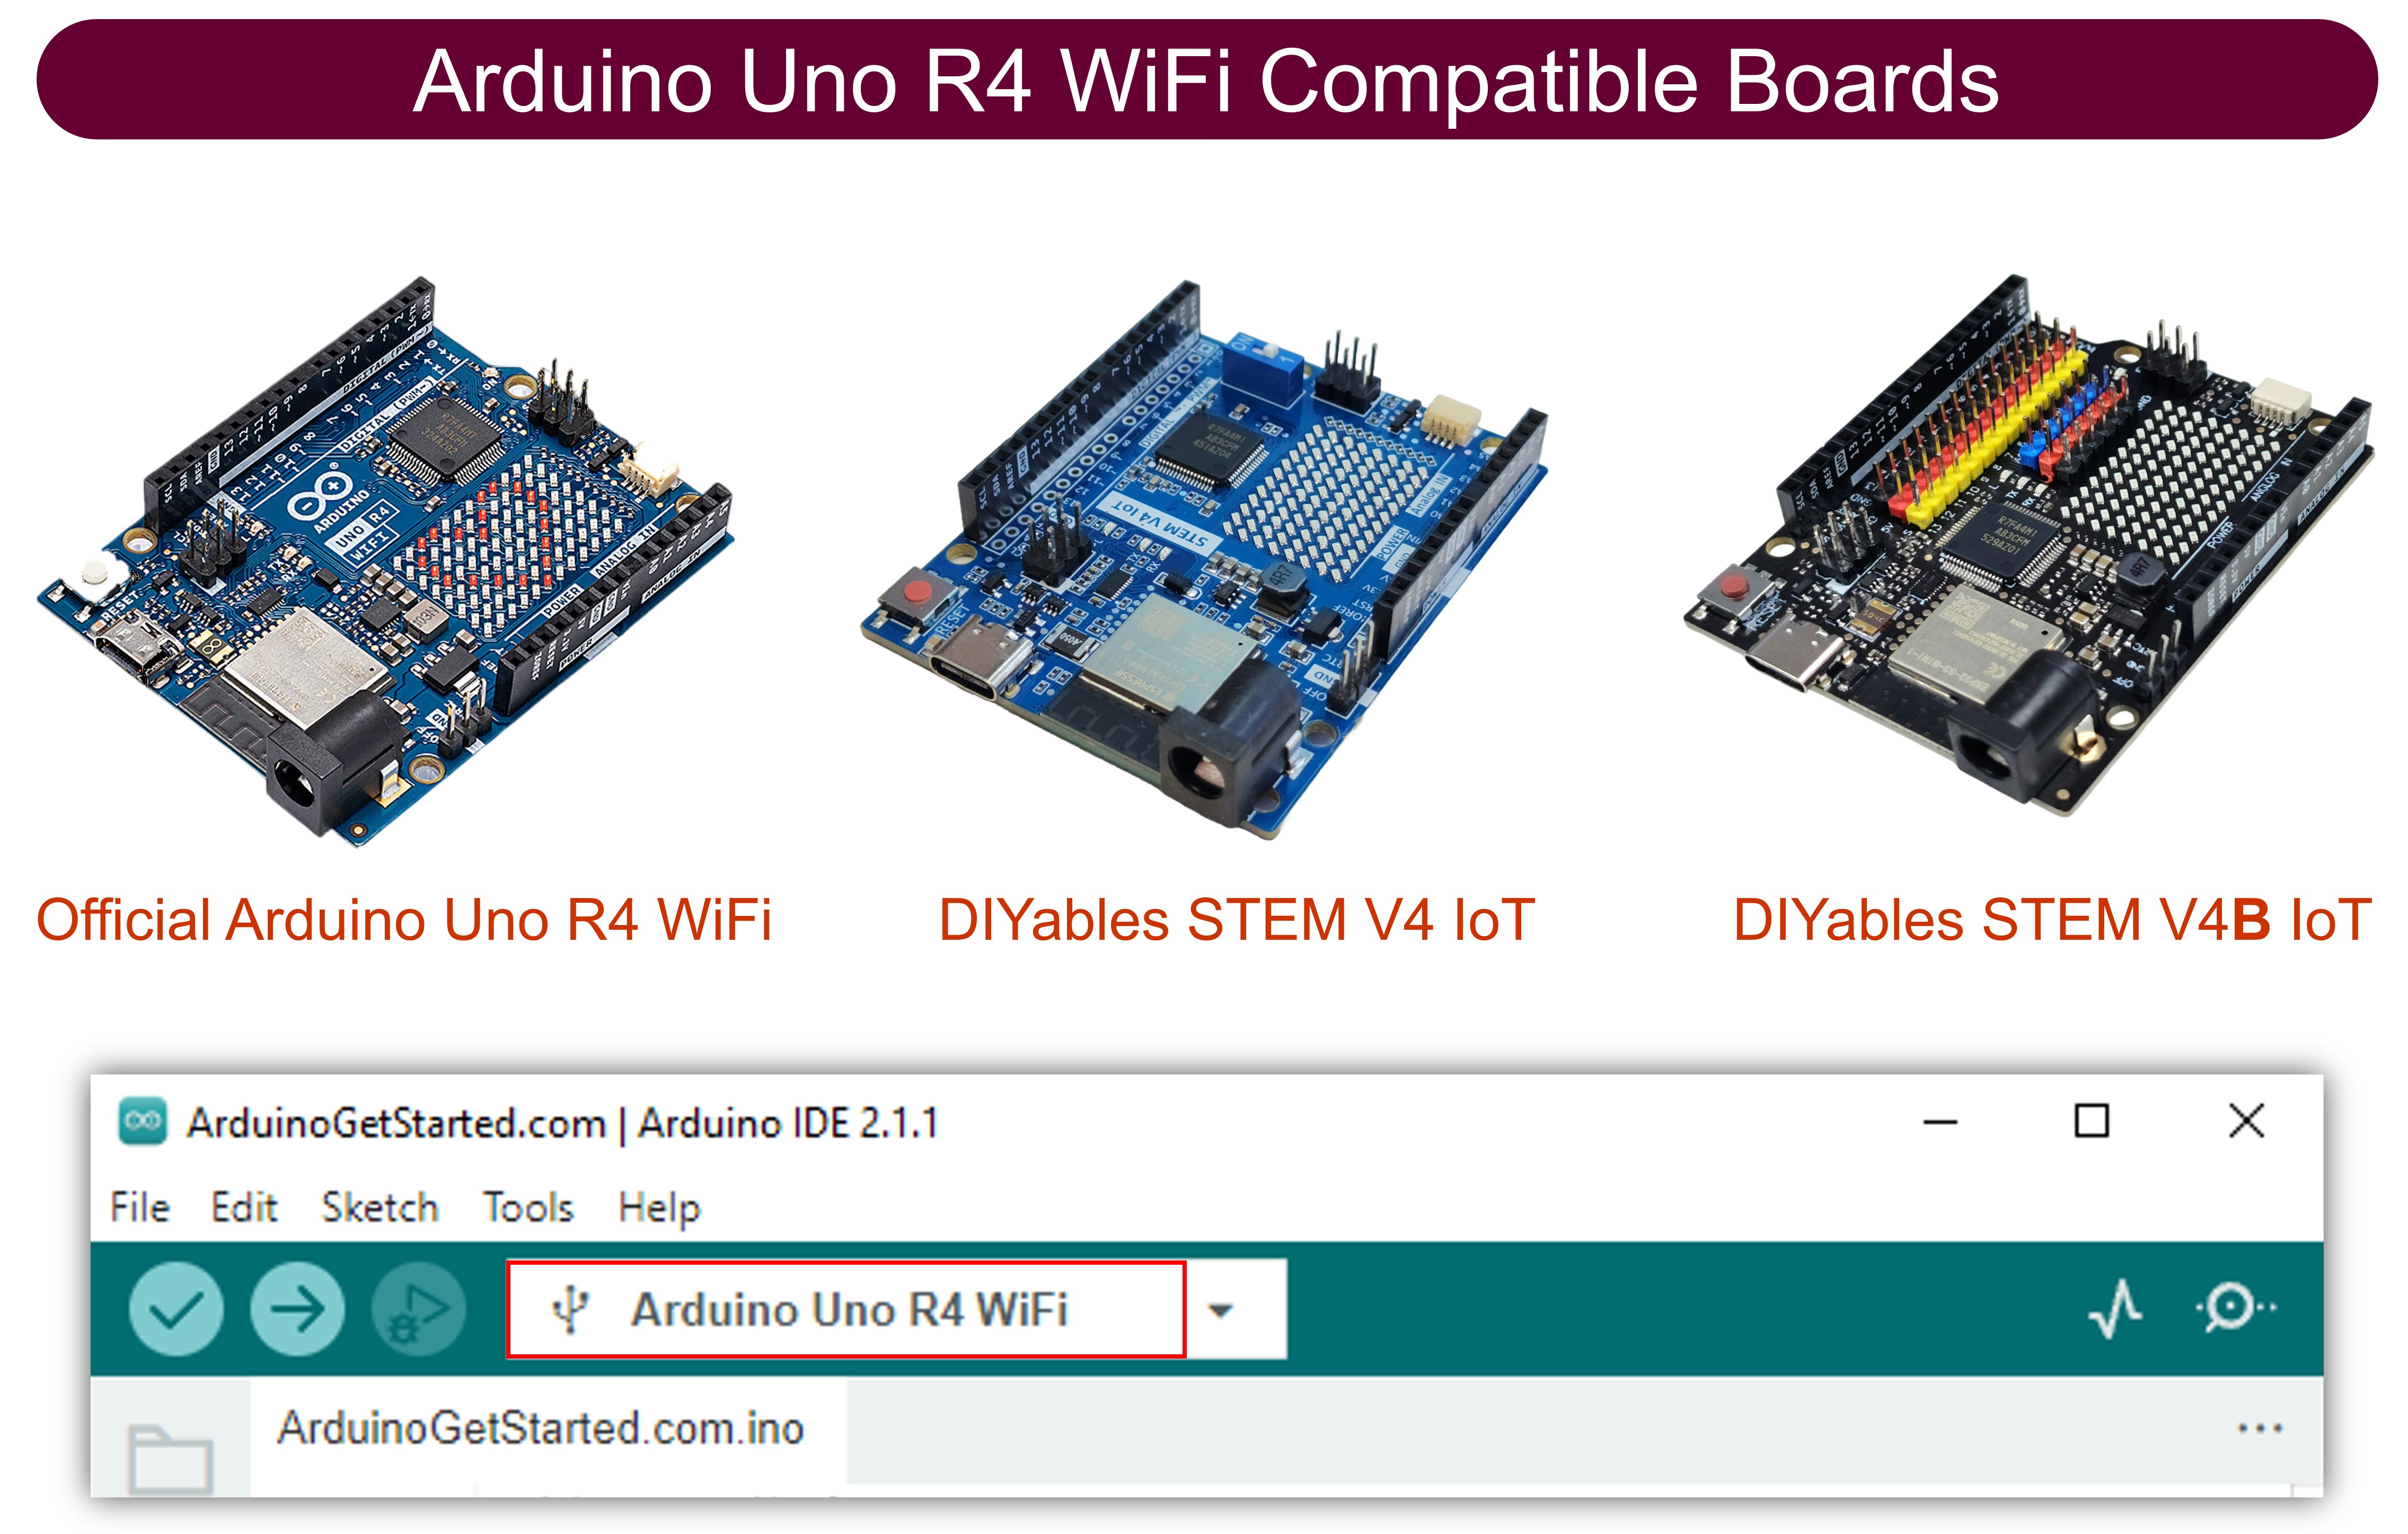
- 처음 이 Arduino Uno R4 WiFi/DIYables STEM V4 IoT를 사용하는 경우, Arduino IDE에서 Arduino Uno R4 WiFi/DIYables STEM V4 IoT를 위한 환경 설정 튜토리얼을 참조하세요 아두이노 우노 R4 - 소프트웨어 설치.
- Arduino Uno R4/DIYables STEM V4 IoT 보드를 USB 케이블로 컴퓨터에 연결합니다.
- 컴퓨터에서 Arduino IDE를 실행합니다.
- 적절한 Arduino Uno R4 보드(예: Arduino Uno R4 WiFi)와 COM 포트를 선택합니다.
- Arduino IDE의 왼쪽 바에 있는 Libraries 아이콘으로 이동합니다.
- "DIYables WebApps"를 검색한 다음 DIYables에서 제공하는 DIYables WebApps 라이브러리를 찾으세요.
- 라이브러리를 설치하려면 Install 버튼을 클릭합니다.
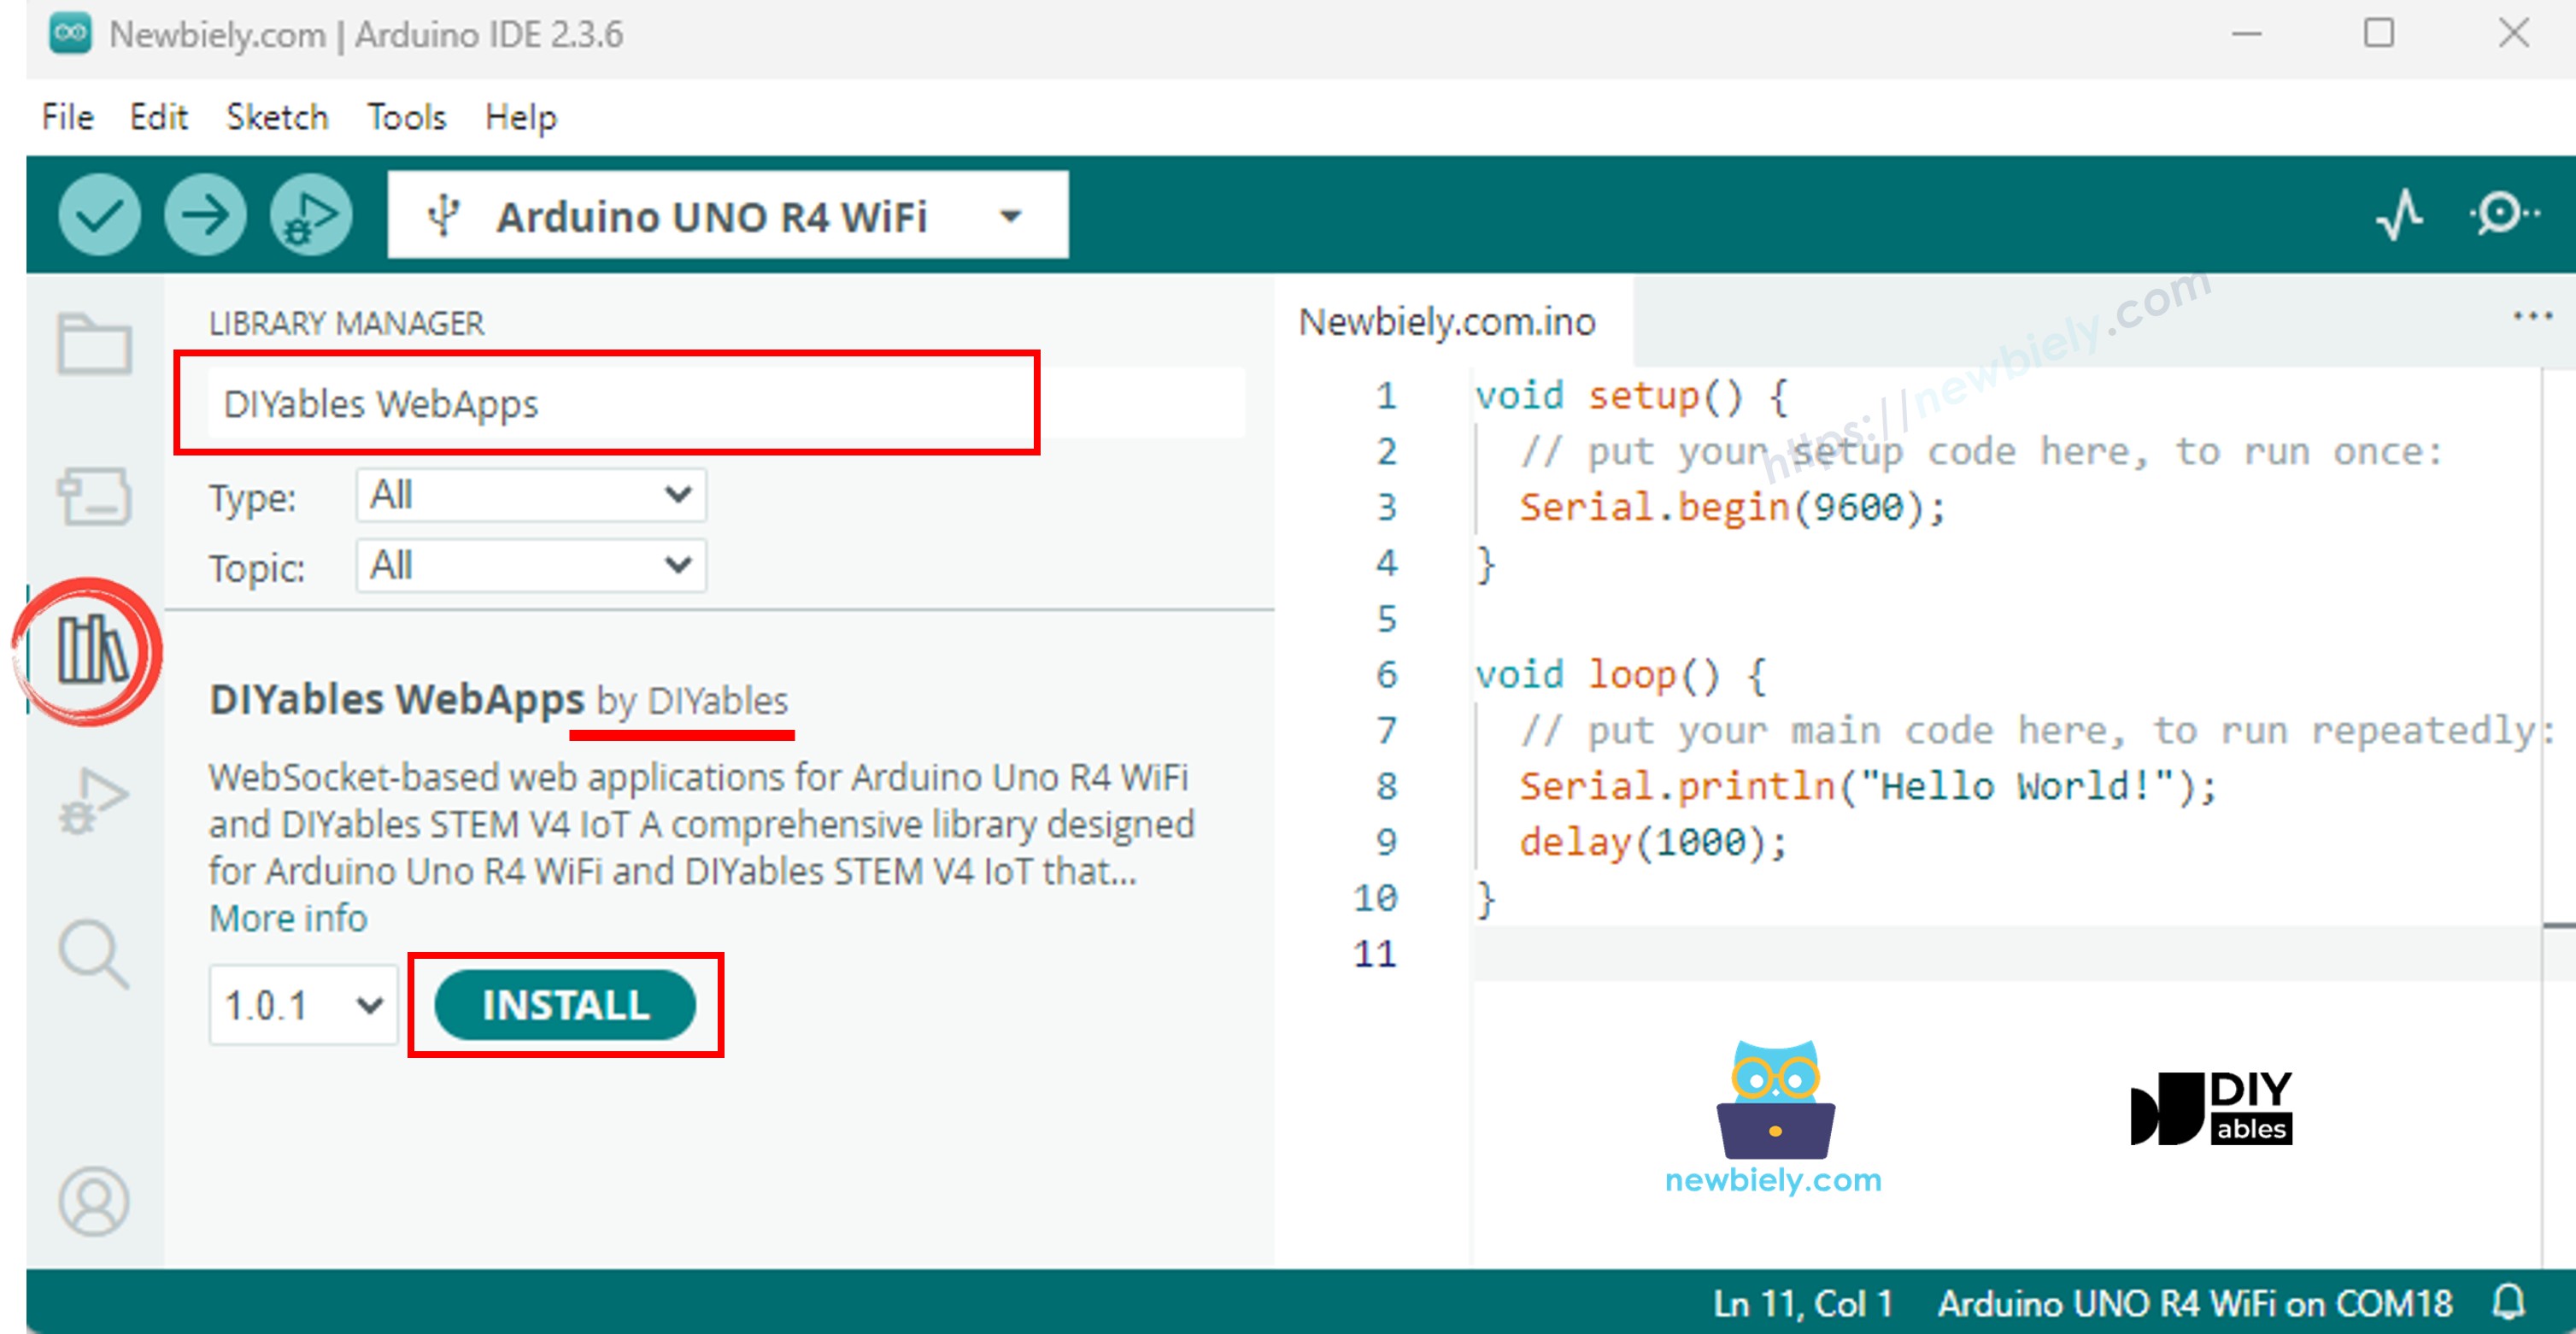
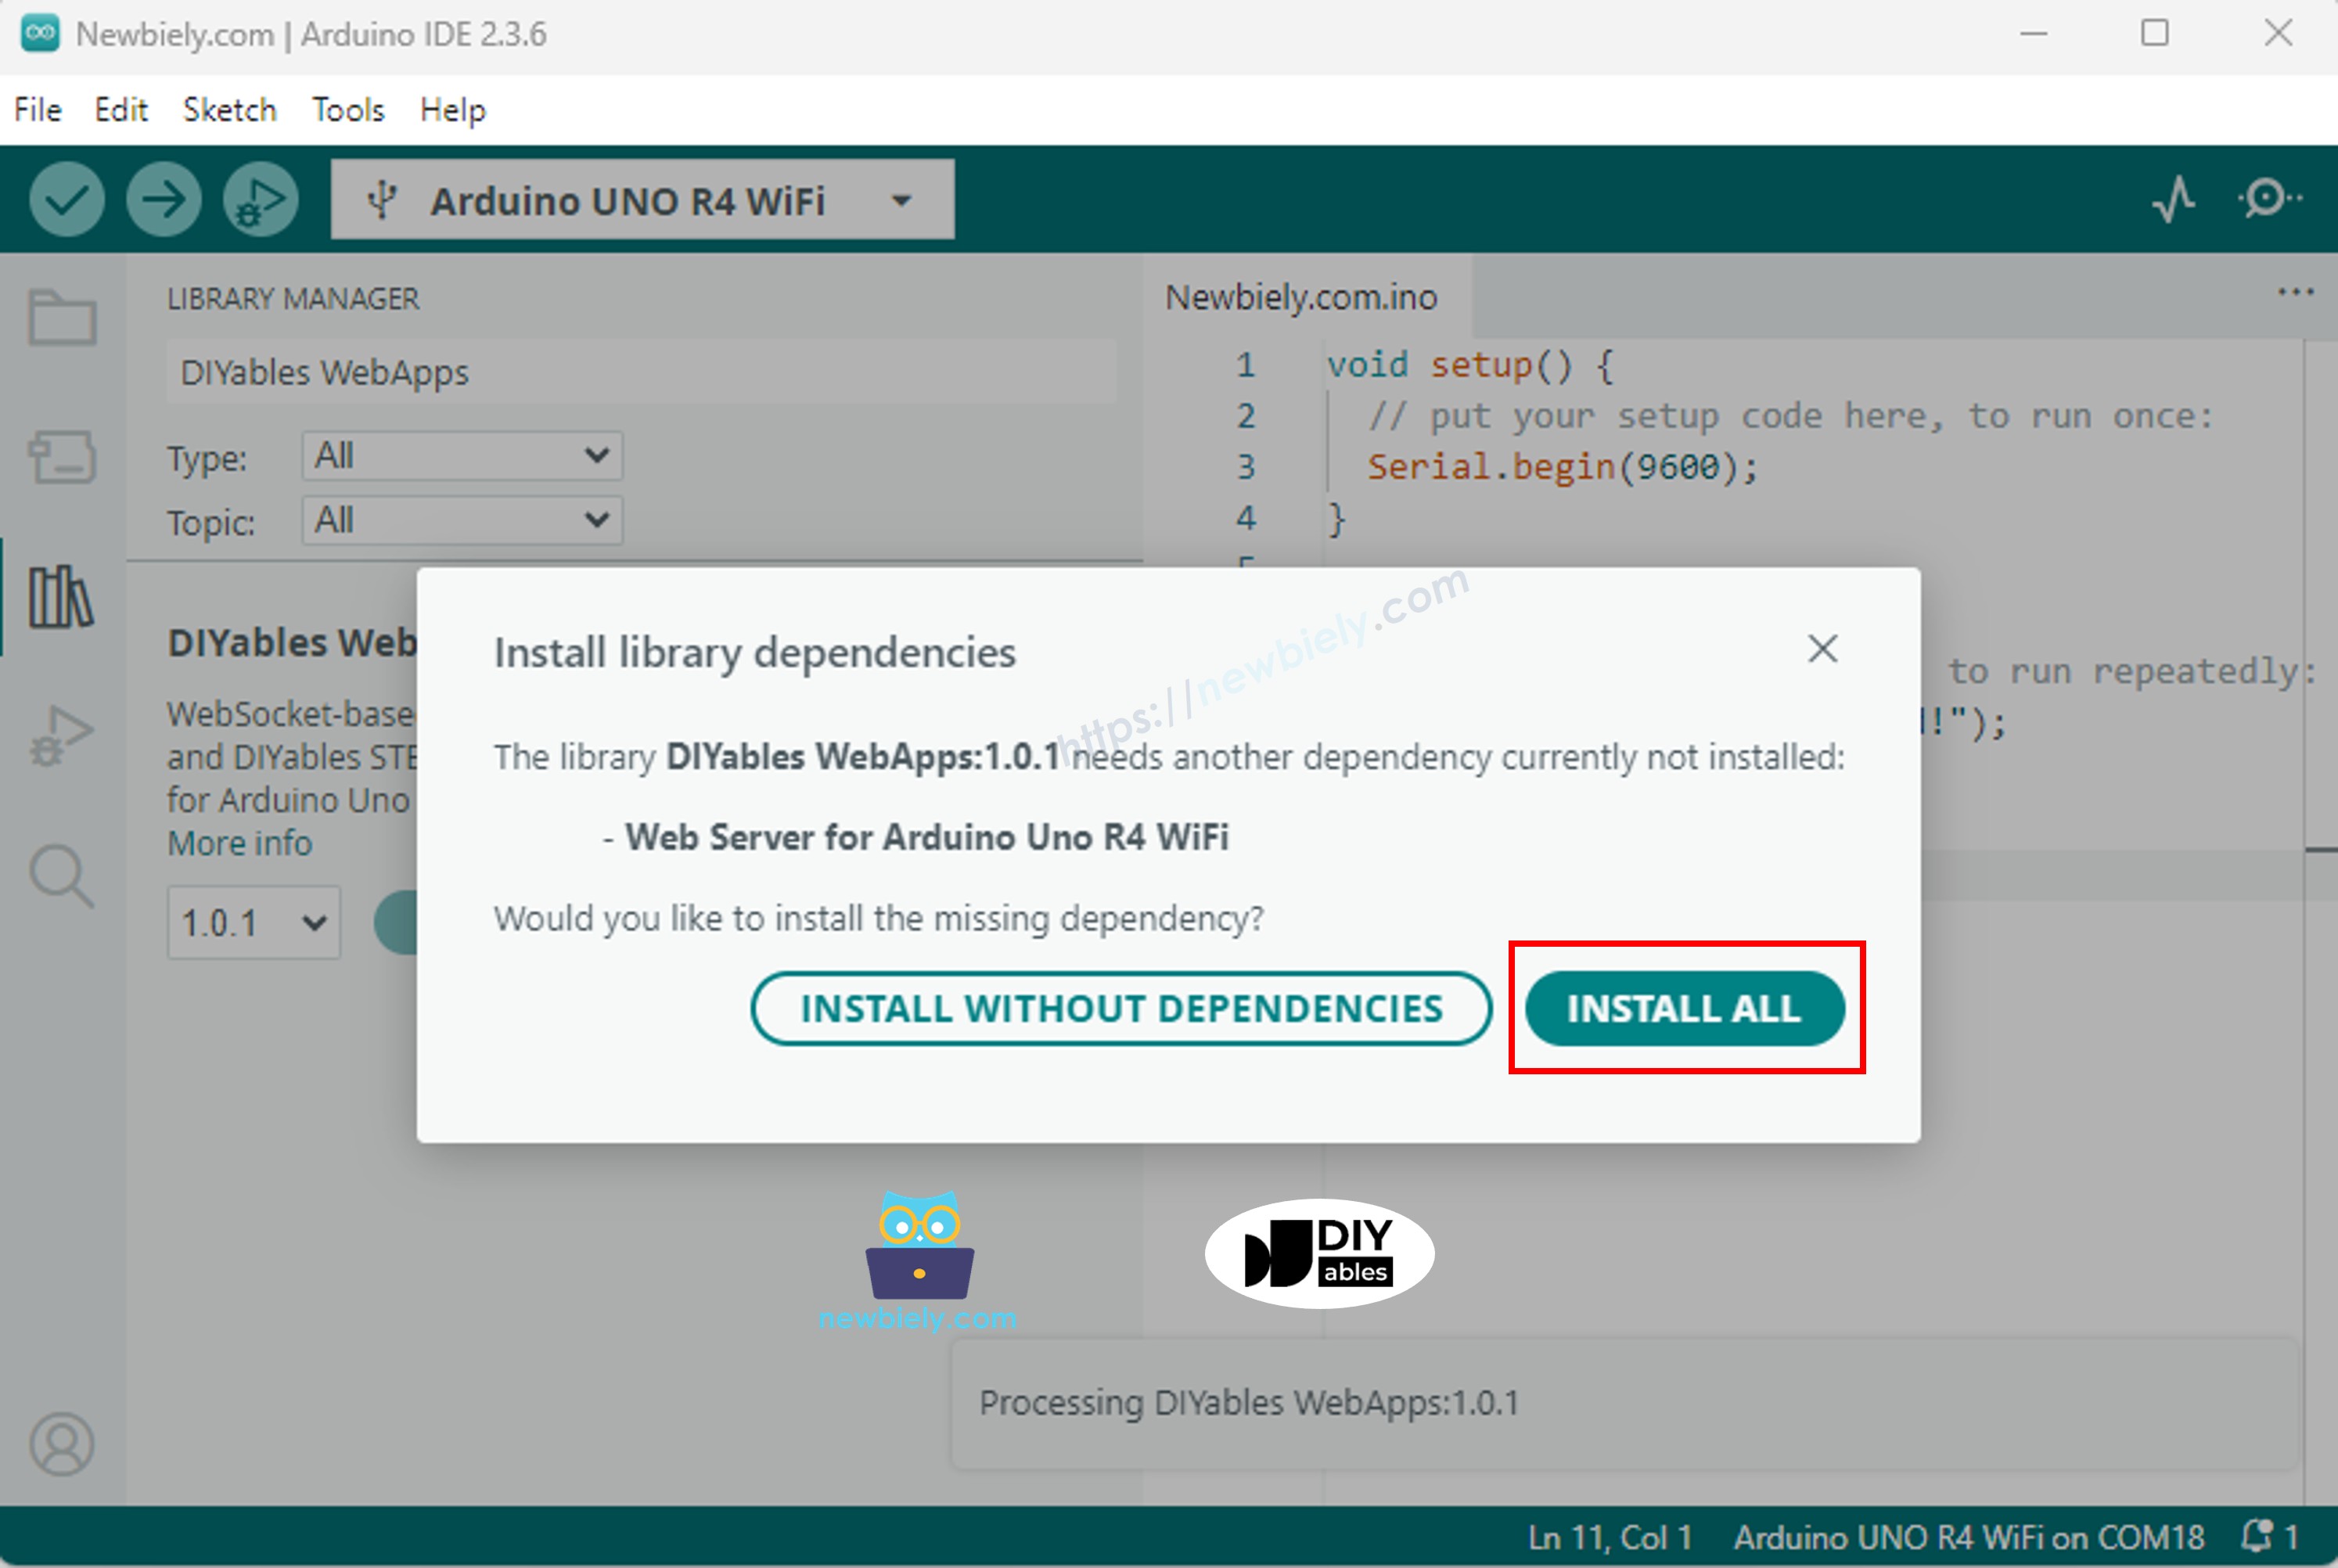
- 다른 라이브러리 의존성 설치를 요청받게 됩니다.
- 모든 라이브러리 의존성을 설치하려면 Install All 버튼을 클릭하십시오.
- Arduino IDE에서, File 예제 DIYables WebApps WebRTC 예제 또는 위의 코드를 복사하여 Arduino IDE의 편집기에 붙여넣으십시오
/*
* DIYables WebApp Library - Web RTC Example
*
* This example demonstrates the Web RTC feature:
* - Real-time clock display for both Arduino and client device
* - One-click time synchronization from web browser to Arduino
* - Hardware RTC integration for persistent timekeeping
* - Visual time difference monitoring
*
* Hardware: Arduino Uno R4 WiFi or DIYables STEM V4 IoT
*
* Setup:
* 1. Update WiFi credentials below
* 2. Upload the sketch to your Arduino
* 3. Open Serial Monitor to see the IP address
* 4. Navigate to http://[IP_ADDRESS]/web-rtc
*/
#include <DIYablesWebApps.h>
#include "RTC.h"
// WiFi credentials - UPDATE THESE WITH YOUR NETWORK
const char WIFI_SSID[] = "YOUR_WIFI_SSID";
const char WIFI_PASSWORD[] = "YOUR_WIFI_PASSWORD";
// Create WebApp server and page instances
UnoR4ServerFactory serverFactory;
DIYablesWebAppServer webAppsServer(serverFactory, 80, 81);
DIYablesHomePage homePage;
DIYablesWebRTCPage webRTCPage;
void setup() {
Serial.begin(9600);
delay(1000);
Serial.println("DIYables WebApp - Web RTC Example");
// Initialize RTC
RTC.begin();
// Check if RTC is running and set initial time if needed
RTCTime savedTime;
RTC.getTime(savedTime);
if (!RTC.isRunning() || savedTime.getYear() == 2000) {
Serial.println("RTC is NOT running, setting initial time...");
// Set a default time - you can modify this to match current time
RTCTime startTime(28, Month::AUGUST, 2025, 12, 0, 0, DayOfWeek::THURSDAY, SaveLight::SAVING_TIME_ACTIVE);
RTC.setTime(startTime);
Serial.println("RTC initialized with default time");
} else {
Serial.println("RTC is already running");
}
// Print initial RTC time
RTCTime initialTime;
RTC.getTime(initialTime);
Serial.print("Initial RTC Time: ");
Serial.print(initialTime.getYear());
Serial.print("/");
Serial.print(Month2int(initialTime.getMonth()));
Serial.print("/");
Serial.print(initialTime.getDayOfMonth());
Serial.print(" - ");
if (initialTime.getHour() < 10) Serial.print("0");
Serial.print(initialTime.getHour());
Serial.print(":");
if (initialTime.getMinutes() < 10) Serial.print("0");
Serial.print(initialTime.getMinutes());
Serial.print(":");
if (initialTime.getSeconds() < 10) Serial.print("0");
Serial.print(initialTime.getSeconds());
Serial.println();
// Add pages to server
webAppsServer.addApp(&homePage);
webAppsServer.addApp(&webRTCPage);
// Optional: Add 404 page for better user experience
webAppsServer.setNotFoundPage(DIYablesNotFoundPage());
// Set callback for time sync from web
webRTCPage.onTimeSyncFromWeb(onTimeSyncReceived);
// Set callback for time request from web
webRTCPage.onTimeRequestToWeb(onTimeRequested);
// Start the WebApp server
if (!webAppsServer.begin(WIFI_SSID, WIFI_PASSWORD)) {
while (1) {
Serial.println("Failed to connect to WiFi");
delay(1000);
}
}
}
void loop() {
// Handle web server
webAppsServer.loop();
// Send current time to web clients and print to Serial every 1 second
static unsigned long lastUpdate = 0;
if (millis() - lastUpdate >= 1000) {
lastUpdate = millis();
// Get current RTC time
RTCTime currentTime;
RTC.getTime(currentTime);
// Send time to web clients in human readable format
webRTCPage.sendTimeToWeb(currentTime.getYear(), Month2int(currentTime.getMonth()),
currentTime.getDayOfMonth(), currentTime.getHour(),
currentTime.getMinutes(), currentTime.getSeconds()); // Print time to Serial Monitor
Serial.print("RTC Time: ");
Serial.print(currentTime.getYear());
Serial.print("/");
Serial.print(Month2int(currentTime.getMonth()));
Serial.print("/");
Serial.print(currentTime.getDayOfMonth());
Serial.print(" - ");
if (currentTime.getHour() < 10) Serial.print("0");
Serial.print(currentTime.getHour());
Serial.print(":");
if (currentTime.getMinutes() < 10) Serial.print("0");
Serial.print(currentTime.getMinutes());
Serial.print(":");
if (currentTime.getSeconds() < 10) Serial.print("0");
Serial.print(currentTime.getSeconds());
Serial.println();
}
delay(10);
}
// Callback function called when web client sends time sync command
void onTimeSyncReceived(unsigned long unixTimestamp) {
Serial.print("Time sync received: ");
Serial.println(unixTimestamp);
// Convert Unix timestamp to RTCTime
RTCTime newTime;
newTime.setUnixTime(unixTimestamp);
// Set RTC time
RTC.setTime(newTime);
Serial.println("Arduino RTC synchronized!");
}
// Callback function called when web client requests current Arduino time
void onTimeRequested() {
// Get current RTC time and send to web in human readable format
RTCTime currentTime;
RTC.getTime(currentTime);
webRTCPage.sendTimeToWeb(currentTime.getYear(), Month2int(currentTime.getMonth()),
currentTime.getDayOfMonth(), currentTime.getHour(),
currentTime.getMinutes(), currentTime.getSeconds());
}
- 코드에서 와이파이 자격 증명을 구성하려면 다음 줄들을 업데이트하십시오:
const char WIFI_SSID[] = "YOUR_WIFI_NETWORK";
const char WIFI_PASSWORD[] = "YOUR_WIFI_PASSWORD";
- Arduino IDE에서 Upload 버튼을 클릭하여 Arduino에 코드를 업로드합니다.
- Arduino IDE에서 Serial Monitor를 엽니다.
- Serial Monitor에서 WiFi에 연결되고 WiFi 정보가 Serial Monitor에 출력될 때까지 기다립니다.
- Serial Monitor에서 결과를 확인합니다. 아래와 같습니다.
8
Serial.println("Hello World!");
Message (Enter to send message to 'Arduino Uno R4 WiFi' on 'COM15')
New Line
9600 baud
DIYables WebApp - Web RTC Example
RTC is already running
Initial RTC Time: 2025/8/28 - 12:00:08
INFO: Added app /
INFO: Added app /web-rtc
DIYables WebApp Library
Platform: Arduino Uno R4 WiFi
Network connected!
IP address: 192.168.0.2
HTTP server started on port 80
Configuring WebSocket server callbacks...
WebSocket server started on port 81
WebSocket URL: ws://192.168.0.2:81
WebSocket server started on port 81
==========================================
DIYables WebApp Ready!
==========================================
📱 Web Interface: http://192.168.0.2
🔗 WebSocket: ws://192.168.0.2:81
📋 Available Applications:
🏠 Home Page: http://192.168.0.2/
🕐 Web RTC: http://192.168.0.2/web-rtc
==========================================
- 아무 것도 보이지 않으면 아두이노 보드를 재부팅하세요.
웹 인터페이스 사용하기
- 같은 와이파이 네트워크에 연결된 컴퓨터나 모바일 기기에서 웹 브라우저를 엽니다
- 직렬 모니터에 표시된 IP 주소를 웹 브라우저에 입력합니다
- 예: http://192.168.1.100
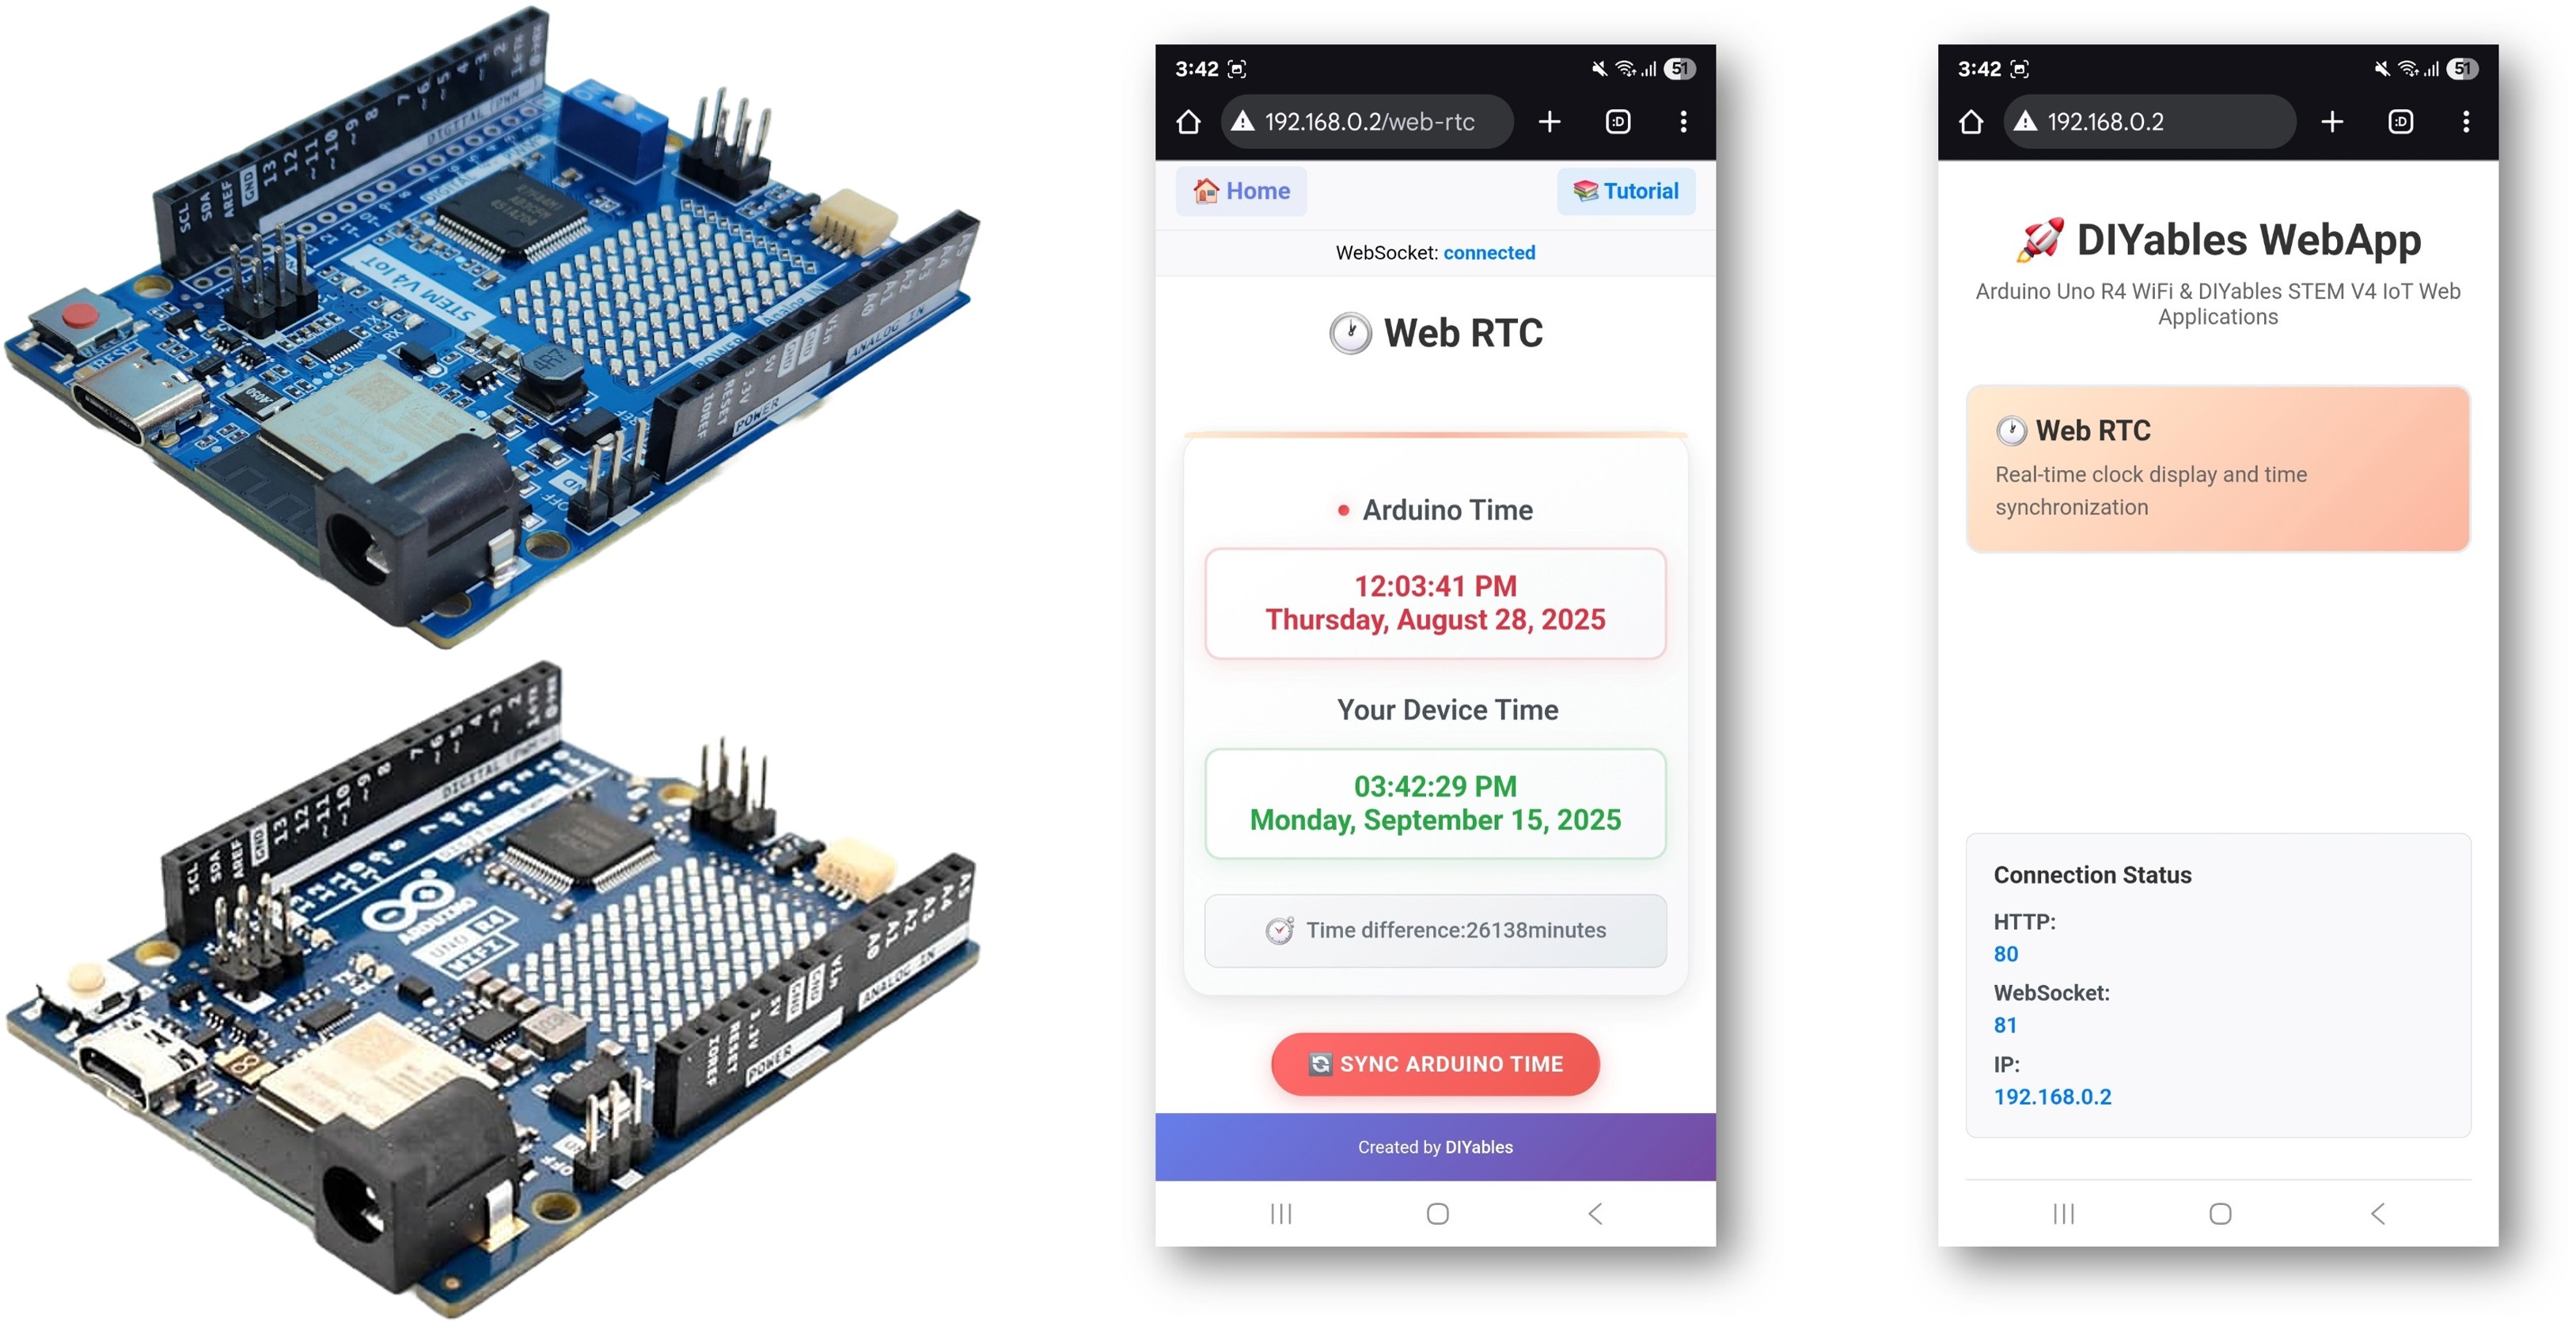
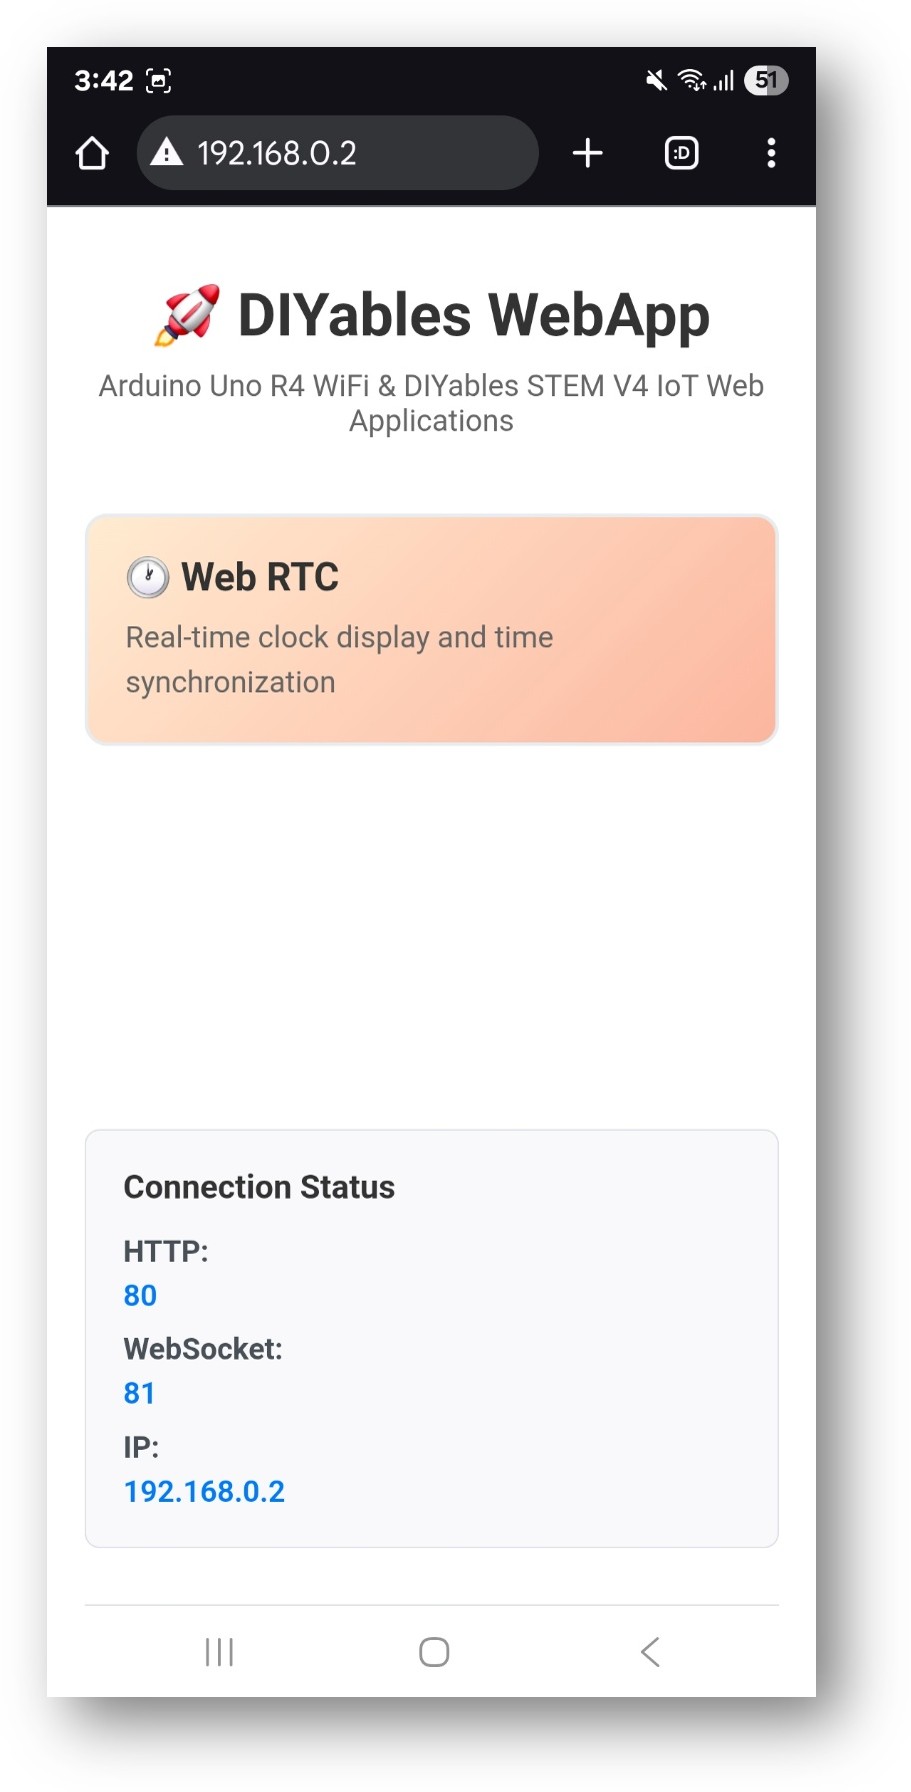
- 아래 이미지와 같은 홈 페이지가 표시됩니다
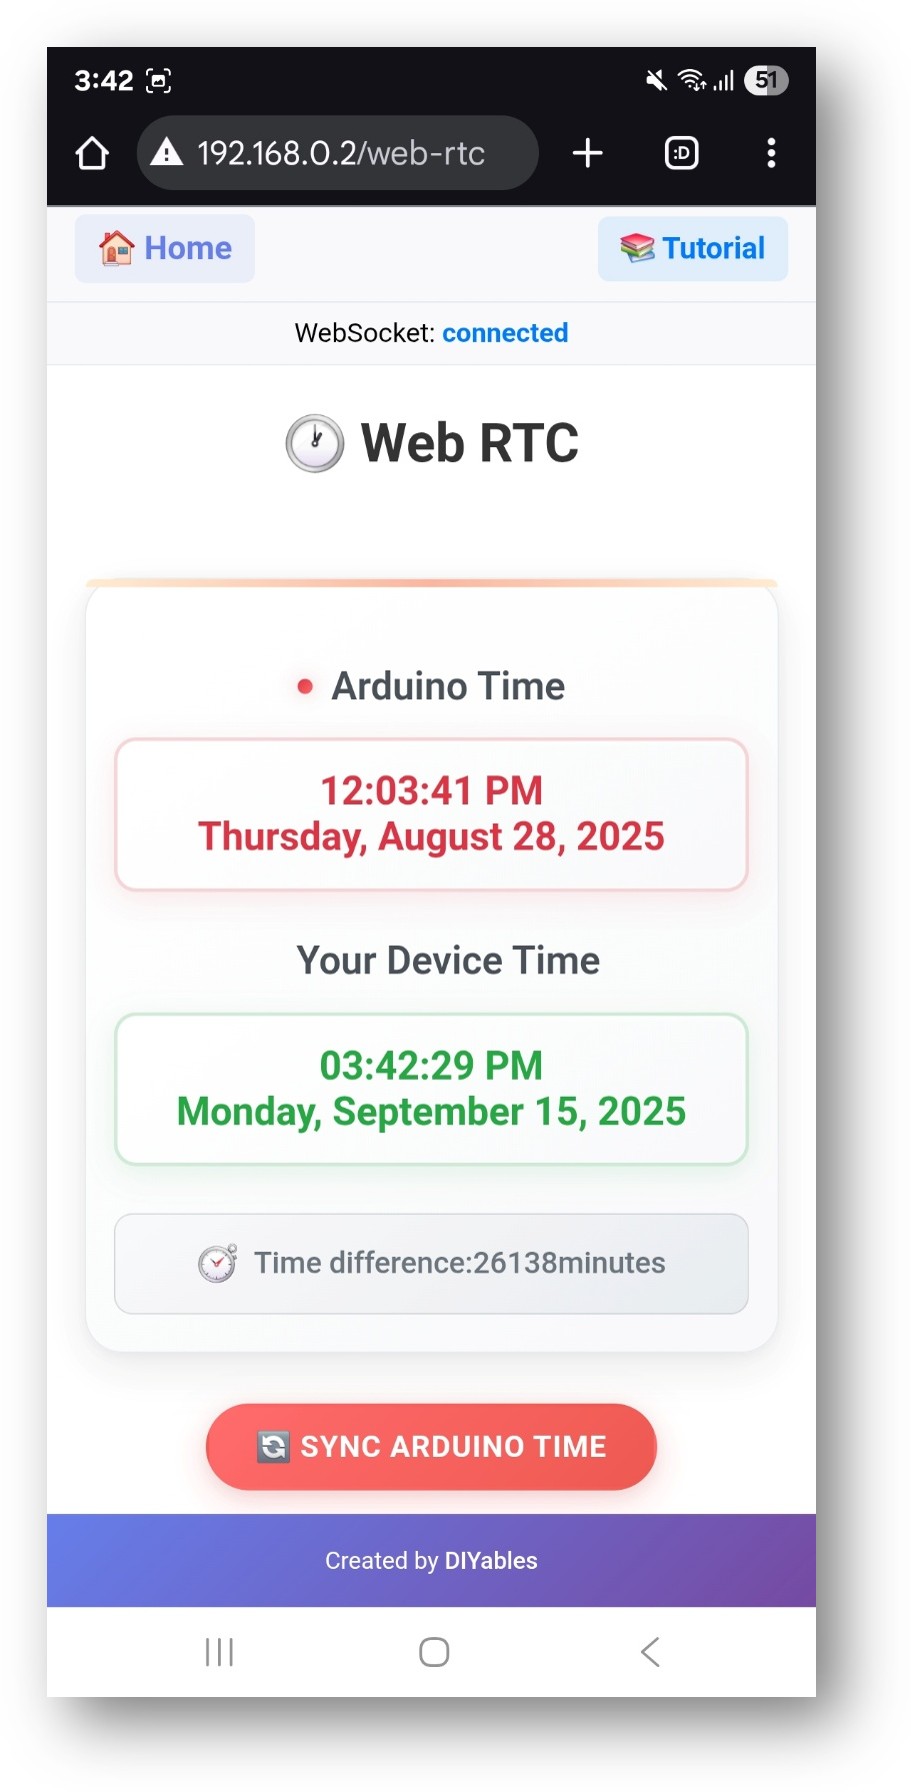
- WebRTC 링크를 클릭하면 아래와 같이 WebRTC 앱의 UI가 표시됩니다:
- 또는 IP 주소 뒤에 /web-rtc를 붙여 페이지에 직접 접속할 수도 있습니다. 예: http://192.168.1.100/web-rtc
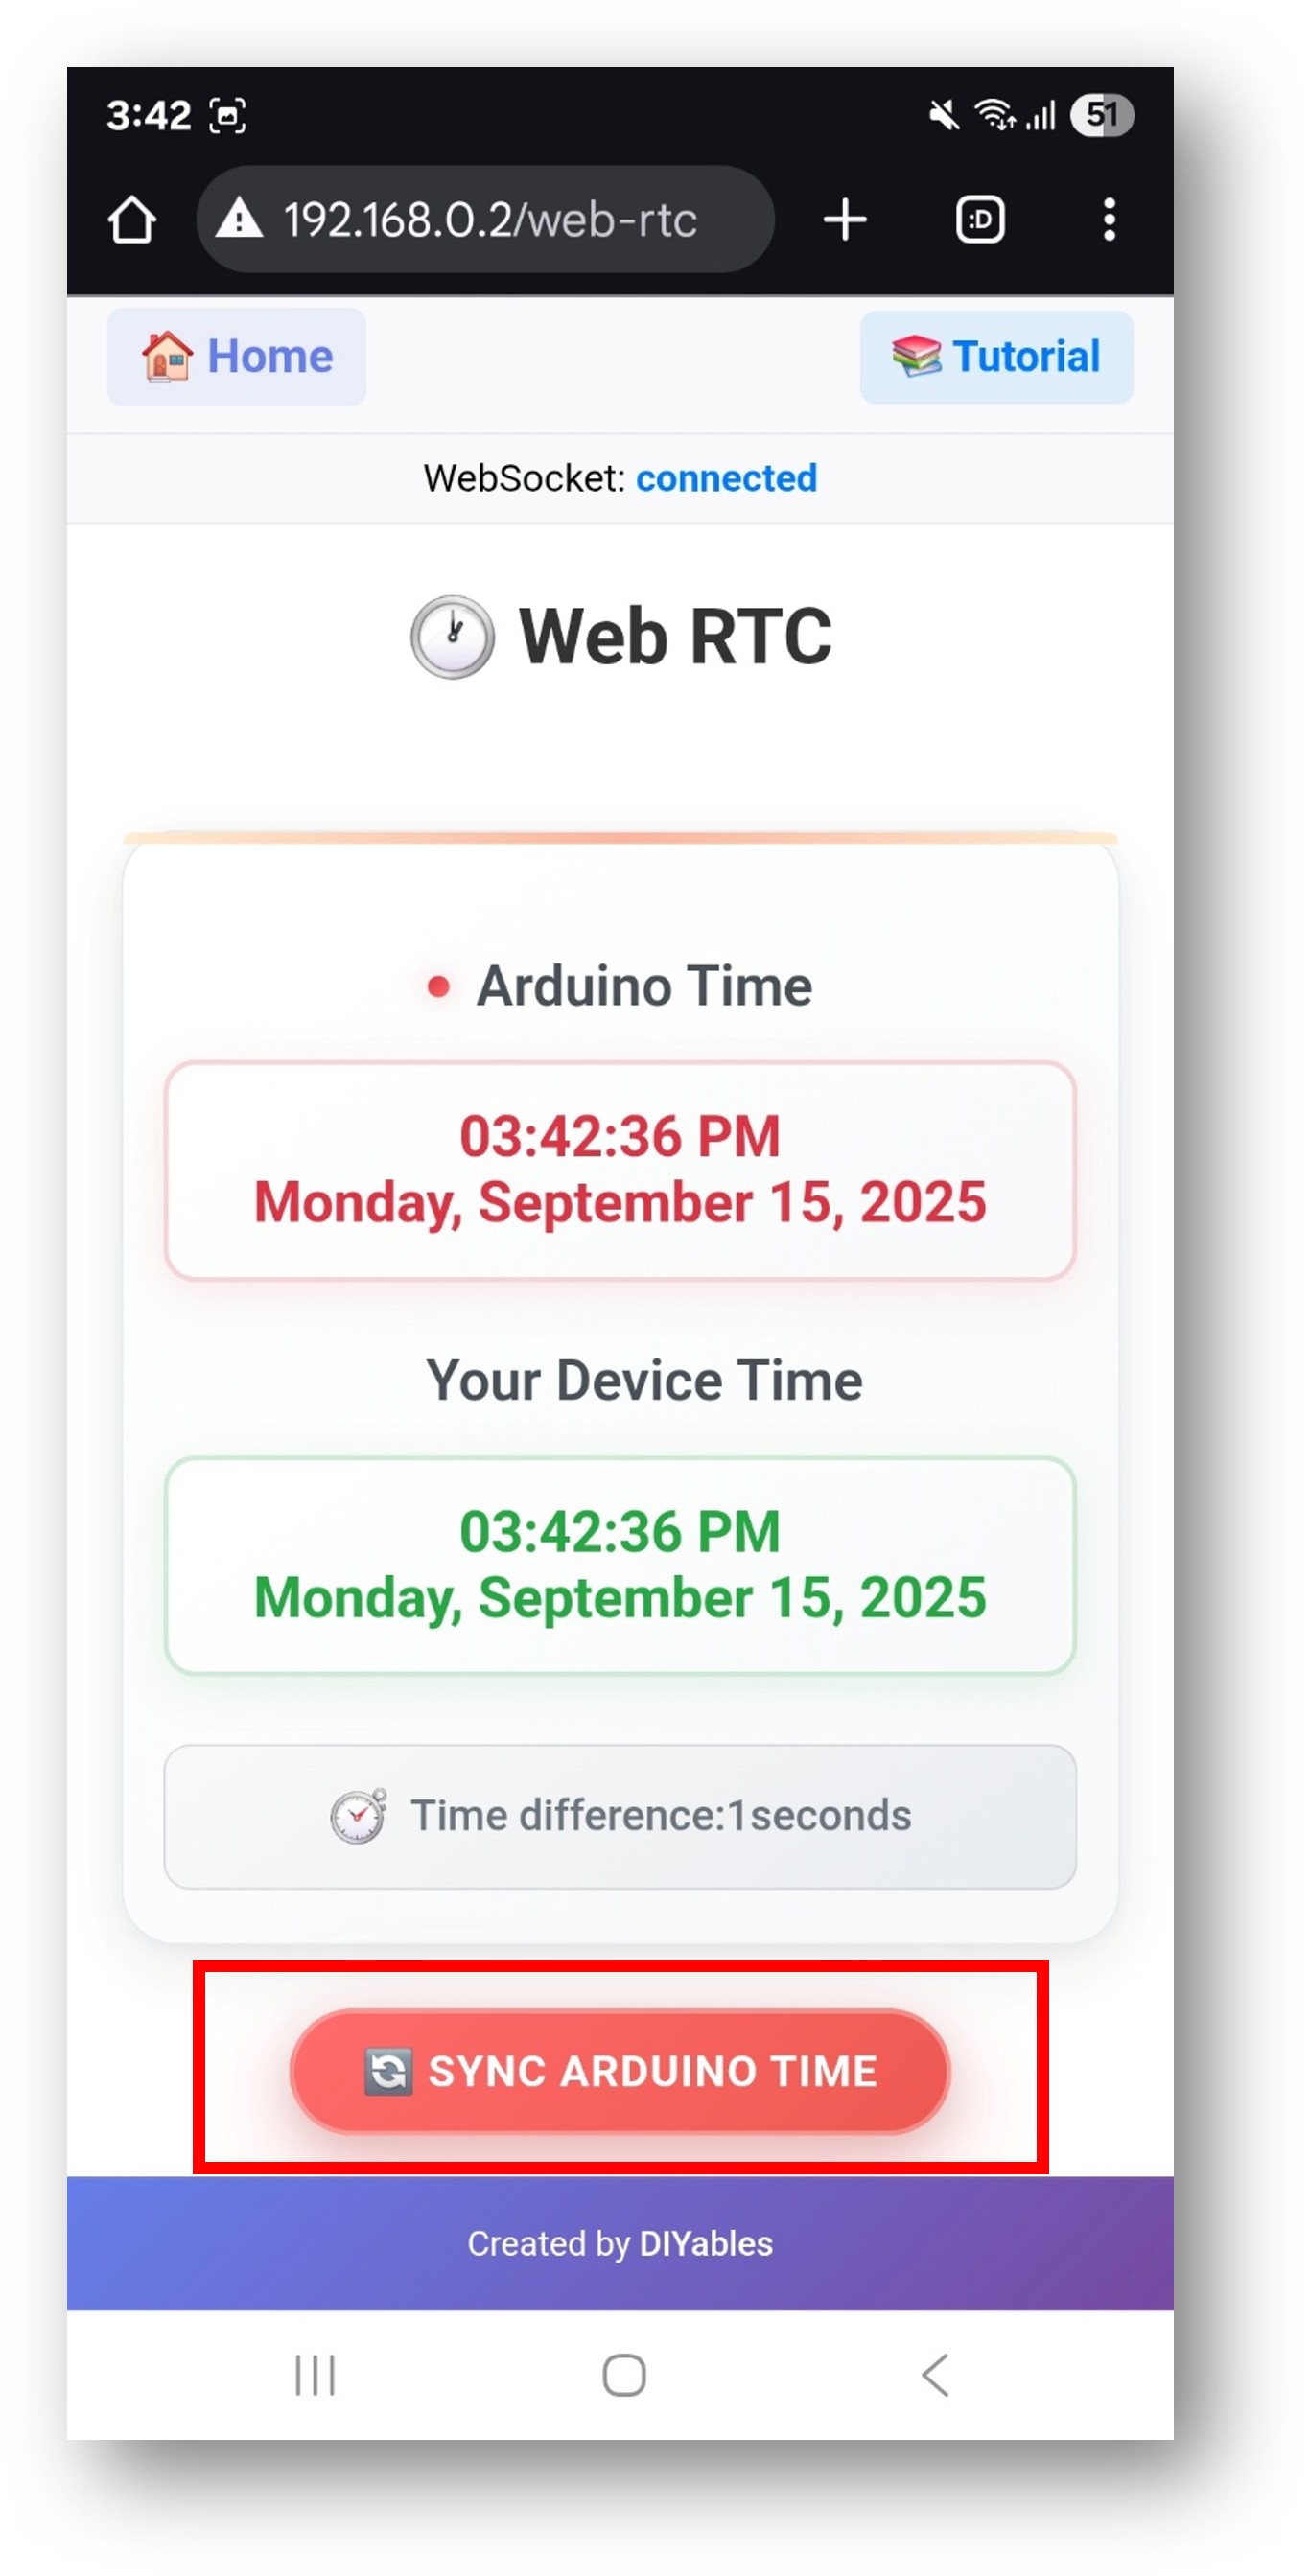
- 다음과 같은 WebRTC 인터페이스가 표시됩니다:
- 아두이노 시간: 아두이노의 RTC에서 현재 시간
- 당신의 기기 시각: 웹 브라우저/기기에서의 현재 시각
- 시간 차이: 두 시간 간의 차이를 분 단위로
- 아두이노 시간 동기화 버튼: 장치의 시간과 함께 아두이노 시간을 동기화하려면 클릭하세요
시간 동기화
- "아두이노 시간 동기화" 버튼을 클릭하여 Arduino의 RTC를 기기의 로컬 시간과 동기화합니다
- 동기화 과정:
- 디바이스의 현재 로컬 시간(UTC가 아님)를 가져옵니다
- 정확한 로컬 시간 동기화를 보장하기 위해 시간대 오프셋을 보정합니다
- WebSocket을 통해 Arduino로 타임스탬프를 보냅니다
- 수신된 시간으로 Arduino의 RTC를 업데이트합니다
- 동기화된 시간을 표시하도록 웹 인터페이스를 업데이트합니다
동기화 후 시간 차이가 최소화되어야 합니다(보통 0~1분)
웹 인터페이스가 닫힌 후에도 Arduino는 정확한 시간을 유지합니다
코드 설명
핵심 구성 요소
#include <DIYablesWebApps.h>
#include <RTC.h>
// Initialize web server and RTC page
DIYablesWebAppServer server;
DIYablesWebRTCPage rtcPage;
설정 함수
void setup() {
Serial.begin(9600);
// Initialize RTC
RTC.begin();
// Setup WiFi connection
server.setupWiFi(WIFI_SSID, WIFI_PASSWORD);
// Add RTC page to server
server.addWebApp(rtcPage);
// Set up callback functions
rtcPage.onTimeSyncFromWeb(onTimeSyncReceived);
rtcPage.onTimeRequestToWeb(onTimeRequested);
// Start the server
server.begin();
}
콜백 함수들
시간 동기화 콜백:
// Called when web interface sends time sync command
void onTimeSyncReceived(unsigned long unixTimestamp) {
Serial.print("Time sync received: ");
Serial.println(unixTimestamp);
// Convert Unix timestamp to RTCTime
RTCTime newTime;
newTime.setUnixTime(unixTimestamp);
// Set RTC time
RTC.setTime(newTime);
Serial.println("Arduino RTC synchronized!");
}
시간 요청 콜백:
// Called when web interface requests current Arduino time
void onTimeRequested() {
RTCTime currentTime;
RTC.getTime(currentTime);
// Send current time to web interface
rtcPage.sendTimeToWeb(
currentTime.getYear(),
currentTime.getMonth(),
currentTime.getDayOfMonth(),
currentTime.getHour(),
currentTime.getMinutes(),
currentTime.getSeconds()
);
}
메인 루프
void loop() {
server.handleClient();
// Optional: Print current time every 10 seconds
static unsigned long lastPrint = 0;
if (millis() - lastPrint > 10000) {
RTCTime currentTime;
RTC.getTime(currentTime);
Serial.print("Current Arduino Time: ");
Serial.print(currentTime.getHour());
Serial.print(":");
if (currentTime.getMinutes() < 10) Serial.print("0");
Serial.print(currentTime.getMinutes());
Serial.print(":");
if (currentTime.getSeconds() < 10) Serial.print("0");
Serial.println(currentTime.getSeconds());
lastPrint = millis();
}
delay(10);
}
API 메서드
DIYablesWebRTCPage 클래스 메서드
웹에서 시간 동기화를 수행(callback)
- 웹 브라우저에서 시간 동기화를 처리하도록 콜백 함수를 설정합니다.
- 매개변수: void (*callback)(unsigned long unixTimestamp)
- 사용 방법: 사용자가 "Sync Arduino Time" 버튼을 클릭할 때 호출됩니다.
onTimeRequestToWeb(callback)
- 웹 브라우저로부터의 시간 요청을 처리하기 위한 콜백 함수를 설정합니다
- 매개변수: void (*callback)()
- 사용법: 웹 인터페이스가 현재 Arduino 시간을 요청할 때 호출됩니다
웹으로 시간 보내기(연도, 월, 일, 시, 분, 초)
- 현재 아두이노의 시간을 웹 인터페이스로 전송
- 매개변수:
- year: 현재 연도(예: 2025년)
- month: 현재 월 (1-12)
- day: 해당 월의 현재 일 (1-31)
- hour: 현재 시각(0-23)
- minute: 현재 분 (0-59)
- second: 현재 초 (0-59)
웹소켓 통신
웹에서 아두이노로의 메시지
- RTC:GET_TIME - 현재 Arduino 시간 요청
- RTC:SYNC:[timestamp] - 유닉스 타임스탬프로 Arduino 시간 동기화
아두이노에서 웹으로 보내는 메시지
- DATETIME:YYYY,MM,DD,HH,MM,SS - 현재 아두이노의 시간 구성요소를 전송합니다
문제 해결
자주 발생하는 문제
1. 수 시간의 차이
- 문제: 아두이노가 기기의 시간보다 몇 시간 차이가 나는 시간을 표시합니다
- 원인: 일반적으로 시간대 문제이거나 RTC가 제대로 초기화되지 않음
- 해결 방법:
- 'Sync Arduino Time' 버튼을 클릭하여 다시 동기화합니다.
- Setup()에서 RTC가 올바르게 초기화되었는지 확인합니다.
- WiFi 연결이 안정적인지 확인하십시오.
2. "아두이노에 연결되지 않음" 오류
- 문제: 동기화 버튼을 클릭할 때 오류가 발생합니다
- 원인: WebSocket 연결에 실패했습니다
- 해결 방법:
- 아두이노의 IP 주소가 올바른지 확인
- 웹 페이지를 새로고침
- 아두이노가 같은 와이파이 네트워크에 연결되어 있는지 확인하십시오.
- 방화벽 설정 확인
- 시간 업데이트가 중지됩니다
- 문제: 시간 표시가 멈추거나 업데이트되지 않습니다
- 원인: WebSocket 연결이 끊겼거나 RTC가 중지되었습니다
- 해결 방법:
- 웹 페이지를 새로 고침
- WebSocket 연결 상태 확인
- RTC가 응답하지 않으면 Arduino를 재시작합니다
4. 큰 시간 차이(일/개월)
- 문제: 시간 차이가 수천 분으로 표시됩니다
- 원인: RTC가 올바르게 설정되지 않았거나 상당히 오차가 발생했습니다
- 해결 방법: 동기화 버튼을 여러 번 클릭하고 콜백 함수를 확인하세요
디버깅 팁
직렬 디버깅 활성화:
void onTimeSyncReceived(unsigned long unixTimestamp) {
Serial.print("Time sync received: ");
Serial.println(unixTimestamp);
// ... rest of function
}
void onTimeRequested() {
Serial.println("Time request received from web");
// ... rest of function
}
RTC 초기화 확인:
void setup() {
// ... other setup code
if (RTC.begin()) {
Serial.println("RTC initialized successfully");
} else {
Serial.println("RTC initialization failed!");
}
}
고급 사용법
타임스탬프가 있는 데이터 로깅
void logSensorData(float temperature, float humidity) {
RTCTime currentTime;
RTC.getTime(currentTime);
String logEntry = String(currentTime.getYear()) + "-" +
String(currentTime.getMonth()) + "-" +
String(currentTime.getDayOfMonth()) + " " +
String(currentTime.getHour()) + ":" +
String(currentTime.getMinutes()) + ":" +
String(currentTime.getSeconds()) + " - " +
"Temp: " + String(temperature) + "°C, " +
"Humidity: " + String(humidity) + "%";
Serial.println(logEntry);
// Save to SD card, send to database, etc.
}
예정된 작업
void checkScheduledActions() {
RTCTime currentTime;
RTC.getTime(currentTime);
// Turn on LED every day at 6:00 AM
if (currentTime.getHour() == 6 && currentTime.getMinutes() == 0) {
digitalWrite(LED_BUILTIN, HIGH);
Serial.println("Morning LED activated!");
}
// Turn off LED every day at 10:00 PM
if (currentTime.getHour() == 22 && currentTime.getMinutes() == 0) {
digitalWrite(LED_BUILTIN, LOW);
Serial.println("Evening LED deactivated!");
}
}
다중 웹 애플리케이션 통합
// Combine WebRTC with other web apps
server.addWebApp(rtcPage); // Real-time clock
server.addWebApp(monitorPage); // Serial monitor with timestamps
server.addWebApp(plotterPage); // Data plotting with time axis
응용 사례 및 사용 사례
교육 프로젝트
- 시간 관리 학습: 학생들에게 RTC(실시간 시계), 시간 기록 및 동기화에 대해 가르치기
- IoT 시간 개념: IoT 시스템에서 네트워크 시간 동기화를 시연하기
- 데이터 로깅 프로젝트: 센서 측정값과 실험에 타임스탬프를 추가하기
- 스케줄링 시스템: 시간 기반 자동화 및 제어 시스템 만들기
현실 세계의 응용
- 홈 자동화: 조명, 관개 또는 기타 기기의 스케줄링
- 데이터 수집: 분석을 위한 센서 판독값에 타임스탬프를 기록
- 이벤트 로깅: 특정 이벤트가 발생했을 때를 정확한 시각으로 기록
- 원격 모니터링: 원격으로 장치 상태 및 마지막 업데이트 시간을 확인
STEM 교육의 이점
- 시간대 개념: 로컬 시간과 UTC 및 시간대 처리 이해하기
- 네트워크 통신: 웹소켓 통신 및 실시간 업데이트 학습
- 하드웨어 통합: 웹 인터페이스와 하드웨어 RTC 기능의 결합
- 문제 해결: 타이밍 이슈 및 동기화 문제 디버깅
기술 사양
메모리 사용량
- 플래시 메모리: WebRTC 기능을 위한 약 8KB
- SRAM: 작동 중 약 2KB
- WebSocket 버퍼: 메시지 처리를 위한 약 1KB
성능 특성
- 업데이트 빈도: WebSocket을 통한 실시간 업데이트
- 동기화 정확도: 일반적으로 1~2초 이내
- 네트워크 오버헤드: 업데이트 메시지당 약 50바이트
- 응답 시간: 시간 동기화 작업의 100ms 미만
호환성
- 아두이노 보드: Arduino Uno R4 WiFi, DIYables STEM V4 IoT
- 브라우저: WebSocket을 지원하는 모든 최신 브라우저
- 장치: 데스크탑, 태블릿 및 모바일 기기
- 네트워크: 인터넷 접속이 가능한 WiFi 네트워크
요약
WebRTC 예제는 어떻게 하는지 보여줍니다:
- 웹 기반 실시간 시계 인터페이스 만들기
- 아두이노 RTC를 웹 브라우저 시간과 동기화하기
- 사용자 친화적인 형식으로 시간 정보를 표시하기
- 시간 차이와 연결 상태를 모니터링하기
- 다른 웹 애플리케이션과 시간 기능을 통합하기
- 시간 관리 기능을 갖춘 교육용 사물인터넷(IoT) 프로젝트 만들기
이 예제는 정확한 시간 측정이 필요한 프로젝트, 타임스탬프가 포함된 데이터 로깅, 스케줄링된 자동화, 그리고 IoT 시스템에서 시간 동기화 개념에 대한 교육적 시연에 이상적입니다.


