아두이노 나노 ESP32 키패드 1x4
이 가이드에서는 Arduino Nano ESP32와 1x4 키패드를 사용하는 방법을 배우게 됩니다. 다음과 같은 내용을 다룰 예정입니다:
- Arduino Nano ESP32에 1x4 키패드를 연결하는 방법.
- 1x4 키패드에서 어떤 키가 눌렸는지 감지하도록 Arduino Nano ESP32를 프로그래밍하는 방법.
준비물
| 1 | × | 아두이노 나노 ESP32 | 쿠팡 | 아마존 | |
| 1 | × | USB 케이블 타입-A to 타입-C (USB-A PC용) | 쿠팡 | 아마존 | |
| 1 | × | USB 케이블 타입-C to 타입-C (USB-C PC용) | 아마존 | |
| 1 | × | 키패드 1x4 | 쿠팡 | 아마존 | |
| 1 | × | 점퍼케이블 | 쿠팡 | 아마존 | |
| 1 | × | (추천) 아두이노 나노용 스크루 터미널 확장 보드 | 쿠팡 | 아마존 | |
| 1 | × | (추천) 아두이노 나노용 브레이크아웃 확장 보드 | 쿠팡 | 아마존 | |
| 1 | × | (추천) 아두이노 나노 ESP32용 전원 분배기 | 쿠팡 | 아마존 |
공개: 이 포스팅 에 제공된 일부 링크는 아마존 제휴 링크입니다. 이 포스팅은 쿠팡 파트너스 활동의 일환으로, 이에 따른 일정액의 수수료를 제공받습니다.
키패드 1x4에 대하여
1x4 키패드에는 한 줄에 네 개의 버튼이 있습니다. 사람들은 이를 사용하여 비밀번호를 입력하거나 메뉴를 이동하거나 장치를 제어합니다.
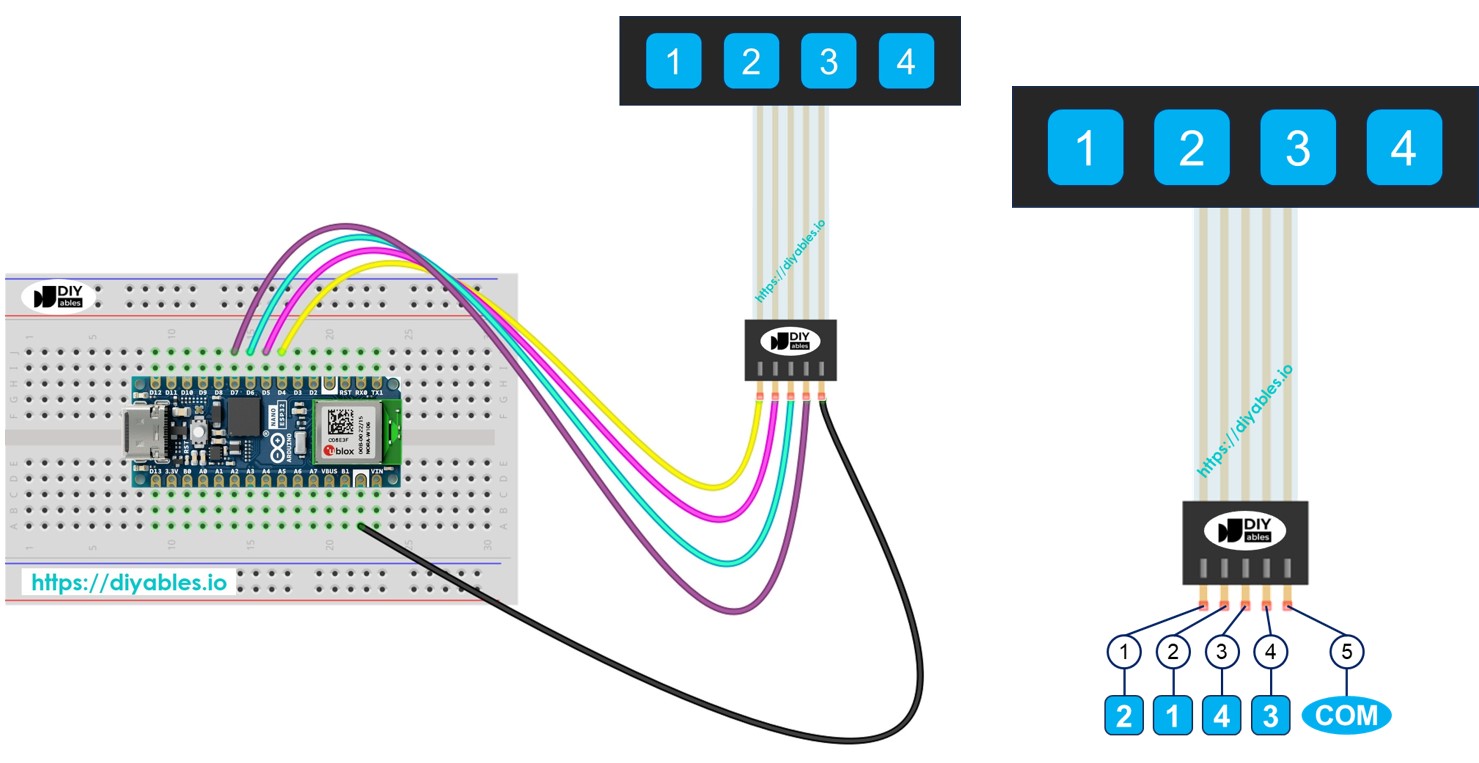
핀 배치
1x4 키패드는 5개의 핀을 가지고 있습니다. 이 핀들의 배치는 키 라벨의 순서와 일치하지 않습니다.
- 핀 1은 키 2에 연결됩니다
- 핀 2는 키 1에 연결됩니다
- 핀 3은 키 4에 연결됩니다
- 핀 4는 키 3에 연결됩니다
- 핀 5는 모든 키에 연결되며 공통입니다
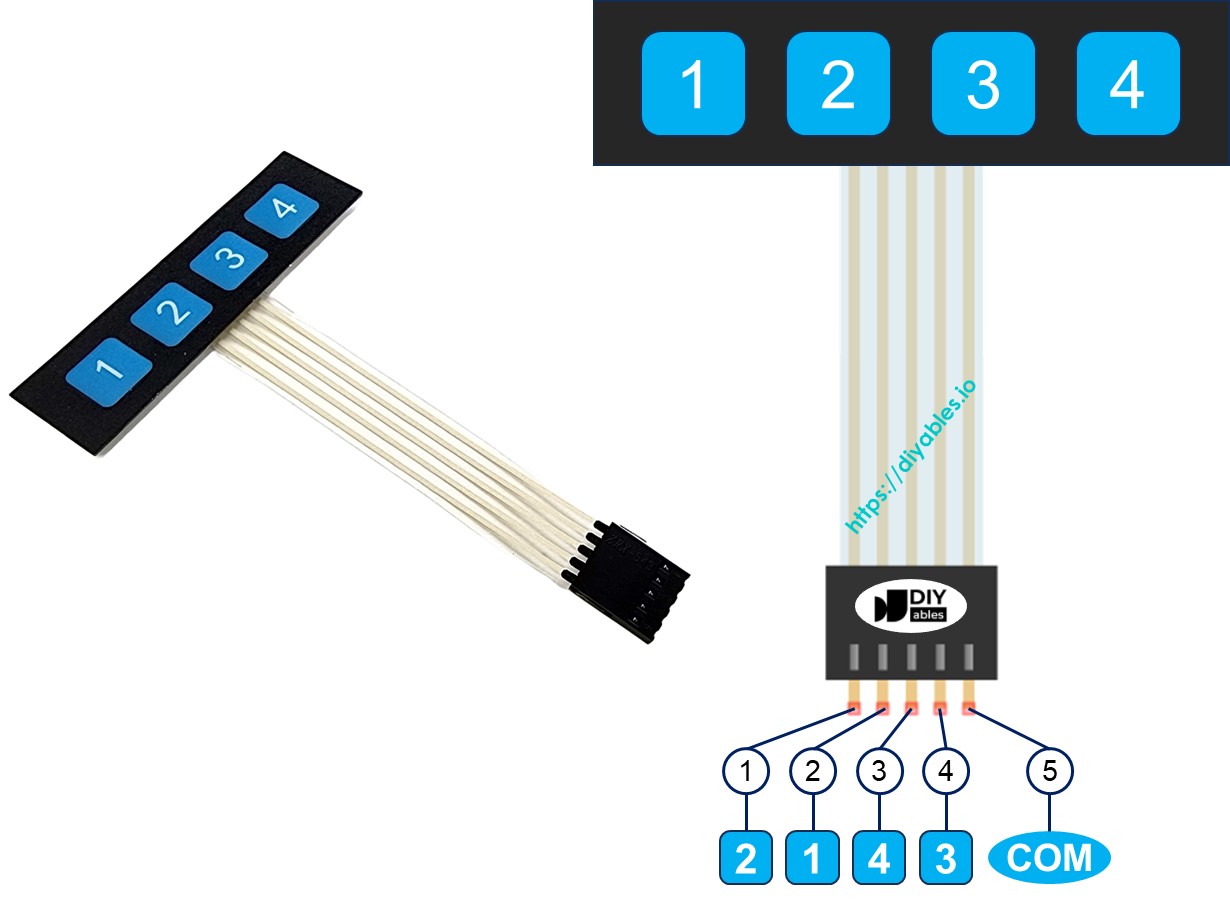
image source: diyables.io
선연결
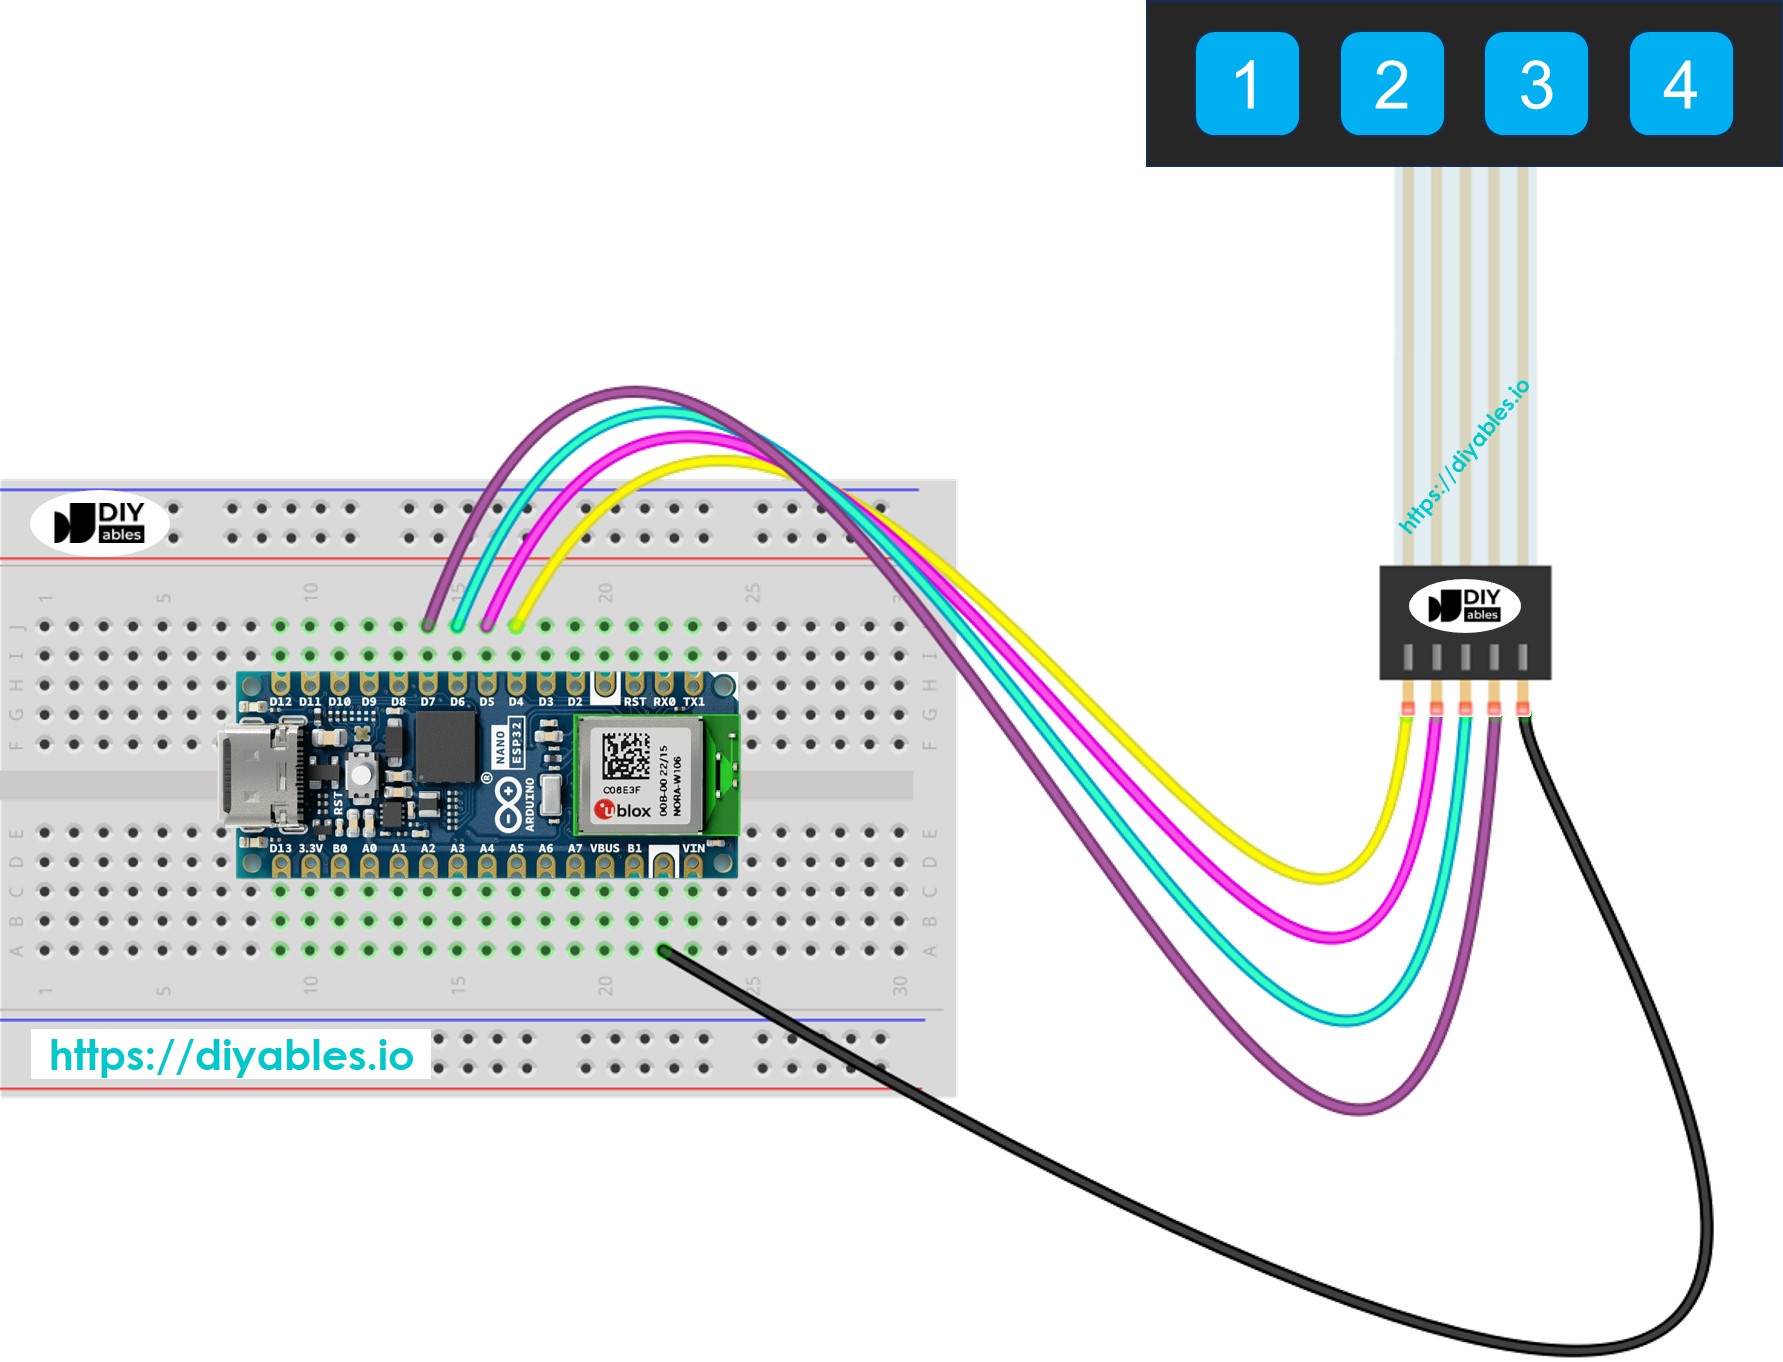
이 이미지는 Fritzing을 사용하여 만들어졌습니다. 이미지를 확대하려면 클릭하세요.
아두이노 나노 ESP32 코드
1x4 키패드의 모든 키는 버튼처럼 작동하믔로, digitalRead() 함수를 사용하여 각 키의 상태를 확인할 수 있습니다. 다른 버튼들처럼 누름 현상이 여러 번 등록될 수 있는 바운싱 문제를 해결해야 합니다. 이를 방지하기 위해 각 키를 디바운싱하는 것이 중요합니다. 다른 코드 부분에 영향을 주지 않고 네 개의 키를 한 번에 디바운싱하는 것은 어려울 수 있습니다. 다행히, ezBbutton 라이브러리가 이를 더 쉽게 해줍니다.
#include <ezButton.h>
#define KEY_NUM 4 // the number of keys
#define PIN_KEY_1 D5 // The Arduino Nano ESP32 pin connected to the key 1
#define PIN_KEY_2 D4 // The Arduino Nano ESP32 pin connected to the key 2
#define PIN_KEY_3 D7 // The Arduino Nano ESP32 pin connected to the key 3
#define PIN_KEY_4 D6 // The Arduino Nano ESP32 pin connected to the key 4
ezButton keypad_1x4[] = {
ezButton(PIN_KEY_1),
ezButton(PIN_KEY_2),
ezButton(PIN_KEY_3),
ezButton(PIN_KEY_4)
};
void setup() {
Serial.begin(9600);
for (byte i = 0; i < KEY_NUM; i++) {
keypad_1x4[i].setDebounceTime(100); // set debounce time to 100 milliseconds
}
}
void loop() {
int key = getKeyPressed();
if (key) {
Serial.print("The key ");
Serial.print(key);
Serial.println(" is pressed");
}
}
int getKeyPressed() {
for (byte i = 0; i < KEY_NUM; i++)
keypad_1x4[i].loop(); // MUST call the loop() function first
for (byte i = 0; i < KEY_NUM; i++) {
// get key state after debounce
int key_state = keypad_1x4[i].getState(); // the state after debounce
if (keypad_1x4[i].isPressed())
return (i + 1);
}
return 0;
}
자세한 사용 방법
Arduino Nano ESP32를 시작하려면 다음 단계를 따르세요:
- Arduino Nano ESP32에 처음이시라면 Arduino IDE에서 Arduino Nano ESP32 환경 설정 방벙에 대한 튜토리얼을 참조하세요.
- Arduino Nano ESP32를 1x4 키패드에 연결하세요.
- USB 케이블을 사용하여 Arduino Nano ESP32 보드를 컴퓨터에 연결하세요.
- 컴퓨터에서 Arduino IDE를 실행하세요.
- Arduino Nano ESP32 보드와 해당 COM 포트를 선택하세요.
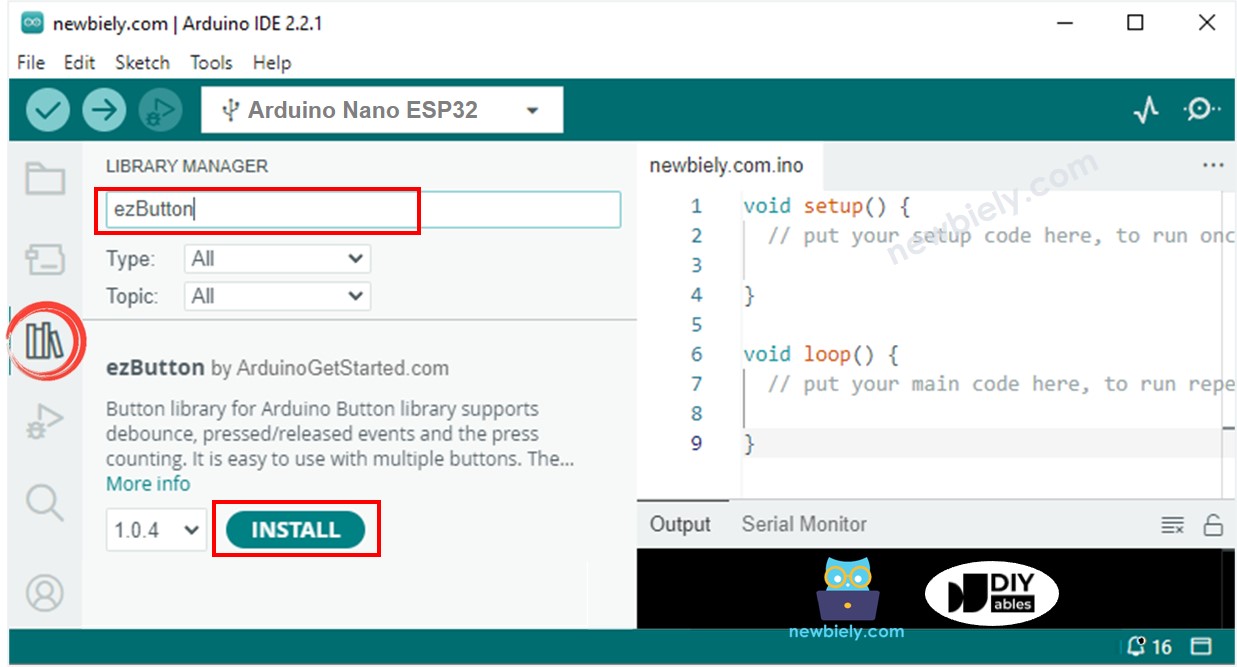
- Arduino IDE의 왼쪽에 있는 Libraries 아이콘을 클릭하세요.
- ezButton을 검색하고 Arduino Nano ESP32GetStarted.com에서 버튼 라이브러리를 찾으세요.
- Install 버튼을 클릭하여 ezButton 라이브러리를 추가하세요.
- 코드를 복사하여 아두이노 IDE에서 열기
- 아두이노 IDE에서 Upload 버튼을 클릭하여 코드를 아두이노 나노 ESP32에 업로드하기
- 시리얼 모니터 열기
- 1x4 키패드의 각 키를 차례로 누르기
- 시리얼 모니터에서 결과 확인하기
8
Serial.println("Hello World!");
Message (Enter to send message to 'Arduino Nano ESP32' on 'COM15')
New Line
9600 baud
1
2
3
4