아두이노 나노 ESP32 - SD 카드 | Arduino Nano ESP32 - SD Card

이 가이드에서는 아두이노 나노 ESP32와 함께 마이크로 SD 카드를 사용하는 방법을 탐구할 것입니다. 다음 주제들을 자세히 다룰 것입니다:

준비물

1×Arduino Nano ESP32 Amazon
1×USB Cable Type-C 쿠팡 | Amazon
1×Micro SD Card Amazon
1×Micro SD Card Module 쿠팡 | Amazon
1×Jumper Wires Amazon
1×Breadboard 쿠팡 | Amazon
1×USB 3.0 SD Card Reader Amazon
1×(Recommended) Screw Terminal Expansion Board for Arduino Nano 쿠팡 | Amazon
공개: 이 섹션에서 제공된 링크 중 일부는 제휴 링크입니다. 이 링크를 통해 구매한 경우 추가 비용없이 수수료를 받을 수 있습니다. 지원해 주셔서 감사합니다.

마이크로 SD 카드 모듈에 관하여

Micro SD 카드 모듈은 Arduino Nano ESP32와 인터페이스할 수 있으며 Micro SD 카드를 장착할 수 있습니다. 다시 말해, Micro SD 카드 모듈은 Arduino Nano ESP32와 Micro SD 카드 사이의 연결고리입니다.

핀배열
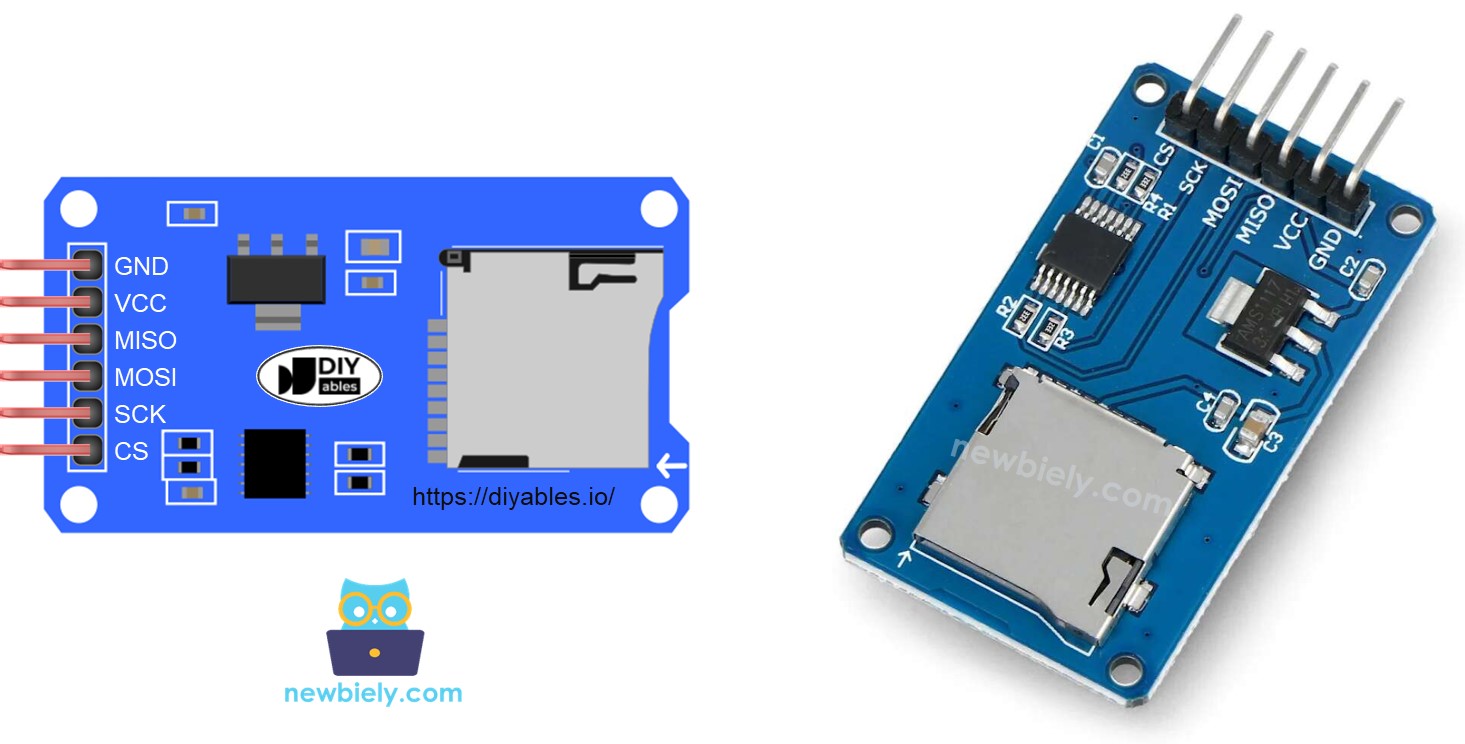
Micro SD Card Module Pinout

Micro SD 카드 모듈에는 6개의 핀이 포함됩니다:

  • VCC 핀: ESP32의 5V 핀에 연결하세요.
  • GND 핀: 이 핀을 ESP32의 GND에 연결하세요.
  • MISO 핀: (Master In Slave Out) 이 핀을 ESP32의 MISO 핀에 연결하세요.
  • MOSI 핀: (Master Out Slave In) 이 핀을 ESP32의 MOSI 핀에 연결하세요.
  • SCK 핀: 이 핀을 ESP32의 SCK 핀에 연결하세요.
  • SS 핀: (Slave Select) 이 핀을 Arduino Nano ESP32 코드에서 SS 핀으로 지정된 핀에 연결하세요.

준비

  • USB 3.0 SD 카드 리더기를 통해 PC에 마이크로 SD 카드를 연결하세요.
  • 마이크로 SD 카드가 FAT16 또는 FAT32로 포맷되어 있는지 확인하세요 (구글링해보세요).

선연결

아두이노 나노 ESP32 보드를 USB 포트를 통해 전원을 공급할 때의 배선도.
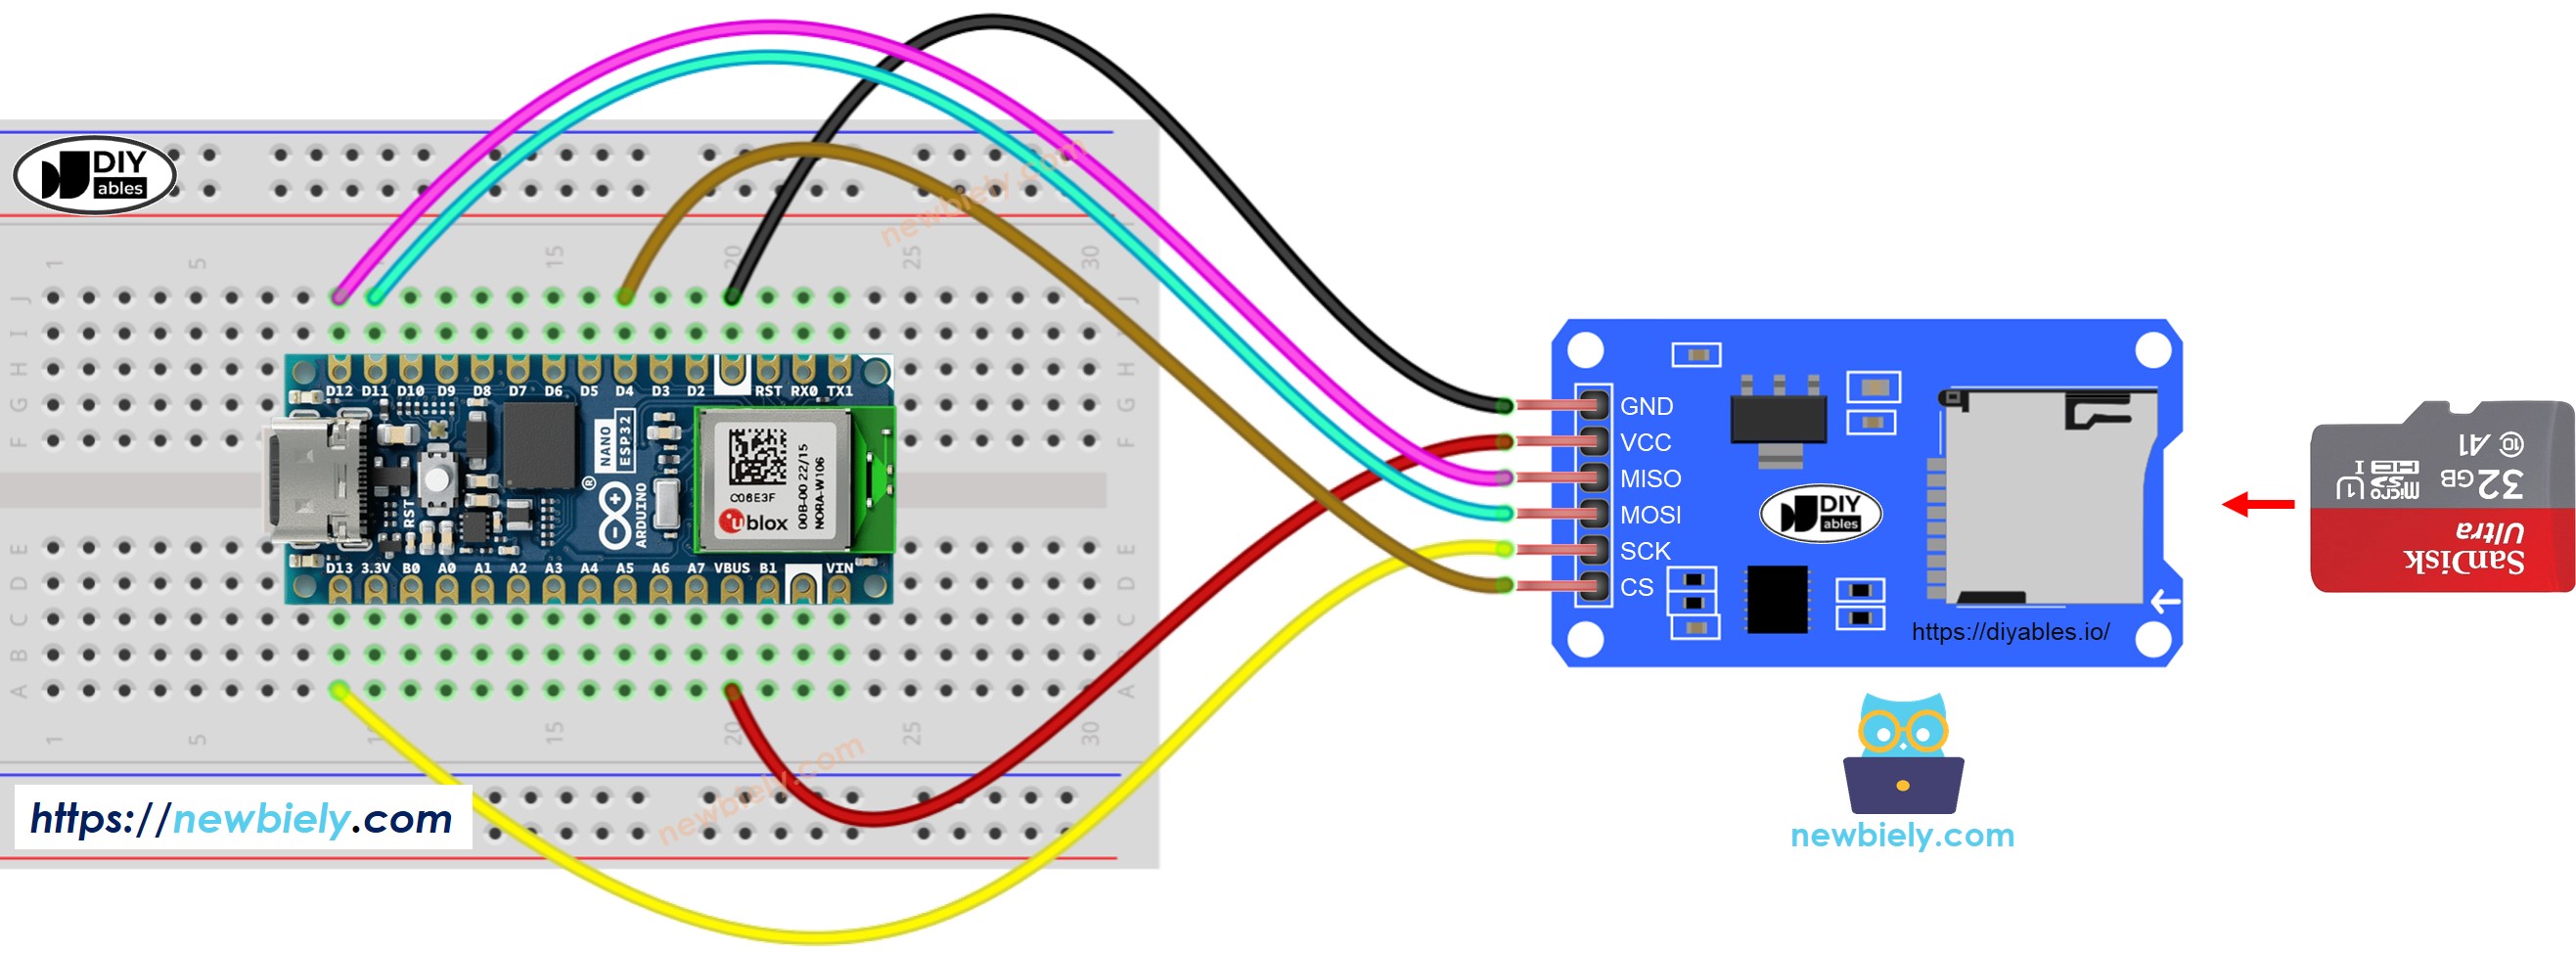
Arduino Nano ESP32 Micro SD Card Module Wiring Diagram

이 이미지는 Fritzing을 사용하여 만들어졌습니다. 이미지를 확대하려면 클릭하세요.

아두이노 나노 ESP32 보드를 Vin 핀을 통해 전원을 공급할 때의 배선도.
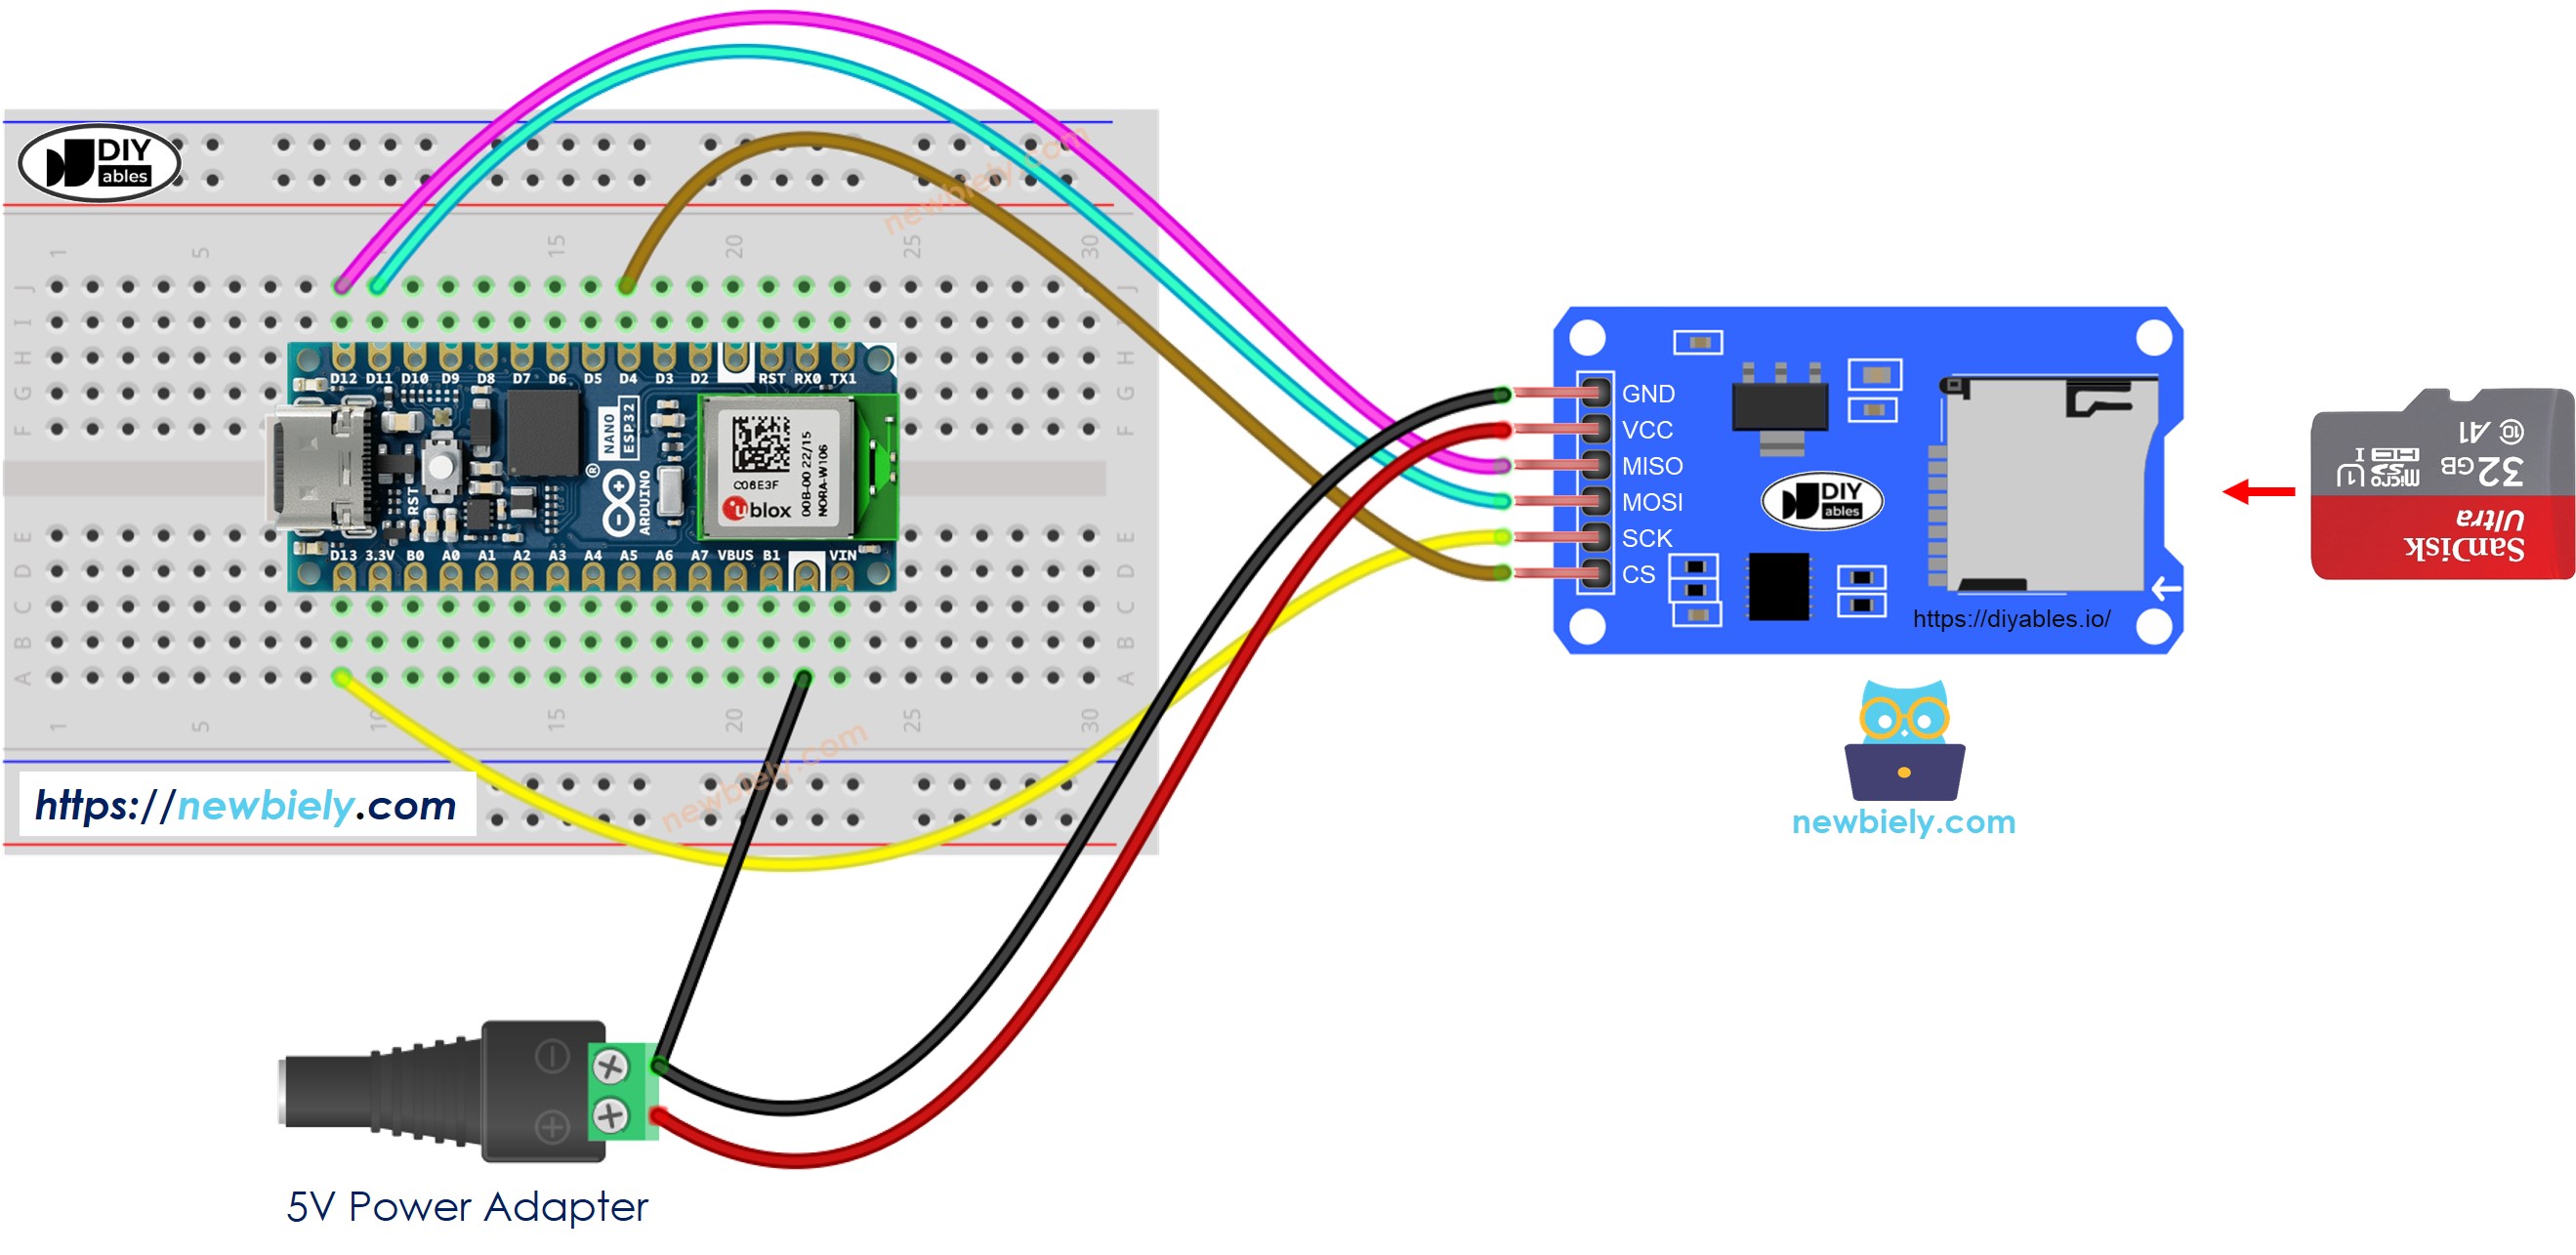
Arduino Nano ESP32 Micro SD Card Module external power wiring diagram

이 이미지는 Fritzing을 사용하여 만들어졌습니다. 이미지를 확대하려면 클릭하세요.

Arduino Nano ESP32 - Micro SD 카드에 파일을 여는 방법 및 존재하지 않는 경우 생성하기

아두이노 나노 ESP32 코드

/* * 이 Arduino Nano ESP32 코드는 newbiely.kr 에서 개발되었습니다 * 이 Arduino Nano ESP32 코드는 어떠한 제한 없이 공개 사용을 위해 제공됩니다. * 상세한 지침 및 연결도에 대해서는 다음을 방문하세요: * https://newbiely.kr/tutorials/arduino-nano-esp32/arduino-nano-esp32-sd-card */ #include <SD.h> #define PIN_SPI_CS D4 // The Arduino Nano ESP32 pin connected to the CS pin of SD card module File myFile; void setup() { Serial.begin(9600); if (!SD.begin(PIN_SPI_CS)) { while (1) { Serial.println(F("SD CARD FAILED, OR NOT PRESENT!")); delay(1000); } } Serial.println(F("SD CARD INITIALIZED.")); if (!SD.exists("/esp32.txt")) { Serial.println(F("esp32.txt doesn't exist. Creating esp32.txt file...")); // create a new file by opening a new file and immediately close it myFile = SD.open("/esp32.txt", FILE_WRITE); myFile.close(); } // recheck if file is created or not if (SD.exists("/esp32.txt")) Serial.println(F("esp32.txt exists on SD Card.")); else Serial.println(F("esp32.txt doesn't exist on SD Card.")); } void loop() { }

사용 방법

  • Arduino Nano ESP32를 처음 사용하는 경우, Arduino IDE에서 Arduino Nano ESP32 환경 설정 방법을 참조하세요.
  • 컴퓨터에서 Arduino IDE를 엽니다.
  • 올바른 Arduino Nano ESP32 보드(예: Arduino Nano ESP32와 COM 포트를 선택합니다.
  • Micro SD 카드를 Micro SD 카드 모듈에 삽입합니다.
  • 위의 연결도에 따라 Micro SD 카드 모듈과 Arduino Nano ESP32 사이를 연결합니다.
  • USB 케이블을 통해 Arduino Nano ESP32를 PC에 연결합니다.
  • Arduino IDE를 열고, 올바른 보드와 포트를 선택합니다.
  • Arduino IDE에서 시리얼을 엽니다.
  • 위의 코드를 복사하여 Arduino IDE에 붙여넣습니다.
  • Arduino IDE에서 Upload 버튼을 클릭하여 코드를 Arduino Nano ESP32에 업로드합니다.
  • 첫 실행에 대한 시리얼 모니터에서의 결과
COM6
Send
SD CARD INITIALIZED. esp32.txt doesn't exist. Creating esp32.txt file... esp32.txt exists on SD Card.
Autoscroll Show timestamp
Clear output
9600 baud  
Newline  

다음 실행에 대한 시리얼 모니터의 결과

COM6
Send
SD CARD INITIALIZED. esp32.txt exists on SD Card.
Autoscroll Show timestamp
Clear output
9600 baud  
Newline  

※ NOTE THAT:

Serial Monitor를 열기 전에 첫 업로드를 실행하는 경우 처음에는 Serial Monitor에서 출력을 볼 수 없을 수 있습니다.

  • 모듈에서 마이크로 SD 카드를 분리하세요.
  • 마이크로 SD 카드를 USB SD 카드 리더기에 삽입하세요.
  • USB SD 카드 리더기를 PC에 연결하세요.
  • 파일이 있는지 없는지 확인하세요.

아두이노 나노 ESP32 - 마이크로 SD 카드에 파일을 쓰고/읽는 방법

아래 코드는 다음을 수행합니다:

  • 파일에 데이터 쓰기
  • 파일의 내용을 문자 단위로 읽고 시리얼 모니터에 출력하기
/* * 이 Arduino Nano ESP32 코드는 newbiely.kr 에서 개발되었습니다 * 이 Arduino Nano ESP32 코드는 어떠한 제한 없이 공개 사용을 위해 제공됩니다. * 상세한 지침 및 연결도에 대해서는 다음을 방문하세요: * https://newbiely.kr/tutorials/arduino-nano-esp32/arduino-nano-esp32-sd-card */ #include <SD.h> #define PIN_SPI_CS D4 // The Arduino Nano ESP32 pin connected to the CS pin of SD card module File myFile; void setup() { Serial.begin(9600); if (!SD.begin(PIN_SPI_CS)) { while (1) { Serial.println(F("SD CARD FAILED, OR NOT PRESENT!")); delay(1000); } } Serial.println(F("SD CARD INITIALIZED.")); // open file for writing myFile = SD.open("/esp32.txt", FILE_WRITE); if (myFile) { myFile.println("Created by esp32io.com"); // write a line to esp32.txt myFile.println("Learn ESP32 and SD Card"); // write another line to esp32.txt myFile.close(); } else { Serial.print(F("SD Card: Issue encountered while attempting to open the file esp32.txt")); } // open file for reading myFile = SD.open("/esp32.txt", FILE_READ); if (myFile) { while (myFile.available()) { char ch = myFile.read(); // read characters one by one from Micro SD Card Serial.print(ch); // print the character to Serial Monitor } myFile.close(); } else { Serial.print(F("SD Card: Issue encountered while attempting to open the file esp32.txt")); } } void loop() { }

시리얼 모니터가 파일의 내용을 보여주었다.

COM6
Send
Created by newbiely.kr Learn Arduino Nano ESP32 and SD Card
Autoscroll Show timestamp
Clear output
9600 baud  
Newline  

※ NOTE THAT:

기본적으로 데이터는 파일의 끝에 추가됩니다. 위의 코드로 Arduino Nano ESP32를 재부팅하면 텍스트가 파일에 다시 추가됩니다 ⇒ 시리얼 모니터는 아래와 같이 더 많은 라인을 보여줄 것입니다:

COM6
Send
newbiely.kr에 의해 생성됨 Arduino Nano ESP32 및 SD 카드 배우기 newbiely.kr에 의해 생성됨 Arduino Nano ESP32 및 SD 카드 배우기
Autoscroll Show timestamp
Clear output
9600 baud  
Newline  

모듈에서 마이크로 SD 카드를 분리한 후, 컨텐츠를 확인하기 위해 PC에서 열 수도 있습니다 (USB SD 카드 리더기가 필요합니다).

아두이노 나노 ESP32 - 마이크로 SD 카드에 있는 파일을 줄 단위로 읽는 방법

/* * 이 Arduino Nano ESP32 코드는 newbiely.kr 에서 개발되었습니다 * 이 Arduino Nano ESP32 코드는 어떠한 제한 없이 공개 사용을 위해 제공됩니다. * 상세한 지침 및 연결도에 대해서는 다음을 방문하세요: * https://newbiely.kr/tutorials/arduino-nano-esp32/arduino-nano-esp32-sd-card */ #include <SD.h> #define PIN_SPI_CS D4 // The Arduino Nano ESP32 pin connected to the CS pin of SD card module File myFile; void setup() { Serial.begin(9600); if (!SD.begin(PIN_SPI_CS)) { while (1) { Serial.println(F("SD CARD FAILED, OR NOT PRESENT!")); delay(1000); } } Serial.println(F("SD CARD INITIALIZED.")); // open file for writing myFile = SD.open("/esp32.txt", FILE_WRITE); if (myFile) { myFile.println("Created by esp32io.com"); // write a line to esp32.txt myFile.println("Learn ESP32 and SD Card"); // write another line to esp32.txt myFile.close(); } else { Serial.print(F("SD Card: Issue encountered while attempting to open the file esp32.txt")); } // open file for reading myFile = SD.open("/esp32.txt", FILE_READ); if (myFile) { int line_count = 0; while (myFile.available()) { char line[100]; // maximum is 100 characters, change it if needed int line_length = myFile.readBytesUntil('\n', line, 100); // read line-by-line from Micro SD Card line_count++; Serial.print(F("Line ")); Serial.print(line_count); Serial.print(F(": ")); Serial.write(line, line_length); // print the character to Serial Monitor // \n character is escaped by readBytesUntil function Serial.write('\n'); // print a new line charactor } myFile.close(); } else { Serial.print(F("SD Card: Issue encountered while attempting to open the file esp32.txt")); } } void loop() { }

시리얼 모니터의 결과

COM6
Send
SD CARD INITIALIZED. Line 1: Created by newbiely.kr Line 2: Learn Arduino Nano ESP32 and SD Card
Autoscroll Show timestamp
Clear output
9600 baud  
Newline  

※ NOTE THAT:

파일의 내용을 이전에 삭제하지 않으면 시리얼 모니터에서 더 많은 줄을 볼 수 있습니다.

아두이노 나노 ESP32 - 마이크로 SD 카드의 파일을 덮어쓰는 방법

기본적으로 내용은 파일의 끝에 추가됩니다. 파일을 덮어쓰는 가장 간단한 방법은: 기존 파일을 삭제하고 같은 이름으로 새 파일을 생성하는 것입니다.

/* * 이 Arduino Nano ESP32 코드는 newbiely.kr 에서 개발되었습니다 * 이 Arduino Nano ESP32 코드는 어떠한 제한 없이 공개 사용을 위해 제공됩니다. * 상세한 지침 및 연결도에 대해서는 다음을 방문하세요: * https://newbiely.kr/tutorials/arduino-nano-esp32/arduino-nano-esp32-sd-card */ #include <SD.h> #define PIN_SPI_CS D4 // The Arduino Nano ESP32 pin connected to the CS pin of SD card module File myFile; void setup() { Serial.begin(9600); if (!SD.begin(PIN_SPI_CS)) { while (1) { Serial.println(F("SD CARD FAILED, OR NOT PRESENT!")); delay(1000); } } Serial.println(F("SD CARD INITIALIZED.")); SD.remove("/esp32.txt"); // delete the file if existed // create new file by opening file for writing myFile = SD.open("/esp32.txt", FILE_WRITE); if (myFile) { myFile.println("Created by esp32io.com"); // write a line to esp32.txt myFile.println("Learn ESP32 and SD Card"); // write another line to esp32.txt myFile.close(); } else { Serial.print(F("SD Card: Issue encountered while attempting to open the file esp32.txt")); } // open file for reading myFile = SD.open("/esp32.txt", FILE_READ); if (myFile) { while (myFile.available()) { char ch = myFile.read(); // read characters one by one from Micro SD Card Serial.print(ch); // print the character to Serial Monitor } myFile.close(); } else { Serial.print(F("SD Card: Issue encountered while attempting to open the file esp32.txt")); } } void loop() { }

시리얼 모니터의 결과

COM6
Send
SD CARD INITIALIZED. Created by newbiely.kr Learn Arduino Nano ESP32 and SD Card
Autoscroll Show timestamp
Clear output
9600 baud  
Newline  
  • 아두이노 나노 ESP32 재부팅
  • 시리얼 모니터의 파일 내용이 추가되었는지 확인하세요.

모듈에서 마이크로 SD 카드를 분리한 다음, PC에서 내용을 확인하기 위해 열 수도 있습니다 (USB SD 카드 리더기가 필요함).

동영상

비디오 제작은 시간이 많이 걸리는 작업입니다. 비디오 튜토리얼이 학습에 도움이 되었다면, YouTube 채널 을 구독하여 알려 주시기 바랍니다. 비디오에 대한 높은 수요가 있다면, 비디오를 만들기 위해 노력하겠습니다.

※ OUR MESSAGES

  • Please feel free to share the link of this tutorial. However, Please do not use our content on any other websites. We invested a lot of effort and time to create the content, please respect our work!