이 가이드에서는 Arduino Nano ESP32와 힘 센서를 사용하여 귀하의 물건을 안전하게 보관하는 방법을 알려 드릴 것입니다. 누군가 귀하의 소지품을 옮기려고 할 때 이메일을 보내는 시스템을 설정하는 단계를 다룰 것입니다. Arduino Nano ESP32를 준비하고, 힘 센서를 연결하며, Gmail을 통해 이메일을 보내도록 설정하는 방법을 배우게 됩니다. 자세한 지침을 제공하고 이 시스템이 어떻게 유용할 수 있는지 보여 드릴 것입니다.
공개: 이 포스팅 에 제공된 일부 링크는 아마존 제휴 링크입니다. 이 포스팅은 쿠팡 파트너스 활동의 일환으로, 이에 따른 일정액의 수수료를 제공받습니다.
힘 센서와 Gmail에 관하여
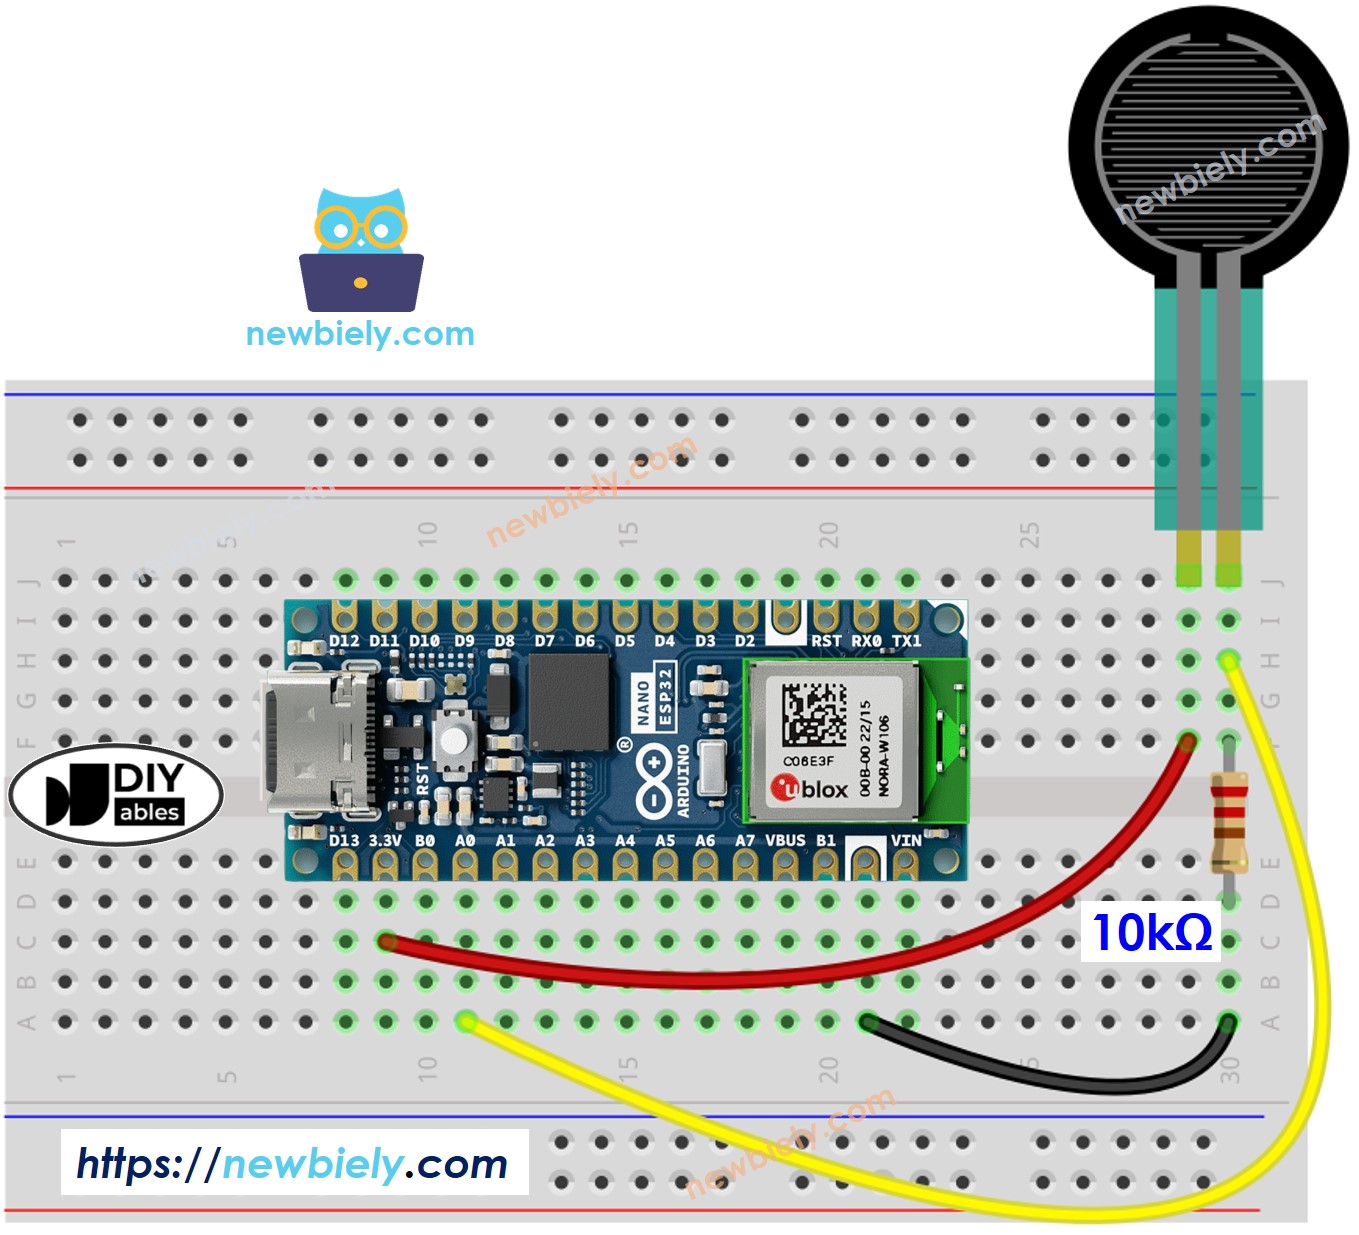
포스 센서와 Gmail에 대한 자세한 가이드를 제공합니다. 각 튜퉴리얼은 하드웨어 설정, 작동 원리 이해, Arduino Nano ESP32에 전선 연결, Arduino Nano ESP32용 코드 작성 방법에 대한 단계별 지침을 제공합니다. 자세한 내용은 다음 링크를 방문해 주세요:
/* * 이 아두이노 나노 esp32 코드는 newbiely.kr 에서 개발되었습니다 * 이 아두이노 나노 esp32 코드는 어떠한 제한 없이 공개 사용을 위해 제공됩니다. * 상세한 지침 및 연결도에 대해서는 다음을 방문하세요: * https://newbiely.kr/tutorials/arduino-nano-esp32/arduino-nano-esp32-secure-your-belongings-detect-theft-and-send-email-alerts */#include <WiFi.h>#include <ESP_Mail_Client.h>#define WIFI_SSID "YOUR_WIFI_SSID"// CHANGE IT#define WIFI_PASSWORD "YOUR_WIFI_PASSWORD"// CHANGE IT// the sender email credentials#define SENDER_EMAIL "xxxxxx@gmail.com"// CHANGE IT#define SENDER_PASSWORD "xxxx xxxx xxxx xxxx"// CHANGE IT to your Google App password#define RECIPIENT_EMAIL "xxxxxx@gmail.com"// CHANGE IT#define SMTP_HOST "smtp.gmail.com"#define SMTP_PORT 587#define FORCE_SENSOR_PIN A0 // The Arduino Nano ESP32 pin A0 are connected to the FSR with 10K pulldown resistor#define THRESHOLD 100 // may need to callibrate this valueSMTPSessionsmtp;voidsetup() {Serial.begin(9600);// set the ADC attenuation to 11 dB (up to ~3.3V input) analogSetAttenuation(ADC_11db);WiFi.begin(WIFI_SSID, WIFI_PASSWORD);Serial.print("Connecting to Wi-Fi");while (WiFi.status() != WL_CONNECTED) {Serial.print(".");delay(300); }Serial.println();Serial.print("Connected with IP: ");Serial.println(WiFi.localIP());Serial.println();pinMode(DOOR_SENSOR_PIN, INPUT_PULLUP); // set ESP32 pin to input pull-up mode door_state = digitalRead(DOOR_SENSOR_PIN); // read state}voidloop() {int forceValue = analogRead(FORCE_SENSOR_PIN);if (forceValue < THRESHOLD) {Serial.println("Alert! Someone has stolen your stuff!");String subject = "Email Notification from ESP32";String textMsg = "This is an email sent from ESP32.\n"; textMsg += "Alert! Someone has stolen your stuff!"; gmail_send(subject, textMsg); }}void gmail_send(String subject, String textMsg) {// set the network reconnection optionMailClient.networkReconnect(true);smtp.debug(1);smtp.callback(smtpCallback); Session_Config config;// set the session configconfig.server.host_name = SMTP_HOST;config.server.port = SMTP_PORT;config.login.email = SENDER_EMAIL;config.login.password = SENDER_PASSWORD;config.login.user_domain = F("127.0.0.1");config.time.ntp_server = F("pool.ntp.org,time.nist.gov");config.time.gmt_offset = 3;config.time.day_light_offset = 0;// declare the message class SMTP_Message message;// set the message headers message.sender.name = F("ESP32"); message.sender.email = SENDER_EMAIL; message.subject = subject; message.addRecipient(F("To Whom It May Concern"), RECIPIENT_EMAIL); message.text.content = textMsg; message.text.transfer_encoding = "base64"; message.text.charSet = F("utf-8"); message.priority = esp_mail_smtp_priority::esp_mail_smtp_priority_low;// set the custom message header message.addHeader(F("Message-ID: <abcde.fghij@gmail.com>"));// connect to the serverif (!smtp.connect(&config)) {Serial.printf("Connection error, Status Code: %d, Error Code: %d, Reason: %s\n", smtp.statusCode(), smtp.errorCode(), smtp.errorReason().c_str());return; }if (!smtp.isLoggedIn()) {Serial.println("Not yet logged in."); } else {if (smtp.isAuthenticated())Serial.println("Successfully logged in.");elseSerial.println("Connected with no Auth."); }// start sending Email and close the sessionif (!MailClient.sendMail(&smtp, &message))Serial.printf("Error, Status Code: %d, Error Code: %d, Reason: %s\n", smtp.statusCode(), smtp.errorCode(), smtp.errorReason().c_str());}// callback function to get the Email sending statusvoid smtpCallback(SMTP_Status status) {// print the current statusSerial.println(status.info());// print the sending resultif (status.success()) {Serial.println("----------------");Serial.printf("Email sent success: %d\n", status.completedCount());Serial.printf("Email sent failed: %d\n", status.failedCount());Serial.println("----------------\n");for (size_t i = 0; i < smtp.sendingResult.size(); i++) {// get the result item SMTP_Result result = smtp.sendingResult.getItem(i);Serial.printf("Message No: %d\n", i + 1);Serial.printf("Status: %s\n", result.completed ? "success" : "failed");Serial.printf("Date/Time: %s\n", MailClient.Time.getDateTimeString(result.timestamp, "%B %d, %Y %H:%M:%S").c_str());Serial.printf("Recipient: %s\n", result.recipients.c_str());Serial.printf("Subject: %s\n", result.subject.c_str()); }Serial.println("----------------\n");// free the memorysmtp.sendingResult.clear(); }}