아두이노 나노 닷스타 LED 스트립
이 튜토리얼에서는 Arduino Nano를 사용하여 DotStar RGB LED 스트립을 제어하는 방법을 배울 예정입니다. 구체적으로, 우리는 다음 사항을 배우게 됩니다:
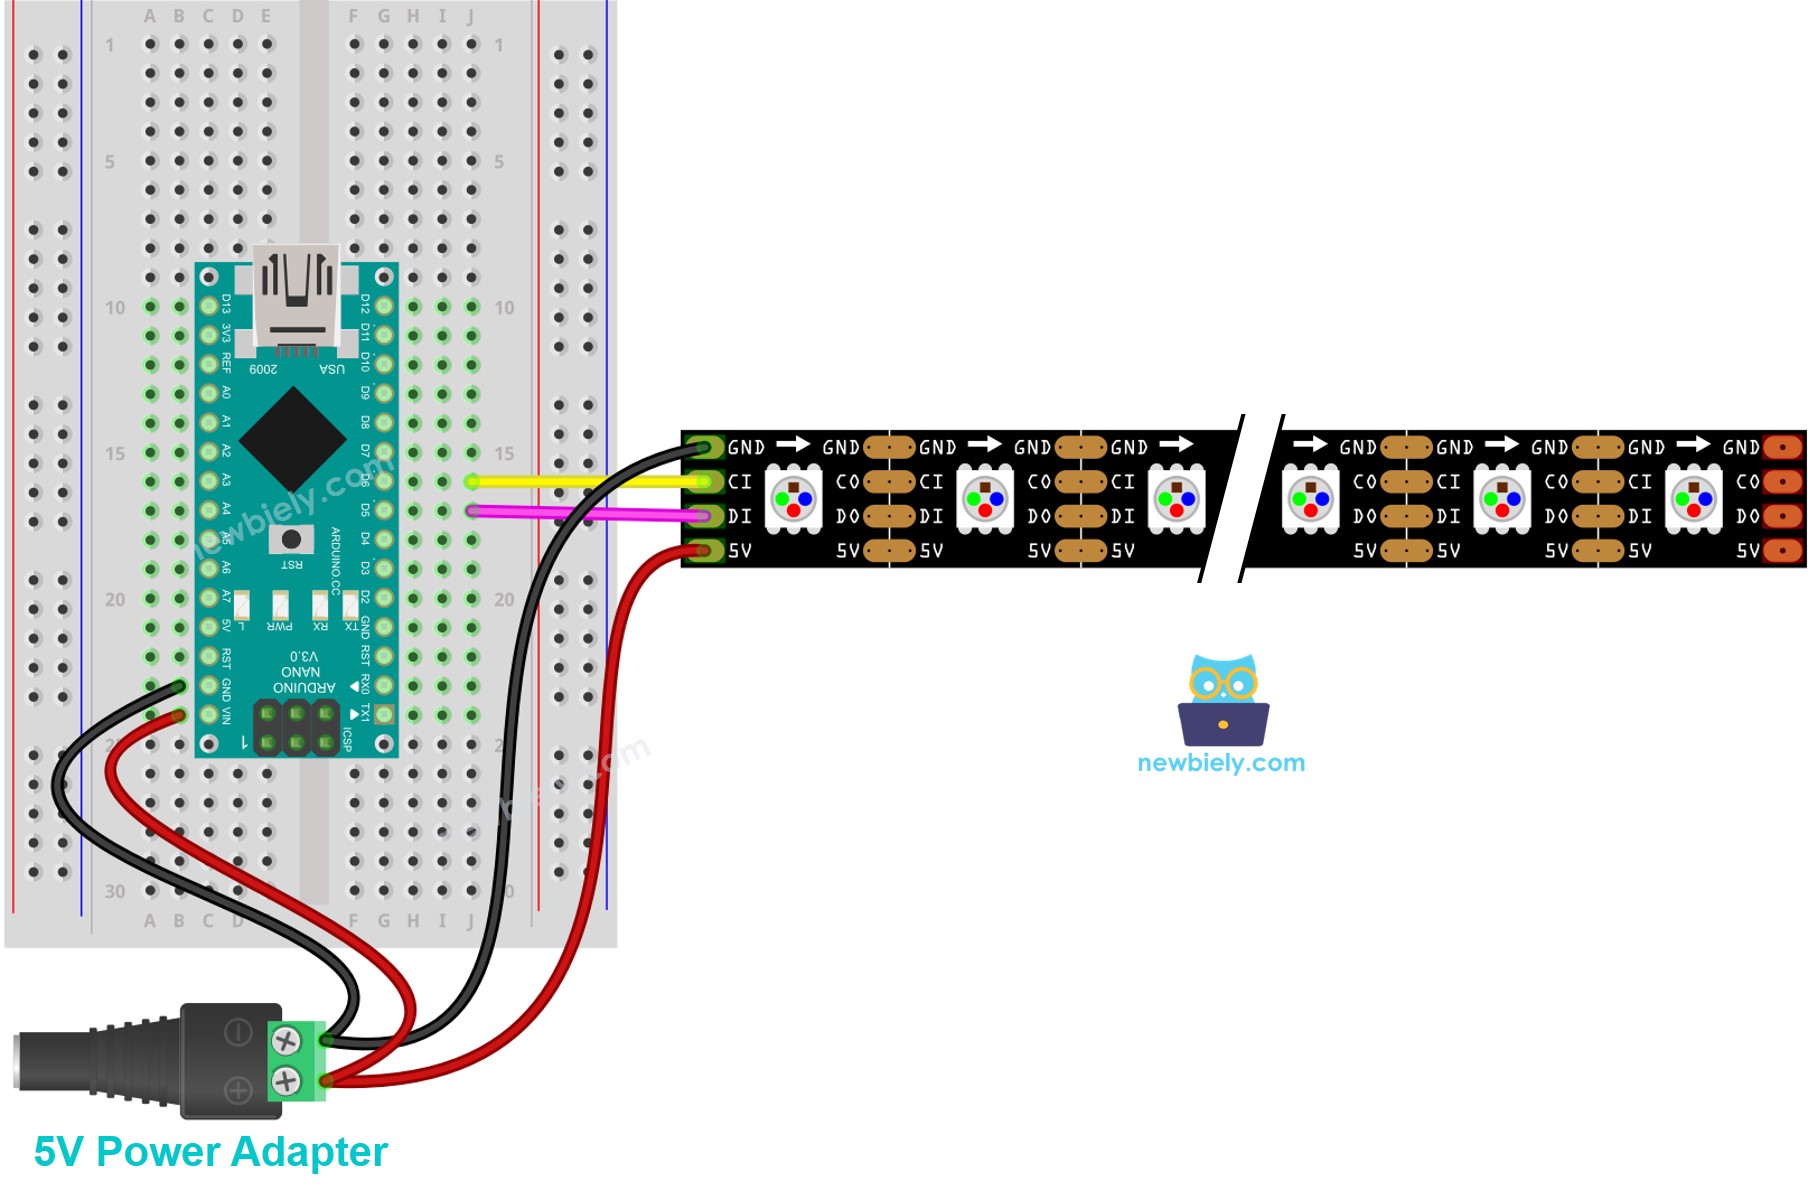
아두이노 나노를 DotStar LED 스트립에 연결하는 방법
아두이노 나노를 프로그래밍하여 LED 스트립의 각 개별 LED의 색상과 밝기를 제어하는 방법
아두이노 나노를 프로그래밍하여 DotStar LED 스트립에 혜성 효과를 만드는 방법
| 1 | × | 아두이노 나노 | 쿠팡 | 아마존 | |
| 1 | × | USB A to Mini-B USB 케이블 | 쿠팡 | 아마존 | |
| 1 | × | DotStar RGB LED 스트립 | 아마존 | |
| 1 | × | 1000uF Capacitor | 아마존 | |
| 1 | × | 470Ω Resistor | 아마존 | |
| 1 | × | 5V 전원 어댑터 | 아마존 | |
| 1 | × | DC 커넥터 전원 연결 잭 플러그 소켓 | 쿠팡 | 아마존 | |
| 1 | × | 점퍼케이블 | 쿠팡 | 아마존 | |
| 1 | × | (추천) 아두이노 나노용 스크루 터미널 확장 보드 | 쿠팡 | 아마존 | |
| 1 | × | (추천) 아두이노 나노용 브레이크아웃 확장 보드 | 쿠팡 | 아마존 | |
| 1 | × | (추천) 아두이노 나노용 전원 분배기 | 쿠팡 | 아마존 | |
공개: 이 포스팅 에 제공된 일부 링크는 아마존 제휴 링크입니다. 이 포스팅은 쿠팡 파트너스 활동의 일환으로, 이에 따른 일정액의 수수료를 제공받습니다.
DotStar RGB LED 스트립에는 세 개의 핀이 있습니다:
GND 핀: GND(0V)에 연결해야 합니다.
CI 핀: 클록 신호를 받는 클록 핀입니다. Arduino Nano 핀에 연결해야 합니다.
DI 핀: 제어 신호를 받는 데이터 핀입니다. Arduino Nano 핀에 연결해야 합니다.
5V 핀: 외부 전원 공급 장치의 5V에 연결해야 합니다.

이 이미지는 Fritzing을 사용하여 만들어졌습니다. 이미지를 확대하려면 클릭하세요.
Arduino Nano와 기타 부품에 전원을 공급하는 가장 효과적인 방법은 다음 링크를 참조하세요: 아두이노 나노 전원 공급 방법.
DotStar 라이브러리를 포함하세요.
#include <Adafruit_DotStar.h>
#include <SPI.h>
DotStar 객체를 선언하십시오.
#define NUMPIXELS 144
#define DATAPIN D5
#define CLOCKPIN D6
Adafruit_DotStar strip(NUMPIXELS, DATAPIN, CLOCKPIN, DOTSTAR_BRG);
DotStar를 초기화합니다.
strip.begin();
strip.setBrightness(255);
strip.show();
각 개별 LED(픽셀이라고 함)의 색상(r, g, b)을 설정하세요.
strip.setPixelColor(pixel, g, r, b);
모든 스트립의 밝기 설정
strip.setBrightness(100);
아래 코드는 각 픽셀 사이에 지연 시간을 두고 픽셀을 하나씩 빨간색으로 바꿉니다.
#include <Adafruit_DotStar.h>
#include <SPI.h>
#define NUMPIXELS 144
#define DATAPIN D5
#define CLOCKPIN D6
Adafruit_DotStar strip(NUMPIXELS, DATAPIN, CLOCKPIN, DOTSTAR_BRG);
void setup() {
Serial.begin(9600);
strip.begin();
strip.show();
strip.setBrightness(255);
}
void loop() {
for (int pixel = 0; pixel < NUMPIXELS; pixel++) {
int r = 255;
int g = 0;
int b = 0;
strip.clear();
strip.setPixelColor(pixel, g, r, b);
strip.show();
delay(1000);
}
}
제공된 다이어그램에 따라 구성 요소를 연결하세요.
USB 케이블을 사용하여 Arduino Nano 보드를 컴퓨터에 연결하세요.
컴퓨터에서 Arduino IDE를 실행하세요.
Arduino Nano 보드와 해당하는 COM 포트를 선택하세요.
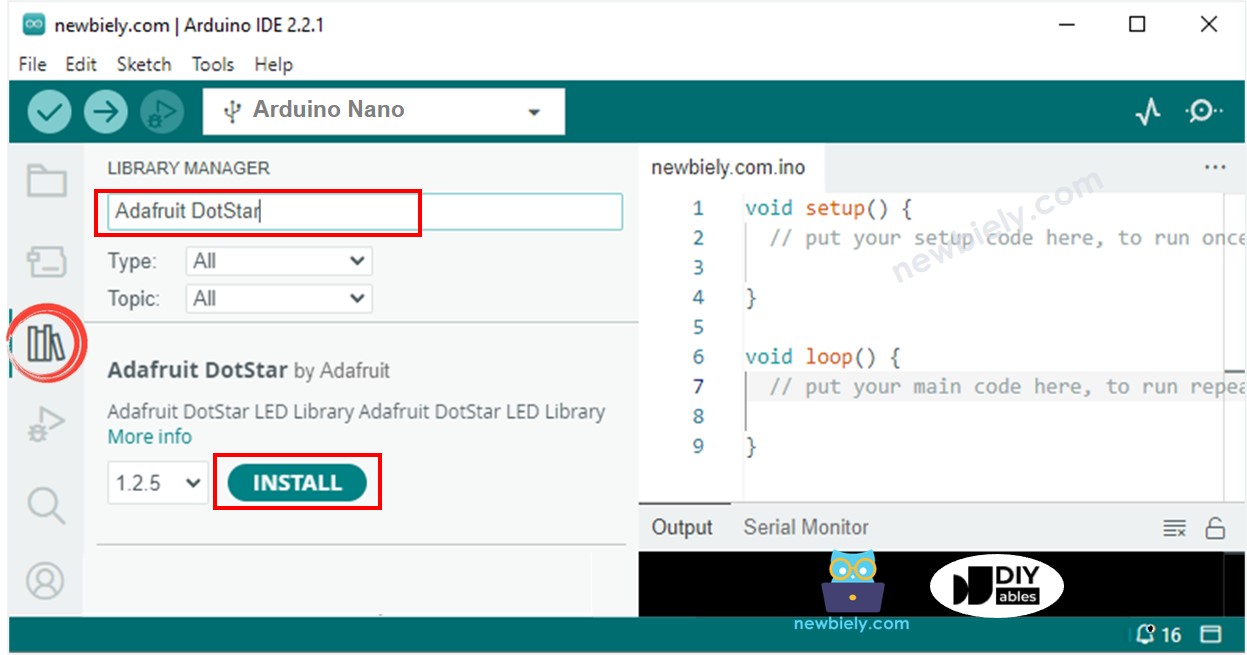
Arduino IDE의 왼쪽 탐색바에서 Library Manager 아이콘을 클릭하여 라이브러리 관리자를 엽니다.
“Adafruit DotStar”를 검색하고 Adafruit의 DotStar 라이브러리를 찾으세요.
DotStar 라이브러리를 설치하려면 Install 버튼을 클릭하세요.
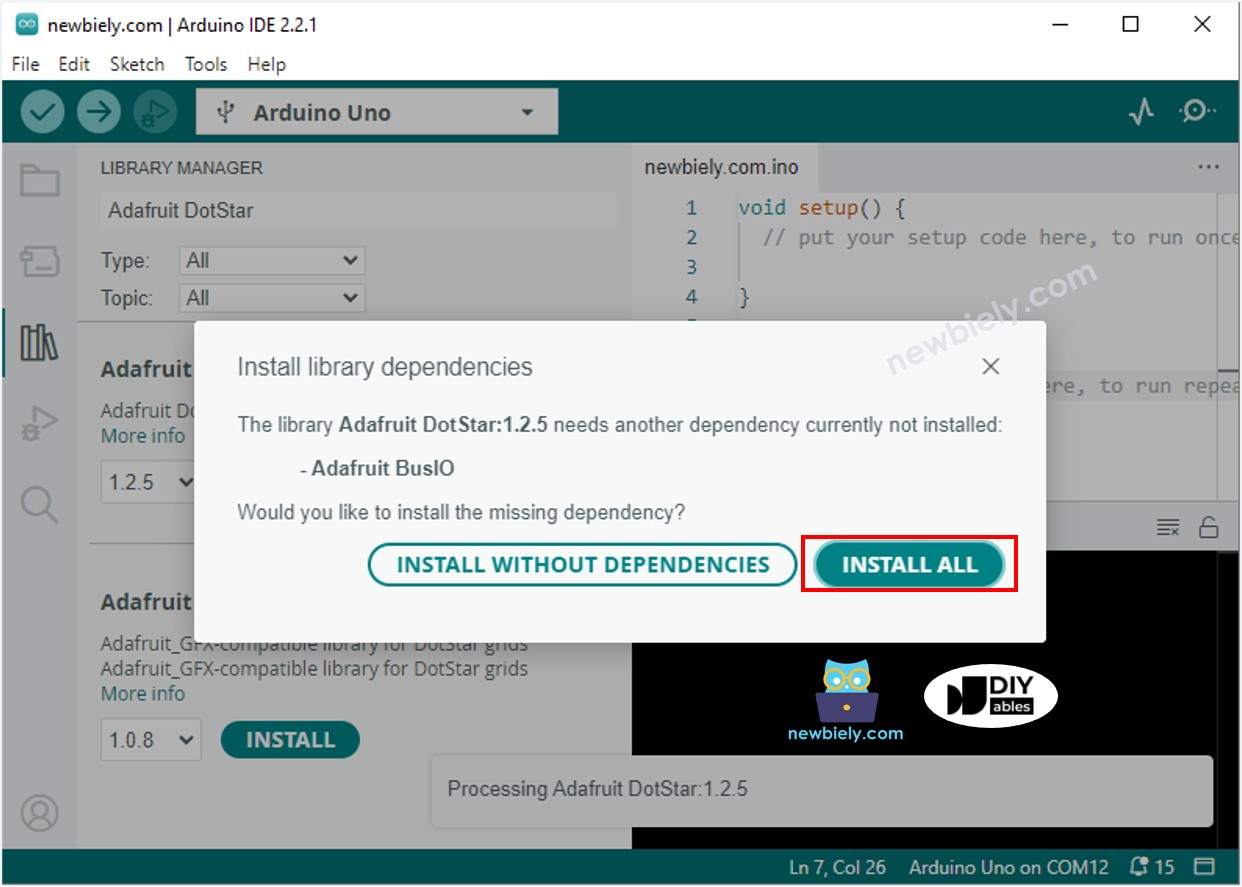
의존성을 설치하라는 요청을 받게 됩니다. Install All 버튼을 클릭하세요.
아래 코드는 DotStar LED 스트립에 혜성 효과를 제공합니다.
#include <Adafruit_DotStar.h>
#include <SPI.h>
#define COMET_LENGTH_ALL 30
#define COMET_LENGTH_BODY 25
#define COMET_LENGTH_HEAD 5
#define TWO_COMET_DISTANCE 10
#define COMET_SPEED 2000
#define COMET_COLOR_R 204
#define COMET_COLOR_G 255
#define COMET_COLOR_B 255
#define COMET_BRIGHTNESS_MIN 1
#define COMET_BRIGHTNESS_MAX 200
#define COMET_BRIGHTNESS_HEAD 80
#define FLICKER_MAX 255
#define FLICKER_MIN 100
#define FLICKER_SPEED 800
#define NUMPIXELS 144
#define DATAPIN D5
#define CLOCKPIN D6
Adafruit_DotStar strip(NUMPIXELS, DATAPIN, CLOCKPIN, DOTSTAR_BRG);
int pos_head = 0;
unsigned long cometTimeStart;
unsigned long flickerTimeStart;
unsigned long progress;
unsigned long cometBrightness;
unsigned long flickerBrightness;
unsigned long TIME_PER_PIXEL;
void setup() {
Serial.begin(9600);
strip.begin();
strip.show();
strip.setBrightness(255);
TIME_PER_PIXEL = map(1, 0, NUMPIXELS, 0, COMET_SPEED);
cometTimeStart = millis();
flickerTimeStart = millis();
}
void loop() {
progress = millis() - flickerTimeStart;
if (progress >= 2 * FLICKER_SPEED) {
progress = 2 * FLICKER_SPEED;
flickerTimeStart = millis();
}
if (progress > FLICKER_SPEED)
progress = 2 * FLICKER_SPEED - progress;
flickerBrightness = map(progress, 0, FLICKER_SPEED, FLICKER_MIN, FLICKER_MAX);
strip.setBrightness(flickerBrightness);
progress = millis() - cometTimeStart;
if (progress >= TIME_PER_PIXEL) {
pos_head++;
pos_head %= (COMET_LENGTH_ALL + TWO_COMET_DISTANCE);
int offset = COMET_LENGTH_ALL - pos_head;
for (int pixel = 0; pixel < NUMPIXELS; pixel++) {
int pos_offset = pixel + offset;
pos_offset %= (COMET_LENGTH_ALL + TWO_COMET_DISTANCE);
if (pos_offset < COMET_LENGTH_BODY)
cometBrightness = map(pos_offset, 0, COMET_LENGTH_BODY - 1, COMET_BRIGHTNESS_MIN, COMET_BRIGHTNESS_MAX);
else if (pos_offset >= COMET_LENGTH_BODY && pos_offset < COMET_LENGTH_ALL)
cometBrightness = map(pos_offset - COMET_LENGTH_BODY + 1, 0, COMET_LENGTH_ALL - COMET_LENGTH_BODY, COMET_BRIGHTNESS_MAX, COMET_BRIGHTNESS_HEAD);
else
cometBrightness = 0;
int r = (COMET_COLOR_R * cometBrightness) >> 8;
int g = (COMET_COLOR_G * cometBrightness) >> 8;
int b = (COMET_COLOR_B * cometBrightness) >> 8;
strip.setPixelColor(pixel, g, r, b);
}
strip.show();
cometTimeStart = millis();
}
}
비디오 제작은 시간이 많이 걸리는 작업입니다. 비디오 튜토리얼이 학습에 도움이 되었다면, YouTube 채널 을 구독하여 알려 주시기 바랍니다. 비디오에 대한 높은 수요가 있다면, 비디오를 만들기 위해 노력하겠습니다.


