이 가이드에서는 이더넷 모듈이 장착된 Arduino Nano 보드를 웹 서버로 프로그래밍하는 방법을 보여드립니다. 여러분은 컴퓨터나 스마트폰을 통해 접근 가능한 웹 페이지를 통해 데이터를 보고 Arduino Nano를 제어할 수 있습니다. 아래에 설명된 대로 간단한 작업부터 시작하여 보다 고급 작업으로 진행할 것입니다.
아두이노 나노 웹 서버 - 헬로 월드!
아두이노 나노 웹 서버 - 웹페이지를 통한 센서 값 모니터링.
아두이노 나노 웹 서버 - 웹페이지에서 값 자동 업데이트.
아두이노 나노 웹 서버 - 아두이노 코드에서 HTML, CSS, JavaScript 분리.
Arduino Nano와 기타 부품에 전원을 공급하는 가장 효과적인 방법은 다음 링크를 참조하세요: 아두이노 나노 전원 공급 방법.
image source: diyables.io
아두이노 나노 웹 서버 - 헬로 월드
이것은 비교적 간단합니다. Arduino Nano 코드는 다음 작업을 수행합니다:
웹 브라우저로부터 HTTP 요청을 듣는 웹 서버 생성.
웹 브라우저로부터 요청을 받으면, Arduino Nano는 다음 정보를 제공합니다:
HTTP 헤더
HTTP 본문: "Hello World!" 포함.
다음은 위의 작업을 수행하는 Arduino Nano 코드입니다:
/* * 이 아두이노 나노 코드는 newbiely.kr 에서 개발되었습니다 * 이 아두이노 나노 코드는 어떠한 제한 없이 공개 사용을 위해 제공됩니다. * 상세한 지침 및 연결도에 대해서는 다음을 방문하세요: * https://newbiely.kr/tutorials/arduino-nano/arduino-nano-web-server */#include <SPI.h>#include <Ethernet.h>// MAC address for the Ethernet module, you can modify it as neededbyte mac[] = { 0xDE, 0xAD, 0xBE, 0xEF, 0xFE, 0xED }; IPAddress ip(192, 168, 1, 177); // Set a static IP addressEthernetServer server(80); // Create an Ethernet server that listens on port 80voidsetup() {//Initialize serial communication:Serial.begin(9600);// Start the Ethernet connection:if (Ethernet.begin(mac) == 0) {Serial.println(F("Failed to configure Ethernet using DHCP"));// Try with a static IP:Ethernet.begin(mac, ip); }// Start the server: server.begin();// Print the Ethernet board's IP address: Serial.print(F("Arduino Nano Web Server's IP address: ")); Serial.println(Ethernet.localIP());}void loop() {// Listen for incoming clientsEthernetClient client = server.available();if (client) {// read the HTTP request header line by linewhile (client.connected()) {if (client.available()) {String HTTP_header = client.readStringUntil('\n'); // read the header line of HTTP requestif (HTTP_header.equals("\r")) // the end of HTTP requestbreak;Serial.print(F("<< "));Serial.println(HTTP_header); // print HTTP request to Serial Monitor } }// send the HTTP response// send the HTTP response header client.println(F("HTTP/1.1 200 OK")); client.println(F("Content-Type: text/html")); client.println(F("Connection: close")); // the connection will be closed after completion of the response client.println(); // the separator between HTTP header and body// send the HTTP response body client.println(F("<!DOCTYPE HTML>")); client.println(F("<html>")); client.println(F("<head>")); client.println(F("<link rel=\"icon\" href=\"data:,\">")); client.println(F("</head>")); client.println(F("<p>")); client.println(F("Hello World!")); client.println(F("</p>")); client.println(F("</html>")); client.flush();// give the web browser time to receive the datadelay(10);// close the connection: client.stop(); }}
자세한 사용 방법
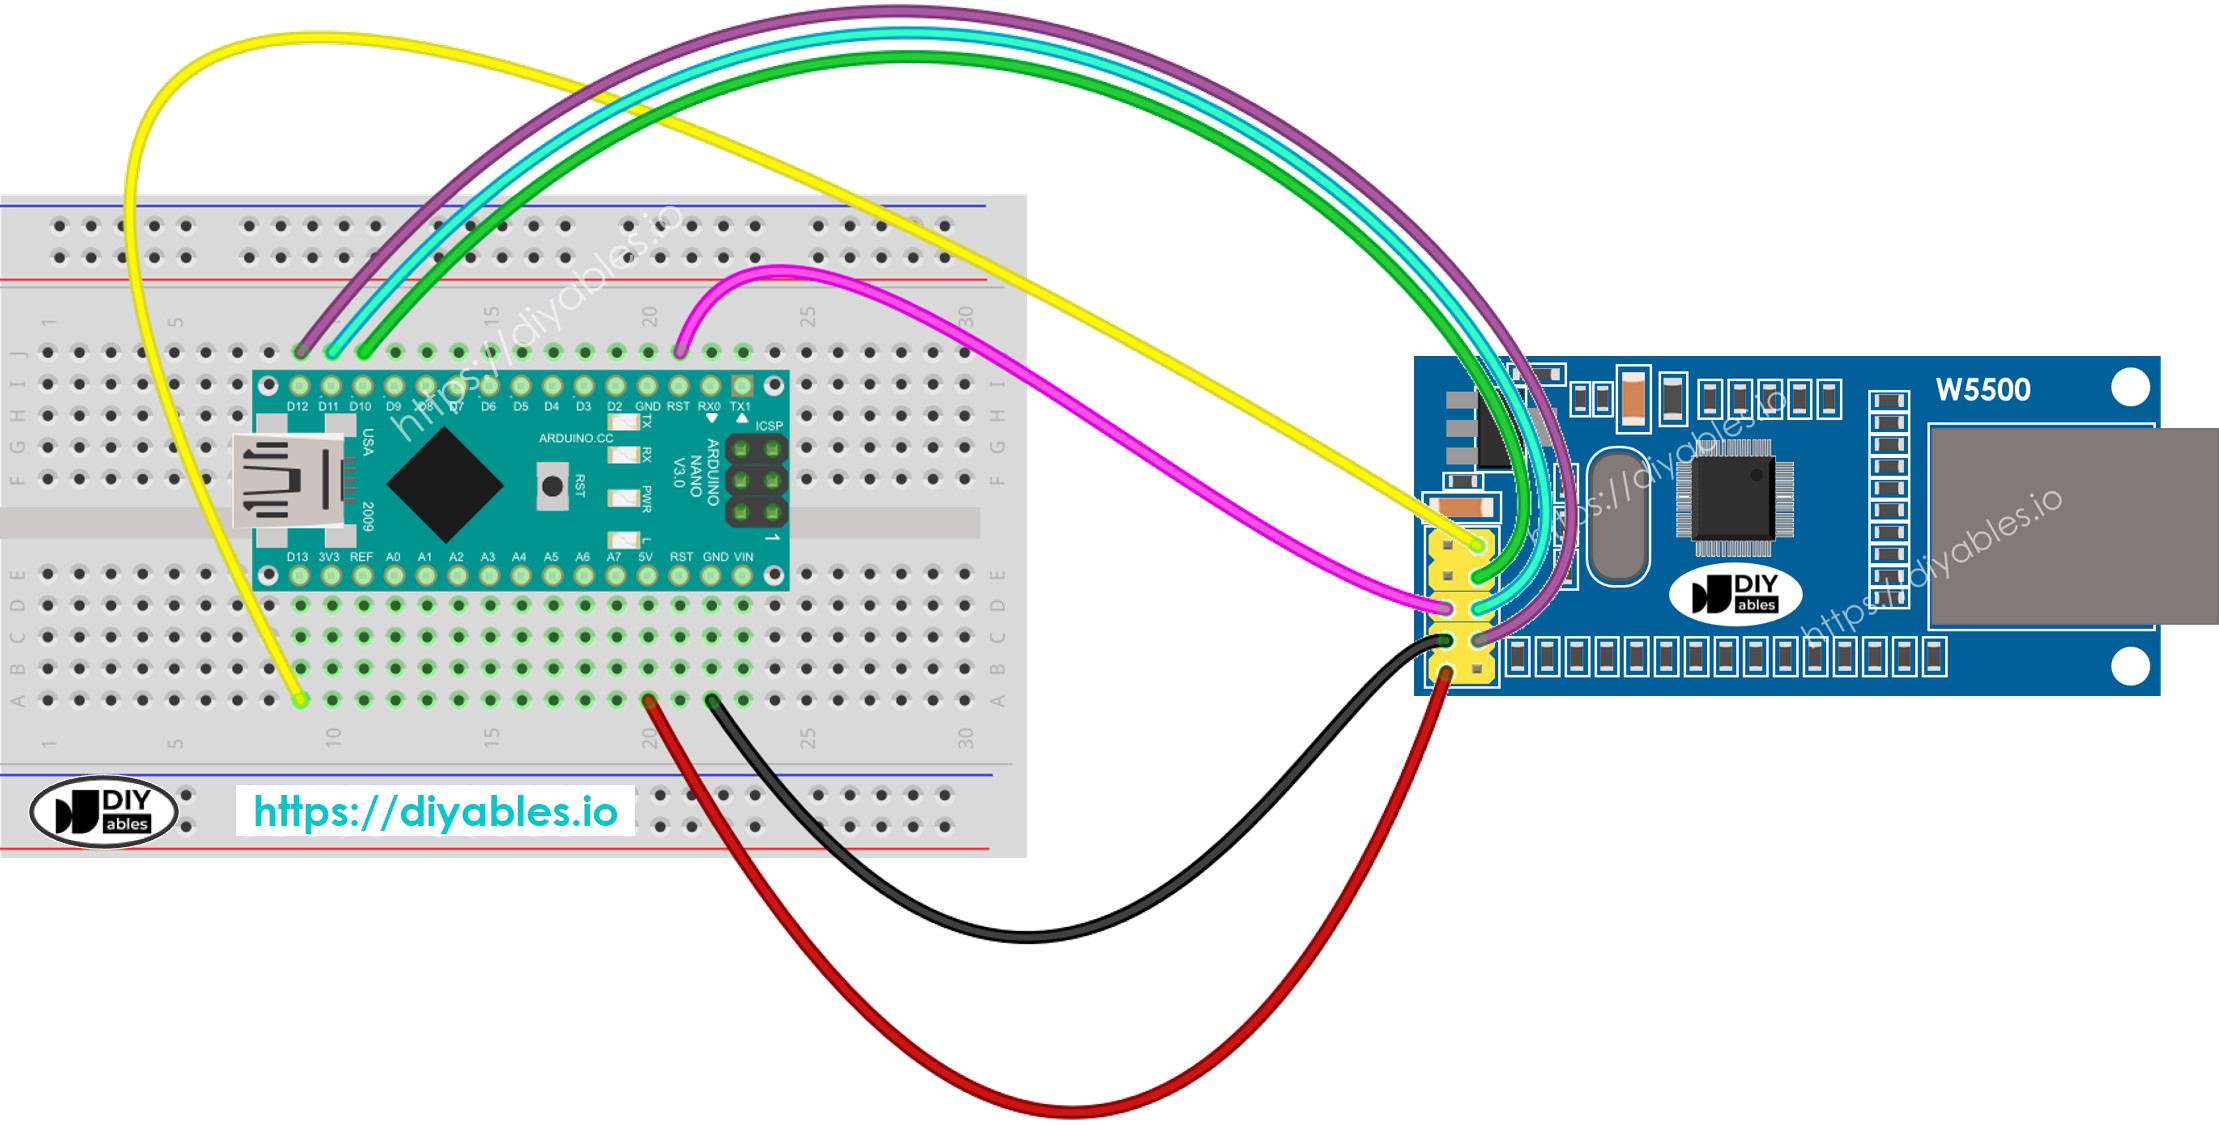
위의 배선도에 따라 Arduino Nano를 이더넷 모듈에 연결하세요.
이더넷 모듈에 이더넷 케이블을 연결하세요.
Arduino Nano를 USB 케이블을 사용하여 PC에 연결하세요.
PC에서 Arduino IDE를 실행하세요.
Arduino Nano 보드와 해당하는 COM 포트를 선택하세요.
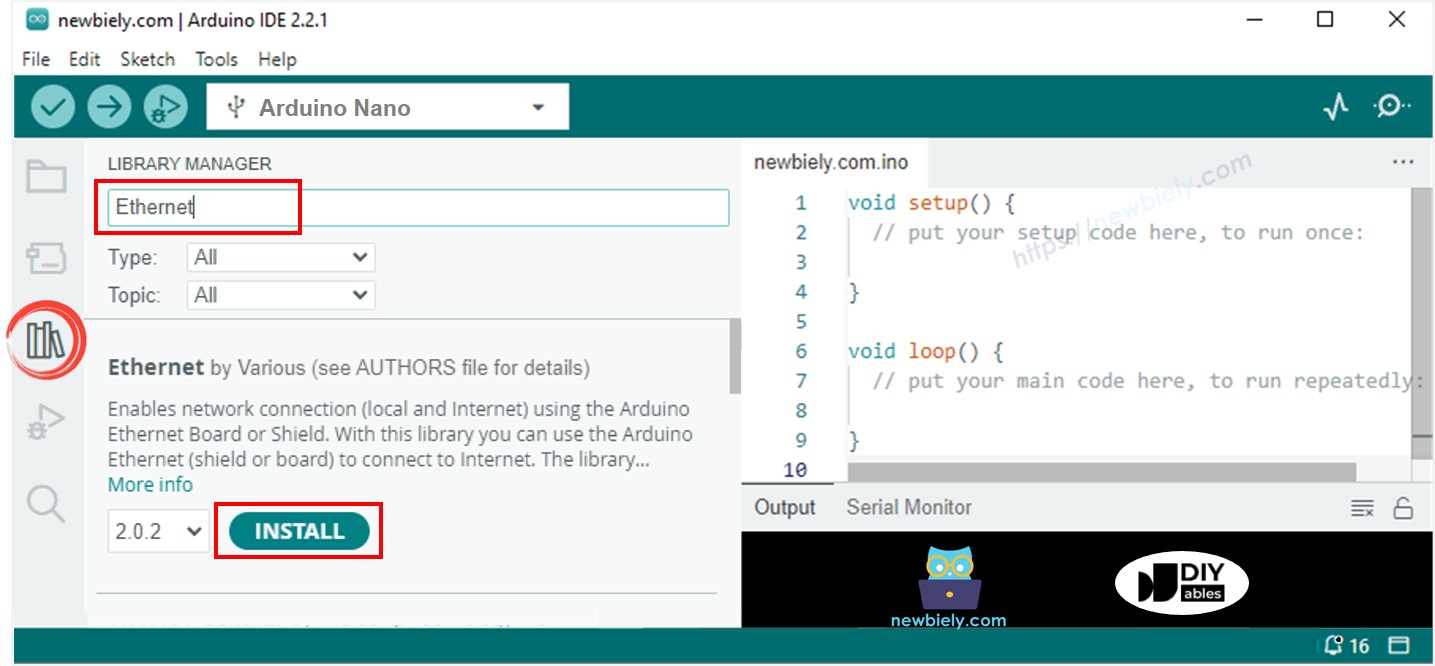
Arduino IDE 왼쪽 바에서 Libraries 아이콘을 클릭하세요.
“Ethernet”를 검색한 후 Various에서 제공하는 Ethernet 라이브러리를 찾으세요.
Install 버튼을 클릭하여 Ethernet 라이브러리를 설치하세요.
위의 코드를 복사하여 Arduino IDE로 엽니다.
Arduino IDE에서 Upload 버튼을 클릭하여 코드를 Arduino Nano에 업로드합니다.
시리얼 모니터를 엽니다.
시리얼 모니터에서 결과를 확인합니다.
Newbiely | Arduino IDE 2.3.8
──
☐
✕
File
Edit
Sketch
Tools
Help
Arduino Nano
Newbiely.ino
···
8Serial.println("Hello World!");
Output
Serial Monitor
Message (Enter to send message to 'Arduino Nano' on 'COM15')
New Line
9600 baud
Arduino Nano Web Server's IP address: 192.168.0.3
Ln 11, Col 1
Arduino Nano on COM15
2
표시된 IP 주소를 주목하여 스마트폰이나 PC의 웹 브라우저 주소창에 입력하세요.
그러면 시리얼 모니터에 다음 출력이 표시됩니다.
Newbiely | Arduino IDE 2.3.8
──
☐
✕
File
Edit
Sketch
Tools
Help
Arduino Nano
Newbiely.ino
···
8Serial.println("Hello World!");
Output
Serial Monitor
Message (Enter to send message to 'Arduino Nano' on 'COM15')
New Line
9600 baud
Arduino Nano Web Server's IP address: 192.168.0.3
<< GET / HTTP/1.1
<< Host: 192.168.0.3
<< Connection: keep-alive
<< Upgrade-Insecure-Requests: 1
<< User-Agent: Mozilla/5.0 (Windows NT 10.0; Win64; x64) AppleWebKit/537.36 (KHTML, like Gecko) Chrome/129.0.0.0 Safari/537.36 Edg/129.0.0.0
<< Accept: text/html,application/xhtml+xml,application/xml;q=0.9,image/avif,image/webp,image/apng,*/*;q=0.8,application/signed-exchange;v=b3;q=0.7
<< Accept-Encoding: gzip, deflate
<< Accept-Language: en-US,en;q=0.9,ko;q=0.8
Ln 11, Col 1
Arduino Nano on COM15
2
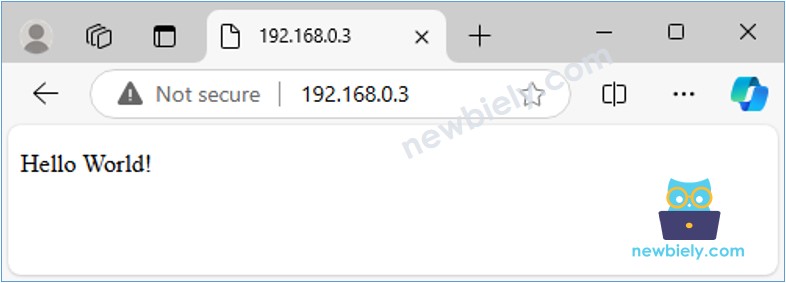
IP 주소를 사용하여 웹 브라우저에 접속하면 "Hello World!"를 표시하는 간단한 웹 페이지가 보일 것입니다. 페이지는 다음과 같이 보일 것입니다:
Arduino Nano 웹 서버 - 웹페이지를 통한 센서 값 모니터링.
다음 Arduino Nano 코드는 다음 작업을 수행합니다:
웹 브라우저에서 오는 HTTP 요청을 수신하는 웹 서버 만들기.
웹 브라우저로부터 요청을 받으면, Arduino Nano는 다음 정보를 포함하여 응답합니다:
HTTP 헤더
HTTP 본문: HTML, CSS 콘텐츠 및 센서로부터 읽은 값을 포함합니다.
/* * 이 아두이노 나노 코드는 newbiely.kr 에서 개발되었습니다 * 이 아두이노 나노 코드는 어떠한 제한 없이 공개 사용을 위해 제공됩니다. * 상세한 지침 및 연결도에 대해서는 다음을 방문하세요: * https://newbiely.kr/tutorials/arduino-nano/arduino-nano-web-server */#include <SPI.h>#include <Ethernet.h>// MAC address for the Ethernet module, you can modify it as neededbyte mac[] = { 0xDE, 0xAD, 0xBE, 0xEF, 0xFE, 0xED }; IPAddress ip(192, 168, 1, 177); // Set a static IP addressEthernetServer server(80); // Create an Ethernet server that listens on port 80floatgetTemperature() {// YOUR SENSOR IMPLEMENTATION HERE// simulate the temperature valuefloat temp_x100 = random(0, 10000); // a random value from 0 to 10000return temp_x100 / 100; // return the simulated temperature value from 0 to 100 in float}voidsetup() {//Initialize serial communication:Serial.begin(9600);// Start the Ethernet connection:if (Ethernet.begin(mac) == 0) {Serial.println(F("Failed to configure Ethernet using DHCP"));// Try with a static IP:Ethernet.begin(mac, ip); }// Start the server: server.begin();// Print the Ethernet board's IP address:Serial.print(F("Server is at: "));Serial.println(Ethernet.localIP());}voidloop() {// Listen for incoming clientsEthernetClient client = server.available();if (client) {// read the HTTP request header line by linewhile (client.connected()) {if (client.available()) {String HTTP_header = client.readStringUntil('\n'); // read the header line of HTTP requestif (HTTP_header.equals("\r")) // the end of HTTP requestbreak;Serial.print(F("<< "));Serial.println(HTTP_header); // print HTTP request to Serial Monitor } }// send the HTTP response// send the HTTP response header client.println(F("HTTP/1.1 200 OK")); client.println(F("Content-Type: text/html")); client.println(F("Connection: close")); // the connection will be closed after completion of the response client.println(); // the separator between HTTP header and body// send the HTTP response body client.println(F("<!DOCTYPE HTML>")); client.println(F("<html>")); client.println(F("<head>")); client.println(F("<link rel=\"icon\" href=\"data:,\">")); client.println(F("</head>")); client.println(F("<p>")); client.print(F("Temperature: <span style=\"color: red;\">"));float temperature = getTemperature(); client.print(temperature, 2); client.println(F("°C</span>")); client.println(F("</p>")); client.println(F("</html>")); client.flush();// give the web browser time to receive the datadelay(10);// close the connection: client.stop(); }}
자세한 사용 방법
위의 코드를 복사하여 Arduino IDE에서 엽니다.
Arduino IDE에서 Upload 버튼을 클릭하여 코드를 Arduino Nano에 업로드합니다.
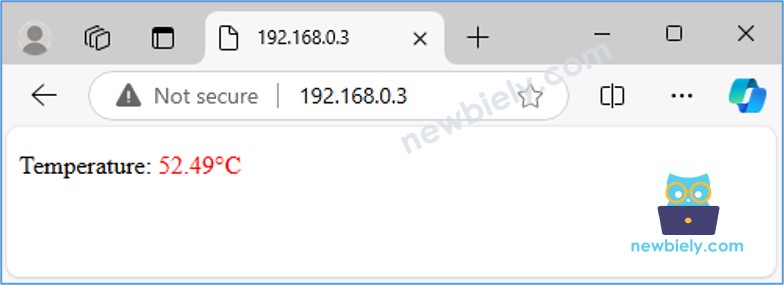
이전 웹 페이지를 다시 로드(Ctrl + F5)하면 아래와 같이 표시됩니다:
제공된 코드로 온도를 업데이트하려면 웹 브라우저에서 페이지를 새로 고쳐야 합니다. 다음 섹션에서는 페이지를 새로 고침하지 않고 백그라운드에서 온도 값을 자동으로 업데이트하는 방법을 배워보겠습니다.
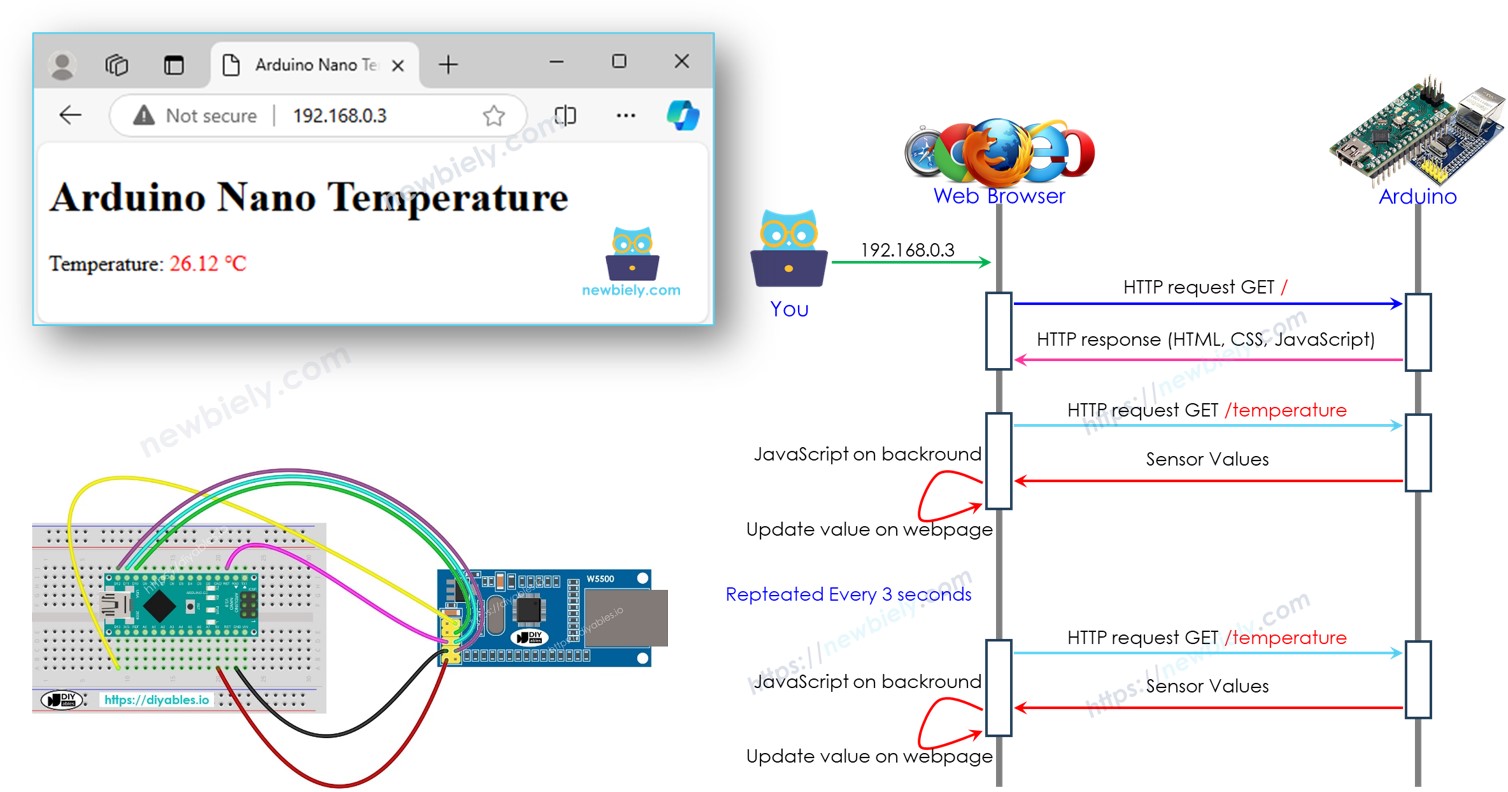
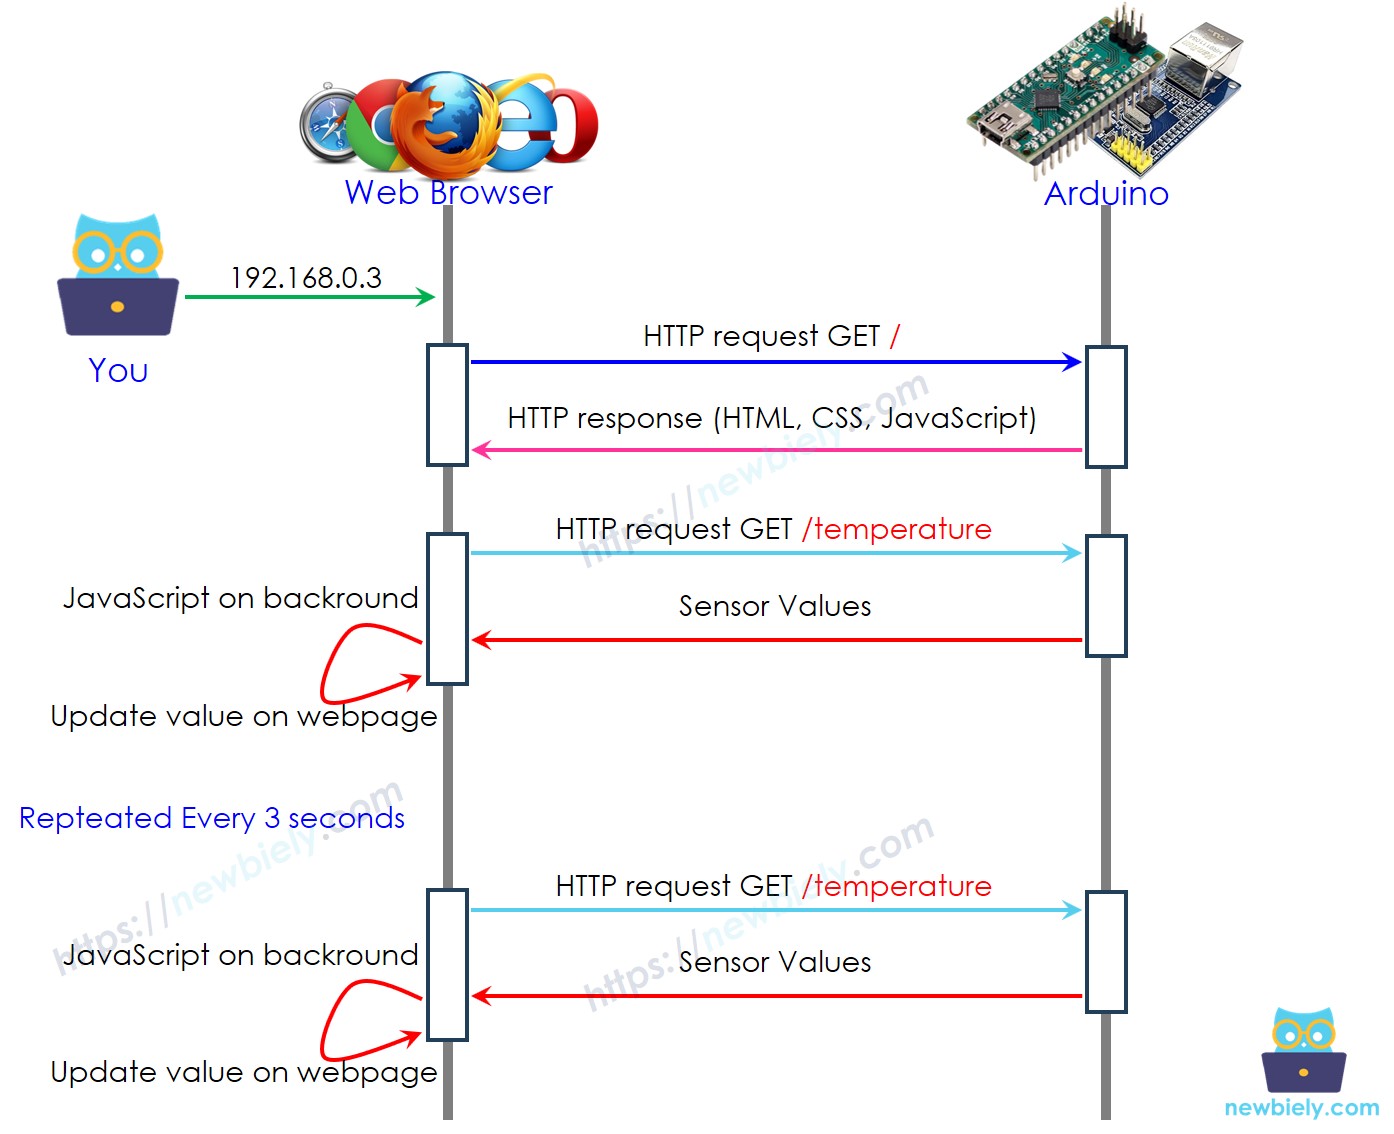
아두이노 나노 웹 서버 - 웹페이지에서 자동 업데이트되는 값
자동 업데이트 작동 방식
사용자가 웹 브라우저에 Arduino Nano의 IP 주소를 입력합니다.
웹 브라우저는 Arduino Nano의 홈페이지(/)로 HTTP 요청을 보냅니다.
Arduino는 HTML, CSS, JavaScript로 응답합니다.
웹 브라우저는 수신한 HTML과 CSS를 사용하여 웹페이지를 표시합니다.
매 3초마다 웹 브라우저는 JavaScript 코드를 실행하여 /temperature 엔드포인트에 HTTP 요청을 보냅니다.
Arduino는 센서 값을 읽고 응답으로 전송합니다.
웹 브라우저는 센서 값을 수신하고 웹페이지를 적절히 업데이트합니다.
다음은 위의 작업을 수행하는 Arduino Nano 코드입니다:
/* * 이 아두이노 나노 코드는 newbiely.kr 에서 개발되었습니다 * 이 아두이노 나노 코드는 어떠한 제한 없이 공개 사용을 위해 제공됩니다. * 상세한 지침 및 연결도에 대해서는 다음을 방문하세요: * https://newbiely.kr/tutorials/arduino-nano/arduino-nano-web-server */#include <SPI.h>#include <Ethernet.h>// MAC address and IP address for the Ethernet module (modify if necessary)byte mac[] = { 0xDE, 0xAD, 0xBE, 0xEF, 0xFE, 0xED }; IPAddress ip(192, 168, 1, 177); // Static IP address for the Arduino NanoEthernetServer server(80); // Set up the Ethernet server to listen on port 80const char* HTML_CONTENT = R"=====(<!DOCTYPE html><html><head> <title>Arduino Nano Temperature</title></head><body> <h1>Arduino Nano Temperature</h1> <p>Temperature: <span style="color: red;"><span id="temperature">Loading...</span> ℃</span></p> <script> function fetchTemperature() { fetch("/temperature") .then(response => response.text()) .then(data => { document.getElementById("temperature").textContent = data; }); } fetchTemperature(); setInterval(fetchTemperature, 3000); // Update temperature every 3 seconds </script></body></html>)=====";float getTemperature() {// YOUR SENSOR IMPLEMENTATION HERE// simulate the temperature valuefloat temp_x100 = random(0, 10000); // a random value from 0 to 10000return temp_x100 / 100; // return the simulated temperature value from 0 to 100 in float}voidsetup() {// Start serial communicationSerial.begin(9600);// Start Ethernet connectionif (Ethernet.begin(mac) == 0) {Serial.println(F("Failed to configure Ethernet using DHCP"));// Try with a static IP address if DHCP failsEthernet.begin(mac, ip); }// Start the server server.begin();// Print the Arduino Nano's IP address Serial.print(F("Arduino Nano Web Server's IP address: ")); Serial.println(Ethernet.localIP());}void loop() {// Listen for incoming clientsEthernetClient client = server.available();if (client) {Serial.println(F("Client connected"));// Wait until the client sends some datawhile (client.connected()) {if (client.available()) {// Read the first line of the HTTP requestString request = client.readStringUntil('\r');Serial.print(F("Request: "));Serial.println(request); client.flush();// Serve the HTML page from the index.h file if the request is "/"if (request.indexOf("GET / ") >= 0) { client.println(F("HTTP/1.1 200 OK")); client.println(F("Content-Type: text/html")); client.println(F("Connection: close")); // Connection will be closed after the response client.println(); client.println(HTML_CONTENT); // Send the HTML page from index.h }// Serve the temperature data if the request is "/temperature"elseif (request.indexOf("GET /temperature") >= 0) {float temperature = getTemperature(); client.println(F("HTTP/1.1 200 OK")); client.println(F("Content-Type: text/plain")); client.println(F("Connection: close")); // Connection will be closed after the response client.println(); client.print(temperature, 2); // Send the temperature as plain text }// Close the connection client.stop();Serial.println(F("Client disconnected")); } } }}
자세한 사용 방법
위 코드를 복사하여 Arduino IDE에서 엽니다.
Arduino IDE에서 Upload 버튼을 클릭하여 코드를 Arduino Nano에 업로드합니다.
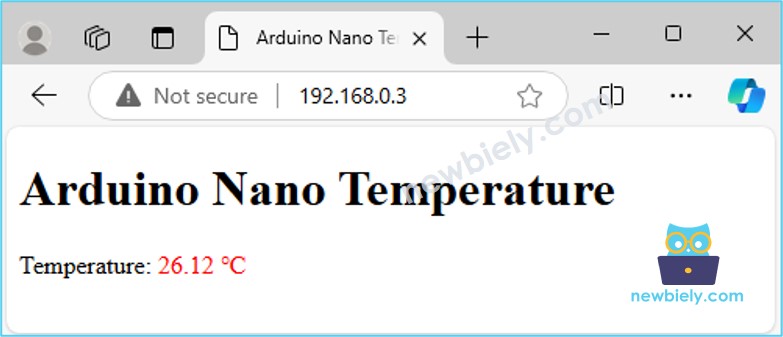
이전 웹 페이지를 다시 로드하십시오(Ctrl + F5), 그러면 아래와 같이 표시됩니다:
값이 3초마다 자동으로 업데이트되는 것을 볼 수 있습니다.
Arduino IDE에서 HTML 콘텐츠를 다른 파일로 분리하기
간단한 웹 페이지를 최소한의 콘텐츠로 만들고 싶다면, 이전에 설명한 것처럼 HTML을 Arduino Nano 코드에 직접 삽입할 수 있습니다.
그러나, 보다 복잡하고 기능이 풍부한 웹 페이지의 경우, 모든 HTML, CSS, 그리고 JavaScript를 Arduino Nano 코드에 직접 포함하는 것은 번거로울 수 있습니다. 이러한 경우에는 코드를 관리하는 다른 방법을 사용하는 것이 더 좋습니다.
Arduino Nano 코드는 여전히 .ino 파일에 저장됩니다.
웹 페이지 콘텐츠(HTML, CSS, JavaScript)는 별도의 .h 파일에 넣을 것입니다. 이 분리는 Arduino 코드에 방해가 되지 않으면서 웹 페이지를 더 쉽게 관리하고 업데이트할 수 있게 합니다.
자세한 사용 방법
아두이노 IDE를 열고 새 스케치를 만듭니다. 이름을 예를 들어 newbiely.com.ino로 설정합니다. 아래 제공된 코드를 복사하여 생성한 파일에 붙여넣습니다.
/* * 이 아두이노 나노 코드는 newbiely.kr 에서 개발되었습니다 * 이 아두이노 나노 코드는 어떠한 제한 없이 공개 사용을 위해 제공됩니다. * 상세한 지침 및 연결도에 대해서는 다음을 방문하세요: * https://newbiely.kr/tutorials/arduino-nano/arduino-nano-web-server */#include <SPI.h>#include <Ethernet.h>#include"index.h"// Include the index.h file// MAC address and IP address for the Ethernet module (modify if necessary)byte mac[] = { 0xDE, 0xAD, 0xBE, 0xEF, 0xFE, 0xED }; IPAddress ip(192, 168, 1, 177); // Static IP address for the Arduino NanoEthernetServer server(80); // Set up the Ethernet server to listen on port 80floatgetTemperature() {// YOUR SENSOR IMPLEMENTATION HERE// simulate the temperature valuefloat temp_x100 = random(0, 10000); // a random value from 0 to 10000return temp_x100 / 100; // return the simulated temperature value from 0 to 100 in float}voidsetup() {// Start serial communicationSerial.begin(9600);// Start Ethernet connectionif (Ethernet.begin(mac) == 0) {Serial.println(F("Failed to configure Ethernet using DHCP"));// Try with a static IP address if DHCP failsEthernet.begin(mac, ip); }// Start the server server.begin();// Print the Arduino Nano's IP address Serial.print(F("Arduino Nano Web Server's IP address: ")); Serial.println(Ethernet.localIP());}void loop() {// Listen for incoming clientsEthernetClient client = server.available();if (client) {Serial.println(F("Client connected"));// Wait until the client sends some datawhile (client.connected()) {if (client.available()) {// Read the first line of the HTTP requestString request = client.readStringUntil('\r');Serial.print(F("Request: "));Serial.println(request); client.flush();// Serve the HTML page from the index.h file if the request is "/"if (request.indexOf("GET / ") >= 0) { client.println(F("HTTP/1.1 200 OK")); client.println(F("Content-Type: text/html")); client.println(F("Connection: close")); // Connection will be closed after the response client.println(); client.println(HTML_CONTENT); // Send the HTML page from index.h }// Serve the temperature data if the request is "/temperature"elseif (request.indexOf("GET /temperature") >= 0) {float temperature = getTemperature(); client.println(F("HTTP/1.1 200 OK")); client.println(F("Content-Type: text/plain")); client.println(F("Connection: close")); // Connection will be closed after the response client.println(); client.print(temperature, 2); // Send the temperature as plain text }// Close the connection client.stop();Serial.println(F("Client disconnected")); } } }}
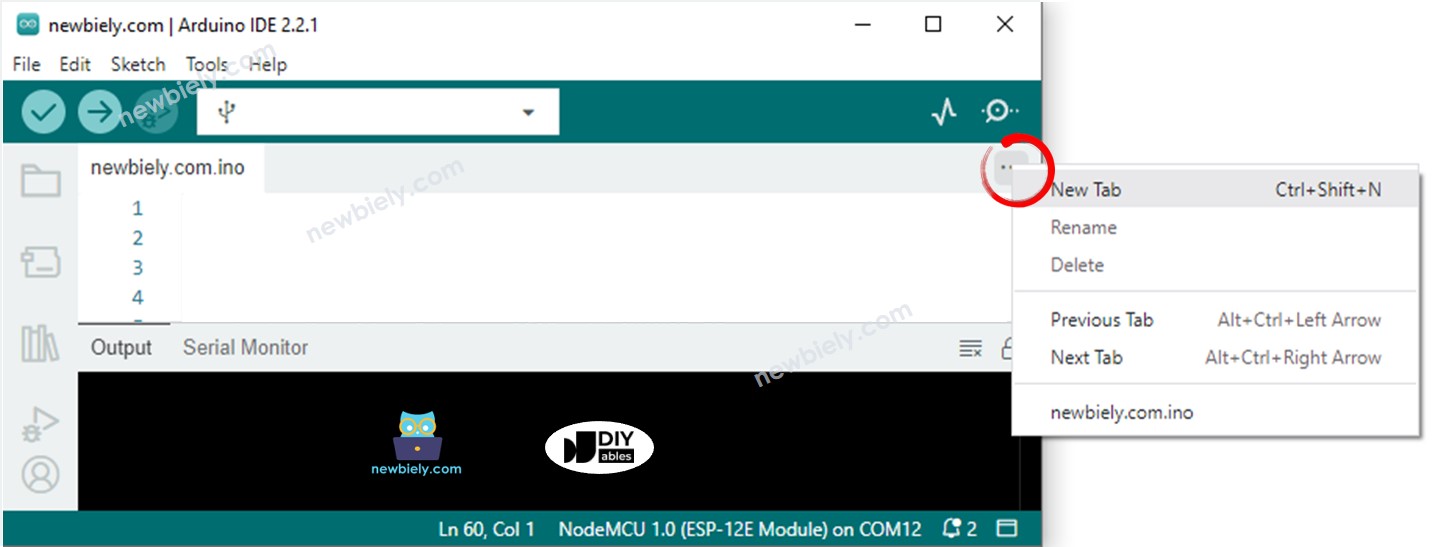
Arduino IDE에서 index.h 파일 생성하기:
직렬 모니터 아이콘 바로 아래에 있는 버튼을 클릭하고 새 탭을 선택하거나 Ctrl+Shift+N 키를 사용하세요.
파일의 이름을 index.h라고 입력하고 OK 버튼을 클릭하세요.
아래 코드를 복사하여 index.h에 붙여넣으세요.
/* * 이 아두이노 나노 코드는 newbiely.kr 에서 개발되었습니다 * 이 아두이노 나노 코드는 어떠한 제한 없이 공개 사용을 위해 제공됩니다. * 상세한 지침 및 연결도에 대해서는 다음을 방문하세요: * https://newbiely.kr/tutorials/arduino-nano/arduino-nano-web-server *//* * This Arduino Nano code was developed by newbiely.com * * This Arduino Nano code is made available for public use without any restriction * * For comprehensive instructions and wiring diagrams, please visit: * http://localhost/web/newbiely.com/public/tutorials/arduino-nano-esp32/arduino-nano-esp32-web-server */#ifndef WEBPAGE_H#define WEBPAGE_Hconst char* HTML_CONTENT = R"=====(<!DOCTYPE html><html><head> <title>Arduino Nano Temperature</title></head><body> <h1>Arduino Nano Temperature</h1> <p>Temperature: <span style="color: red;"><span id="temperature">Loading...</span> ℃</span></p> <script> function fetchTemperature() { fetch("/temperature") .then(response => response.text()) .then(data => { document.getElementById("temperature").textContent = data; }); } fetchTemperature(); setInterval(fetchTemperature, 3000); // Update temperature every 3 seconds </script></body></html>)=====";#endif
이제 두 파일에 코드가 있습니다: newbiely.com.ino 및 index.h
Arduino IDE에서 Upload 버튼을 클릭하여 코드를 Arduino Nano에 업로드합니다.
웹 페이지를 새로고침하세요(Ctrl + F5 사용). 그러면 이전과 동일하게 나타날 것입니다.
※ 주의:
index.h 파일의 HTML 콘텐츠를 변경하더라도 newbiely.com.ino 파일을 변경하지 않으면, Arduino IDE는 코드 컴파일 및 업로드 시 업데이트된 HTML 콘텐츠를 갱신하거나 포함하지 않습니다.
Arduino IDE가 HTML 콘텐츠를 업데이트하도록 하려면, newbiely.com.ino 파일에 빈 줄이나 주석 추가와 같은 사소한 변경을 해야 합니다. 이렇게 하면 IDE가 변경 사항을 감지하여 업데이트된 HTML 콘텐츠가 업로드에 포함되도록 보장합니다.
웹을 통한 Arduino Nano 제어
Arduino Nano에 연결된 것을 제어하는 것은 단지 값을 읽는 것보다 약간 더 어렵습니다. 이는 Arduino Nano가 웹 브라우저로부터 받은 요청을 이해해야 어떤 조치를 취할지 알 수 있기 때문입니다.
더 포괄적이고 상세한 예시를 원하신다면, 아래에 나열된 튜토리얼을 확인해 보시길 추천합니다.