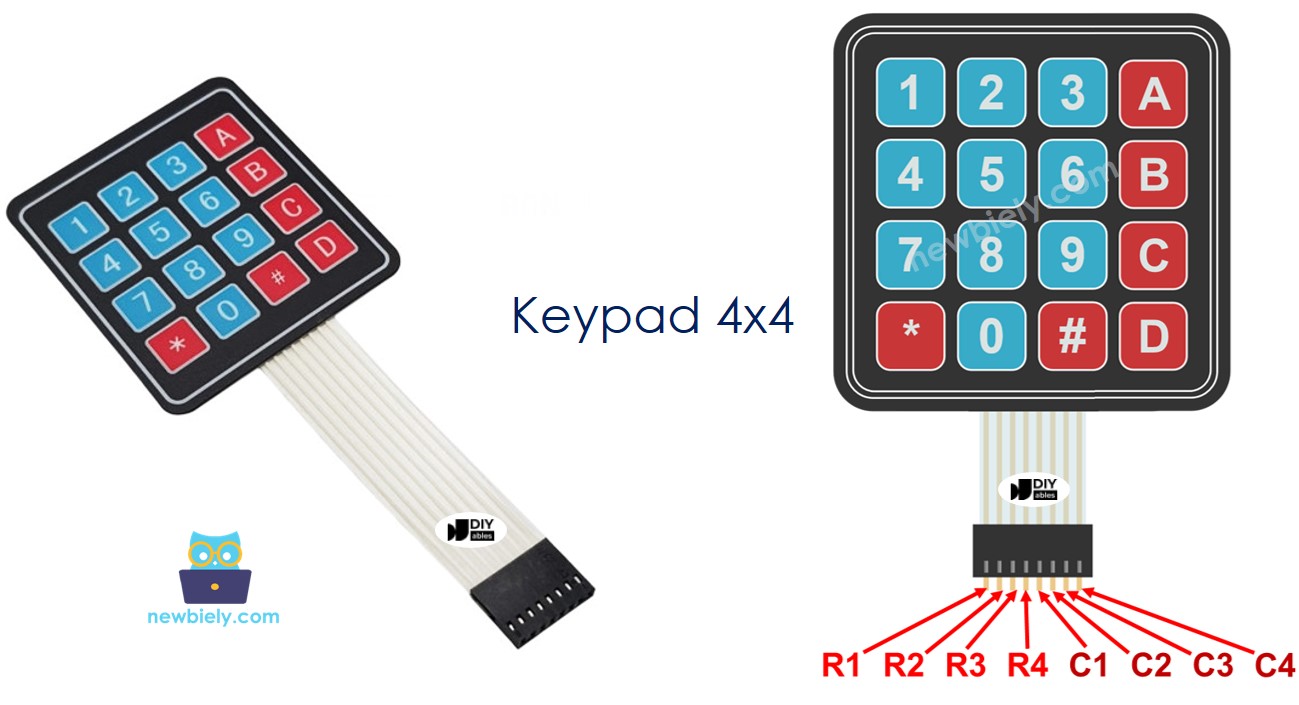
4x4 키패드의 일반적인 사용 방식은 비밀번호를 입력하는 것입니다. 두 개의 특수 키가 사용됩니다:
* — 현재 입력을 지우고 다시 시작합니다
# — 입력을 확인하고 비밀번호를 확인합니다
다른 모든 키는 비밀번호 문자열을 한 번에 한 문자씩 작성합니다.
논리:
아무 키나 누르기 → 입력 버퍼에 추가하기
* 누르기 → 입력 버퍼 지우기
# 누르기 → 입력을 저장된 비밀번호와 비교한 후 버퍼 지우기
/* * 이 Arduino UNO Q 코드는 newbiely.kr 에서 개발되었습니다 * 이 Arduino UNO Q 코드는 어떠한 제한 없이 공개 사용을 위해 제공됩니다. * 상세한 지침 및 연결도에 대해서는 다음을 방문하세요: * https://newbiely.kr/tutorials/arduino-uno-q/arduino-uno-q-keypad-4x4 */#include <DIYables_Keypad.h> // DIYables_Keypad libraryconstint ROW_NUM = 4; //four rowsconstint COLUMN_NUM = 3; //three columnschar keys[ROW_NUM][COLUMN_NUM] = { {'1','2','3'}, {'4','5','6'}, {'7','8','9'}, {'*','0','#'}};byte pin_rows[ROW_NUM] = {9, 8, 7, 6}; //connect to the row pinouts of the keypadbyte pin_column[COLUMN_NUM] = {5, 4, 3}; //connect to the column pinouts of the keypadDIYables_Keypadkeypad = DIYables_Keypad( makeKeymap(keys), pin_rows, pin_column, ROW_NUM, COLUMN_NUM );constString password = "1234"; // change your password hereString input_password;voidsetup(){Serial.begin(9600);Serial.println("Keypad 3x4 password"); input_password.reserve(32); // maximum input characters is 33, change if needed}voidloop(){char key = keypad.getKey();if (key){Serial.println(key);if(key == '*') { input_password = ""; // clear input password } elseif(key == '#') {if(password == input_password) {Serial.println("password is correct");// DO YOUR WORK HERE } else {Serial.println("password is incorrect, try again"); } input_password = ""; // clear input password } else { input_password += key; // append new character to input password string } }}
※ 주의:
업로드하기 전에 password 변수를 원하는 비밀번호로 변경하세요. 비밀번호에 숫자 0–9, 문자 A–D, * 또는 #의 조합을 사용할 수 있습니다.
Bridge: Linux + MCU
이 섹션에서는 Arduino UNO Q의 두 프로세서를 프로그래밍하여 Linux 측에서 키패드 입력을 원격으로 읽을 수 있도록 하는 방법을 보여줍니다:
4x4 키패드는 MCU (STM32)에 연결됩니다 — MCU는 loop() 내에서 keypad.getKey()를 통해 폴링합니다
MPU는 키패드 핀을 직접 읽을 수 없습니다 — Bridge.call()을 통해 MCU에서 마지막으로 눌린 키를 요청해야 합니다
MPU는 Wi-Fi를 가지고 있습니다 — 전체 Debian Linux를 실행하며 키 입력에 반응하고 인터넷을 통해 알림을 보낼 수 있습니다
Arduino_RouterBridge는 RPC 통신을 두 프로세서 간에 사용할 수 있게 합니다
⚠️ /dev/ttyHS1 (Linux)과 Serial1 (MCU)은 라우터에 의해 예약되어 있습니다 — 사용자 코드에서는 절대 이를 열지 마세요
요약: MCU가 키패드를 폴링합니다 → MPU가 Bridge를 통해 마지막 키를 읽습니다 → MPU가 인터넷을 통해 어디서나 키 입력에 반응할 수 있습니다.
참고: Bridge 스케치에서 keypad.getKey()는 Arduino loop() 내에서 호출되어 지속적으로 키 입력을 감지합니다 — 이는 필수이며 Bridge 통신을 방해하지 않습니다.
MCU 코드 (Bridge)
/* * 이 Arduino UNO Q 코드는 newbiely.kr 에서 개발되었습니다 * 이 Arduino UNO Q 코드는 어떠한 제한 없이 공개 사용을 위해 제공됩니다. * 상세한 지침 및 연결도에 대해서는 다음을 방문하세요: * https://newbiely.kr/tutorials/arduino-uno-q/arduino-uno-q-keypad-4x4 */#include <DIYables_Keypad.h>#include"Arduino_RouterBridge.h"constint ROW_NUM = 4;constint COLUMN_NUM = 4;char keys[ROW_NUM][COLUMN_NUM] = { { '1', '2', '3', 'A' }, { '4', '5', '6', 'B' }, { '7', '8', '9', 'C' }, { '*', '0', '#', 'D' }};byte pin_rows[ROW_NUM] = { 9, 8, 7, 6 };byte pin_column[COLUMN_NUM] = { 5, 4, 3, 2 };DIYables_Keypadkeypad = DIYables_Keypad(makeKeymap(keys), pin_rows, pin_column, ROW_NUM, COLUMN_NUM);char last_key = 0;String get_key(String arg) {char key = last_key; last_key = 0;if (key == 0)return"none";returnString(key);}String get_status(String arg) {if (last_key == 0)return"No key pressed";return"Last key: " + String(last_key);}voidsetup() {Bridge.begin(); Monitor.begin();Bridge.provide("get_key", get_key);Bridge.provide("get_status", get_status); Monitor.println("Arduino UNO Q Keypad 4x4 Bridge ready");}voidloop() {char key = keypad.getKey();if (key) { last_key = key; Monitor.println("Key pressed: " + String(key)); }}
Python 코드 (Bridge)
/* * 이 Arduino UNO Q 코드는 newbiely.kr 에서 개발되었습니다 * 이 Arduino UNO Q 코드는 어떠한 제한 없이 공개 사용을 위해 제공됩니다. * 상세한 지침 및 연결도에 대해서는 다음을 방문하세요: * https://newbiely.kr/tutorials/arduino-uno-q/arduino-uno-q-keypad-4x4 */from arduino.app_utils import *import timedef loop(): result = Bridge.call("get_key")if result != "none":print(f"Key pressed: {result}")else:print("No key pressed") time.sleep(0.2)App.run(user_loop=loop)
빠른 단계
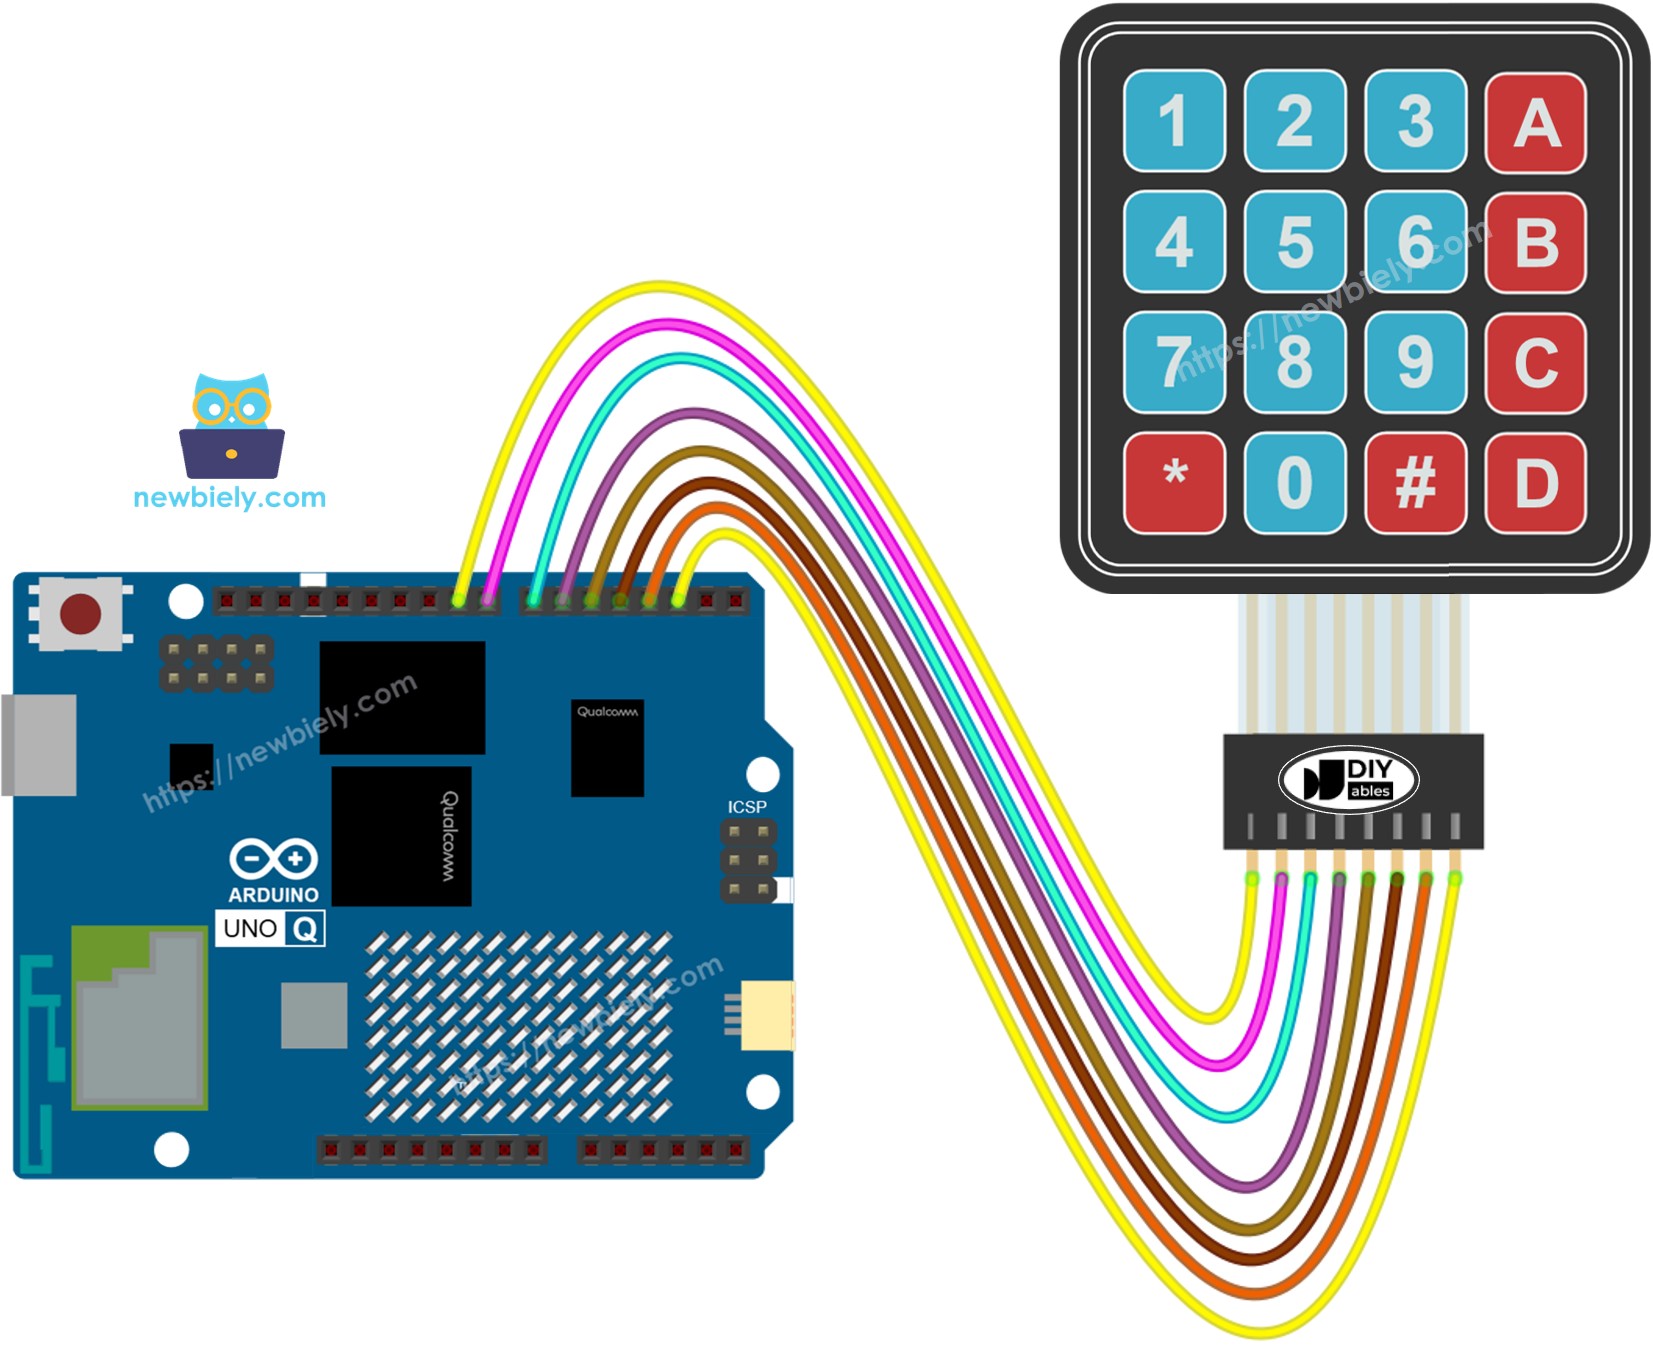
연결하기: 배선 다이어그램에 표시된 대로 4x4 키패드를 Arduino UNO Q에 연결합니다.
새 앱 만들기:Create New App을 클릭하고, Keypad4x4Bridge라는 이름을 입력한 후 Create를 클릭합니다.
MCU 스케치 붙여넣기: 위의 MCU Bridge 코드를 복사하고 sketch/sketch.ino에 붙여넣습니다.
Python 코드 붙여넣기: 위의 Python Bridge 코드를 복사하고 앱의 Python 파일에 붙여넣습니다.
업로드: Arduino App Lab에서 Run 버튼을 클릭합니다.
키패드의 키를 누르고 Python 콘솔을 확인합니다.
App Lab 콘솔 출력
DIYables_Apps
Stop
sketch.ino
1#include"Arduino_RouterBridge.h"
Serial Monitor
Python
Message (Enter to send a message to "Newbiely" on usb(2820070321))
New Line
9600 baud
[2026-04-29 09:00:01] Arduino UNO Q Keypad 4x4 Bridge ready
[2026-04-29 09:00:05] Key pressed: A
[2026-04-29 09:00:08] Key pressed: #
DIYables_Apps
Stop
sketch.ino
1#include"Arduino_RouterBridge.h"
Serial Monitor
Python
[2026-04-29 09:00:03] No key pressed
[2026-04-29 09:00:05] Key pressed: A
[2026-04-29 09:00:07] No key pressed
[2026-04-29 09:00:08] Key pressed: #
Telegram
4x4 키패드에서 키가 눌렸을 때 Telegram 알림을 받습니다 — 원격 접근 시스템, 이벤트 트리거 또는 PIN 코드 알림에 유용합니다.
MCU 스케치: 이전 Bridge 섹션의 MCU 스케치를 유지합니다.
Python 코드 (Telegram)
/* * 이 Arduino UNO Q 코드는 newbiely.kr 에서 개발되었습니다 * 이 Arduino UNO Q 코드는 어떠한 제한 없이 공개 사용을 위해 제공됩니다. * 상세한 지침 및 연결도에 대해서는 다음을 방문하세요: * https://newbiely.kr/tutorials/arduino-uno-q/arduino-uno-q-keypad-4x4 */from arduino.app_utils import *import requestsimport timeTELEGRAM_BOT_TOKEN = "YOUR_TELEGRAM_BOT_TOKEN"CHAT_ID = "YOUR_CHAT_ID"last_update_id = 0def get_updates():global last_update_id url = f"https://api.telegram.org/bot{TELEGRAM_BOT_TOKEN}/getUpdates" params = {"offset": last_update_id + 1, "timeout": 5}try: response = requests.get(url, params=params, timeout=10) data = response.json()if data["ok"]:return data["result"]exceptExceptionas e:print(f"Error getting updates: {e}")return []def send_message(chat_id, text): url = f"https://api.telegram.org/bot{TELEGRAM_BOT_TOKEN}/sendMessage" payload = {"chat_id": chat_id, "text": text}try: requests.post(url, data=payload, timeout=10)exceptExceptionas e:print(f"Error sending message: {e}")def loop():global last_update_id# Poll keypad and notify on key press result = Bridge.call("get_key")if result != "none": msg = f"Key pressed: {result}"print(msg) send_message(CHAT_ID, msg)# Handle incoming Telegram commands updates = get_updates()for update in updates: last_update_id = update["update_id"]if"message"notin update:continue message = update["message"] chat_id = message["chat"]["id"] text = message.get("text", "").strip()print(f"Received: {text}")if text == "/start": send_message(chat_id,"Arduino UNO Q Keypad 4x4 Bot\n""/key - Read the last key pressed\n""/status - Get keypad status")elif text == "/key": result = Bridge.call("get_key")if result != "none": send_message(chat_id, f"Key pressed: {result}")else: send_message(chat_id, "No key pressed")elif text == "/status": result = Bridge.call("get_status") send_message(chat_id, result)else: send_message(chat_id, "Unknown command. Send /start for help.") time.sleep(0.2)App.run(user_loop=loop)
빠른 단계
YOUR_TELEGRAM_BOT_TOKEN을 BotFather에서 얻은 실제 봇 토큰으로 바꿉니다.
YOUR_CHAT_ID를 Telegram 채팅 ID로 바꿉니다.
이 Python 코드를 앱의 Python 파일에 붙여넣습니다 (MCU 스케치는 동일하게 유지합니다).
Run 버튼을 클릭합니다. 키패드의 키를 누르면 — Telegram 채팅에서 자동으로 알림을 받습니다.
App Lab 콘솔 출력
DIYables_Apps
Stop
sketch.ino
1#include"Arduino_RouterBridge.h"
Serial Monitor
Python
[2026-04-29 09:15:00] Waiting for Telegram messages...
[2026-04-29 09:15:05] Key pressed: B
[2026-04-29 09:15:20] Received: /key
[2026-04-29 09:15:35] Key pressed: D
Telegram12:45
Welcome to Telegram!
ArduinoBot10:19
Chatting with Arduino...
BotFatherYesterday
Your bot has been created.
ArduinoBot
bot
Today
/key
10:15 AM✓✓
No key pressed
10:16 AM
(presses key B on keypad)
10:17 AM✓✓
Key pressed: B
10:18 AM
/status
10:19 AM✓✓
No key pressed
10:20 AM
OpenClaw
You can adapt the OpenClaw to this tutorial by refering the instruction on 아두이노 우노 Q - OpenClaw Tutorial
프로젝트 아이디어
Arduino UNO Q에서 4x4 키패드를 사용하여 많은 창의적인 프로젝트를 만들 수 있습니다:
원격 PIN 코드 잠금: 사용자가 키패드에 PIN을 입력합니다. MCU가 이를 확인하고 릴레이 또는 솔레노이드 잠금을 제어하며, MPU가 성공 또는 실패 시 Telegram 알림을 보냅니다
기능 키 컨트롤러: A–D 키를 기능 단축키로 사용합니다 — 각각 다른 IoT 동작을 트리거합니다 (예: A = 조명 켜기, B = 조명 끄기, C = 팬 켜기, D = 알람)
계산기 인터페이스: 사용자가 키패드를 통해 두 개의 숫자와 연산자를 입력하고, 결과가 Serial Monitor 또는 LCD에 표시되는 간단한 계산기를 만듭니다
Telegram 트리거 키패드 로거: 모든 키 입력이 자동으로 원격 위치의 물리적 모니터링을 위해 Telegram 그룹으로 전달됩니다
다중 사용자 접근 시스템: 다른 사용자에게 다른 PIN을 할당합니다 — MPU가 각 성공한 로그인을 사용자 이름 및 타임스탬프와 함께 Telegram을 통해 기록합니다
도전 과제
Arduino UNO Q의 4x4 키패드를 더 잘 활용할 준비가 되셨나요? 이러한 도전 과제를 시도해 보세요:
쉬움: MCU 스케치를 수정하여 키 A가 눌렸을 때 LED를 켜고 키 B가 눌렸을 때 꺼지도록 합니다.
중간: Python에서 전체 비밀번호 시스템을 구현합니다: Bridge를 통해 수신된 키 입력을 누적하고, #이 도착했을 때 입력을 확인하고, "접근 허용" 또는 "접근 거부" 메시지와 함께 Telegram 메시지를 보냅니다.
고급: 다중 사용자 키패드 접근 시스템을 구축합니다 — Python에 두 개의 다른 PIN을 저장합니다. 키패드에 두 PIN 중 하나가 올바르게 입력되면 MCU가 릴레이를 활성화하고 MPU가 어느 PIN이 사용되었는지를 식별하는 타임스탬프와 함께 이벤트를 기록하고 Telegram 알림을 보냅니다.