int redValue = map(redPW, redMin, redMax, 255, 0);
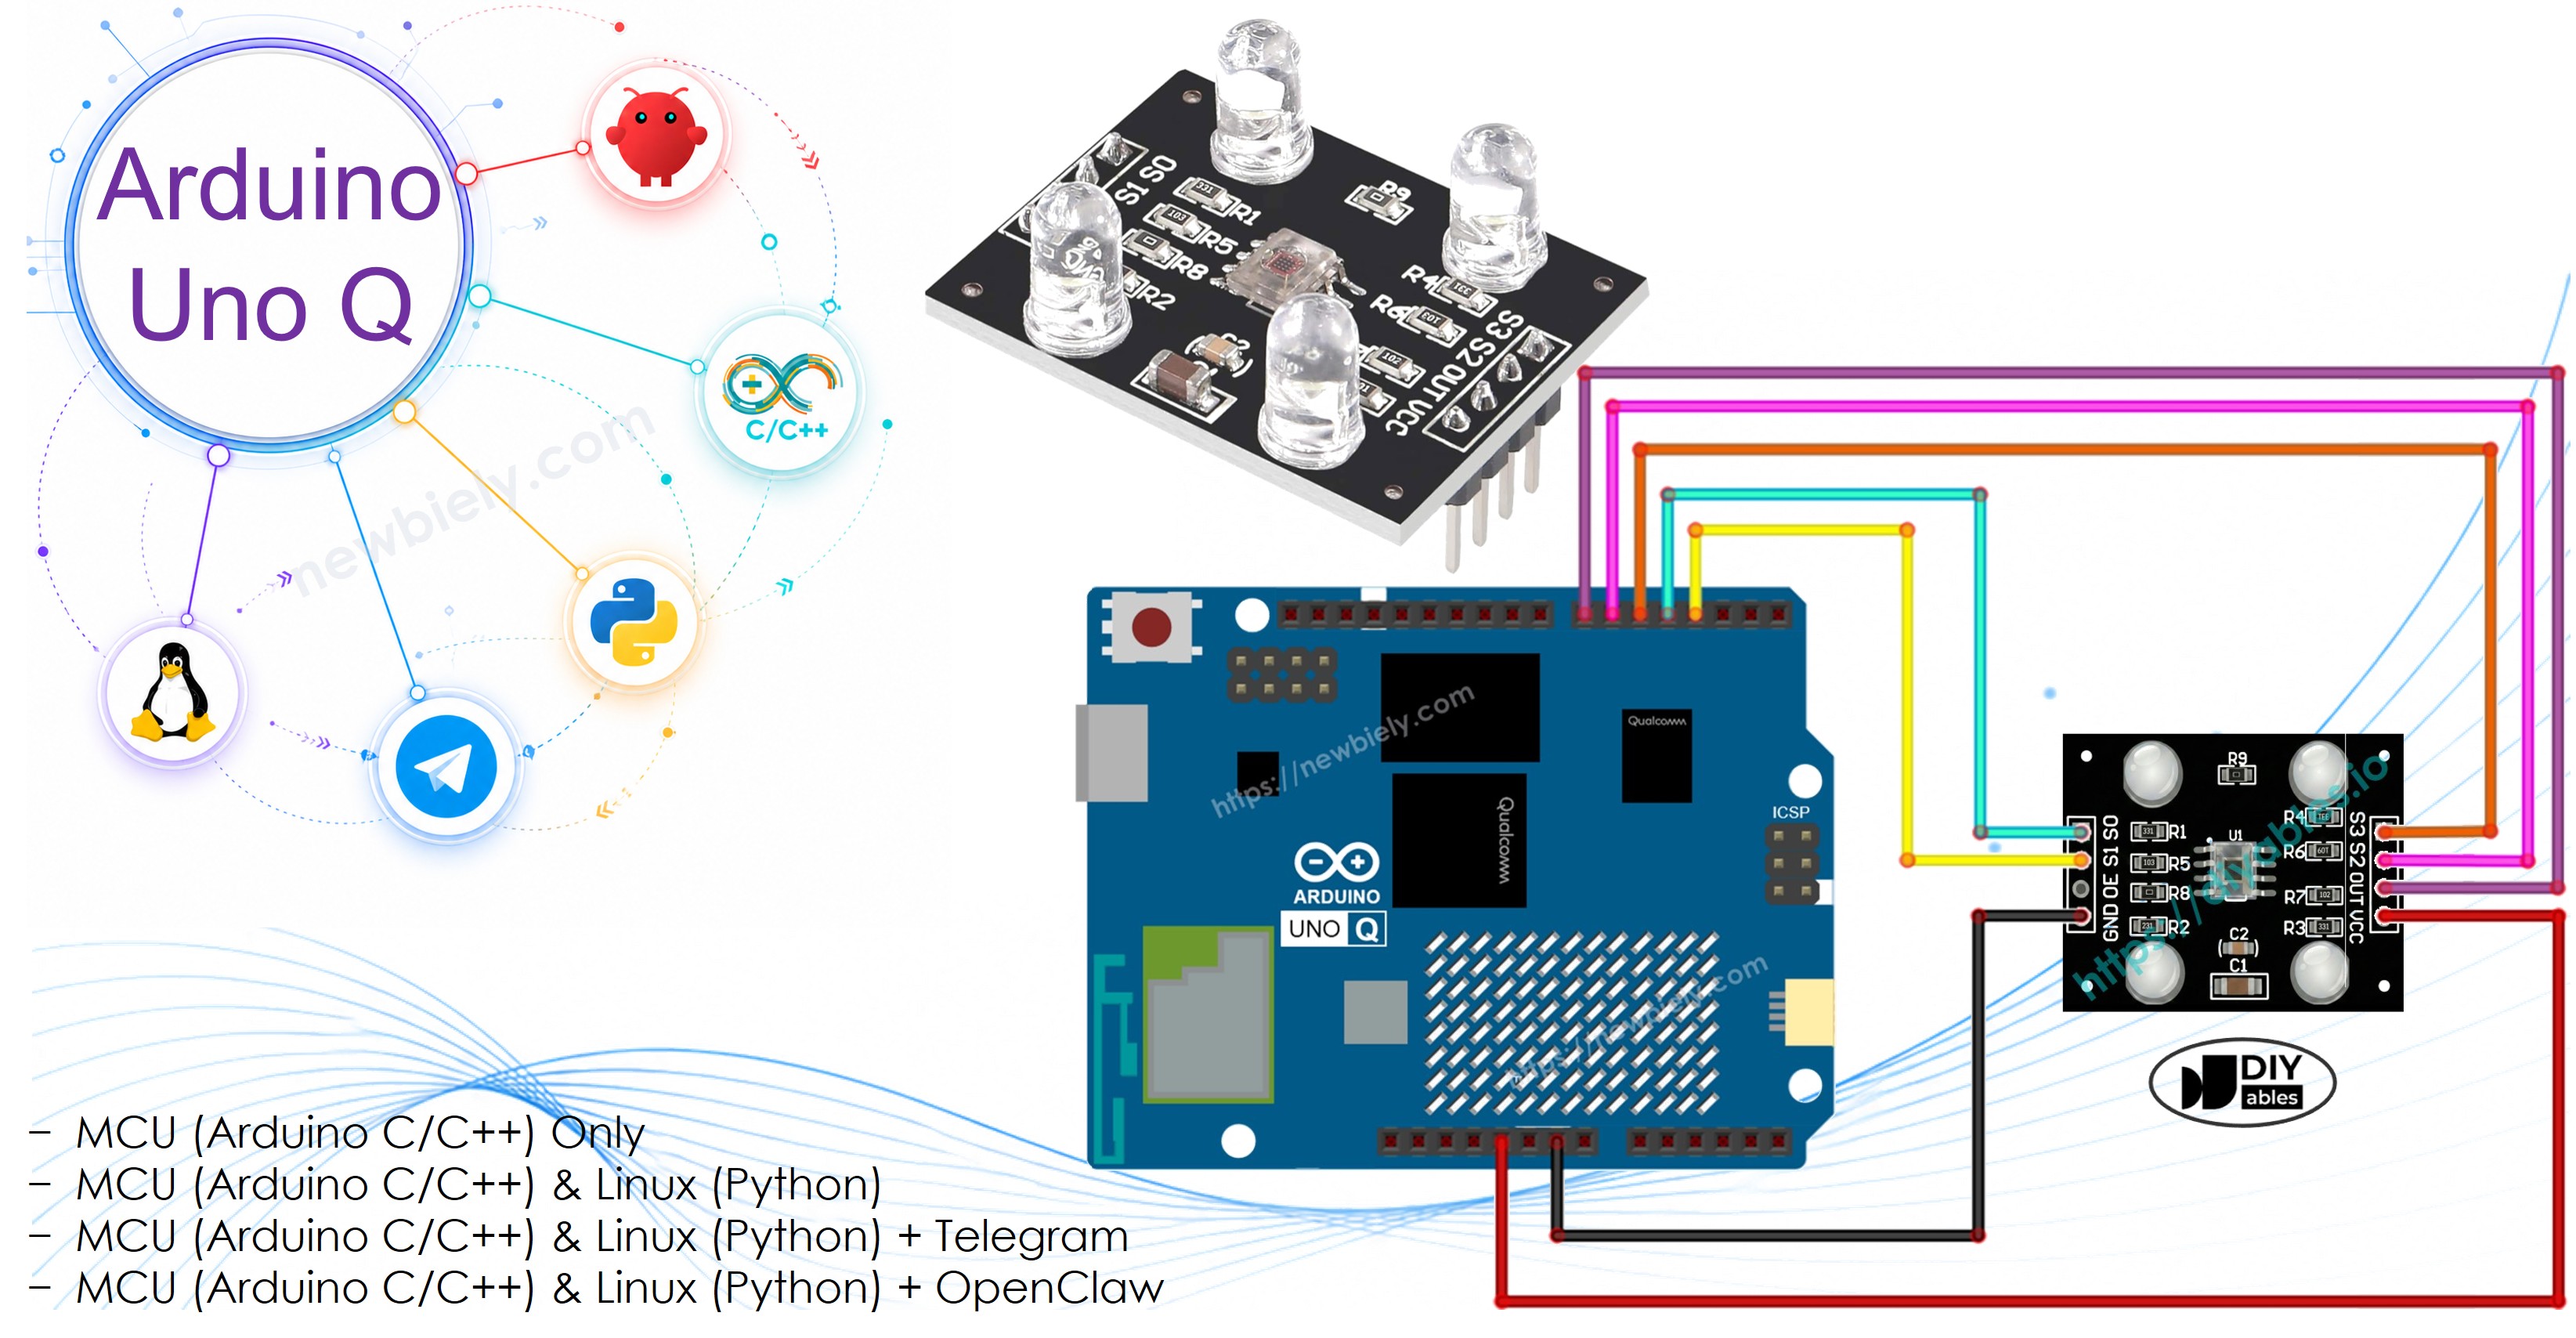
Arduino UNO Q 코드 — 보정
TCS3200 읽기는 거리, LED 밝기, 주변광의 영향을 받습니다. 먼저 보정 스케치를 실행하여 특정 설정에서 최소 및 최대 펄스 폭을 찾으십시오.
/* * 이 Arduino UNO Q 코드는 newbiely.kr 에서 개발되었습니다 * 이 Arduino UNO Q 코드는 어떠한 제한 없이 공개 사용을 위해 제공됩니다. * 상세한 지침 및 연결도에 대해서는 다음을 방문하세요: * https://newbiely.kr/tutorials/arduino-uno-q/arduino-uno-q-tcs3200d-tcs230-color-sensor */// TCS3200 Color Sensor - Calibration Sketch// Run this first to find the min/max pulse widths for your environment.// Point the sensor at white, black, and various colored objects.// Note the stable Min and Max values, then enter them into the main sketch.#define S0 4#define S1 3#define S2 6#define S3 5#define sensorOut 7int redPW = 0, greenPW = 0, bluePW = 0;int redMin = 10000, redMax = 0;int greenMin = 10000, greenMax = 0;int blueMin = 10000, blueMax = 0;int getRedPW() {digitalWrite(S2, LOW);digitalWrite(S3, LOW);returnpulseIn(sensorOut, LOW);}int getGreenPW() {digitalWrite(S2, HIGH);digitalWrite(S3, HIGH);returnpulseIn(sensorOut, LOW);}int getBluePW() {digitalWrite(S2, LOW);digitalWrite(S3, HIGH);returnpulseIn(sensorOut, LOW);}voidsetup() {pinMode(S0, OUTPUT);pinMode(S1, OUTPUT);pinMode(S2, OUTPUT);pinMode(S3, OUTPUT);pinMode(sensorOut, INPUT);// Frequency scaling 20%digitalWrite(S0, HIGH);digitalWrite(S1, LOW);Serial.begin(9600);Serial.println("=== TCS3200 Calibration ===");Serial.println("Point the sensor at different objects (white, black, colors).");Serial.println("Min and Max values are tracked automatically.");Serial.println("When values look stable, note them down for the main sketch.");Serial.println("------------------------------------------");}voidloop() { redPW = getRedPW(); delay(200); greenPW = getGreenPW(); delay(200); bluePW = getBluePW(); delay(200);if (redPW < redMin) redMin = redPW;if (redPW > redMax) redMax = redPW;if (greenPW < greenMin) greenMin = greenPW;if (greenPW > greenMax) greenMax = greenPW;if (bluePW < blueMin) blueMin = bluePW;if (bluePW > blueMax) blueMax = bluePW;Serial.print("Red PW = "); Serial.print(redPW);Serial.print(" - Green PW = "); Serial.print(greenPW);Serial.print(" - Blue PW = "); Serial.println(bluePW);Serial.print(" Min -> R:"); Serial.print(redMin);Serial.print(" G:"); Serial.print(greenMin);Serial.print(" B:"); Serial.println(blueMin);Serial.print(" Max -> R:"); Serial.print(redMax);Serial.print(" G:"); Serial.print(greenMax);Serial.print(" B:"); Serial.println(blueMax);Serial.println("------------------------------------------");}
빠른 단계
Arduino UNO Q를 처음 사용하세요? 계속 진행하기 전에 아두이노 우노 Q 시작하기 튜토리얼을 따르세요.
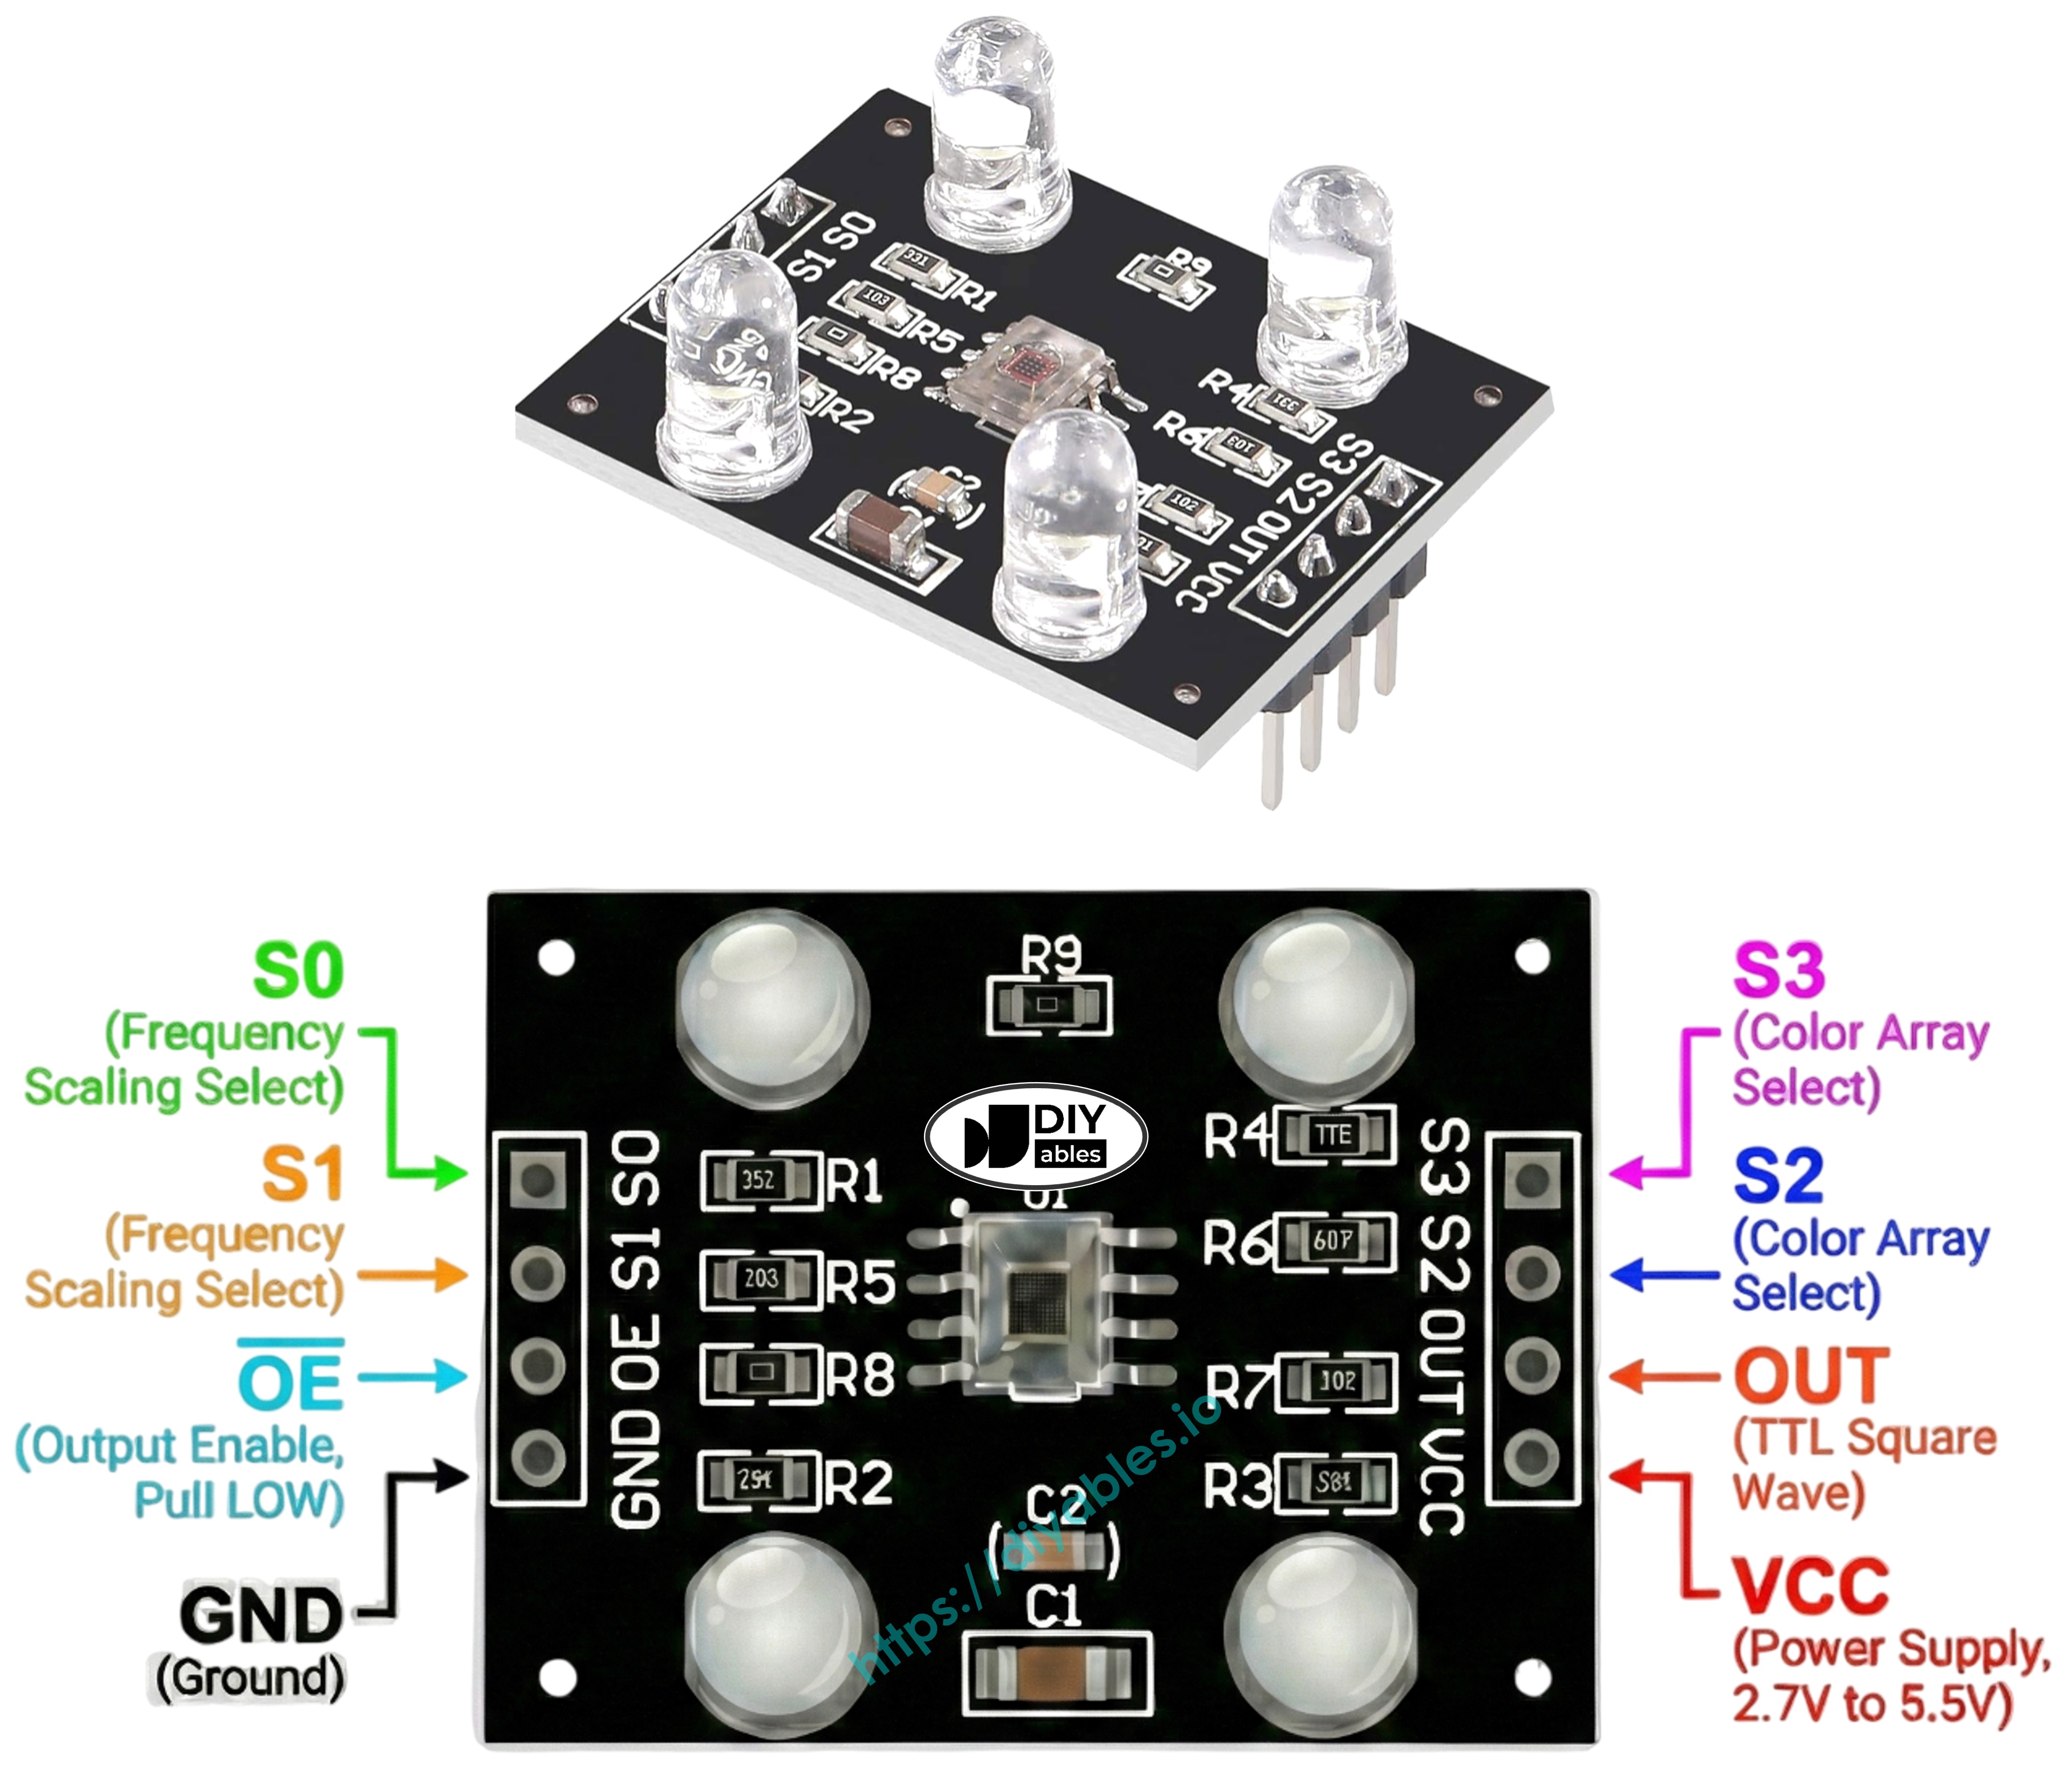
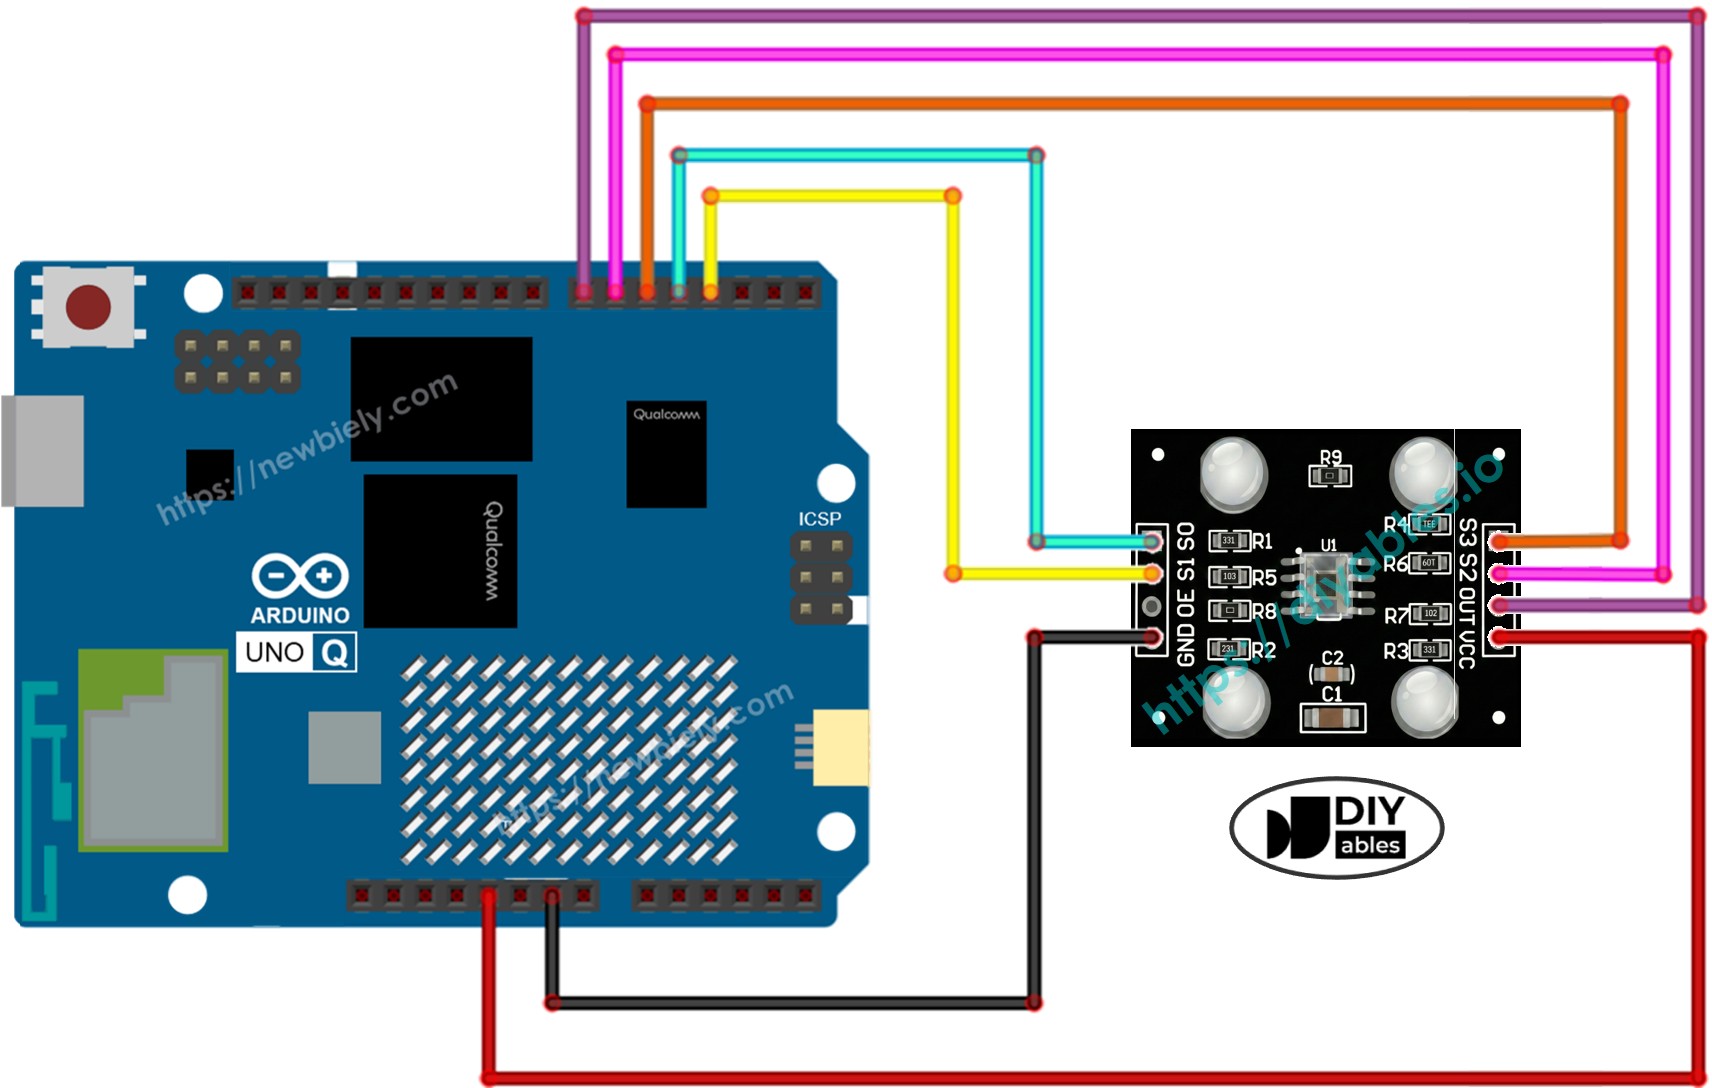
연결: 배선 다이어그램에 표시된 대로 색상 센서를 Arduino UNO Q MCU에 배선하세요.
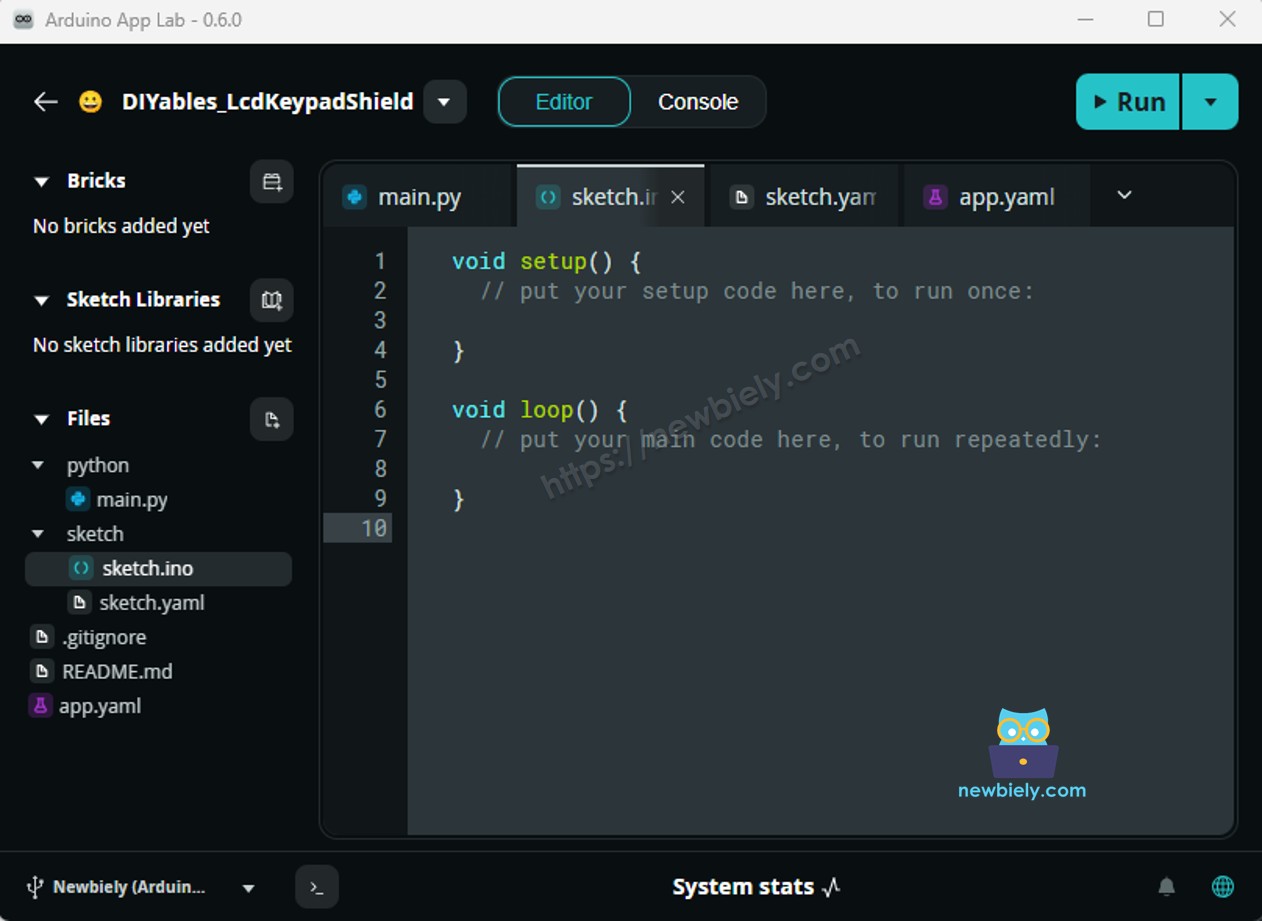
Arduino App Lab 열기: Arduino App Lab을 실행하고 Arduino UNO Q를 감지할 때까지 기다리세요.
새 앱 만들기:Create New App 버튼을 클릭하세요.
앱에 이름을 지정하세요. 예: ColorSensorCalibration
Create를 클릭하여 확인하세요.
스케치 붙여넣기: 위의 보정 코드를 복사하여 sketch/sketch.ino에 붙여넣으세요.
업로드: Arduino App Lab에서 Run 버튼을 클릭하세요.
센서를 다양한 물체 위에 움직이세요: 흰색 물체, 검은색 물체, 색상이 있는 물체.
10-20초 후 Min과 Max 값이 안정화되면 기록하세요.
App Lab 콘솔 출력
DIYables_Apps
Stop
sketch.ino
1#include"Arduino_RouterBridge.h"
Serial Monitor
Python
Message (Enter to send a message to "Newbiely" on usb(2820070321))
New Line
9600 baud
[2026-04-29 09:00:00] === TCS3200 Calibration ===
[2026-04-29 09:00:00] Point the sensor at different objects (white, black, colors).
[2026-04-29 09:00:00] Min and Max values are tracked automatically.
[2026-04-29 09:00:00] When values look stable, note them down for the main sketch.
[2026-04-29 09:00:00] ------------------------------------------
[2026-04-29 09:00:01] Red PW = 42 - Green PW = 55 - Blue PW = 60
[2026-04-29 09:00:01] Min -> R:42 G:55 B:60
[2026-04-29 09:00:01] Max -> R:42 G:55 B:60
[2026-04-29 09:00:01] ------------------------------------------
[2026-04-29 09:00:02] Red PW = 210 - Green PW = 185 - Blue PW = 172
[2026-04-29 09:00:02] Min -> R:42 G:55 B:60
[2026-04-29 09:00:02] Max -> R:210 G:185 B:172
[2026-04-29 09:00:02] ------------------------------------------
출력에서 보정 값은 다음과 같습니다:
redMin = 42, redMax = 210
greenMin = 55, greenMax = 185
blueMin = 60, blueMax = 172
Arduino UNO Q 코드 — RGB 값 읽기
이제 상단의 여섯 보정 변수를 실제 값으로 업데이트하고 이 메인 스케치를 업로드하여 정확한 RGB 값을 읽으세요.
/* * 이 Arduino UNO Q 코드는 newbiely.kr 에서 개발되었습니다 * 이 Arduino UNO Q 코드는 어떠한 제한 없이 공개 사용을 위해 제공됩니다. * 상세한 지침 및 연결도에 대해서는 다음을 방문하세요: * https://newbiely.kr/tutorials/arduino-uno-q/arduino-uno-q-tcs3200d-tcs230-color-sensor */// TCS3200 Color Sensor - Read RGB Values// IMPORTANT: Run the calibration sketch first and replace the 0 values below// with your actual calibration numbers.#define S0 4#define S1 3#define S2 6#define S3 5#define sensorOut 7// Calibration values — replace with your values from the calibration sketchint redMin = 0; // Red minimum pulse widthint redMax = 0; // Red maximum pulse widthint greenMin = 0; // Green minimum pulse widthint greenMax = 0; // Green maximum pulse widthint blueMin = 0; // Blue minimum pulse widthint blueMax = 0; // Blue maximum pulse widthint redPW = 0, greenPW = 0, bluePW = 0;int redValue = 0, greenValue = 0, blueValue = 0;int getRedPW() {digitalWrite(S2, LOW);digitalWrite(S3, LOW);returnpulseIn(sensorOut, LOW);}int getGreenPW() {digitalWrite(S2, HIGH);digitalWrite(S3, HIGH);returnpulseIn(sensorOut, LOW);}int getBluePW() {digitalWrite(S2, LOW);digitalWrite(S3, HIGH);returnpulseIn(sensorOut, LOW);}voidsetup() {pinMode(S0, OUTPUT);pinMode(S1, OUTPUT);pinMode(S2, OUTPUT);pinMode(S3, OUTPUT);pinMode(sensorOut, INPUT);// Frequency scaling 20%digitalWrite(S0, HIGH);digitalWrite(S1, LOW);Serial.begin(9600);Serial.println("Arduino UNO Q TCS3200 Color Sensor ready");}voidloop() { redPW = getRedPW(); delay(200); greenPW = getGreenPW(); delay(200); bluePW = getBluePW(); delay(200);// Map pulse width to 0-255 (lower PW = more light = higher value) redValue = map(redPW, redMin, redMax, 255, 0); greenValue = map(greenPW, greenMin, greenMax, 255, 0); blueValue = map(bluePW, blueMin, blueMax, 255, 0);Serial.print("Red = "); Serial.print(redValue);Serial.print(" - Green = "); Serial.print(greenValue);Serial.print(" - Blue = "); Serial.println(blueValue);}
Message (Enter to send a message to "Newbiely" on usb(2820070321))
New Line
9600 baud
[2026-04-29 09:00:01] Arduino UNO Q TCS3200 Color Sensor ready
[2026-04-29 09:00:02] Red = 210 - Green = 35 - Blue = 20
[2026-04-29 09:00:03] Red = 25 - Green = 200 - Blue = 40
[2026-04-29 09:00:04] Red = 30 - Green = 45 - Blue = 215
[2026-04-29 09:00:05] Red = 225 - Green = 220 - Blue = 218
Bridge: Linux + MCU
이 섹션은 Arduino UNO Q의 두 프로세서가 함께 작동하여 Linux 쪽에서 Bridge를 통해 지속적으로 색상 데이터를 읽을 수 있는 방법을 보여줍니다:
색상 센서는 MCU에 연결되어 있습니다 — MCU는 매 600ms마다 RGB 값을 읽고 캐시합니다.
MPU는 센서를 직접 읽을 수 없습니다 — Bridge 함수를 호출하여 RGB 또는 색상명을 가져옵니다.
MPU에는 Wi-Fi가 있습니다 — 완전한 Debian Linux를 실행하며 Telegram 명령에 실시간 색상 읽기로 응답할 수 있습니다.
Arduino_RouterBridge는 두 프로세서 간의 RPC 통신을 활성화합니다.
⚠️ /dev/ttyHS1 (Linux) 및 Serial1 (MCU)은 라우터에서 예약됩니다 — 사용자 코드에서 절대 열지 마세요.
MCU 루프는 매 600ms마다 R, G, B 채널을 읽고 값을 캐시합니다. Bridge 콜백은 캐시된 값을 즉시 제공하며 블로킹이 없습니다.
MCU 코드 (Bridge)
/* * 이 Arduino UNO Q 코드는 newbiely.kr 에서 개발되었습니다 * 이 Arduino UNO Q 코드는 어떠한 제한 없이 공개 사용을 위해 제공됩니다. * 상세한 지침 및 연결도에 대해서는 다음을 방문하세요: * https://newbiely.kr/tutorials/arduino-uno-q/arduino-uno-q-tcs3200d-tcs230-color-sensor */#include"Arduino_RouterBridge.h"#define S0 4#define S1 3#define S2 6#define S3 5#define sensorOut 7// Calibration values — replace with your values from the calibration sketchint redMin = 42;int redMax = 210;int greenMin = 55;int greenMax = 185;int blueMin = 60;int blueMax = 172;// Cached RGB valuesint cached_red = 0;int cached_green = 0;int cached_blue = 0;unsignedlong last_read_ms = 0;constunsignedlong READ_INTERVAL = 600;int getRedPW() {digitalWrite(S2, LOW);digitalWrite(S3, LOW);returnpulseIn(sensorOut, LOW);}int getGreenPW() {digitalWrite(S2, HIGH);digitalWrite(S3, HIGH);returnpulseIn(sensorOut, LOW);}int getBluePW() {digitalWrite(S2, LOW);digitalWrite(S3, HIGH);returnpulseIn(sensorOut, LOW);}String get_rgb(String arg) {return"R:" + String(cached_red) + " G:" + String(cached_green) + " B:" + String(cached_blue);}String get_color(String arg) {int r = cached_red;int g = cached_green;int b = cached_blue;// Detect dominant colorif (r > 200 && g > 200 && b > 200) return"white";if (r < 50 && g < 50 && b < 50) return"black";if (r > g && r > b) return"red";if (g > r && g > b) return"green";if (b > r && b > g) return"blue";return"unknown";}voidsetup() {Bridge.begin(); Monitor.begin();pinMode(S0, OUTPUT);pinMode(S1, OUTPUT);pinMode(S2, OUTPUT);pinMode(S3, OUTPUT);pinMode(sensorOut, INPUT);// Frequency scaling 20%digitalWrite(S0, HIGH);digitalWrite(S1, LOW);Bridge.provide("get_rgb", get_rgb);Bridge.provide("get_color", get_color); Monitor.println("Arduino UNO Q TCS3200 Color Sensor Bridge ready");}voidloop() {unsignedlongnow = millis();if (now - last_read_ms >= READ_INTERVAL) { last_read_ms = now;int redPW = getRedPW(); delay(200);int greenPW = getGreenPW(); delay(200);int bluePW = getBluePW(); delay(200); cached_red = constrain(map(redPW, redMin, redMax, 255, 0), 0, 255); cached_green = constrain(map(greenPW, greenMin, greenMax, 255, 0), 0, 255); cached_blue = constrain(map(bluePW, blueMin, blueMax, 255, 0), 0, 255); }}
Python 코드 (Bridge)
/* * 이 Arduino UNO Q 코드는 newbiely.kr 에서 개발되었습니다 * 이 Arduino UNO Q 코드는 어떠한 제한 없이 공개 사용을 위해 제공됩니다. * 상세한 지침 및 연결도에 대해서는 다음을 방문하세요: * https://newbiely.kr/tutorials/arduino-uno-q/arduino-uno-q-tcs3200d-tcs230-color-sensor */from arduino.app_utils import *import timedef loop(): rgb = Bridge.call("get_rgb") color = Bridge.call("get_color")print(f"Color: {color} | {rgb}") time.sleep(1)App.run(user_loop=loop)
빠른 단계
연결: 배선 다이어그램에 표시된 대로 색상 센서를 Arduino UNO Q에 배선하세요.
Arduino App Lab 열기 및 ColorSensorBridge라는 이름의 새 앱을 만드세요.
보정 값 업데이트 — MCU Bridge 코드 (redMin, redMax 등)의 보정 값을 보정 스케치의 값으로 업데이트하세요.
MCU 스케치 붙여넣기 — sketch/sketch.ino에 붙여넣으세요.
Python 코드 붙여넣기 — Python 파일에 붙여넣으세요.
Install the library: Click the Add sketch library button (the open book icon with a + sign) in the left sidebar.
Search for Arduino_RouterBridge created by Arduino and click the Install button.
My Apps/DIYables Apps
Run
Bricks
No bricks added...
Sketch Libraries
No sketch libra...
Files
python
sketch
.gitignore
README.md
app.yaml
sketch.ino
Add sketch library
Arduino_RouterBridge
Arduino_RouterBridgeArduino
This library provides a simple RPC bridge for Arduino UNO Q boards, allowing communication between the board and other devices using MsgPack serialization.
0.4.1
Install
More Info
업로드: Run 버튼을 클릭하세요.
센서를 다양한 색상의 물체에 향하세요 — Python 콘솔이 매초 업데이트되는 것을 봅니다.
App Lab 콘솔 출력
DIYables_Apps
Stop
sketch.ino
1#include"Arduino_RouterBridge.h"
Serial Monitor
Python
Message (Enter to send a message to "Newbiely" on usb(2820070321))
New Line
9600 baud
[2026-04-29 09:00:01] Arduino UNO Q TCS3200 Color Sensor Bridge ready
DIYables_Apps
Stop
sketch.ino
1#include"Arduino_RouterBridge.h"
Serial Monitor
Python
[2026-04-29 09:00:02] Color: red | R:215 G:30 B:25
[2026-04-29 09:00:03] Color: green | R:28 G:205 B:38
[2026-04-29 09:00:04] Color: blue | R:22 G:40 B:218
[2026-04-29 09:00:05] Color: white | R:228 G:222 B:220
[2026-04-29 09:00:06] Color: black | R:12 G:10 B:8
Telegram
Telegram 명령을 통해 Arduino UNO Q에서 색상 센서를 원격으로 쿼리하세요.
MCU 스케치: 이전 Bridge 섹션에서 같은 MCU 스케치를 유지하세요.
Python 코드 (Telegram)
/* * 이 Arduino UNO Q 코드는 newbiely.kr 에서 개발되었습니다 * 이 Arduino UNO Q 코드는 어떠한 제한 없이 공개 사용을 위해 제공됩니다. * 상세한 지침 및 연결도에 대해서는 다음을 방문하세요: * https://newbiely.kr/tutorials/arduino-uno-q/arduino-uno-q-tcs3200d-tcs230-color-sensor */from arduino.app_utils import *import requestsimport timeTELEGRAM_BOT_TOKEN = "YOUR_TELEGRAM_BOT_TOKEN"CHAT_ID = "YOUR_CHAT_ID"last_update_id = 0def get_updates():global last_update_id url = f"https://api.telegram.org/bot{TELEGRAM_BOT_TOKEN}/getUpdates" params = {"offset": last_update_id + 1, "timeout": 5}try: response = requests.get(url, params=params, timeout=10) data = response.json()if data["ok"]:return data["result"]exceptExceptionas e:print(f"Error getting updates: {e}")return []def send_message(chat_id, text): url = f"https://api.telegram.org/bot{TELEGRAM_BOT_TOKEN}/sendMessage" payload = {"chat_id": chat_id, "text": text}try: requests.post(url, data=payload, timeout=10)exceptExceptionas e:print(f"Error sending message: {e}")def loop(): updates = get_updates()for update in updates: last_update_id = update["update_id"]if"message"notin update:continue message = update["message"] chat_id = message["chat"]["id"] text = message.get("text", "").strip()print(f"Received: {text}")if text == "/start": send_message(chat_id,"Arduino UNO Q Color Sensor Bot\n""/rgb - Read RGB values (0-255)\n""/color - Detect dominant color")elif text == "/rgb": result = Bridge.call("get_rgb") send_message(chat_id, f"RGB values: {result}")elif text == "/color": result = Bridge.call("get_color") send_message(chat_id, f"Detected color: {result}")else: send_message(chat_id, "Unknown command. Send /start for help.") time.sleep(0.5)App.run(user_loop=loop)
빠른 단계
YOUR_TELEGRAM_BOT_TOKEN을 BotFather에서 받은 실제 Telegram 봇 토큰으로 바꾸세요.
You can adapt the OpenClaw to this tutorial by refering the instruction on 아두이노 우노 Q - OpenClaw Tutorial
프로젝트 아이디어
Arduino UNO Q와 TCS3200 색상 센서로 많은 유용한 프로젝트를 만들 수 있습니다:
색상 분류 기계: Bridge를 통해 컨베이어 벨트의 물체 색상을 감지합니다 — MCU가 감지된 색상에 따라 각 물체를 올바른 빈으로 리다이렉트하는 서보를 트리거합니다.
원격 색상 로거: 감지된 색상과 RGB 값을 Linux의 CSV 파일에 5초마다 로깅합니다 — Telegram /report 명령을 사용하여 타임스탬프가 있는 마지막 10개 읽기를 가져옵니다.
색상 활성화 경고: Telegram을 사용하여 대상 색상을 정의합니다 — 센서가 해당 정확한 색상을 감지하면 즉시 Telegram 알림을 보냅니다 (예: 생산 라인의 품질 관리).
식물 건강 모니터: 센서를 식물 잎에 향합니다 — 초록 채널 값을 매일 추적하여 초기 황변 또는 변색을 감지하고 초록 값이 임계값 아래로 떨어지면 Telegram 경고를 보냅니다.
대화형 색상 게임: Telegram 메시지 "10초 내에 파란색을 보여주세요"를 보냅니다 — MCU가 색상을 읽고 Python이 플레이어가 타이머 전에 올바른 색상을 보였는지 여부를 회신합니다.
도전해보세요
Arduino UNO Q의 TCS3200 색상 센서로 더 나아가고 싶으세요? 이 도전을 시도해보세요:
쉬움:/history Telegram 명령을 추가하여 Python 리스트에 저장된 타임스탬프가 있는 마지막 5개 감지된 색상을 반환합니다 — 콘솔을 확인하지 않고 최근 읽기를 검토하는 데 유용합니다.
중간: 평균화 구현: 단일 읽기를 캐시하는 대신 MCU가 각 R/G/B 채널을 3번 읽고 평균을 반환합니다 — 노이즈를 평활화하고 색상 감지 정확도를 향상시킵니다.
고급: 색상 학습 시스템 구축: /learn red, /learn green, /learn blue Telegram 명령을 추가하여 현재 RGB 읽기를 캡처하고 해당 색상의 참조로 저장합니다 — 그런 다음 이 저장된 참조를 사용하여 색상 매칭 시 하드코딩된 임계값 대신 사용합니다.