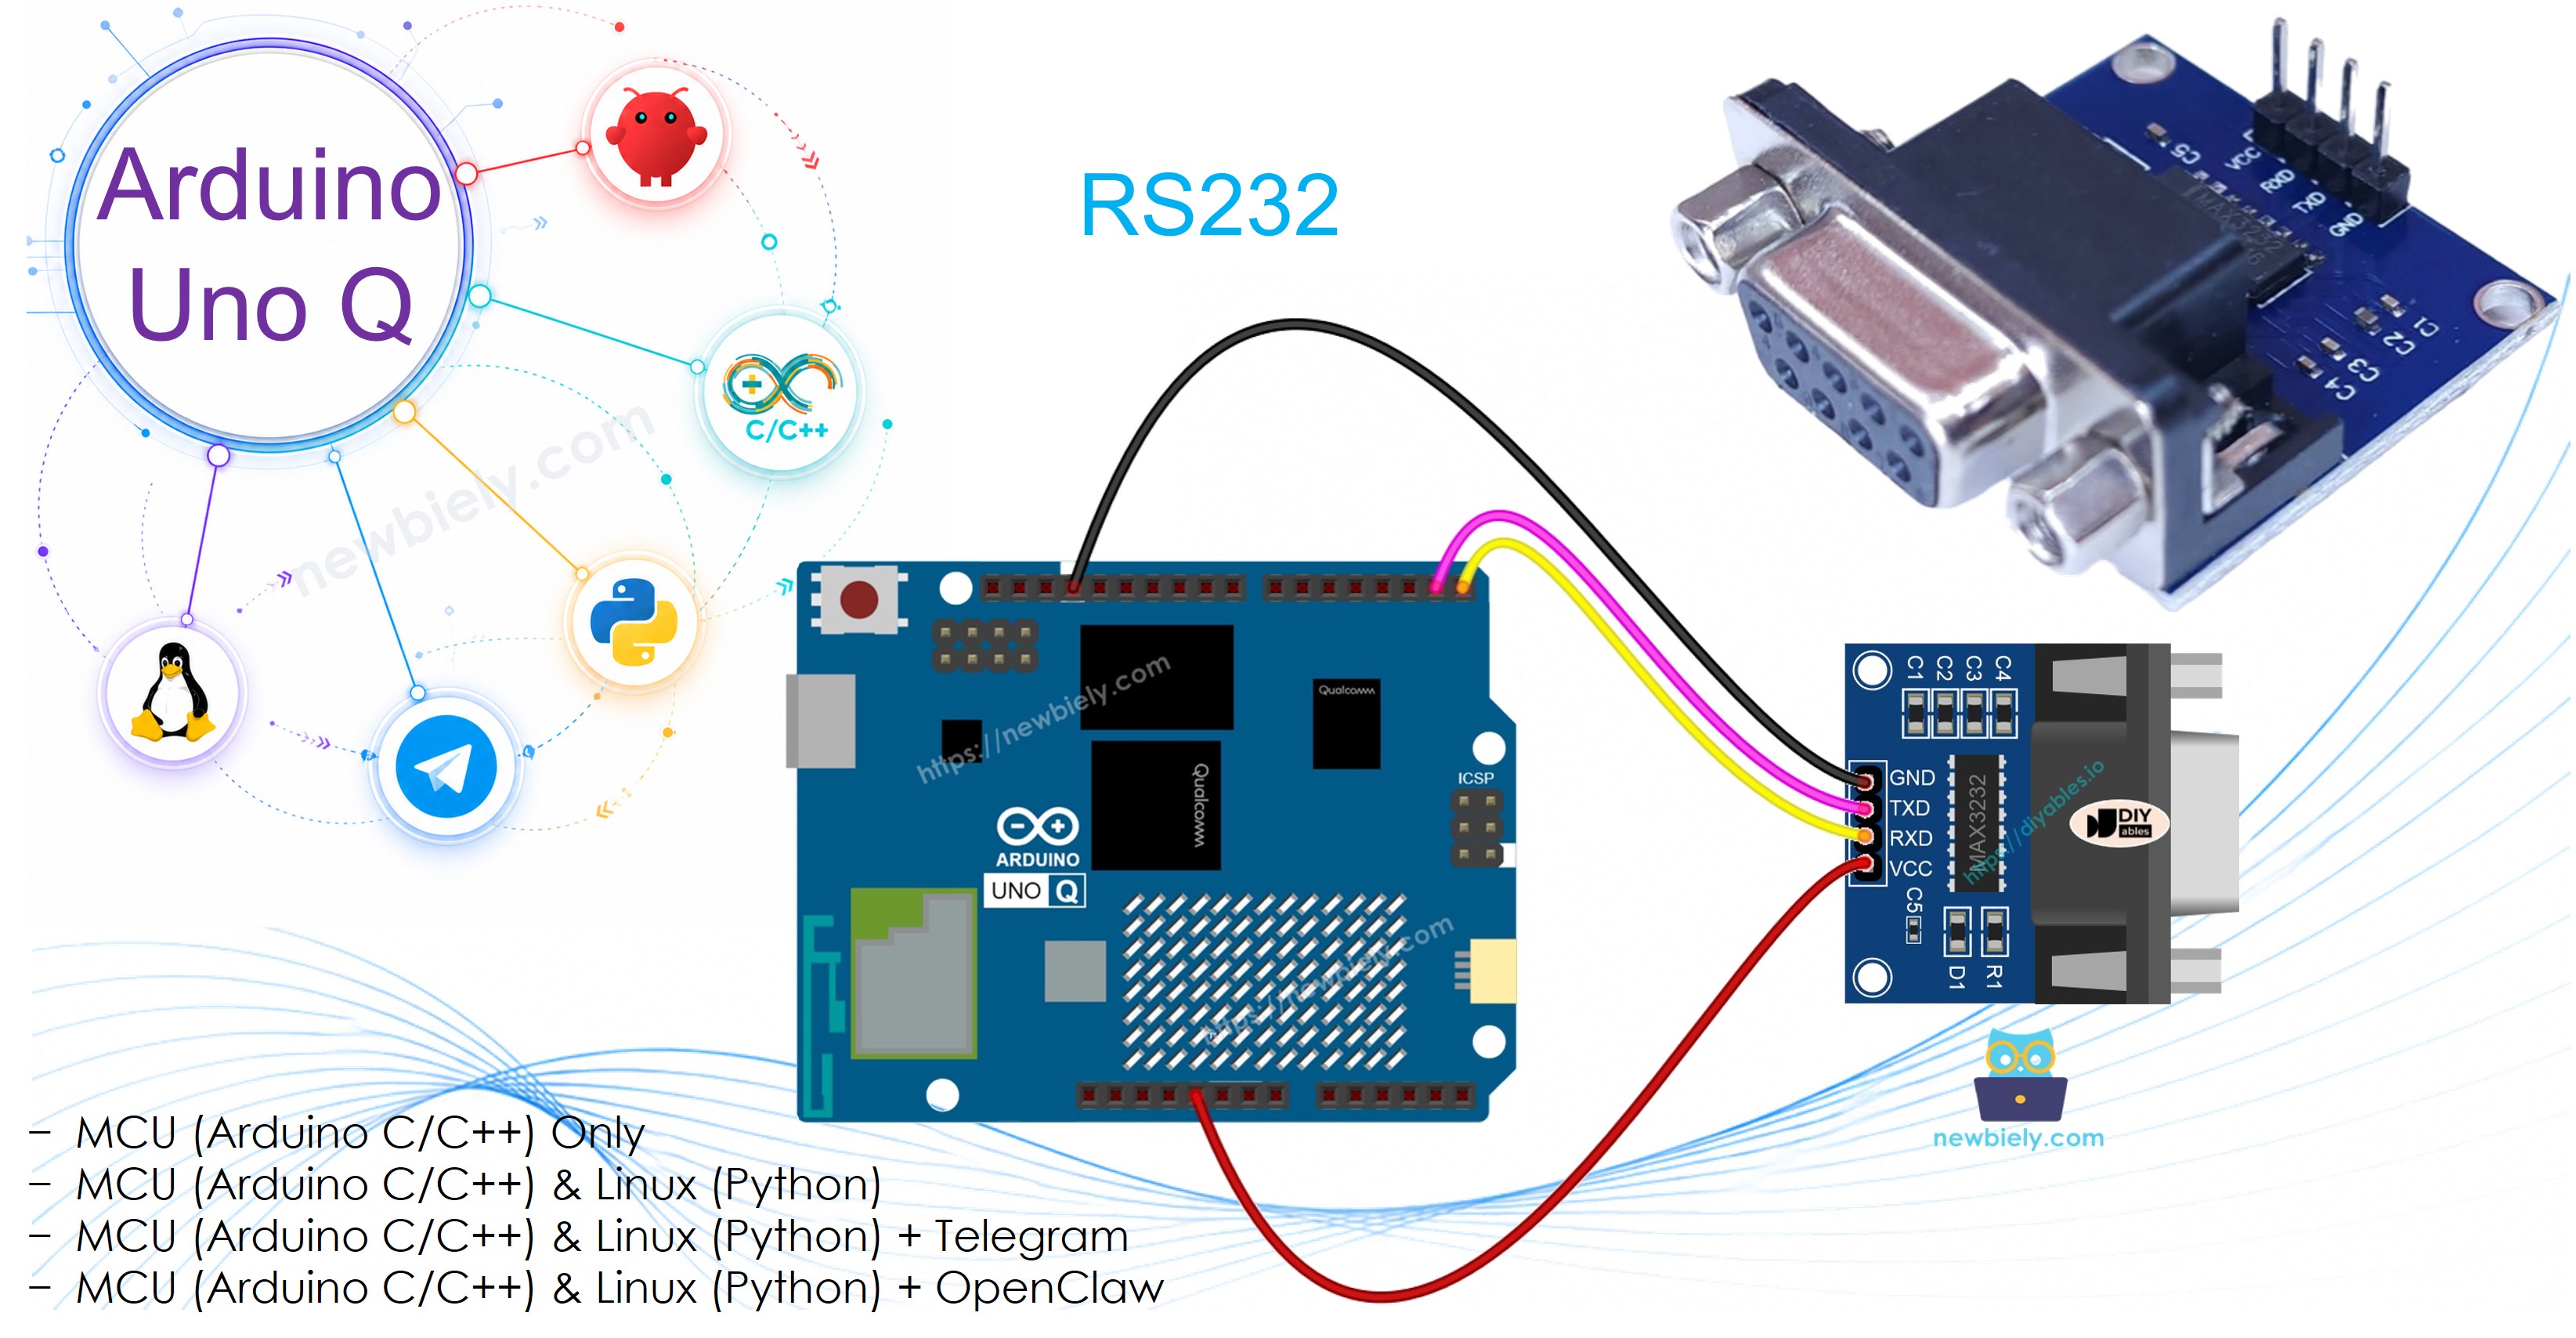
아두이노 우노 Q RS232

Arduino UNO Q와 TTL-to-RS232 모듈을 사용하여 RS232 시리얼 통신을 수행합니다. MCU는 SoftwareSerial을 통해 통신하며, 모듈은 TTL 신호를 장거리 시리얼 통신을 위한 RS232 전압 레벨로 변환합니다. Bridge와 Telegram을 사용하면 Python이나 휴대폰에서 원격으로 RS232 데이터를 송수신할 수 있습니다.

이 튜토리얼에서 배울 내용:

Arduino UNO Q rs232

필요한 하드웨어

1×Arduino UNO Q 아마존
1×USB Cable for Arduino Uno Q 아마존
1×TTL-RS232 변환 모듈 쿠팡 | 아마존
1×점퍼케이블 쿠팡 | 아마존
1×(선택사항) RS232 to USB 변환 케이블 쿠팡 | 아마존
1×(선택사항) RS232 Gender Changer 아마존
1×(추천) 아두이노 우노용 스크루 터미널 블록 쉴드 쿠팡 | 아마존
1×(추천) Sensors/Servo Expansion Shield for Arduino Uno 쿠팡 | 아마존
1×(추천) 아두이노 우노용 브레드보드 쉴드 쿠팡 | 아마존
1×(추천) 아두이노 우노용 케이스 쿠팡 | 아마존
1×(추천) 아두이노 우노용 프로토타이핑 베이스 플레이트 & 브레드보드 키트 아마존
공개: 이 포스팅 에 제공된 일부 링크는 아마존 제휴 링크입니다. 이 포스팅은 쿠팡 파트너스 활동의 일환으로, 이에 따른 일정액의 수수료를 제공받습니다.

TTL to RS232 모듈 정보

Arduino UNO Q MCU는 TTL 로직 레벨(3.3V)을 사용하여 UART를 통해 통신합니다. TTL 신호는 짧은 거리에서만 전달됩니다. RS232 호환 장치(PLC, 구형 컴퓨터, 산업용 장비)와 장거리에서 통신하려면 TTL 신호를 RS232 전압 레벨(일반적으로 ±12V)로 변환해야 합니다. TTL-to-RS232 모듈은 양방향으로 이 변환을 수행합니다.
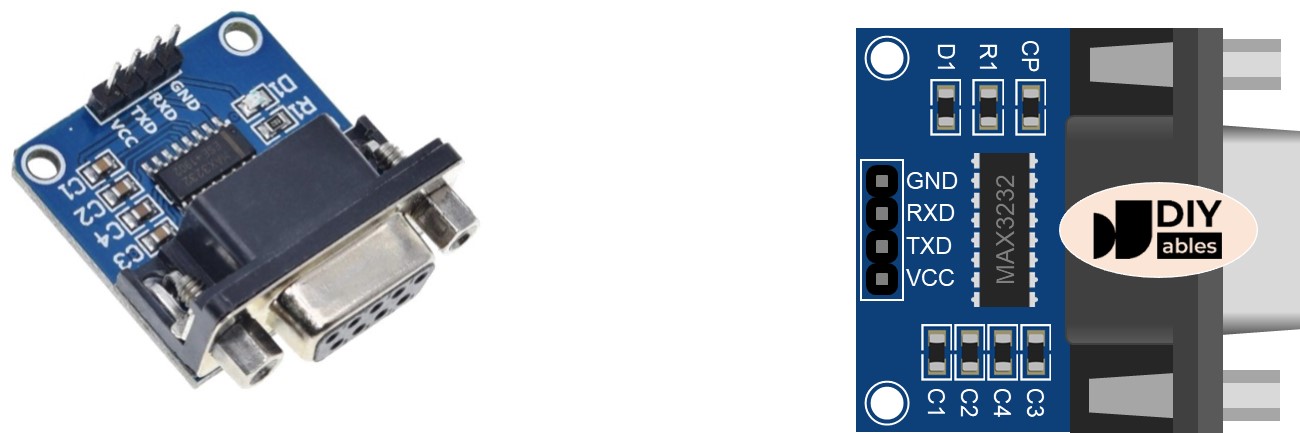
rs232 module 사용법 핀아웃

핀아웃

  • TTL 인터페이스 (Arduino UNO Q MCU에 연결):
    • VCC: 전원 입력 — 3.3V에 연결
    • GND: 그라운드
    • RXD: 데이터 입력 — MCU TX 핀(D6)에 연결
    • TXD: 데이터 출력 — MCU RX 핀(D7)에 연결
  • RS232 인터페이스: DB9 암 D-Sub 커넥터 — RS232 장치에 연결

배선도

Arduino UNO Q ttl to rs232 module 연결 배선도

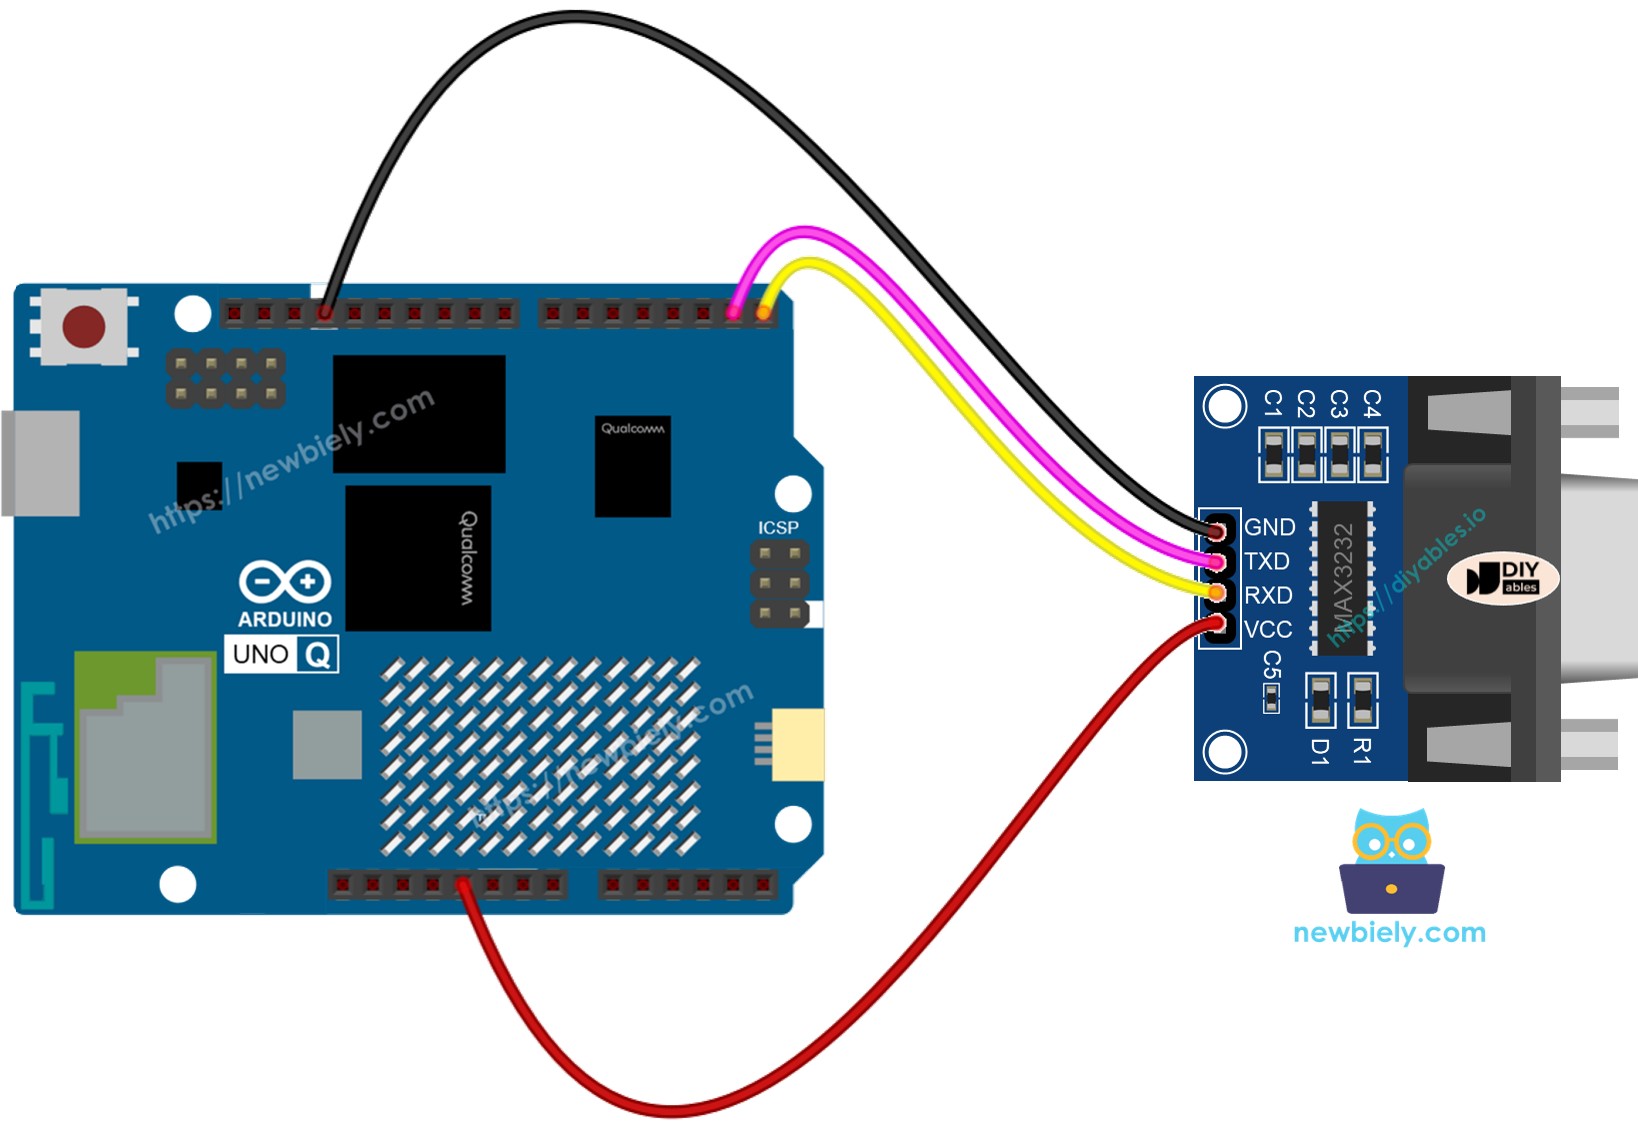
이 이미지는 Fritzing을 사용하여 만들어졌습니다. 이미지를 확대하려면 클릭하세요.

TTL-to-RS232 모듈 핀 Arduino UNO Q MCU 핀 참고
VCC 3.3V
GND GND
RXD D6 (MCU TX)
TXD D7 (MCU RX)

DB9 커넥터를 RS232 장치 또는 RS232-to-USB 케이블에 연결합니다.

RS232 프로그래밍 방법

  • SoftwareSerial을 포함하고 RS232 시리얼 객체를 생성합니다:
#include <SoftwareSerial.h> SoftwareSerial rs232(7, 6); // RX: D7, TX: D6
  • 들어오는 RS232 데이터를 읽습니다:
if (rs232.available()) { char data = rs232.read(); }
  • RS232을 통해 데이터를 전송합니다:
rs232.print("Hello from Arduino UNO Q"); rs232.println("With newline");

Arduino UNO Q 코드

/* * 이 Arduino UNO Q 코드는 newbiely.kr 에서 개발되었습니다 * 이 Arduino UNO Q 코드는 어떠한 제한 없이 공개 사용을 위해 제공됩니다. * 상세한 지침 및 연결도에 대해서는 다음을 방문하세요: * https://newbiely.kr/tutorials/arduino-uno-q/arduino-uno-q-rs232 */ #include <SoftwareSerial.h> SoftwareSerial rs232(7, 6); // RX: D7, TX: D6 void setup() { Monitor.begin(9600); // USB serial for debug output rs232.begin(9600); // RS232 module serial delay(100); } void loop() { // Forward data from RS232 to Monitor if (rs232.available()) { char data = rs232.read(); Monitor.print(data); rs232.print(data); // echo back to sender } // Forward data from Monitor to RS232 if (Monitor.available()) { char data = Monitor.read(); rs232.print(data); } }

빠른 단계

Arduino UNO Q를 처음 사용하시나요? 계속 진행하기 전에 아두이노 우노 Q 시작하기 튜토리얼을 따라하세요.

  • 연결: 배선도에 표시된 대로 TTL-to-RS232 모듈을 Arduino UNO Q MCU에 연결합니다.
  • Arduino App Lab 열기: Arduino App Lab을 실행하고 Arduino UNO Q를 감지할 때까지 기다립니다.
  • 새 앱 만들기: Create New App 버튼을 클릭합니다.
create new app in 아두이노 app lab on Arduino UNO Q
  • 앱에 이름을 지정합니다. 예: RS232
  • Create를 클릭하여 확인합니다.
아두이노 app lab app folders and files on Arduino UNO Q
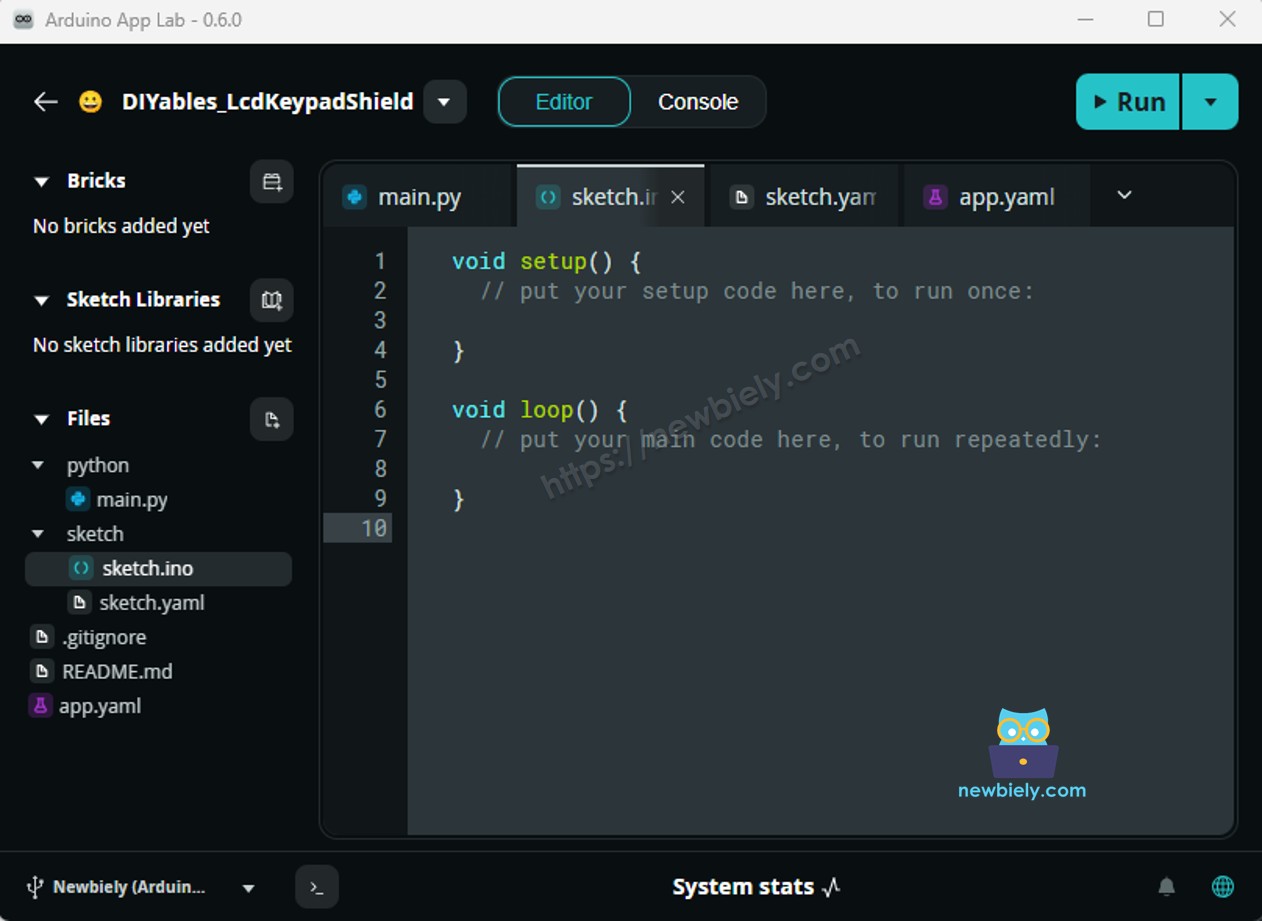
  • 스케치 붙여넣기: 위의 MCU 코드를 복사하여 sketch/sketch.ino에 붙여넣습니다.
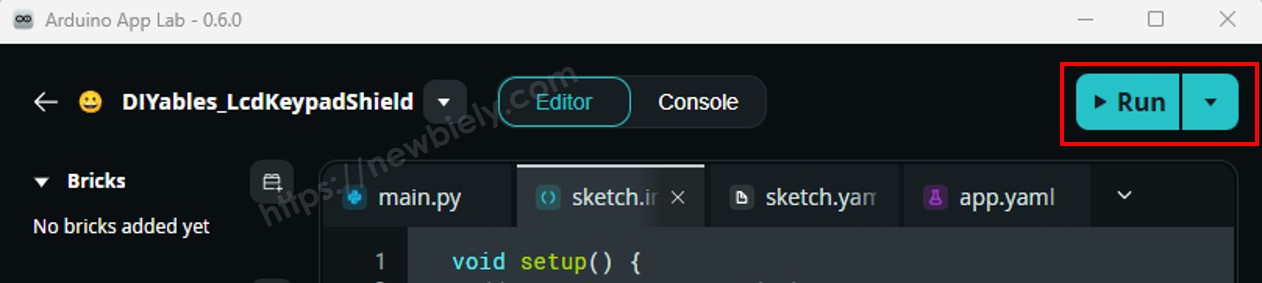
  • 업로드: Arduino App Lab에서 Run 버튼을 클릭합니다.
click run 버튼 in 아두이노 app lab on Arduino UNO Q

테스트

RS232 통신을 테스트하려면:

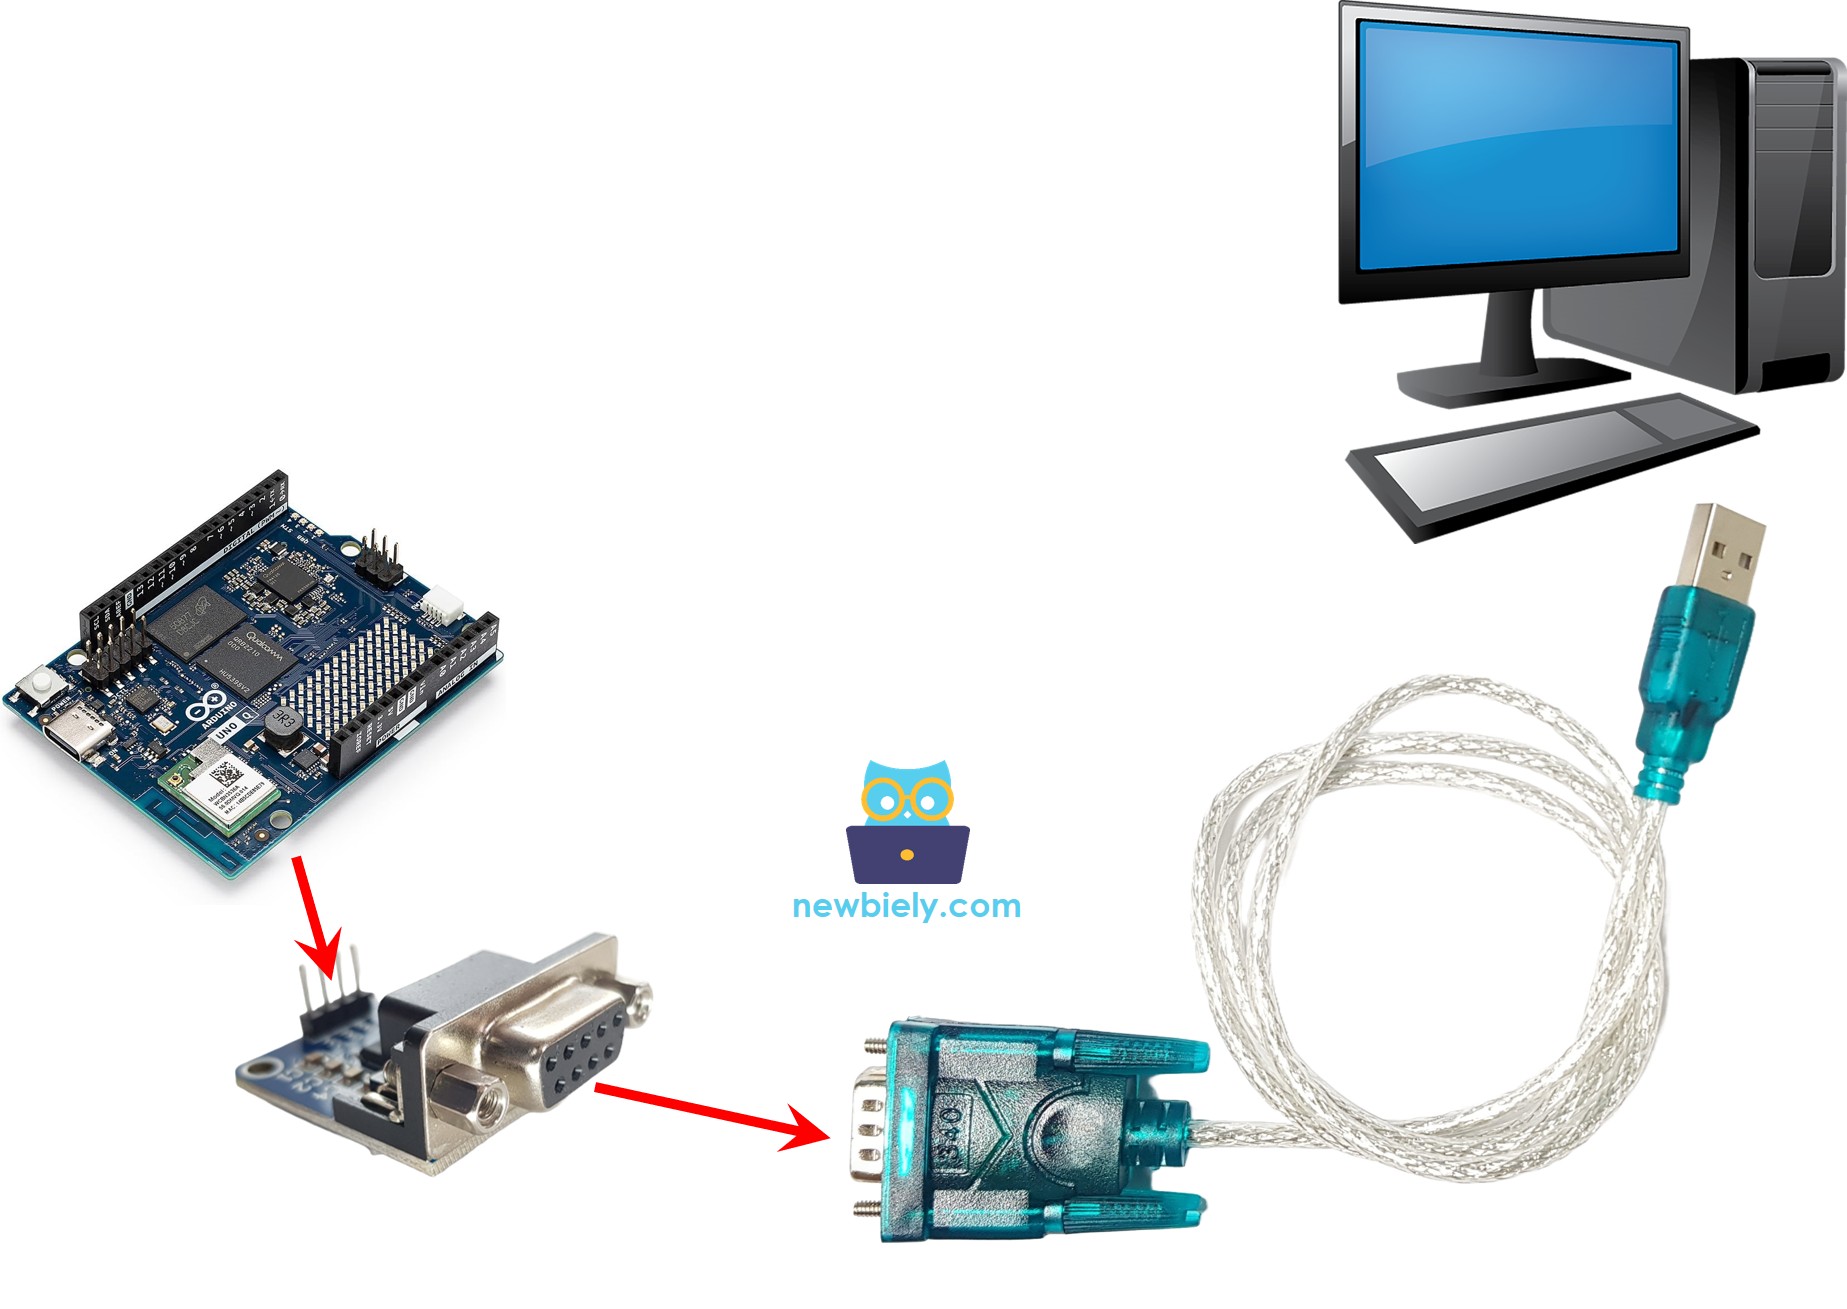
  • RS232-to-USB 케이블을 사용하여 모듈의 DB9 포트를 PC에 연결합니다:
Arduino UNO Q rs232 to pc communication
  • PC에서 시리얼 터미널(예: Tera Term 또는 PuTTY)을 엽니다.
  • 보드 레이트를 9600으로 설정하고 올바른 COM 포트를 선택합니다.
  • 텍스트를 입력하고 전송합니다. Arduino UNO Q는 그것을 에코하여 돌려보낼 것입니다 — 터미널에서 에코된 데이터를 볼 수 있을 것입니다.

Bridge: Linux + MCU

이 섹션은 Bridge를 통해 Linux 측(Python)에서 RS232 데이터를 송수신하는 방법을 보여줍니다:

  • TTL-to-RS232 모듈은 SoftwareSerial을 통해 MCU에 연결됩니다 — MCU가 모든 시리얼 I/O를 처리합니다
  • MPU는 SoftwareSerial을 직접 사용할 수 없습니다 — Bridge 함수를 호출하여 RS232 데이터를 송수신합니다
  • MPU는 Wi-Fi를 가지고 있습니다 — 전체 Debian Linux를 실행하므로 RS232 데이터를 Telegram 또는 웹 서비스로 중계할 수 있습니다
  • Arduino_RouterBridge는 두 프로세서 간의 RPC 통신을 가능하게 합니다
  • ⚠️ /dev/ttyHS1(Linux)과 Serial1(MCU)은 라우터에서 예약됨 — 사용자 코드에서 절대 열지 마세요

MCU 코드 (Bridge)

/* * 이 Arduino UNO Q 코드는 newbiely.kr 에서 개발되었습니다 * 이 Arduino UNO Q 코드는 어떠한 제한 없이 공개 사용을 위해 제공됩니다. * 상세한 지침 및 연결도에 대해서는 다음을 방문하세요: * https://newbiely.kr/tutorials/arduino-uno-q/arduino-uno-q-rs232 */ #include "Arduino_RouterBridge.h" #include <SoftwareSerial.h> SoftwareSerial rs232(7, 6); // RX: D7, TX: D6 String received_data = ""; String send_rs232(String arg) { rs232.println(arg); Monitor.print("Sent via RS232: "); Monitor.println(arg); return "ok:sent"; } String get_received(String arg) { String result = received_data; received_data = ""; return result; } void setup() { Bridge.begin(); Monitor.begin(); rs232.begin(9600); delay(100); Bridge.provide_safe("send_rs232", send_rs232); Bridge.provide("get_received", get_received); Monitor.println("Arduino UNO Q RS232 Bridge ready"); } void loop() { // Accumulate incoming RS232 data between Bridge calls while (rs232.available()) { char c = rs232.read(); received_data += c; } }

Python 코드 (Bridge)

/* * 이 Arduino UNO Q 코드는 newbiely.kr 에서 개발되었습니다 * 이 Arduino UNO Q 코드는 어떠한 제한 없이 공개 사용을 위해 제공됩니다. * 상세한 지침 및 연결도에 대해서는 다음을 방문하세요: * https://newbiely.kr/tutorials/arduino-uno-q/arduino-uno-q-rs232 */ from arduino.app_utils import * import time def loop(): print("Sending message via RS232...") result = Bridge.call("send_rs232", "Hello from Arduino UNO Q!") print(f"Result: {result}") time.sleep(1) data = Bridge.call("get_received") if data: print(f"Received via RS232: {data}") else: print("No data received") time.sleep(2) App.run(user_loop=loop)

빠른 단계

  • 연결: 위에 표시된 대로 TTL-to-RS232 모듈을 Arduino UNO Q에 연결합니다.
  • Arduino App Lab 열기RS232Bridge라는 이름의 새 앱을 만듭니다.
  • MCU 스케치를 붙여넣기 sketch/sketch.ino에 붙여넣습니다.
  • Python 코드를 붙여넣기 Python 파일에 붙여넣습니다.
  • Install the library: Click the Add sketch library button (the open book icon with a + sign) in the left sidebar.
add sketch 라이브러리 in 아두이노 app lab on Arduino UNO Q
  • Search for Arduino_RouterBridge created by Arduino and click the Install button.
My Apps / DIYables Apps
Run
Bricks
No bricks added...
Sketch Libraries
No sketch libra...
Files
python
sketch
.gitignore
README.md
app.yaml
sketch.ino
Add sketch library
Arduino_RouterBridge Arduino

This library provides a simple RPC bridge for Arduino UNO Q boards, allowing communication between the board and other devices using MsgPack serialization.

0.4.1
Install
More Info
  • 업로드: Run 버튼을 클릭합니다. Python은 RS232를 통해 메시지를 전송하고 에코된 데이터를 다시 읽습니다.
click run 버튼 in 아두이노 app lab on Arduino UNO Q

App Lab 콘솔 출력

DIYables_Apps
Stop
sketch.ino
1#include "Arduino_RouterBridge.h"
Serial Monitor
Python
Message (Enter to send a message to "Newbiely" on usb(2820070321))
New Line
9600 baud
[2026-04-29 09:00:01] Arduino UNO Q RS232 Bridge ready [2026-04-29 09:00:06] Sent via RS232: Hello from Arduino UNO Q!
DIYables_Apps
Stop
sketch.ino
1#include "Arduino_RouterBridge.h"
Serial Monitor
Python
[2026-04-29 09:00:06] Sending message via RS232... [2026-04-29 09:00:06] Result: ok:sent [2026-04-29 09:00:07] Received via RS232: Hello from Arduino UNO Q!

Telegram

Telegram을 통해 RS232 데이터를 송수신합니다 — 산업용 장치의 메시지를 휴대폰으로 전달하거나 Telegram에서 RS232 장치로 명령을 전송합니다.

MCU 스케치: 이전 Bridge 섹션의 동일한 MCU 스케치를 유지합니다.

Python 코드 (Telegram)

/* * 이 Arduino UNO Q 코드는 newbiely.kr 에서 개발되었습니다 * 이 Arduino UNO Q 코드는 어떠한 제한 없이 공개 사용을 위해 제공됩니다. * 상세한 지침 및 연결도에 대해서는 다음을 방문하세요: * https://newbiely.kr/tutorials/arduino-uno-q/arduino-uno-q-rs232 */ from arduino.app_utils import * import requests import time TELEGRAM_BOT_TOKEN = "YOUR_TELEGRAM_BOT_TOKEN" CHAT_ID = "YOUR_CHAT_ID" last_update_id = 0 def get_updates(): global last_update_id url = f"https://api.telegram.org/bot{TELEGRAM_BOT_TOKEN}/getUpdates" params = {"offset": last_update_id + 1, "timeout": 5} try: response = requests.get(url, params=params, timeout=10) data = response.json() if data["ok"]: return data["result"] except Exception as e: print(f"Error getting updates: {e}") return [] def send_message(chat_id, text): url = f"https://api.telegram.org/bot{TELEGRAM_BOT_TOKEN}/sendMessage" payload = {"chat_id": chat_id, "text": text} try: requests.post(url, data=payload, timeout=10) except Exception as e: print(f"Error sending message: {e}") def loop(): updates = get_updates() for update in updates: last_update_id = update["update_id"] if "message" not in update: continue message = update["message"] chat_id = message["chat"]["id"] text = message.get("text", "").strip() print(f"Received: {text}") if text == "/start": send_message(chat_id, "Arduino UNO Q RS232 Bot\n" "/send <message> - Send a message via RS232\n" "/read - Read data received from RS232") elif text.startswith("/send"): parts = text.split(" ", 1) if len(parts) < 2: send_message(chat_id, "Usage: /send <message>") else: result = Bridge.call("send_rs232", parts[1]) send_message(chat_id, f"Sent via RS232: {parts[1]}") elif text == "/read": data = Bridge.call("get_received") if data: send_message(chat_id, f"Received via RS232:\n{data}") else: send_message(chat_id, "No data received yet.") else: send_message(chat_id, "Unknown command. Send /start for help.") time.sleep(0.3) App.run(user_loop=loop)

빠른 단계

  • YOUR_TELEGRAM_BOT_TOKEN을 BotFather에서 실제 봇 토큰으로 바꿉니다.
  • YOUR_CHAT_ID를 실제 Telegram 채팅 ID로 바꿉니다.
  • Python 코드를 앱의 Python 파일에 붙여넣습니다(동일한 MCU 스케치 유지).
  • Run 버튼을 클릭합니다 — Telegram에서 /send Hello를 전송하여 RS232를 통해 데이터를 전송합니다.

App Lab 콘솔 출력

DIYables_Apps
Stop
sketch.ino
1#include "Arduino_RouterBridge.h"
Serial Monitor
Python
[2026-04-29 09:10:05] Received: /send Hello RS232 device! [2026-04-29 09:10:09] Received: /read
Telegram
Telegram 12:45
Welcome to Telegram!
ArduinoBot 10:19
Chatting with Arduino...
telegram-botfather
BotFather Yesterday
Your bot has been created.

ArduinoBot

bot
Today
/send Hello RS232 device!
10:15 AM ✓✓
Sent via RS232: Hello RS232 device!
10:16 AM
/read
10:17 AM ✓✓
Received via RS232: Hello RS232 device!
10:18 AM

OpenClaw

You can adapt the OpenClaw to this tutorial by refering the instruction on 아두이노 우노 Q - OpenClaw Tutorial

프로젝트 아이디어

Arduino UNO Q를 사용한 RS232 통신으로 많은 유용한 프로젝트를 만들 수 있습니다:

  • 산업용 PLC 게이트웨이: Arduino UNO Q를 PLC 또는 산업용 컨트롤러에 RS232를 통해 연결하세요. Python은 받은 상태 메시지를 Telegram으로 전달하여 휴대폰에서 공장 장비를 모니터링할 수 있습니다
  • 바코드 스캐너 통합: RS232 바코드 스캐너를 TTL-to-RS232 모듈에 연결하세요. 바코드가 스캔되면 MCU는 SoftwareSerial을 통해 데이터를 읽고 Python은 로깅을 위해 Telegram으로 전송합니다
  • 레거시 시리얼 프린터 제어: Telegram에서 Bridge를 통해 인쇄 명령을 MCU로 전송하면, MCU는 RS232를 통해 레거시 시리얼 프린터 또는 디스플레이 터미널로 명령을 전달합니다 — 최신 무선 제어를 구형 시리얼 하드웨어와 연결합니다
  • RS232 출력이 있는 GPS: RS232 출력 GPS 수신기를 모듈에 연결하세요. MCU는 NMEA 문장을 읽고, Python은 데이터를 파싱하며, Telegram은 요청 시 위치 업데이트를 전송합니다
  • 원격 시리얼 진단: 임베디드 장치의 RS232 디버그 출력을 Bridge를 통해 Telegram으로 전달하세요 — 시리얼 터미널에 물리적으로 접근하지 않고 원격 장치를 모니터링하는 데 유용합니다

자신을 도전해보세요

Arduino UNO Q에서 RS232를 더 깊이 학습할 준비가 되었나요? 이 도전에 시도해보세요:

  • 쉬움: MCU 스케치를 수정하여 수신된 바이트를 누적하여 개행 문자가 감지될 때까지 모으세요. 그 후 get_received를 통해 완전한 줄을 단일 문자열로 노출하세요 — 데이터가 청크로 도착할 때 부분 읽기를 방지합니다.
  • 중간: 양방향 중계를 만들세요: Python은 센서 Bridge 함수에서 온도를 읽고 상태 문자열을 포맷한 후, send_rs232를 통해 30초마다 전송하고 동시에 get_received로 RS232 응답을 읽습니다 — Telegram 알림으로 전달합니다.
  • 어려움: 메시지 큐를 구현하세요: Python은 나가는 RS232 메시지 목록을 유지하고 send_rs232를 통해 초당 하나씩 전송하며, get_received로 모든 응답을 수집합니다. 각 배치 후에 전송된 메시지 수와 받은 응답을 보여주는 Telegram 요약을 전송합니다.