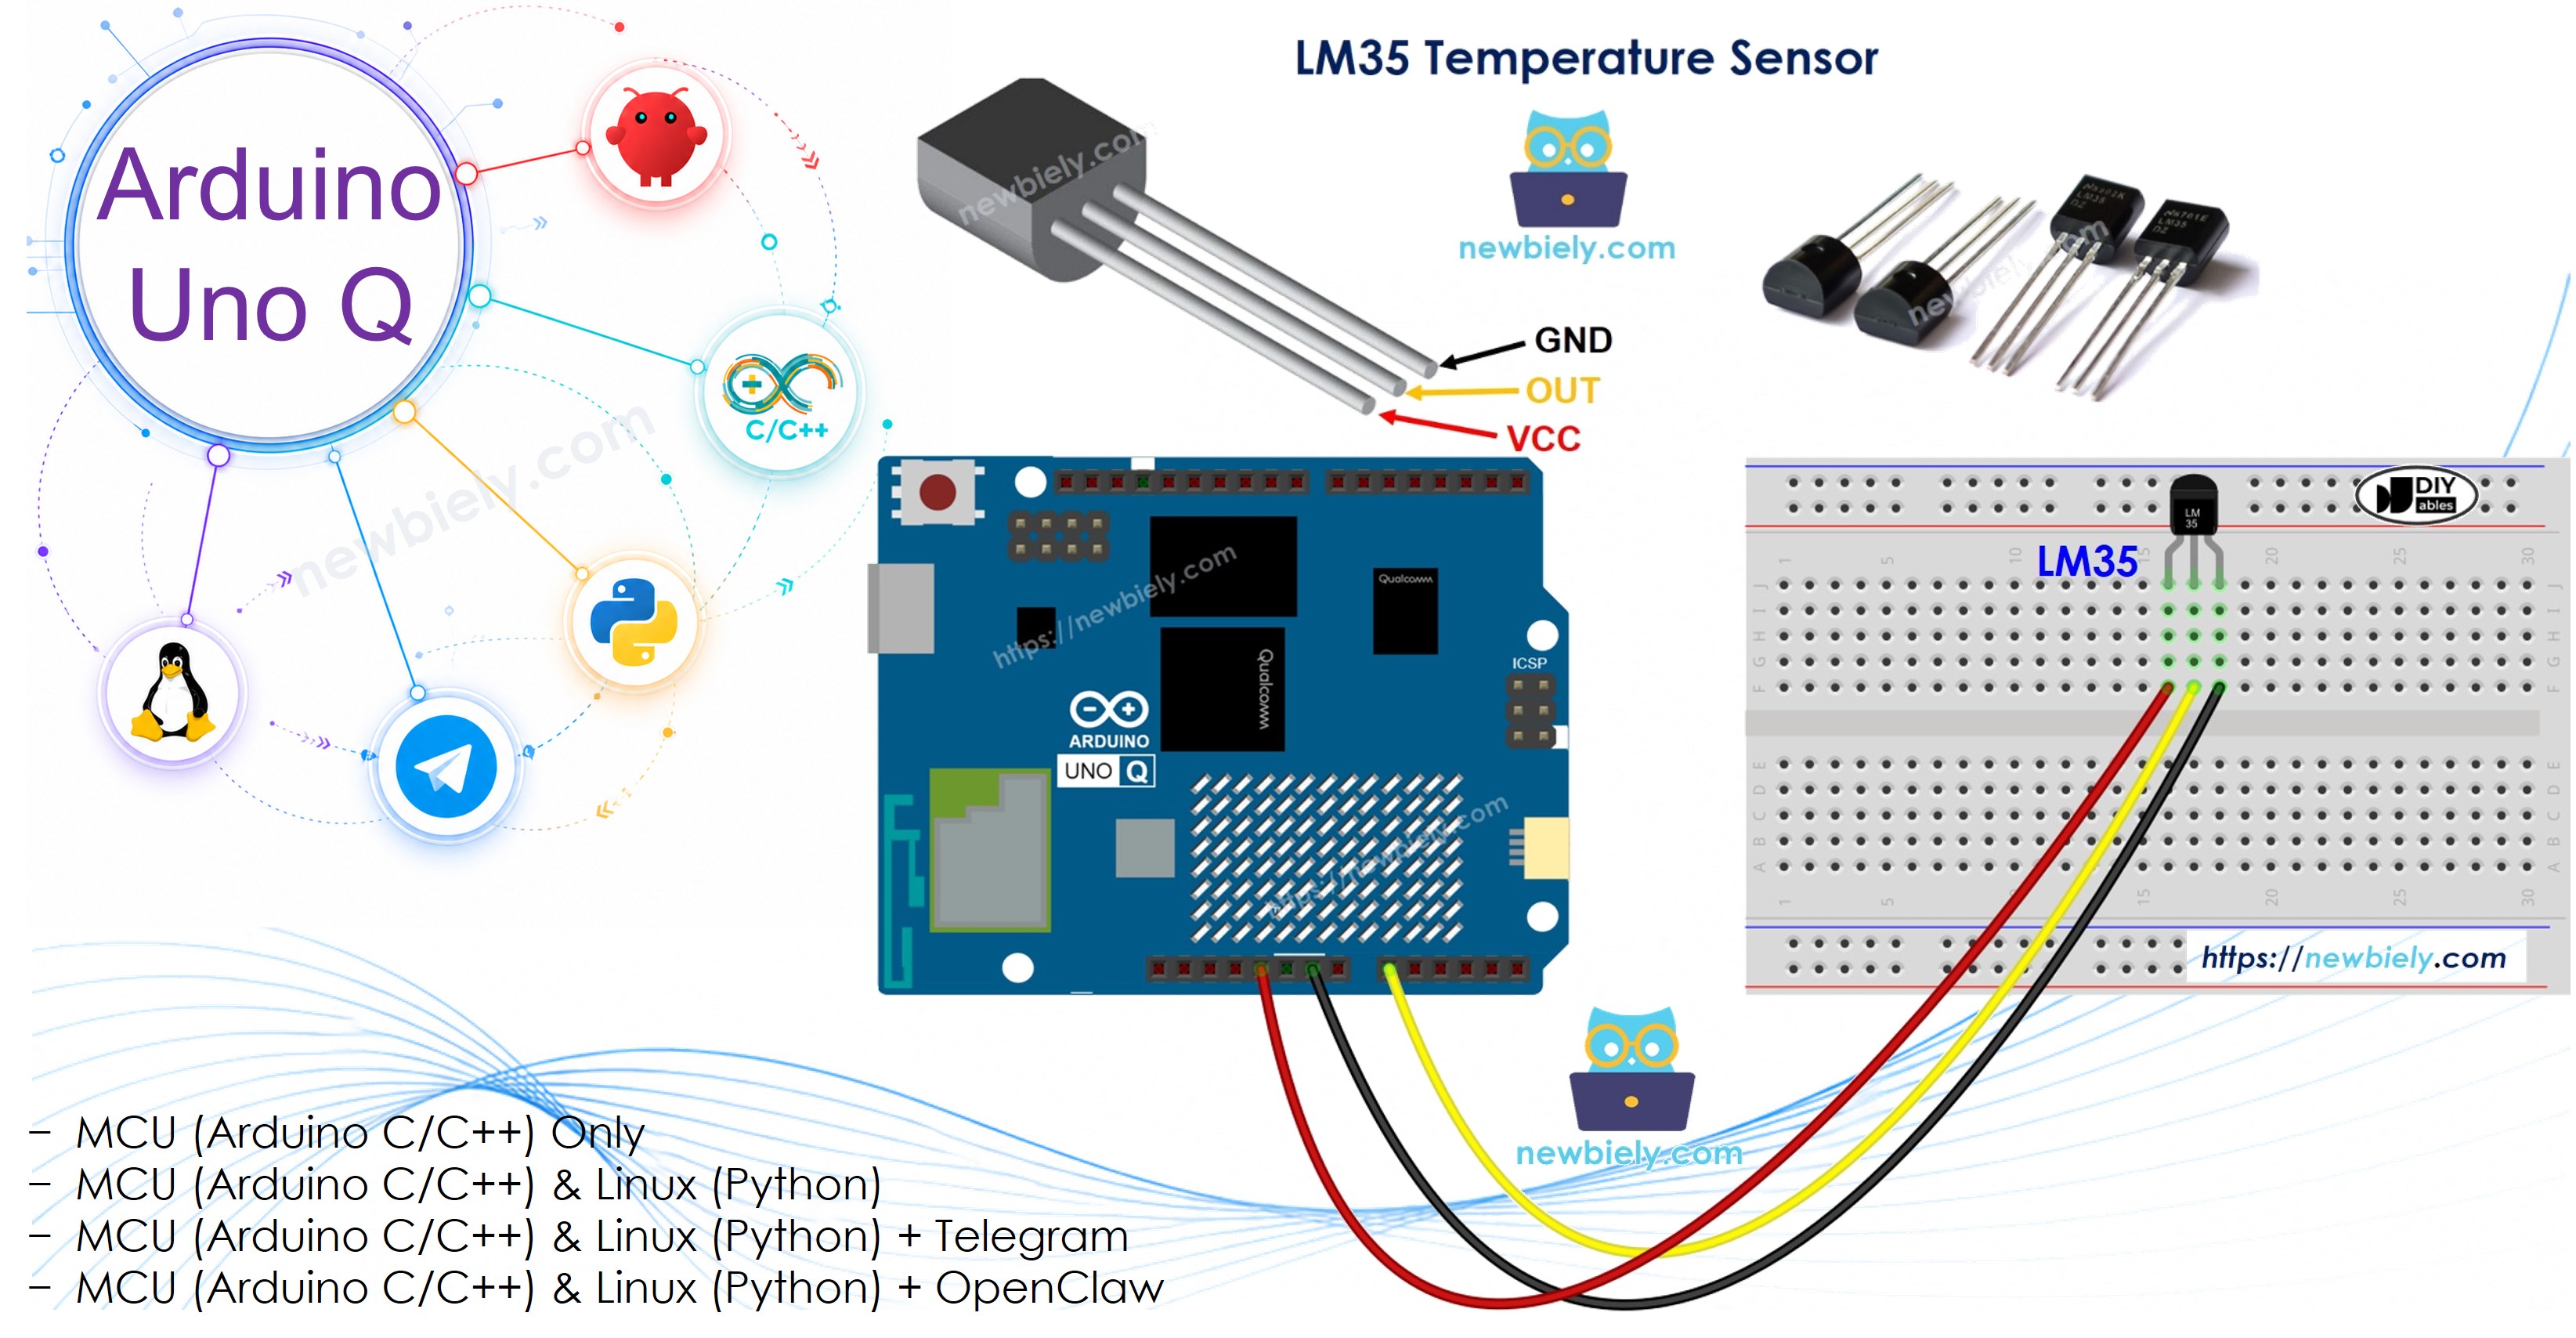
LM35는 온도에 비례하는 전압을 출력하는 간단한 아날로그 온도 센서입니다. Arduino UNO Q에서 MCU의 12비트 ADC는 표준 10비트 보드보다 더 높은 정밀도를 제공합니다. 이 튜토리얼은 LM35를 배선하고 프로그래밍하는 방법을 보여주며, Telegram을 통해 원격으로 모니터링하는 방법도 소개합니다.
이 튜토리얼에서 배우는 내용:
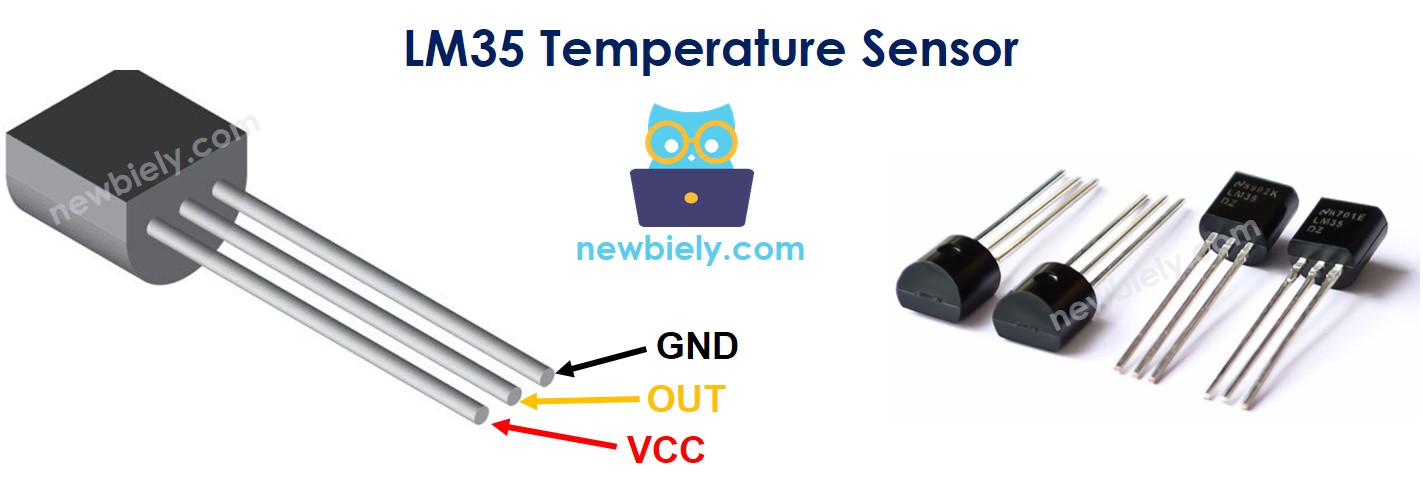
LM35 온도 센서가 무엇이고 어떻게 작동하는지
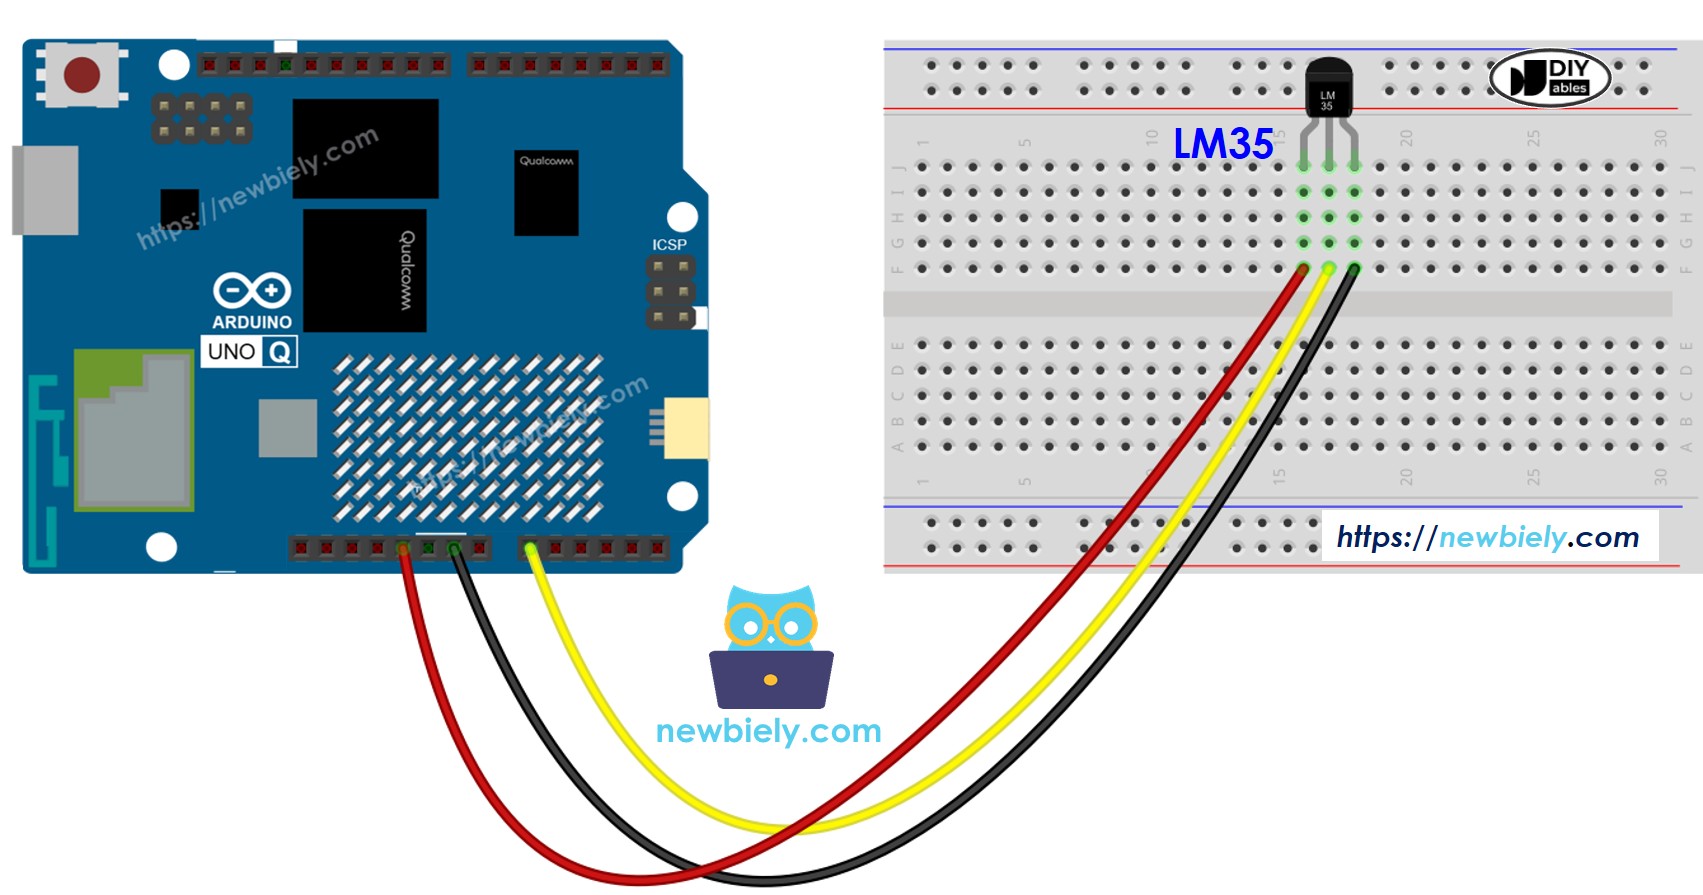
LM35를 Arduino UNO Q MCU 아날로그 핀에 배선하는 방법
MCU를 프로그래밍하는 방법 (C/C++ Arduino 코드)로 12비트 ADC를 사용하여 LM35에서 온도를 읽는 방법
Linux 측 (Python)과 MCU 측 (C/C++)을 모두 프로그래밍하여 Bridge를 통해 LM35 데이터를 읽는 방법
Arduino UNO Q에서 온도가 임계값을 초과할 때 Telegram 알림을 수신하는 방법
LM35 VCC를 5V 핀에 연결하세요. 3.3V가 아닙니다 — LM35는 작동하려면 최소 4V가 필요합니다. 아날로그 출력은 여전히 MCU의 3.3V ADC 범위 내에 있습니다.
LM35을 위한 프로그래밍 방법
아날로그 핀에서 ADC 값 읽기:
int adcVal = analogRead(PIN_LM35);
ADC 값을 밀리볼트로 변환 (3.3V 기준 및 12비트 해상도 사용):
float milliVolt = adcVal * (ADC_VREF_mV / ADC_RESOLUTION);// ADC_VREF_mV = 3300.0 (3.3V reference on UNO Q MCU)// ADC_RESOLUTION = 4096.0 (12-bit ADC on UNO Q MCU)
밀리볼트를 섭씨로 변환:
float tempC = milliVolt / 10;
섭씨를 화씨로 변환:
float tempF = tempC * 9.0 / 5.0 + 32.0;
Arduino UNO Q 코드
Arduino UNO Q는 함께 작동하는 두 개의 프로세서를 가지고 있습니다:
STM32 MCU는 12비트 ADC를 통해 LM35 아날로그 출력을 직접 읽습니다 — 모든 센서 읽기 및 변환은 MCU에서 실행됩니다
Qualcomm MPU는 Debian Linux를 실행하고 Wi-Fi, Python, 클라우드 연결을 처리합니다
이 섹션에서는 MCU만 프로그래밍됩니다 — Linux 측은 유휴 상태입니다. 이후 섹션에서 두 프로세서가 Bridge를 통해 함께 작동하는 방식을 보여줍니다.
MCU는 매초 LM35을 읽고 온도를 Serial Monitor에 출력합니다.
/* * 이 Arduino UNO Q 코드는 newbiely.kr 에서 개발되었습니다 * 이 Arduino UNO Q 코드는 어떠한 제한 없이 공개 사용을 위해 제공됩니다. * 상세한 지침 및 연결도에 대해서는 다음을 방문하세요: * https://newbiely.kr/tutorials/arduino-uno-q/arduino-uno-q-lm35-temperature-sensor */// Arduino UNO Q MCU (STM32U585) uses a 12-bit ADC (0–4095) with a 3.3V reference#define ADC_VREF_mV 3300.0 // MCU reference voltage in millivolts#define ADC_RESOLUTION 4096.0 // 12-bit ADC resolution#define PIN_LM35 A0 // Analog pin connected to LM35 OUT pinvoidsetup() {Serial.begin(115200);delay(1500);Serial.println("Arduino UNO Q LM35 Temperature Sensor ready");}voidloop() {int adcVal = analogRead(PIN_LM35);float milliVolt = adcVal * (ADC_VREF_mV / ADC_RESOLUTION);float tempC = milliVolt / 10;float tempF = tempC * 9.0 / 5.0 + 32.0;Serial.print("Temperature: ");Serial.print(tempC);Serial.print("°C = ");Serial.print(tempF);Serial.println("°F");delay(1000);}
빠른 단계
Arduino UNO Q를 처음 사용하나요? 계속하기 전에 아두이노 우노 Q 시작하기 튜토리얼을 따르세요.
연결: 배선 다이어그램에 표시된 대로 LM35 센서를 Arduino UNO Q MCU에 배선합니다.
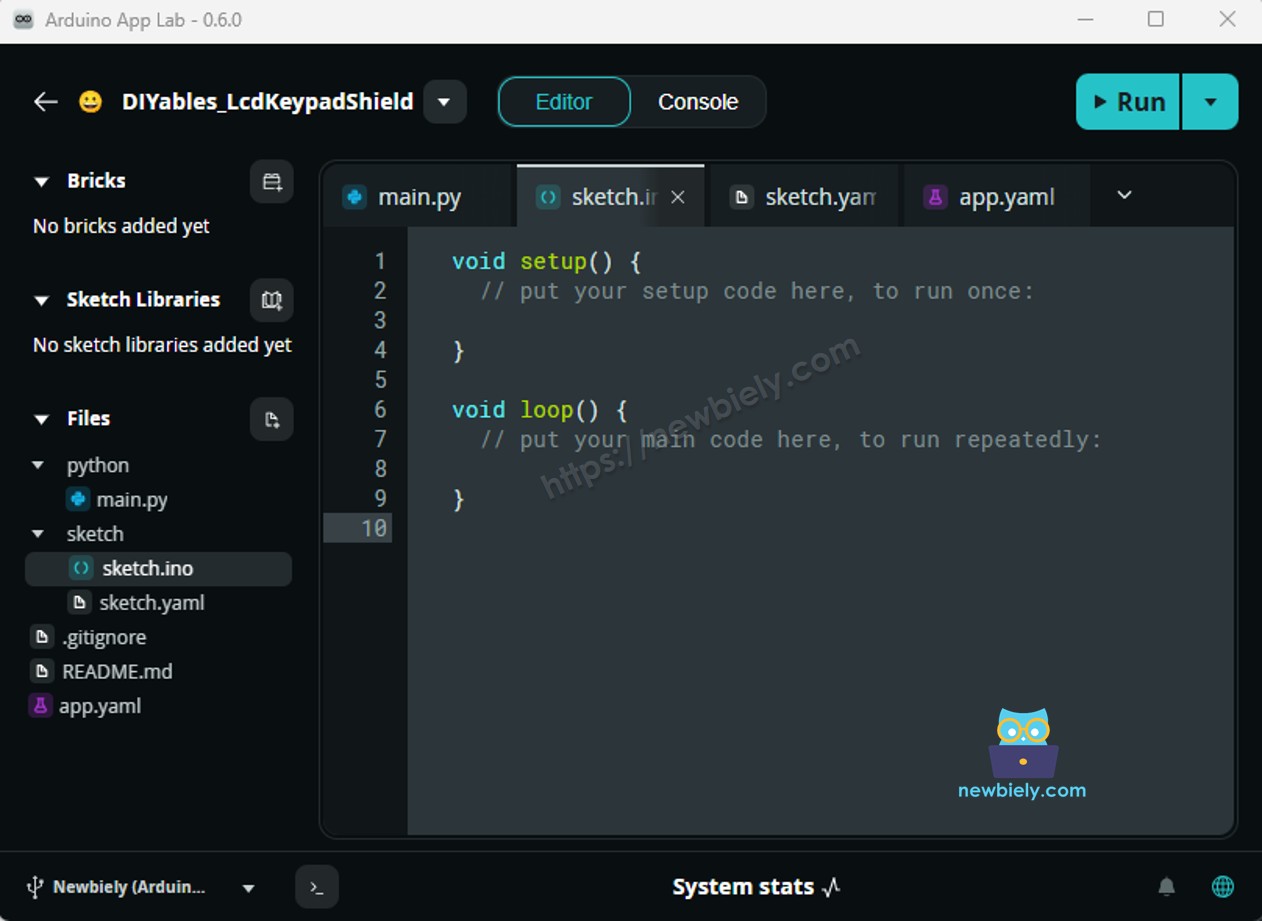
Arduino App Lab 열기: Arduino App Lab을 실행하고 Arduino UNO Q를 감지할 때까지 대기합니다.
새 앱 만들기:Create New App 버튼을 클릭합니다.
앱에 이름을 지정합니다 (예: Lm35TemperatureSensor).
Create를 클릭하여 확인합니다.
스케치 붙여넣기: 위의 MCU 코드를 복사하여 sketch/sketch.ino에 붙여넣습니다. 다른 파일은 기본값으로 유지합니다.
라이브러리 불필요 — LM35은 내장된 analogRead() 함수만 사용합니다.
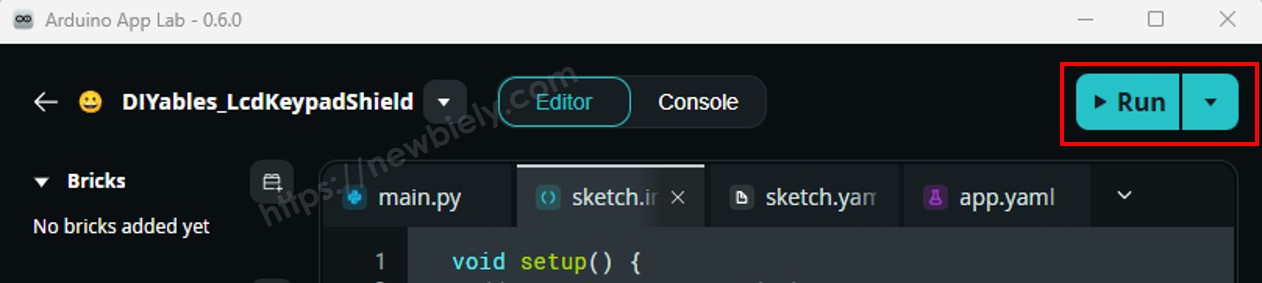
업로드: Arduino App Lab에서 Run 버튼을 클릭합니다.
센서를 손에 들고 있으세요 — 콘솔에서 온도가 올라가는 것을 지켜보세요.
App Lab 콘솔 출력
DIYables_Apps
Stop
sketch.ino
1#include"Arduino_RouterBridge.h"
Serial Monitor
Python
Message (Enter to send a message to "Newbiely" on usb(2820070321))
이 섹션에서는 Arduino UNO Q의 두 프로세서를 모두 프로그래밍하여 Linux 측에서 Bridge를 통해 LM35 온도를 읽는 방법을 보여줍니다:
LM35 센서는 MCU (STM32) 아날로그 핀에 연결되어 있으며 — MCU는 매초 ADC 값을 읽고 변환합니다
MPU는 아날로그 핀에 직접 접근할 수 없습니다 — Bridge 함수를 호출하여 읽기를 검색해야 합니다
MPU에는 Wi-Fi가 있습니다 — 전체 Debian Linux를 실행하면서 데이터를 기록하고, 대시보드에 게시하거나, 인터넷을 통해 알림을 보낼 수 있습니다
Arduino_RouterBridge는 두 프로세서 간 RPC 통신을 활성화합니다
⚠️ /dev/ttyHS1 (Linux)과 Serial1 (MCU)은 라우터에 예약됨 — 사용자 코드에서 이들을 열지 마세요
요약하면: MCU는 12비트 ADC를 통해 매초 LM35을 읽음 → MPU는 Bridge를 통해 온도를 읽음 → MPU는 Wi-Fi를 통해 게시하거나 알림을 보냄
MCU 코드 (Bridge)
/* * 이 Arduino UNO Q 코드는 newbiely.kr 에서 개발되었습니다 * 이 Arduino UNO Q 코드는 어떠한 제한 없이 공개 사용을 위해 제공됩니다. * 상세한 지침 및 연결도에 대해서는 다음을 방문하세요: * https://newbiely.kr/tutorials/arduino-uno-q/arduino-uno-q-lm35-temperature-sensor */// Arduino UNO Q MCU (STM32U585) uses a 12-bit ADC (0–4095) with a 3.3V reference#include "Arduino_RouterBridge.h"#define ADC_VREF_mV 3300.0#define ADC_RESOLUTION 4096.0#define PIN_LM35 A0float last_temp_c = 0.0;float last_temp_f = 0.0;unsignedlong last_read_ms = 0;void read_lm35() {int adcVal = analogRead(PIN_LM35);float milliVolt = adcVal * (ADC_VREF_mV / ADC_RESOLUTION); last_temp_c = milliVolt / 10.0; last_temp_f = last_temp_c * 9.0 / 5.0 + 32.0;}String get_temp_c(String arg) {returnString(last_temp_c, 2);}String get_temp_f(String arg) {returnString(last_temp_f, 2);}String get_status(String arg) {return"Temp: " + String(last_temp_c, 2) + "°C / " + String(last_temp_f, 2) + "°F";}voidsetup() {Bridge.begin(); Monitor.begin(); read_lm35();Bridge.provide("get_temp_c", get_temp_c);Bridge.provide("get_temp_f", get_temp_f);Bridge.provide("get_status", get_status); Monitor.println("Arduino UNO Q LM35 Temperature Sensor Bridge ready");}voidloop() {unsignedlongnow = millis();if (now - last_read_ms >= 1000) { last_read_ms = now; read_lm35(); Monitor.println("Temp: " + String(last_temp_c, 2) + "°C / " + String(last_temp_f, 2) + "°F"); }}
Python 코드 (Bridge)
/* * 이 Arduino UNO Q 코드는 newbiely.kr 에서 개발되었습니다 * 이 Arduino UNO Q 코드는 어떠한 제한 없이 공개 사용을 위해 제공됩니다. * 상세한 지침 및 연결도에 대해서는 다음을 방문하세요: * https://newbiely.kr/tutorials/arduino-uno-q/arduino-uno-q-lm35-temperature-sensor */from arduino.app_utils import *import timedef loop(): temp_c = Bridge.call("get_temp_c") temp_f = Bridge.call("get_temp_f")print(f"Temperature: {temp_c}°C = {temp_f}°F") time.sleep(1)App.run(user_loop=loop)
빠른 단계
연결: 배선 다이어그램에 표시된 대로 LM35 센서를 Arduino UNO Q에 배선합니다.
새 앱 만들기:Create New App을 클릭하고, 이름을 Lm35TemperatureSensorBridge로 지정한 후, Create을 클릭합니다.
MCU 스케치 붙여넣기: 위의 MCU Bridge 코드를 복사하여 sketch/sketch.ino에 붙여넣습니다.
Python 코드 붙여넣기: 위의 Python Bridge 코드를 복사하여 앱의 Python 파일에 붙여넣습니다.
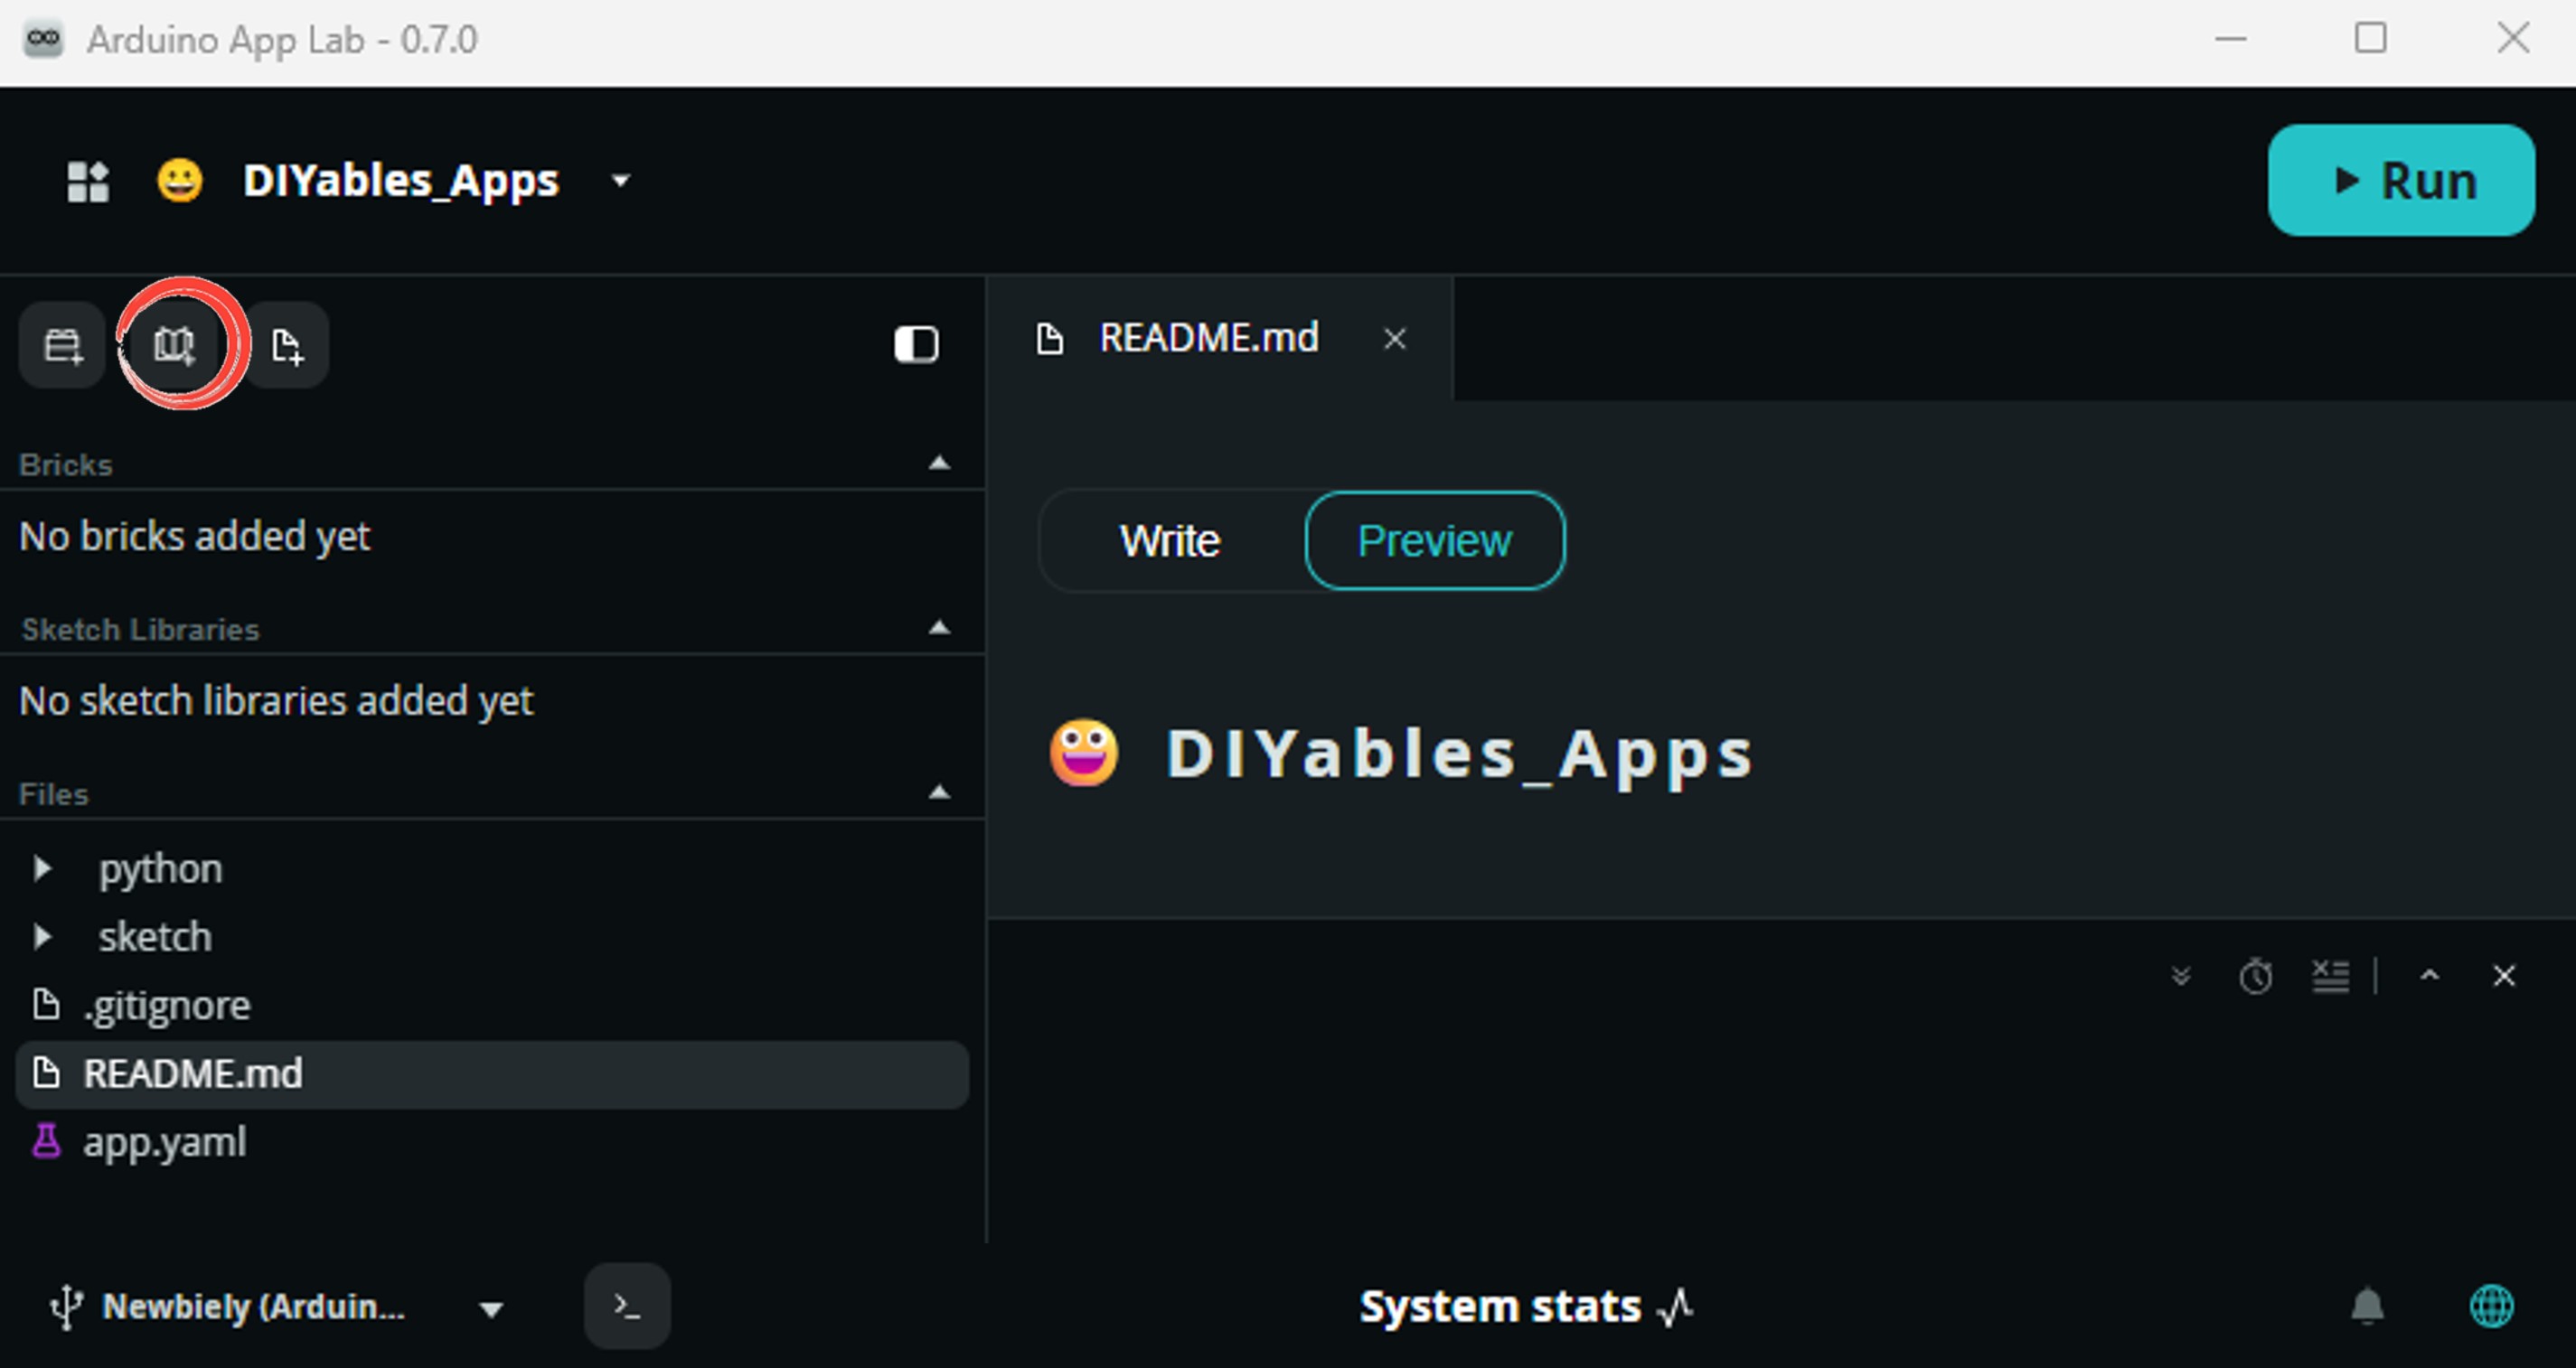
Install the library: Click the Add sketch library button (the open book icon with a + sign) in the left sidebar.
Search for Arduino_RouterBridge created by Arduino and click the Install button.
My Apps/DIYables Apps
Run
Bricks
No bricks added...
Sketch Libraries
No sketch libra...
Files
python
sketch
.gitignore
README.md
app.yaml
sketch.ino
Add sketch library
Arduino_RouterBridge
Arduino_RouterBridgeArduino
This library provides a simple RPC bridge for Arduino UNO Q boards, allowing communication between the board and other devices using MsgPack serialization.
0.4.1
Install
More Info
업로드: Arduino App Lab에서 Run 버튼을 클릭합니다.
Python 콘솔에서 매초 온도 읽기가 나타나는 것을 지켜보세요.
App Lab 콘솔 출력
DIYables_Apps
Stop
sketch.ino
1#include"Arduino_RouterBridge.h"
Serial Monitor
Python
Message (Enter to send a message to "Newbiely" on usb(2820070321))