ESP8266 웹을 통한 자동차 제어
이 튜토리얼은 WiFi를 사용하여 스마트폰이나 PC의 웹 브라우저로 ESP8266을 사용하여 로봇 자동차를 무선으로 제어하는 방법을 안내합니다. 제어는 WebSocket이라는 것을 사용하는 그래픽 웹 사용자 인터페이스를 통해 이루어지며, 차량의 원활하고 동적인 제어를 가능하게 합니다.
| 1 | × | ESP8266 NodeMCU | 쿠팡 | 아마존 | |
| 1 | × | USB 케이블 타입-A to 타입-C (USB-A PC용) | 쿠팡 | 아마존 | |
| 1 | × | USB 케이블 타입-C to 타입-C (USB-C PC용) | 아마존 | |
| 1 | × | 2WD RC Car | 쿠팡 | 아마존 | |
| 1 | × | L298N 모터 드라이버 모듈 | 쿠팡 | 아마존 | |
| 1 | × | IR 리모컨 키트 | 아마존 | |
| 1 | × | CR2025 배터리 (IR 리모컨용) | 아마존 | |
| 1 | × | 1.5V AA Battery (for ESP8266 and Car) | 아마존 | |
| 1 | × | 점퍼케이블 | 쿠팡 | 아마존 | |
| 1 | × | 브레드보드 | 쿠팡 | 아마존 | |
| 1 | × | (추천) ESP8266용 스크루 터미널 확장 보드 | 쿠팡 | 아마존 | |
| 1 | × | (추천) ESP8266 Type-C용 전원 분배기 | 쿠팡 | 아마존 | |
공개: 이 포스팅 에 제공된 일부 링크는 아마존 제휴 링크입니다. 이 포스팅은 쿠팡 파트너스 활동의 일환으로, 이에 따른 일정액의 수수료를 제공받습니다.
이제 왜 WebSocket을 선택해야 할까요? 여기 그 이유가 있습니다:
WebSocket 없이는 차의 방향을 바꾸기 위해 매번 페이지를 다시 로딩해야 합니다. 이상적이지 않죠!
하지만, WebSocket을 사용하면 웹페이지와 ESP8266 사이에 특별한 연결을 설정합니다. 이를 통해 페이지를 다시 로드할 필요 없이 ESP8266에 명령을 백그라운드에서 보낼 수 있습니다. 결과는? 로봇 자동차가 실시간으로 매끄럽게 움직입니다. 꽤 멋지죠?
한마디로, WebSocket 연결은 로봇의 원활하고 실시간 제어를 가능하게 합니다.
다음 링크에서 2WD RC 자동차와 WebSocket에 관한 구체적인 튜토리얼이 있습니다. 각 튜토리얼에는 하드웨어 핀 아웃, 작동 원리, ESP8266과의 배선 연결, ESP8266 코드 등에 대한 자세한 정보와 단계별 지침이 포함되어 있습니다. 다음 링크에서 더 자세히 알아보세요:
ESP8266 코드는 웹 서버와 WebSocket 서버 모두를 생성합니다. 작동 방식은 다음과 같습니다:
웹 브라우저에서 ESP8266의 IP 주소를 입력하면, 웹페이지(사용자 인터페이스)를 ESP8266로부터 요청합니다.
ESP8266의 웹 서버는 웹페이지의 내용(HTML, CSS, JavaScript)을 보내며 응답합니다.
그러면 웹 브라우저가 웹페이지를 표시합니다.
웹페이지 내의 JavaScript 코드는 ESP8266 상의 WebSocket 서버에 WebSocket 연결을 설정합니다.
이 WebSocket 연결이 설정되면, 웹페이지 상의 버튼을 누르거나 떼면 JavaScript 코드가 이 WebSocket 연결을 통해 명령을 ESP8266으로 조용히 보냅니다.
ESP8266 상의 WebSocket 서버는 명령을 받으면 해당 명령에 따라 로봇 자동차를 제어합니다.
아래 표는 사용자의 조작에 따라 웹페이지가 ESP8266에 보내는 명령어 목록을 보여줍니다:
| User's Action | Button | Command | Car Action |
|---|
| PRESS | UP | 1 | MOVE FORWARD |
| PRESS | DOWN | 2 | MOVE BACKWARD |
| PRESS | LEFT | 4 | TURN LEFT |
| PRESS | RIGHT | 8 | TURN RIGHT |
| PRESS | STOP | 0 | STOP |
| RELEASE | UP | 0 | STOP |
| RELEASE | DOWN | 0 | STOP |
| RELEASE | LEFT | 0 | STOP |
| RELEASE | RIGHT | 0 | STOP |
| RELEASE | STOP | 0 | STOP |
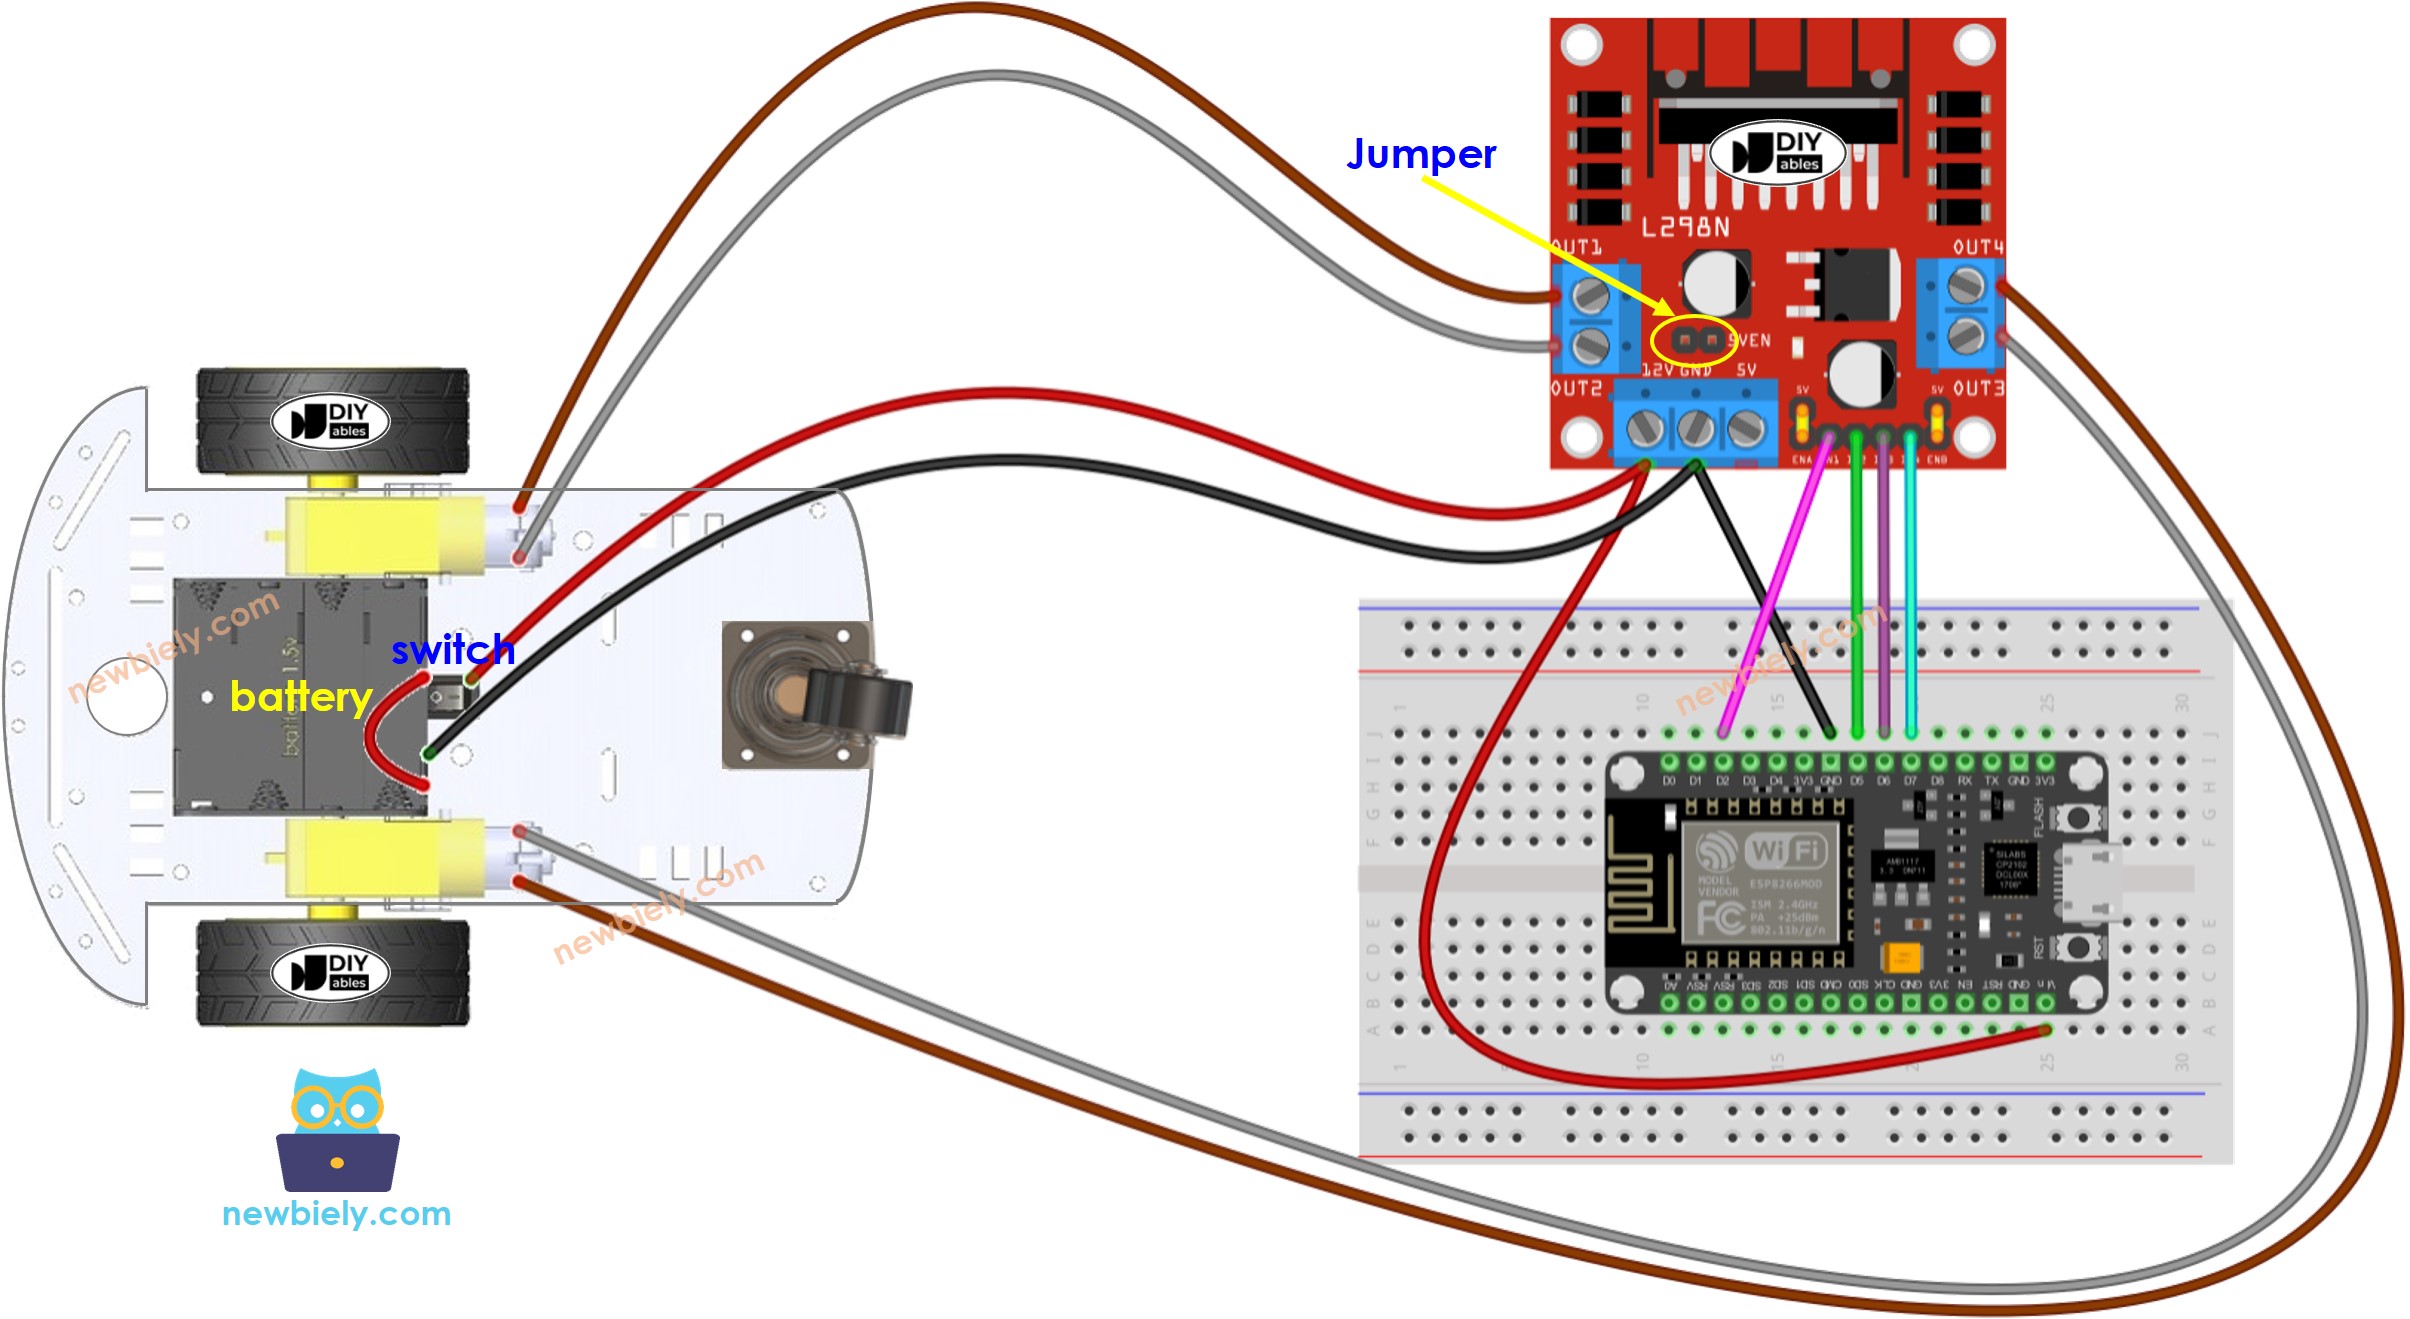
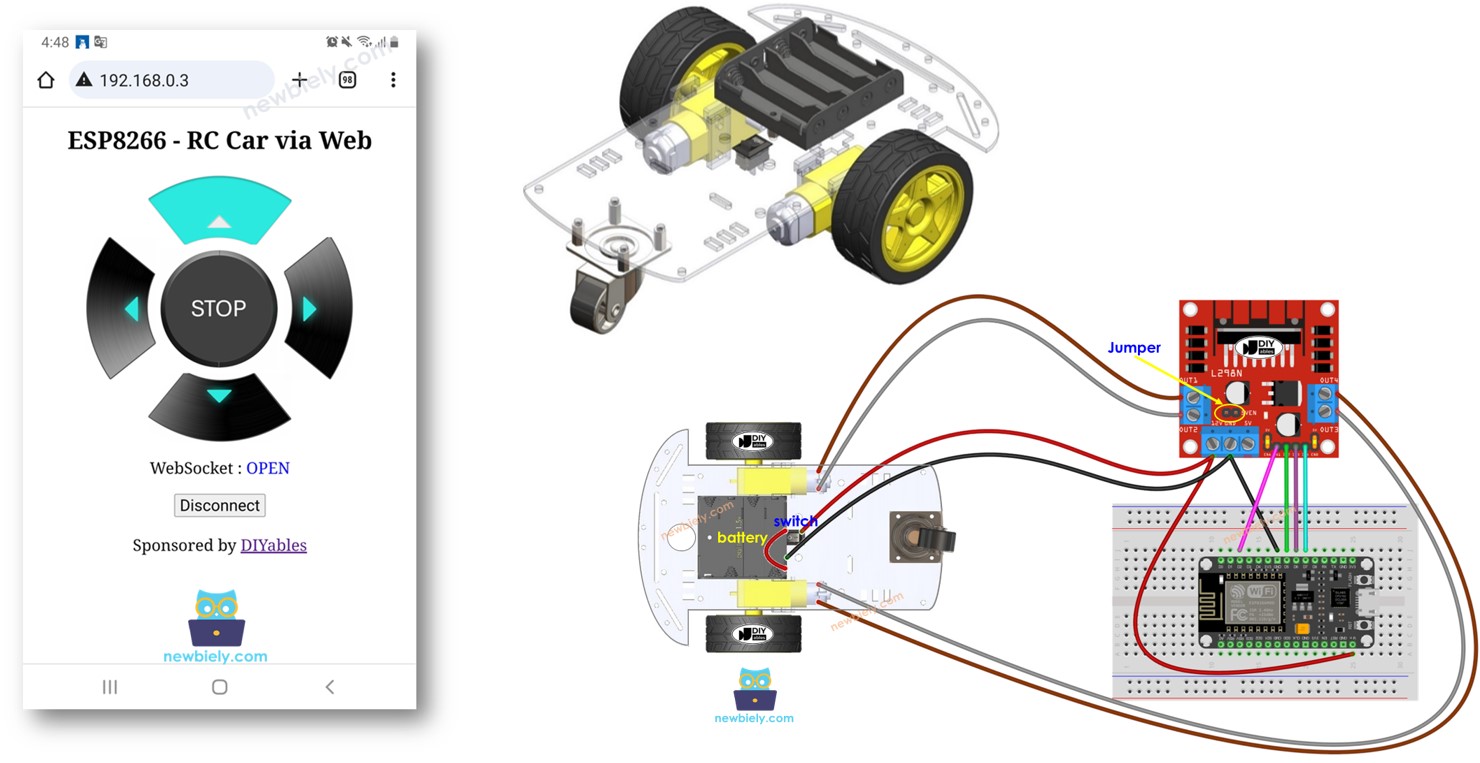
이 이미지는 Fritzing을 사용하여 만들어졌습니다. 이미지를 확대하려면 클릭하세요.
ESP8266 핀배열 및 ESP8266 전원을 켜는 방법에 대해 더 많이 보십시오.
일반적으로 두 개의 전원이 필요합니다:
하지만, 모든 것에 하나의 전원원만 사용하여 단순화할 수 있습니다 - 1.5V짜리 배터리 4개로 총 6V입니다. 방법은 다음과 같습니다:
아래와 같이 배터리를 L298N 모듈에 연결하십시오.
ENA 및 ENB 핀에서 L298N 모듈의 5볼트에 이르기까지 두 개의 점퍼를 배치하십시오.
다이어그램에 노란색 원으로 표시된 5VEN이라고 라벨이 붙은 점퍼를 제거하십시오.
위 다이어그램과 같이 나머지 배선을 하십시오.
2WD RC 자동차에는 온/오프 스위치가 있으므로, 스위치를 통해 배터리를 연결하여 자동차의 전원을 켜고 끌 수 있습니다. 간단하게 하고 싶다면 스위치를 무시하면 됩니다.
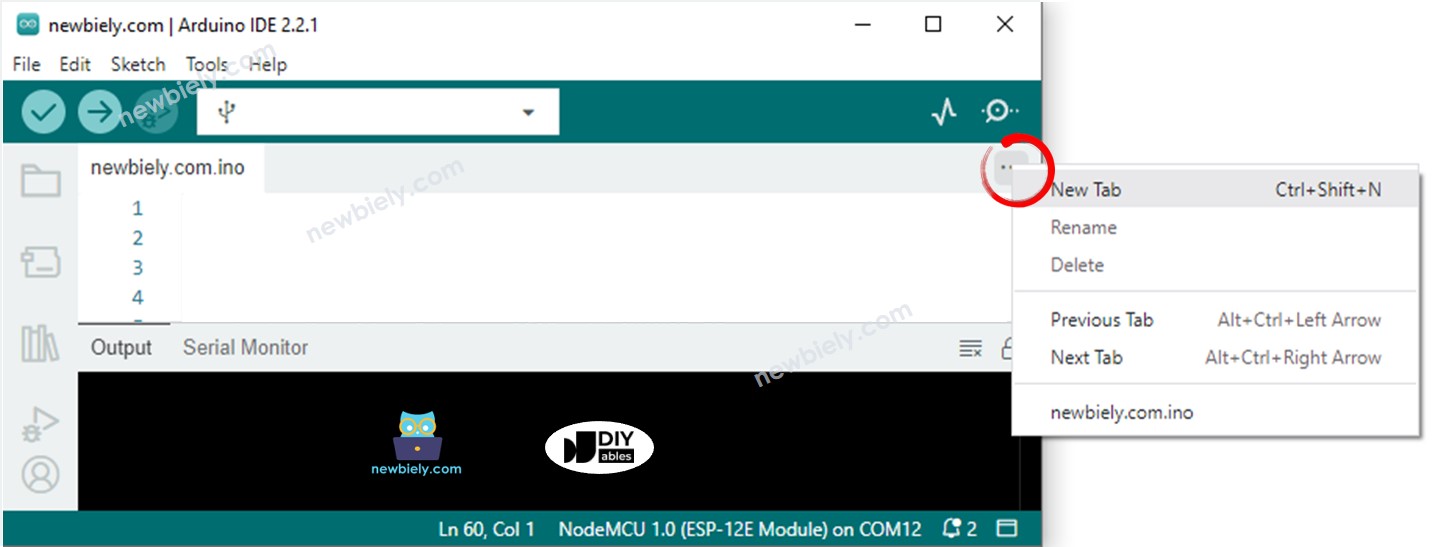
웹페이지의 콘텐츠(HTML, CSS, JavaScript)는 index.h 파일에 별도로 저장됩니다. 그래서 우리는 Arduino IDE에 두 개의 코드 파일을 가지게 됩니다:
Arduino IDE에서 ESP8266을 시작하는 방법은 다음과 같습니다:
다이어그램에 표시된 대로 구성 요소를 연결하세요.
USB 케이블을 사용하여 ESP8266 보드를 컴퓨터에 연결하세요.
컴퓨터에서 Arduino IDE를 엽니다.
올바른 ESP8266 보드(예: NodeMCU 1.0 (ESP-12E Module))와 해당 COM 포트를 선택하세요.
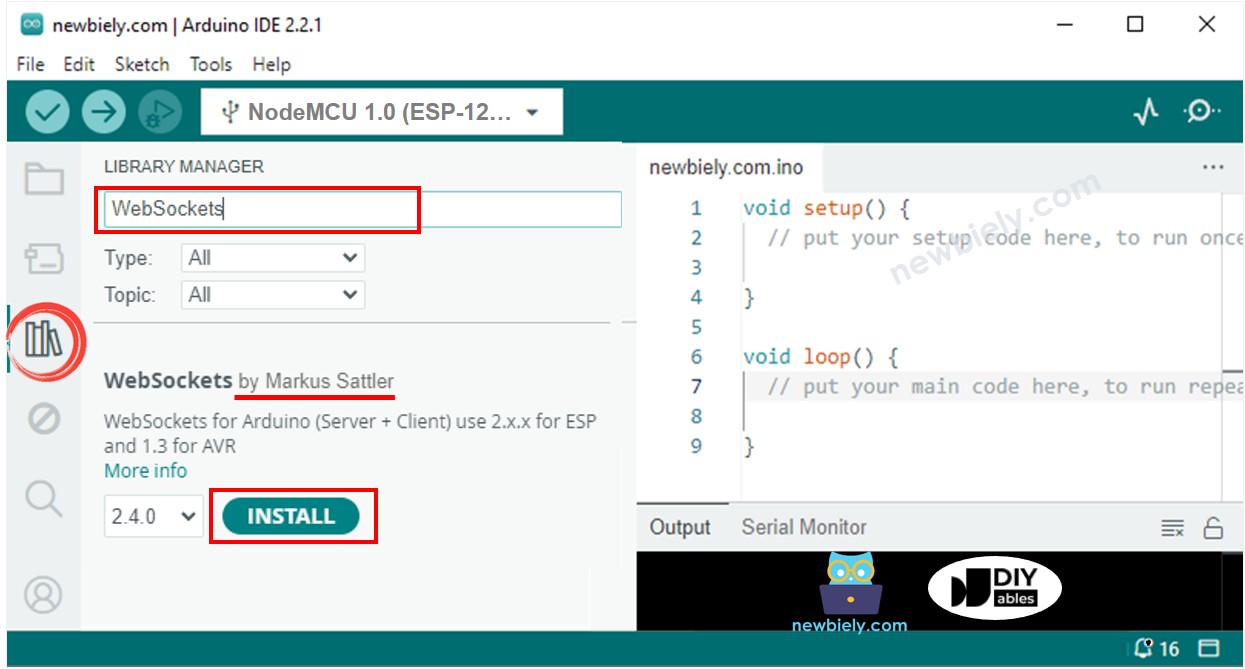
Arduino IDE의 왼쪽 탐색 바에 있는 Library Manager 아이콘을 클릭하여 라이브러리 관리자를 엽니다.
“WebSockets”을 검색한 다음, Markus Sattler이 만든 WebSockets를 찾습니다.
Install 버튼을 클릭하여 WebSockets 라이브러리를 설치하세요.
#include <ESP8266WiFi.h>
#include <ESP8266WebServer.h>
#include "index.h"
#define CMD_STOP 0
#define CMD_FORWARD 1
#define CMD_BACKWARD 2
#define CMD_LEFT 4
#define CMD_RIGHT 8
#define IN1_PIN D2
#define IN2_PIN D5
#define IN3_PIN D6
#define IN4_PIN D7
const char* ssid = "YOUR_WIFI_SSID";
const char* password = "YOUR_WIFI_PASSWORD";
ESP8266WebServer server(80);
DIYables_ESP32_WebSocket* webSocket;
void webSocketEvent(uint8_t num, WStype_t type, uint8_t* payload, size_t length) {
switch (type) {
case WStype_DISCONNECTED:
Serial.printf("[%u] Disconnected!\n", num);
break;
case WStype_CONNECTED:
{
IPAddress ip = webSocket.remoteIP(num);
Serial.printf("[%u] Connected from %d.%d.%d.%d\n", num, ip[0], ip[1], ip[2], ip[3]);
}
break;
case WStype_TEXT:
String angle = String((char*)payload);
int command = angle.toInt();
Serial.print("command: ");
Serial.println(command);
switch (command) {
case CMD_STOP:
Serial.println("Stop");
CAR_stop();
break;
case CMD_FORWARD:
Serial.println("Move Forward");
CAR_moveForward();
break;
case CMD_BACKWARD:
Serial.println("Move Backward");
CAR_moveBackward();
break;
case CMD_LEFT:
Serial.println("Turn Left");
CAR_turnLeft();
break;
case CMD_RIGHT:
Serial.println("Turn Right");
CAR_turnRight();
break;
default:
Serial.println("Unknown command");
}
break;
}
}
void setup() {
Serial.begin(9600);
pinMode(IN1_PIN, OUTPUT);
pinMode(IN2_PIN, OUTPUT);
pinMode(IN3_PIN, OUTPUT);
pinMode(IN4_PIN, OUTPUT);
WiFi.begin(ssid, password);
while (WiFi.status() != WL_CONNECTED) {
delay(1000);
Serial.println("Connecting to WiFi...");
}
Serial.println("Connected to WiFi");
webSocket.begin();
webSocket.onEvent(webSocketEvent);
server.on("/", HTTP_GET, []() {
Serial.println("Web Server: received a web page request");
String html = HTML_CONTENT;
server.send(200, "text/html", html);
});
server.begin();
Serial.print("ESP8266 Web Server's IP address: ");
Serial.println(WiFi.localIP());
}
void loop() {
server.handleClient();
webSocket.loop();
}
void CAR_moveForward() {
digitalWrite(IN1_PIN, HIGH);
digitalWrite(IN2_PIN, LOW);
digitalWrite(IN3_PIN, HIGH);
digitalWrite(IN4_PIN, LOW);
}
void CAR_moveBackward() {
digitalWrite(IN1_PIN, LOW);
digitalWrite(IN2_PIN, HIGH);
digitalWrite(IN3_PIN, LOW);
digitalWrite(IN4_PIN, HIGH);
}
void CAR_turnLeft() {
digitalWrite(IN1_PIN, HIGH);
digitalWrite(IN2_PIN, LOW);
digitalWrite(IN3_PIN, LOW);
digitalWrite(IN4_PIN, LOW);
}
void CAR_turnRight() {
digitalWrite(IN1_PIN, LOW);
digitalWrite(IN2_PIN, LOW);
digitalWrite(IN3_PIN, HIGH);
digitalWrite(IN4_PIN, LOW);
}
void CAR_stop() {
digitalWrite(IN1_PIN, LOW);
digitalWrite(IN2_PIN, LOW);
digitalWrite(IN3_PIN, LOW);
digitalWrite(IN4_PIN, LOW);
}
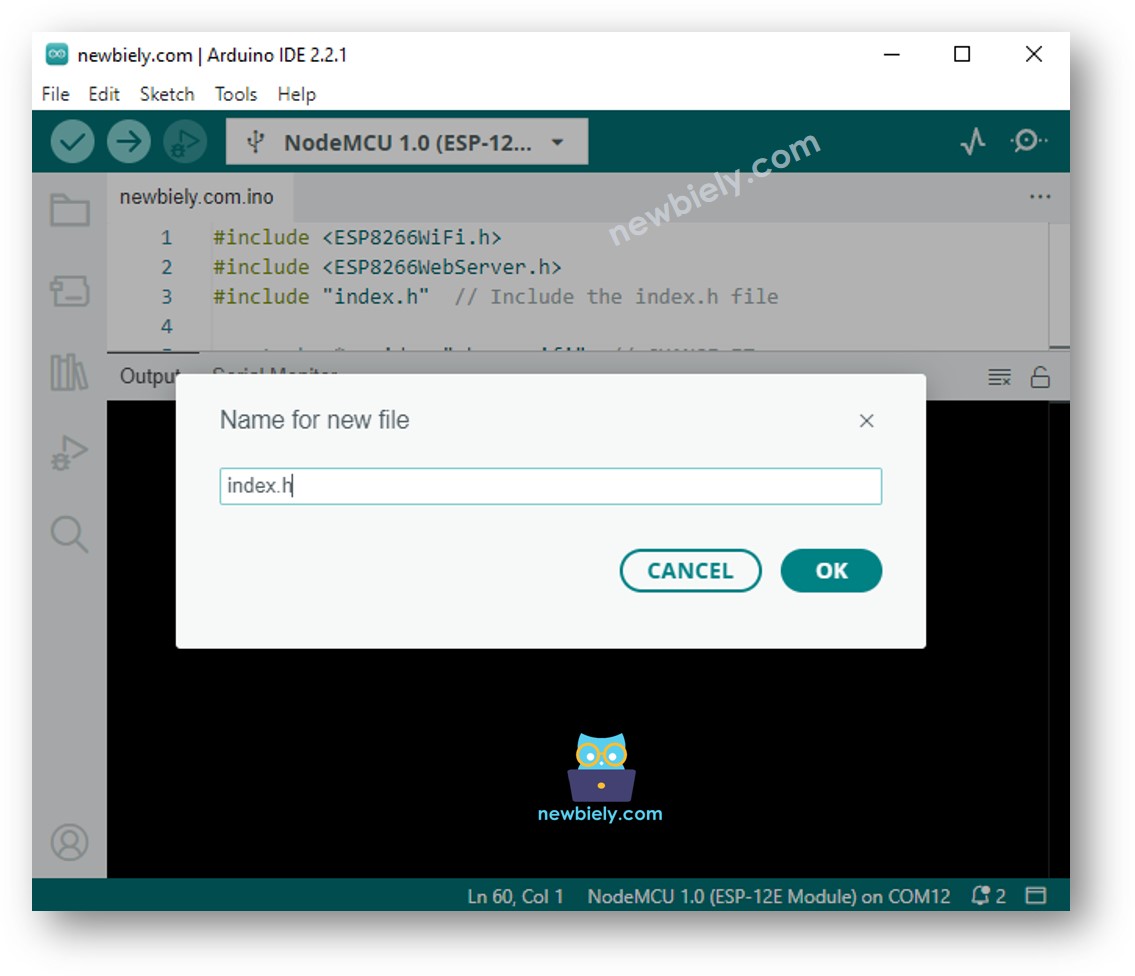
Arduino IDE에서 index.h 파일을 생성하는 방법:
파일 이름을 index.h로 지정하고 OK 버튼을 클릭하세요.
아래 코드를 복사하여 index.h에 붙여넣으세요.
const char *HTML_CONTENT = R"=====(
<!DOCTYPE html>
<html>
<head>
<title>ESP8266 Control Car via Web</title>
<meta name="viewport" content="width=device-width, initial-scale=0.7, maximum-scale=1, user-scalable=no">
<style type="text/css">
body { text-align: center; font-size: 24px;}
button { text-align: center; font-size: 24px;}
#container {
margin-right: auto;
margin-left: auto;
width: 400px;
height: 400px;
position: relative;
margin-bottom: 10px;
}
div[class^='button'] { position: absolute; }
.button_up, .button_down { width:214px; height:104px;}
.button_left, .button_right { width:104px; height:214px;}
.button_stop { width:178px; height:178px;}
.button_up {
background: url('https://newbiely.com/images/tutorial/up_inactive.png') no-repeat;
background-size: contain;
left: 200px;
top: 0px;
transform: translateX(-50%);
}
.button_down {
background: url('https://newbiely.com/images/tutorial/down_inactive.png') no-repeat;
background-size: contain;
left:200px;
bottom: 0px;
transform: translateX(-50%);
}
.button_right {
background: url('https://newbiely.com/images/tutorial/right_inactive.png') no-repeat;
background-size: contain;
right: 0px;
top: 200px;
transform: translateY(-50%);
}
.button_left {
background: url('https://newbiely.com/images/tutorial/left_inactive.png') no-repeat;
background-size: contain;
left:0px;
top: 200px;
transform: translateY(-50%);
}
.button_stop {
background: url('https://newbiely.com/images/tutorial/stop_inactive.png') no-repeat;
background-size: contain;
left:200px;
top: 200px;
transform: translate(-50%, -50%);
}
</style>
<script>
var CMD_STOP = 0;
var CMD_FORWARD = 1;
var CMD_BACKWARD = 2;
var CMD_LEFT = 4;
var CMD_RIGHT = 8;
var img_name_lookup = {
[CMD_STOP]: "stop",
[CMD_FORWARD]: "up",
[CMD_BACKWARD]: "down",
[CMD_LEFT]: "left",
[CMD_RIGHT]: "right"
}
var ws = null;
function init()
{
var container = document.querySelector("#container");
container.addEventListener("touchstart", mouse_down);
container.addEventListener("touchend", mouse_up);
container.addEventListener("touchcancel", mouse_up);
container.addEventListener("mousedown", mouse_down);
container.addEventListener("mouseup", mouse_up);
container.addEventListener("mouseout", mouse_up);
}
function ws_onmessage(e_msg)
{
e_msg = e_msg || window.event;
}
function ws_onopen()
{
document.getElementById("ws_state").innerHTML = "OPEN";
document.getElementById("wc_conn").innerHTML = "Disconnect";
}
function ws_onclose()
{
document.getElementById("ws_state").innerHTML = "CLOSED";
document.getElementById("wc_conn").innerHTML = "Connect";
console.log("socket was closed");
ws.onopen = null;
ws.onclose = null;
ws.onmessage = null;
ws = null;
}
function wc_onclick()
{
if(ws == null)
{
ws = new WebSocket("ws:
document.getElementById("ws_state").innerHTML = "CONNECTING";
ws.onopen = ws_onopen;
ws.onclose = ws_onclose;
ws.onmessage = ws_onmessage;
}
else
ws.close();
}
function mouse_down(event)
{
if (event.target !== event.currentTarget)
{
var id = event.target.id;
send_command(id);
event.target.style.backgroundImage = "url('https://newbiely.com/images/tutorial/" + img_name_lookup[id] + "_active.png')";
}
event.stopPropagation();
event.preventDefault();
}
function mouse_up(event)
{
if (event.target !== event.currentTarget)
{
var id = event.target.id;
send_command(CMD_STOP);
event.target.style.backgroundImage = "url('https://newbiely.com/images/tutorial/" + img_name_lookup[id] + "_inactive.png')";
}
event.stopPropagation();
event.preventDefault();
}
function send_command(cmd)
{
if(ws != null)
if(ws.readyState == 1)
ws.send(cmd + "\r\n");
}
window.onload = init;
</script>
</head>
<body>
<h2>ESP8266 - RC Car via Web</h2>
<div id="container">
<div id="0" class="button_stop"></div>
<div id="1" class="button_up"></div>
<div id="2" class="button_down"></div>
<div id="8" class="button_right"></div>
<div id="4" class="button_left"></div>
</div>
<p>
WebSocket : <span id="ws_state" style="color:blue">closed</span><br>
</p>
<button id="wc_conn" type="button" onclick="wc_onclick();">Connect</button>
<br>
<br>
<div class="sponsor">Sponsored by <a href="https://amazon.com/diyables">DIYables</a></div>
</body>
</html>
)=====";
Connecting to WiFi...
Connected to WiFi
ESP8266 Web Server's IP address IP address: 192.168.0.5
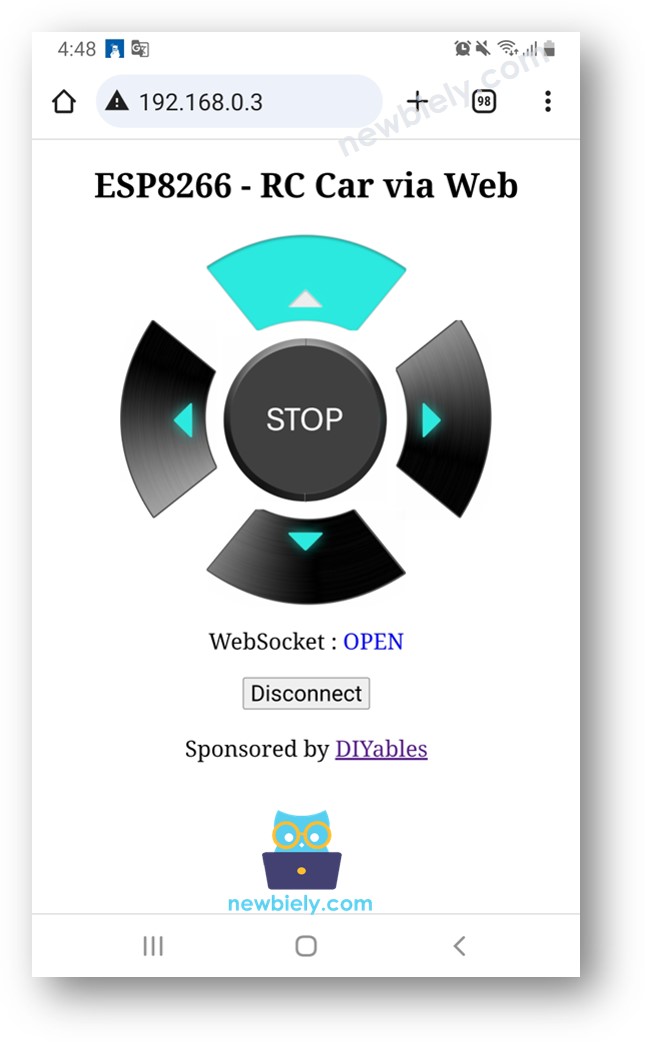
웹페이지의 자바스크립트 코드가 자동으로 ESP8266에 WebSocket 연결을 생성합니다.
이제 웹 인터페이스를 통해 차량을 좌회전/우회전하거나 앞으로/뒤로 이동시킬 수 있습니다.
ESP8266의 메모리를 절약하기 위해, 제어 버튼의 이미지는 ESP8266에 저장되지 않습니다. 대신, 인터넷에 저장되므로, 웹 컨트롤 페이지에 대한 이미지를 로드하려면 휴대폰이나 PC가 인터넷 연결을 가져야 합니다.
※ 주의:
index.h의 HTML 내용을 수정하고 newbiely.kr.ino 파일은 건드리지 않으면, ESP8266에 코드를 컴파일하여 업로드할 때 Arduino IDE는 HTML 내용을 업데이트하지 않습니다.
이 경우 Arduino IDE가 HTML 내용을 업데이트하게 하려면, newbiely.kr.ino 파일에 변경사항을 만들어야 합니다 (예: 빈 줄 추가, 주석 추가....).
위의 ESP8266 코드에는 줄별 설명이 포함되어 있습니다. 코드에서 주석을 읽어주세요!
