공개: 이 포스팅 에 제공된 일부 링크는 아마존 제휴 링크입니다. 이 포스팅은 쿠팡 파트너스 활동의 일환으로, 이에 따른 일정액의 수수료를 제공받습니다.
실시간 시계 DS3231 모듈에 관하여
ESP8266에는 millis() 및 micros()와 같이 시간과 관련된 특정 함수가 있습니다. 그러나 이 함수들은 시간(초, 분, 시, 일, 날짜, 월, 년)을 제공하지 않습니다. 이 정보를 얻으려면 DS3231 또는 DS1370과 같은 실시간 시계(RTC) 모듈을 사용해야 합니다. DS3231 모듈은 DS1370보다 더 높은 정밀도를 가지고 있습니다. 보다 자세한 정보는 DS3231 vs DS1307을 참조하세요.
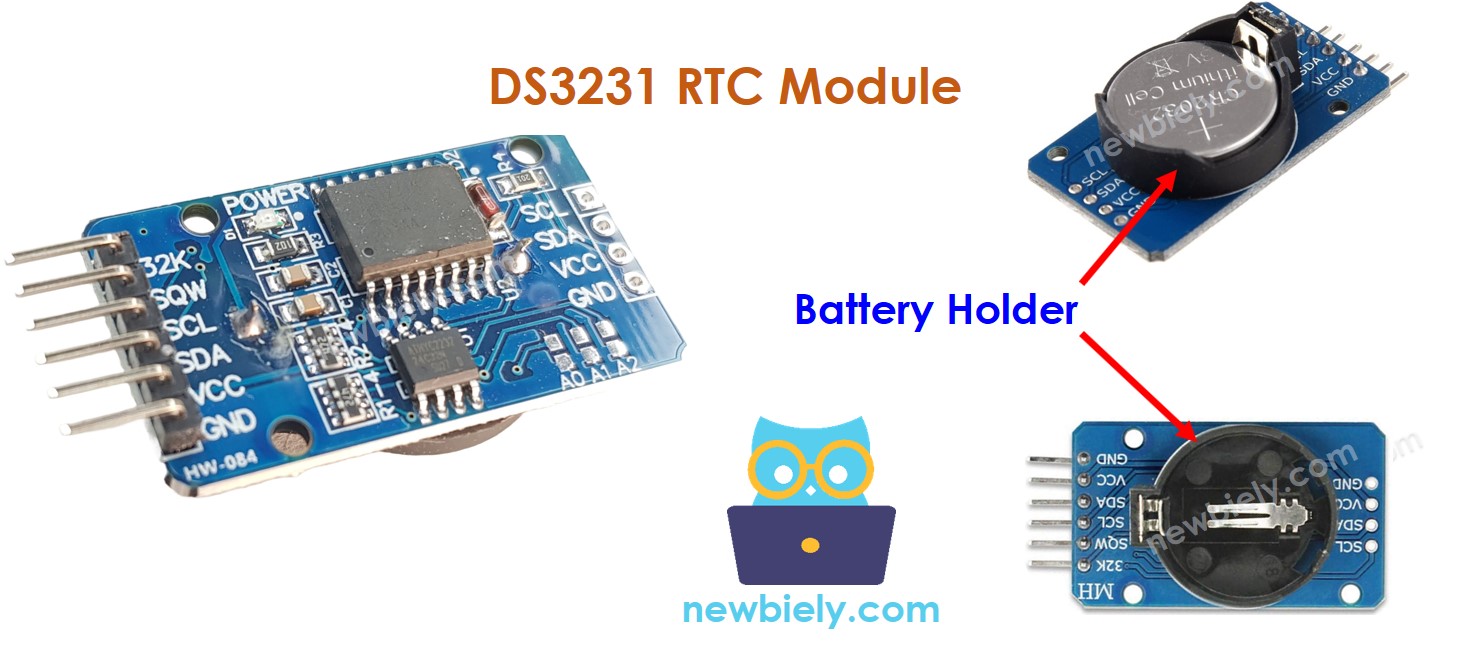
RTC 모듈 핀아웃
실시간 시계 DS3231 모듈에는 10개의 핀이 있습니다:
32K: 이 핀은 안정적이고 정확한 기준 클록을 제공합니다.
SQW: 이 핀은 1Hz, 4kHz, 8kHz 또는 32kHz에서 사각파를 생성하며 프로그래밍을 통해 관리할 수 있습니다. 또한 다양한 시간 의존적 애플리케이션에서 알람 인터럽트로 사용될 수 있습니다.
SCL: 이것은 I2C 인터페이스를 위한 직렬 클록 핀입니다.
SDA: 이것은 I2C 인터페이스를 위한 직렬 데이터 핀입니다.
VCC: 이 핀은 모듈에 전력을 공급합니다. 3.3V에서 5.5V 사이일 수 있습니다.
GND: 이것은 지상 핀입니다.
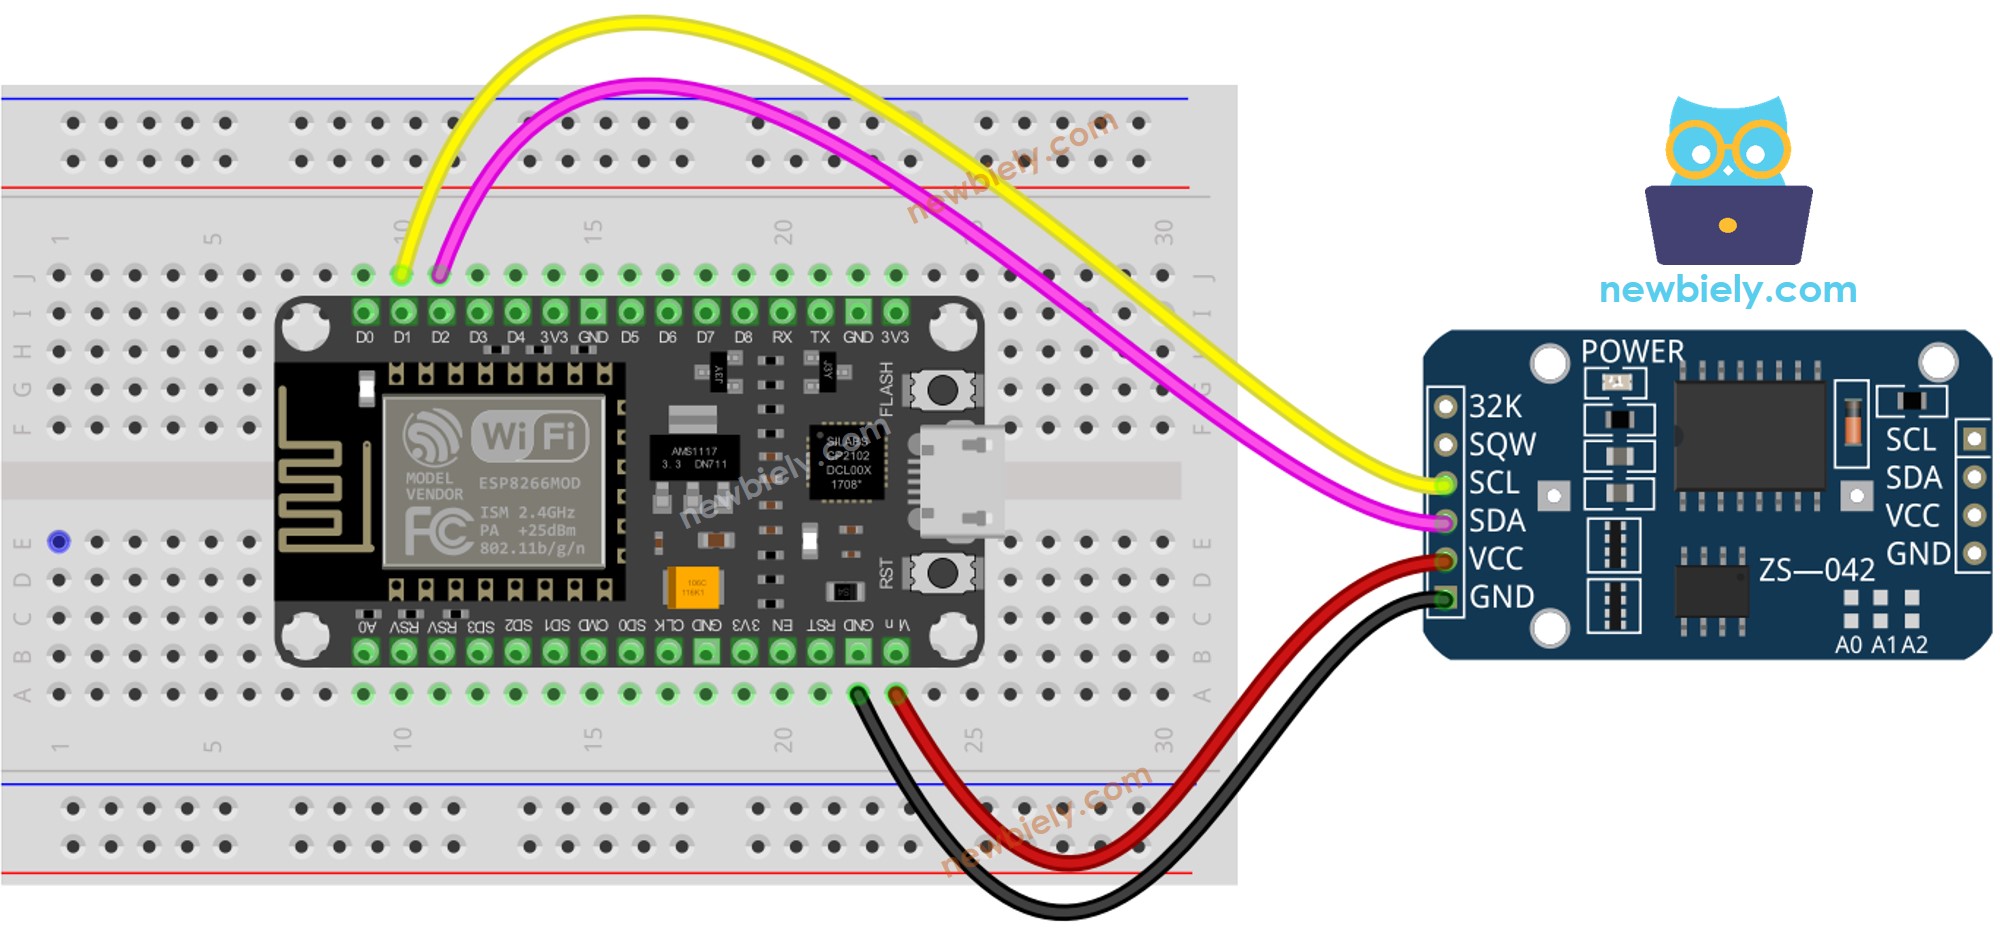
정상 작동을 위해서는 VCC, GND, SDA, SCL 이라는 네 개의 핀이 필요합니다.
DS3231 모듈에는 CR2032 배터리가 삽입되면 주전원이 꺼져 있을 때에도 모듈의 시간을 계속 유지시켜 주는 배터리 홀더가 있습니다. 배터리가 없는 경우, 주전원이 끊어지면 시간 정보가 소실되어 다시 설정해야 합니다.
/* * 이 ESP8266 NodeMCU 코드는 newbiely.kr 에서 개발되었습니다 * 이 ESP8266 NodeMCU 코드는 어떠한 제한 없이 공개 사용을 위해 제공됩니다. * 상세한 지침 및 연결도에 대해서는 다음을 방문하세요: * https://newbiely.kr/tutorials/esp8266/esp8266-rtc */#include <RTClib.h>RTC_DS3231 rtc;char daysOfTheWeek[7][12] = {"Sunday","Monday","Tuesday","Wednesday","Thursday","Friday","Saturday"};voidsetup () {Serial.begin(9600);// RTC 모듈 설정if (! rtc.begin()) {Serial.println("Couldn't find RTC");Serial.flush();while (1); }// 이 스케치가 컴파일된 PC의 날짜 및 시간으로 RTC를 자동으로 설정 rtc.adjust(DateTime(F(__DATE__), F(__TIME__)));// 명시적인 날짜 및 시간으로 RTC를 수동으로 설정, 예를 들어// 2021년 1월 21일 오전 3시를 설정하려면 아래를 호출:// rtc.adjust(DateTime(2021, 1, 21, 3, 0, 0));}voidloop () {DateTimenow = rtc.now();Serial.print("Date & Time: ");Serial.print(now.year(), DEC);Serial.print('/');Serial.print(now.month(), DEC);Serial.print('/');Serial.print(now.day(), DEC);Serial.print(" (");Serial.print(daysOfTheWeek[now.dayOfTheWeek()]);Serial.print(") ");Serial.print(now.hour(), DEC);Serial.print(':');Serial.print(now.minute(), DEC);Serial.print(':');Serial.println(now.second(), DEC);delay(1000); // 1초 지연}
올바른 ESP8266 보드를 선택하세요. 예를 들어, NodeMCU 1.0 (ESP-12E Module) 및 해당 COM 포트를 선택합니다.
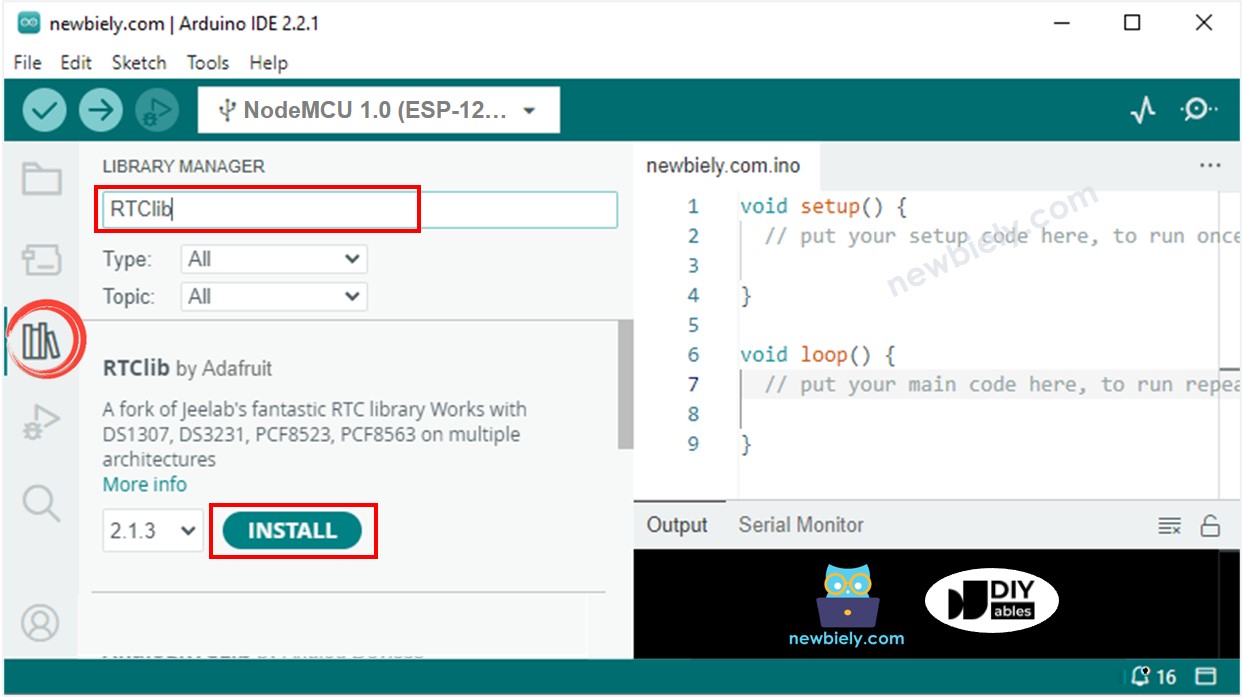
Arduino IDE의 왼쪽 바에 있는 Libraries 아이콘을 클릭하세요.
“RTClib”을 검색하여 Adafruit의 RTC 라이브러리를 찾으세요.
RTC 라이브러리를 설치하려면 Install 버튼을 누르세요.
코드를 복사하고 Arduino IDE로 열어주세요.
IDE에서 Upload 버튼을 클릭하여 ESP8266으로 전송하세요.
시리얼 모니터를 엽니다.
시리얼 모니터에서 출력을 확인하세요.
Newbiely | Arduino IDE 2.3.8
──
☐
✕
File
Edit
Sketch
Tools
Help
Nodemcu 1.0 (ESP-12E Module)
Newbiely.ino
···
8Serial.println("Hello World!");
Output
Serial Monitor
Message (Enter to send message to 'Nodemcu 1.0 (ESP-12E Module)' on 'COM15')
New Line
9600 baud
Date & Time: 2021/10/6 (Wednesday) 11:27:35
Date & Time: 2021/10/6 (Wednesday) 11:27:36
Date & Time: 2021/10/6 (Wednesday) 11:27:37
Date & Time: 2021/10/6 (Wednesday) 11:27:38
Date & Time: 2021/10/6 (Wednesday) 11:27:39
Date & Time: 2021/10/6 (Wednesday) 11:27:40
Date & Time: 2021/10/6 (Wednesday) 11:27:41
Date & Time: 2021/10/6 (Wednesday) 11:27:42
Date & Time: 2021/10/6 (Wednesday) 11:27:43
Date & Time: 2021/10/6 (Wednesday) 11:27:44
Ln 11, Col 1
Nodemcu 1.0 (ESP-12E Module) on COM15
2
ESP8266 코드 - 일일 일정을 만드는 방법
/* * 이 ESP8266 NodeMCU 코드는 newbiely.kr 에서 개발되었습니다 * 이 ESP8266 NodeMCU 코드는 어떠한 제한 없이 공개 사용을 위해 제공됩니다. * 상세한 지침 및 연결도에 대해서는 다음을 방문하세요: * https://newbiely.kr/tutorials/esp8266/esp8266-rtc */// Date and time functions using a DS3231 RTC connected via I2C and Wire lib#include <RTClib.h>// 13:50부터 14:10까지의 이벤트uint8_t DAILY_EVENT_START_HH = 13; // 이벤트 시작 시간: 시uint8_t DAILY_EVENT_START_MM = 50; // 이벤트 시작 시간: 분uint8_t DAILY_EVENT_END_HH = 14; // 이벤트 종료 시간: 시uint8_t DAILY_EVENT_END_MM = 10; // 이벤트 종료 시간: 분RTC_DS3231 rtc;char daysOfTheWeek[7][12] = {"Sunday","Monday","Tuesday","Wednesday","Thursday","Friday","Saturday"};voidsetup () {Serial.begin(9600);// SETUP RTC MODULEif (! rtc.begin()) {Serial.println("Couldn't find RTC");while (1); }// sets the RTC to the date & time on PC this sketch was compiled rtc.adjust(DateTime(F(__DATE__), F(__TIME__)));// sets the RTC with an explicit date & time, for example to set// January 21, 2021 at 3am you would call:// rtc.adjust(DateTime(2021, 1, 21, 3, 0, 0));}voidloop () {DateTimenow = rtc.now();if (now.hour() >= DAILY_EVENT_START_HH &&now.minute() >= DAILY_EVENT_START_MM &&now.hour() < DAILY_EVENT_END_HH &&now.minute() < DAILY_EVENT_END_MM) {Serial.println("It is on scheduled time");// TODO: write your code" } else {Serial.println("It is NOT on scheduled time"); } printTime(now);}void printTime(DateTime time) {Serial.print("TIME: ");Serial.print(time.year(), DEC);Serial.print('/');Serial.print(time.month(), DEC);Serial.print('/');Serial.print(time.day(), DEC);Serial.print(" (");Serial.print(daysOfTheWeek[time.dayOfTheWeek()]);Serial.print(") ");Serial.print(time.hour(), DEC);Serial.print(':');Serial.print(time.minute(), DEC);Serial.print(':');Serial.println(time.second(), DEC);}
ESP8266 코드 - 주간 일정 만드는 방법
/* * 이 ESP8266 NodeMCU 코드는 newbiely.kr 에서 개발되었습니다 * 이 ESP8266 NodeMCU 코드는 어떠한 제한 없이 공개 사용을 위해 제공됩니다. * 상세한 지침 및 연결도에 대해서는 다음을 방문하세요: * https://newbiely.kr/tutorials/esp8266/esp8266-rtc */// DS3231 RTC를 I2C와 Wire 라이브러리를 통해 연결하여 날짜 및 시간 함수 사용#include <RTClib.h>// 변경할 수 없는 매개변수들#define SUNDAY 0#define MONDAY 1#define TUESDAY 2#define WEDNESDAY 3#define THURSDAY 4#define FRIDAY 5#define SATURDAY 6// 월요일에 있으며, 13:50부터 14:10까지의 이벤트uint8_t WEEKLY_EVENT_DAY = MONDAY;uint8_t WEEKLY_EVENT_START_HH = 13; // 이벤트 시작 시간: 시uint8_t WEEKLY_EVENT_START_MM = 50; // 이벤트 시작 시간: 분uint8_t WEEKLY_EVENT_END_HH = 14; // 이벤트 종료 시간: 시uint8_t WEEKLY_EVENT_END_MM = 10; // 이벤트 종료 시간: 분RTC_DS3231 rtc;char daysOfTheWeek[7][12] = {"Sunday","Monday","Tuesday","Wednesday","Thursday","Friday","Saturday"};voidsetup () {Serial.begin(9600);// RTC 모듈 설정if (! rtc.begin()) {Serial.println("Couldn't find RTC");while (1); }// 이 스케치가 컴파일된 PC의 날짜 & 시간으로 RTC를 설정 rtc.adjust(DateTime(F(__DATE__), F(__TIME__)));// 명시적인 날짜 & 시간으로 RTC를 설정, 예: 2021년 1월 21일 오전 3시를 설정하려면 다음을 호출:// rtc.adjust(DateTime(2021, 1, 21, 3, 0, 0));}voidloop () {DateTimenow = rtc.now();if (now.dayOfTheWeek() == WEEKLY_EVENT_DAY &&now.hour() >= WEEKLY_EVENT_START_HH &&now.minute() >= WEEKLY_EVENT_START_MM &&now.hour() < WEEKLY_EVENT_END_HH &&now.minute() < WEEKLY_EVENT_END_MM) {Serial.println("It is on scheduled time");// TODO: write your code" } else {Serial.println("It is NOT on scheduled time"); } printTime(now);}void printTime(DateTime time) {Serial.print("TIME: ");Serial.print(time.year(), DEC);Serial.print('/');Serial.print(time.month(), DEC);Serial.print('/');Serial.print(time.day(), DEC);Serial.print(" (");Serial.print(daysOfTheWeek[time.dayOfTheWeek()]);Serial.print(") ");Serial.print(time.hour(), DEC);Serial.print(':');Serial.print(time.minute(), DEC);Serial.print(':');Serial.println(time.second(), DEC);}
ESP8266 코드 - 특정 날짜에 일정을 만드는 방법
/* * 이 ESP8266 NodeMCU 코드는 newbiely.kr 에서 개발되었습니다 * 이 ESP8266 NodeMCU 코드는 어떠한 제한 없이 공개 사용을 위해 제공됩니다. * 상세한 지침 및 연결도에 대해서는 다음을 방문하세요: * https://newbiely.kr/tutorials/esp8266/esp8266-rtc */// DS3231 RTC를 I2C와 Wire 라이브러리를 사용하여 날짜와 시간 기능 사용#include <RTClib.h>// 변경 불가능한 매개변수#define SUNDAY 0#define MONDAY 1#define TUESDAY 2#define WEDNESDAY 3#define THURSDAY 4#define FRIDAY 5#define SATURDAY 6#define JANUARY 1#define FEBRUARY 2#define MARCH 3#define APRIL 4#define MAY 5#define JUNE 6#define JULY 7#define AUGUST 8#define SEPTEMBER 9#define OCTOBER 10#define NOVEMBER 11#define DECEMBER 12// 2021년 8월 15일 13:50부터 2021년 9월 29일 14:10까지의 이벤트DateTime EVENT_START(2021, AUGUST, 15, 13, 50);DateTime EVENT_END(2021, SEPTEMBER, 29, 14, 10);RTC_DS3231 rtc;char daysOfTheWeek[7][12] = {"Sunday","Monday","Tuesday","Wednesday","Thursday","Friday","Saturday"};voidsetup () {Serial.begin(9600);// RTC 모듈 설정if (! rtc.begin()) {Serial.println("Couldn't find RTC");Serial.flush();while (1); }// 이 스케치가 컴파일된 PC의 날짜와 시간으로 RTC를 설정 rtc.adjust(DateTime(F(__DATE__), F(__TIME__)));// 명시적인 날짜와 시간으로 RTC를 설정하려면, 예를 들어// 2021년 1월 21일 새벽 3시를 설정하려면 다음과 같이 호출하십시오:// rtc.adjust(DateTime(2021, 1, 21, 3, 0, 0));}voidloop () {DateTimenow = rtc.now();if (now.secondstime() >= EVENT_START.secondstime() &&now.secondstime() < EVENT_END.secondstime()) {Serial.println("It is on scheduled time");// TODO: write your code" } else {Serial.println("It is NOT on scheduled time"); } printTime(now);}void printTime(DateTime time) {Serial.print("TIME: ");Serial.print(time.year(), DEC);Serial.print('/');Serial.print(time.month(), DEC);Serial.print('/');Serial.print(time.day(), DEC);Serial.print(" (");Serial.print(daysOfTheWeek[time.dayOfTheWeek()]);Serial.print(") ");Serial.print(time.hour(), DEC);Serial.print(':');Serial.print(time.minute(), DEC);Serial.print(':');Serial.println(time.second(), DEC);}
동영상
비디오 제작은 시간이 많이 걸리는 작업입니다. 비디오 튜토리얼이 학습에 도움이 되었다면, YouTube 채널 을 구독하여 알려 주시기 바랍니다. 비디오에 대한 높은 수요가 있다면, 비디오를 만들기 위해 노력하겠습니다.