아두이노 나노 미니 Mp3 플레이어

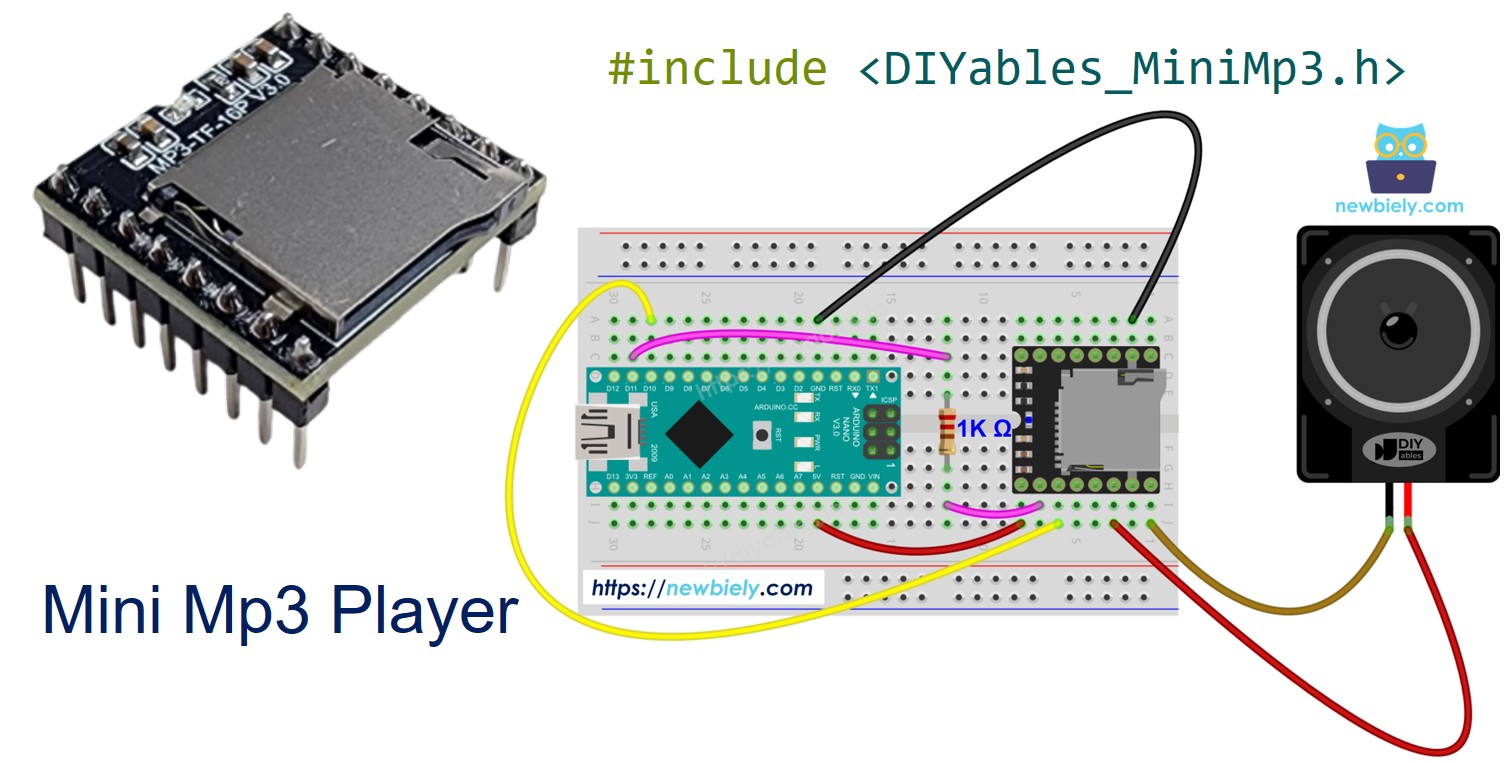
이 가이드는 DIYables 미니 Mp3 플레이어 모듈을 Arduino Nano와 함께 작동시키는 데 필요한 모든 것을 안내합니다. 마지막에는 다음을 알 수 있습니다:

아두이노 나노 미니 mp3 플레이어

필요한 하드웨어

1×아두이노 나노 쿠팡 | 아마존
1×USB A to Mini-B USB 케이블 쿠팡 | 아마존
1×DIYables Mini Mp3 Player module 아마존
1×마이크로 SD 카드 아마존
1×Speaker 아마존
1×브레드보드 쿠팡 | 아마존
1×점퍼케이블 쿠팡 | 아마존
1×(추천) 아두이노 나노용 스크루 터미널 확장 보드 쿠팡 | 아마존
1×(추천) 아두이노 나노용 브레이크아웃 확장 보드 쿠팡 | 아마존
1×(추천) 아두이노 나노용 전원 분배기 쿠팡 | 아마존
공개: 이 포스팅 에 제공된 일부 링크는 아마존 제휴 링크입니다. 이 포스팅은 쿠팡 파트너스 활동의 일환으로, 이에 따른 일정액의 수수료를 제공받습니다.

미니 Mp3 플레이어 모듈 개요

DIYables 미니 Mp3 플레이어 모듈은 YX5200-24SS 디코더 칩을 소형 보드에 탑재했습니다. mp3 파일이 담긴 마이크로 SD 카드를 삽입하고 스피커를 연결하면 Arduino Nano가 간단한 시리얼 연결로 제어하는 독립형 오디오 플레이어가 됩니다.

모듈의 기능:

  • 재생 제어: 재생, 일시 정지, 재개, 중지, 다음, 이전
  • 볼륨: 0(무음)에서 30(최대)까지 조절 가능
  • EQ 프리셋: Normal, Pop, Rock, Jazz, Classic, Bass
  • 반복 모드: 한 트랙 반복, 폴더 반복, 전체 반복, 셔플
  • 폴더: 번호가 매겨진 폴더에 트랙 정리하여 쉽게 선택
  • 광고: 현재 트랙을 중단했다가 중단된 지점에서 계속
  • 상태 조회: 재생 중인 트랙, 현재 볼륨 등 모듈에 질의

모든 통신은 9600 보드레이트 UART로 이루어집니다 — TX와 RX 두 개의 선 및 전원만 필요합니다.
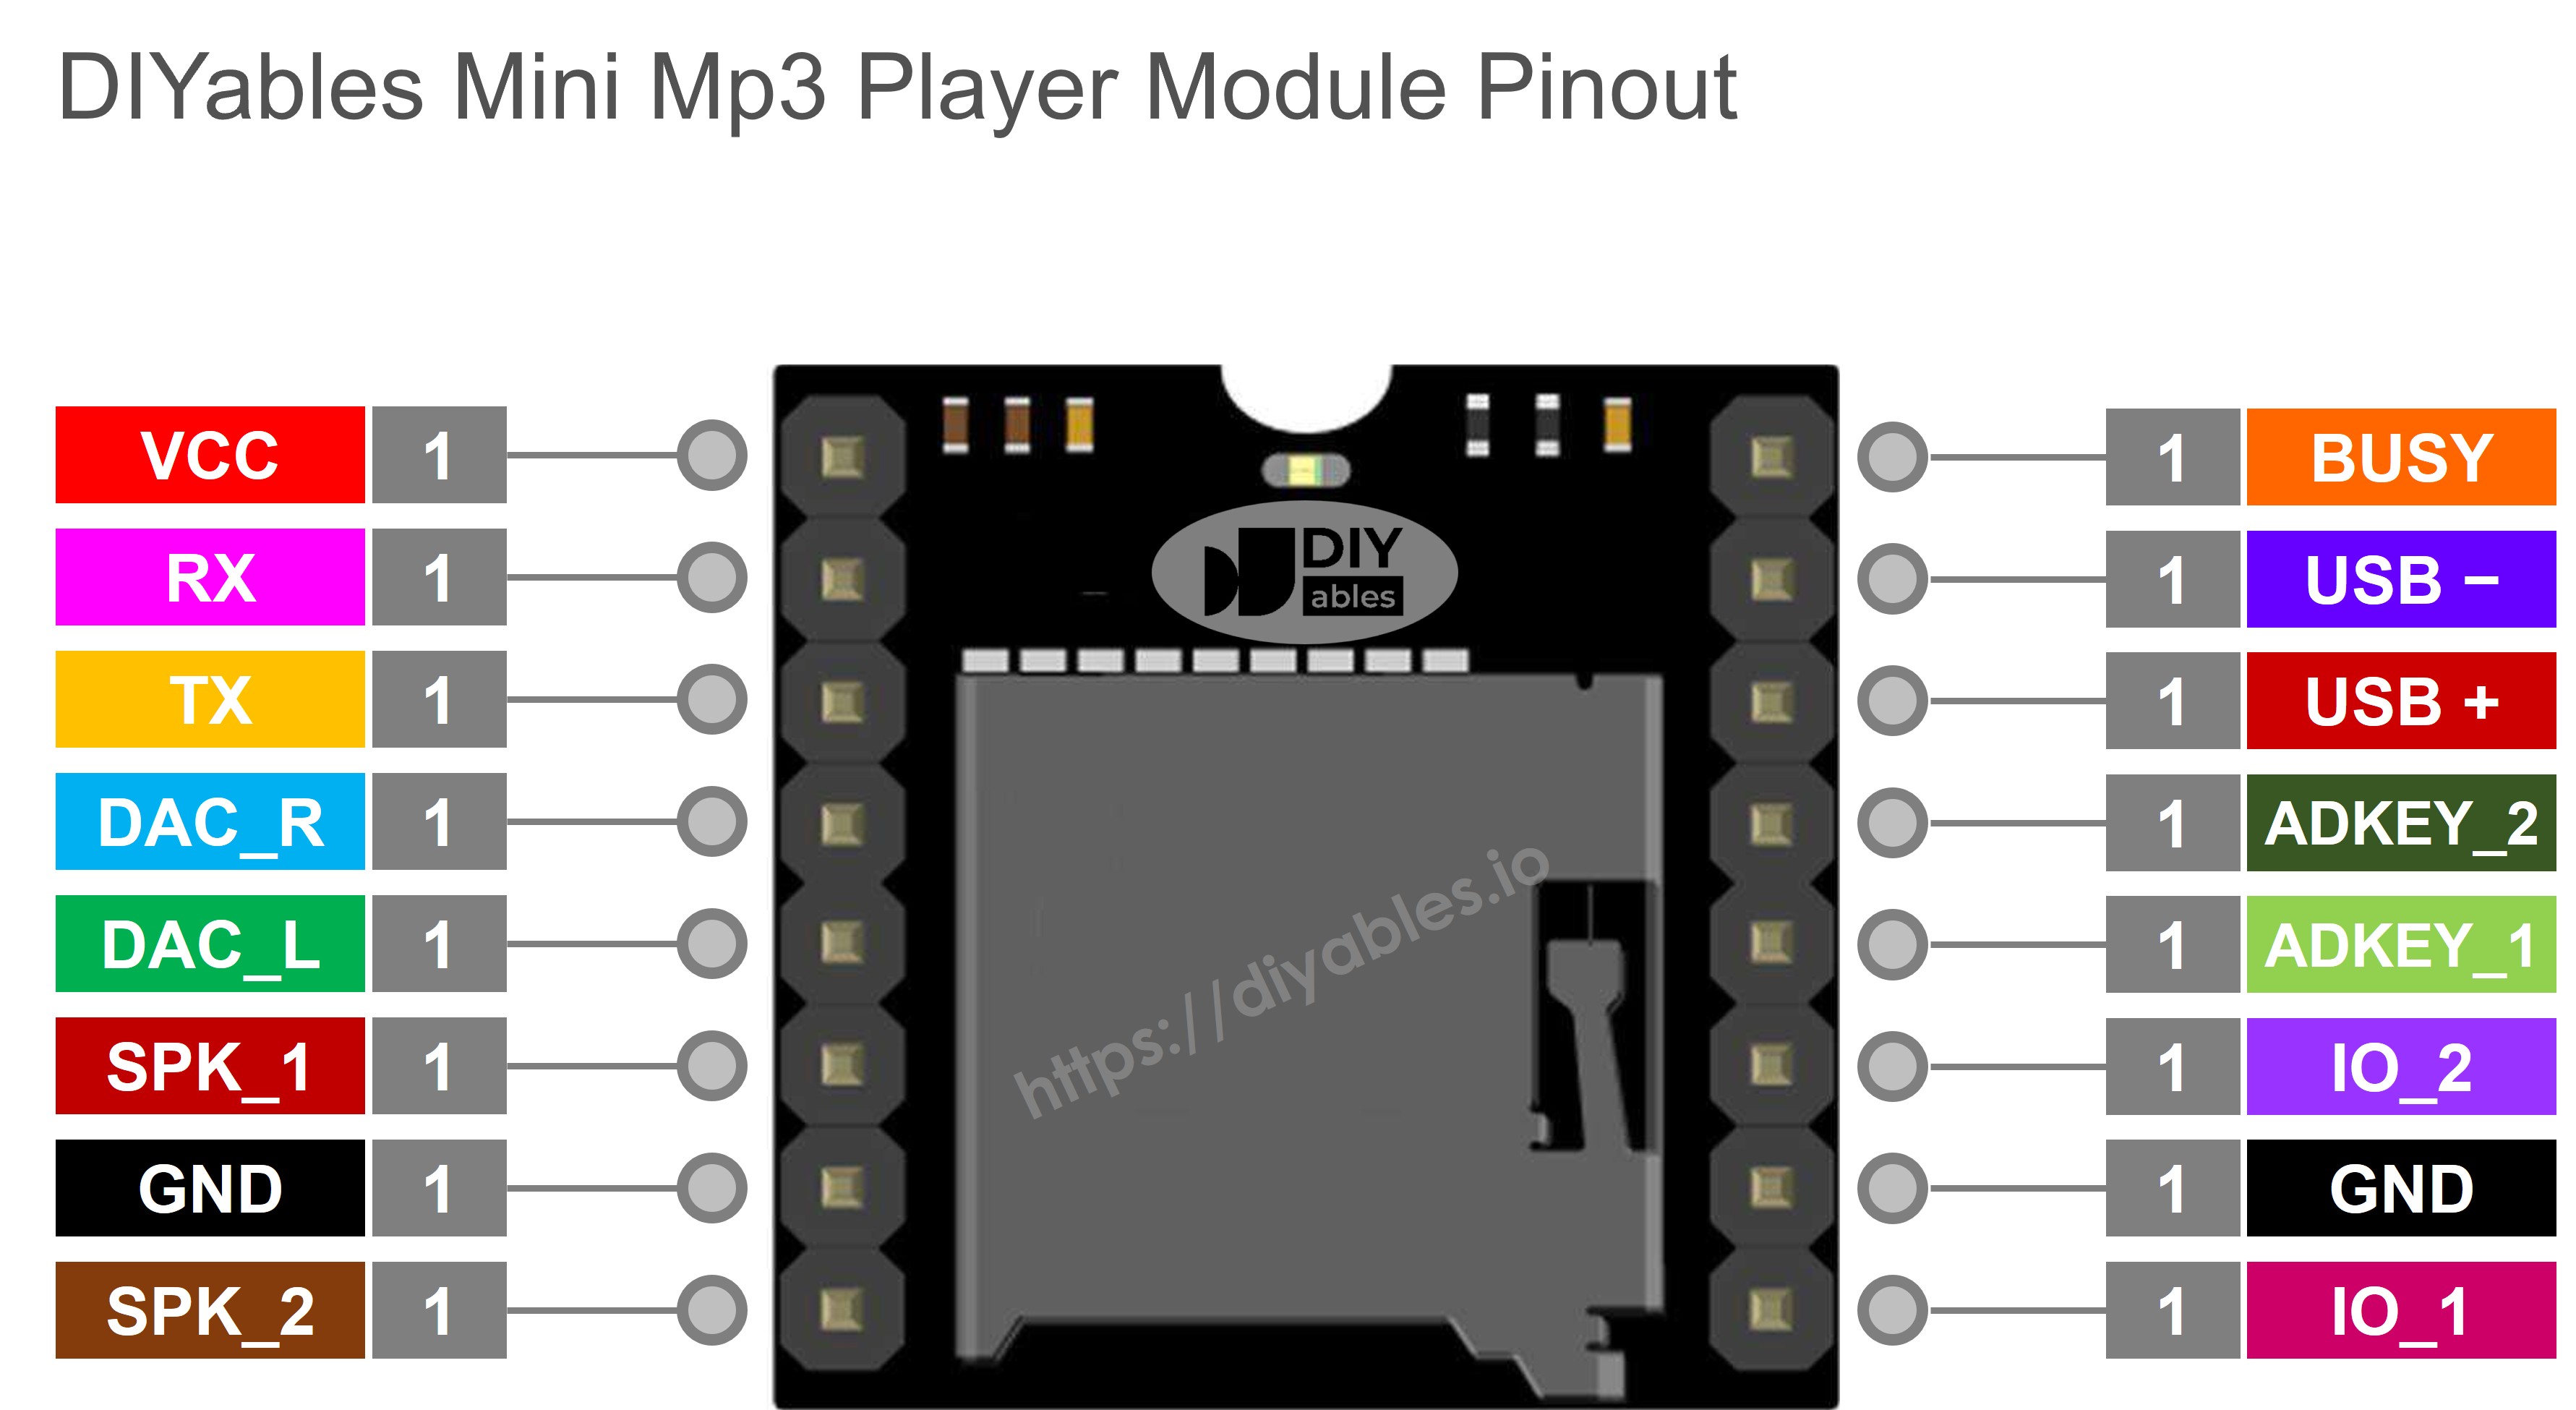
핀 레퍼런스

기능
VCC 전원 입력(3.2V ~ 5.0V)
GND 그라운드 연결
RX Nano에서 시리얼 명령 수신(1K 저항을 통해)
TX Nano로 시리얼 데이터 전송
SPK_1 스피커 양극 단자(내장 3W 앰프)
SPK_2 스피커 음극 단자
DAC_R 우측 오디오 라인 출력(외부 앰프용)
DAC_L 좌측 오디오 라인 출력(외부 앰프용)
BUSY 재생 중 LOW, 대기 중 HIGH(선택 사항)
IO_1 짧게 누르기 이전 트랙, 길게 누르기 볼륨 감소
IO_2 짧게 누르기 다음 트랙, 길게 누르기 볼륨 증가
미니 mp3 플레이어 핀아웃

배선도

미니 Mp3 플레이어 모듈을 Arduino Nano에 다음과 같이 연결합니다:

미니 Mp3 핀 Arduino Nano 핀 참고
VCC 5V
GND GND
RX 핀 11 반드시 1K 저항을 직렬로 사용해야 합니다(모듈은 3.3V 로직)
TX 핀 10
SPK_1 스피커+ 직접 스피커 연결(최대 3W)
SPK_2 스피커- 직접 스피커 연결(최대 3W)

중요: RX 핀의 1K 저항은 5V Arduino Nano를 사용할 때 필수입니다. 모듈의 3.3V 로직 입력을 보호합니다. 없으면 모듈이 작동하지 않거나 손상될 수 있습니다.

아두이노 나노 미니 mp3 플레이어 배선도

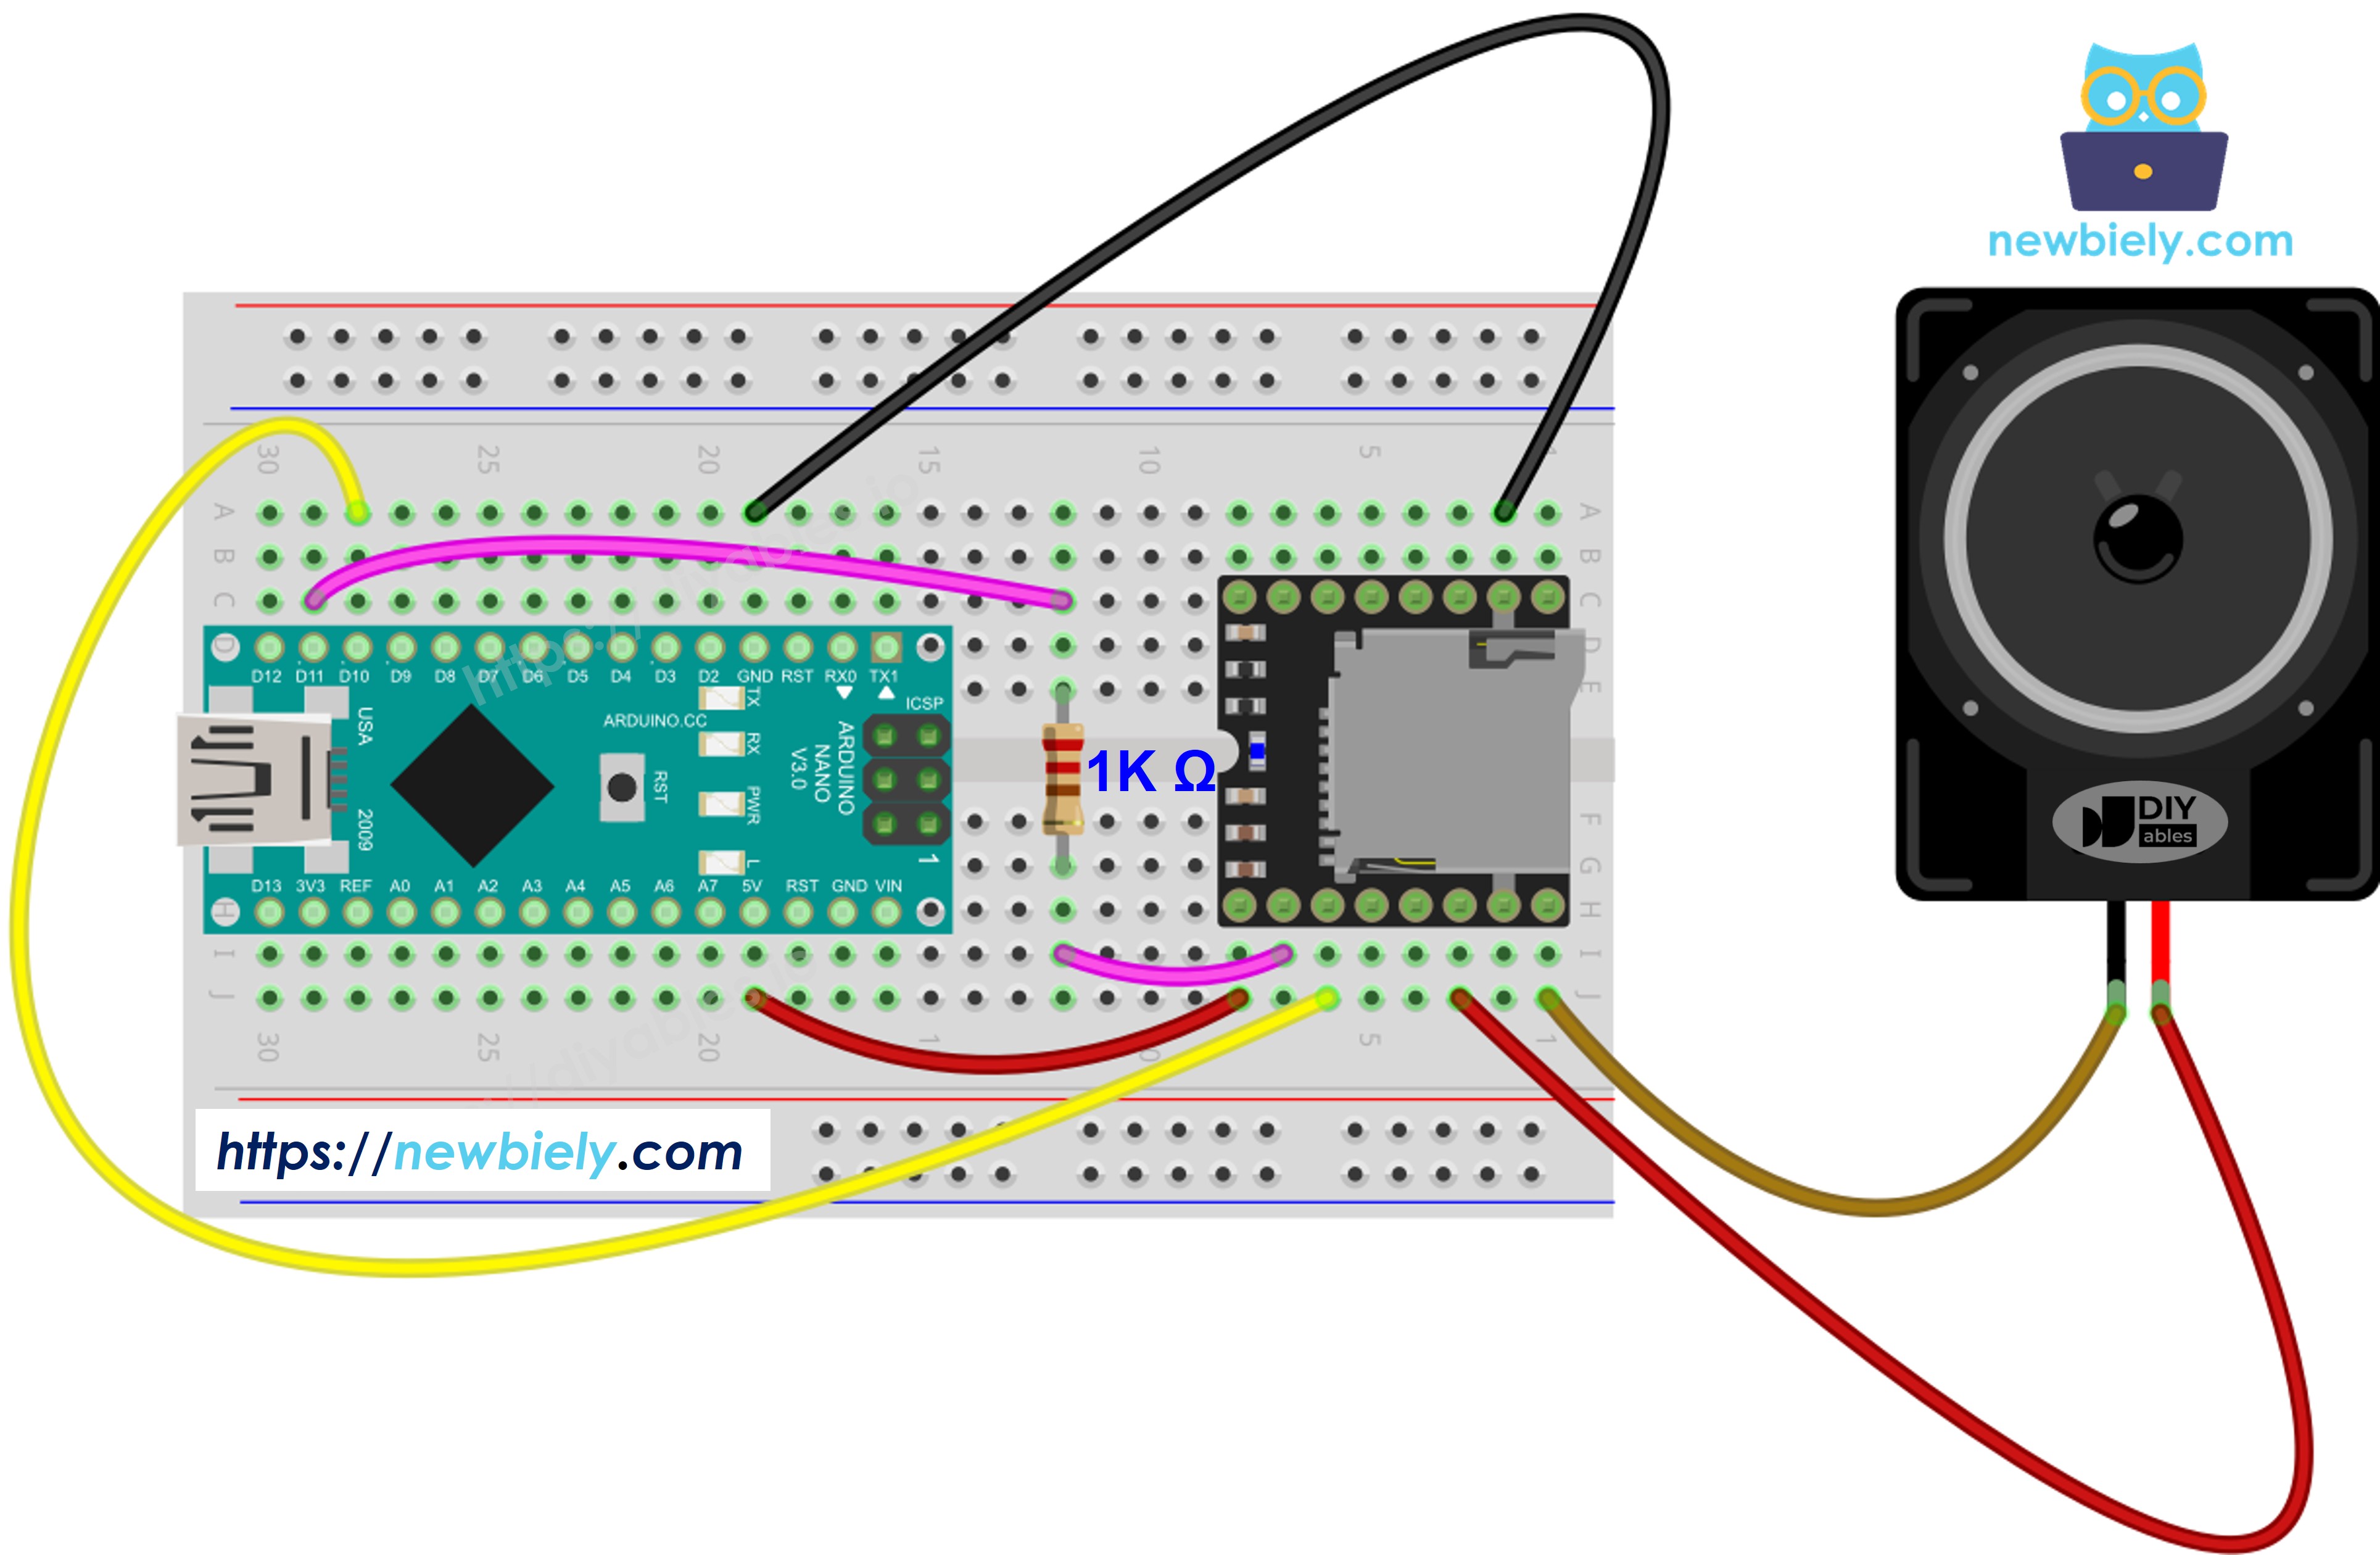
이 이미지는 Fritzing을 사용하여 만들어졌습니다. 이미지를 확대하려면 클릭하세요.

Arduino Nano와 기타 부품에 전원을 공급하는 가장 효과적인 방법은 다음 링크를 참조하세요: 아두이노 나노 전원 공급 방법.

SD 카드 준비

사용 전에 마이크로 SD 카드를 FAT16 또는 FAT32로 포맷합니다. 앞자리 0이 붙은 번호로 mp3 파일을 SD 카드 루트에 복사합니다:

/001.mp3 /002.mp3 /003.mp3

중요: 트랙 번호는 1부터 시작합니다(0이 아닌). 모듈은 파일명이 아닌 SD 카드에 파일이 복사된 순서를 기준으로 트랙 번호를 지정합니다. 먼저 SD 카드를 포맷한 후 순서대로 파일을 하나씩 복사합니다.

폴더 재생의 경우 번호가 매겨진 폴더에 번호가 매겨진 파일을 만듭니다:

/01/001.mp3 /01/002.mp3 /02/001.mp3

폴더 이름은 2자리 앞자리 0이 붙어야 합니다(01-99). 폴더 내 트랙 이름은 3자리 앞자리 0이 붙어야 합니다(001-255).

라이브러리 설치

  • USB 케이블로 Arduino Nano를 컴퓨터에 연결합니다.
  • Arduino IDE를 열고 올바른 보드와 포트를 선택합니다.
  • Arduino IDE 왼쪽 바의 Libraries 아이콘으로 이동합니다.
  • "DIYables_MiniMp3"를 검색하고 DIYables의 DIYables_MiniMp3 라이브러리를 찾습니다.
  • Install 버튼을 클릭하여 최신 버전의 라이브러리를 설치합니다.
아두이노 미니 mp3 플레이어 라이브러리

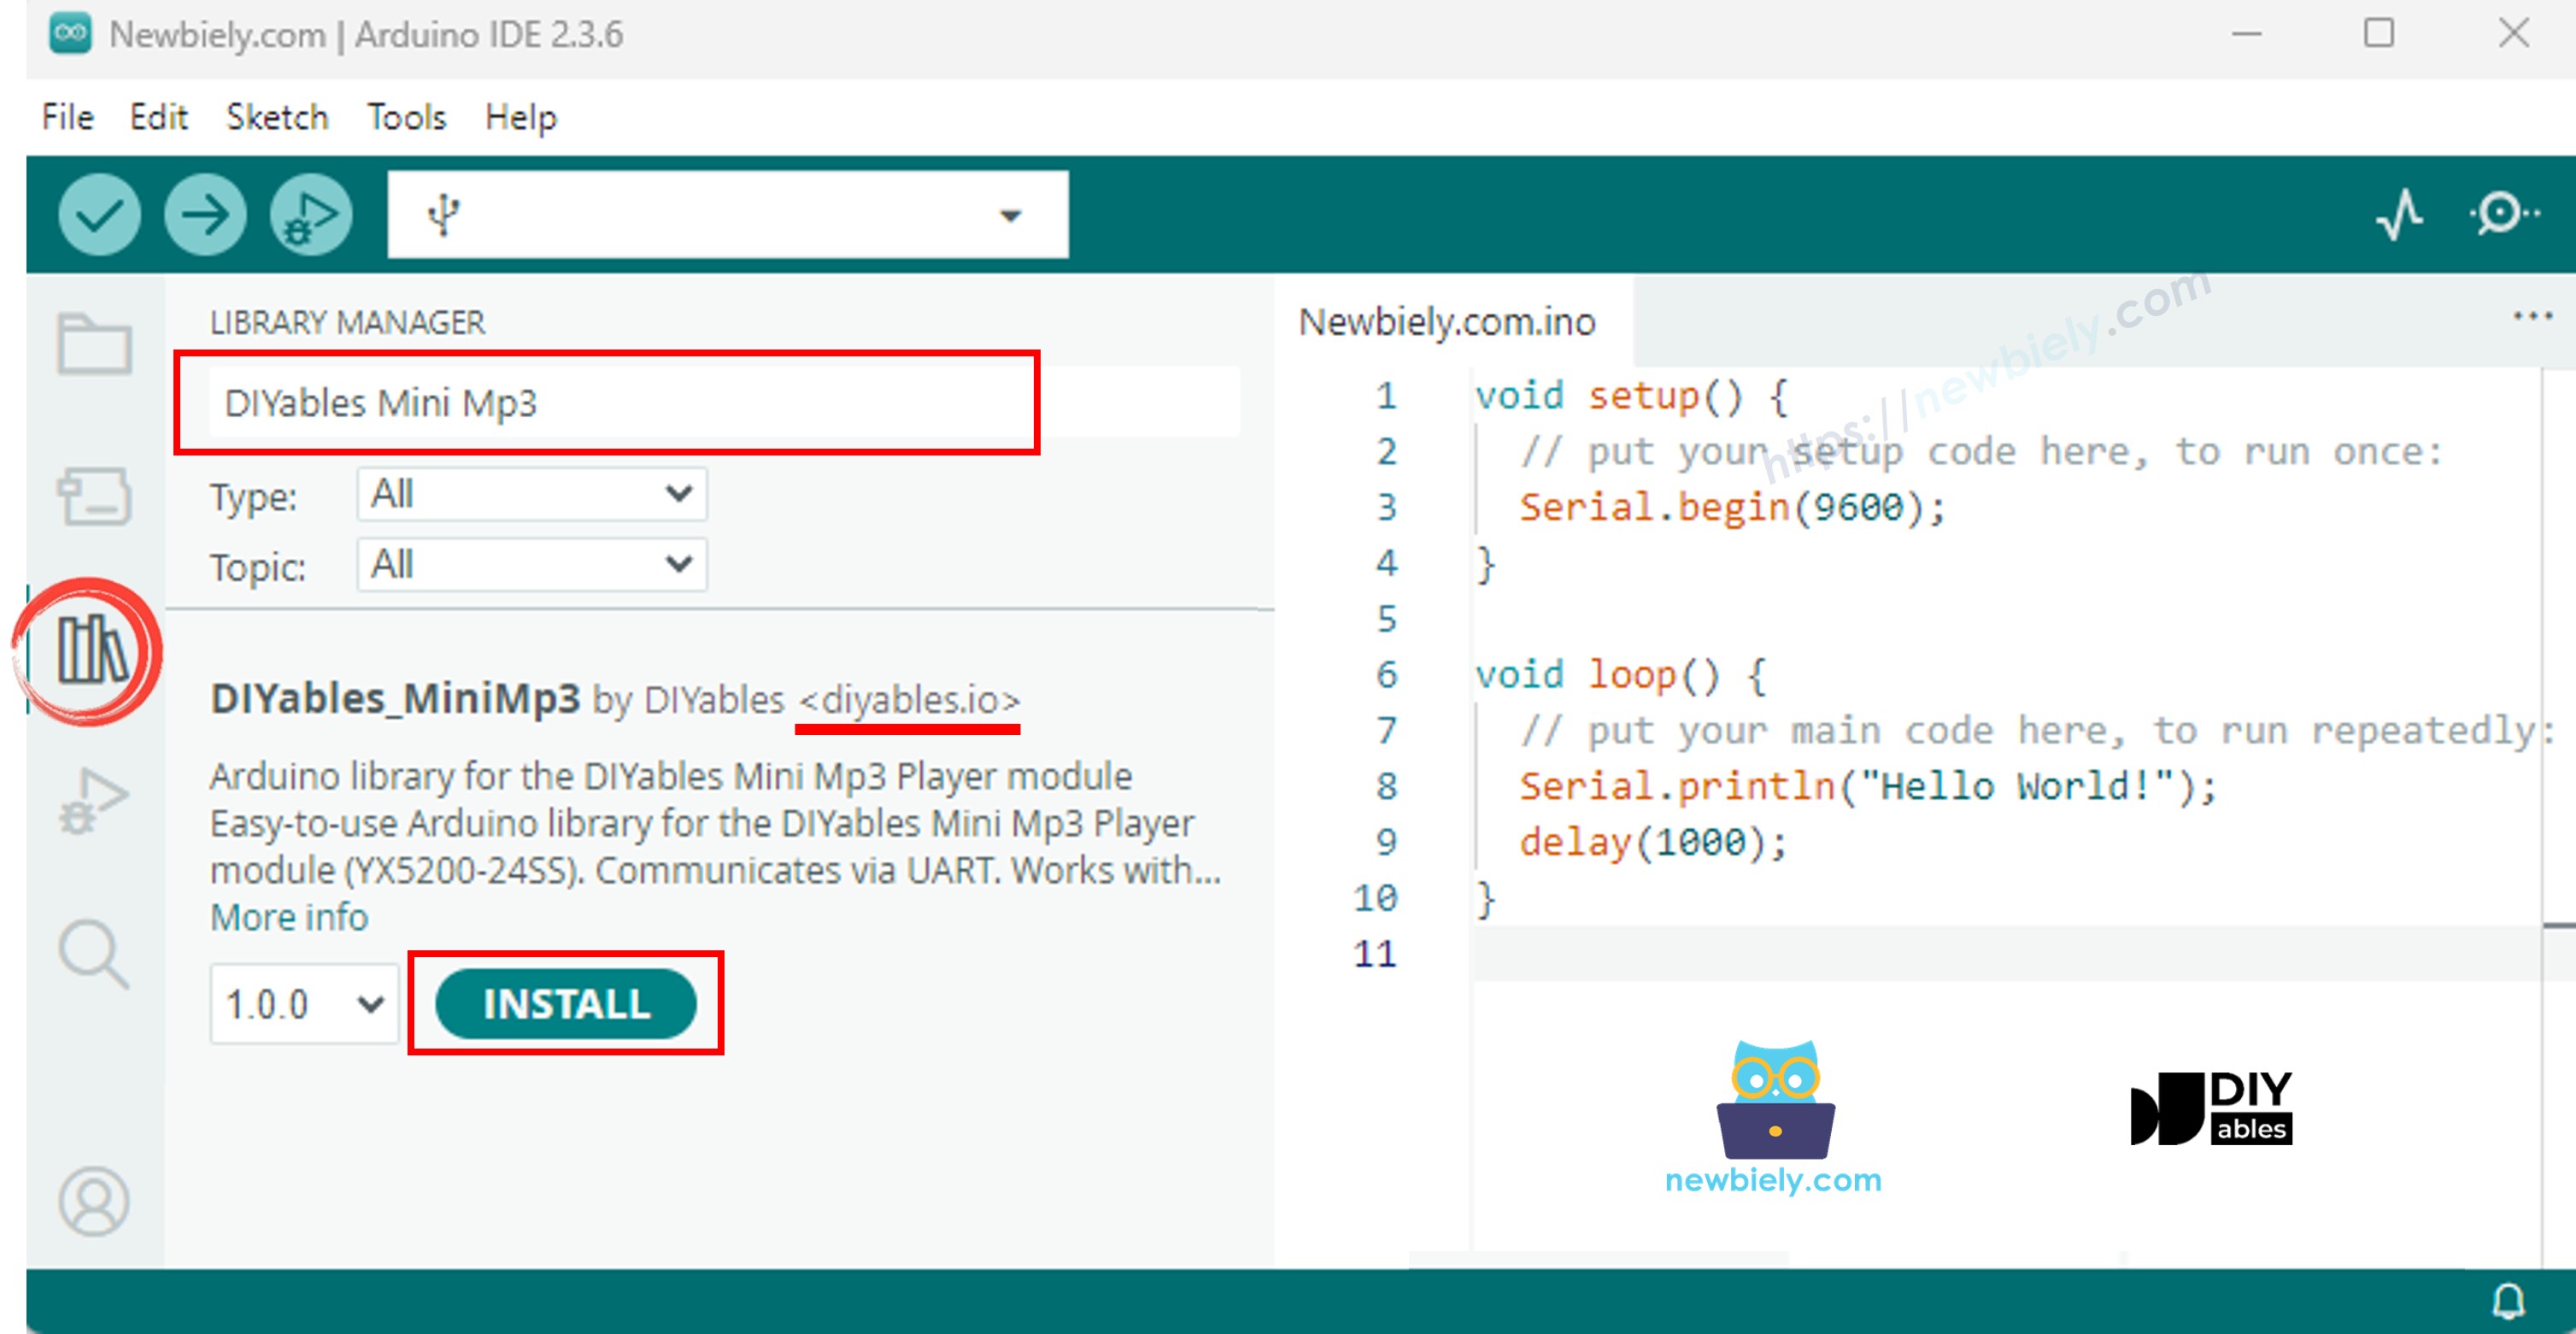
참고: 이 라이브러리는 외부 의존성 없이 자급자족합니다.

기본 구조

미니 Mp3 플레이어를 사용하는 모든 스케치는 다음 기본 구조를 따릅니다:

#include <DIYables_MiniMp3.h> #include <SoftwareSerial.h> SoftwareSerial mp3Serial(10, 11); // RX, TX DIYables_MiniMp3 mp3; void setup() { mp3Serial.begin(9600); mp3.begin(mp3Serial); delay(1000); // Wait for the module to initialize mp3.setVolume(25); // Set volume (0 to 30) } void loop() { // Your code here }

mp3.begin(mp3Serial)은 모듈과의 통신을 초기화합니다. delay(1000)은 모듈이 부팅될 시간을 줍니다. 기본 볼륨이 0일 수 있으므로 재생 전에 볼륨을 설정해야 합니다.

Arduino Nano 코드 - 트랙 재생

/* * DIYables Mini Mp3 Player - Play One Track * * Product: DIYables Mini Mp3 Player Module * https://diyables.io/products/mini-mp3-player-module * * Tested with: * - Arduino Uno R3 * - Arduino Uno R4 WiFi / R4 Minima * - Arduino Mega * - Arduino Due * - Arduino Giga * - DIYables STEM V3 https://diyables.io/stem-v3 * - DIYables STEM V4 IoT https://diyables.io/stem-v4-iot * - DIYables STEM V4B IoT https://diyables.io/stem-v4b-iot * - DIYables STEM V4 Edu https://diyables.io/stem-v4-edu * - DIYables MEGA2560 R3 https://diyables.io/atmega2560-board * - DIYables Nano R3 https://diyables.io/nano-board * - DIYables ESP32 Board https://diyables.io/esp32-board * - DIYables ESP32 S3 (Uno) https://diyables.io/esp32-s3-uno * - Expected to work with other Arduino-compatible boards * * Plays track 001 once, then stops. * * Wiring (Arduino Uno): * Mini Mp3 RX -> Arduino Pin 11 (via 1K resistor) * Mini Mp3 TX -> Arduino Pin 10 * Mini Mp3 VCC -> 5V * Mini Mp3 GND -> GND * Speaker connected to SPK_1 and SPK_2 pins * * SD Card: Put mp3 files in root, named 001.mp3, 002.mp3, etc. */ #include <DIYables_MiniMp3.h> #include <SoftwareSerial.h> SoftwareSerial mp3Serial(10, 11); // RX, TX DIYables_MiniMp3 mp3; void setup() { Serial.begin(9600); mp3Serial.begin(9600); mp3.begin(mp3Serial); delay(1000); // Wait for the module to initialize mp3.setVolume(25); // Set volume (0 to 30) Serial.println("Playing track 1..."); mp3.play(1); // Play track 001.mp3 } void loop() { // Nothing to do here }

빠른 단계

  • Mp3 파일(001.mp3, 002.mp3 등)로 SD 카드를 준비합니다.
  • SD 카드를 미니 Mp3 플레이어 모듈에 삽입합니다.
  • 배선도에 표시된 대로 모듈을 Arduino Nano에 연결합니다.
  • USB 케이블로 Arduino Nano를 컴퓨터에 연결합니다.
  • Arduino IDE를 열고 올바른 보드와 포트를 선택합니다.
  • 위 코드를 복사하여 Arduino IDE 편집기에 붙여넣습니다.
  • Arduino IDE의 Upload 버튼을 클릭하여 Arduino Nano에 코드를 업로드합니다.

스피커를 통해 트랙 001.mp3가 재생되는 소리가 들립니다.

재생 API 요약

메서드 설명 예시
play(trackNum) 번호로 트랙 재생 mp3.play(1)
playNext() 다음 트랙 재생 mp3.playNext()
playPrevious() 이전 트랙 재생 mp3.playPrevious()
pause() 재생 일시 정지 mp3.pause()
resume() 재생 재개 mp3.resume()
stop() 재생 중지 mp3.stop()

Arduino Nano 코드 - 여러 트랙 재생

/* * DIYables Mini Mp3 Player - Play Multiple Tracks * * Product: DIYables Mini Mp3 Player Module * https://diyables.io/products/mini-mp3-player-module * * Tested with: * - Arduino Uno R3 * - Arduino Uno R4 WiFi / R4 Minima * - Arduino Mega * - Arduino Due * - Arduino Giga * - DIYables STEM V3 https://diyables.io/stem-v3 * - DIYables STEM V4 IoT https://diyables.io/stem-v4-iot * - DIYables STEM V4B IoT https://diyables.io/stem-v4b-iot * - DIYables STEM V4 Edu https://diyables.io/stem-v4-edu * - DIYables MEGA2560 R3 https://diyables.io/atmega2560-board * - DIYables Nano R3 https://diyables.io/nano-board * - DIYables ESP32 Board https://diyables.io/esp32-board * - DIYables ESP32 S3 (Uno) https://diyables.io/esp32-s3-uno * - Expected to work with other Arduino-compatible boards * * Plays tracks one after another with a delay between them. * * Wiring (Arduino Uno): * Mini Mp3 RX -> Arduino Pin 11 (via 1K resistor) * Mini Mp3 TX -> Arduino Pin 10 * Mini Mp3 VCC -> 5V * Mini Mp3 GND -> GND * Speaker connected to SPK_1 and SPK_2 pins * * SD Card: Put mp3 files in root, named 001.mp3, 002.mp3, 003.mp3 */ #include <DIYables_MiniMp3.h> #include <SoftwareSerial.h> SoftwareSerial mp3Serial(10, 11); // RX, TX DIYables_MiniMp3 mp3; int currentTrack = 1; int totalTracks = 3; // Change this to match your SD card unsigned long lastTrackTime = 0; unsigned long trackDuration = 5000; // Wait 5 seconds between tracks (adjust as needed) void setup() { Serial.begin(9600); mp3Serial.begin(9600); mp3.begin(mp3Serial); delay(1000); mp3.setVolume(20); Serial.println("Playing track 1..."); mp3.play(currentTrack); lastTrackTime = millis(); } void loop() { // After trackDuration, play the next track if (millis() - lastTrackTime >= trackDuration) { currentTrack++; if (currentTrack > totalTracks) currentTrack = 1; // Loop back to first track Serial.print("Playing track "); Serial.println(currentTrack); mp3.play(currentTrack); lastTrackTime = millis(); } }

빠른 단계

  • SD 카드에 mp3 트랙이 최소 3개(001.mp3, 002.mp3, 003.mp3) 있는지 확인합니다.
  • 위 코드를 복사하여 Arduino IDE 편집기에 붙여넣습니다.
  • Arduino IDE의 Upload 버튼을 클릭하여 Arduino Nano에 코드를 업로드합니다.

Arduino Nano 코드 - 볼륨 제어

/* * DIYables Mini Mp3 Player - Volume Control * * Product: DIYables Mini Mp3 Player Module * https://diyables.io/products/mini-mp3-player-module * * Tested with: * - Arduino Uno R3 * - Arduino Uno R4 WiFi / R4 Minima * - Arduino Mega * - Arduino Due * - Arduino Giga * - DIYables STEM V3 https://diyables.io/stem-v3 * - DIYables STEM V4 IoT https://diyables.io/stem-v4-iot * - DIYables STEM V4B IoT https://diyables.io/stem-v4b-iot * - DIYables STEM V4 Edu https://diyables.io/stem-v4-edu * - DIYables MEGA2560 R3 https://diyables.io/atmega2560-board * - DIYables Nano R3 https://diyables.io/nano-board * - DIYables ESP32 Board https://diyables.io/esp32-board * - DIYables ESP32 S3 (Uno) https://diyables.io/esp32-s3-uno * - Expected to work with other Arduino-compatible boards * * Use two buttons to increase/decrease the volume. * Press button on pin 2 to volume up, pin 3 to volume down. * * Wiring (Arduino Uno): * Mini Mp3 RX -> Arduino Pin 11 (via 1K resistor) * Mini Mp3 TX -> Arduino Pin 10 * Mini Mp3 VCC -> 5V * Mini Mp3 GND -> GND * Speaker connected to SPK_1 and SPK_2 pins * Button UP -> Pin 2 (other leg to GND) * Button DOWN -> Pin 3 (other leg to GND) * * SD Card: Put mp3 files in root, named 001.mp3, 002.mp3, etc. */ #include <DIYables_MiniMp3.h> #include <SoftwareSerial.h> SoftwareSerial mp3Serial(10, 11); // RX, TX DIYables_MiniMp3 mp3; const int BUTTON_VOL_UP = 2; const int BUTTON_VOL_DOWN = 3; int volume = 15; // Start at half volume void setup() { Serial.begin(9600); mp3Serial.begin(9600); pinMode(BUTTON_VOL_UP, INPUT_PULLUP); pinMode(BUTTON_VOL_DOWN, INPUT_PULLUP); mp3.begin(mp3Serial); delay(1000); mp3.setVolume(volume); mp3.loopTrack(1); // Play track 1 on repeat Serial.print("Volume: "); Serial.println(volume); } void loop() { // Volume Up button (pressed = LOW because of INPUT_PULLUP) if (digitalRead(BUTTON_VOL_UP) == LOW) { if (volume < 30) { volume++; mp3.setVolume(volume); Serial.print("Volume: "); Serial.println(volume); } delay(200); // Simple debounce } // Volume Down button if (digitalRead(BUTTON_VOL_DOWN) == LOW) { if (volume > 0) { volume--; mp3.setVolume(volume); Serial.print("Volume: "); Serial.println(volume); } delay(200); // Simple debounce } }

빠른 단계

  • 코드 주석에 표시된 대로 모듈과 두 개의 버튼을 Arduino Nano에 연결합니다.
  • 위 코드를 복사하여 Arduino IDE 편집기에 붙여넣습니다.
  • Arduino IDE의 Upload 버튼을 클릭하여 Arduino Nano에 코드를 업로드합니다.

볼륨 API 요약

메서드 설명 예시
setVolume(vol) 볼륨 설정(0-30) mp3.setVolume(25)
volumeUp() 볼륨 1 증가 mp3.volumeUp()
volumeDown() 볼륨 1 감소 mp3.volumeDown()
getVolume() 현재 볼륨 가져오기 mp3.getVolume()

Arduino Nano 코드 - 버튼으로 다음/이전

/* * DIYables Mini Mp3 Player - Next/Previous with Buttons * * Product: DIYables Mini Mp3 Player Module * https://diyables.io/products/mini-mp3-player-module * * Tested with: * - Arduino Uno R3 * - Arduino Uno R4 WiFi / R4 Minima * - Arduino Mega * - Arduino Due * - Arduino Giga * - DIYables STEM V3 https://diyables.io/stem-v3 * - DIYables STEM V4 IoT https://diyables.io/stem-v4-iot * - DIYables STEM V4B IoT https://diyables.io/stem-v4b-iot * - DIYables STEM V4 Edu https://diyables.io/stem-v4-edu * - DIYables MEGA2560 R3 https://diyables.io/atmega2560-board * - DIYables Nano R3 https://diyables.io/nano-board * - DIYables ESP32 Board https://diyables.io/esp32-board * - DIYables ESP32 S3 (Uno) https://diyables.io/esp32-s3-uno * - Expected to work with other Arduino-compatible boards * * Use two buttons to play next/previous tracks. * Displays the current track number on the Serial Monitor. * * Wiring (Arduino Uno): * Mini Mp3 RX -> Arduino Pin 11 (via 1K resistor) * Mini Mp3 TX -> Arduino Pin 10 * Mini Mp3 VCC -> 5V * Mini Mp3 GND -> GND * Speaker connected to SPK_1 and SPK_2 pins * Button NEXT -> Pin 2 (other leg to GND) * Button PREV -> Pin 3 (other leg to GND) * * SD Card: Put mp3 files in root, named 001.mp3, 002.mp3, etc. */ #include <DIYables_MiniMp3.h> #include <SoftwareSerial.h> SoftwareSerial mp3Serial(10, 11); // RX, TX DIYables_MiniMp3 mp3; const int BUTTON_NEXT = 2; const int BUTTON_PREV = 3; void setup() { Serial.begin(9600); mp3Serial.begin(9600); pinMode(BUTTON_NEXT, INPUT_PULLUP); pinMode(BUTTON_PREV, INPUT_PULLUP); mp3.begin(mp3Serial); delay(1000); mp3.setVolume(20); mp3.play(1); // Start with track 1 Serial.println("Press NEXT or PREV button to change track"); } void loop() { if (digitalRead(BUTTON_NEXT) == LOW) { Serial.println("Next track"); mp3.playNext(); delay(300); // Simple debounce } if (digitalRead(BUTTON_PREV) == LOW) { Serial.println("Previous track"); mp3.playPrevious(); delay(300); // Simple debounce } }

빠른 단계

  • 위 코드를 복사하여 Arduino IDE 편집기에 붙여넣습니다.
  • Arduino IDE의 Upload 버튼을 클릭하여 Arduino Nano에 코드를 업로드합니다.
  • NEXT 또는 PREV 버튼을 눌러 트랙을 변경합니다.

Arduino Nano 코드 - 일시 정지 및 재개

/* * DIYables Mini Mp3 Player - Pause and Resume * * Product: DIYables Mini Mp3 Player Module * https://diyables.io/products/mini-mp3-player-module * * Tested with: * - Arduino Uno R3 * - Arduino Uno R4 WiFi / R4 Minima * - Arduino Mega * - Arduino Due * - Arduino Giga * - DIYables STEM V3 https://diyables.io/stem-v3 * - DIYables STEM V4 IoT https://diyables.io/stem-v4-iot * - DIYables STEM V4B IoT https://diyables.io/stem-v4b-iot * - DIYables STEM V4 Edu https://diyables.io/stem-v4-edu * - DIYables MEGA2560 R3 https://diyables.io/atmega2560-board * - DIYables Nano R3 https://diyables.io/nano-board * - DIYables ESP32 Board https://diyables.io/esp32-board * - DIYables ESP32 S3 (Uno) https://diyables.io/esp32-s3-uno * - Expected to work with other Arduino-compatible boards * * Demonstrates pausing and resuming playback using a single button. * Press the button to toggle between pause and resume. * * Wiring (Arduino Uno): * Mini Mp3 RX -> Arduino Pin 11 (via 1K resistor) * Mini Mp3 TX -> Arduino Pin 10 * Mini Mp3 VCC -> 5V * Mini Mp3 GND -> GND * Speaker connected to SPK_1 and SPK_2 pins * Button -> Pin 2 (other leg to GND) * * SD Card: Put mp3 files in root, named 001.mp3, 002.mp3, etc. */ #include <DIYables_MiniMp3.h> #include <SoftwareSerial.h> SoftwareSerial mp3Serial(10, 11); // RX, TX DIYables_MiniMp3 mp3; const int BUTTON_PIN = 2; bool paused = false; void setup() { Serial.begin(9600); mp3Serial.begin(9600); pinMode(BUTTON_PIN, INPUT_PULLUP); mp3.begin(mp3Serial); delay(1000); mp3.setVolume(20); mp3.play(1); Serial.println("Playing. Press button to pause/resume."); } void loop() { if (digitalRead(BUTTON_PIN) == LOW) { if (paused) { mp3.resume(); Serial.println("Resumed"); } else { mp3.pause(); Serial.println("Paused"); } paused = !paused; delay(300); // Simple debounce } }

빠른 단계

  • 위 코드를 복사하여 Arduino IDE 편집기에 붙여넣습니다.
  • Arduino IDE의 Upload 버튼을 클릭하여 Arduino Nano에 코드를 업로드합니다.

Arduino Nano 코드 - 트랙 반복

/* * DIYables Mini Mp3 Player - Loop Track * * Product: DIYables Mini Mp3 Player Module * https://diyables.io/products/mini-mp3-player-module * * Tested with: * - Arduino Uno R3 * - Arduino Uno R4 WiFi / R4 Minima * - Arduino Mega * - Arduino Due * - Arduino Giga * - DIYables STEM V3 https://diyables.io/stem-v3 * - DIYables STEM V4 IoT https://diyables.io/stem-v4-iot * - DIYables STEM V4B IoT https://diyables.io/stem-v4b-iot * - DIYables STEM V4 Edu https://diyables.io/stem-v4-edu * - DIYables MEGA2560 R3 https://diyables.io/atmega2560-board * - DIYables Nano R3 https://diyables.io/nano-board * - DIYables ESP32 Board https://diyables.io/esp32-board * - DIYables ESP32 S3 (Uno) https://diyables.io/esp32-s3-uno * - Expected to work with other Arduino-compatible boards * * Loops (repeats) a track continuously with EQ setting. * * Wiring (Arduino Uno): * Mini Mp3 RX -> Arduino Pin 11 (via 1K resistor) * Mini Mp3 TX -> Arduino Pin 10 * Mini Mp3 VCC -> 5V * Mini Mp3 GND -> GND * Speaker connected to SPK_1 and SPK_2 pins * * SD Card file structure: * /001.mp3 * /002.mp3 * ... */ #include <DIYables_MiniMp3.h> #include <SoftwareSerial.h> SoftwareSerial mp3Serial(10, 11); // RX, TX DIYables_MiniMp3 mp3; void setup() { Serial.begin(9600); mp3Serial.begin(9600); mp3.begin(mp3Serial); delay(1000); // Wait for the module to initialize mp3.setVolume(25); // Volume: 0 to 30 mp3.setEQ(DIYables_MiniMp3::EQ_NORMAL); Serial.println("Playing track 1 on loop..."); mp3.loopTrack(1); } void loop() { // Your code here }

빠른 단계

  • 위 코드를 복사하여 Arduino IDE 편집기에 붙여넣습니다.
  • Arduino IDE의 Upload 버튼을 클릭하여 Arduino Nano에 코드를 업로드합니다.

반복 및 셔플 API 요약

메서드 설명 예시
loopTrack(trackNum) 특정 트랙 반복 mp3.loopTrack(1)
loopFolder(folder) 폴더의 모든 트랙 반복 mp3.loopFolder(1)
loopAll() 모든 트랙 반복 mp3.loopAll()
stopLoop() 반복 중지 mp3.stopLoop()
shuffle() 모든 트랙 무작위 재생 mp3.shuffle()

Arduino Nano 코드 - 폴더에서 재생

/* * DIYables Mini Mp3 Player - Play from Folder * * Product: DIYables Mini Mp3 Player Module * https://diyables.io/products/mini-mp3-player-module * * Tested with: * - Arduino Uno R3 * - Arduino Uno R4 WiFi / R4 Minima * - Arduino Mega * - Arduino Due * - Arduino Giga * - DIYables STEM V3 https://diyables.io/stem-v3 * - DIYables STEM V4 IoT https://diyables.io/stem-v4-iot * - DIYables STEM V4B IoT https://diyables.io/stem-v4b-iot * - DIYables STEM V4 Edu https://diyables.io/stem-v4-edu * - DIYables MEGA2560 R3 https://diyables.io/atmega2560-board * - DIYables Nano R3 https://diyables.io/nano-board * - DIYables ESP32 Board https://diyables.io/esp32-board * - DIYables ESP32 S3 (Uno) https://diyables.io/esp32-s3-uno * - Expected to work with other Arduino-compatible boards * * Plays tracks from specific folders on the SD card. * * Wiring (Arduino Uno): * Mini Mp3 RX -> Arduino Pin 11 (via 1K resistor) * Mini Mp3 TX -> Arduino Pin 10 * Mini Mp3 VCC -> 5V * Mini Mp3 GND -> GND * Speaker connected to SPK_1 and SPK_2 pins * * SD Card file structure: * /01/001.mp3 <- playFolder(1, 1) * /01/002.mp3 <- playFolder(1, 2) * /02/001.mp3 <- playFolder(2, 1) * /02/002.mp3 <- playFolder(2, 2) * * IMPORTANT: * - Numbering starts from 1, NOT 0 * - Folder names must be 2-digit zero-padded (01-99) * - Track names must be 3-digit zero-padded (001-255) * - Format SD card as FAT32, then copy files one by one in order * - Track order is determined by the order files were copied, * NOT by filename. So copy them in the correct sequence. */ #include <DIYables_MiniMp3.h> #include <SoftwareSerial.h> SoftwareSerial mp3Serial(10, 11); // RX, TX DIYables_MiniMp3 mp3; void setup() { Serial.begin(9600); mp3Serial.begin(9600); mp3.begin(mp3Serial); delay(1000); mp3.setVolume(20); // Play track 1 from folder 01 Serial.println("Playing folder 01, track 001..."); mp3.playFolder(1, 1); delay(5000); // Play track 2 from folder 01 Serial.println("Playing folder 01, track 002..."); mp3.playFolder(1, 2); delay(5000); // Play track 1 from folder 02 Serial.println("Playing folder 02, track 001..."); mp3.playFolder(2, 1); } void loop() { // Nothing to do here }

빠른 단계

  • 번호가 매겨진 mp3 파일(001.mp3, 002.mp3)이 포함된 폴더(01, 02)로 SD 카드를 준비합니다.
  • 위 코드를 복사하여 Arduino IDE 편집기에 붙여넣습니다.
  • Arduino IDE의 Upload 버튼을 클릭하여 Arduino Nano에 코드를 업로드합니다.

폴더 재생 API 요약

메서드 설명 예시
playFolder(folder, track) 폴더에서 트랙 재생(최대 99개 폴더, 255개 트랙) mp3.playFolder(1, 1)
playLargeFolder(folder, track) 폴더에서 재생(최대 15개 폴더, 3000개 트랙) mp3.playLargeFolder(1, 1500)
playFromMP3Folder(trackNum) /mp3 폴더에서 재생 mp3.playFromMP3Folder(1)

Arduino Nano 코드 - 시리얼 모니터 제어

/* * DIYables Mini Mp3 Player - Serial Command Control * * Product: DIYables Mini Mp3 Player Module * https://diyables.io/products/mini-mp3-player-module * * Tested with: * - Arduino Uno R3 * - Arduino Uno R4 WiFi / R4 Minima * - Arduino Mega * - Arduino Due * - Arduino Giga * - DIYables STEM V3 https://diyables.io/stem-v3 * - DIYables STEM V4 IoT https://diyables.io/stem-v4-iot * - DIYables STEM V4B IoT https://diyables.io/stem-v4b-iot * - DIYables STEM V4 Edu https://diyables.io/stem-v4-edu * - DIYables MEGA2560 R3 https://diyables.io/atmega2560-board * - DIYables Nano R3 https://diyables.io/nano-board * - DIYables ESP32 Board https://diyables.io/esp32-board * - DIYables ESP32 S3 (Uno) https://diyables.io/esp32-s3-uno * - Expected to work with other Arduino-compatible boards * * Control the Mp3 player by typing commands in the Serial Monitor. * Great for testing all functions without extra hardware. * * Commands (type in Serial Monitor, then press Enter): * 1-9 Play track 1 to 9 * + Volume up * - Volume down * p Pause * r Resume * s Stop * n Next track * b Previous track (back) * ? Show current status * * Wiring (Arduino Uno): * Mini Mp3 RX -> Arduino Pin 11 (via 1K resistor) * Mini Mp3 TX -> Arduino Pin 10 * Mini Mp3 VCC -> 5V * Mini Mp3 GND -> GND * Speaker connected to SPK_1 and SPK_2 pins * * SD Card: Put mp3 files in root, named 001.mp3, 002.mp3, etc. */ #include <DIYables_MiniMp3.h> #include <SoftwareSerial.h> SoftwareSerial mp3Serial(10, 11); // RX, TX DIYables_MiniMp3 mp3; void setup() { Serial.begin(9600); mp3Serial.begin(9600); mp3.begin(mp3Serial); delay(1000); mp3.setVolume(20); Serial.println("=== DIYables Mini Mp3 Player ==="); Serial.println("Commands:"); Serial.println(" 1-9 Play track number"); Serial.println(" + Volume up"); Serial.println(" - Volume down"); Serial.println(" p Pause"); Serial.println(" r Resume"); Serial.println(" s Stop"); Serial.println(" n Next track"); Serial.println(" b Previous track"); Serial.println(" ? Show status"); Serial.println("================================"); } void loop() { if (Serial.available()) { char cmd = Serial.read(); switch (cmd) { case '1': case '2': case '3': case '4': case '5': case '6': case '7': case '8': case '9': Serial.print("Playing track "); Serial.println(cmd - '0'); mp3.play(cmd - '0'); break; case '+': Serial.println("Volume up"); mp3.volumeUp(); break; case '-': Serial.println("Volume down"); mp3.volumeDown(); break; case 'p': Serial.println("Paused"); mp3.pause(); break; case 'r': Serial.println("Resumed"); mp3.resume(); break; case 's': Serial.println("Stopped"); mp3.stop(); break; case 'n': Serial.println("Next track"); mp3.playNext(); break; case 'b': Serial.println("Previous track"); mp3.playPrevious(); break; case '?': { Serial.println("--- Status ---"); int16_t vol = mp3.getVolume(); Serial.print("Volume: "); Serial.println(vol); int16_t track = mp3.getCurrentTrack(); Serial.print("Current track: "); Serial.println(track); bool playing = mp3.isPlaying(); Serial.print("Playing: "); Serial.println(playing ? "Yes" : "No"); int16_t total = mp3.getTrackCount(); Serial.print("Total tracks: "); Serial.println(total); Serial.println("--------------"); break; } default: break; } } }

빠른 단계

  • 위 코드를 복사하여 Arduino IDE 편집기에 붙여넣습니다.
  • Arduino IDE의 Upload 버튼을 클릭하여 Arduino Nano에 코드를 업로드합니다.
  • 시리얼 모니터를 엽니다(보드레이트 9600).
  • 명령을 입력하고 Enter 키를 누릅니다:
명령 동작
1-9 트랙 1~9 재생
+ 볼륨 올리기
* 볼륨 내리기
p 일시 정지
r 재개
s 중지
n 다음 트랙
b 이전 트랙
? 현재 상태 표시

이퀄라이저 설정

모듈은 6가지 EQ 모드를 지원합니다:

상수 설명
DIYables_MiniMp3::EQ_NORMAL 0 보통(플랫)
DIYables_MiniMp3::EQ_POP 1
DIYables_MiniMp3::EQ_ROCK 2
DIYables_MiniMp3::EQ_JAZZ 3 재즈
DIYables_MiniMp3::EQ_CLASSIC 4 클래식
DIYables_MiniMp3::EQ_BASS 5 베이스 부스트

예시:

mp3.setEQ(DIYables_MiniMp3::EQ_ROCK);

상태 조회

메서드 반환 설명
isPlaying() bool 트랙이 현재 재생 중이면 true
getVolume() int16_t 현재 볼륨(0-30)
getEQ() int16_t 현재 EQ 설정(0-5)
getTrackCount() int16_t SD 카드의 총 트랙 수
getCurrentTrack() int16_t 현재 재생 중인 트랙 번호
getFolderCount() int16_t SD 카드의 폴더 수
getTrackCountInFolder(folder) int16_t 폴더 내 트랙 수

플랫폼 지원

이 라이브러리는 모든 Arduino 플랫폼(architectures=*)을 지원합니다. Stream 호환 시리얼 포트를 제공하는 모든 보드에서 작동합니다.