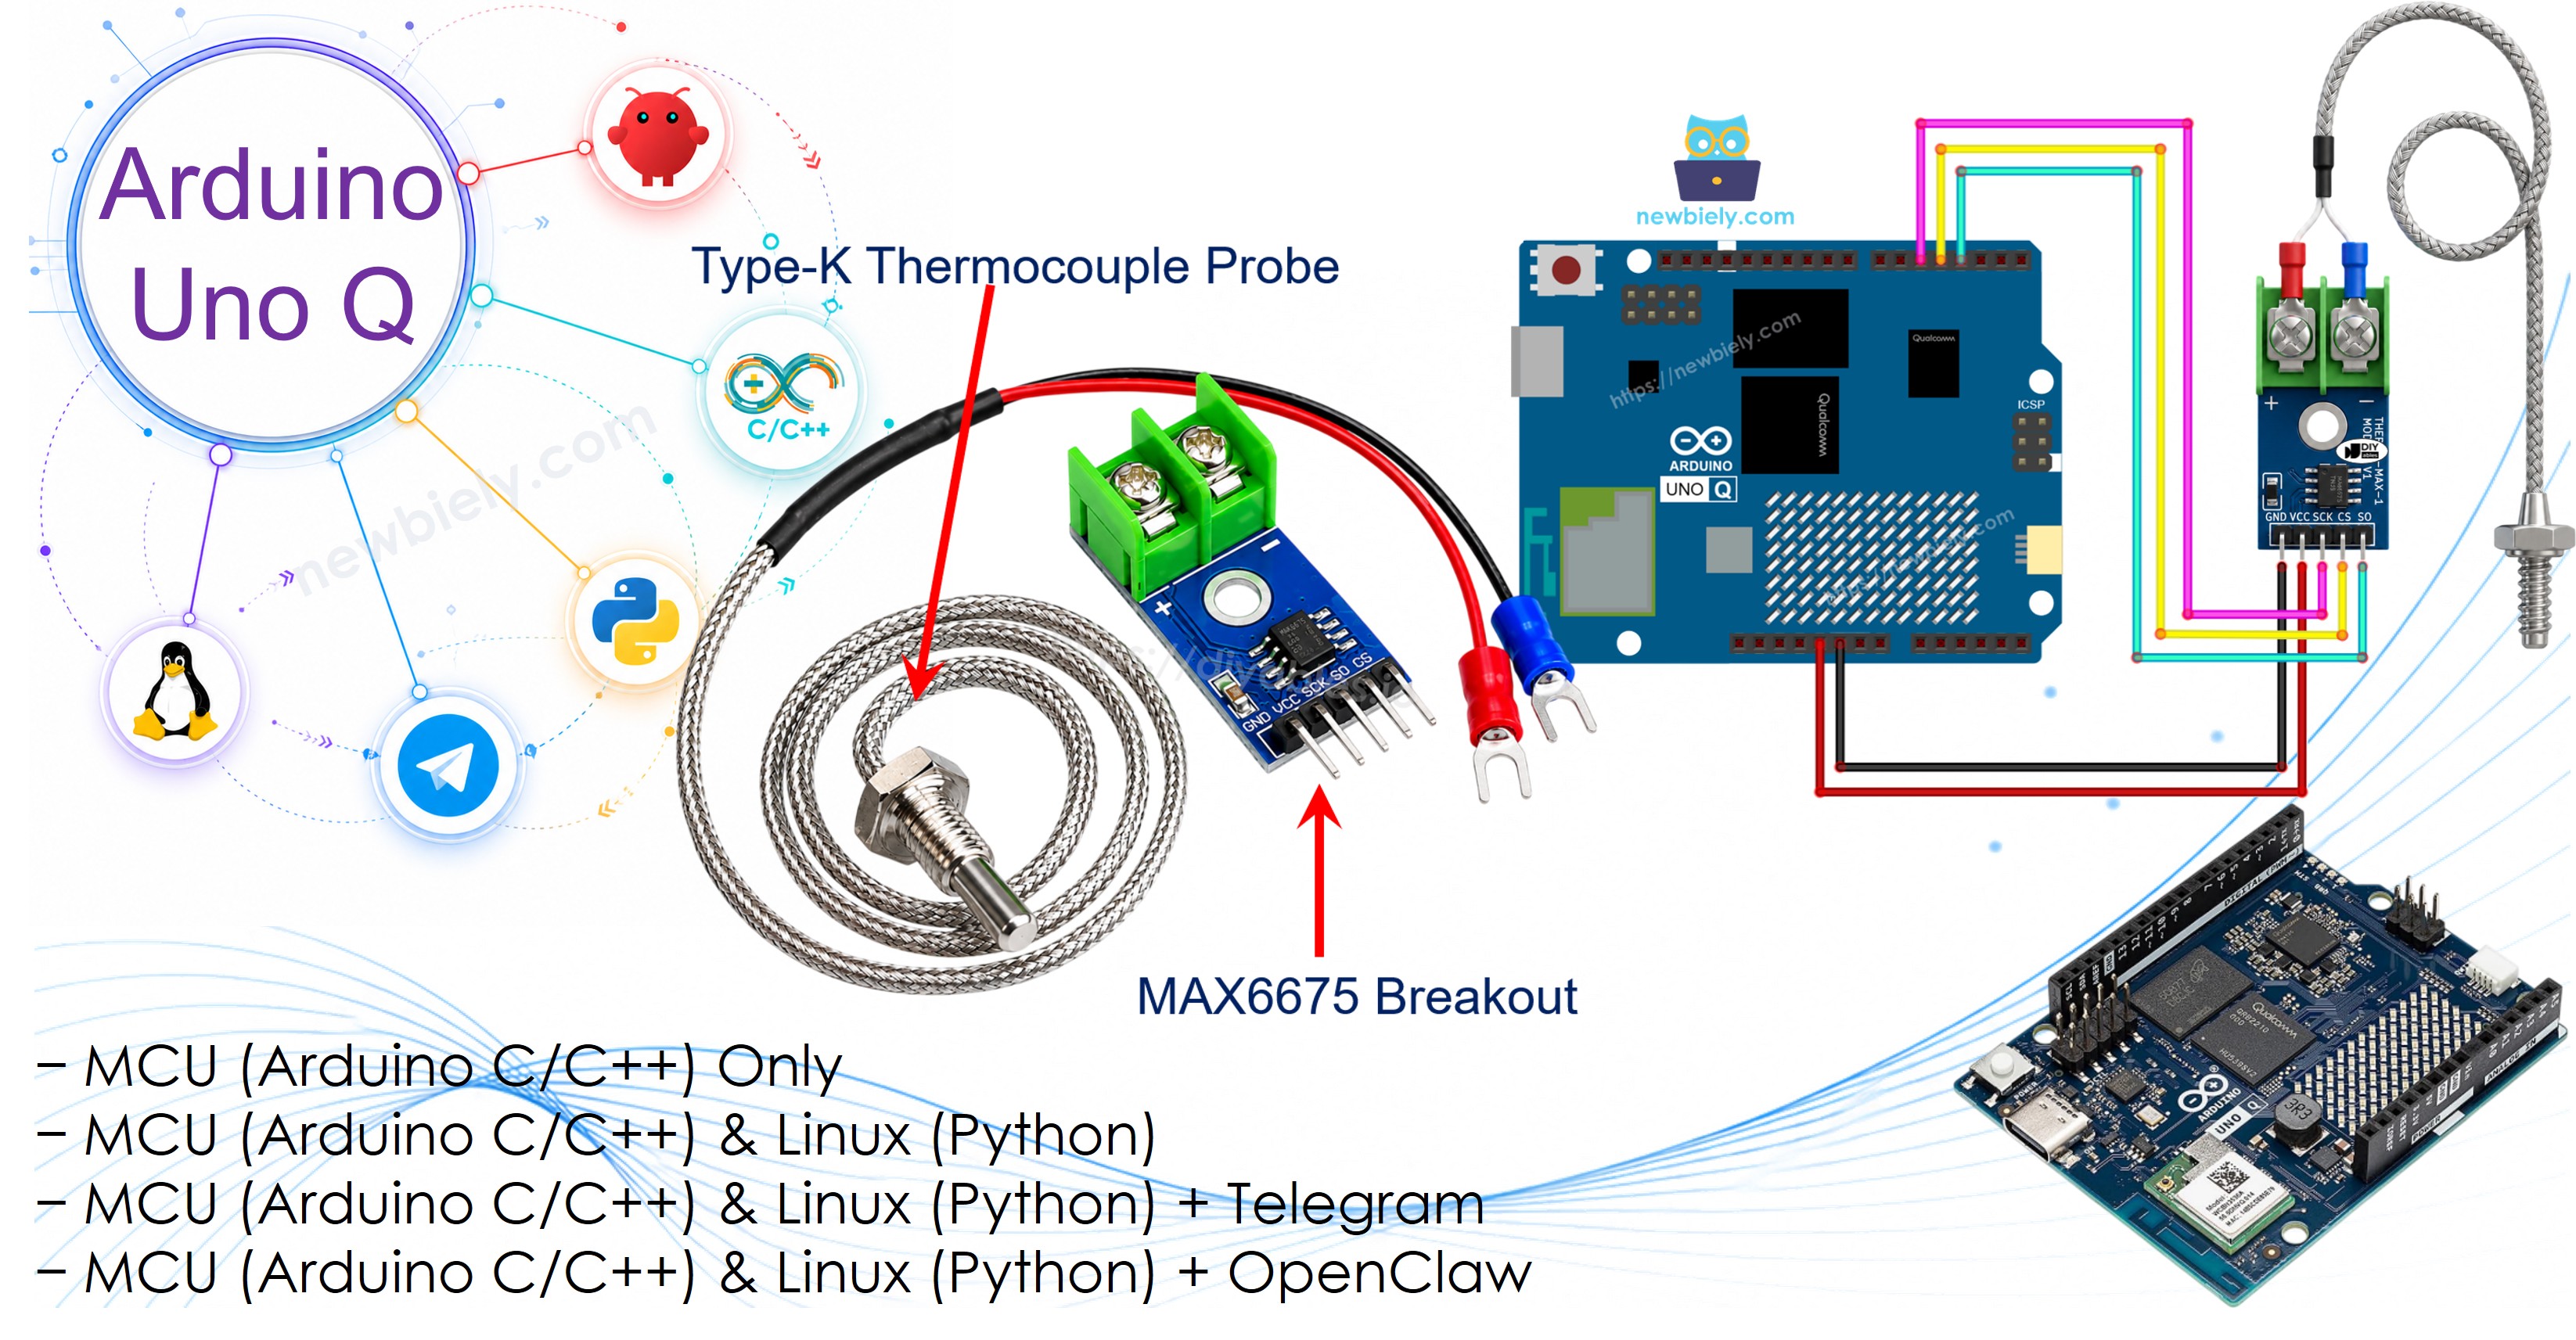
아두이노 우노 Q MAX6675 열전대 모듈

DHT11이나 LM35 같은 일반 센서는 오븐, 납땜 인두, 작동 중인 엔진 근처에서 견디지 못합니다 — 애초에 그런 열을 위해 만들어지지 않았기 때문입니다. MAX6675 모듈은 Type-K 열전대 프로브와 전용 디지타이저 칩을 짝지어 이 문제를 해결하며, Arduino UNO Q가 일반 센서로는 감당할 수 없는 훨씬 높은 온도를 안전하게 읽을 수 있게 해 줍니다. 이 튜토리얼에서는 배선과 프로그래밍 방법, 그리고 Telegram으로 원격 모니터링하는 방법을 보여줍니다.

이 튜토리얼에서 배울 내용:

Arduino UNO Q max6675 열전대 모듈

준비물

1×Arduino UNO Q 아마존
1×USB Cable for Arduino Uno Q 아마존
1×MAX6675 Thermocouple Module 아마존
1×브레드보드 쿠팡 | 아마존
1×점퍼케이블 쿠팡 | 아마존
1×(추천) 아두이노 우노용 스크루 터미널 블록 쉴드 쿠팡 | 아마존
1×(추천) Sensors/Servo Expansion Shield for Arduino Uno 쿠팡 | 아마존
1×(추천) 아두이노 우노용 브레드보드 쉴드 쿠팡 | 아마존
1×(추천) 아두이노 우노용 케이스 쿠팡 | 아마존
1×(추천) 아두이노 우노용 프로토타이핑 베이스 플레이트 & 브레드보드 키트 아마존
공개: 이 포스팅 에 제공된 일부 링크는 아마존 제휴 링크입니다. 이 포스팅은 쿠팡 파트너스 활동의 일환으로, 이에 따른 일정액의 수수료를 제공받습니다.

MAX6675 열전대 모듈에 대하여

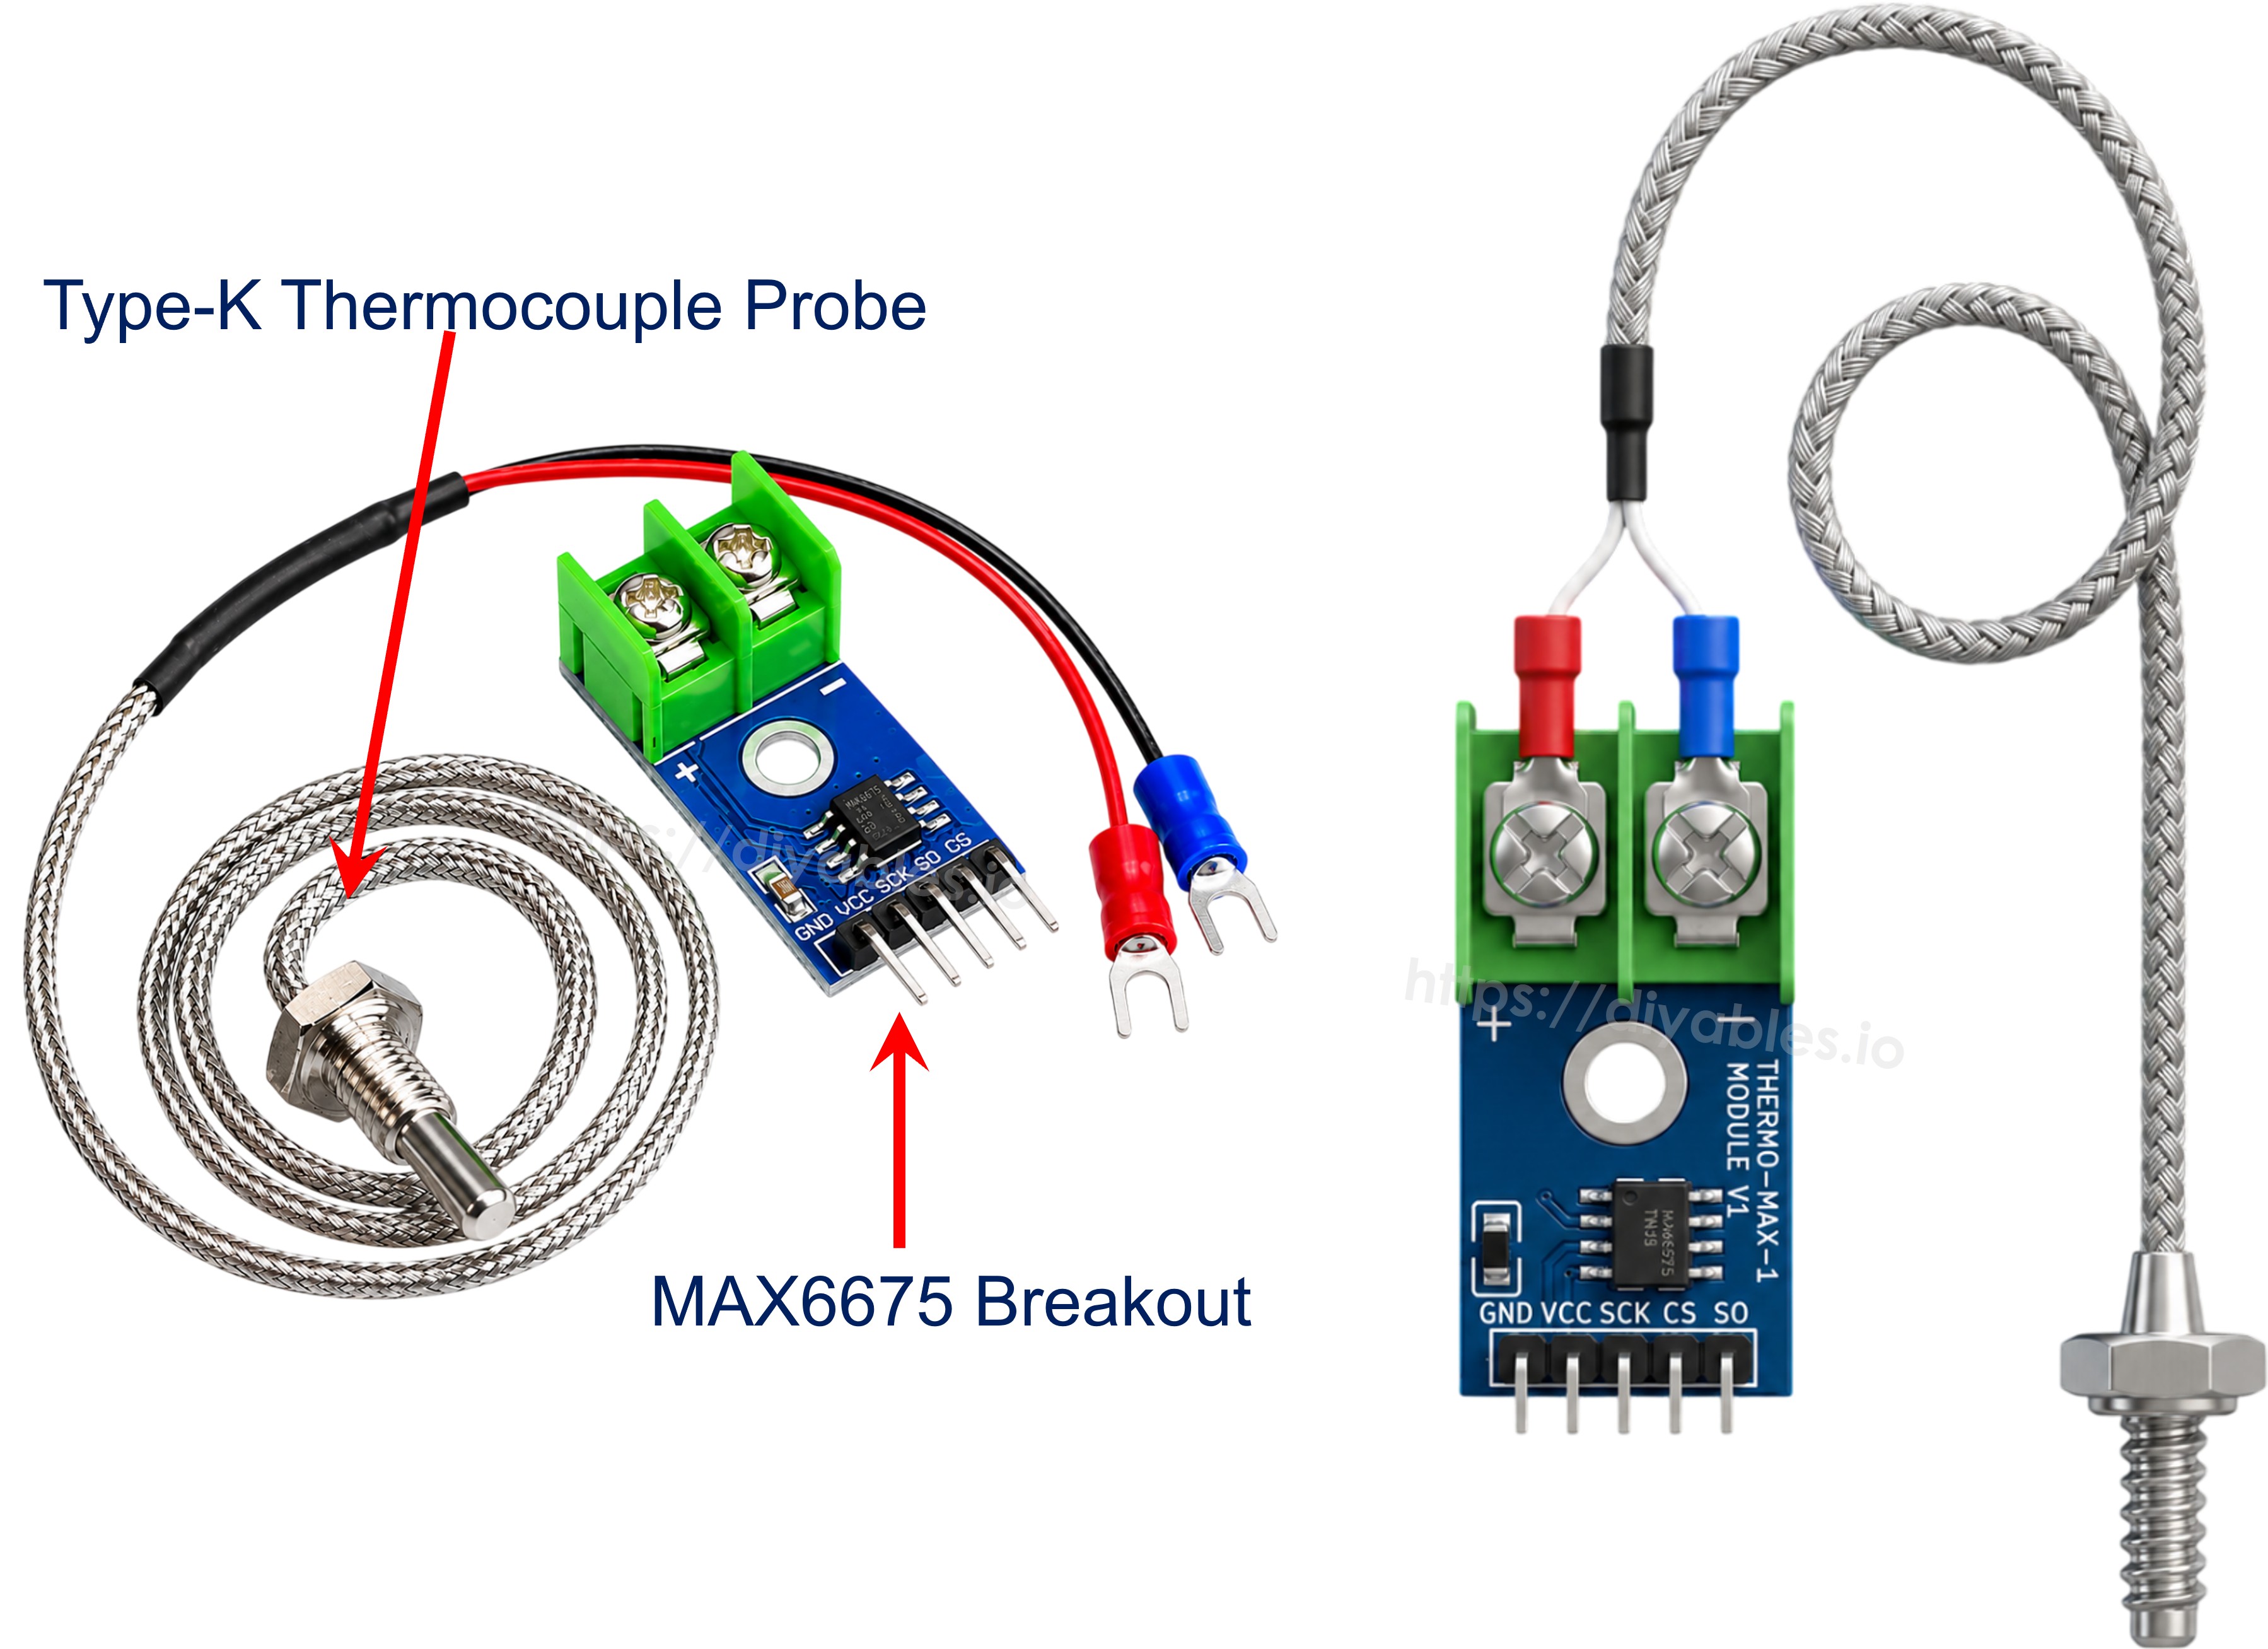
열전대는 서로 다른 두 금속 선을 한쪽 끝에서 접합한 온도 센서이며, 이 끝을 온접점(hot junction)이라고 합니다. 이 접점을 가열하면 온도에 따라 변하는 작은 전압이 생깁니다 — MAX6675 칩은 이 작은 전압을 Arduino UNO Q가 바로 사용할 수 있는 깨끗한 12비트 디지털 값으로 변환합니다. 가장 흔한 프로브 종류인 Type-K는 크로멜(Chromel)과 알루멜(Alumel) 선으로 만들어지며, 대략 -328°F에서 +2300°F까지 측정할 수 있습니다.

MAX6675 모듈
동작 전압 3.0V ~ 5.5V
인터페이스 3선식 (SCK, CS, SO)
온도 범위 0°C ~ 1024°C (프로브 외부 케이스 정격은 0°C ~ 80°C)
정확도 ±3°C

핀아웃

max6675 열전대 모듈 핀아웃

브레이크아웃 보드에는 네 개의 헤더 핀과 프로브용 2핀 나사 단자가 있습니다:

  • VCC: 3.3V 또는 5V에 연결합니다
  • GND: GND(0V)에 연결합니다
  • SCK: 클록 핀 — MCU의 디지털 핀에 연결합니다
  • CS: 칩 선택 핀 — MCU의 디지털 핀에 연결합니다
  • SO: 시리얼 데이터 출력 (MISO만 있고 MOSI는 없음) — MCU의 디지털 핀에 연결합니다

Type-K 프로브는 보드 반대쪽의 나사 단자에 연결합니다: 빨간 선은 +에, 파란 선은 -에 연결합니다.

배선도
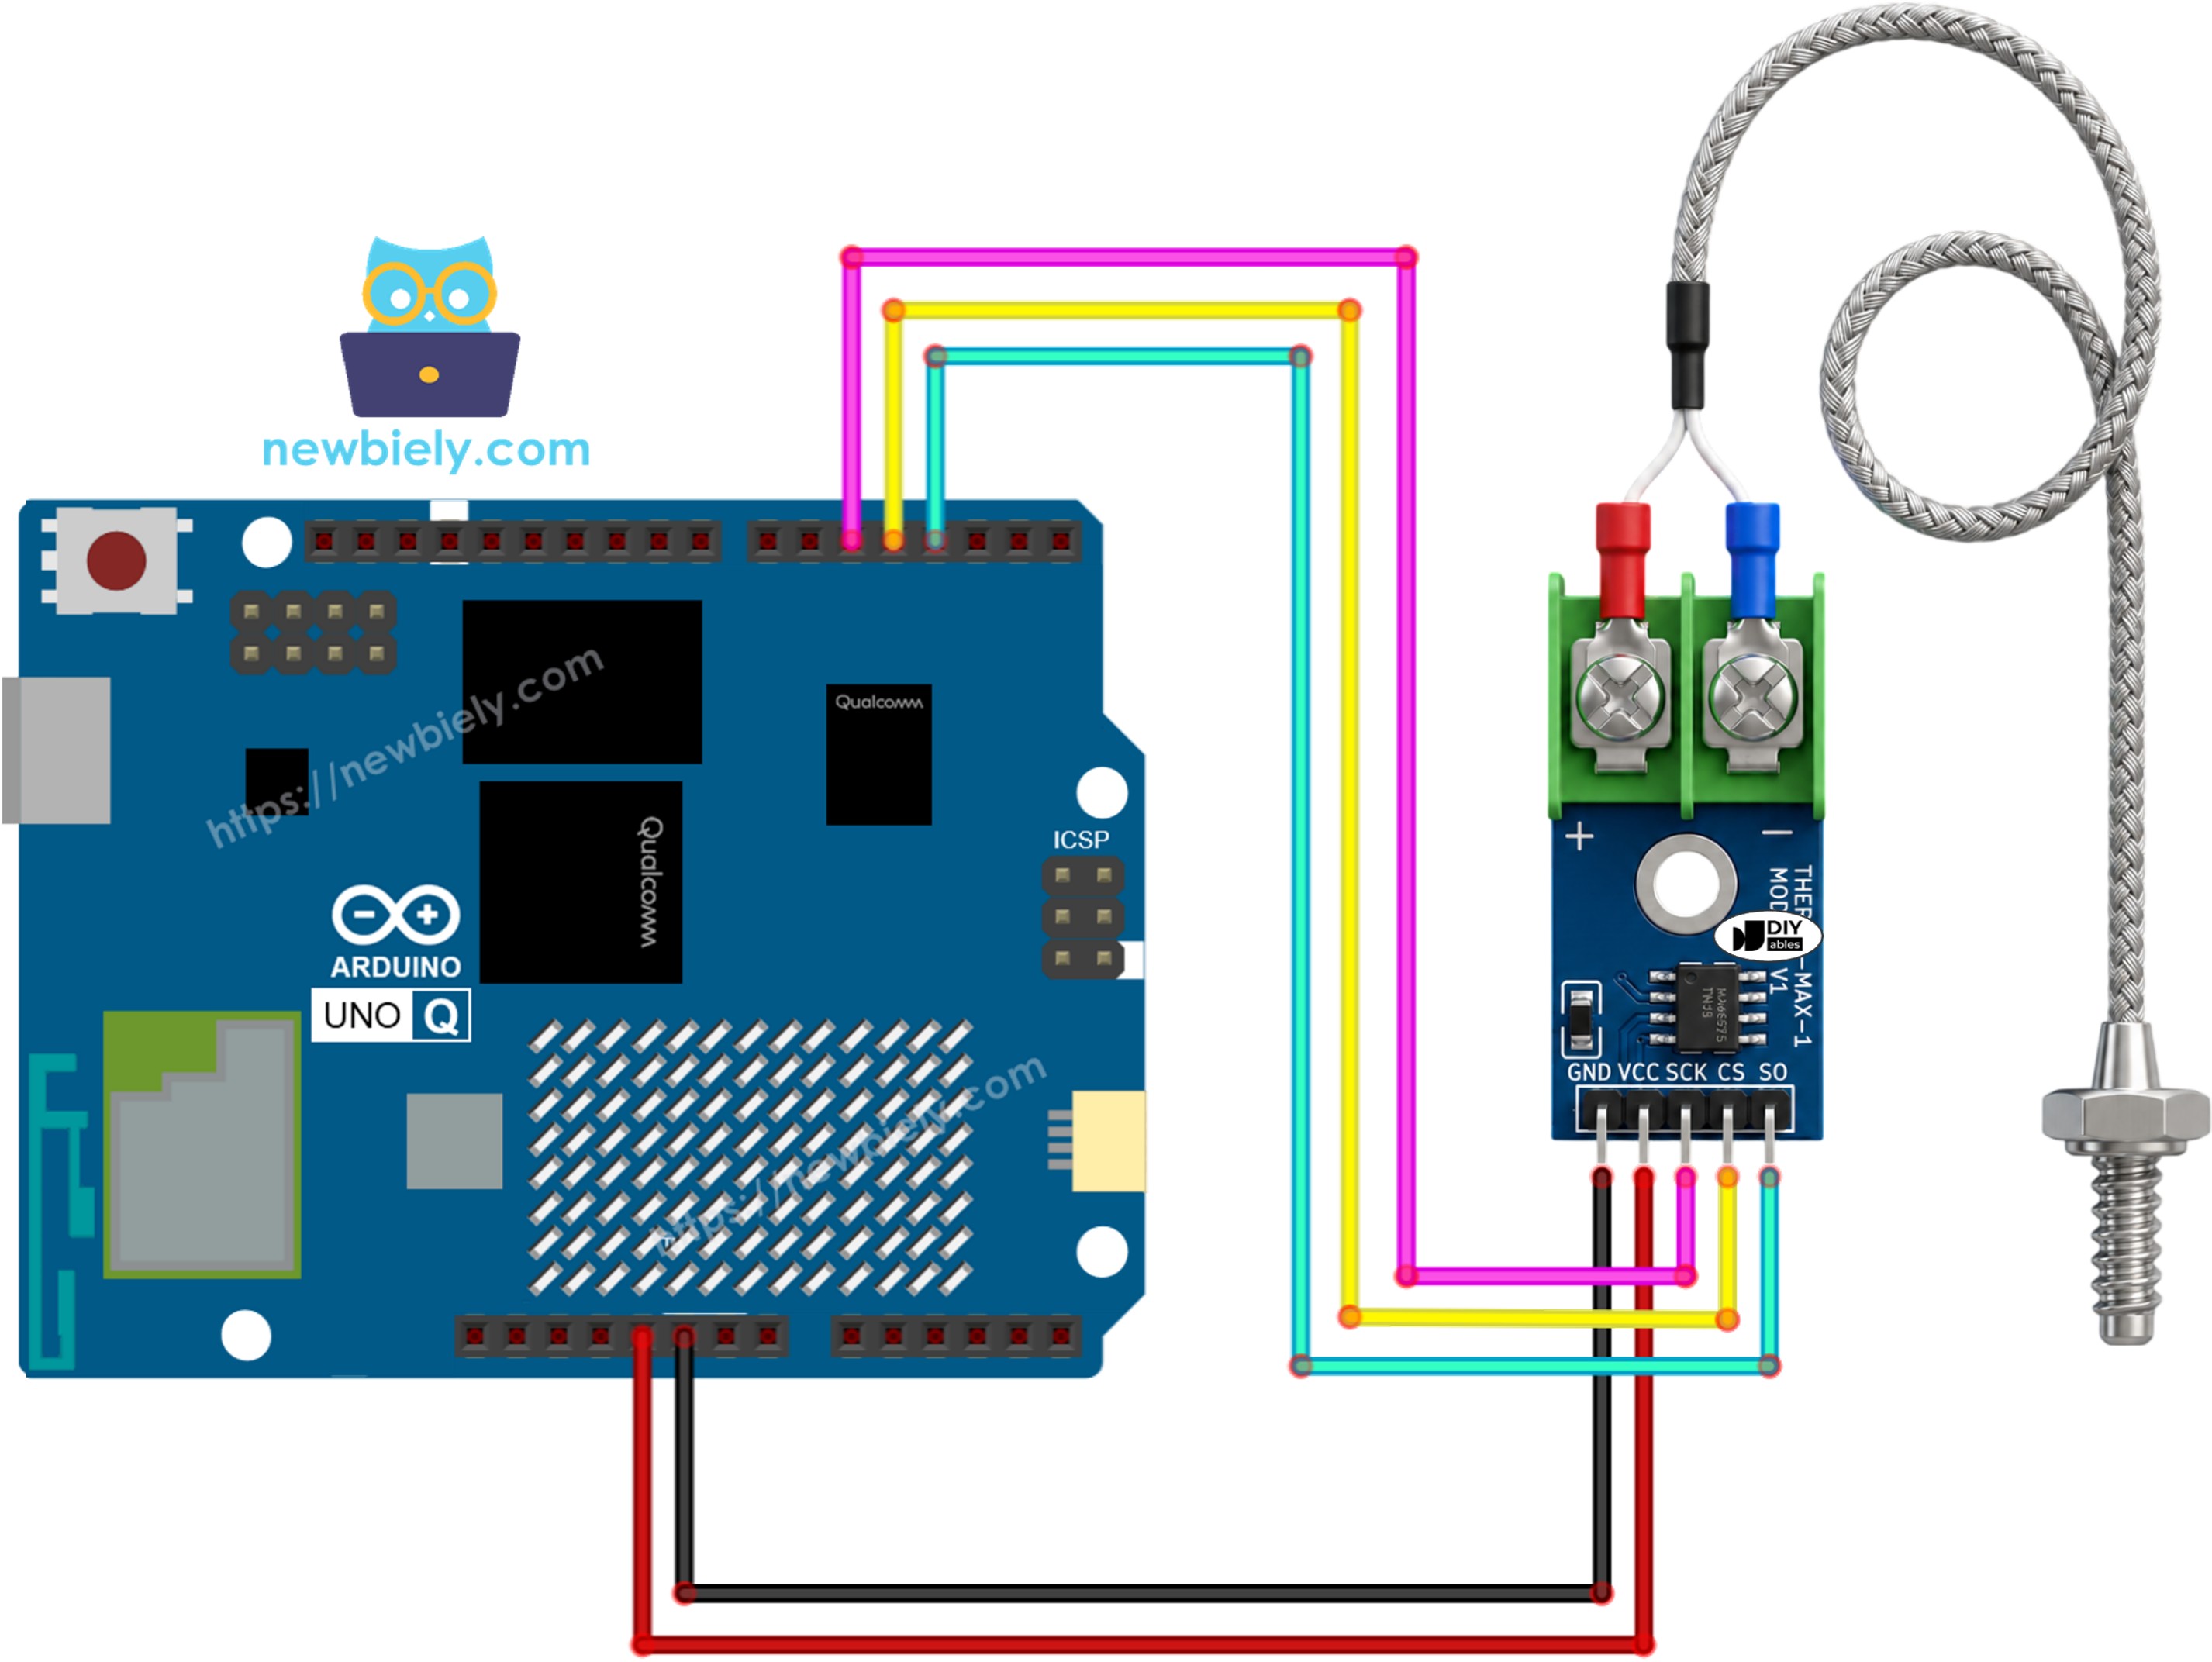
Arduino UNO Q max6675 열전대 모듈 배선도

이 이미지는 Fritzing을 사용하여 만들어졌습니다. 이미지를 확대하려면 클릭하세요.

MAX6675 모듈 핀 Arduino UNO Q MCU
VCC 5V
GND GND
SCK D5
CS D4
SO D3

MAX6675 프로그래밍 방법

  • 라이브러리를 포함합니다:
#include "max6675.h"
  • 핀을 정의하고 thermocouple 객체를 만듭니다:
#define SCK_PIN 5 #define CS_PIN 4 #define SO_PIN 3 MAX6675 thermocouple(SCK_PIN, CS_PIN, SO_PIN);
  • 섭씨와 화씨로 온도를 읽습니다:
float tempC = thermocouple.readCelsius(); float tempF = thermocouple.readFahrenheit();

※ 주의:

MAX6675는 변환을 완료하는 데 약 220ms가 필요합니다 — 대략 250ms에 한 번보다 자주 읽지 않도록 하세요.

Arduino UNO Q 코드

Arduino UNO Q에는 함께 동작하는 두 개의 프로세서가 있습니다:

  • STM32 MCU는 3선식 인터페이스를 통해 MAX6675 모듈을 직접 읽습니다 — 모든 센서 읽기는 MCU에서 실행됩니다
  • Qualcomm MPU는 Debian Linux를 실행하며 Wi-Fi, Python, 클라우드 연결을 처리합니다
  • 이 섹션에서는 MCU만 프로그래밍합니다 — Linux 측은 유휴 상태로 둡니다. 두 프로세서가 Bridge를 통해 함께 동작하는 방법은 뒤 섹션에서 보여줍니다.

MCU는 매초 MAX6675를 읽고 온도를 시리얼 모니터에 출력합니다.

/* * 이 Arduino UNO Q 코드는 newbiely.kr 에서 개발되었습니다 * 이 Arduino UNO Q 코드는 어떠한 제한 없이 공개 사용을 위해 제공됩니다. * 상세한 지침 및 연결도에 대해서는 다음을 방문하세요: * https://newbiely.kr/tutorials/arduino-uno-q/arduino-uno-q-max6675-thermocouple-module */ #include "max6675.h" // Arduino UNO Q MCU pins connected to the MAX6675 module #define SCK_PIN 5 #define CS_PIN 4 #define SO_PIN 3 MAX6675 thermocouple(SCK_PIN, CS_PIN, SO_PIN); void setup() { Serial.begin(115200); delay(1500); Serial.println("Arduino UNO Q MAX6675 Thermocouple Module ready"); } void loop() { float tempC = thermocouple.readCelsius(); float tempF = thermocouple.readFahrenheit(); Serial.print("Temperature: "); Serial.print(tempC); Serial.print("°C = "); Serial.print(tempF); Serial.println("°F"); delay(1000); }

빠른 단계

Arduino UNO Q를 처음 사용하시나요? 진행하기 전에 아두이노 우노 Q 시작하기 튜토리얼을 따라 하세요.

  • 연결: 배선도와 같이 MAX6675 모듈을 Arduino UNO Q MCU에 연결합니다.
  • Arduino App Lab 열기: Arduino App Lab을 실행하고 Arduino UNO Q를 감지할 때까지 기다립니다.
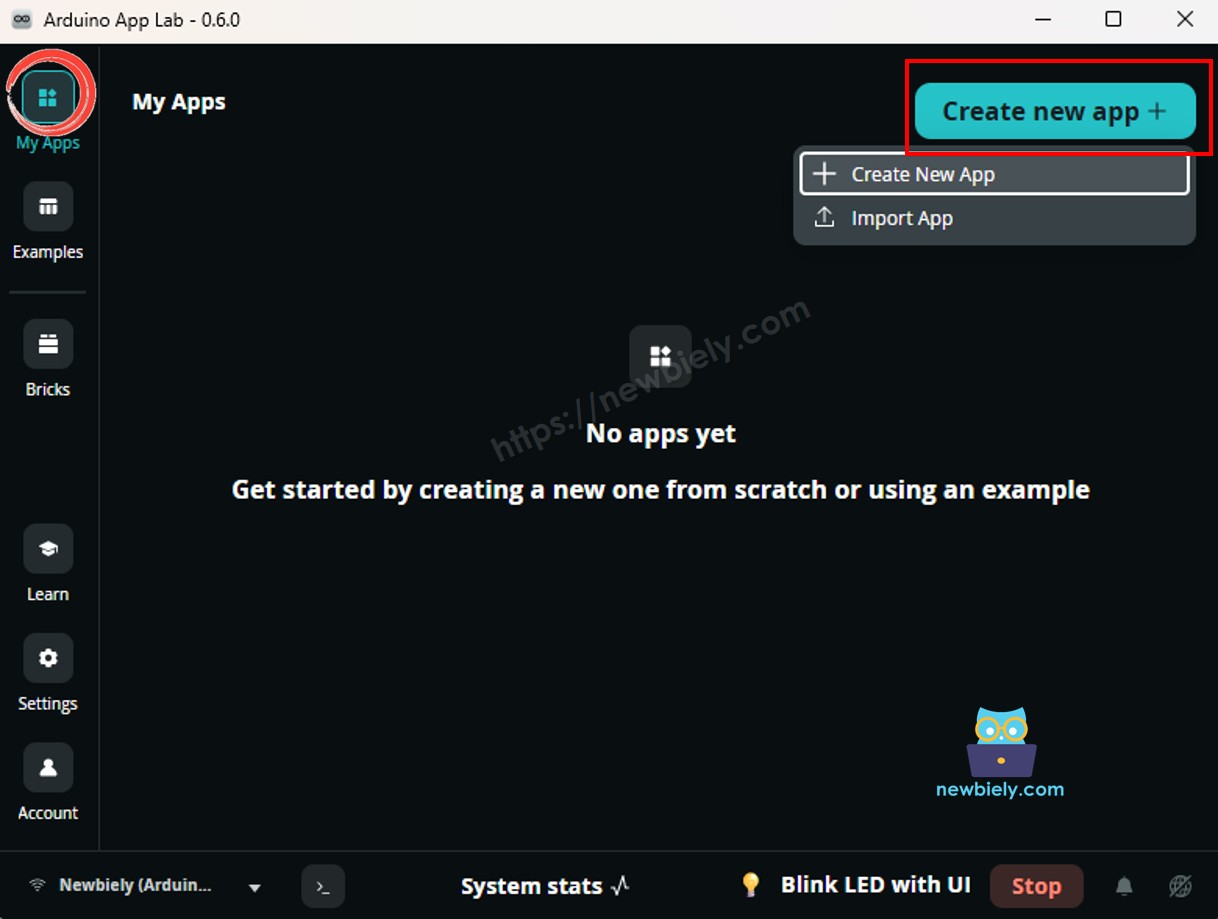
  • 새 App 만들기: Create New App 버튼을 클릭합니다.
Arduino UNO Q의 아두이노 app lab에서 새 app 만들기
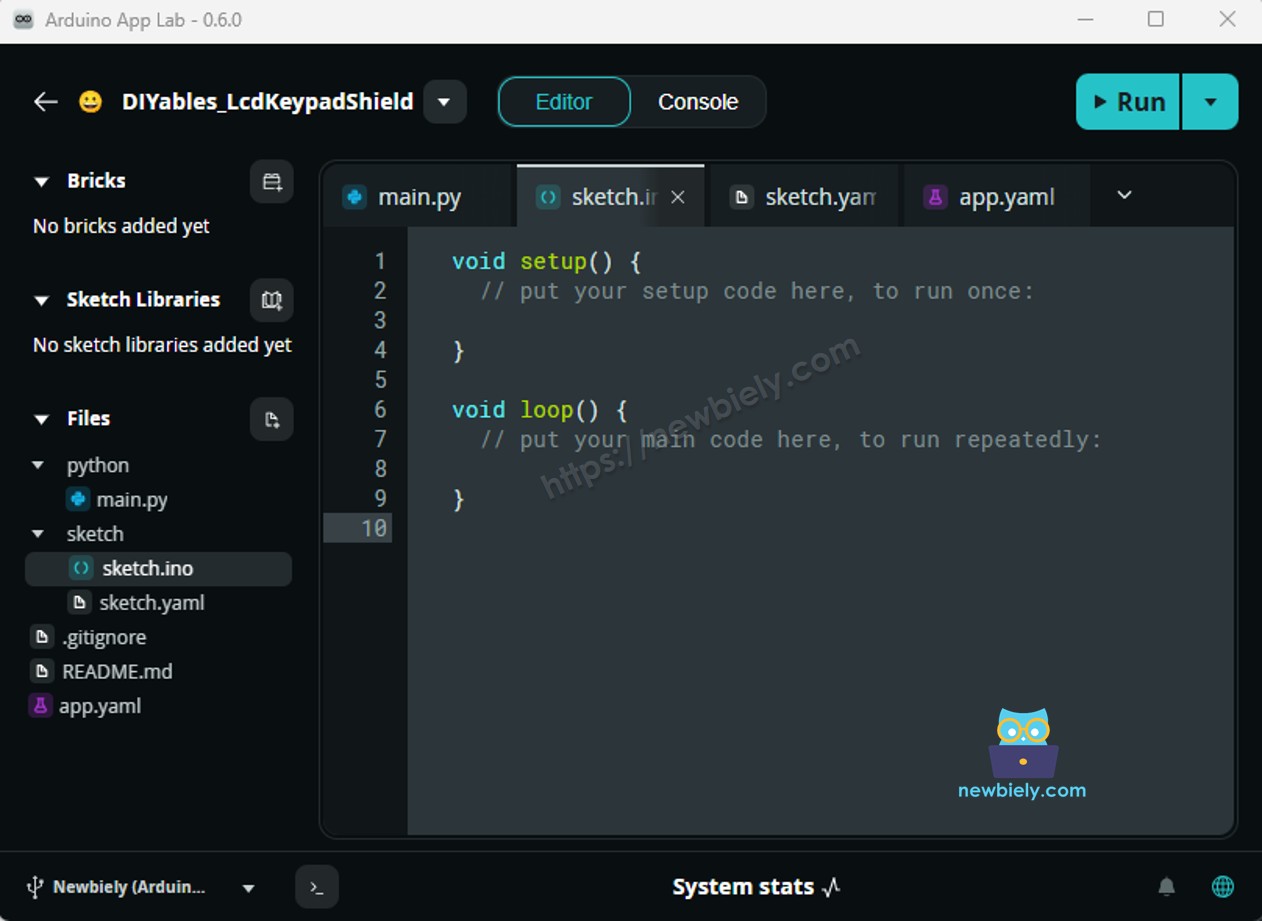
  • App에 이름을 지정합니다. 예: Max6675ThermocoupleModule
  • Create를 클릭하여 확인합니다.
Arduino UNO Q의 아두이노 app lab app 폴더와 파일
  • 스케치 붙여넣기: 위의 MCU 코드를 복사하여 sketch/sketch.ino에 붙여넣습니다. 다른 파일은 기본값으로 둡니다.
  • Install the library: Click the Add sketch library button (the open book icon with a + sign) in the left sidebar.
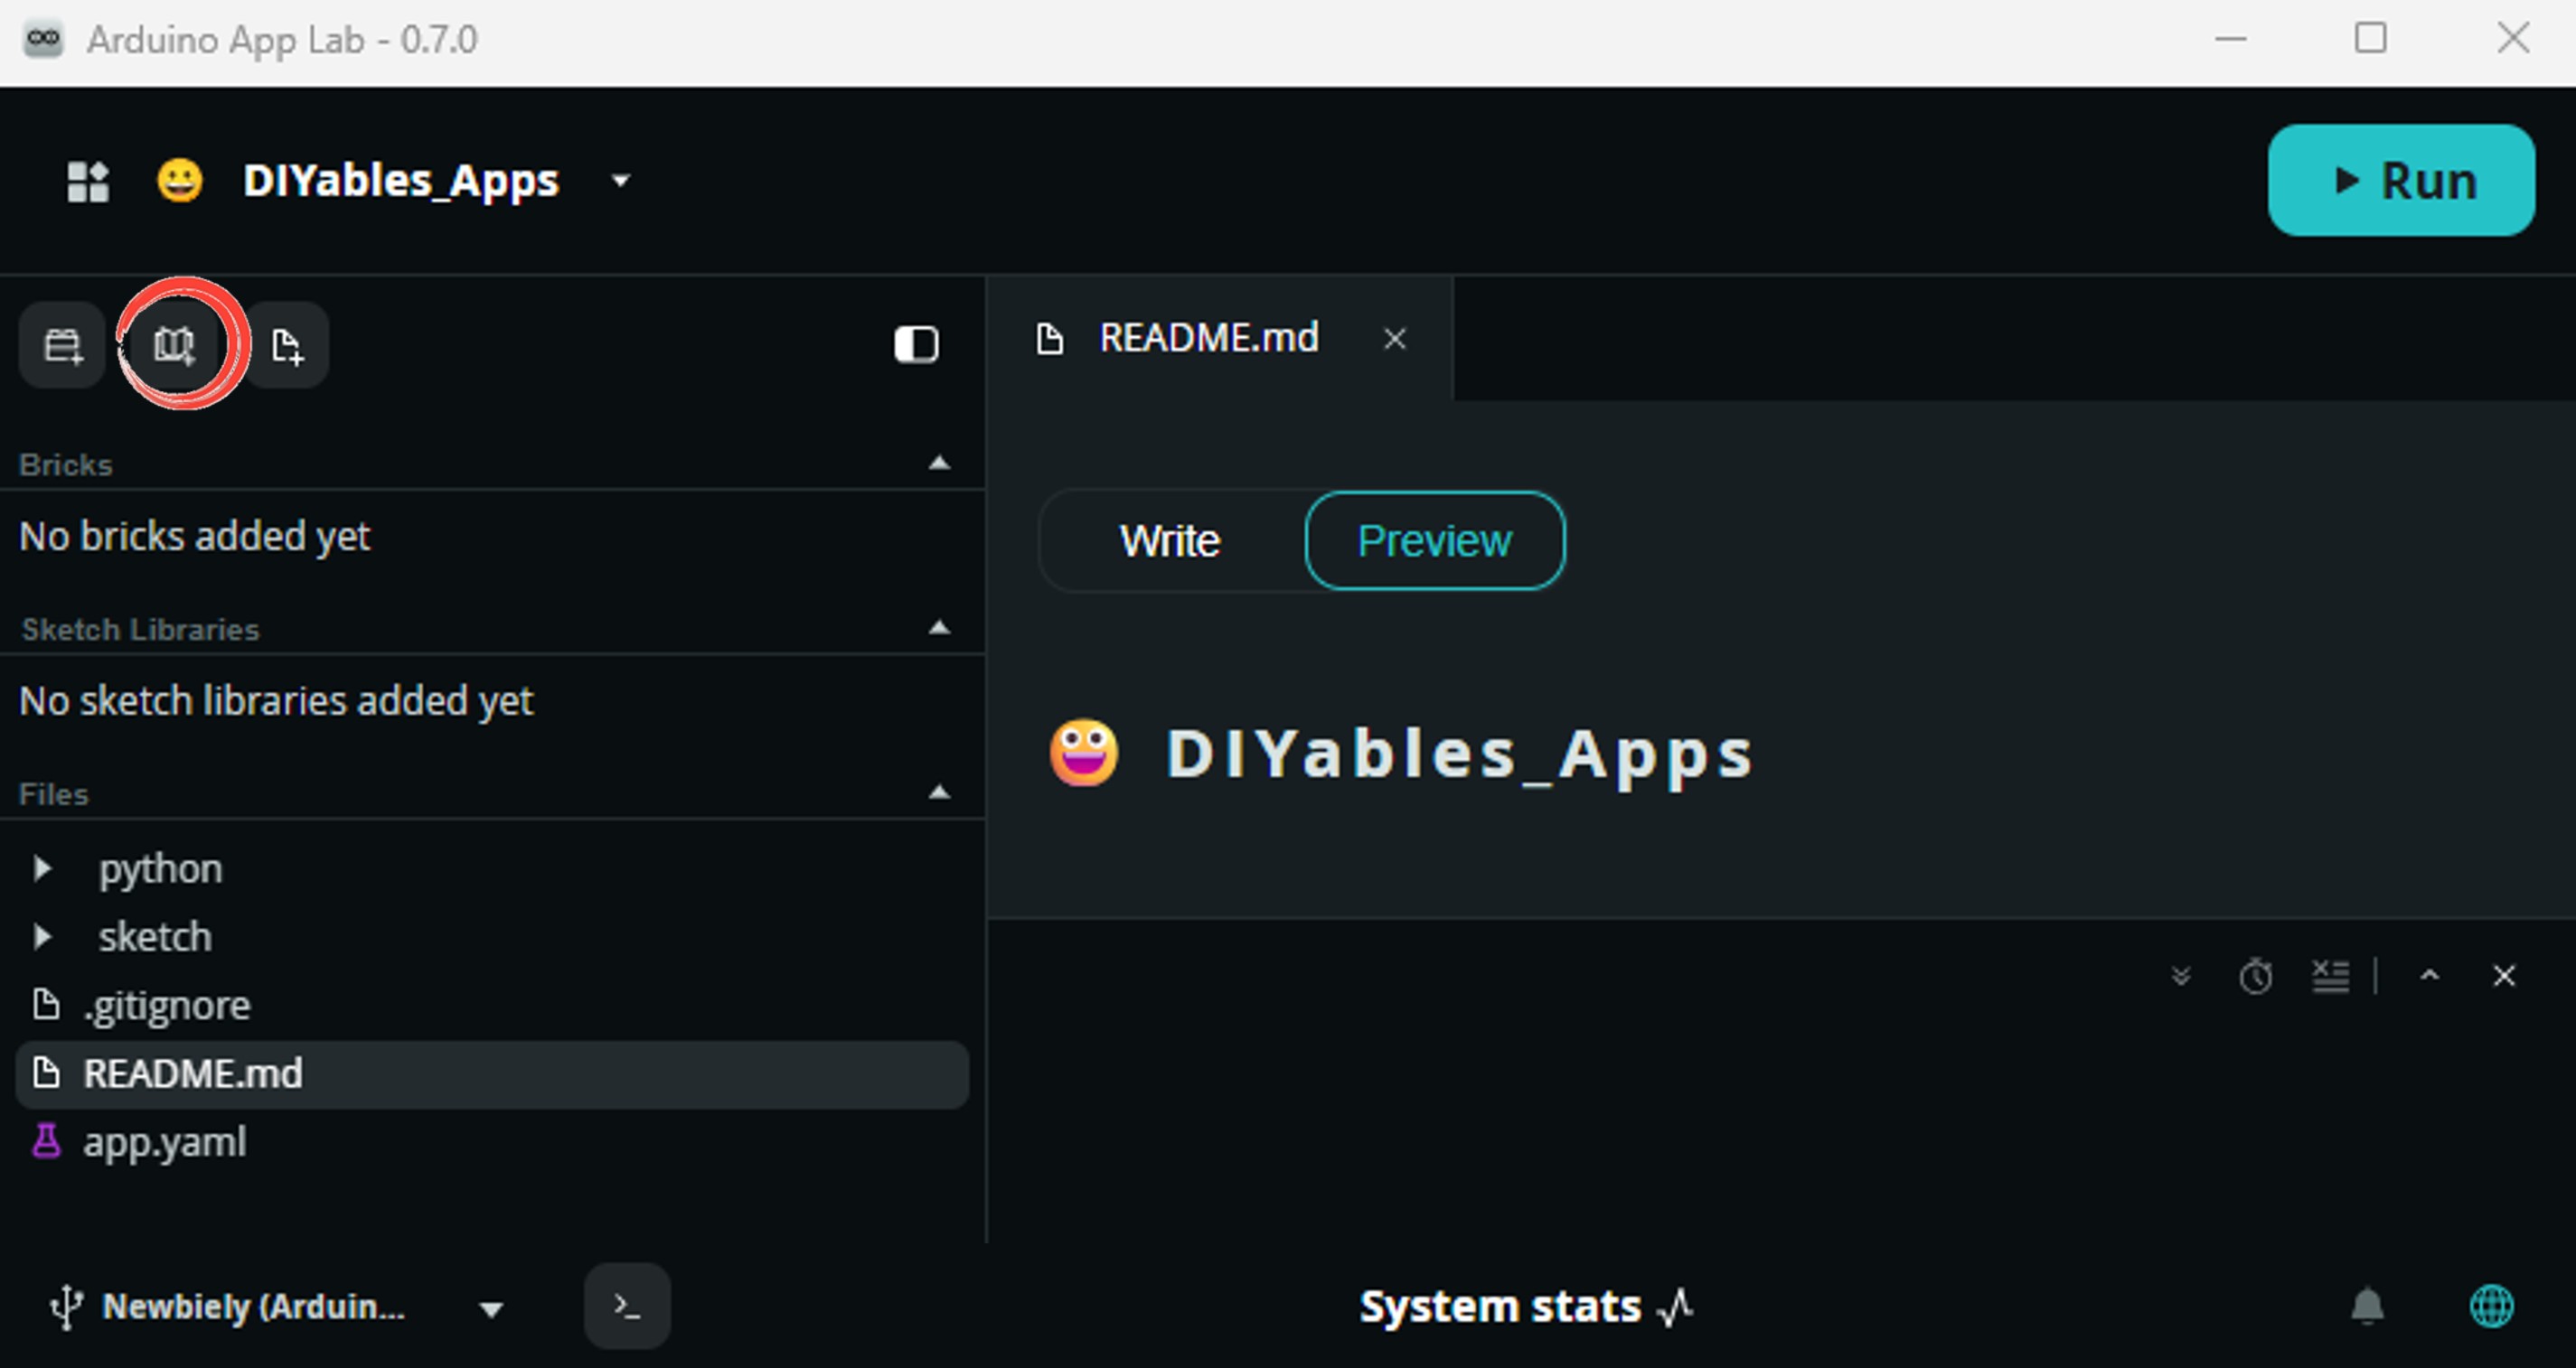
add sketch 라이브러리 in 아두이노 app lab on Arduino UNO Q
  • Search for MAX6675 library created by Adafruit and click the Install button.
My Apps / DIYables Apps
Run
Bricks
No bricks added...
Sketch Libraries
No sketch libra...
Files
python
sketch
.gitignore
README.md
app.yaml
sketch.ino
Add sketch library
MAX6675 library Adafruit

Arduino library for interfacing with MAX6675 thermocouple amplifier

1.1.2
Install
More Info
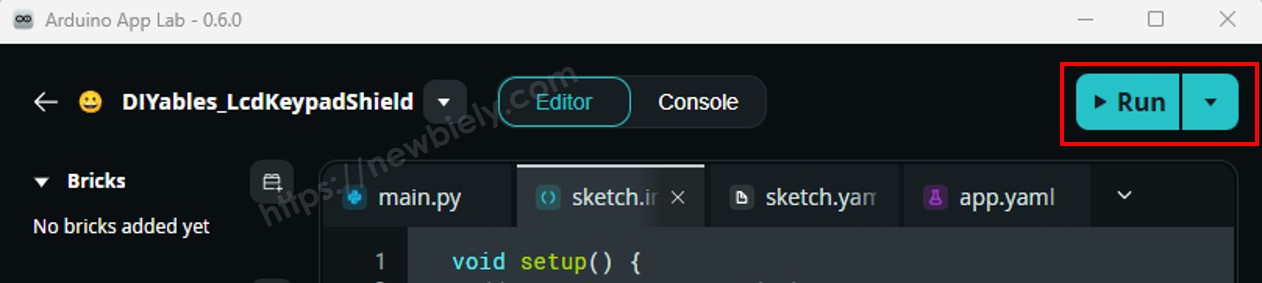
  • 업로드: Arduino App Lab에서 Run 버튼을 클릭합니다.
Arduino UNO Q의 아두이노 app lab에서 run 버튼 클릭
  • 프로브 끝을 따뜻한 것(뜨거운 물이 담긴 머그컵이 좋습니다)에 대고 — 콘솔에서 온도가 올라가는 것을 지켜보세요.

App Lab 콘솔 출력

DIYables_Apps
Stop
sketch.ino
1#include "Arduino_RouterBridge.h"
Serial Monitor
Python
Message (Enter to send a message to "Newbiely" on usb(2820070321))
New Line
9600 baud
[2026-04-29 09:00:01] Arduino UNO Q MAX6675 Thermocouple Module ready [2026-04-29 09:00:02] Temperature: 24.50°C = 76.10°F [2026-04-29 09:00:03] Temperature: 26.75°C = 80.15°F [2026-04-29 09:00:04] Temperature: 31.00°C = 87.80°F [2026-04-29 09:00:05] Temperature: 38.25°C = 100.85°F

Bridge: Linux + MCU

이 섹션에서는 Linux 측이 Bridge를 통해 MAX6675 온도를 읽을 수 있도록 Arduino UNO Q의 두 프로세서를 모두 프로그래밍하는 방법을 보여줍니다:

  • MAX6675 모듈은 3선식 인터페이스를 통해 MCU(STM32)에 연결됩니다 — MCU는 매초 최신 값을 읽고 캐시합니다
  • MPU는 MAX6675에 직접 접근할 수 없습니다 — 측정값을 가져오려면 Bridge 함수를 호출해야 합니다
  • MPU에는 Wi-Fi가 있습니다 — 완전한 Debian Linux를 실행하므로 데이터를 기록하거나, 대시보드에 게시하거나, 인터넷으로 알림을 보낼 수 있습니다
  • Arduino_RouterBridge는 두 프로세서 간의 RPC 통신을 가능하게 합니다
  • ⚠️ /dev/ttyHS1(Linux)과 Serial1(MCU)은 라우터가 예약한 것입니다 — 사용자 코드에서 절대 열지 마세요

요약하면: MCU가 매초 MAX6675를 읽고 결과를 캐시 → MPU가 Bridge를 폴링하여 측정값을 가져옴 → MPU가 Wi-Fi로 게시하거나 알림을 보냄.

MCU 코드 (Bridge)

/* * 이 Arduino UNO Q 코드는 newbiely.kr 에서 개발되었습니다 * 이 Arduino UNO Q 코드는 어떠한 제한 없이 공개 사용을 위해 제공됩니다. * 상세한 지침 및 연결도에 대해서는 다음을 방문하세요: * https://newbiely.kr/tutorials/arduino-uno-q/arduino-uno-q-max6675-thermocouple-module */ #include "Arduino_RouterBridge.h" #include "max6675.h" // Arduino UNO Q MCU pins connected to the MAX6675 module #define SCK_PIN 5 #define CS_PIN 4 #define SO_PIN 3 MAX6675 thermocouple(SCK_PIN, CS_PIN, SO_PIN); float last_temp_c = 0.0; float last_temp_f = 0.0; unsigned long last_read_ms = 0; void read_thermocouple() { last_temp_c = thermocouple.readCelsius(); last_temp_f = thermocouple.readFahrenheit(); } String get_temp_c(String arg) { return String(last_temp_c, 2); } String get_temp_f(String arg) { return String(last_temp_f, 2); } String get_status(String arg) { return "Temp: " + String(last_temp_c, 2) + "°C / " + String(last_temp_f, 2) + "°F"; } void setup() { Bridge.begin(); Monitor.begin(); read_thermocouple(); Bridge.provide("get_temp_c", get_temp_c); Bridge.provide("get_temp_f", get_temp_f); Bridge.provide("get_status", get_status); Monitor.println("Arduino UNO Q MAX6675 Thermocouple Module Bridge ready"); } void loop() { unsigned long now = millis(); if (now - last_read_ms >= 1000) { last_read_ms = now; read_thermocouple(); Monitor.println("Temp: " + String(last_temp_c, 2) + "°C / " + String(last_temp_f, 2) + "°F"); } }

Python 코드 (Bridge)

/* * 이 Arduino UNO Q 코드는 newbiely.kr 에서 개발되었습니다 * 이 Arduino UNO Q 코드는 어떠한 제한 없이 공개 사용을 위해 제공됩니다. * 상세한 지침 및 연결도에 대해서는 다음을 방문하세요: * https://newbiely.kr/tutorials/arduino-uno-q/arduino-uno-q-max6675-thermocouple-module */ from arduino.app_utils import * import time def loop(): temp_c = Bridge.call("get_temp_c") temp_f = Bridge.call("get_temp_f") print(f"Temperature: {temp_c}°C = {temp_f}°F") time.sleep(1) App.run(user_loop=loop)

빠른 단계

  • 연결: 배선도와 같이 MAX6675 모듈을 Arduino UNO Q에 연결합니다.
  • Arduino App Lab 열기: Arduino App Lab을 실행하고 보드가 감지될 때까지 기다립니다.
  • 새 App 만들기: Create New App을 클릭하고, 이름을 Max6675ThermocoupleModuleBridge로 지정한 다음 Create를 클릭합니다.
  • MCU 스케치 붙여넣기: 위의 MCU Bridge 코드를 복사하여 sketch/sketch.ino에 붙여넣습니다.
  • Python 코드 붙여넣기: 위의 Python Bridge 코드를 복사하여 App의 Python 파일에 붙여넣습니다.
  • Install the library: Click the Add sketch library button (the open book icon with a + sign) in the left sidebar.
add sketch 라이브러리 in 아두이노 app lab on Arduino UNO Q
  • Search for Arduino_RouterBridge created by Arduino and click the Install button.
My Apps / DIYables Apps
Run
Bricks
No bricks added...
Sketch Libraries
No sketch libra...
Files
python
sketch
.gitignore
README.md
app.yaml
sketch.ino
Add sketch library
Arduino_RouterBridge Arduino

This library provides a simple RPC bridge for Arduino UNO Q boards, allowing communication between the board and other devices using MsgPack serialization.

0.4.1
Install
More Info
  • 업로드: Arduino App Lab에서 Run 버튼을 클릭합니다.
Arduino UNO Q의 아두이노 app lab에서 run 버튼 클릭
  • Python 콘솔에 매초 온도 측정값이 나타나는 것을 확인합니다.

App Lab 콘솔 출력

DIYables_Apps
Stop
sketch.ino
1#include "Arduino_RouterBridge.h"
Serial Monitor
Python
Message (Enter to send a message to "Newbiely" on usb(2820070321))
New Line
9600 baud
[2026-04-29 09:00:01] Arduino UNO Q MAX6675 Thermocouple Module Bridge ready [2026-04-29 09:00:02] Temp: 24.50°C / 76.10°F [2026-04-29 09:00:03] Temp: 26.75°C / 80.15°F [2026-04-29 09:00:04] Temp: 31.00°C / 87.80°F
DIYables_Apps
Stop
sketch.ino
1#include "Arduino_RouterBridge.h"
Serial Monitor
Python
[2026-04-29 09:00:02] Temperature: 24.50°C = 76.10°F [2026-04-29 09:00:03] Temperature: 26.75°C = 80.15°F [2026-04-29 09:00:04] Temperature: 31.00°C = 87.80°F [2026-04-29 09:00:05] Temperature: 38.25°C = 100.85°F

Telegram

MAX6675 온도를 원격으로 모니터링하고, 온도가 100°C를 넘으면 자동으로 Telegram 알림을 받으세요 — 다른 방에서 오븐, 가마, 납땜 스테이션을 지켜볼 때 편리합니다.

MCU 스케치: 이전 Bridge 섹션의 MCU 스케치를 그대로 사용합니다.

Python 코드 (Telegram)

/* * 이 Arduino UNO Q 코드는 newbiely.kr 에서 개발되었습니다 * 이 Arduino UNO Q 코드는 어떠한 제한 없이 공개 사용을 위해 제공됩니다. * 상세한 지침 및 연결도에 대해서는 다음을 방문하세요: * https://newbiely.kr/tutorials/arduino-uno-q/arduino-uno-q-max6675-thermocouple-module */ from arduino.app_utils import * import requests import time TELEGRAM_BOT_TOKEN = "YOUR_TELEGRAM_BOT_TOKEN" CHAT_ID = "YOUR_CHAT_ID" last_update_id = 0 ALERT_THRESHOLD_C = 100.0 alert_sent = False def get_updates(): global last_update_id url = f"https://api.telegram.org/bot{TELEGRAM_BOT_TOKEN}/getUpdates" params = {"offset": last_update_id + 1, "timeout": 5} try: response = requests.get(url, params=params, timeout=10) data = response.json() if data["ok"]: return data["result"] except Exception as e: print(f"Error getting updates: {e}") return [] def send_message(chat_id, text): url = f"https://api.telegram.org/bot{TELEGRAM_BOT_TOKEN}/sendMessage" payload = {"chat_id": chat_id, "text": text} try: requests.post(url, data=payload, timeout=10) except Exception as e: print(f"Error sending message: {e}") def loop(): global alert_sent # Auto-alert on high temperature temp_c_str = Bridge.call("get_temp_c") try: temp_c = float(temp_c_str) if temp_c > ALERT_THRESHOLD_C and not alert_sent: alert_sent = True temp_f = Bridge.call("get_temp_f") msg = f"🔥 High temperature alert: {temp_c_str}°C / {temp_f}°F" print(msg) send_message(CHAT_ID, msg) elif temp_c <= ALERT_THRESHOLD_C: alert_sent = False except ValueError: pass # Handle Telegram commands updates = get_updates() for update in updates: last_update_id = update["update_id"] if "message" not in update: continue message = update["message"] chat_id = message["chat"]["id"] text = message.get("text", "").strip() print(f"Received: {text}") if text == "/start": send_message(chat_id, "Arduino UNO Q MAX6675 Thermocouple Bot\n" "/temp - Read temperature (°C and °F)\n" "/tempC - Read temperature in Celsius\n" "/tempF - Read temperature in Fahrenheit\n" "/status - Get sensor status") elif text == "/temp": temp_c = Bridge.call("get_temp_c") temp_f = Bridge.call("get_temp_f") send_message(chat_id, f"Temperature: {temp_c}°C = {temp_f}°F") elif text == "/tempC": result = Bridge.call("get_temp_c") send_message(chat_id, f"Temperature: {result}°C") elif text == "/tempF": result = Bridge.call("get_temp_f") send_message(chat_id, f"Temperature: {result}°F") elif text == "/status": result = Bridge.call("get_status") send_message(chat_id, result) else: send_message(chat_id, "Unknown command. Send /start for help.") time.sleep(1) App.run(user_loop=loop)

빠른 단계

  • YOUR_TELEGRAM_BOT_TOKEN을 BotFather에서 받은 실제 봇 토큰으로 바꿉니다.
  • YOUR_CHAT_ID를 여러분의 Telegram 채팅 ID로 바꿉니다.
  • 이 Python 코드를 App의 Python 파일에 붙여넣습니다 (MCU 스케치는 그대로 유지).
  • Run 버튼을 클릭합니다. Telegram에서 /temp를 보내거나, 프로브를 100°C 이상으로 가열하여 알림을 발생시킵니다.

App Lab 콘솔 출력

DIYables_Apps
Stop
sketch.ino
1#include "Arduino_RouterBridge.h"
Serial Monitor
Python
[2026-04-29 09:10:00] Waiting for Telegram messages... [2026-04-29 09:10:15] 🔥 High temperature alert: 104.50°C / 220.10°F [2026-04-29 09:10:30] Received: /temp [2026-04-29 09:10:45] Received: /tempC
Telegram
Telegram 12:45
Welcome to Telegram!
ArduinoBot 10:19
Chatting with Arduino...
telegram-botfather
BotFather Yesterday
Your bot has been created.

ArduinoBot

bot
Today
/temp
10:15 AM ✓✓
Temperature: 24.50°C = 76.10°F
10:16 AM
/tempC
10:17 AM ✓✓
Temperature: 24.50°C
10:18 AM
/tempF
10:19 AM ✓✓
Temperature: 76.10°F
10:20 AM
/status
10:21 AM ✓✓
Temp: 24.50°C / 76.10°F
10:22 AM
🔥 High temperature alert: 104.50°C / 220.10°F
10:23 AM

OpenClaw

You can adapt the OpenClaw to this tutorial by refering the instruction on 아두이노 우노 Q - OpenClaw Tutorial

프로젝트 아이디어

MAX6675와 Arduino UNO Q로 다양한 유용한 프로젝트를 만들 수 있습니다:

  • 가마 또는 오븐 온도 기록기: Bridge와 Python으로 시간에 따른 온도를 기록하고, 대시보드에 소성/베이킹 곡선을 그립니다
  • 납땜 스테이션 모니터: 인두 팁 온도를 추적하고, 목표 범위를 벗어나면 Telegram 알림을 받습니다
  • 바비큐 / 훈연기 온도계: 프로브를 그릴 석쇠에 고정하고 Telegram으로 원격 업데이트를 받아, 뚜껑을 계속 열어 볼 필요가 없게 합니다
  • 3D 프린터 핫엔드 감시기: 핫엔드가 안전 한계를 넘어 과열되면 MCU가 Bridge를 통해 릴레이를 작동시켜 전원을 차단합니다
  • 다중 구역 용광로 조사: 여러 MAX6675 모듈을 서로 다른 디지털 핀에 연결하고, Python 측에서 Bridge로 각 모듈을 폴링하여 나란히 비교합니다

스스로 도전해 보기

Arduino UNO Q에서 MAX6675로 더 나아갈 준비가 되셨나요? 다음 도전 과제를 시도해 보세요:

  • 쉬움: 부팅 이후 본 가장 높은 온도와 가장 낮은 온도를 기억하는 최소/최대 추적 기능을 MCU 스케치에 추가합니다.
  • 보통: 열전대 프로브가 분리되었는지 보고하는 get_fault(String) Bridge 함수를 추가하고(프로브가 열려 있으면 MAX6675가 오류 비트를 설정합니다), 이 값이 true가 되면 Python 측에서 경고를 출력하게 합니다.
  • 고급: 데이터 로거를 만듭니다: Python 측에서 5초마다 타임스탬프가 포함된 온도 측정값 CSV를 기록하게 하고, 지난 1시간 동안의 가장 높은 측정값을 보내 주는 Telegram /report 명령을 추가합니다.