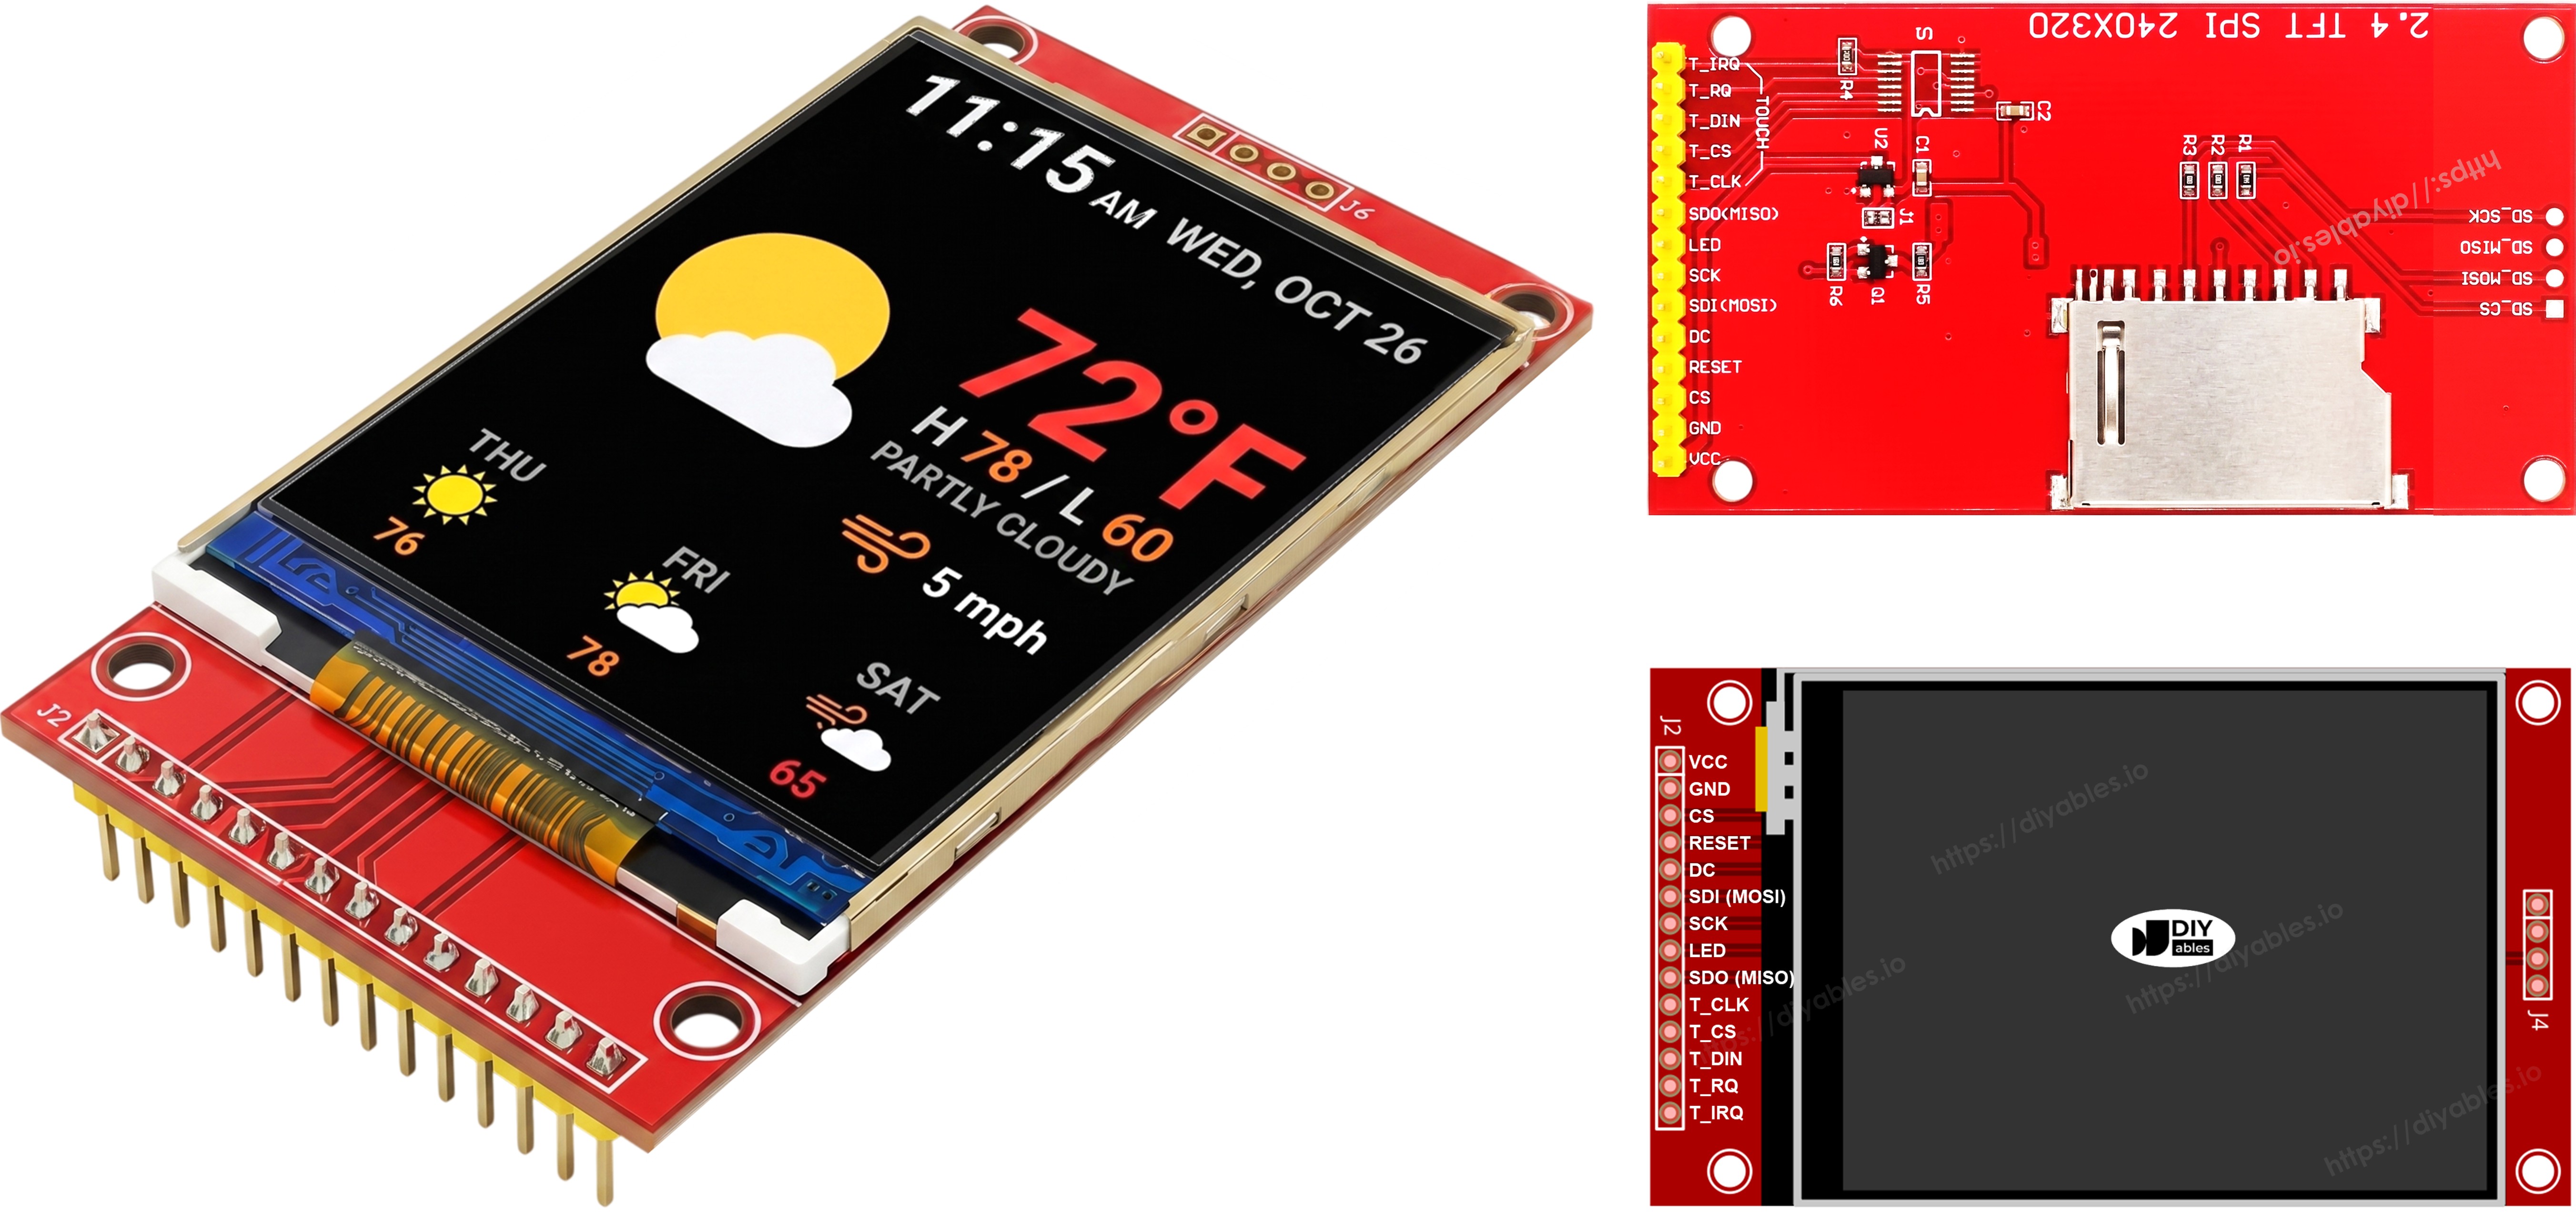
아두이노 우노 Q TFT LCD 터치 디스플레이 SPI

몇 가닥의 전선만으로 Arduino UNO Q 프로젝트에 컬러 화면을 추가하고 싶으신가요? 이 초보자 친화적인 가이드는 터치가 있든 없든 Arduino UNO Q에서 SPI TFT LCD 디스플레이를 사용하는 방법을 단계별로 보여줍니다.

이 튜토리얼에서 배울 내용:

이 가이드는 터치 및 비터치 SPI TFT LCD 디스플레이를 모두 다룹니다. ILI9341, ILI9488, 또는 ST7789 컨트롤러 칩으로 구동되는 1.3, 1.54, 2.2, 2.4, 2.8, 3.2, 3.5인치 패널과 호환됩니다.

Arduino UNO Q tft spi 디스플레이

팁 — 더 간단하고 빠른 대안: 배선이 전혀 필요 없는 화면을 원한다면, 대신 아두이노 우노 Q - TFT LCD 터치 스크린 디스플레이를 고려해 보세요. Arduino UNO Q 헤더에 바로 꽂으면 되므로 점퍼 와이어가 필요 없습니다. 8비트 병렬 인터페이스를 사용하여 SPI보다 픽셀 데이터를 훨씬 빠르게 전송합니다.

준비물

1×Arduino UNO Q 아마존
1×USB Cable for Arduino Uno Q 아마존
1×SPI TFT display module 쿠팡 | 아마존
1×점퍼케이블 쿠팡 | 아마존
1×(옵션) Micro SD Card 아마존
1×(추천) 아두이노 우노용 스크루 터미널 블록 쉴드 쿠팡 | 아마존
1×(추천) Sensors/Servo Expansion Shield for Arduino Uno 쿠팡 | 아마존
1×(추천) 아두이노 우노용 브레드보드 쉴드 쿠팡 | 아마존
1×(추천) 아두이노 우노용 케이스 쿠팡 | 아마존
1×(추천) 아두이노 우노용 프로토타이핑 베이스 플레이트 & 브레드보드 키트 아마존
공개: 이 포스팅 에 제공된 일부 링크는 아마존 제휴 링크입니다. 이 포스팅은 쿠팡 파트너스 활동의 일환으로, 이에 따른 일정액의 수수료를 제공받습니다.

참고: 5V Arduino 보드와 달리 Arduino UNO Q MCU는 이미 3.3V 로직으로 동작하므로, 이 배선에는 5V-3.3V 레벨 변환기가 필요하지 않습니다.

SPI TFT LCD 디스플레이에 대하여

SPI TFT 디스플레이는 SPI 버스를 통해 컨트롤러 칩이 구동하는 컬러 LCD 패널입니다.

주요 사양 및 기능:

  • 인터페이스: SPI (4선식) — 몇 가닥의 신호선만 필요합니다
  • 색상: 드라이버 칩에 따라 16비트 또는 18비트 풀 RGB 컬러
  • 지원 크기: 1.3, 1.54, 2.2, 2.4, 2.8, 3.2, 3.5인치 패널
  • 터치 (선택 사항): 같은 SPI 버스에 있는 XPT2046 / HR2046 / ADS7843 저항막 터치 컨트롤러
  • MicroSD 슬롯: 대부분의 모듈에 있으며, 역시 공유 SPI 버스에 연결됩니다
  • 라이브러리: DIYables_TFT_SPI — 디스플레이와 터치 컨트롤러를 위한 하나의 라이브러리
  • 로직 레벨: 3.3V — Arduino UNO Q MCU 핀과 완벽하게 일치합니다

DIYables_TFT_SPI 라이브러리는 세 가지 일반적인 드라이버 칩을 지원합니다:

  • ILI9341 — 16비트 RGB565 컬러, 최대 40 MHz SPI
  • ILI9488 — 18비트 RGB666 컬러, 최대 24 MHz SPI
  • ST7789 — 16비트 RGB565 컬러, 최대 40 MHz SPI

권장 사항: 아직 디스플레이를 구입하지 않았다면 ST7789 드라이버를 권장합니다. 널리 구할 수 있고, 최대 40 MHz SPI 속도로 동작하며, 새 프로젝트에 가장 간단한 선택입니다.

라이브러리는 Adafruit GFX를 확장하므로, 모든 표준 그리기 및 텍스트 함수를 사용할 수 있습니다.

핀아웃

대부분의 SPI TFT LCD 디스플레이에는 다음과 같은 핀이 있습니다:

디스플레이 핀:

핀 기능
VCC 전원 공급
GND 접지
CS 칩 선택 — SPI 버스에서 디스플레이를 선택하려면 LOW로 내립니다
DC / RS 데이터 / 명령 선택 — 픽셀 데이터는 HIGH, 명령은 LOW
RST 하드웨어 리셋 — 선택 사항, 사용하지 않으면 3.3V에 연결합니다
MOSI / SDI / SDA SPI 데이터 입력 (MCU에서 디스플레이로)
SCK / CLK SPI 클록
MISO / SDO SPI 데이터 출력 (디스플레이에서 MCU로) — 표시 전용으로 사용할 때는 선택 사항
LED / BL / BLK 백라이트 전원 — 3.3V 또는 밝기 조절용 PWM 핀에 연결합니다

SD 카드 핀 (애플리케이션에서 SD 카드에 접근해야 하는 경우):

핀 기능
SD_CS / TF_CS SD 카드 칩 선택
MOSI / SDI MOSI — MCU에서 SD 카드로 가는 데이터
SCK / CLK SCK — SPI 클록
MISO / SDO MISO — SD 카드에서 MCU로 가는 데이터

터치를 지원하는 TFT 디스플레이에는 추가 터치 핀이 있습니다 (애플리케이션이 터치 기능을 사용하고 디스플레이가 이를 지원하는 경우):

핀 기능
T_CS 터치 컨트롤러 칩 선택
T_CLK SCK — SPI 클록
T_DIN MOSI — MCU에서 터치 컨트롤러로 가는 데이터
T_DO MISO — 터치 컨트롤러에서 MCU로 가는 데이터
T_IRQ 터치 인터럽트 — 선택 사항, 화면이 터치되고 있을 때 신호를 보냅니다

참고: 일부 비터치 디스플레이 모듈에도 T_CS, T_CLK, T_DIN, T_DO, T_IRQ 핀이 있습니다. 이런 보드에서는 터치 컨트롤러 IC가 실장되어 있지 않아 이 핀들은 동작하지 않습니다. 제조 변형을 줄이기 위해 PCB가 터치 버전과 같은 레이아웃을 재사용하기 때문에 핀이 보이는 것입니다.

tft spi 디스플레이 핀아웃

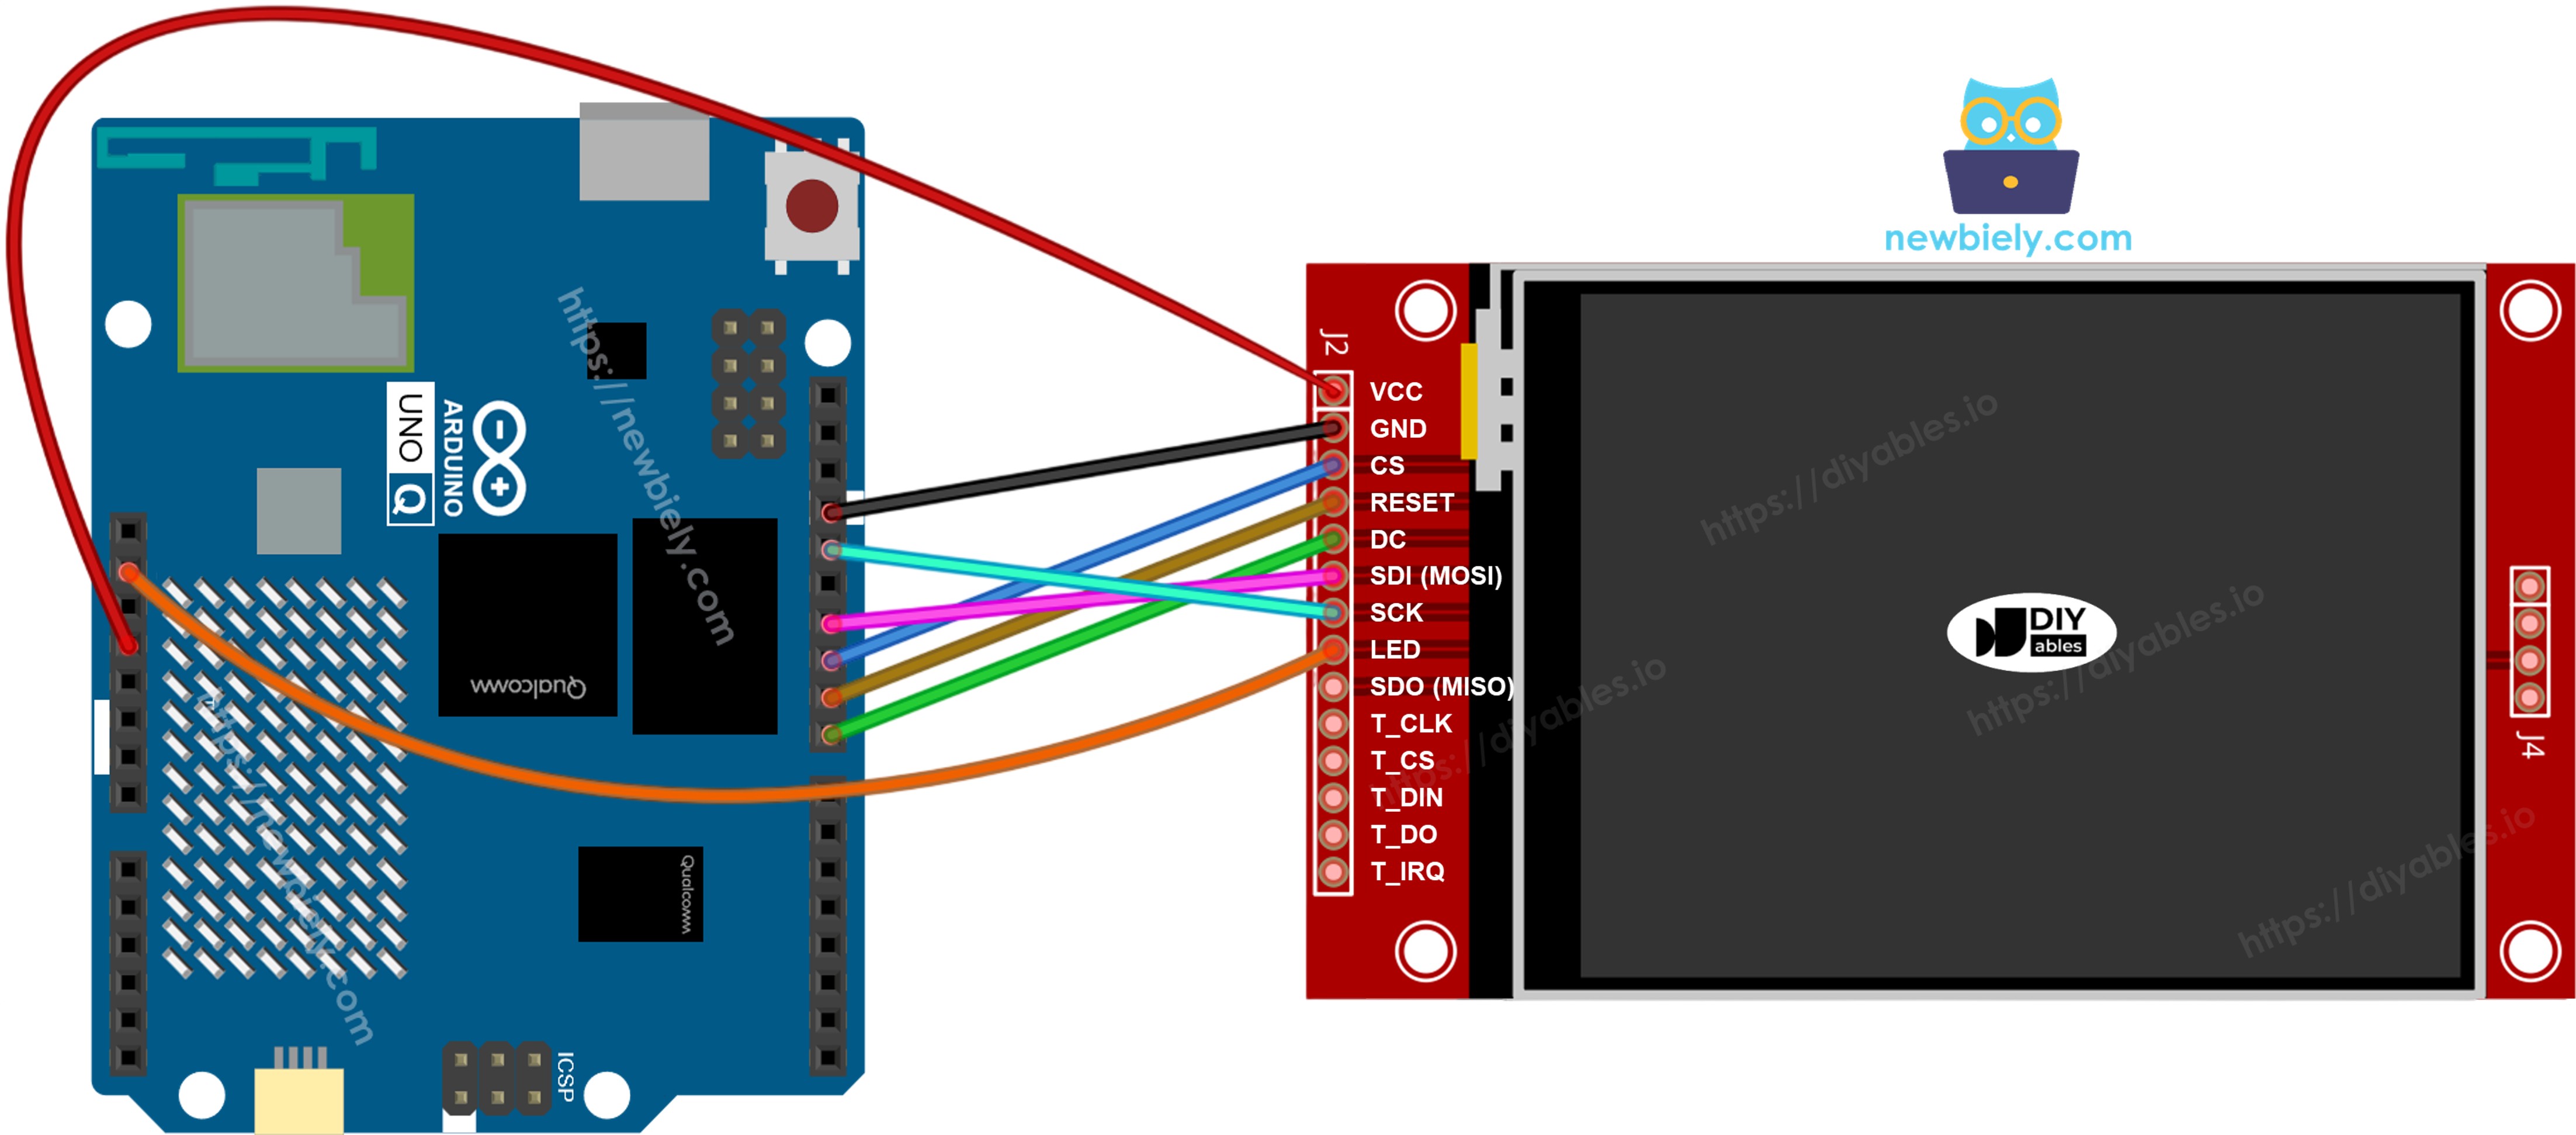
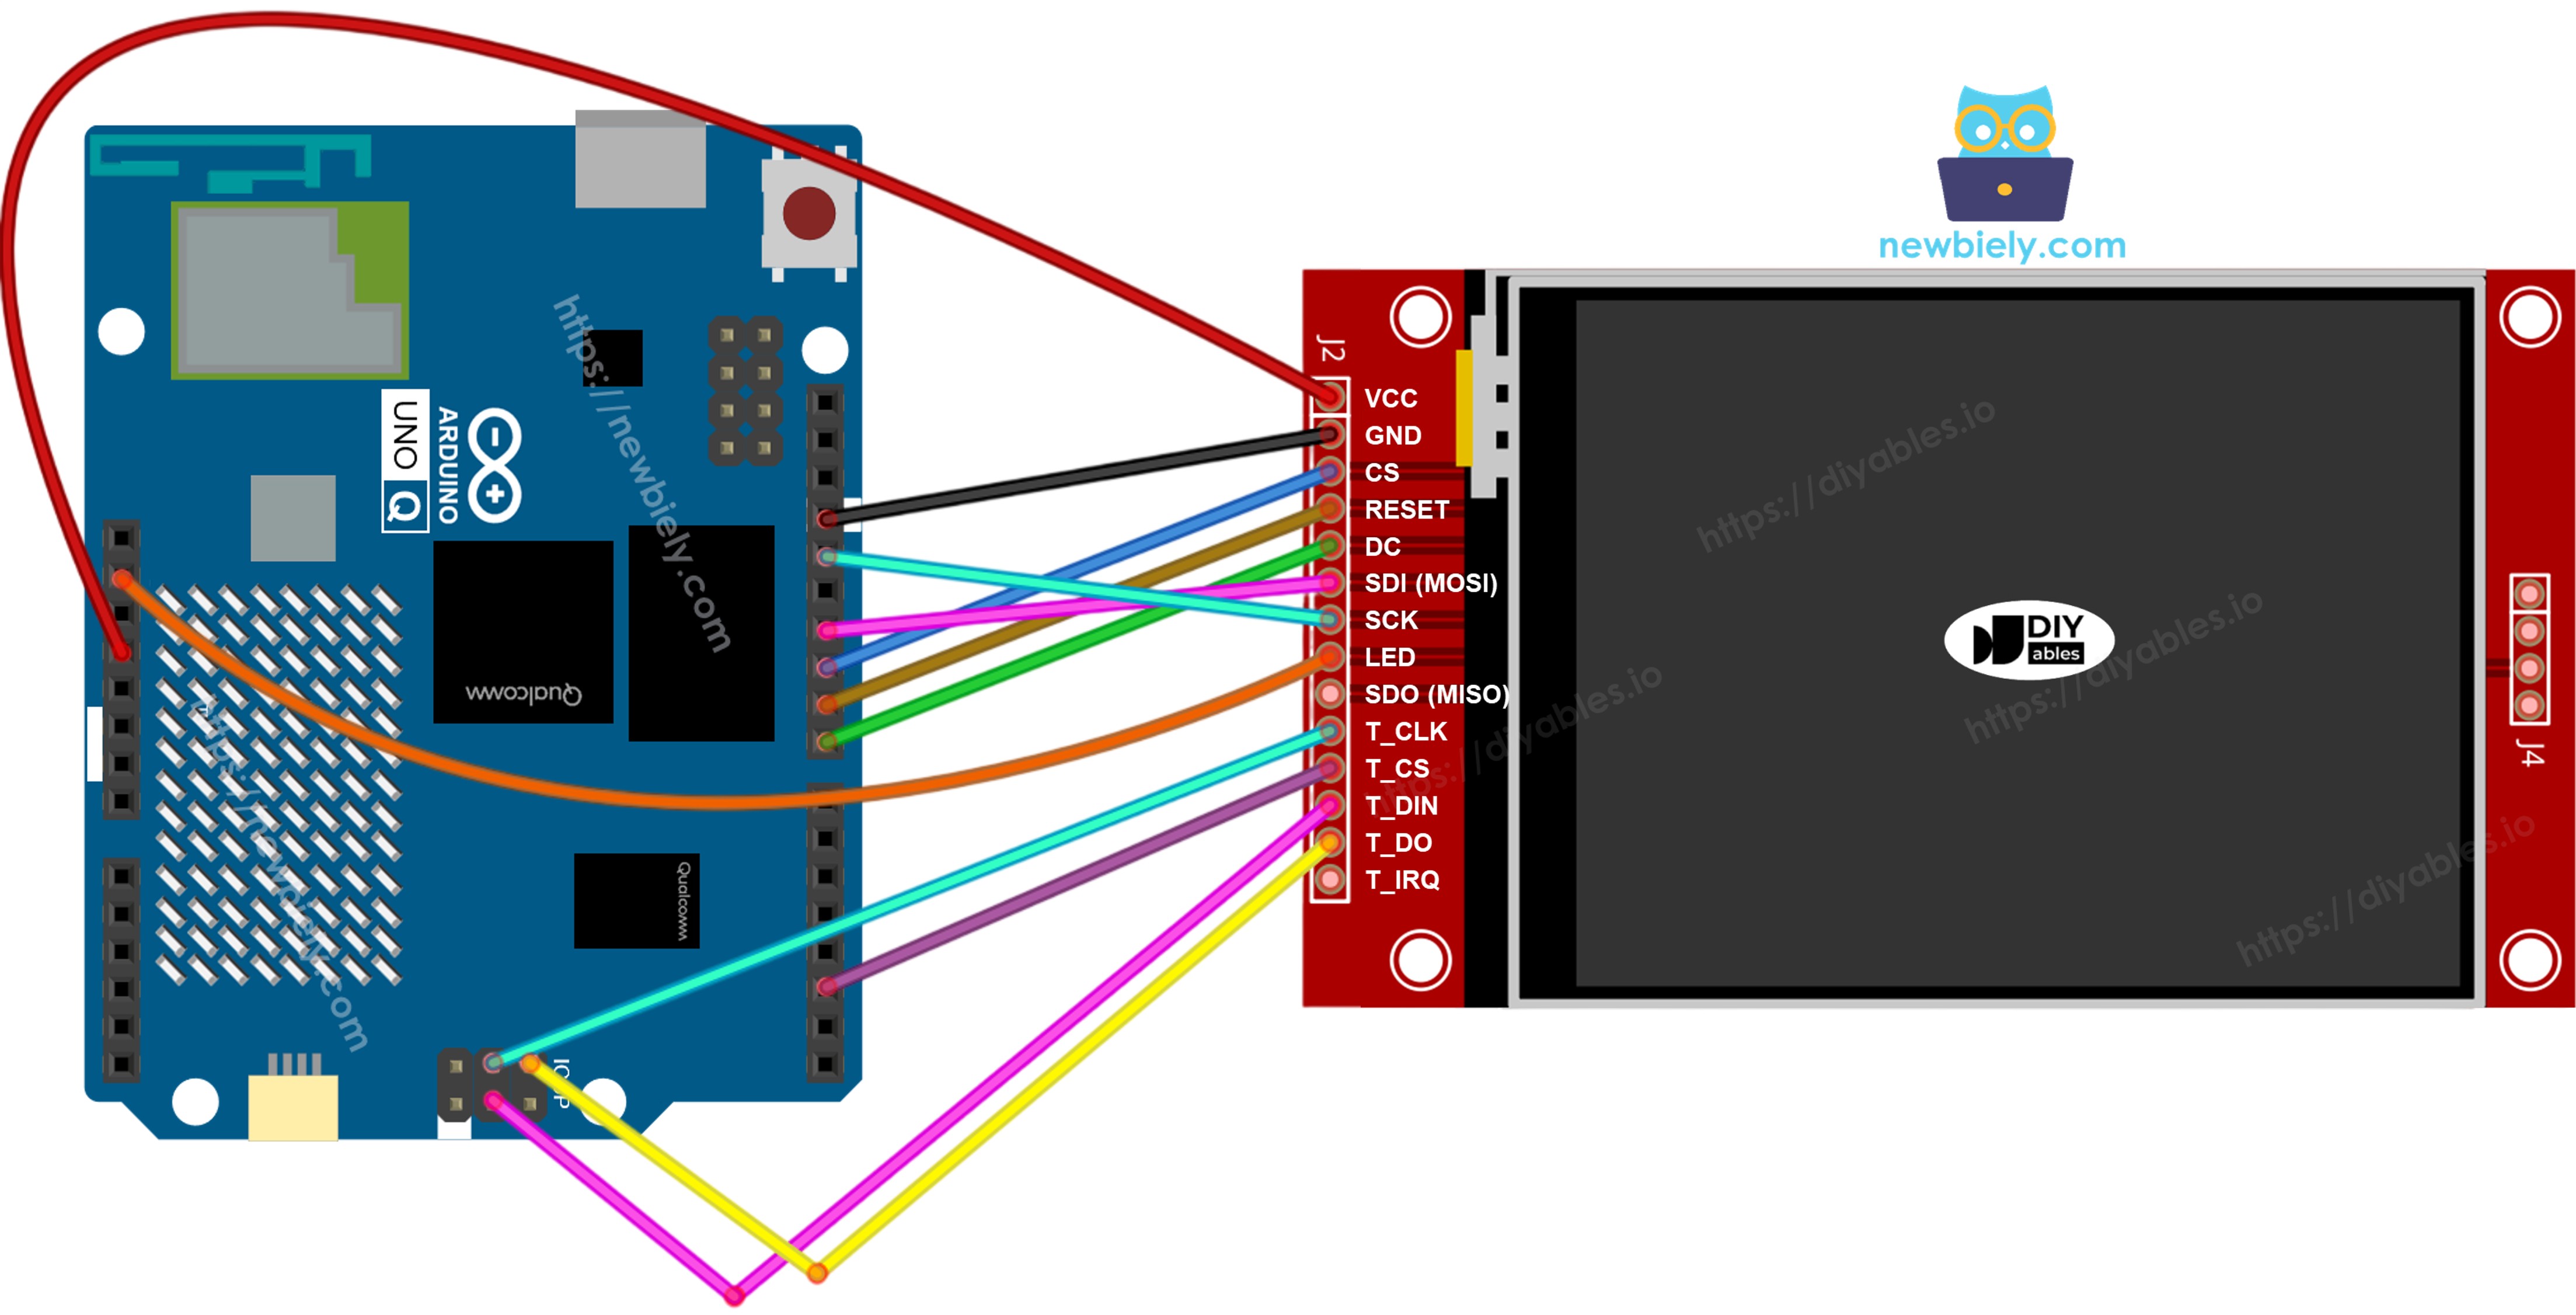
배선도

참고 — SDO (MISO)는 선택 사항입니다: SDO (MISO) 라인은 디스플레이에서 보드로 돌아오는 데이터만 전달합니다. 이 튜토리얼의 예제 코드는 디스플레이에서 데이터를 읽지 않으므로 이 핀은 연결하지 않아도 됩니다. 터치 컨트롤러가 같은 SPI 버스를 공유하는 모듈에서는 SDO 라인을 연결하면 통신을 방해할 수 있으므로, 연결하지 않는 것을 권장합니다.

디스플레이는 Arduino UNO Q MCU 헤더의 하드웨어 SPI 핀에 연결됩니다.

  • 참고: Arduino UNO Q MCU 핀은 SPI TFT 디스플레이와 일치하는 3.3V 로직을 출력합니다 — 레벨 변환기 없이 신호선을 직접 연결하세요.
  • 참고: TFT VCC 핀은 5V가 아니라 Arduino UNO Q의 3.3V 핀에 연결하세요.
  • 참고: 디스플레이, SD 카드, 터치 컨트롤러는 모두 MOSI (D11), SCK (D13), MISO (D12)를 공유합니다. 각각 자신의 CS 핀이 있으므로, 한 번에 하나만 활성화됩니다.

터치 없음

Arduino UNO Q에서 MOSI를 D11에, SCK를 D13에, MISO를 D12에 연결합니다. CS, DC, RST는 사용 가능한 아무 GPIO나 쓸 수 있습니다 — 예제에서는 D10, D8, D9를 사용합니다.

디스플레이:

TFT 핀 Arduino UNO Q MCU 핀 설명
VCC 3.3V 전원 공급
GND GND 접지
CS D10 칩 선택
DC / RS D8 데이터 / 명령 선택
RST D9 리셋 (선택 사항)
MOSI / SDI D11 하드웨어 SPI MOSI
SCK D13 하드웨어 SPI 클록
MISO / SDO D12 하드웨어 SPI MISO (선택 사항)
LED / BL 3.3V 백라이트 전원

SD 카드 (애플리케이션에서 SD 카드에 접근해야 하는 경우):

SD 핀 Arduino UNO Q MCU 핀 설명
SD_CS / TF_CS D4 SD 카드 칩 선택
MOSI / SDI D11 디스플레이 MOSI (D11)와 공유
SCK / CLK D13 디스플레이 SCK (D13)와 공유
MISO / SDO D12 디스플레이 MISO (D12)와 공유
터치 없는 Arduino UNO Q tft spi 디스플레이 배선도

이 이미지는 Fritzing을 사용하여 만들어졌습니다. 이미지를 확대하려면 클릭하세요.

터치 있음

XPT2046 터치 컨트롤러를 Arduino UNO Q SPI 버스에 연결하여, 디스플레이와 D11, D13, D12를 공유합니다.

디스플레이:

TFT 핀 Arduino UNO Q MCU 핀 설명
VCC 3.3V 전원 공급
GND GND 접지
CS D10 칩 선택
DC / RS D8 데이터 / 명령 선택
RST D9 리셋 (선택 사항)
MOSI / SDI D11 하드웨어 SPI MOSI
SCK D13 하드웨어 SPI 클록
MISO / SDO D12 하드웨어 SPI MISO (선택 사항)
LED / BL 3.3V 백라이트 전원

터치 컨트롤러 (애플리케이션이 터치 기능을 사용하고 디스플레이가 이를 지원하는 경우):

터치 핀 Arduino UNO Q MCU 핀 설명
T_CS D2 터치 칩 선택
T_IRQ D2 터치 인터럽트 (선택 사항)
T_DIN D11 디스플레이 MOSI (D11)와 공유
T_CLK D13 디스플레이 SCK (D13)와 공유
T_DO D12 디스플레이 MISO (D12)와 공유
터치 있는 Arduino UNO Q tft spi 디스플레이 배선도

이 이미지는 Fritzing을 사용하여 만들어졌습니다. 이미지를 확대하려면 클릭하세요.

Arduino UNO Q MCU는 Uno 헤더에 하나의 하드웨어 SPI 인터페이스를 제공하므로, 디스플레이, SD 카드, 터치 컨트롤러 세 주변장치가 모두 같은 세 개의 데이터 라인을 공유합니다. DIYables_TFT_SPI 라이브러리는 하나의 API로 디스플레이와 XPT2046 터치 컨트롤러를 모두 관리하므로, 터치 쪽을 위한 별도의 SPI 라이브러리가 필요 없습니다.

Arduino UNO Q 코드 — 최소 스케치 구조

Arduino UNO Q에는 함께 동작하는 두 개의 프로세서가 있습니다:

  • STM32 MCU는 SPI TFT 디스플레이를 구동하고 터치 컨트롤러를 읽습니다 — 모든 텍스트와 그래픽을 실시간으로 렌더링합니다
  • Qualcomm MPU는 Debian Linux를 실행하며 Wi-Fi, Python, 클라우드 연결을 처리합니다
  • 이 섹션에서는 MCU만 프로그래밍합니다 — Linux 측은 유휴 상태로 둡니다. 두 프로세서가 Bridge를 통해 함께 동작하는 방법은 뒤 섹션에서 보여줍니다.

DIYables_TFT_SPI 라이브러리를 사용하는 모든 스케치는 다음 뼈대를 공유합니다:

#include <DIYables_TFT_SPI.h> #define TFT_CS_PIN 10 #define TFT_DC_PIN 8 #define TFT_RST_PIN 9 // Uncomment the line that matches your driver chip: // DIYables_ILI9341_SPI TFT_display(240, 320, TFT_CS_PIN, TFT_DC_PIN, TFT_RST_PIN); // DIYables_ILI9488_SPI TFT_display(320, 480, TFT_CS_PIN, TFT_DC_PIN, TFT_RST_PIN); DIYables_ST7789_SPI TFT_display(240, 320, TFT_CS_PIN, TFT_DC_PIN, TFT_RST_PIN); void setup() { TFT_display.begin(); TFT_display.setRotation(1); } void loop() { // drawing code here }

생성자에 패널의 실제 픽셀 크기를 전달하세요. 같은 드라이버 칩을 사용하는 모듈도 크기가 다양합니다.

Arduino UNO Q 코드 — 도형 그리기

아래 스케치는 SPI TFT 디스플레이에서 Adafruit GFX 그리기 기본 요소를 보여줍니다: 원, 삼각형, 사각형, 둥근 사각형, 선.

코드가 하는 일:

  • 드라이버 칩에 맞는 디스플레이 객체를 만듭니다
  • 패널을 초기화하고 가로 방향으로 회전을 설정합니다
  • 모든 도형 위치를 실제 화면 크기에 맞게 조정합니다
  • 10초마다 색이 있는 도형 격자 전체를 다시 그립니다
/* * 이 Arduino UNO Q 코드는 newbiely.kr 에서 개발되었습니다 * 이 Arduino UNO Q 코드는 어떠한 제한 없이 공개 사용을 위해 제공됩니다. * 상세한 지침 및 연결도에 대해서는 다음을 방문하세요: * https://newbiely.kr/tutorials/arduino-uno-q/arduino-uno-q-tft-lcd-touch-display-spi */ /* Created by DIYables This example code is in the public domain Product page: https://diyables.io */ // ============================================= // Single include brings in the base class plus all driver classes. // ============================================= #include <DIYables_TFT_SPI.h> // ============================================= // Wiring (Arduino UNO Q - MCU side) // --------------------------------------------- // TFT module Arduino UNO Q // ------------ --------------------------------- // VCC -> 3.3V // GND -> GND // CS -> D10 (TFT_CS_PIN) // RESET -> D9 (TFT_RST_PIN) // DC / RS -> D8 (TFT_DC_PIN) // SDI / MOSI -> D11 (hardware SPI MOSI) // SCK -> D13 (hardware SPI SCK) // LED -> 3.3V (or any GPIO via initBacklight) // SDO / MISO -> D12 (only needed when reading from display) // // The Arduino UNO Q MCU pins are 3.3V - no level converter is needed. // ============================================= // ============================================= // SPI pin definitions (adjust for your board) // ============================================= #define TFT_CS_PIN 10 #define TFT_DC_PIN 8 #define TFT_RST_PIN 9 // Panel resolution in native (portrait) orientation - change to match your module #define TFT_WIDTH 240 #define TFT_HEIGHT 320 // MOSI and SCK use default hardware SPI pins // ============================================= // Create display object (uncomment matching driver) // ============================================= // DIYables_ILI9341_SPI TFT_display(TFT_WIDTH, TFT_HEIGHT, TFT_CS_PIN, TFT_DC_PIN, TFT_RST_PIN); // DIYables_ILI9488_SPI TFT_display(TFT_WIDTH, TFT_HEIGHT, TFT_CS_PIN, TFT_DC_PIN, TFT_RST_PIN); DIYables_ST7789_SPI TFT_display(TFT_WIDTH, TFT_HEIGHT, TFT_CS_PIN, TFT_DC_PIN, TFT_RST_PIN); #define BLACK DIYables_TFT_SPI::colorRGB(0, 0, 0) #define BLUE DIYables_TFT_SPI::colorRGB(0, 0, 255) #define RED DIYables_TFT_SPI::colorRGB(255, 0, 0) #define GREEN DIYables_TFT_SPI::colorRGB(0, 255, 0) #define ORANGE DIYables_TFT_SPI::colorRGB(255, 165, 0) #define PINK DIYables_TFT_SPI::colorRGB(255, 192, 203) #define VIOLET DIYables_TFT_SPI::colorRGB(148, 0, 211) #define TURQUOISE DIYables_TFT_SPI::colorRGB(64, 224, 208) #define WHITE DIYables_TFT_SPI::colorRGB(255, 255, 255) // Helper to draw a filled diamond void fillDiamond(int cx, int cy, int h, int v, uint16_t color) { int x0 = cx, y0 = cy - v; int x1 = cx + h, y1 = cy; int x2 = cx, y2 = cy + v; int x3 = cx - h, y3 = cy; TFT_display.fillTriangle(x0, y0, x1, y1, x2, y2, color); TFT_display.fillTriangle(x0, y0, x2, y2, x3, y3, color); } void setup() { TFT_display.begin(); TFT_display.setRotation(1); // Landscape } void loop() { TFT_display.fillScreen(WHITE); uint16_t w = TFT_display.width(); uint16_t h = TFT_display.height(); // Scale positions relative to screen size with better spacing int col1 = w / 8; int col2 = w * 3 / 8; int col3 = w * 5 / 8; int col4 = w * 7 / 8; int row1 = h / 4; int row2 = h / 2; int row3 = h * 3 / 4; // Outlined circle TFT_display.drawCircle(col1, row1, 30, RED); // Filled circle TFT_display.fillCircle(col2, row1, 30, RED); // Outlined triangle TFT_display.drawTriangle(col3 - 30, row1 + 25, col3 + 30, row1 + 25, col3, row1 - 25, BLUE); // Filled triangle TFT_display.fillTriangle(col4 - 30, row1 + 25, col4 + 30, row1 + 25, col4, row1 - 25, GREEN); // Outlined rectangle TFT_display.drawRect(col1 - 35, row2 - 20, 70, 40, ORANGE); // Filled rectangle TFT_display.fillRect(col2 - 35, row2 - 20, 70, 40, TURQUOISE); // Outlined round rectangle TFT_display.drawRoundRect(col3 - 35, row2 - 20, 70, 40, 10, VIOLET); // Filled round rectangle TFT_display.fillRoundRect(col4 - 35, row2 - 20, 70, 40, 10, PINK); // Outlined diamond (centered between col1 and col2) int diamond1_x = (col1 + col2) / 2; TFT_display.drawLine(diamond1_x, row3 - 30, diamond1_x + 25, row3, GREEN); TFT_display.drawLine(diamond1_x + 25, row3, diamond1_x, row3 + 30, GREEN); TFT_display.drawLine(diamond1_x, row3 + 30, diamond1_x - 25, row3, GREEN); TFT_display.drawLine(diamond1_x - 25, row3, diamond1_x, row3 - 30, GREEN); // Filled diamond (centered between col3 and col4) int diamond2_x = (col3 + col4) / 2; fillDiamond(diamond2_x, row3, 25, 30, BLUE); delay(10000); }

빠른 단계

Arduino UNO Q를 처음 사용하시나요? 진행하기 전에 아두이노 우노 Q 시작하기 튜토리얼을 따라 개발 환경을 준비하세요.

  • 연결: 배선도와 같이 SPI TFT 디스플레이를 Arduino UNO Q에 연결한 다음, USB-C 케이블을 꽂습니다.
  • Arduino App Lab 열기: Arduino App Lab을 실행하고 Arduino UNO Q를 감지할 때까지 기다립니다 — 처음 실행할 때는 몇 분 정도 걸릴 수 있습니다.
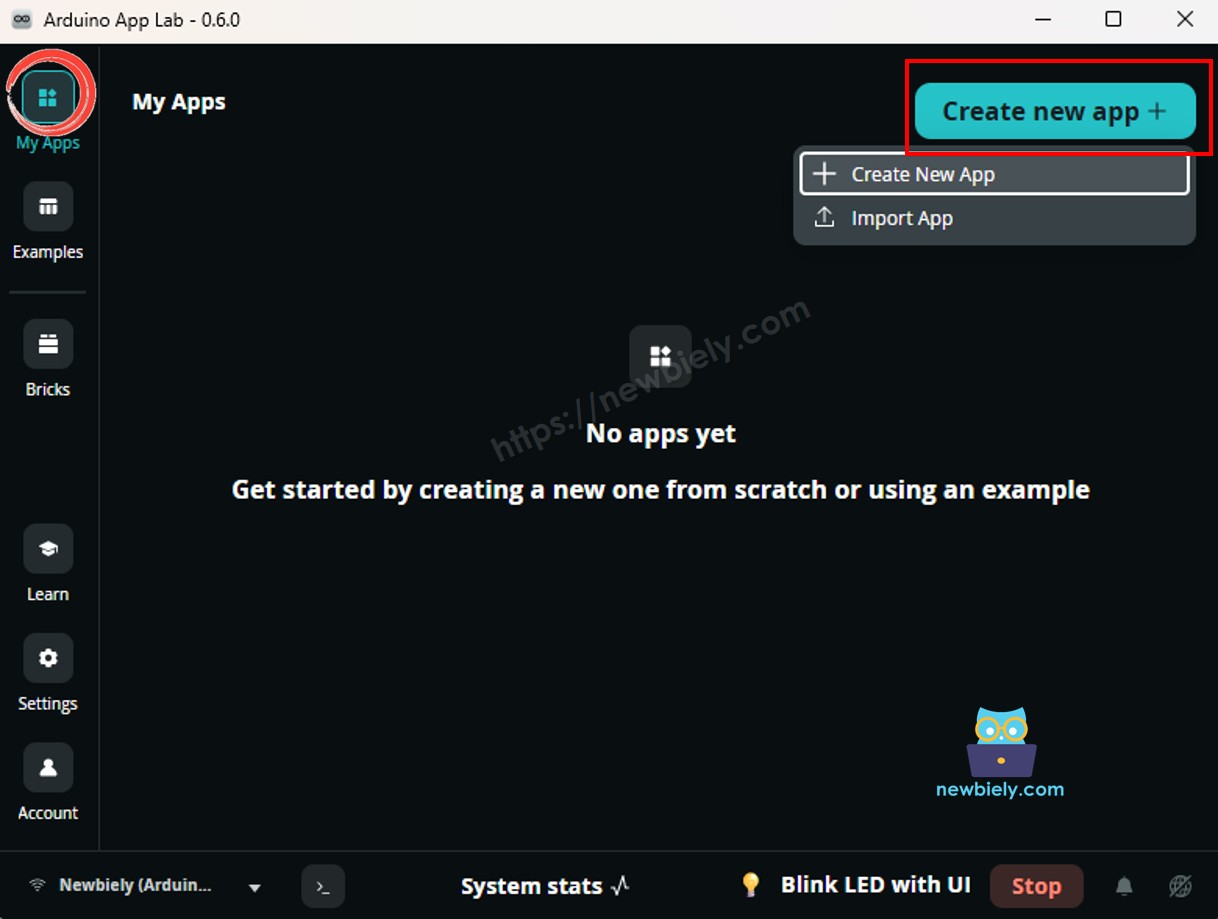
  • 새 App 만들기: Create New App 버튼을 클릭합니다.
Arduino UNO Q의 아두이노 app lab에서 새 app 만들기
  • App에 이름을 지정합니다. 예: DIYables_TftSpi
  • Create를 클릭하여 확인합니다.
  • 새 App 안에 생성된 폴더와 파일 세트가 보입니다.
Arduino UNO Q의 아두이노 app lab app 폴더와 파일
  • sketch/sketch.ino 파일을 찾습니다 — 여기에 MCU 스케치를 붙여넣습니다.
  • 스케치 붙여넣기: 위의 MCU 코드를 복사하여 그 스케치 파일에 붙여넣습니다. 다른 파일은 기본값으로 둡니다.
  • 드라이버 선택: 패널에 맞는 생성자 줄 — ILI9341, ILI9488, 또는 ST7789 — 의 주석을 해제하고 나머지 두 줄은 주석 처리합니다.
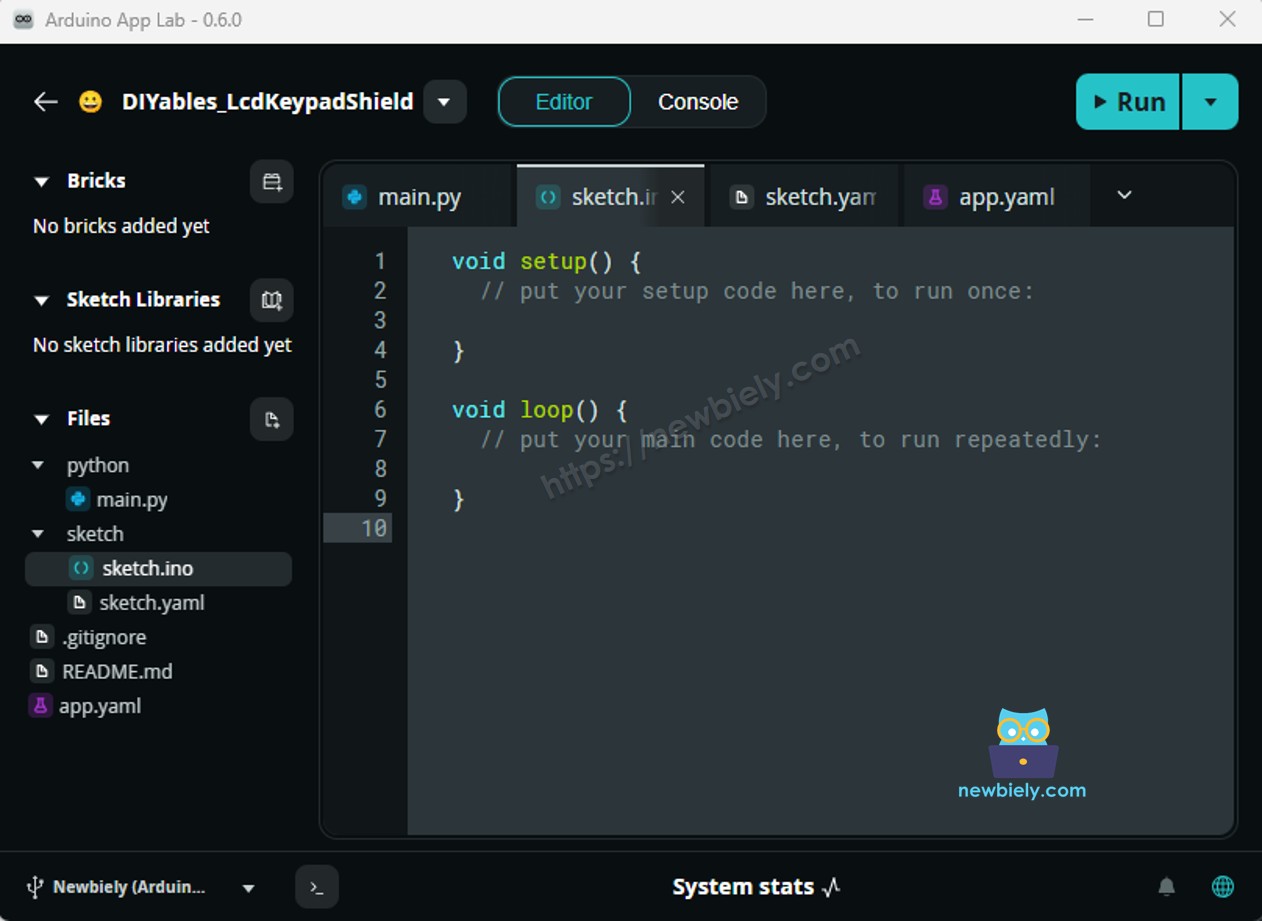
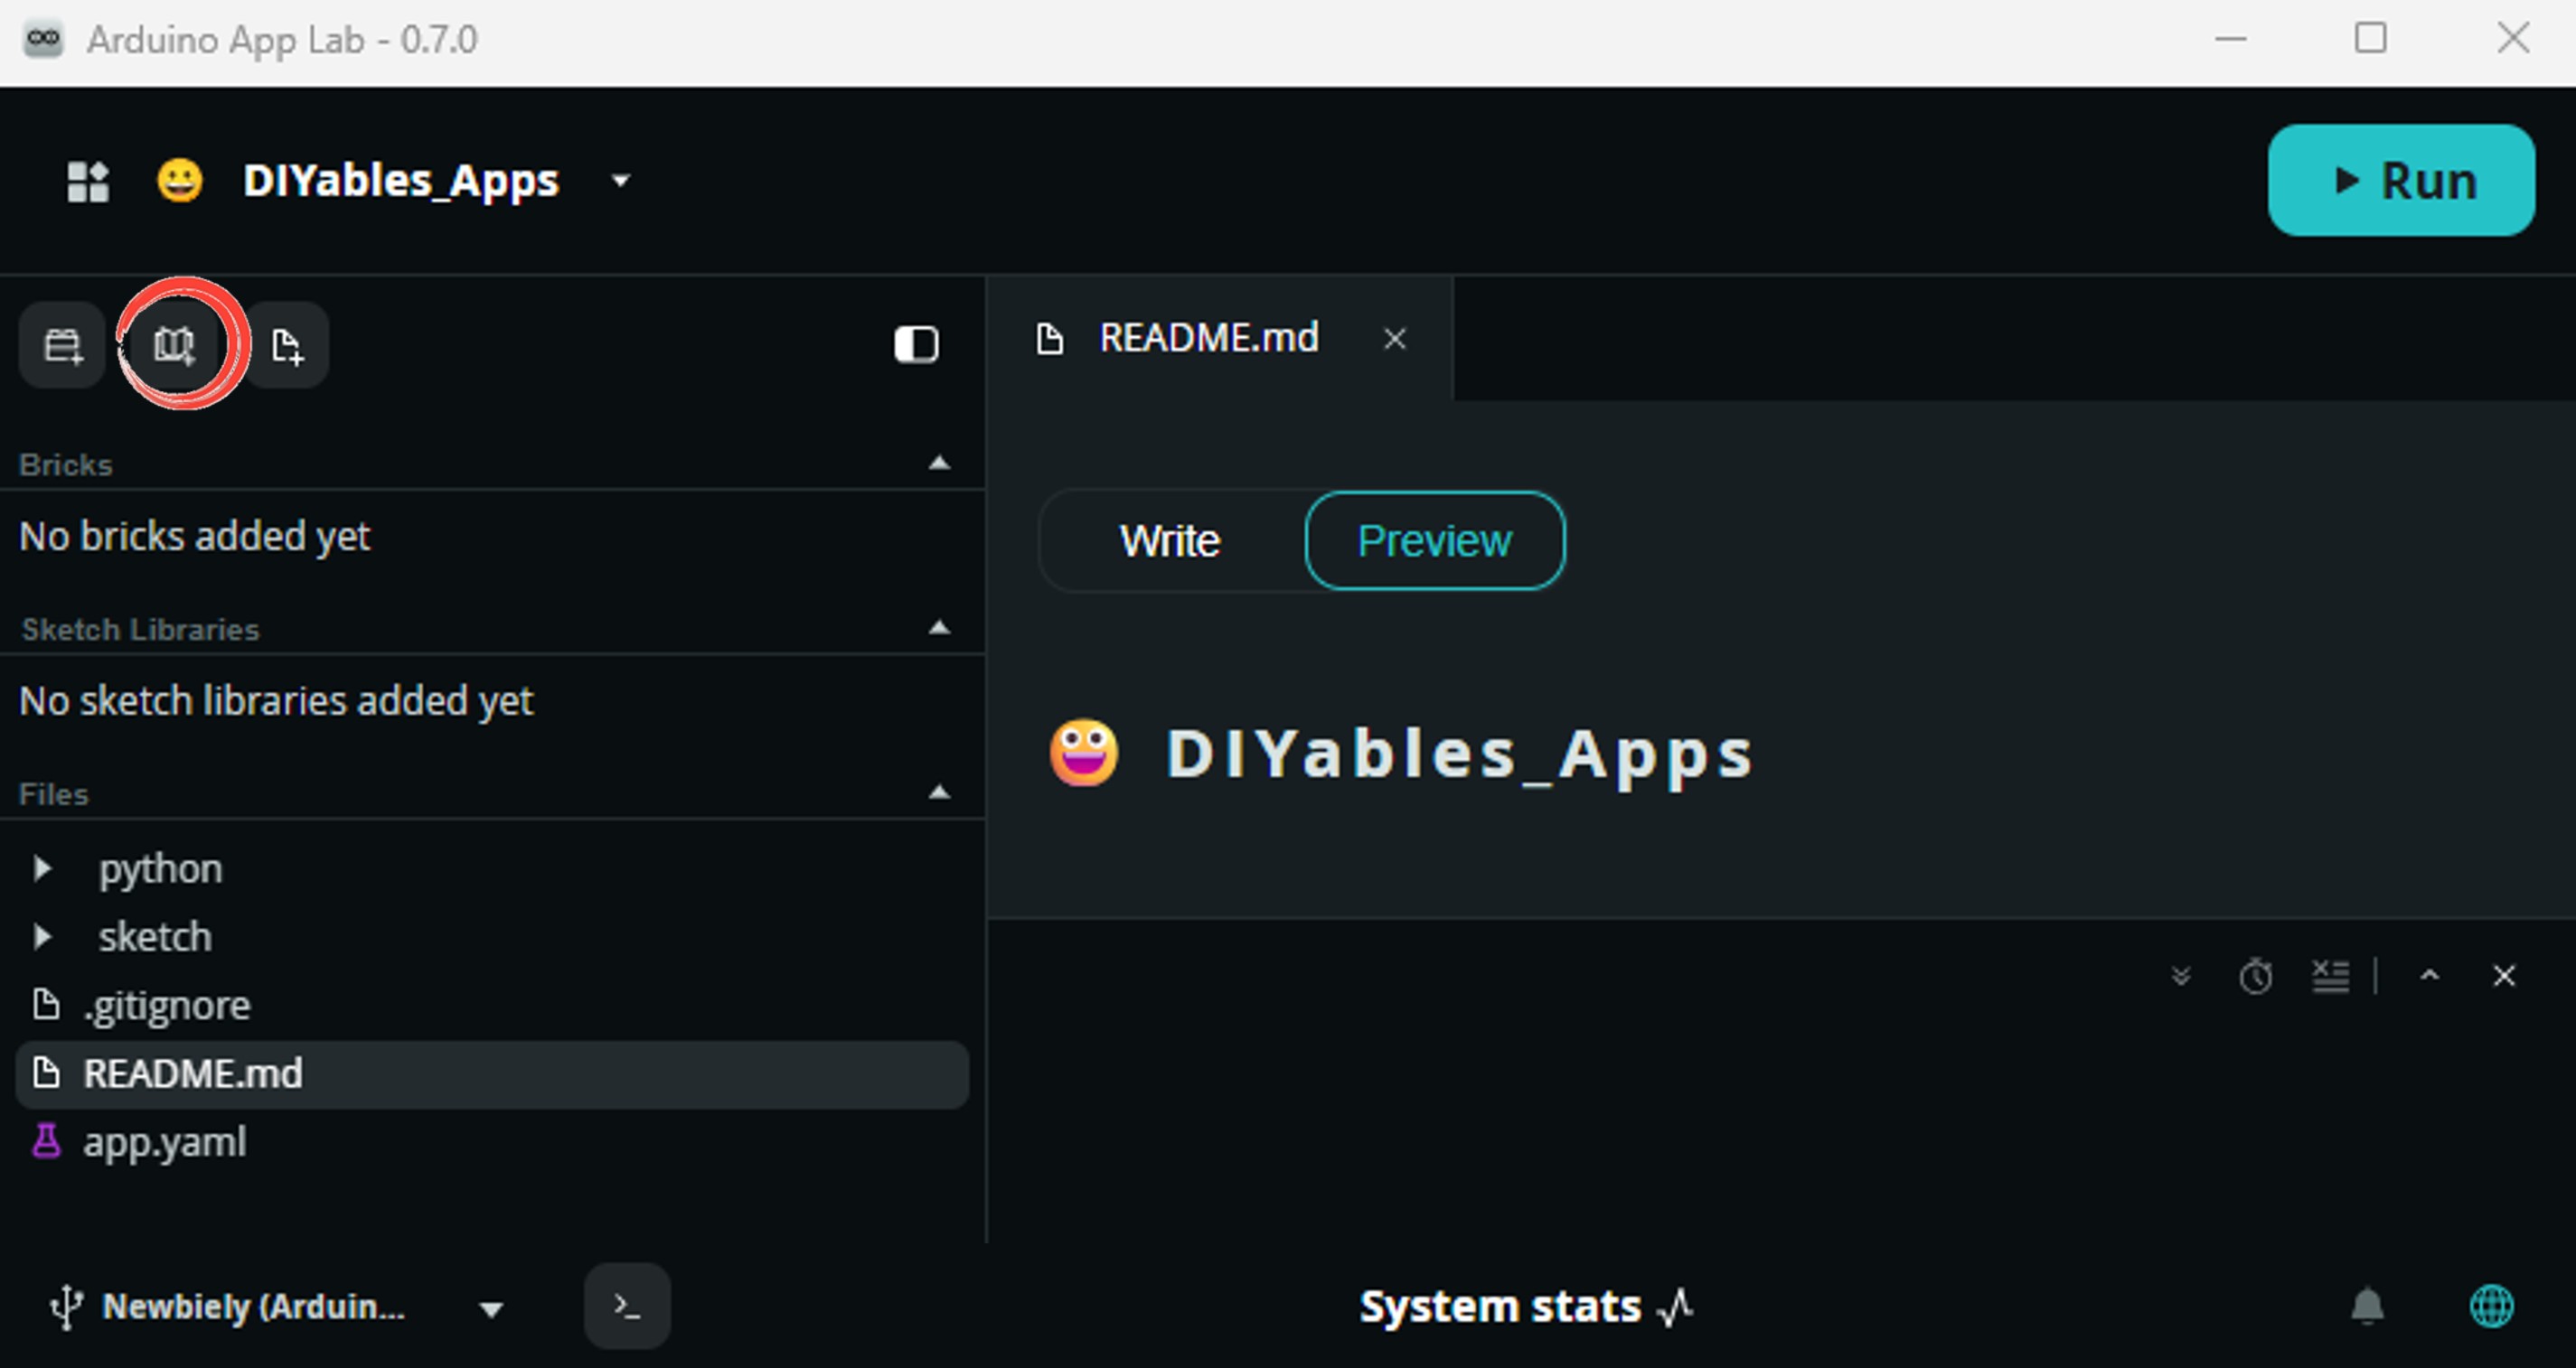
    • Install the library: Click the Add sketch library button (the open book icon with a + sign) in the left sidebar.
    add sketch 라이브러리 in 아두이노 app lab on Arduino UNO Q
    • Search for Arduino_RouterBridge created by Arduino and click the Install button.
    My Apps / DIYables Apps
    Run
    Bricks
    No bricks added...
    Sketch Libraries
    No sketch libra...
    Files
    python
    sketch
    .gitignore
    README.md
    app.yaml
    sketch.ino
    Add sketch library
    Arduino_RouterBridge Arduino

    This library provides a simple RPC bridge for Arduino UNO Q boards, allowing communication between the board and other devices using MsgPack serialization.

    0.4.1
    Install
    More Info
    • Search for DIYables TFT SPI created by DIYables.io and click the Install button.
    My Apps / DIYables Apps
    Run
    Bricks
    No bricks added...
    Sketch Libraries
    No sketch libra...
    Files
    python
    sketch
    .gitignore
    README.md
    app.yaml
    sketch.ino
    Add sketch library
    DIYables TFT SPI DIYables.io

    Works with both touch and non-touch versions of the same SPI TFT modules. Supports ILI9341 (240x320, 16-bit RGB565), ILI9488 (320x480, 18-bit RGB666), and ST7789 (240x320, 16-bit RGB565) displays over SPI. Includes built-in driver for XPT2046 / HR2046 / ADS7843 SPI touch controllers and 4-wire resistive touch panels - no separate touch library required. Use the display-only API for non-touch panels, or add initTouchSPI() to enable touch on modules that include a touch controller. Extends Adafruit GFX for full graphics support. Works with any Arduino-compatible board that has SPI.

    1.0.3
    Install
    More Info
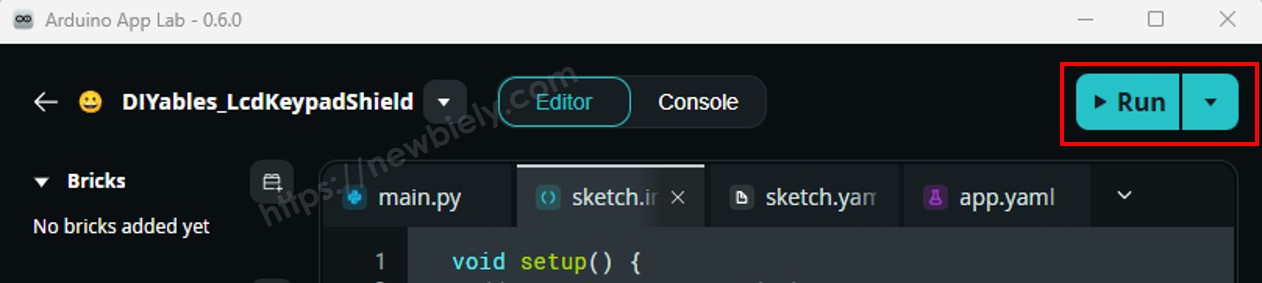
    • 업로드: Arduino App Lab에서 Run 버튼을 클릭하여 STM32에 컴파일하고 업로드합니다.
    Arduino UNO Q의 아두이노 app lab에서 run 버튼 클릭

    디스플레이에 몇 초마다 새로 고쳐지는 색 도형 격자가 표시됩니다!

    • 전문가 팁: 생성자의 너비와 높이를 패널의 실제 픽셀 크기로 설정하세요. 여기서 값이 맞지 않는 것이 이미지가 밀리거나 잘리는 가장 흔한 원인입니다.

    메서드 빠른 참조

    메서드 기능 사용법
    begin() 디스플레이 컨트롤러를 초기화합니다. setup()에서 한 번 호출합니다. TFT_display.begin();
    setRotation(r) 좌표계를 회전합니다. 0=세로, 1=가로. TFT_display.setRotation(1);
    fillScreen(color) 화면을 단색으로 지웁니다. TFT_display.fillScreen(WHITE);
    colorRGB(r,g,b) 8비트 성분으로 16비트 RGB565 색상을 만듭니다. colorRGB(0, 128, 255)
    fillCircle(x,y,r,color) 채워진 원을 그립니다. TFT_display.fillCircle(80, 80, 40, RED);
    fillRect(x,y,w,h,color) 채워진 사각형을 그립니다. TFT_display.fillRect(10, 10, 60, 40, BLUE);
    drawRoundRect(x,y,w,h,r,color) 둥근 사각형 외곽선을 그립니다. TFT_display.drawRoundRect(5,5,100,50,10,GREEN);

    Arduino UNO Q 코드 — 텍스트와 숫자 표시

    이 스케치는 SPI TFT 디스플레이에서 문자열과 숫자를 다양한 크기, 색상, 위치로 출력하는 방법을 보여줍니다.

    코드가 하는 일:

    • 화면을 흰색으로 채웁니다
    • 자홍색 텍스트 색상과 큰 텍스트 크기를 설정합니다
    • 소수점 한 자리와 도 기호가 있는 온도 값을 출력합니다
    • 다음 줄에 습도 값을 출력합니다
    /* * 이 Arduino UNO Q 코드는 newbiely.kr 에서 개발되었습니다 * 이 Arduino UNO Q 코드는 어떠한 제한 없이 공개 사용을 위해 제공됩니다. * 상세한 지침 및 연결도에 대해서는 다음을 방문하세요: * https://newbiely.kr/tutorials/arduino-uno-q/arduino-uno-q-tft-lcd-touch-display-spi */ /* Created by DIYables This example code is in the public domain Product page: https://diyables.io */ // ============================================= // Single include brings in the base class plus all driver classes. // ============================================= #include <DIYables_TFT_SPI.h> // ============================================= // Wiring (Arduino UNO Q - MCU side) // --------------------------------------------- // TFT module Arduino UNO Q // ------------ --------------------------------- // VCC -> 3.3V // GND -> GND // CS -> D10 (TFT_CS_PIN) // RESET -> D9 (TFT_RST_PIN) // DC / RS -> D8 (TFT_DC_PIN) // SDI / MOSI -> D11 (hardware SPI MOSI) // SCK -> D13 (hardware SPI SCK) // LED -> 3.3V (or any GPIO via initBacklight) // SDO / MISO -> D12 (only needed when reading from display) // // The Arduino UNO Q MCU pins are 3.3V - no level converter is needed. // ============================================= // ============================================= // SPI pin definitions (adjust for your board) // ============================================= #define TFT_CS_PIN 10 #define TFT_DC_PIN 8 #define TFT_RST_PIN 9 // Panel resolution in native (portrait) orientation - change to match your module #define TFT_WIDTH 240 #define TFT_HEIGHT 320 // ============================================= // Create display object (uncomment matching driver) // ============================================= // DIYables_ILI9341_SPI TFT_display(TFT_WIDTH, TFT_HEIGHT, TFT_CS_PIN, TFT_DC_PIN, TFT_RST_PIN); // DIYables_ILI9488_SPI TFT_display(TFT_WIDTH, TFT_HEIGHT, TFT_CS_PIN, TFT_DC_PIN, TFT_RST_PIN); DIYables_ST7789_SPI TFT_display(TFT_WIDTH, TFT_HEIGHT, TFT_CS_PIN, TFT_DC_PIN, TFT_RST_PIN); #define MAGENTA DIYables_TFT_SPI::colorRGB(255, 0, 255) #define WHITE DIYables_TFT_SPI::colorRGB(255, 255, 255) void setup() { TFT_display.begin(); TFT_display.setRotation(1); // Landscape TFT_display.fillScreen(WHITE); // Set text color and size TFT_display.setTextColor(MAGENTA); TFT_display.setTextSize(3); // Sample values float temperature = 23.5; float humidity = 78.6; // Display temperature TFT_display.setCursor(20, 20); TFT_display.print("Temperature: "); TFT_display.print(temperature, 1); TFT_display.print(char(247)); TFT_display.println("C"); // Display humidity TFT_display.setCursor(20, 60); TFT_display.print("Humidity: "); TFT_display.print(humidity, 1); TFT_display.print("%"); } void loop() { }

    빠른 단계

    • 위의 코드를 복사하여 sketch/sketch.ino에 붙여넣습니다.
    • Arduino App Lab에서 Run 버튼을 클릭합니다.
    Arduino UNO Q의 아두이노 app lab에서 run 버튼 클릭

    디스플레이에 온도와 습도 값이 큰 자홍색 텍스트로 출력됩니다.

    메서드 빠른 참조

    메서드 기능 사용법
    setTextColor(color) 텍스트 전경색을 설정합니다. TFT_display.setTextColor(BLACK);
    setTextSize(size) 텍스트 크기를 조정합니다. 크기 1은 6x8 픽셀입니다. TFT_display.setTextSize(2);
    setCursor(x, y) 텍스트 커서 위치를 지정합니다. TFT_display.setCursor(10, 30);
    print(value) 커서 위치에 문자열이나 숫자를 출력합니다. TFT_display.print("Temp: ");
    println(value) 출력한 후 다음 줄로 이동합니다. TFT_display.println(25.4);

    Arduino UNO Q 코드 — 이미지 그리기

    이 스케치는 프로그램 메모리에 저장된 풀 컬러 RGB565 비트맵 이미지를 표시합니다. 이미지 데이터는 bitmap.h에 PROGMEM으로 표시된 const uint16_t 배열로 선언됩니다. 이렇게 하면 픽셀 데이터가 SRAM이 아니라 플래시에 저장되므로, RAM이 부족해도 디스플레이가 올바르게 동작합니다. 컴파일하기 전에 bitmap.h를 스케치 폴더에 복사하세요.

    코드가 하는 일:

    • bitmap.h에서 비트맵 배열을 포함합니다
    • 실제 화면 크기를 읽어 이미지를 가운데에 배치합니다
    • 가운데 위치에 RGB565 비트맵을 그립니다
    • 간단한 효과로 2초마다 디스플레이 색상을 반전합니다
    /* * 이 Arduino UNO Q 코드는 newbiely.kr 에서 개발되었습니다 * 이 Arduino UNO Q 코드는 어떠한 제한 없이 공개 사용을 위해 제공됩니다. * 상세한 지침 및 연결도에 대해서는 다음을 방문하세요: * https://newbiely.kr/tutorials/arduino-uno-q/arduino-uno-q-tft-lcd-touch-display-spi */ /* Created by DIYables This example code is in the public domain Product page: https://diyables.io */ // ============================================= // Single include brings in the base class plus all driver classes. // ============================================= #include <DIYables_TFT_SPI.h> #include "bitmap.h" // ============================================= // Wiring (Arduino UNO Q - MCU side) // --------------------------------------------- // TFT module Arduino UNO Q // ------------ --------------------------------- // VCC -> 3.3V // GND -> GND // CS -> D10 (TFT_CS_PIN) // RESET -> D9 (TFT_RST_PIN) // DC / RS -> D8 (TFT_DC_PIN) // SDI / MOSI -> D11 (hardware SPI MOSI) // SCK -> D13 (hardware SPI SCK) // LED -> 3.3V (or any GPIO via initBacklight) // SDO / MISO -> D12 (only needed when reading from display) // // The Arduino UNO Q MCU pins are 3.3V - no level converter is needed. // ============================================= // ============================================= // SPI pin definitions (adjust for your board) // ============================================= #define TFT_CS_PIN 10 #define TFT_DC_PIN 8 #define TFT_RST_PIN 9 // Panel resolution in native (portrait) orientation - change to match your module #define TFT_WIDTH 240 #define TFT_HEIGHT 320 // ============================================= // Create display object (uncomment matching driver) // ============================================= // DIYables_ILI9341_SPI TFT_display(TFT_WIDTH, TFT_HEIGHT, TFT_CS_PIN, TFT_DC_PIN, TFT_RST_PIN); // DIYables_ILI9488_SPI TFT_display(TFT_WIDTH, TFT_HEIGHT, TFT_CS_PIN, TFT_DC_PIN, TFT_RST_PIN); DIYables_ST7789_SPI TFT_display(TFT_WIDTH, TFT_HEIGHT, TFT_CS_PIN, TFT_DC_PIN, TFT_RST_PIN); #define WHITE DIYables_TFT_SPI::colorRGB(255, 255, 255) int img_width = 120; int img_height = 53; void setup() { TFT_display.begin(); uint16_t SCREEN_WIDTH = TFT_display.width(); uint16_t SCREEN_HEIGHT = TFT_display.height(); int x = (SCREEN_WIDTH - img_width) / 2; int y = (SCREEN_HEIGHT - img_height) / 2; TFT_display.fillScreen(WHITE); TFT_display.drawRGBBitmap(x, y, myBitmap, img_width, img_height); } void loop() { delay(2000); TFT_display.invertDisplay(true); delay(2000); TFT_display.invertDisplay(false); }

    빠른 단계

    • 위의 코드를 복사하여 sketch/sketch.ino에 붙여넣습니다.
    • 스케치와 같은 폴더에 bitmap.h라는 새 파일을 만듭니다:
      • Arduino App Lab에서 sketch/ 폴더를 마우스 오른쪽 버튼으로 클릭하고 New File을 선택합니다.
      • 이름을 bitmap.h로 지정합니다.
      • 아래 비트맵 배열을 복사하여 bitmap.h에 붙여넣습니다. 이 배열에는 DIYables 로고가 들어 있습니다.
      const uint16_t myBitmap[] PROGMEM = {0xffff, 0xffff, 0xffff, 0xffff, 0xffff, 0xffff, 0xffff, 0xffff, 0xffff, 0xffff, 0xffff, 0xffff, 0xffff, 0xffff, 0xffff, 0xffff, 0xffff, 0xffff, 0xffff, 0xffff, 0xef5d, 0x0000, 0x0000, 0x0000, 0x0000, 0x0000, 0x0000, 0x0000, 0x0000, 0x0000, 0x0000, 0x0000, 0x0000, 0x0000, 0x0000, 0x0000, 0x0000, 0x0000, 0x0000, 0x0000, 0x0000, 0x0000, 0x0000, 0x0000, 0x0000, 0x0000, 0x0000, 0x0000, 0x0000, 0x0000, 0x0000, 0x0000, 0x0000, 0x0000, 0x0000, 0xffff, 0xffff, 0xffff, 0xffff, 0xbdf7, 0x0000, 0x0000, 0x0000, 0x0000, 0x0000, 0x0000, 0x0000, 0x0000, 0x0000, 0x0000, 0x0000, 0x0000, 0x0000, 0x18c3, 0xbdf7, 0xbdf7, 0xe73c, 0xffff, 0xffff, 0xffff, 0xffff, 0xffff, 0xffff, 0xffff, 0xffff, 0xffff, 0xffff, 0xffdf, 0x0000, 0x0000, 0x0000, 0x0000, 0x0000, 0xffdf, 0xffff, 0xffff, 0x2124, 0x0000, 0x0000, 0x0000, 0x0000, 0x0000, 0xdedb, 0xffff, 0xffff, 0xffff, 0xffff, 0xffff, 0xffff, 0xffff, 0xffff, 0xffff, 0xffff, 0xffff, 0x0841, 0x0000, 0x0000, 0x0000, 0x0000, 0x3186, 0xffff, 0xffff, 0xffff, 0xffff, 0xffff, 0xffff, 0xffff, 0xffff, 0xffff, 0xffff, 0xffff, 0xffff, 0xffff, 0xffff, 0xffff, 0xffff, 0xffff, 0xffff, 0xffff, 0xffff, 0xef5d, 0x0000, 0x0000, 0x0000, 0x0000, 0x0000, 0x0000, 0x0000, 0x0000, 0x0000, 0x0000, 0x0000, 0x0000, 0x0000, 0x0000, 0x0000, 0x0000, 0x0000, 0x0000, 0x0000, 0x0000, 0x0000, 0x0000, 0x0000, 0x0000, 0x0000, 0x0000, 0x0000, 0x0000, 0x0000, 0x0000, 0x0000, 0x0000, 0x0000, 0x0000, 0xffff, 0xffff, 0xffff, 0xffff, 0xbdf7, 0x0000, 0x0000, 0x0000, 0x0000, 0x0000, 0x0000, 0x0000, 0x0000, 0x0000, 0x0000, 0x0000, 0x0000, 0x0000, 0x0000, 0x0000, 0x0000, 0x2124, 0x528a, 0xffff, 0xffff, 0xffff, 0xffff, 0xffff, 0xffff, 0xffff, 0xffff, 0xffff, 0xffdf, 0x0000, 0x0000, 0x0000, 0x0000, 0x0000, 0xffdf, 0xffff, 0xffff, 0x8c71, 0x0000, 0x0000, 0x0000, 0x0000, 0x0000, 0x632c, 0xffff, 0xffff, 0xffff, 0xffff, 0xffff, 0xffff, 0xffff, 0xffff, 0xffff, 0xffff, 0x630c, 0x0000, 0x0000, 0x0000, 0x0000, 0x3186, 0xf79e, 0xffff, 0xffff, 0xffff, 0xffff, 0xffff, 0xffff, 0xffff, 0xffff, 0xffff, 0xffff, 0xffff, 0xffff, 0xffff, 0xffff, 0xffff, 0xffff, 0xffff, 0xffff, 0xffff, 0xffff, 0xef5d, 0x0000, 0x0000, 0x0000, 0x0000, 0x0000, 0x0000, 0x0000, 0x0000, 0x0000, 0x0000, 0x0000, 0x0000, 0x0000, 0x0000, 0x0000, 0x0000, 0x0000, 0x0000, 0x0000, 0x0000, 0x0000, 0x0000, 0x0000, 0x0000, 0x0000, 0x0000, 0x0000, 0x0000, 0x0000, 0x0000, 0x0000, 0x0000, 0x0000, 0x0000, 0xffff, 0xffff, 0xffff, 0xffff, 0xbdf7, 0x0000, 0x0000, 0x0000, 0x0000, 0x0000, 0x0000, 0x0000, 0x0000, 0x0000, 0x0000, 0x0000, 0x0000, 0x0000, 0x0000, 0x0000, 0x0000, 0x0000, 0x0000, 0x0000, 0xbdf7, 0xffff, 0xffff, 0xffff, 0xffff, 0xffff, 0xffff, 0xffff, 0xffdf, 0x0000, 0x0000, 0x0000, 0x0000, 0x0000, 0xffdf, 0xffff, 0xffff, 0xffff, 0x528a, 0x0000, 0x0000, 0x0000, 0x0000, 0x0000, 0xe71c, 0xffff, 0xffff, 0xffff, 0xffff, 0xffff, 0xffff, 0xffff, 0xffff, 0xef5d, 0x2124, 0x0000, 0x0000, 0x0000, 0x0000, 0x73ae, 0xffff, 0xffff, 0xffff, 0xffff, 0xffff, 0xffff, 0xffff, 0xffff, 0xffff, 0xffff, 0xffff, 0xffff, 0xffff, 0xffff, 0xffff, 0xffff, 0xffff, 0xffff, 0xffff, 0xffff, 0xffff, 0xef5d, 0x0000, 0x0000, 0x0000, 0x0000, 0x0000, 0x0000, 0x0000, 0x0000, 0x0000, 0x0000, 0x0000, 0x0000, 0x0000, 0x0000, 0x0000, 0x0000, 0x0000, 0x0000, 0x0000, 0x0000, 0x0000, 0x0000, 0x0000, 0x0000, 0x0000, 0x0000, 0x0000, 0x0000, 0x0000, 0x0000, 0x0000, 0x0000, 0x0000, 0x0000, 0xffff, 0xffff, 0xffff, 0xffff, 0xbdf7, 0x0000, 0x0000, 0x0000, 0x0000, 0x0000, 0x0000, 0x0000, 0x0000, 0x0000, 0x0000, 0x0000, 0x0000, 0x0000, 0x0000, 0x0000, 0x0000, 0x0000, 0x0000, 0x0000, 0x0020, 0xad55, 0xffff, 0xffff, 0xffff, 0xffff, 0xffff, 0xffff, 0xffdf, 0x0000, 0x0000, 0x0000, 0x0000, 0x0000, 0xffdf, 0xffff, 0xffff, 0xffff, 0xffff, 0x0000, 0x0000, 0x0000, 0x0000, 0x0000, 0x3186, 0xffff, 0xffff, 0xffff, 0xffff, 0xffff, 0xffff, 0xffff, 0xffff, 0x4a69, 0x0000, 0x0000, 0x0000, 0x0000, 0x0000, 0xffff, 0xffff, 0xffff, 0xffff, 0xffff, 0xffff, 0xffff, 0xffff, 0xffff, 0xffff, 0xffff, 0xffff, 0xffff, 0xffff, 0xffff, 0xffff, 0xffff, 0xffff, 0xffff, 0xffff, 0xffff, 0xffff, 0xef5d, 0x0000, 0x0000, 0x0000, 0x0000, 0x0000, 0x0000, 0x0000, 0x0000, 0x0000, 0x0000, 0x0000, 0x0000, 0x0000, 0x0000, 0x0000, 0x0000, 0x0000, 0x0000, 0x0000, 0x0000, 0x0000, 0x0000, 0x0000, 0x0000, 0x0000, 0x0000, 0x0000, 0x0000, 0x0000, 0x0000, 0x0000, 0x0000, 0x0000, 0x0000, 0xffff, 0xffff, 0xffff, 0xffff, 0xbdf7, 0x0000, 0x0000, 0x0000, 0x0000, 0x0000, 0x4a49, 0x4a49, 0x4a49, 0x4a49, 0x4a49, 0x4a49, 0x4a49, 0x4a49, 0x0000, 0x0000, 0x0000, 0x0000, 0x0000, 0x0000, 0x0000, 0x0000, 0xbdd7, 0xffff, 0xffff, 0xffff, 0xffff, 0xffff, 0xffdf, 0x0000, 0x0000, 0x0000, 0x0000, 0x0000, 0xffdf, 0xffff, 0xffff, 0xffff, 0xffff, 0x9492, 0x0000, 0x0000, 0x0000, 0x0000, 0x0000, 0x630c, 0xffff, 0xffff, 0xffff, 0xffff, 0xffff, 0xffff, 0xc618, 0x0000, 0x0000, 0x0000, 0x0000, 0x10a2, 0xd6ba, 0xffff, 0xffff, 0xffff, 0xffff, 0xffff, 0xffff, 0xffff, 0xffff, 0xffff, 0xffff, 0xffff, 0xffff, 0xffff, 0xffff, 0xffff, 0xffff, 0xffff, 0xffff, 0xffff, 0xffff, 0xffff, 0xffff, 0xef5d, 0x0000, 0x0000, 0x0000, 0x0000, 0x0000, 0x0000, 0x0000, 0x0000, 0x0000, 0x0000, 0x0000, 0x0000, 0x0000, 0x0000, 0x0000, 0x0000, 0x0000, 0x0000, 0x0000, 0x0000, 0x0000, 0x0000, 0x0000, 0x0000, 0x0000, 0x0000, 0x0000, 0x0000, 0x0000, 0x0000, 0x0000, 0x0000, 0x0000, 0x0000, 0xffff, 0xffff, 0xffff, 0xffff, 0xbdf7, 0x0000, 0x0000, 0x0000, 0x0000, 0x0000, 0xffff, 0xffff, 0xffff, 0xffff, 0xffff, 0xffff, 0xffff, 0xffff, 0xce79, 0xb596, 0x0000, 0x0000, 0x0000, 0x0000, 0x0000, 0x0000, 0x1082, 0xffff, 0xffff, 0xffff, 0xffff, 0xffff, 0xffdf, 0x0000, 0x0000, 0x0000, 0x0000, 0x0000, 0xffdf, 0xffff, 0xffff, 0xffff, 0xffff, 0xef5d, 0x1082, 0x0000, 0x0000, 0x0000, 0x0000, 0x1082, 0xe73c, 0xffff, 0xffff, 0xffff, 0xffff, 0xffff, 0x2965, 0x0000, 0x0000, 0x0000, 0x0000, 0x4228, 0xffff, 0xffff, 0xffff, 0xffff, 0xffff, 0xffff, 0xffff, 0xffff, 0xffff, 0xffff, 0xffff, 0xffff, 0xffff, 0xffff, 0xffff, 0xffff, 0xffff, 0xffff, 0xffff, 0xffff, 0xffff, 0xffff, 0xffff, 0xef5d, 0x0000, 0x0000, 0x0000, 0x0000, 0x0000, 0x0000, 0x0000, 0x0000, 0x0000, 0x0000, 0x0000, 0x0000, 0x0000, 0x0000, 0x0000, 0x0000, 0x0000, 0x0000, 0x0000, 0x0000, 0x0000, 0x0000, 0x0000, 0x0000, 0x0000, 0x0000, 0x0000, 0x0000, 0x0000, 0x0000, 0x0000, 0x0000, 0x0000, 0x0000, 0xffff, 0xffff, 0xffff, 0xffff, 0xbdf7, 0x0000, 0x0000, 0x0000, 0x0000, 0x0000, 0xffff, 0xffff, 0xffff, 0xffff, 0xffff, 0xffff, 0xffff, 0xffff, 0xffff, 0xffff, 0xef5d, 0x18e3, 0x0000, 0x0000, 0x0000, 0x0000, 0x0000, 0x8c71, 0xffff, 0xffff, 0xffff, 0xffff, 0xffdf, 0x0000, 0x0000, 0x0000, 0x0000, 0x0000, 0xffdf, 0xffff, 0xffff, 0xffff, 0xffff, 0xffff, 0xffff, 0x0000, 0x0000, 0x0000, 0x0000, 0x0000, 0x9cd3, 0xffff, 0xffff, 0xffff, 0xffff, 0x9cf3, 0x0000, 0x0000, 0x0000, 0x0000, 0x0000, 0xffff, 0xffff, 0xffff, 0xffff, 0xffff, 0xffff, 0xffff, 0xffff, 0xffff, 0xffff, 0xffff, 0xffff, 0xffff, 0xffff, 0xffff, 0xffff, 0xffff, 0xffff, 0xffff, 0xffff, 0xffff, 0xffff, 0xffff, 0xffff, 0xef5d, 0x0000, 0x0000, 0x0000, 0x0000, 0x0000, 0x0000, 0x0000, 0x0000, 0x0000, 0x0000, 0x0000, 0x0000, 0x0000, 0x0000, 0x0000, 0x0000, 0x0000, 0x0000, 0x0000, 0x0000, 0x0000, 0x0000, 0x0000, 0x0000, 0x0000, 0x0000, 0x0000, 0x0000, 0x0000, 0x0000, 0x0000, 0x0000, 0x0000, 0x0000, 0xffff, 0xffff, 0xffff, 0xffff, 0xbdf7, 0x0000, 0x0000, 0x0000, 0x0000, 0x0000, 0xffff, 0xffff, 0xffff, 0xffff, 0xffff, 0xffff, 0xffff, 0xffff, 0xffff, 0xffff, 0xffff, 0xe71c, 0x0000, 0x0000, 0x0000, 0x0000, 0x0000, 0x18c3, 0xffff, 0xffff, 0xffff, 0xffff, 0xffdf, 0x0000, 0x0000, 0x0000, 0x0000, 0x0000, 0xffdf, 0xffff, 0xffff, 0xffff, 0xffff, 0xffff, 0xffff, 0x7bcf, 0x0000, 0x0000, 0x0000, 0x0000, 0x0000, 0x7bef, 0xffff, 0xffff, 0xffff, 0x10a2, 0x0000, 0x0000, 0x0000, 0x0000, 0xa534, 0xffff, 0xffff, 0xffff, 0xffff, 0xffff, 0xffff, 0xffff, 0xffff, 0xffff, 0xffff, 0xffff, 0xffff, 0xffff, 0xffff, 0xffff, 0xffff, 0xffff, 0xffff, 0xffff, 0xffff, 0xffff, 0xffff, 0xffff, 0xffff, 0xef5d, 0x0000, 0x0000, 0x0000, 0x0000, 0x0000, 0x0000, 0x0000, 0x0000, 0x0000, 0x0000, 0x0000, 0x0000, 0x0000, 0x0000, 0x0000, 0x0000, 0x0000, 0x0000, 0x0000, 0x0000, 0x0000, 0x0000, 0x0000, 0x0000, 0x0000, 0x0000, 0x0000, 0x0000, 0x0000, 0x0000, 0x0000, 0x0000, 0x0000, 0x0000, 0xffff, 0xffff, 0xffff, 0xffff, 0xbdf7, 0x0000, 0x0000, 0x0000, 0x0000, 0x0000, 0xffff, 0xffff, 0xffff, 0xffff, 0xffff, 0xffff, 0xffff, 0xffff, 0xffff, 0xffff, 0xffff, 0xffff, 0x4a69, 0x0000, 0x0000, 0x0000, 0x0000, 0x0000, 0xffff, 0xffff, 0xffff, 0xffff, 0xffdf, 0x0000, 0x0000, 0x0000, 0x0000, 0x0000, 0xffdf, 0xffff, 0xffff, 0xffff, 0xffff, 0xffff, 0xffff, 0xbdd7, 0x0841, 0x0000, 0x0000, 0x0000, 0x0000, 0x39e7, 0xf79e, 0xffff, 0x2945, 0x0000, 0x0000, 0x0000, 0x0000, 0x4a69, 0xffff, 0xffff, 0xffff, 0xffff, 0xffff, 0xffff, 0xffff, 0xffff, 0xffff, 0xffff, 0xffff, 0xffff, 0xffff, 0xffff, 0xffff, 0xffff, 0xffff, 0xffff, 0xffff, 0xffff, 0xffff, 0xffff, 0xffff, 0xffff, 0xffff, 0xef5d, 0x0000, 0x0000, 0x0000, 0x0000, 0x0000, 0x0000, 0x0000, 0x0000, 0x0000, 0x0000, 0x0000, 0x0000, 0x0000, 0x0000, 0x0000, 0x0000, 0x0000, 0x0000, 0x0000, 0x0000, 0x0000, 0x0000, 0x0000, 0x0000, 0x0000, 0x0000, 0x0000, 0x0000, 0x0000, 0x0000, 0x0000, 0x0000, 0x0000, 0x0000, 0xffff, 0xffff, 0xffff, 0xffff, 0xbdf7, 0x0000, 0x0000, 0x0000, 0x0000, 0x0000, 0xffff, 0xffff, 0xffff, 0xffff, 0xffff, 0xffff, 0xffff, 0xffff, 0xffff, 0xffff, 0xffff, 0xffff, 0xe73c, 0x0000, 0x0000, 0x0000, 0x0000, 0x0000, 0x31a6, 0xffff, 0xffff, 0xffff, 0xffdf, 0x0000, 0x0000, 0x0000, 0x0000, 0x0000, 0xffdf, 0xffff, 0xffff, 0xffff, 0xffff, 0xffff, 0xffff, 0xffff, 0xdedb, 0x0000, 0x0000, 0x0000, 0x0000, 0x0000, 0xdedb, 0xb5b6, 0x0020, 0x0000, 0x0000, 0x0000, 0x0000, 0xe71c, 0xffff, 0xffff, 0xffff, 0xffff, 0xffff, 0xffff, 0xffff, 0xffff, 0xffff, 0xffff, 0xffff, 0xffff, 0xffff, 0xffff, 0xffff, 0xffff, 0xffff, 0xffff, 0xffff, 0xffff, 0xffff, 0xffff, 0xffff, 0xffff, 0xffff, 0xef5d, 0x0000, 0x0000, 0x0000, 0x0000, 0x0000, 0x0000, 0x0000, 0x0000, 0x0000, 0x0000, 0x0000, 0x0000, 0x0000, 0x0000, 0x0000, 0x0000, 0x0000, 0x0000, 0x0000, 0x0000, 0x0000, 0x0000, 0x0000, 0x0000, 0x0000, 0x0000, 0x0000, 0x0000, 0x0000, 0x0000, 0x0000, 0x0000, 0x0000, 0x0000, 0xffff, 0xffff, 0xffff, 0xffff, 0xbdf7, 0x0000, 0x0000, 0x0000, 0x0000, 0x0000, 0xffff, 0xffff, 0xffff, 0xffff, 0xffff, 0xffff, 0xffff, 0xffff, 0xffff, 0xffff, 0xffff, 0xffff, 0xe73c, 0x0841, 0x0000, 0x0000, 0x0000, 0x0000, 0x0861, 0xffff, 0xffff, 0xffff, 0xffdf, 0x0000, 0x0000, 0x0000, 0x0000, 0x0000, 0xffdf, 0xffff, 0xffff, 0xffff, 0xffff, 0xffff, 0xffff, 0xffff, 0xffff, 0x31a6, 0x0000, 0x0000, 0x0000, 0x0000, 0x0000, 0x6b6d, 0x0000, 0x0000, 0x0000, 0x0000, 0x4a49, 0xffff, 0xffff, 0xffff, 0xffff, 0xffff, 0xffff, 0x2124, 0x2124, 0x2124, 0x2124, 0xffff, 0xffff, 0xffff, 0xffff, 0xffff, 0xffff, 0xffff, 0xffff, 0xffff, 0xffff, 0xffff, 0xffff, 0xffff, 0xffff, 0xffff, 0xffff, 0xef5d, 0x0000, 0x0000, 0x0000, 0x0000, 0x0000, 0x0000, 0x0000, 0x0000, 0x0000, 0x0000, 0x0000, 0x0000, 0x0000, 0x0000, 0x0000, 0x0000, 0x0000, 0x0000, 0x0000, 0x0000, 0x0000, 0x0000, 0x0000, 0x0000, 0x0000, 0x0000, 0x0000, 0x0000, 0x0000, 0x0000, 0x0000, 0x0000, 0x0000, 0x0000, 0xffff, 0xffff, 0xffff, 0xffff, 0xbdf7, 0x0000, 0x0000, 0x0000, 0x0000, 0x0000, 0xffff, 0xffff, 0xffff, 0xffff, 0xffff, 0xffff, 0xffff, 0xffff, 0xffff, 0xffff, 0xffff, 0xffff, 0xffff, 0x5aeb, 0x0000, 0x0000, 0x0000, 0x0000, 0x0861, 0xffff, 0xffff, 0xffff, 0xffdf, 0x0000, 0x0000, 0x0000, 0x0000, 0x0000, 0xffdf, 0xffff, 0xffff, 0xffff, 0xffff, 0xffff, 0xffff, 0xffff, 0xffff, 0x9cd3, 0x0000, 0x0000, 0x0000, 0x0000, 0x0000, 0x0000, 0x0000, 0x0000, 0x0000, 0x4228, 0xffdf, 0xffff, 0xffff, 0xffff, 0xffff, 0xffff, 0xffff, 0x0000, 0x0000, 0x0000, 0x0000, 0x0000, 0x0000, 0x2104, 0xa514, 0xffff, 0xffff, 0xffff, 0xffff, 0xffff, 0xffff, 0xffff, 0xffff, 0xffff, 0xffff, 0xffff, 0xffff, 0xef5d, 0x0000, 0x0000, 0x0000, 0x0000, 0x0000, 0x0000, 0x0000, 0x0000, 0x0000, 0x0000, 0x0000, 0x0000, 0x0000, 0x0000, 0x0000, 0x0000, 0x0000, 0x0000, 0x0000, 0x0000, 0x0000, 0x0000, 0x0000, 0x0000, 0x0000, 0x0000, 0x0000, 0x0000, 0x0000, 0x0000, 0x0000, 0x0000, 0x0000, 0x0000, 0xffff, 0xffff, 0xffff, 0xffff, 0xbdf7, 0x0000, 0x0000, 0x0000, 0x0000, 0x0000, 0xffff, 0xffff, 0xffff, 0xffff, 0xffff, 0xffff, 0xffff, 0xffff, 0xffff, 0xffff, 0xffff, 0xffff, 0xffdf, 0x528a, 0x0000, 0x0000, 0x0000, 0x0000, 0x0861, 0xffff, 0xffff, 0xffff, 0xffdf, 0x0000, 0x0000, 0x0000, 0x0000, 0x0000, 0xffdf, 0xffff, 0xffff, 0xffff, 0xffff, 0xffff, 0xffff, 0xffff, 0xffff, 0xffff, 0x6b6d, 0x0000, 0x0000, 0x0000, 0x0000, 0x0000, 0x0000, 0x0000, 0x0000, 0x9492, 0xffff, 0xffff, 0xffff, 0xffff, 0xffff, 0xffff, 0xffff, 0x0000, 0x0000, 0x0000, 0x0000, 0x0000, 0x0000, 0x0000, 0x0000, 0x18e3, 0xb5b6, 0xffff, 0xffff, 0xffff, 0xffff, 0xffff, 0xffff, 0xffff, 0xffff, 0xffff, 0xffff, 0xef5d, 0x0000, 0x0000, 0x0000, 0x0000, 0x0000, 0x0000, 0x0000, 0x0000, 0x0000, 0x0000, 0x0000, 0x0000, 0x0000, 0x0000, 0x0000, 0x0000, 0x0000, 0x0000, 0x0000, 0x0000, 0x0000, 0x0000, 0x0000, 0x0000, 0x0000, 0x0000, 0x0000, 0x0000, 0x0000, 0x0000, 0x0000, 0x0000, 0x0000, 0x0000, 0xffff, 0xffff, 0xffff, 0xffff, 0xbdf7, 0x0000, 0x0000, 0x0000, 0x0000, 0x0000, 0xffff, 0xffff, 0xffff, 0xffff, 0xffff, 0xffff, 0xffff, 0xffff, 0xffff, 0xffff, 0xffff, 0xffff, 0xe73c, 0x0020, 0x0000, 0x0000, 0x0000, 0x0000, 0x0861, 0xffff, 0xffff, 0xffff, 0xffdf, 0x0000, 0x0000, 0x0000, 0x0000, 0x0000, 0xffdf, 0xffff, 0xffff, 0xffff, 0xffff, 0xffff, 0xffff, 0xffff, 0xffff, 0xffff, 0xffff, 0x0000, 0x0000, 0x0000, 0x0000, 0x0000, 0x0000, 0x0000, 0x0000, 0xffff, 0xffff, 0xffff, 0xffff, 0xffff, 0xffff, 0xffff, 0xffff, 0x0000, 0x0000, 0x0000, 0x0000, 0x0000, 0x0000, 0x0000, 0x0000, 0x0000, 0x0000, 0x18c3, 0xdefb, 0xffff, 0xffff, 0xffff, 0xffff, 0xffff, 0xffff, 0xffff, 0xffff, 0xef5d, 0x0000, 0x0000, 0x0000, 0x0000, 0x0000, 0x0000, 0x0000, 0x0000, 0x0000, 0x0000, 0x0000, 0x0000, 0x0000, 0x0000, 0x0000, 0x0000, 0x0000, 0x0000, 0x0000, 0x0000, 0x0000, 0x0000, 0x0000, 0x0000, 0x0000, 0x0000, 0x0000, 0x0000, 0x0000, 0x0000, 0x0000, 0x0000, 0x0000, 0x0000, 0xffff, 0xffff, 0xffff, 0xffff, 0xbdf7, 0x0000, 0x0000, 0x0000, 0x0000, 0x0000, 0xffff, 0xffff, 0xffff, 0xffff, 0xffff, 0xffff, 0xffff, 0xffff, 0xffff, 0xffff, 0xffff, 0xffff, 0xe73c, 0x0000, 0x0000, 0x0000, 0x0000, 0x0000, 0x6b6d, 0xffff, 0xffff, 0xffff, 0xffdf, 0x0000, 0x0000, 0x0000, 0x0000, 0x0000, 0xffdf, 0xffff, 0xffff, 0xffff, 0xffff, 0xffff, 0xffff, 0xffff, 0xffff, 0xffff, 0xffff, 0x9cf3, 0x0000, 0x0000, 0x0000, 0x0000, 0x0000, 0x18e3, 0xe71c, 0xffff, 0xffff, 0xffff, 0xffff, 0xffff, 0xffff, 0xffff, 0xffff, 0x0000, 0x0000, 0x0000, 0x0000, 0x0000, 0x0000, 0x0000, 0x0000, 0x0000, 0x0000, 0x0000, 0x1082, 0x39e7, 0xffff, 0xffff, 0xffff, 0xffff, 0xffff, 0xffff, 0xffff, 0xef5d, 0x0000, 0x0000, 0x0000, 0x0000, 0x0000, 0x0000, 0x0000, 0x0000, 0x0000, 0x0000, 0x0000, 0x0000, 0x0000, 0x0000, 0x0000, 0x0000, 0x0000, 0x0000, 0x0000, 0x0000, 0x0000, 0x0000, 0x0000, 0x0000, 0x0000, 0x0000, 0x0000, 0x0000, 0x0000, 0x0000, 0x0000, 0x0000, 0x0000, 0x0000, 0xffff, 0xffff, 0xffff, 0xffff, 0xbdf7, 0x0000, 0x0000, 0x0000, 0x0000, 0x0000, 0xffff, 0xffff, 0xffff, 0xffff, 0xffff, 0xffff, 0xffff, 0xffff, 0xffff, 0xffff, 0xffff, 0xffff, 0x18c3, 0x0000, 0x0000, 0x0000, 0x0000, 0x0000, 0xffff, 0xffff, 0xffff, 0xffff, 0xffdf, 0x0000, 0x0000, 0x0000, 0x0000, 0x0000, 0xffdf, 0xffff, 0xffff, 0xffff, 0xffff, 0xffff, 0xffff, 0xffff, 0xffff, 0xffff, 0xffff, 0xf7be, 0x18e3, 0x0000, 0x0000, 0x0000, 0x0000, 0x528a, 0xffff, 0xffff, 0xffff, 0xffff, 0xffff, 0xffff, 0xffff, 0xffff, 0xffff, 0x0000, 0x0000, 0x0000, 0x0000, 0x0000, 0x0000, 0x0000, 0x0000, 0x0000, 0x0000, 0x0000, 0x0000, 0x0000, 0x630c, 0xffff, 0xffff, 0xffff, 0xffff, 0xffff, 0xffff, 0xef5d, 0x0000, 0x0000, 0x0000, 0x0000, 0x0000, 0x0000, 0x0000, 0x0000, 0x0000, 0x0000, 0x0000, 0x0000, 0x0000, 0x0000, 0x0000, 0x0000, 0x0000, 0x0000, 0x0000, 0x0000, 0x0000, 0x0000, 0x0000, 0x0000, 0x0000, 0x0000, 0x0000, 0x0000, 0x0000, 0x0000, 0x0000, 0x0000, 0x0000, 0x0000, 0xffff, 0xffff, 0xffff, 0xffff, 0xbdf7, 0x0000, 0x0000, 0x0000, 0x0000, 0x0000, 0xffff, 0xffff, 0xffff, 0xffff, 0xffff, 0xffff, 0xffff, 0xffff, 0xffff, 0xffff, 0xffff, 0xbdf7, 0x0000, 0x0000, 0x0000, 0x0000, 0x0000, 0x18e3, 0xffff, 0xffff, 0xffff, 0xffff, 0xffdf, 0x0000, 0x0000, 0x0000, 0x0000, 0x0000, 0xffdf, 0xffff, 0xffff, 0xffff, 0xffff, 0xffff, 0xffff, 0xffff, 0xffff, 0xffff, 0xffff, 0xffff, 0x2104, 0x0000, 0x0000, 0x0000, 0x0000, 0x52aa, 0xffff, 0xffff, 0xffff, 0xffff, 0xffff, 0xffff, 0xffff, 0xffff, 0xffff, 0x0000, 0x0000, 0x0000, 0x0000, 0x0000, 0x0000, 0x0000, 0x0000, 0x0000, 0x0000, 0x0000, 0x0000, 0x0000, 0x0000, 0x31a6, 0xffff, 0xffff, 0xffff, 0xffff, 0xffff, 0xef5d, 0x0000, 0x0000, 0x0000, 0x0000, 0x0000, 0x0000, 0x0000, 0x0000, 0x0000, 0x0000, 0x0000, 0x0000, 0x0000, 0x0000, 0x0000, 0x0000, 0x0000, 0x0000, 0x0000, 0x0000, 0x0000, 0x0000, 0x0000, 0x0000, 0x0000, 0x0000, 0x0000, 0x0000, 0x0000, 0x0000, 0x0000, 0x0000, 0x0000, 0x0000, 0xffff, 0xffff, 0xffff, 0xffff, 0xbdf7, 0x0000, 0x0000, 0x0000, 0x0000, 0x0000, 0xffff, 0xffff, 0xffff, 0xffff, 0xffff, 0xffff, 0xffff, 0xffff, 0xffff, 0xffff, 0xe71c, 0x0841, 0x0000, 0x0000, 0x0000, 0x0000, 0x0000, 0x8c51, 0xffff, 0xffff, 0xffff, 0xffff, 0xffdf, 0x0000, 0x0000, 0x0000, 0x0000, 0x0000, 0xffdf, 0xffff, 0xffff, 0xffff, 0xffff, 0xffff, 0xffff, 0xffff, 0xffff, 0xffff, 0xffff, 0xffff, 0x2104, 0x0000, 0x0000, 0x0000, 0x0000, 0x52aa, 0xffff, 0xffff, 0xffff, 0xffff, 0xffff, 0xffff, 0xffff, 0xffff, 0xffff, 0x0000, 0x0000, 0x0000, 0x0000, 0x0000, 0x0000, 0x0000, 0x0000, 0x0000, 0x0000, 0x0000, 0x0000, 0x0000, 0x0000, 0x0000, 0x5acb, 0xffff, 0xffff, 0xffff, 0xffff, 0xef5d, 0x0000, 0x0000, 0x0000, 0x0000, 0x0000, 0x0000, 0x0000, 0x0000, 0x0000, 0x0000, 0x0000, 0x0000, 0x0000, 0x0000, 0x0000, 0x0000, 0x0000, 0x0000, 0x0000, 0x0000, 0x0000, 0x0000, 0x0000, 0x0000, 0x0000, 0x0000, 0x0000, 0x0000, 0x0000, 0x0000, 0x0000, 0x0000, 0x0000, 0x0000, 0xffff, 0xffff, 0xffff, 0xffff, 0xbdf7, 0x0000, 0x0000, 0x0000, 0x0000, 0x0000, 0xffff, 0xffff, 0xffff, 0xffff, 0xffff, 0xffff, 0xffff, 0xffff, 0xc618, 0x9492, 0x0000, 0x0000, 0x0000, 0x0000, 0x0000, 0x0000, 0x1082, 0xffff, 0xffff, 0xffff, 0xffff, 0xffff, 0xffdf, 0x0000, 0x0000, 0x0000, 0x0000, 0x0000, 0xffdf, 0xffff, 0xffff, 0xffff, 0xffff, 0xffff, 0xffff, 0xffff, 0xffff, 0xffff, 0xffff, 0xffff, 0x2104, 0x0000, 0x0000, 0x0000, 0x0000, 0x52aa, 0xffff, 0xffff, 0xffff, 0xffff, 0xffff, 0xffff, 0xffff, 0xffff, 0xffff, 0x0000, 0x0000, 0x0000, 0x0000, 0x0000, 0x0000, 0x0000, 0x0000, 0x0000, 0x0000, 0x0000, 0x0000, 0x0000, 0x0000, 0x0000, 0x0000, 0xffff, 0xffff, 0xffff, 0xffff, 0xef5d, 0x0000, 0x0000, 0x0000, 0x0000, 0x0000, 0x0000, 0x0000, 0x0000, 0x0000, 0x0000, 0x0000, 0x0000, 0x0000, 0x0000, 0x0000, 0x0000, 0x0000, 0x0000, 0x0000, 0x0000, 0x0000, 0x0000, 0x0000, 0x0000, 0x0000, 0x0000, 0x0000, 0x0000, 0x0000, 0x0000, 0x0000, 0x0000, 0x0000, 0x0000, 0xffff, 0xffff, 0xffff, 0xffff, 0xbdf7, 0x0000, 0x0000, 0x0000, 0x0000, 0x0000, 0x1082, 0x1082, 0x1082, 0x1082, 0x1082, 0x1082, 0x1082, 0x1082, 0x0020, 0x0000, 0x0000, 0x0000, 0x0000, 0x0000, 0x0000, 0x0000, 0xef7d, 0xffff, 0xffff, 0xffff, 0xffff, 0xffff, 0xffdf, 0x0000, 0x0000, 0x0000, 0x0000, 0x0000, 0xffdf, 0xffff, 0xffff, 0xffff, 0xffff, 0xffff, 0xffff, 0xffff, 0xffff, 0xffff, 0xffff, 0xffff, 0x2104, 0x0000, 0x0000, 0x0000, 0x0000, 0x52aa, 0xffff, 0xffff, 0xffff, 0xffff, 0xffff, 0xffff, 0xffff, 0xffff, 0xffff, 0x0000, 0x0000, 0x0000, 0x0000, 0x0000, 0x0000, 0x0000, 0x0000, 0x0000, 0x0000, 0x0000, 0x0000, 0x0000, 0x0000, 0x0000, 0x0000, 0x1082, 0xd69a, 0xffff, 0xffff, 0xef5d, 0x0000, 0x0000, 0x0000, 0x0000, 0x0000, 0x0000, 0x0000, 0x0000, 0x0000, 0x0000, 0x0000, 0x0000, 0x0000, 0x0000, 0x0000, 0x0000, 0x0000, 0x0000, 0x0000, 0x0000, 0x0000, 0x0000, 0x0000, 0x0000, 0x0000, 0x0000, 0x0000, 0x0000, 0x0000, 0x0000, 0x0000, 0x0000, 0x0000, 0x0000, 0xffff, 0xffff, 0xffff, 0xffff, 0xbdf7, 0x0000, 0x0000, 0x0000, 0x0000, 0x0000, 0x0000, 0x0000, 0x0000, 0x0000, 0x0000, 0x0000, 0x0000, 0x0000, 0x0000, 0x0000, 0x0000, 0x0000, 0x0000, 0x0000, 0x0841, 0xc618, 0xffff, 0xffff, 0xffff, 0xffff, 0xffff, 0xffff, 0xffdf, 0x0000, 0x0000, 0x0000, 0x0000, 0x0000, 0xffdf, 0xffff, 0xffff, 0xffff, 0xffff, 0xffff, 0xffff, 0xffff, 0xffff, 0xffff, 0xffff, 0xffff, 0x2104, 0x0000, 0x0000, 0x0000, 0x0000, 0x52aa, 0xffff, 0xffff, 0xffff, 0xffff, 0xffff, 0xffff, 0xffff, 0xffff, 0xffff, 0x0000, 0x0000, 0x0000, 0x0000, 0x0000, 0x0000, 0x0000, 0x0000, 0x0000, 0x0000, 0x0000, 0x0000, 0x0000, 0x0000, 0x0000, 0x0000, 0x0000, 0x9cd3, 0xffff, 0xffff, 0xef5d, 0x0000, 0x0000, 0x0000, 0x0000, 0x0000, 0x0000, 0x0000, 0x0000, 0x0000, 0x0000, 0x0000, 0x0000, 0x0000, 0x0000, 0x0000, 0x0000, 0x0000, 0x0000, 0x0000, 0x0000, 0x0000, 0x0000, 0x0000, 0x0000, 0x0000, 0x0000, 0x0000, 0x0000, 0x0000, 0x0000, 0x0000, 0x0000, 0x0000, 0x0000, 0xffff, 0xffff, 0xffff, 0xffff, 0xbdf7, 0x0000, 0x0000, 0x0000, 0x0000, 0x0000, 0x0000, 0x0000, 0x0000, 0x0000, 0x0000, 0x0000, 0x0000, 0x0000, 0x0000, 0x0000, 0x0000, 0x0000, 0x0000, 0x0000, 0xf7be, 0xffff, 0xffff, 0xffff, 0xffff, 0xffff, 0xffff, 0xffff, 0xffdf, 0x0000, 0x0000, 0x0000, 0x0000, 0x0000, 0xffdf, 0xffff, 0xffff, 0xffff, 0xffff, 0xffff, 0xffff, 0xffff, 0xffff, 0xffff, 0xffff, 0xffff, 0x2104, 0x0000, 0x0000, 0x0000, 0x0000, 0x52aa, 0xffff, 0xffff, 0xffff, 0xffff, 0xffff, 0xffff, 0xffff, 0xffff, 0xffff, 0x0000, 0x0000, 0x0000, 0x0000, 0x0000, 0x0000, 0x0000, 0x0000, 0x0000, 0x0000, 0x0000, 0x0000, 0x0000, 0x0000, 0x0000, 0x0000, 0x0000, 0x0000, 0xffff, 0xffff, 0xef5d, 0x0000, 0x0000, 0x0000, 0x0000, 0x0000, 0x0000, 0x0000, 0x0000, 0x0000, 0x0000, 0x0000, 0x0000, 0x0000, 0x0000, 0x0000, 0x0000, 0x0000, 0x0000, 0x0000, 0x0000, 0x0000, 0x0000, 0x0000, 0x0000, 0x0000, 0x0000, 0x0000, 0x0000, 0x0000, 0x0000, 0x0000, 0x0000, 0x0000, 0x0000, 0xffff, 0xffff, 0xffff, 0xffff, 0xbdf7, 0x0000, 0x0000, 0x0000, 0x0000, 0x0000, 0x0000, 0x0000, 0x0000, 0x0000, 0x0000, 0x0000, 0x0000, 0x0000, 0x0000, 0x0000, 0x0000, 0x4a49, 0x8430, 0xffff, 0xffff, 0xffff, 0xffff, 0xffff, 0xffff, 0xffff, 0xffff, 0xffff, 0xffdf, 0x0000, 0x0000, 0x0000, 0x0000, 0x0000, 0xffdf, 0xffff, 0xffff, 0xffff, 0xffff, 0xffff, 0xffff, 0xffff, 0xffff, 0xffff, 0xffff, 0xffff, 0x2104, 0x0000, 0x0000, 0x0000, 0x0000, 0x52aa, 0xffff, 0xffff, 0xffff, 0xffff, 0xffff, 0xffff, 0xffff, 0xffff, 0xffff, 0x0000, 0x0000, 0x0000, 0x0000, 0x0000, 0x0000, 0x0000, 0x0000, 0x0000, 0x0000, 0x0000, 0x0000, 0x0000, 0x0000, 0x0000, 0x0000, 0x0000, 0x0000, 0x18e3, 0xffff, 0xef5d, 0x0000, 0x0000, 0x0000, 0x0000, 0x0000, 0x0000, 0x0000, 0x0000, 0x0000, 0x0000, 0x0000, 0x0000, 0x0000, 0x0000, 0x0000, 0x0000, 0x0000, 0x0000, 0x0000, 0x0000, 0x0000, 0x0000, 0x0000, 0x0000, 0x0000, 0x0000, 0x0000, 0x0000, 0x0000, 0x0000, 0x0000, 0x0000, 0x0000, 0x0000, 0xffff, 0xffff, 0xffff, 0xffff, 0xbdf7, 0x0000, 0x0000, 0x0000, 0x0000, 0x0000, 0x0000, 0x0000, 0x0000, 0x0000, 0x0000, 0x0000, 0x0000, 0x0000, 0x0000, 0x9cf3, 0xffdf, 0xffff, 0xffff, 0xffff, 0xffff, 0xffff, 0xffff, 0xffff, 0xffff, 0xffff, 0xffff, 0xffff, 0xffdf, 0x0000, 0x0000, 0x0000, 0x0000, 0x0000, 0xffdf, 0xffff, 0xffff, 0xffff, 0xffff, 0xffff, 0xffff, 0xffff, 0xffff, 0xffff, 0xffff, 0xffff, 0x2104, 0x0000, 0x0000, 0x0000, 0x0000, 0x52aa, 0xffff, 0xffff, 0xffff, 0xffff, 0xffff, 0xffff, 0xffff, 0xffff, 0xffff, 0x0000, 0x0000, 0x0000, 0x0000, 0x0000, 0x0000, 0x0000, 0x0000, 0x0000, 0x0000, 0x0000, 0x0000, 0x0000, 0x0000, 0x0000, 0x0000, 0x0000, 0x0000, 0x0861, 0xce79, 0xef5d, 0x0000, 0x0000, 0x0000, 0x0000, 0x0000, 0x0000, 0x0000, 0x0000, 0x0000, 0x0000, 0x0000, 0x0000, 0x0000, 0x0000, 0x0000, 0x0000, 0x0000, 0x0000, 0x0000, 0x0000, 0x0000, 0x0000, 0x0000, 0x0000, 0x0000, 0x0000, 0x0000, 0x0000, 0x0000, 0x0000, 0x0000, 0x0000, 0x0000, 0x0000, 0xffff, 0xffff, 0xffff, 0xffff, 0xffff, 0xffff, 0xffff, 0xffff, 0xffff, 0xffff, 0xffff, 0xffff, 0xffff, 0xffff, 0xffff, 0xffff, 0xffff, 0xffff, 0xffff, 0xffff, 0xffff, 0xffff, 0xffff, 0xffff, 0xffff, 0xffff, 0xffff, 0xffff, 0xffff, 0xffff, 0xffff, 0xffff, 0xffff, 0xffff, 0xffff, 0xffff, 0xffff, 0xffff, 0xffff, 0xffff, 0xffff, 0xffff, 0xffff, 0xffff, 0xffff, 0xffff, 0xffff, 0xffff, 0xffff, 0xffff, 0xffff, 0xffff, 0xffff, 0xffff, 0xffff, 0xffff, 0xffff, 0xffff, 0xffff, 0xffff, 0xffff, 0xffff, 0xffff, 0xffff, 0xffff, 0x0000, 0x0000, 0x0000, 0x0000, 0x0000, 0x0000, 0x0000, 0x0000, 0x0000, 0x0000, 0x0000, 0x0000, 0x0000, 0x0000, 0x0000, 0x0000, 0x0000, 0x0000, 0x0000, 0x94b2, 0xef5d, 0x0000, 0x0000, 0x0000, 0x0000, 0x0000, 0x0000, 0x0000, 0x0000, 0x0000, 0x0000, 0x0000, 0x0000, 0x0000, 0x0000, 0x0000, 0x0000, 0x0000, 0x0000, 0x0000, 0x0000, 0x0000, 0x0000, 0x0000, 0x0000, 0x0000, 0x0000, 0x0000, 0x0000, 0x0000, 0x0000, 0x0000, 0x0000, 0x0000, 0x0000, 0xffff, 0xffff, 0xffff, 0xffff, 0xffff, 0xffff, 0xffff, 0xffff, 0xffff, 0xffff, 0xffff, 0xffff, 0xffff, 0xffff, 0xffff, 0xffff, 0xffff, 0xffff, 0xffff, 0xffff, 0xffff, 0xffff, 0xffff, 0xffff, 0xffff, 0xffff, 0xffff, 0xffff, 0xffff, 0xffff, 0xffff, 0xffff, 0xffff, 0xffff, 0xffff, 0xffff, 0xffff, 0xffff, 0xffff, 0xffff, 0xffff, 0xffff, 0xffff, 0xffff, 0xffff, 0xffff, 0xffff, 0xffff, 0xffff, 0xffff, 0xffff, 0xffff, 0xffff, 0xffff, 0xffff, 0xffff, 0xffff, 0xffff, 0xffff, 0xffff, 0xffff, 0xffff, 0xffff, 0xffff, 0xffff, 0x0000, 0x0000, 0x0000, 0x0000, 0x0000, 0x0000, 0x0000, 0x0000, 0x0000, 0x0000, 0x0000, 0x0000, 0x0000, 0x0000, 0x0000, 0x0000, 0x0000, 0x0000, 0x0000, 0x4a49, 0xef5d, 0x0000, 0x0000, 0x0000, 0x0000, 0x0000, 0x0000, 0x0000, 0x0000, 0x0000, 0x0000, 0x0000, 0x0000, 0x0000, 0x0000, 0x0000, 0x0000, 0x0000, 0x0000, 0x0000, 0x0000, 0x0000, 0x0000, 0x0000, 0x0000, 0x0000, 0x0000, 0x0000, 0x0000, 0x0000, 0x0000, 0x0000, 0x0000, 0x0000, 0x0000, 0xffff, 0xffff, 0xffff, 0xffff, 0xffff, 0xffff, 0xffff, 0xffff, 0xffff, 0xffff, 0xffff, 0xffff, 0xffff, 0xffff, 0xffff, 0xffff, 0xffff, 0xffff, 0xffff, 0xffff, 0xffff, 0xffff, 0xffff, 0xffff, 0xffff, 0xffff, 0xffff, 0xffff, 0xffff, 0xffff, 0xffff, 0xffff, 0xffff, 0xffff, 0xffff, 0xffff, 0xffff, 0xffff, 0xffff, 0xffff, 0xffff, 0xffff, 0xffff, 0xffff, 0xffff, 0xffff, 0xffff, 0xffff, 0xffff, 0xffff, 0xffff, 0xffff, 0xffff, 0xffff, 0xffff, 0xffff, 0xffff, 0xffff, 0xffff, 0xffff, 0xffff, 0xffff, 0xffff, 0xffff, 0xffff, 0x0000, 0x0000, 0x0000, 0x0000, 0x0000, 0x0000, 0x0000, 0x0000, 0x0000, 0x0000, 0x0000, 0x0000, 0x0000, 0x0000, 0x0000, 0x0000, 0x0000, 0x0000, 0x0000, 0x0000, 0xef5d, 0x0000, 0x0000, 0x0000, 0x0000, 0x0000, 0x0000, 0x0000, 0x0000, 0x0000, 0x0000, 0x0000, 0x0000, 0x0000, 0x0000, 0x0000, 0x0000, 0x0000, 0x0000, 0x0000, 0x0000, 0x0000, 0x0000, 0x0000, 0x0000, 0x0000, 0x0000, 0x0000, 0x0000, 0x0000, 0x0000, 0x0000, 0x0000, 0x0000, 0x0000, 0xffff, 0xffff, 0xffff, 0xffff, 0xffff, 0xffff, 0xffff, 0xffff, 0xffff, 0xffff, 0xffff, 0xffff, 0xffff, 0xffff, 0xffff, 0xffff, 0xffff, 0xffff, 0xffff, 0xffff, 0xffff, 0xffff, 0xffff, 0xffff, 0xffff, 0xffff, 0xffff, 0xffff, 0xffff, 0xffff, 0xffff, 0xffff, 0xffff, 0xffff, 0xffff, 0xffff, 0xffff, 0xffff, 0xffff, 0xffff, 0xffff, 0xffff, 0xffff, 0xffff, 0xffff, 0xffff, 0xffff, 0xffff, 0xffff, 0xffff, 0xffff, 0xffff, 0xffff, 0xffff, 0xffff, 0xffff, 0xffff, 0xffff, 0xffff, 0xffff, 0xffff, 0xffff, 0xffff, 0xffff, 0xffff, 0x0000, 0x0000, 0x0000, 0x0000, 0x0000, 0x0000, 0x0000, 0x0000, 0x0000, 0x0000, 0x0000, 0x0000, 0x0000, 0x0000, 0x0000, 0x0000, 0x0000, 0x0000, 0x0000, 0x0000, 0xef5d, 0x0000, 0x0000, 0x0000, 0x0000, 0x0000, 0x0000, 0x0000, 0x0000, 0x0000, 0x0000, 0x0000, 0x0000, 0x0000, 0x0000, 0x0000, 0x0000, 0x0000, 0x0000, 0x0000, 0x0000, 0x0000, 0x0000, 0x0000, 0x0000, 0x0000, 0x0000, 0x0000, 0x0000, 0x0000, 0x0000, 0x0000, 0x0000, 0x0000, 0x0000, 0xffff, 0xffff, 0xffff, 0xffff, 0xffff, 0xffff, 0xffff, 0xffff, 0xffff, 0xffff, 0xffff, 0xffff, 0xffff, 0xffff, 0xffff, 0xffff, 0xffff, 0xffff, 0xffff, 0xffff, 0xffff, 0xffff, 0xffff, 0xffff, 0xffff, 0xffff, 0xffff, 0xffff, 0xffff, 0xffff, 0xffff, 0xffff, 0xffff, 0xffff, 0xffff, 0xffff, 0xffff, 0xffff, 0xffff, 0xffff, 0xffff, 0xffff, 0xffff, 0xffff, 0xffff, 0xffff, 0xffff, 0xffff, 0xffff, 0xffff, 0xffff, 0xffff, 0xffff, 0xffff, 0xffff, 0xffff, 0xffff, 0xffff, 0xffff, 0xffff, 0xffff, 0xffff, 0xffff, 0xffff, 0xffff, 0x0000, 0x0000, 0x0000, 0x0000, 0x0000, 0x0000, 0x0000, 0x0000, 0x0000, 0x0000, 0x0000, 0x0000, 0x0000, 0x0000, 0x0000, 0x0000, 0x0000, 0x0000, 0x0000, 0x0000, 0xef5d, 0x0000, 0x0000, 0x0000, 0x0000, 0x0000, 0x0000, 0x0000, 0x0000, 0x0000, 0x0000, 0x0000, 0x0000, 0x0000, 0x0000, 0x0000, 0x0000, 0x0000, 0x0000, 0x0000, 0x0000, 0x0000, 0x0000, 0x0000, 0x0000, 0x0000, 0x0000, 0x0000, 0x0000, 0x0000, 0x0000, 0x0000, 0x0000, 0x0000, 0x0000, 0xffff, 0xffff, 0xffff, 0xffff, 0xbdf7, 0x0000, 0x0000, 0x0000, 0x0000, 0x0000, 0x0000, 0x0000, 0x0000, 0x0000, 0x0000, 0x0000, 0x0000, 0x0000, 0x0000, 0x0000, 0x0000, 0x0000, 0x0000, 0x0000, 0x0000, 0x0000, 0x0000, 0x0000, 0x0000, 0x0000, 0x0000, 0x0000, 0x0000, 0x0000, 0x0000, 0x0000, 0x0000, 0x0000, 0x0000, 0x0000, 0x0000, 0x0000, 0x0000, 0x0000, 0x0000, 0x0000, 0x0000, 0x0000, 0x0000, 0x0000, 0x0000, 0x0000, 0x0000, 0x0000, 0x0000, 0x0000, 0x0000, 0x0000, 0x0000, 0x0000, 0x0000, 0x0000, 0x0000, 0x0000, 0x0000, 0x0000, 0x0000, 0x0000, 0x0000, 0x0000, 0x0000, 0x0000, 0x0000, 0x0000, 0x0000, 0x0000, 0x0000, 0x0000, 0x0000, 0x0000, 0x0000, 0x0000, 0x0000, 0x0000, 0x0000, 0xef5d, 0x0000, 0x0000, 0x0000, 0x0000, 0x0000, 0x0000, 0x0000, 0x0000, 0x0000, 0x0000, 0x0000, 0x0000, 0x0000, 0x0000, 0x0000, 0x0000, 0x0000, 0x0000, 0x0000, 0x0000, 0x0000, 0x0000, 0x0000, 0x0000, 0x0000, 0x0000, 0x0000, 0x0000, 0x0000, 0x0000, 0x0000, 0x0000, 0x0000, 0x0000, 0xffff, 0xffff, 0xffff, 0xffff, 0xbdf7, 0x0000, 0x0000, 0x0000, 0x0000, 0x0000, 0x0000, 0x0000, 0x0000, 0x0000, 0x0000, 0x0000, 0x0000, 0x0000, 0x0000, 0x0000, 0x0000, 0x0000, 0x0000, 0x0000, 0x0000, 0x0000, 0x0000, 0x0000, 0x0000, 0x0000, 0x0000, 0x0000, 0x0000, 0x0000, 0x0000, 0x0000, 0x0000, 0x0000, 0x0000, 0x0000, 0x0000, 0x0000, 0x0000, 0x0000, 0x0000, 0x0000, 0x0000, 0x0000, 0x0000, 0x0000, 0x0000, 0x0000, 0x0000, 0x0000, 0x0000, 0x0000, 0x0000, 0x0000, 0x0000, 0x0000, 0x0000, 0x0000, 0x0000, 0x0000, 0x0000, 0x0000, 0x0000, 0x0000, 0x0000, 0x0000, 0x0000, 0x0000, 0x0000, 0x0000, 0x0000, 0x0000, 0x0000, 0x0000, 0x0000, 0x0000, 0x0000, 0x0000, 0x0000, 0x0000, 0x0000, 0x0000, 0x0000, 0x0000, 0x0000, 0x0000, 0x0000, 0x0000, 0x0000, 0x0000, 0x0000, 0x0000, 0x0000, 0x0000, 0x0000, 0x0000, 0x0000, 0x0000, 0x0000, 0x0000, 0x0000, 0x0000, 0x0000, 0x0000, 0x0000, 0x0000, 0x0000, 0x0000, 0x0000, 0x0000, 0x0000, 0x0000, 0x0000, 0x0000, 0x0000, 0x18e3, 0xffff, 0xffff, 0xffff, 0xffff, 0xbdf7, 0x0000, 0x0000, 0x0000, 0x0000, 0x0000, 0x0000, 0x0000, 0x0000, 0x0000, 0x0000, 0x0000, 0x0000, 0x0000, 0x0000, 0x0000, 0x0000, 0x0000, 0x0000, 0x0000, 0x0000, 0x0000, 0x0000, 0x0000, 0x0000, 0x0000, 0x0000, 0x0000, 0x0000, 0x0000, 0x0000, 0x0000, 0x0000, 0x0000, 0x0000, 0x0000, 0x0000, 0x0000, 0x0000, 0x0000, 0x0000, 0x0000, 0x0000, 0x0000, 0x0000, 0x0000, 0x0000, 0x0000, 0x0000, 0x0000, 0x0000, 0x0000, 0x0000, 0x0000, 0x0000, 0x0000, 0x0000, 0x0000, 0x0000, 0x0000, 0x0000, 0x0000, 0x0000, 0x0000, 0x0000, 0x0000, 0x0000, 0x0000, 0x0000, 0x0000, 0x0000, 0x0000, 0x0000, 0x0000, 0x0000, 0x0000, 0x0000, 0x0000, 0x0000, 0x0000, 0x0000, 0x0000, 0x0000, 0x0000, 0x0000, 0x0000, 0x0000, 0x0000, 0x0000, 0x0000, 0x0000, 0x0000, 0x0000, 0x0000, 0x0000, 0x0000, 0x0000, 0x0000, 0x0000, 0x0000, 0x0000, 0x0000, 0x0000, 0x0000, 0x0000, 0x0000, 0x0000, 0x0000, 0x0000, 0x0000, 0x0000, 0x0000, 0x0000, 0x0000, 0x0000, 0xce59, 0xffff, 0xffff, 0xffff, 0xffff, 0xbdf7, 0x0000, 0x0000, 0x0000, 0x0000, 0x0000, 0x0000, 0x0000, 0x0000, 0x0000, 0x0000, 0x0000, 0x0000, 0x0000, 0x0000, 0x0000, 0x0000, 0x0000, 0x0000, 0x0000, 0x0000, 0x0000, 0x0000, 0x0000, 0x0000, 0x0000, 0x0000, 0x0000, 0x0000, 0x0000, 0x0000, 0x0000, 0x0000, 0x0000, 0x0000, 0x0000, 0x0000, 0x0000, 0x0000, 0x0000, 0x0000, 0x0000, 0x0000, 0x0000, 0x0000, 0x0000, 0x0000, 0x0000, 0x0000, 0x0000, 0x0000, 0x0000, 0x0000, 0x0000, 0x0000, 0x0000, 0x0000, 0x0000, 0x0000, 0x0000, 0x0000, 0x0000, 0x0000, 0x0000, 0x0000, 0x0000, 0x0000, 0x0000, 0x0000, 0x0000, 0x0000, 0x0000, 0x0000, 0x0000, 0x0000, 0x0000, 0x0000, 0x0000, 0x0000, 0x0000, 0x0000, 0xef5d, 0x0000, 0x0000, 0x0000, 0x0000, 0x0000, 0x0000, 0x0000, 0x0000, 0x0000, 0x0000, 0x0000, 0x0000, 0x0000, 0x0000, 0x0000, 0x0000, 0x0000, 0x0000, 0x0000, 0x0000, 0x0000, 0x0000, 0x0000, 0x0000, 0x0000, 0x0000, 0x0000, 0x0000, 0x0000, 0x0000, 0x0000, 0x0000, 0x0000, 0xce59, 0xffff, 0xffff, 0xffff, 0xffff, 0xbdf7, 0x0000, 0x0000, 0x0000, 0x0000, 0x0000, 0x0000, 0x0000, 0x0000, 0x0000, 0x0000, 0x0000, 0x0000, 0x0000, 0x0000, 0x0000, 0x0000, 0x0000, 0x1082, 0x1082, 0x0000, 0x0000, 0x0000, 0x0000, 0x0000, 0x0000, 0x0000, 0x0000, 0x0000, 0x0000, 0x0000, 0x1082, 0x1082, 0x0841, 0x0000, 0x0000, 0x0000, 0x0000, 0x0000, 0x0000, 0x0000, 0x0000, 0x0000, 0x0000, 0x0000, 0x0000, 0x0000, 0x0000, 0x0000, 0x0000, 0x0000, 0x0000, 0x0000, 0x0000, 0x0000, 0x0000, 0x0000, 0x0000, 0x0000, 0x0000, 0x0000, 0x0000, 0x0000, 0x0000, 0x0000, 0x0000, 0x0000, 0x0000, 0x0000, 0x0000, 0x0000, 0x0000, 0x0000, 0x0000, 0x0000, 0x0000, 0x0000, 0x0000, 0x0000, 0x0000, 0x0000, 0xef5d, 0x0000, 0x0000, 0x0000, 0x0000, 0x0000, 0x0000, 0x0000, 0x0000, 0x0000, 0x0000, 0x0000, 0x0000, 0x0000, 0x0000, 0x0000, 0x0000, 0x0000, 0x0000, 0x0000, 0x0000, 0x0000, 0x0000, 0x0000, 0x0000, 0x0000, 0x0000, 0x0000, 0x0000, 0x0000, 0x0000, 0x0000, 0x0000, 0x0000, 0xce59, 0xffff, 0xffff, 0xffff, 0xffff, 0xbdf7, 0x0000, 0x0000, 0x0000, 0x0000, 0x0000, 0x0000, 0x0000, 0x0000, 0x0000, 0x0000, 0x0000, 0x0000, 0x0000, 0x0000, 0x0000, 0x0000, 0x0000, 0xffff, 0xffff, 0x0000, 0x0000, 0x0000, 0x0000, 0x0000, 0x0000, 0x0000, 0x0000, 0x0000, 0x0000, 0x0000, 0xffff, 0xffff, 0x8430, 0x0000, 0x0000, 0x0000, 0x0000, 0x0000, 0x0000, 0x0000, 0x0000, 0x0000, 0x0000, 0x0000, 0x0000, 0x0000, 0x0000, 0x0000, 0x0000, 0x0000, 0x0000, 0x0000, 0x0000, 0x0000, 0x0000, 0x0000, 0x0000, 0x0000, 0x0000, 0x0000, 0x0000, 0x0000, 0x0000, 0x0000, 0x0000, 0x0000, 0x0000, 0x0000, 0x0000, 0x0000, 0x0000, 0x0000, 0x0000, 0x0000, 0x0000, 0x0000, 0x0000, 0x0000, 0x0000, 0x0000, 0xef5d, 0x0000, 0x0000, 0x0000, 0x0000, 0x0000, 0x0000, 0x0000, 0x0000, 0x0000, 0x0000, 0x0000, 0x0000, 0x0000, 0x0000, 0x0000, 0x0000, 0x0000, 0x0000, 0x0000, 0x0000, 0x0000, 0x0000, 0x0000, 0x0000, 0x0000, 0x0000, 0x0000, 0x0000, 0x0000, 0x0000, 0x0000, 0x0000, 0x0020, 0xce79, 0xffff, 0xffff, 0xffff, 0xffff, 0xbdf7, 0x0000, 0x0000, 0x0000, 0x0000, 0x0000, 0x0000, 0x0000, 0x0000, 0x0000, 0x0000, 0x0000, 0x0000, 0x0000, 0x0000, 0x0000, 0x0000, 0x0000, 0xffff, 0xffff, 0x0000, 0x0000, 0x0000, 0x0000, 0x0000, 0x0000, 0x0000, 0x0000, 0x0000, 0x0000, 0x0000, 0xffff, 0xffff, 0x8430, 0x0000, 0x0000, 0x0000, 0x0000, 0x0000, 0x0000, 0x0000, 0x0000, 0x0000, 0x0000, 0x0000, 0x0000, 0x0000, 0x0000, 0x0000, 0x0000, 0x0000, 0x0000, 0x0000, 0x0000, 0x0000, 0x0000, 0x0000, 0x0000, 0x0000, 0x0000, 0x0000, 0x0000, 0x0000, 0x0000, 0x0000, 0x0000, 0x0000, 0x0000, 0x0000, 0x0000, 0x0000, 0x0000, 0x0000, 0x0000, 0x0000, 0x0000, 0x0000, 0x0000, 0x0000, 0x0000, 0x0000, 0xef5d, 0x0000, 0x0000, 0x0000, 0x0000, 0x0000, 0x0000, 0x0000, 0x0000, 0x0000, 0x0000, 0x0000, 0x0000, 0x0000, 0x0000, 0x0000, 0x0000, 0x0000, 0x0000, 0x0000, 0x0000, 0x0000, 0x0000, 0x0000, 0x0000, 0x0000, 0x0000, 0x0000, 0x0000, 0x0000, 0x0000, 0x0000, 0x0000, 0x4a69, 0xffff, 0xffff, 0xffff, 0xffff, 0xffff, 0xbdf7, 0x0000, 0x0000, 0x0000, 0x0000, 0x0000, 0x0000, 0x0000, 0x0000, 0x0000, 0x0000, 0x0000, 0x0000, 0x0000, 0x0000, 0x0000, 0x0000, 0x0000, 0xffff, 0xffff, 0x0000, 0x0000, 0x0000, 0x0000, 0x0000, 0x0000, 0x0000, 0x0000, 0x0000, 0x0000, 0x0000, 0xffff, 0xffff, 0x8430, 0x0000, 0x0000, 0x0000, 0x0000, 0x0000, 0x0000, 0x0000, 0x0000, 0x0000, 0x0000, 0x0000, 0x0000, 0x0000, 0x0000, 0x0000, 0x0000, 0x0000, 0x0000, 0x0000, 0x0000, 0x0000, 0x0000, 0x0000, 0x0000, 0x0000, 0x0000, 0x0000, 0x0000, 0x0000, 0x0000, 0x0000, 0x0000, 0x0000, 0x0000, 0x0000, 0x0000, 0x0000, 0x0000, 0x0000, 0x0000, 0x0000, 0x0000, 0x0000, 0x0000, 0x0000, 0x0000, 0x1082, 0xef5d, 0x0000, 0x0000, 0x0000, 0x0000, 0x0000, 0x0000, 0x0000, 0x0000, 0x0000, 0x0000, 0x0000, 0x0000, 0x0000, 0x0000, 0x0000, 0x0000, 0x0000, 0x0000, 0x0000, 0x0000, 0x0000, 0x0000, 0x0000, 0x0000, 0x0000, 0x0000, 0x0000, 0x0000, 0x0000, 0x0000, 0x0000, 0x0000, 0x630c, 0xffff, 0xffff, 0xffff, 0xffff, 0xffff, 0xbdf7, 0x0000, 0x0000, 0x0000, 0x0000, 0x0000, 0x0000, 0x0000, 0x18c3, 0x18c3, 0x18c3, 0x18c3, 0x10a2, 0x0000, 0x0000, 0x0000, 0x0000, 0x0000, 0xffff, 0xffff, 0x0000, 0x0861, 0x18c3, 0x18c3, 0x18c3, 0x0861, 0x0000, 0x0000, 0x0000, 0x0000, 0x0000, 0xffff, 0xffff, 0x8430, 0x0000, 0x0000, 0x0000, 0x0000, 0x0000, 0x18c3, 0x18c3, 0x18c3, 0x18c3, 0x0000, 0x0000, 0x0000, 0x0000, 0x0000, 0x0000, 0x0841, 0x18c3, 0x18c3, 0x18c3, 0x18c3, 0x0020, 0x0000, 0x0000, 0x0000, 0x0000, 0x0000, 0x0000, 0x0000, 0x0000, 0x0000, 0x0000, 0x0000, 0x0000, 0x0000, 0x0000, 0x0000, 0x0000, 0x0000, 0x0000, 0x0000, 0x0000, 0x0000, 0x0000, 0x0000, 0x0000, 0x0000, 0x94b2, 0xef5d, 0x0000, 0x0000, 0x0000, 0x0000, 0x0000, 0x0000, 0x0000, 0x0000, 0x0000, 0x0000, 0x0000, 0x0000, 0x0000, 0x0000, 0x0000, 0x0000, 0x0000, 0x0000, 0x0000, 0x0000, 0x0000, 0x0000, 0x0000, 0x0000, 0x0000, 0x0000, 0x0000, 0x0000, 0x0000, 0x0000, 0x0000, 0x0000, 0xffff, 0xffff, 0xffff, 0xffff, 0xffff, 0xffff, 0xbdf7, 0x0000, 0x0000, 0x0000, 0x0000, 0x0000, 0x2104, 0x9cf3, 0xffff, 0xffff, 0xffff, 0xffff, 0xf79e, 0x9cf3, 0x0000, 0x0000, 0x0000, 0x0000, 0xffff, 0xffff, 0x0861, 0xce59, 0xffff, 0xffff, 0xffff, 0xce59, 0x94b2, 0x0000, 0x0000, 0x0000, 0x0000, 0xffff, 0xffff, 0x8430, 0x0000, 0x0000, 0x0000, 0x4228, 0x9cf3, 0xffff, 0xffff, 0xffff, 0xffff, 0x9cf3, 0x1082, 0x0000, 0x0000, 0x0000, 0x8430, 0xbdf7, 0xffff, 0xffff, 0xffff, 0xffff, 0xad75, 0x6b6d, 0x0000, 0x0000, 0x0000, 0x0000, 0x0000, 0x0000, 0x0000, 0x0000, 0x0000, 0x0000, 0x0000, 0x0000, 0x0000, 0x0000, 0x0000, 0x0000, 0x0000, 0x0000, 0x0000, 0x0000, 0x0000, 0x0000, 0x0000, 0x0000, 0xa514, 0xef5d, 0x0000, 0x0000, 0x0000, 0x0000, 0x0000, 0x0000, 0x0000, 0x0000, 0x0000, 0x0000, 0x0000, 0x0000, 0x0000, 0x0000, 0x0000, 0x0000, 0x0000, 0x0000, 0x0000, 0x0000, 0x0000, 0x0000, 0x0000, 0x0000, 0x0000, 0x0000, 0x0000, 0x0000, 0x0000, 0x0000, 0x0000, 0xce79, 0xffff, 0xffff, 0xffff, 0xffff, 0xffff, 0xffff, 0xbdf7, 0x0000, 0x0000, 0x0000, 0x0000, 0x0000, 0x8430, 0xffff, 0xe71c, 0xe71c, 0xe71c, 0xe71c, 0xffff, 0xffff, 0x18c3, 0x0000, 0x0000, 0x0000, 0xffff, 0xffff, 0xffff, 0xffff, 0xe71c, 0xe71c, 0xe71c, 0xffff, 0xffff, 0x8c51, 0x0000, 0x0000, 0x0000, 0xffff, 0xffff, 0x8430, 0x0000, 0x0000, 0x18e3, 0xffff, 0xffff, 0xe73c, 0xe71c, 0xe71c, 0xffdf, 0xffff, 0xffff, 0x1082, 0x0000, 0x5aeb, 0xffff, 0xffff, 0xe73c, 0xe71c, 0xe71c, 0xe71c, 0xffdf, 0x0000, 0x0000, 0x0000, 0x0000, 0x0000, 0x0000, 0x0000, 0x0000, 0x0000, 0x0000, 0x0000, 0x0000, 0x0000, 0x0000, 0x0000, 0x0000, 0x0000, 0x0000, 0x0000, 0x0000, 0x0000, 0x0000, 0x0000, 0x0000, 0x18c3, 0xffff, 0xef5d, 0x0000, 0x0000, 0x0000, 0x0000, 0x0000, 0x0000, 0x0000, 0x0000, 0x0000, 0x0000, 0x0000, 0x0000, 0x0000, 0x0000, 0x0000, 0x0000, 0x0000, 0x0000, 0x0000, 0x0000, 0x0000, 0x0000, 0x0000, 0x0000, 0x0000, 0x0000, 0x0000, 0x0000, 0x0000, 0x0000, 0x2965, 0xef5d, 0xffff, 0xffff, 0xffff, 0xffff, 0xffff, 0xffff, 0xbdf7, 0x0000, 0x0000, 0x0000, 0x0000, 0x0000, 0x1082, 0x5aeb, 0x0000, 0x0000, 0x0000, 0x0000, 0xe73c, 0xffff, 0xdefb, 0x0000, 0x0000, 0x0000, 0xffff, 0xffff, 0xf79e, 0x5aeb, 0x0000, 0x0000, 0x0020, 0xb5b6, 0xffff, 0xffff, 0x0000, 0x0000, 0x0000, 0xffff, 0xffff, 0x8430, 0x0000, 0x0000, 0xf79e, 0xffff, 0x6b4d, 0x10a2, 0x0000, 0x0000, 0x4a69, 0xef7d, 0xffff, 0x94b2, 0x0000, 0x5aeb, 0xffff, 0xc638, 0x0861, 0x0000, 0x0000, 0x0000, 0x4a69, 0x0000, 0x0000, 0x0000, 0x0000, 0x0000, 0x0000, 0x0000, 0x0000, 0x0000, 0x0000, 0x0000, 0x0000, 0x0000, 0x0000, 0x0000, 0x0000, 0x0000, 0x0000, 0x0000, 0x0000, 0x0000, 0x0000, 0x0000, 0x0000, 0xffff, 0xffff, 0xef5d, 0x0000, 0x0000, 0x0000, 0x0000, 0x0000, 0x0000, 0x0000, 0x0000, 0x0000, 0x0000, 0x0000, 0x0000, 0x0000, 0x0000, 0x0000, 0x0000, 0x0000, 0x0000, 0x0000, 0x0000, 0x0000, 0x0000, 0x0000, 0x0000, 0x0000, 0x0000, 0x0000, 0x0000, 0x0000, 0x0000, 0x6b4d, 0xffff, 0xffff, 0xffff, 0xffff, 0xffff, 0xffff, 0xffff, 0xbdf7, 0x0000, 0x0000, 0x0000, 0x0000, 0x0000, 0x0000, 0x0000, 0x0000, 0x18e3, 0x2124, 0x2124, 0x4228, 0xffff, 0xdefb, 0x0000, 0x0000, 0x0000, 0xffff, 0xffff, 0xd69a, 0x0000, 0x0000, 0x0000, 0x0000, 0x0000, 0xffff, 0xffff, 0xffdf, 0x0000, 0x0000, 0xffff, 0xffff, 0x8430, 0x0000, 0x73ae, 0xffff, 0xffff, 0x2124, 0x10a2, 0x10a2, 0x10a2, 0x10a2, 0x738e, 0xffff, 0xad55, 0x0020, 0x5aeb, 0xffff, 0xffff, 0x4a49, 0x2124, 0x0020, 0x0000, 0x0000, 0x0000, 0x0000, 0x0000, 0x0000, 0x0000, 0x0000, 0x0000, 0x0000, 0x0000, 0x0000, 0x0000, 0x0000, 0x0000, 0x0000, 0x0000, 0x0000, 0x0000, 0x0000, 0x0000, 0x0000, 0x0000, 0x0000, 0x0000, 0x632c, 0xffff, 0xffff, 0xef5d, 0x0000, 0x0000, 0x0000, 0x0000, 0x0000, 0x0000, 0x0000, 0x0000, 0x0000, 0x0000, 0x0000, 0x0000, 0x0000, 0x0000, 0x0000, 0x0000, 0x0000, 0x0000, 0x0000, 0x0000, 0x0000, 0x0000, 0x0000, 0x0000, 0x0000, 0x0000, 0x0000, 0x0000, 0x0000, 0x0000, 0xffff, 0xffff, 0xffff, 0xffff, 0xffff, 0xffff, 0xffff, 0xffff, 0xbdf7, 0x0000, 0x0000, 0x0000, 0x0000, 0x0000, 0x2104, 0xa534, 0xad75, 0xef5d, 0xffff, 0xffff, 0xffff, 0xffff, 0xdefb, 0x0000, 0x0000, 0x0000, 0xffff, 0xffff, 0x10a2, 0x0000, 0x0000, 0x0000, 0x0000, 0x0000, 0xffff, 0xffff, 0xffdf, 0x0000, 0x0000, 0xffff, 0xffff, 0x8430, 0x0000, 0x73ae, 0xffff, 0xffff, 0xe71c, 0xe71c, 0xe71c, 0xe71c, 0xe71c, 0xef7d, 0xffff, 0xffff, 0x2104, 0x2104, 0xe73c, 0xffff, 0xffff, 0xffff, 0xb5b6, 0xa534, 0xa534, 0x0000, 0x0000, 0x0000, 0x0000, 0x0000, 0x0000, 0x0000, 0x0000, 0x0000, 0x0000, 0x0000, 0x0000, 0x0000, 0x0000, 0x0000, 0x0000, 0x0000, 0x0000, 0x0000, 0x0000, 0x0000, 0x0000, 0x0020, 0xad55, 0xffff, 0xffff, 0xef5d, 0x0000, 0x0000, 0x0000, 0x0000, 0x0000, 0x0000, 0x0000, 0x0000, 0x0000, 0x0000, 0x0000, 0x0000, 0x0000, 0x0000, 0x0000, 0x0000, 0x0000, 0x0000, 0x0000, 0x0000, 0x0000, 0x0000, 0x0000, 0x0000, 0x0000, 0x0000, 0x0000, 0x0000, 0x0861, 0xdedb, 0xffff, 0xffff, 0xffff, 0xffff, 0xffff, 0xffff, 0xffff, 0xffff, 0xbdf7, 0x0000, 0x0000, 0x0000, 0x0000, 0x0000, 0xffff, 0xffff, 0xf7be, 0xd6ba, 0xd6ba, 0xd6ba, 0xdefb, 0xffff, 0xdefb, 0x0000, 0x0000, 0x0000, 0xffff, 0xffff, 0x2124, 0x0000, 0x0000, 0x0000, 0x0000, 0x0000, 0xffff, 0xffff, 0xffdf, 0x0000, 0x0000, 0xffff, 0xffff, 0x8430, 0x0000, 0x73ae, 0xffff, 0xffff, 0xdedb, 0xd6ba, 0xd6ba, 0xd6ba, 0xd6ba, 0xd6ba, 0xd6ba, 0xd6ba, 0x18e3, 0x0000, 0x0000, 0xd6ba, 0xd6ba, 0xd6ba, 0xffdf, 0xffff, 0xffff, 0xb596, 0x0000, 0x0000, 0x0000, 0x0000, 0x0000, 0x0000, 0x0000, 0x0000, 0x0000, 0x0000, 0x0000, 0x0000, 0x0000, 0x0000, 0x0000, 0x0000, 0x0000, 0x0000, 0x0000, 0x0000, 0x0000, 0xb5b6, 0xffff, 0xffff, 0xffff, 0xef5d, 0x0000, 0x0000, 0x0000, 0x0000, 0x0000, 0x0000, 0x0000, 0x0000, 0x0000, 0x0000, 0x0000, 0x0000, 0x0000, 0x0000, 0x0000, 0x0000, 0x0000, 0x0000, 0x0000, 0x0000, 0x0000, 0x0000, 0x0000, 0x0000, 0x0000, 0x0000, 0x0000, 0x0000, 0xc638, 0xffff, 0xffff, 0xffff, 0xffff, 0xffff, 0xffff, 0xffff, 0xffff, 0xffff, 0xbdf7, 0x0000, 0x0000, 0x0000, 0x0000, 0x0000, 0xffff, 0xffff, 0x4228, 0x0000, 0x0000, 0x0000, 0x2124, 0xffff, 0xdefb, 0x0000, 0x0000, 0x0000, 0xffff, 0xffff, 0xef5d, 0x0000, 0x0000, 0x0000, 0x0000, 0x0000, 0xffff, 0xffff, 0x6b6d, 0x0000, 0x0000, 0xffff, 0xffff, 0x8430, 0x0000, 0x2124, 0xf7be, 0xffff, 0x1082, 0x0000, 0x0000, 0x0000, 0x0000, 0x0000, 0x0000, 0x0000, 0x0000, 0x0000, 0x0000, 0x0000, 0x0000, 0x0000, 0x4228, 0x8c51, 0xffff, 0xbdd7, 0x0000, 0x0000, 0x0000, 0x0000, 0x0000, 0x0000, 0x0000, 0x0000, 0x0000, 0x0000, 0x0000, 0x0000, 0x0000, 0x0000, 0x0000, 0x0000, 0x0000, 0x0000, 0x0000, 0x0000, 0x18e3, 0xffff, 0xffff, 0xffff, 0xffff, 0xef5d, 0x0000, 0x0000, 0x0000, 0x0000, 0x0000, 0x0000, 0x0000, 0x0000, 0x0000, 0x0000, 0x0000, 0x0000, 0x0000, 0x0000, 0x0000, 0x0000, 0x0000, 0x0000, 0x0000, 0x0000, 0x0000, 0x0000, 0x0000, 0x0000, 0x0000, 0x0000, 0x0000, 0x2124, 0xffff, 0xffff, 0xffff, 0xffff, 0xffff, 0xffff, 0xffff, 0xffff, 0xffff, 0xffff, 0xbdf7, 0x0000, 0x0000, 0x0000, 0x0000, 0x0000, 0xffff, 0xffff, 0x2124, 0x0000, 0x0000, 0x18e3, 0xffff, 0xffff, 0xdefb, 0x0000, 0x0000, 0x0000, 0xffff, 0xffff, 0xffff, 0x8430, 0x2965, 0x2965, 0x2965, 0xa514, 0xffff, 0xef5d, 0x0000, 0x0000, 0x0000, 0xffff, 0xffff, 0x8430, 0x0000, 0x0000, 0xc638, 0xffff, 0xffff, 0x2965, 0x2965, 0x18c3, 0x2965, 0x8410, 0x4228, 0x0000, 0x0000, 0x5aeb, 0x4a69, 0x2965, 0x0841, 0x0000, 0x2104, 0x738e, 0xffff, 0xb596, 0x0000, 0x0000, 0x0000, 0x0000, 0x0000, 0x0000, 0x0000, 0x0000, 0x0000, 0x0000, 0x0000, 0x0000, 0x0000, 0x0000, 0x0000, 0x0000, 0x0000, 0x0000, 0x0000, 0x10a2, 0xe71c, 0xffff, 0xffff, 0xffff, 0xffff, 0xef5d, 0x0000, 0x0000, 0x0000, 0x0000, 0x0000, 0x0000, 0x0000, 0x0000, 0x0000, 0x0000, 0x0000, 0x0000, 0x0000, 0x0000, 0x0000, 0x0000, 0x0000, 0x0000, 0x0000, 0x0000, 0x0000, 0x0000, 0x0000, 0x0000, 0x0000, 0x0000, 0x39e7, 0xf79e, 0xffff, 0xffff, 0xffff, 0xffff, 0xffff, 0xffff, 0xffff, 0xffff, 0xffff, 0xffff, 0xbdf7, 0x0000, 0x0000, 0x0000, 0x0000, 0x0000, 0xa534, 0xffff, 0xf79e, 0xad75, 0xad75, 0xe73c, 0xffff, 0xffff, 0xdefb, 0x0000, 0x0000, 0x0000, 0xffff, 0xffff, 0xffff, 0xffff, 0xffff, 0xffff, 0xffff, 0xffff, 0xffff, 0x7bef, 0x0000, 0x0000, 0x0000, 0xffff, 0xffff, 0x8430, 0x0000, 0x0000, 0x0000, 0x9cf3, 0xffff, 0xffff, 0xffff, 0xdedb, 0xffff, 0xffff, 0xffff, 0x0000, 0x0000, 0xce79, 0xffff, 0xffff, 0xbdf7, 0xad75, 0xef5d, 0xffff, 0xffff, 0x632c, 0x0000, 0x0000, 0x0000, 0x0000, 0x0000, 0x0000, 0x0000, 0x0000, 0x0000, 0x0000, 0x0000, 0x0000, 0x0000, 0x0000, 0x0000, 0x0000, 0x0000, 0x0000, 0x2104, 0xffff, 0xffff, 0xffff, 0xffff, 0xffff, 0xffff, 0xef5d, 0x0000, 0x0000, 0x0000, 0x0000, 0x0000, 0x0000, 0x0000, 0x0000, 0x0000, 0x0000, 0x0000, 0x0000, 0x0000, 0x0000, 0x0000, 0x0000, 0x0000, 0x0000, 0x0000, 0x0000, 0x0000, 0x0000, 0x0000, 0x0000, 0x1082, 0x6b4d, 0xffff, 0xffff, 0xffff, 0xffff, 0xffff, 0xffff, 0xffff, 0xffff, 0xffff, 0xffff, 0xffff, 0xffff, 0xbdf7, 0x0000, 0x0000, 0x0000, 0x0000, 0x0000, 0x0000, 0x8c71, 0xce79, 0xf79e, 0xce79, 0xce79, 0x18e3, 0xce79, 0xb596, 0x0000, 0x0000, 0x0000, 0xce79, 0xce79, 0x0020, 0x94b2, 0xce79, 0xef7d, 0xce79, 0xce79, 0x0000, 0x0000, 0x0000, 0x0000, 0x0000, 0xce79, 0xce79, 0x6b4d, 0x0000, 0x0000, 0x0000, 0x0000, 0xbdf7, 0xce79, 0xd69a, 0xef7d, 0xce79, 0xce79, 0x10a2, 0x0000, 0x0000, 0x2104, 0xbdf7, 0xce79, 0xd69a, 0xf7be, 0xd69a, 0xce79, 0x2945, 0x0000, 0x0000, 0x0000, 0x0000, 0x0000, 0x0000, 0x0000, 0x0000, 0x0000, 0x0000, 0x0000, 0x0000, 0x0000, 0x0000, 0x0000, 0x0000, 0x0000, 0x0000, 0x2104, 0xe73c, 0xffff, 0xffff, 0xffff, 0xffff, 0xffff, 0xffff, 0xef5d, 0x0000, 0x0000, 0x0000, 0x0000, 0x0000, 0x0000, 0x0000, 0x0000, 0x0000, 0x0000, 0x0000, 0x0000, 0x0000, 0x0000, 0x0000, 0x0000, 0x0000, 0x0000, 0x0000, 0x0000, 0x0000, 0x0000, 0x0000, 0x0000, 0xd69a, 0xffff, 0xffff, 0xffff, 0xffff, 0xffff, 0xffff, 0xffff, 0xffff, 0xffff, 0xffff, 0xffff, 0xffff, 0xffff, 0xbdf7, 0x0000, 0x0000, 0x0000, 0x0000, 0x0000, 0x0000, 0x0000, 0x0000, 0x31a6, 0x0000, 0x0000, 0x0000, 0x0000, 0x0000, 0x0000, 0x0000, 0x0000, 0x0000, 0x0000, 0x0000, 0x0000, 0x0000, 0x3186, 0x0000, 0x0000, 0x0000, 0x0000, 0x0000, 0x0000, 0x0000, 0x0000, 0x0000, 0x0000, 0x0000, 0x0000, 0x0000, 0x0000, 0x0000, 0x0000, 0x0841, 0x2965, 0x0000, 0x0000, 0x0000, 0x0000, 0x0000, 0x0000, 0x0000, 0x0000, 0x0020, 0x39e7, 0x0020, 0x0000, 0x0000, 0x0000, 0x0000, 0x0000, 0x0000, 0x0000, 0x0000, 0x0000, 0x0000, 0x0000, 0x0000, 0x0000, 0x0000, 0x0000, 0x0000, 0x0000, 0x0000, 0x0841, 0xbdd7, 0xffff, 0xffff, 0xffff, 0xffff, 0xffff, 0xffff, 0xffff, 0xffff, 0xef5d, 0x0000, 0x0000, 0x0000, 0x0000, 0x0000, 0x0000, 0x0000, 0x0000, 0x0000, 0x0000, 0x0000, 0x0000, 0x0000, 0x0000, 0x0000, 0x0000, 0x0000, 0x0000, 0x0000, 0x0000, 0x0000, 0x0000, 0x528a, 0xf79e, 0xffff, 0xffff, 0xffff, 0xffff, 0xffff, 0xffff, 0xffff, 0xffff, 0xffff, 0xffff, 0xffff, 0xffff, 0xffff, 0xffff, 0xbdf7, 0x0000, 0x0000, 0x0000, 0x0000, 0x0000, 0x0000, 0x0000, 0x0000, 0x0000, 0x0000, 0x0000, 0x0000, 0x0000, 0x0000, 0x0000, 0x0000, 0x0000, 0x0000, 0x0000, 0x0000, 0x0000, 0x0000, 0x0000, 0x0000, 0x0000, 0x0000, 0x0000, 0x0000, 0x0000, 0x0000, 0x0000, 0x0000, 0x0000, 0x0000, 0x0000, 0x0000, 0x0000, 0x0000, 0x0000, 0x0000, 0x0000, 0x0000, 0x0000, 0x0000, 0x0000, 0x0000, 0x0000, 0x0000, 0x0000, 0x0000, 0x0000, 0x0000, 0x0000, 0x0000, 0x0000, 0x0000, 0x0000, 0x0000, 0x0000, 0x0000, 0x0000, 0x0000, 0x0000, 0x0000, 0x0000, 0x0000, 0x0000, 0x0000, 0x0000, 0x7bef, 0xc638, 0xffff, 0xffff, 0xffff, 0xffff, 0xffff, 0xffff, 0xffff, 0xffff, 0xffff, 0xef5d, 0x0000, 0x0000, 0x0000, 0x0000, 0x0000, 0x0000, 0x0000, 0x0000, 0x0000, 0x0000, 0x0000, 0x0000, 0x0000, 0x0000, 0x0000, 0x0000, 0x0000, 0x0000, 0x0000, 0x0000, 0x4a49, 0xbdd7, 0xffff, 0xffff, 0xffff, 0xffff, 0xffff, 0xffff, 0xffff, 0xffff, 0xffff, 0xffff, 0xffff, 0xffff, 0xffff, 0xffff, 0xffff, 0xffff, 0xbdf7, 0x0000, 0x0000, 0x0000, 0x0000, 0x0000, 0x0000, 0x0000, 0x0000, 0x0000, 0x0000, 0x0000, 0x0000, 0x0000, 0x0000, 0x0000, 0x0000, 0x0000, 0x0000, 0x0000, 0x0000, 0x0000, 0x0000, 0x0000, 0x0000, 0x0000, 0x0000, 0x0000, 0x0000, 0x0000, 0x0000, 0x0000, 0x0000, 0x0000, 0x0000, 0x0000, 0x0000, 0x0000, 0x0000, 0x0000, 0x0000, 0x0000, 0x0000, 0x0000, 0x0000, 0x0000, 0x0000, 0x0000, 0x0000, 0x0000, 0x0000, 0x0000, 0x0000, 0x0000, 0x0000, 0x0000, 0x0000, 0x0000, 0x0000, 0x0000, 0x0000, 0x0000, 0x0000, 0x0000, 0x0000, 0x0000, 0x0000, 0x39e7, 0x39e7, 0xffff, 0xffff, 0xffff, 0xffff, 0xffff, 0xffff, 0xffff, 0xffff, 0xffff, 0xffff, 0xffff, 0xffff, 0xef5d, 0x0000, 0x0000, 0x0000, 0x0000, 0x0000, 0x0000, 0x0000, 0x0000, 0x0000, 0x0000, 0x0000, 0x0000, 0x0000, 0x0000, 0x0000, 0x0000, 0x0000, 0x39c7, 0x39e7, 0xef7d, 0xffff, 0xffff, 0xffff, 0xffff, 0xffff, 0xffff, 0xffff, 0xffff, 0xffff, 0xffff, 0xffff, 0xffff, 0xffff, 0xffff, 0xffff, 0xffff, 0xffff, 0xffff, 0xbdf7, 0x0000, 0x0000, 0x0000, 0x0000, 0x0000, 0x0000, 0x0000, 0x0000, 0x0000, 0x0000, 0x0000, 0x0000, 0x0000, 0x0000, 0x0000, 0x0000, 0x0000, 0x0000, 0x0000, 0x0000, 0x0000, 0x0000, 0x0000, 0x0000, 0x0000, 0x0000, 0x0000, 0x0000, 0x0000, 0x0000, 0x0000, 0x0000, 0x0000, 0x0000, 0x0000, 0x0000, 0x0000, 0x0000, 0x0000, 0x0000, 0x0000, 0x0000, 0x0000, 0x0000, 0x0000, 0x0000, 0x0000, 0x0000, 0x0000, 0x0000, 0x0000, 0x0000, 0x0000, 0x0000, 0x0000, 0x0000, 0x0000, 0x0000, 0x0000, 0x0000, 0x0000, 0x0000, 0x0000, 0x8c51, 0xbdf7, 0xbdf7, 0xffff, 0xffff, 0xffff, 0xffff, 0xffff, 0xffff, 0xffff, 0xffff, 0xffff, 0xffff, 0xffff, 0xffff, 0xffff, 0xffff, 0xef5d, 0x0000, 0x0000, 0x0000, 0x0000, 0x0000, 0x0000, 0x0000, 0x0000, 0x0000, 0x0000, 0x0000, 0x0000, 0x0000, 0x0000, 0x8410, 0xbdf7, 0xbdf7, 0xffdf, 0xffff, 0xffff, 0xffff, 0xffff, 0xffff, 0xffff, 0xffff, 0xffff, 0xffff, 0xffff, 0xffff, 0xffff, 0xffff, 0xffff, 0xffff, 0xffff, 0xffff, 0xffff, 0xffff, 0xffff, 0xbdf7, 0x0000, 0x0000, 0x0000, 0x0000, 0x0000, 0x0000, 0x0000, 0x0000, 0x0000, 0x0000, 0x0000, 0x0000, 0x0000, 0x0000, 0x0000, 0x0000, 0x0000, 0x0000, 0x0000, 0x0000, 0x0000, 0x0000, 0x0000, 0x0000, 0x0000, 0x0000, 0x0000, 0x0000, 0x0000, 0x0000, 0x0000, 0x0000, 0x0000, 0x0000, 0x0000, 0x0000, 0x0000, 0x0000, 0x0000, 0x0000, 0x0000, 0x0000, 0x0000, 0x0000, 0x0000, 0x0000, 0x0000, 0x0000, 0x0000, 0x0000, 0x0000, 0x0000, 0x0000, 0x0000, 0x0000, 0x0000, 0x0000, 0x0000, 0x0000, 0x0000, };
      • 스케치의 img_width와 img_height를 이미지 크기에 맞게 수정합니다.
      • Arduino App Lab에서 Run 버튼을 클릭합니다.
      Arduino UNO Q의 아두이노 app lab에서 run 버튼 클릭

      디스플레이에 프로그램 메모리에서 로드한 비트맵 이미지가 표시됩니다.
      직접 준비한 이미지를 사용하려면 다음 단계를 따르세요:

      • 이미지를 준비합니다 (JPEG 또는 PNG 형식).
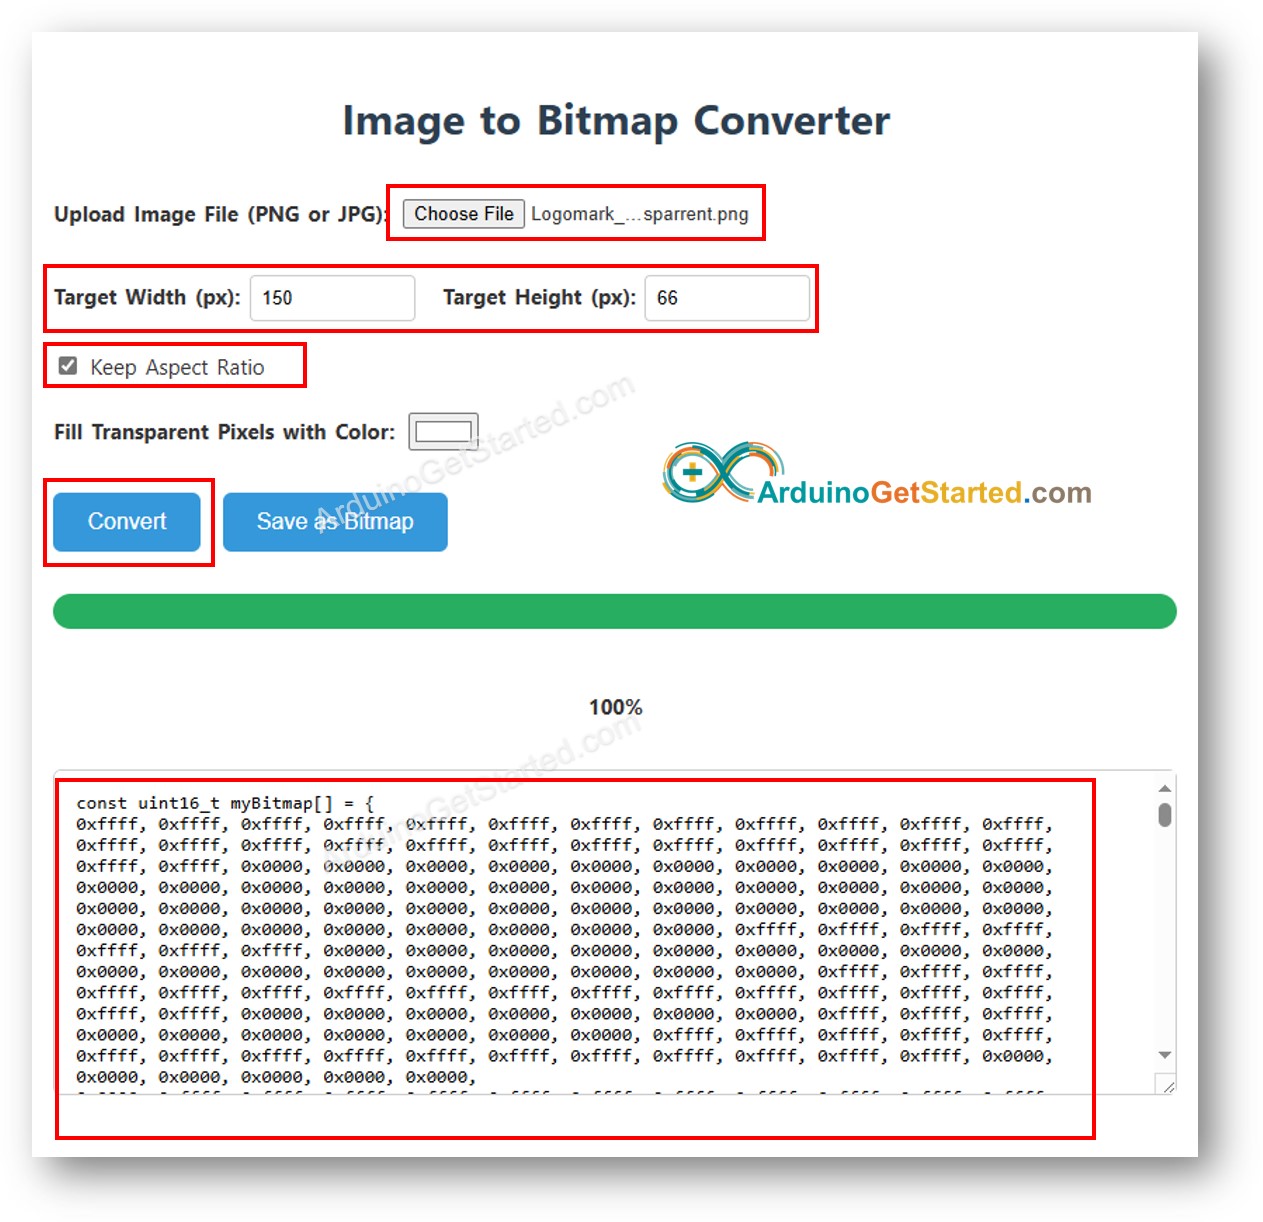
      • Image to Bitmap Converter 도구를 사용하여 비트맵 배열로 변환합니다.
        • 사진을 업로드하고 패널에 맞게 크기를 설정합니다.
        • 투명 PNG의 경우 배경색을 선택합니다.
        • Convert를 클릭한 다음, 생성된 배열을 bitmap.h에 복사합니다.
        이미지를 비트맵 배열로 변환
        • img_width와 img_height를 수정한 다음, 다시 Run을 클릭합니다.

        참고: bitmap.h를 변경했는데 스케치가 다시 컴파일되지 않으면, 스케치 파일 아무 곳에나 공백을 하나 추가하여 강제로 다시 빌드하세요.

        메서드 빠른 참조

        메서드 기능 사용법
        drawRGBBitmap(x,y,bitmap,w,h) 픽셀 (x, y)부터 RGB565 PROGMEM 비트맵을 그립니다. TFT_display.drawRGBBitmap(0, 0, myImage, 240, 320);
        fillScreen(color) 이미지를 그리기 전에 화면을 지웁니다. TFT_display.fillScreen(BLACK);
        invertDisplay(flag) 패널 색상 반전을 켜거나 끕니다. TFT_display.invertDisplay(true);

    Arduino UNO Q 코드 — SD 카드에서 이미지 그리기

    이 스케치는 micro SD 카드에서 24비트 BMP 이미지 파일을 읽고 픽셀 데이터를 작은 덩어리로 나누어 디스플레이에 보냅니다. 이 방식은 전체 이미지를 RAM에 담지 않고 스트리밍하므로 큰 패널에서도 실용적입니다.

    SD 카드를 디스플레이와 같은 SPI 버스에 연결합니다. MOSI (D11), SCK (D13), MISO (D12)를 공유합니다. SD 모듈에는 별도의 CS 핀을 할당합니다 — 스케치에서는 SD_CS (D4)로 정의되어 있습니다.

    코드가 하는 일:

    • 자체 CS 핀으로 SD 카드를 초기화합니다
    • BMP 헤더를 읽어 이미지 너비와 높이를 가져옵니다
    • 이미지를 화면 가운데에 배치합니다
    • 픽셀을 한 줄씩 스트리밍하여 TFT 디스플레이에 그립니다
    • 진행 상황과 오류 메시지를 App Lab 콘솔에 출력합니다
    /* * 이 Arduino UNO Q 코드는 newbiely.kr 에서 개발되었습니다 * 이 Arduino UNO Q 코드는 어떠한 제한 없이 공개 사용을 위해 제공됩니다. * 상세한 지침 및 연결도에 대해서는 다음을 방문하세요: * https://newbiely.kr/tutorials/arduino-uno-q/arduino-uno-q-tft-lcd-touch-display-spi */ /* Created by DIYables This example code is in the public domain Product page: https://diyables.io */ // ============================================= // Single include brings in the base class plus all driver classes. // ============================================= #include "Arduino_RouterBridge.h" #include <DIYables_TFT_SPI.h> #include <SD.h> // ============================================= // Wiring (Arduino UNO Q - MCU side) // --------------------------------------------- // TFT + SD module Arduino UNO Q // ----------------------- --------------------------------- // VCC -> 3.3V // GND -> GND // TFT CS -> D10 (TFT_CS_PIN) // TFT RESET -> D9 (TFT_RST_PIN) // TFT DC / RS -> D8 (TFT_DC_PIN) // SD CS -> D4 (SD_CS) // SDI / MOSI (shared) -> D11 (hardware SPI MOSI) // SDO / MISO (shared) -> D12 (hardware SPI MISO) // SCK (shared) -> D13 (hardware SPI SCK) // LED -> 3.3V (or any GPIO via initBacklight) // // The Arduino UNO Q MCU pins are 3.3V - no level converter is needed. // ============================================= // ============================================= // SPI pin definitions (adjust for your board) // ============================================= #define TFT_CS_PIN 10 #define TFT_DC_PIN 8 #define TFT_RST_PIN 9 // Panel resolution in native (portrait) orientation - change to match your module #define TFT_WIDTH 240 #define TFT_HEIGHT 320 #define SD_CS 4 // SD card chip select (must differ from TFT_CS_PIN) // ============================================= // Create display object (uncomment matching driver) // ============================================= // DIYables_ILI9341_SPI TFT_display(TFT_WIDTH, TFT_HEIGHT, TFT_CS_PIN, TFT_DC_PIN, TFT_RST_PIN); // DIYables_ILI9488_SPI TFT_display(TFT_WIDTH, TFT_HEIGHT, TFT_CS_PIN, TFT_DC_PIN, TFT_RST_PIN); DIYables_ST7789_SPI TFT_display(TFT_WIDTH, TFT_HEIGHT, TFT_CS_PIN, TFT_DC_PIN, TFT_RST_PIN); #define WHITE DIYables_TFT_SPI::colorRGB(255, 255, 255) #define BUFFPIXEL 20 File bmpFile; uint16_t SCREEN_WIDTH; uint16_t SCREEN_HEIGHT; // Helper functions to read BMP file header uint16_t read16(File &f) { uint16_t result; result = f.read(); result |= (f.read() << 8); return result; } uint32_t read32(File &f) { uint32_t result; result = f.read(); result |= ((uint32_t)f.read() << 8); result |= ((uint32_t)f.read() << 16); result |= ((uint32_t)f.read() << 24); return result; } int32_t readS32(File &f) { int32_t result; result = f.read(); result |= ((uint32_t)f.read() << 8); result |= ((uint32_t)f.read() << 16); result |= ((uint32_t)f.read() << 24); return result; } bool getBMPDimensions(const char *filename, uint32_t &w, uint32_t &h) { File f = SD.open(filename); if (!f) return false; if (read16(f) != 0x4D42) { f.close(); return false; } read32(f); // file size read32(f); // reserved read32(f); // image offset read32(f); // DIB header size w = read32(f); int32_t sh = readS32(f); h = (sh < 0) ? -sh : sh; f.close(); return true; } void drawBMP(const char *filename, int x, int y) { bmpFile = SD.open(filename); if (!bmpFile) { Monitor.println("File not found"); return; } if (read16(bmpFile) != 0x4D42) { Monitor.println("Not a BMP file"); bmpFile.close(); return; } uint32_t fileSize = read32(bmpFile); read32(bmpFile); // Reserved uint32_t imageOffset = read32(bmpFile); uint32_t dibHeaderSize = read32(bmpFile); uint32_t bmpWidth = read32(bmpFile); int32_t bmpHeight = readS32(bmpFile); bool topDown = false; if (bmpHeight < 0) { bmpHeight = -bmpHeight; topDown = true; } if (read16(bmpFile) != 1) { Monitor.println("Invalid BMP file"); bmpFile.close(); return; } uint16_t depth = read16(bmpFile); if (depth != 24) { Monitor.println("Only 24-bit BMP is supported"); bmpFile.close(); return; } if (read32(bmpFile) != 0) { Monitor.println("Unsupported BMP compression"); bmpFile.close(); return; } bmpFile.seek(imageOffset); uint8_t sdbuffer[3 * BUFFPIXEL]; uint16_t color; uint32_t rowSize = (bmpWidth * 3 + 3) & ~3; if (x >= SCREEN_WIDTH || y >= SCREEN_HEIGHT) return; uint32_t maxRow = min((uint32_t)bmpHeight, (uint32_t)(SCREEN_HEIGHT - y)); uint32_t maxCol = min(bmpWidth, (uint32_t)(SCREEN_WIDTH - x)); for (uint32_t row = 0; row < maxRow; row++) { int32_t rowPos = topDown ? row : bmpHeight - 1 - row; uint32_t filePosition = imageOffset + rowPos * rowSize; bmpFile.seek(filePosition); for (uint32_t col = 0; col < maxCol; col += BUFFPIXEL) { uint32_t pixelsToRead = min((uint32_t)BUFFPIXEL, maxCol - col); bmpFile.read(sdbuffer, 3 * pixelsToRead); for (uint32_t i = 0; i < pixelsToRead; i++) { uint8_t b = sdbuffer[i * 3]; uint8_t g = sdbuffer[i * 3 + 1]; uint8_t r = sdbuffer[i * 3 + 2]; color = DIYables_TFT_SPI::colorRGB(r, g, b); if ((x + col + i) < SCREEN_WIDTH && (y + row) < SCREEN_HEIGHT) { TFT_display.drawPixel(x + col + i, y + row, color); } } } } bmpFile.close(); Monitor.println("BMP drawn"); } void setup() { Monitor.begin(9600); if (!SD.begin(SD_CS)) { Monitor.println("SD card initialization failed!"); return; } Monitor.println("SD card initialized."); TFT_display.begin(); TFT_display.setRotation(1); // Landscape SCREEN_WIDTH = TFT_display.width(); SCREEN_HEIGHT = TFT_display.height(); TFT_display.fillScreen(WHITE); uint32_t imgWidth, imgHeight; if (getBMPDimensions("diyables.bmp", imgWidth, imgHeight)) { int x = (SCREEN_WIDTH - imgWidth) / 2; int y = (SCREEN_HEIGHT - imgHeight) / 2; drawBMP("diyables.bmp", x, y); } else { Monitor.println("Failed to get BMP dimensions"); } } void loop() { }

    빠른 단계

    • diyables.bmp를 다운로드하여 Micro SD 카드의 루트에 복사합니다.
    • Micro SD 카드를 디스플레이 모듈의 카드 슬롯에 삽입합니다.
    • 위의 코드를 복사하여 sketch/sketch.ino에 붙여넣습니다.
    • Arduino App Lab에서 Run 버튼을 클릭합니다.
    Arduino UNO Q의 아두이노 app lab에서 run 버튼 클릭
    • Console 탭을 열고 Serial Monitor 서브탭을 선택하여 진행 메시지를 확인합니다.

    이미지가 카드에서 읽혀 화면에 표시됩니다.

    직접 준비한 이미지를 사용하려면:

    • Image to Bitmap Converter로 이미지를 변환합니다 — Save as Bitmap을 클릭하여 .bmp 파일을 다운로드합니다.
    • 파일 이름은 짧게 유지합니다 (.bmp를 제외하고 9자 미만).
    • .bmp 파일을 Micro SD 카드에 복사하고, 스케치의 파일 이름을 수정한 다음, Run을 클릭합니다.

    App Lab 콘솔 출력

    DIYables_Apps
    Stop
    sketch.ino
    1#include "Arduino_RouterBridge.h"
    Serial Monitor
    Python
    Message (Enter to send a message to "Newbiely" on usb(2820070321))
    New Line
    9600 baud
    [2026-08-20 09:00:01] SD card initialized. [2026-08-20 09:00:02] BMP drawn

    메서드 빠른 참조

    메서드 기능 사용법
    SD.begin(cs) 자체 칩 선택 핀으로 SD 카드를 초기화합니다. SD.begin(SD_CS);
    SD.open(name) SD 카드에 저장된 파일을 엽니다. File f = SD.open("diyables.bmp");
    width() / height() 회전 후 현재 화면 크기를 가져옵니다. uint16_t w = TFT_display.width();
    drawPixel(x,y,color) 지정한 색으로 픽셀 하나를 그립니다. TFT_display.drawPixel(10, 20, color);

    Arduino UNO Q 코드 — 외부 폰트 사용

    이 스케치는 Adafruit GFX 호환 커스텀 폰트로 화면에 텍스트를 렌더링합니다. 내장 5x7 비트맵 폰트와 비교하면, 커스텀 폰트는 가독성과 스타일이 더 좋습니다. 폰트 파일은 헤더로 포함되며, setFont() 한 번 호출로 활성화됩니다.

    코드가 하는 일:

    • FreeSansBold12pt7b 폰트 헤더를 포함합니다
    • setFont()로 폰트를 활성화합니다
    • 앞과 같은 온도와 습도 값을 이번에는 커스텀 폰트로 출력합니다
    /* * 이 Arduino UNO Q 코드는 newbiely.kr 에서 개발되었습니다 * 이 Arduino UNO Q 코드는 어떠한 제한 없이 공개 사용을 위해 제공됩니다. * 상세한 지침 및 연결도에 대해서는 다음을 방문하세요: * https://newbiely.kr/tutorials/arduino-uno-q/arduino-uno-q-tft-lcd-touch-display-spi */ /* Created by DIYables This example code is in the public domain Product page: https://diyables.io */ // ============================================= // Single include brings in the base class plus all driver classes. // ============================================= #include <DIYables_TFT_SPI.h> #include <Fonts/FreeSansBold12pt7b.h> // ============================================= // Wiring (Arduino UNO Q - MCU side) // --------------------------------------------- // TFT module Arduino UNO Q // ------------ --------------------------------- // VCC -> 3.3V // GND -> GND // CS -> D10 (TFT_CS_PIN) // RESET -> D9 (TFT_RST_PIN) // DC / RS -> D8 (TFT_DC_PIN) // SDI / MOSI -> D11 (hardware SPI MOSI) // SCK -> D13 (hardware SPI SCK) // LED -> 3.3V (or any GPIO via initBacklight) // SDO / MISO -> D12 (only needed when reading from display) // // The Arduino UNO Q MCU pins are 3.3V - no level converter is needed. // ============================================= // ============================================= // SPI pin definitions (adjust for your board) // ============================================= #define TFT_CS_PIN 10 #define TFT_DC_PIN 8 #define TFT_RST_PIN 9 // Panel resolution in native (portrait) orientation - change to match your module #define TFT_WIDTH 240 #define TFT_HEIGHT 320 // ============================================= // Create display object (uncomment matching driver) // ============================================= // DIYables_ILI9341_SPI TFT_display(TFT_WIDTH, TFT_HEIGHT, TFT_CS_PIN, TFT_DC_PIN, TFT_RST_PIN); // DIYables_ILI9488_SPI TFT_display(TFT_WIDTH, TFT_HEIGHT, TFT_CS_PIN, TFT_DC_PIN, TFT_RST_PIN); DIYables_ST7789_SPI TFT_display(TFT_WIDTH, TFT_HEIGHT, TFT_CS_PIN, TFT_DC_PIN, TFT_RST_PIN); #define MAGENTA DIYables_TFT_SPI::colorRGB(255, 0, 255) #define WHITE DIYables_TFT_SPI::colorRGB(255, 255, 255) void setup() { TFT_display.begin(); TFT_display.setFont(&FreeSansBold12pt7b); TFT_display.setRotation(1); // Landscape TFT_display.fillScreen(WHITE); TFT_display.setTextColor(MAGENTA); TFT_display.setTextSize(1); float temperature = 23.5; float humidity = 78.6; TFT_display.setCursor(20, 30); TFT_display.print("Temperature: "); TFT_display.print(temperature, 1); TFT_display.print(char(247)); TFT_display.println("C"); TFT_display.setCursor(20, 70); TFT_display.print("Humidity: "); TFT_display.print(humidity, 1); TFT_display.print("%"); } void loop() { }

    빠른 단계

    • 위의 코드를 복사하여 sketch/sketch.ino에 붙여넣습니다.
    • Arduino App Lab에서 Run 버튼을 클릭합니다.
    Arduino UNO Q의 아두이노 app lab에서 run 버튼 클릭

    디스플레이가 커스텀 폰트로 텍스트를 렌더링합니다. 내장 폰트에 비해 글자 품질이 좋아진 것을 확인해 보세요.

    중요: 일부 커스텀 폰트에는 도 기호 같은 특수 문자가 포함되어 있지 않습니다. 내장 폰트는 이를 지원합니다.

    메서드 빠른 참조

    메서드 기능 사용법
    setFont(&FontName) GFX 호환 커스텀 폰트를 활성화합니다. 내장 5x7 폰트로 되돌리려면 NULL을 전달합니다. TFT_display.setFont(&FreeSans12pt7b);
    setCursor(x, y) 텍스트 커서를 지정한 위치로 이동합니다. TFT_display.setCursor(10, 40);
    setTextColor(color) 텍스트 전경색을 설정합니다. TFT_display.setTextColor(WHITE);
    print(text) 활성 폰트를 사용하여 현재 커서 위치에 문자열을 출력합니다. TFT_display.print("Hello!");

    Arduino UNO Q 코드 — 터치 좌표 얻기

    이 스케치는 XPT2046 터치 컨트롤러에서 터치 좌표를 읽어 Arduino App Lab 콘솔에 출력하고, 터치한 위치에 빨간 점을 그립니다. 이 스케치를 먼저 실행하면 여러분 패널의 숫자 범위를 확인하는 데 도움이 됩니다.

    배선: T_CLK는 D13, T_DIN은 D11, T_DO는 D12 (디스플레이와 SPI 버스 공유). T_CS는 D7, T_IRQ는 D2에 연결하거나 연결하지 않습니다.

    코드가 하는 일:

    • 공유 SPI 버스에서 XPT2046을 초기화합니다
    • 기본 터치 캘리브레이션 값을 적용합니다
    • 터치를 기다렸다가 화면 좌표를 읽습니다
    • 좌표를 콘솔에 출력하고 그 지점에 빨간 점을 표시합니다
    /* * 이 Arduino UNO Q 코드는 newbiely.kr 에서 개발되었습니다 * 이 Arduino UNO Q 코드는 어떠한 제한 없이 공개 사용을 위해 제공됩니다. * 상세한 지침 및 연결도에 대해서는 다음을 방문하세요: * https://newbiely.kr/tutorials/arduino-uno-q/arduino-uno-q-tft-lcd-touch-display-spi */ /* Touch Get Point Example ----------------------- This example demonstrates how to read and display touch coordinates using a DIYables SPI TFT display with a 4-wire resistive touch panel. When you touch the screen, the sketch prints the mapped (screen) X and Y coordinates to the Arduino App Lab console and draws a red dot at the touched location. NOTE: Run the TouchCalibration example first and paste the calibration values into setTouchCalibration() below if the touch coordinates are inaccurate. Created by DIYables This example code is in the public domain Product page: https://diyables.io */ // ============================================= // Single include brings in the base class plus all driver classes. // ============================================= #include "Arduino_RouterBridge.h" #include <DIYables_TFT_SPI.h> // ============================================= // Wiring (Arduino UNO Q - MCU side) // ============================================= // TFT pins (always required) // TFT module Arduino UNO Q // ------------ --------------------------------- // VCC -> 3.3V // GND -> GND // CS -> D10 (TFT_CS_PIN) // RESET -> D9 (TFT_RST_PIN) // DC / RS -> D8 (TFT_DC_PIN) // SDI / MOSI -> D11 (hardware SPI MOSI) // SCK -> D13 (hardware SPI SCK) // SDO / MISO -> D12 (only needed when reading from display) // LED -> 3.3V (or any GPIO via initBacklight) // // XPT2046 / HR2046 / ADS7843 SPI touch controller // (modules with pins: T_CS, T_CLK, T_DIN, T_DO, T_IRQ) // Touch pin Arduino UNO Q // ------------ --------------------------------- // T_CS -> D2 (TOUCH_CS_PIN) // T_IRQ -> D2 (TOUCH_IRQ_PIN, optional - use -1 to skip) // T_CLK -> D13 (shared with display SCK) // T_DIN -> D11 (shared with display MOSI) // T_DO -> D12 (shared with display MISO) // // The Arduino UNO Q MCU pins are 3.3V - no level converter is needed. // ============================================= // ============================================= // SPI pin definitions (adjust for your board) // ============================================= #define TFT_CS_PIN 10 #define TFT_DC_PIN 8 #define TFT_RST_PIN 9 // Panel resolution in native (portrait) orientation - change to match your module #define TFT_WIDTH 240 #define TFT_HEIGHT 320 // MOSI and SCK use default hardware SPI pins // ============================================= // Touch pin definitions (XPT2046 / HR2046 SPI touch controller) // ============================================= #define TOUCH_CS_PIN 2 // T_CS (any GPIO) #define TOUCH_IRQ_PIN -1 // T_IRQ (any GPIO, or -1 if not connected) // ============================================= // ============================================= // Calibration values. // Run the TouchCalibration example and update these if touch is inaccurate. // Typical raw ranges: // - XPT2046 / HR2046 : ~200..3900 (default below) // - 4-wire resistive : ~100..900 // ============================================= #define TOUCH_LEFT_X 300 #define TOUCH_RIGHT_X 3700 #define TOUCH_TOP_Y 300 #define TOUCH_BOT_Y 3700 // ============================================= // Create display object (uncomment matching driver) // ============================================= // DIYables_ILI9341_SPI TFT_display(TFT_WIDTH, TFT_HEIGHT, TFT_CS_PIN, TFT_DC_PIN, TFT_RST_PIN); // DIYables_ILI9488_SPI TFT_display(TFT_WIDTH, TFT_HEIGHT, TFT_CS_PIN, TFT_DC_PIN, TFT_RST_PIN); DIYables_ST7789_SPI TFT_display(TFT_WIDTH, TFT_HEIGHT, TFT_CS_PIN, TFT_DC_PIN, TFT_RST_PIN); #define RED DIYables_TFT_SPI::colorRGB(255, 0, 0) #define WHITE DIYables_TFT_SPI::colorRGB(255, 255, 255) void setup() { Monitor.begin(9600); TFT_display.begin(); TFT_display.setRotation(0); TFT_display.fillScreen(WHITE); TFT_display.initTouchSPI(TOUCH_CS_PIN, TOUCH_IRQ_PIN); // If touch X is mirrored on your board, uncomment: //TFT_display.setTouchInvertX(true); // If touch Y is mirrored on your board, uncomment: //TFT_display.setTouchInvertY(false); TFT_display.setTouchCalibration(TOUCH_LEFT_X, TOUCH_RIGHT_X, TOUCH_TOP_Y, TOUCH_BOT_Y); Monitor.println("Touch the screen to see coordinates."); } void loop() { int x, y; if (TFT_display.getTouch(x, y)) { Monitor.print("Touch at: "); Monitor.print(x); Monitor.print(", "); Monitor.println(y); TFT_display.fillCircle(x, y, 4, RED); delay(200); } }

    빠른 단계

    • 위의 코드를 복사하여 sketch/sketch.ino에 붙여넣습니다.
    • Arduino App Lab에서 Run 버튼을 클릭합니다.
    Arduino UNO Q의 아두이노 app lab에서 run 버튼 클릭
    • Console 탭을 열고 Serial Monitor 서브탭을 선택합니다.
    • 화면을 터치하고 좌표가 나타나는 것을 확인하세요!

    App Lab 콘솔 출력

    DIYables_Apps
    Stop
    sketch.ino
    1#include "Arduino_RouterBridge.h"
    Serial Monitor
    Python
    Message (Enter to send a message to "Newbiely" on usb(2820070321))
    New Line
    9600 baud
    [2026-08-20 09:05:00] Touch the screen to see coordinates. [2026-08-20 09:05:04] Touch at: 118, 96 [2026-08-20 09:05:06] Touch at: 63, 210 [2026-08-20 09:05:09] Touch at: 187, 148 [2026-08-20 09:05:12] Touch at: 42, 287

    메서드 빠른 참조

    메서드 기능 사용법
    initTouchSPI(cs, irq) 공유 SPI 버스에서 XPT2046을 초기화합니다. 인터럽트 핀을 연결하지 않았다면 irq에 -1을 사용합니다. TFT_display.initTouchSPI(7, 2);
    setTouchCalibration(minX,maxX,minY,maxY) 원시 ADC 값을 화면 픽셀 좌표로 매핑합니다. TFT_display.setTouchCalibration(300, 3700, 300, 3700);
    getTouch(x, y) 캘리브레이션된 터치 좌표를 화면 픽셀 단위로 가져옵니다. 눌려 있으면 true를 반환합니다. if (TFT_display.getTouch(x, y)) { ... }
    readTouchRaw(x, y, z) 캘리브레이션을 적용하지 않은 원시 ADC 터치 값을 반환합니다. TFT_display.readTouchRaw(x, y, z);

    Arduino UNO Q 코드 — 터치로 그리기

    이 스케치는 SPI TFT 터치 스크린을 간단한 손가락 그림판으로 바꿉니다. 캘리브레이션된 터치 좌표를 사용하여 손가락이 닿는 각 지점에 작은 채워진 원을 찍어, 손가락이 움직이면서 이어진 그림이 만들어집니다.

    코드가 하는 일:

    • 디스플레이와 XPT2046 터치 컨트롤러를 설정합니다
    • 화면이 눌리고 있는지 계속 확인합니다
    • 각 터치 지점에 작은 빨간 점을 그립니다
    /* * 이 Arduino UNO Q 코드는 newbiely.kr 에서 개발되었습니다 * 이 Arduino UNO Q 코드는 어떠한 제한 없이 공개 사용을 위해 제공됩니다. * 상세한 지침 및 연결도에 대해서는 다음을 방문하세요: * https://newbiely.kr/tutorials/arduino-uno-q/arduino-uno-q-tft-lcd-touch-display-spi */ /* Touch Draw Lines Example ------------------------- Draws lines on the screen following the pen. - Touch and drag on the screen to draw. - Lift the pen to stop drawing. - Touch again to start a new line from the last point. NOTE: Run the TouchCalibration example and update setTouchCalibration() below if the touch coordinates are inaccurate. Created by DIYables This example code is in the public domain Product page: https://diyables.io */ // ============================================= // Single include brings in the base class plus all driver classes. // ============================================= #include <DIYables_TFT_SPI.h> // ============================================= // Wiring (Arduino UNO Q - MCU side) // ============================================= // TFT pins (always required) // TFT module Arduino UNO Q // ------------ --------------------------------- // VCC -> 3.3V // GND -> GND // CS -> D10 (TFT_CS_PIN) // RESET -> D9 (TFT_RST_PIN) // DC / RS -> D8 (TFT_DC_PIN) // SDI / MOSI -> D11 (hardware SPI MOSI) // SCK -> D13 (hardware SPI SCK) // SDO / MISO -> D12 (only needed when reading from display) // LED -> 3.3V (or any GPIO via initBacklight) // // XPT2046 / HR2046 / ADS7843 SPI touch controller // (modules with pins: T_CS, T_CLK, T_DIN, T_DO, T_IRQ) // Touch pin Arduino UNO Q // ------------ --------------------------------- // T_CS -> D2 (TOUCH_CS_PIN) // T_IRQ -> D2 (TOUCH_IRQ_PIN, optional - use -1 to skip) // T_CLK -> D13 (shared with display SCK) // T_DIN -> D11 (shared with display MOSI) // T_DO -> D12 (shared with display MISO) // // The Arduino UNO Q MCU pins are 3.3V - no level converter is needed. // ============================================= // ============================================= // SPI pin definitions (adjust for your board) // ============================================= #define TFT_CS_PIN 10 #define TFT_DC_PIN 8 #define TFT_RST_PIN 9 // Panel resolution in native (portrait) orientation - change to match your module #define TFT_WIDTH 240 #define TFT_HEIGHT 320 // ============================================= // Touch pin definitions (XPT2046 / HR2046 SPI touch controller) // ============================================= #define TOUCH_CS_PIN 2 // T_CS (any GPIO) #define TOUCH_IRQ_PIN -1 // T_IRQ (any GPIO, or -1 if not connected) // ============================================= // ============================================= // Calibration values. // Run the TouchCalibration example and update these if touch is inaccurate. // Typical raw ranges: // - XPT2046 / HR2046 : ~200..3900 (default below) // - 4-wire resistive : ~100..900 // ============================================= #define TOUCH_LEFT_X 300 #define TOUCH_RIGHT_X 3700 #define TOUCH_TOP_Y 300 #define TOUCH_BOT_Y 3700 // ============================================= // Create display object (uncomment matching driver) // ============================================= // DIYables_ILI9341_SPI TFT_display(TFT_WIDTH, TFT_HEIGHT, TFT_CS_PIN, TFT_DC_PIN, TFT_RST_PIN); // DIYables_ILI9488_SPI TFT_display(TFT_WIDTH, TFT_HEIGHT, TFT_CS_PIN, TFT_DC_PIN, TFT_RST_PIN); DIYables_ST7789_SPI TFT_display(TFT_WIDTH, TFT_HEIGHT, TFT_CS_PIN, TFT_DC_PIN, TFT_RST_PIN); #define RED DIYables_TFT_SPI::colorRGB(255, 0, 0) #define WHITE DIYables_TFT_SPI::colorRGB(255, 255, 255) #define PEN_RADIUS 3 void setup() { TFT_display.begin(); TFT_display.setRotation(0); TFT_display.fillScreen(WHITE); TFT_display.initTouchSPI(TOUCH_CS_PIN, TOUCH_IRQ_PIN); // If touch X is mirrored on your board, uncomment: //TFT_display.setTouchInvertX(true); // If touch Y is mirrored on your board, uncomment: //TFT_display.setTouchInvertY(false); TFT_display.setTouchCalibration(TOUCH_LEFT_X, TOUCH_RIGHT_X, TOUCH_TOP_Y, TOUCH_BOT_Y); } void loop() { int x, y; if (TFT_display.getTouch(x, y)) { TFT_display.fillCircle(x, y, PEN_RADIUS, RED); } }

    빠른 단계

    • 위의 코드를 복사하여 sketch/sketch.ino에 붙여넣습니다.
    • Arduino App Lab에서 Run 버튼을 클릭합니다.
    Arduino UNO Q의 아두이노 app lab에서 run 버튼 클릭

    이제 화면에 그림을 그릴 수 있습니다:

    • 화면을 터치하고 드래그하여 그립니다.
    • 손가락을 떼면 그리기가 멈춥니다.
    • 다시 터치하면 계속 그릴 수 있습니다.

    메서드 빠른 참조

    메서드 기능 사용법
    initTouchSPI(cs, irq) 공유 SPI 버스에서 XPT2046을 설정합니다. TFT_display.initTouchSPI(7, -1);
    setTouchInvertX(invert) / setTouchInvertY(invert) 패널에서 X 또는 Y가 반전되어 있을 때 터치 축을 뒤집습니다. setTouchCalibration()보다 먼저 호출하세요. TFT_display.setTouchInvertY(true);
    getTouch(x, y) 캘리브레이션된 터치 좌표를 가져옵니다. 눌려 있는 동안 true를 반환합니다. if (TFT_display.getTouch(x, y)) { ... }
    fillCircle(x, y, r, color) 터치 지점에 작은 점을 그립니다. TFT_display.fillCircle(x, y, 3, RED);

    Arduino UNO Q 코드 — 터치 버튼

    이 스케치는 화면에 사각형 버튼을 그리고, 터치 좌표가 버튼 영역 안에 있는지 확인합니다. 버튼을 탭하면 강조 표시되고 App Lab 콘솔에 이벤트를 출력합니다. 터치로 동작하는 사용자 인터페이스를 만드는 가장 간단한 방법입니다.

    이 예제에서 T_IRQ 핀은 선택 사항입니다. 연결하지 않으려면 irq 인수로 -1을 전달하세요.

    코드가 하는 일:

    • "PRESS"라고 적힌 빨간 버튼을 그립니다
    • 각 터치가 버튼 사각형 안에 있는지 확인합니다
    • 한 번 탭하면 한 번의 이벤트만 발생하도록 누름을 디바운스합니다
    • 버튼을 "PRESSED"가 적힌 회색으로 다시 그리고, 누름과 뗌 이벤트를 기록합니다
    /* * 이 Arduino UNO Q 코드는 newbiely.kr 에서 개발되었습니다 * 이 Arduino UNO Q 코드는 어떠한 제한 없이 공개 사용을 위해 제공됩니다. * 상세한 지침 및 연결도에 대해서는 다음을 방문하세요: * https://newbiely.kr/tutorials/arduino-uno-q/arduino-uno-q-tft-lcd-touch-display-spi */ /* Touch Button Press/Release Example ------------------------------------ This example shows how to detect press and release events on a rectangular button using a DIYables SPI TFT display with a 4-wire resistive touch panel. When you touch inside the button, it changes colour and shows "PRESSED". When you release, it returns to its original state. NOTE: Run the TouchCalibration example and update setTouchCalibration() below if the touch coordinates are inaccurate. Created by DIYables This example code is in the public domain Product page: https://diyables.io */ // ============================================= // Single include brings in the base class plus all driver classes. // ============================================= #include "Arduino_RouterBridge.h" #include <DIYables_TFT_SPI.h> // ============================================= // Wiring (Arduino UNO Q - MCU side) // ============================================= // TFT pins (always required) // TFT module Arduino UNO Q // ------------ --------------------------------- // VCC -> 3.3V // GND -> GND // CS -> D10 (TFT_CS_PIN) // RESET -> D9 (TFT_RST_PIN) // DC / RS -> D8 (TFT_DC_PIN) // SDI / MOSI -> D11 (hardware SPI MOSI) // SCK -> D13 (hardware SPI SCK) // SDO / MISO -> D12 (only needed when reading from display) // LED -> 3.3V (or any GPIO via initBacklight) // // XPT2046 / HR2046 / ADS7843 SPI touch controller // (modules with pins: T_CS, T_CLK, T_DIN, T_DO, T_IRQ) // Touch pin Arduino UNO Q // ------------ --------------------------------- // T_CS -> D2 (TOUCH_CS_PIN) // T_IRQ -> D2 (TOUCH_IRQ_PIN, optional - use -1 to skip) // T_CLK -> D13 (shared with display SCK) // T_DIN -> D11 (shared with display MOSI) // T_DO -> D12 (shared with display MISO) // // The Arduino UNO Q MCU pins are 3.3V - no level converter is needed. // ============================================= // ============================================= // SPI pin definitions (adjust for your board) // ============================================= #define TFT_CS_PIN 10 #define TFT_DC_PIN 8 #define TFT_RST_PIN 9 // Panel resolution in native (portrait) orientation - change to match your module #define TFT_WIDTH 240 #define TFT_HEIGHT 320 // ============================================= // Touch pin definitions (XPT2046 / HR2046 SPI touch controller) // ============================================= #define TOUCH_CS_PIN 2 // T_CS (any GPIO) #define TOUCH_IRQ_PIN -1 // T_IRQ (any GPIO, or -1 if not connected) // ============================================= // ============================================= // Calibration values. // Run the TouchCalibration example and update these if touch is inaccurate. // Typical raw ranges: // - XPT2046 / HR2046 : ~200..3900 (default below) // - 4-wire resistive : ~100..900 // ============================================= #define TOUCH_LEFT_X 300 #define TOUCH_RIGHT_X 3700 #define TOUCH_TOP_Y 300 #define TOUCH_BOT_Y 3700 // ============================================= // Create display object (uncomment matching driver) // ============================================= // DIYables_ILI9341_SPI TFT_display(TFT_WIDTH, TFT_HEIGHT, TFT_CS_PIN, TFT_DC_PIN, TFT_RST_PIN); // DIYables_ILI9488_SPI TFT_display(TFT_WIDTH, TFT_HEIGHT, TFT_CS_PIN, TFT_DC_PIN, TFT_RST_PIN); DIYables_ST7789_SPI TFT_display(TFT_WIDTH, TFT_HEIGHT, TFT_CS_PIN, TFT_DC_PIN, TFT_RST_PIN); #define BLACK DIYables_TFT_SPI::colorRGB( 0, 0, 0) #define WHITE DIYables_TFT_SPI::colorRGB(255, 255, 255) #define GRAY DIYables_TFT_SPI::colorRGB(128, 128, 128) #define RED DIYables_TFT_SPI::colorRGB(255, 0, 0) #define BUTTON_X 30 #define BUTTON_Y 100 #define BUTTON_W 180 #define BUTTON_H 60 #define DEBOUNCE_DELAY 50 bool lastPressed = false; bool stablePressed = false; unsigned long lastDebounceTime = 0; void drawButton(bool pressed) { uint16_t bg = pressed ? GRAY : RED; TFT_display.fillRect(BUTTON_X, BUTTON_Y, BUTTON_W, BUTTON_H, bg); TFT_display.drawRect(BUTTON_X, BUTTON_Y, BUTTON_W, BUTTON_H, BLACK); TFT_display.setTextColor(WHITE, bg); TFT_display.setTextSize(3); TFT_display.setCursor(BUTTON_X + 10, BUTTON_Y + 16); TFT_display.print(pressed ? "PRESSED" : " PRESS "); } void setup() { Monitor.begin(9600); TFT_display.begin(); TFT_display.setRotation(0); TFT_display.fillScreen(WHITE); TFT_display.initTouchSPI(TOUCH_CS_PIN, TOUCH_IRQ_PIN); // If touch X is mirrored on your board, uncomment: //TFT_display.setTouchInvertX(true); // If touch Y is mirrored on your board, uncomment: //TFT_display.setTouchInvertY(false); TFT_display.setTouchCalibration(TOUCH_LEFT_X, TOUCH_RIGHT_X, TOUCH_TOP_Y, TOUCH_BOT_Y); drawButton(false); } void loop() { int x, y; bool pressed = false; if (TFT_display.getTouch(x, y)) { if (x >= BUTTON_X && x < (BUTTON_X + BUTTON_W) && y >= BUTTON_Y && y < (BUTTON_Y + BUTTON_H)) { pressed = true; } } if (pressed != lastPressed) { lastDebounceTime = millis(); } lastPressed = pressed; if ((millis() - lastDebounceTime) > DEBOUNCE_DELAY) { if (pressed != stablePressed) { stablePressed = pressed; drawButton(stablePressed); Monitor.println(stablePressed ? "Button PRESSED" : "Button RELEASED"); } } }

    빠른 단계

    • 위의 코드를 복사하여 sketch/sketch.ino에 붙여넣습니다.
    • Arduino App Lab에서 Run 버튼을 클릭합니다.
    Arduino UNO Q의 아두이노 app lab에서 run 버튼 클릭
    • Console 탭을 열고 Serial Monitor 서브탭을 선택합니다.
    • 화면의 버튼을 탭해 보세요 — 누르고 있는 동안 색이 바뀝니다.

    App Lab 콘솔 출력

    DIYables_Apps
    Stop
    sketch.ino
    1#include "Arduino_RouterBridge.h"
    Serial Monitor
    Python
    Message (Enter to send a message to "Newbiely" on usb(2820070321))
    New Line
    9600 baud
    [2026-08-20 09:10:02] Button PRESSED [2026-08-20 09:10:03] Button RELEASED [2026-08-20 09:10:07] Button PRESSED [2026-08-20 09:10:08] Button RELEASED

    메서드 빠른 참조

    메서드 기능 사용법
    initTouchSPI(cs, irq) XPT2046을 초기화합니다. 인터럽트 핀 없이 폴링하려면 irq에 -1을 전달합니다. TFT_display.initTouchSPI(7, -1);
    setTouchCalibration(minX,maxX,minY,maxY) getTouch()가 디스플레이 픽셀 좌표를 반환하도록 캘리브레이션을 적용합니다. TFT_display.setTouchCalibration(300, 3700, 300, 3700);
    getTouch(x, y) 현재 캘리브레이션된 터치 위치를 가져옵니다. 화면이 눌려 있는 동안 true를 반환합니다. if (TFT_display.getTouch(x, y)) { ... }
    fillRect(x, y, w, h, color) 버튼 배경으로 채워진 색 사각형을 그립니다. TFT_display.fillRect(10, 10, 120, 60, BLUE);

    Arduino UNO Q 코드 — 터치 캘리브레이션

    위의 터치 예제들은 기본 캘리브레이션 값을 사용하며 대부분의 패널에서 동작합니다. 터치 위치가 정확하지 않다면, 이 스케치를 실행하여 여러분의 XPT2046 패널의 원시 ADC 범위를 측정하세요. 안내에 따라 각 모서리를 터치한 다음, 출력된 네 개의 숫자를 다른 터치 스케치의 setTouchCalibration()에 복사합니다.

    제조 편차 때문에 저항막 터치 층이 디스플레이 픽셀과 완벽하게 정렬되지 않으므로 캘리브레이션이 필요합니다. 디스플레이마다 한 번만 하면 됩니다.

    코드가 하는 일:

    • 네 모서리에 1부터 4까지 번호가 붙은 빨간 점을 깜빡입니다
    • 각 모서리를 누르고 있는 동안 여러 개의 원시 측정값을 평균합니다
    • 터치가 감지되는지 확인할 수 있도록 실시간 원시 Z, X, Y 값을 출력합니다
    • 마지막에 바로 사용할 수 있는 setTouchCalibration() 줄을 출력합니다
    /* * 이 Arduino UNO Q 코드는 newbiely.kr 에서 개발되었습니다 * 이 Arduino UNO Q 코드는 어떠한 제한 없이 공개 사용을 위해 제공됩니다. * 상세한 지침 및 연결도에 대해서는 다음을 방문하세요: * https://newbiely.kr/tutorials/arduino-uno-q/arduino-uno-q-tft-lcd-touch-display-spi */ /* Touch Screen Calibration Example --------------------------------- This example measures the raw touch coordinates at all four screen corners and prints ready-to-use calibration values to the App Lab console. It uses readTouchRaw() directly — it does NOT rely on getTouch() or any existing calibration values, so it works even when touch is completely broken. INSTRUCTIONS: 1. Upload this sketch to the Arduino UNO Q MCU with the Run button. 2. Open the Console tab in Arduino App Lab and select the Serial Monitor subtab. 3. The screen shows a blinking red dot in each corner, numbered 1–4: 1 = Top-left 2 = Top-right 3 = Bottom-right 4 = Bottom-left 4. Press and HOLD firmly on the blinking dot. Keep holding until the console prints "Captured!" for that corner. 5. Release, then wait for the next dot to appear and repeat. 6. After all 4 corners, the console prints the calibration values and a ready-to-use setTouchCalibration() call. Copy it into your sketch. NOTE: While waiting, the console continuously prints the live raw Z/X/Y readings so you can confirm that touch is being detected. Created by DIYables This example code is in the public domain Product page: https://diyables.io */ // ============================================= // Single include brings in the base class plus all driver classes. // ============================================= #include "Arduino_RouterBridge.h" #include <DIYables_TFT_SPI.h> // ============================================= // Wiring (Arduino UNO Q) // ============================================= // TFT pins (always required) // TFT module Arduino UNO Q // ------------ --------------------------------- // VCC -> 3.3V // GND -> GND // CS -> D10 (TFT_CS_PIN) // RESET -> D9 (TFT_RST_PIN) // DC / RS -> D8 (TFT_DC_PIN) // SDI / MOSI -> D11 (hardware SPI MOSI) // SCK -> D13 (hardware SPI SCK) // SDO / MISO -> D12 (only needed when reading from display) // LED -> 3.3V (or any GPIO via initBacklight) // // XPT2046 / HR2046 / ADS7843 SPI touch controller // (modules with pins: T_CS, T_CLK, T_DIN, T_DO, T_IRQ) // Touch pin Arduino UNO Q // ------------ --------------------------------- // T_CS -> D2 (TOUCH_CS_PIN) // T_IRQ -> D2 (TOUCH_IRQ_PIN, optional - use -1 to skip) // T_CLK -> D13 (shared with display SCK) // T_DIN -> D11 (shared with display MOSI) // T_DO -> D12 (shared with display MISO) // // The Arduino UNO Q MCU pins are 3.3V - no level converter is needed. // ============================================= // ============================================= // SPI pin definitions (adjust for your board) // ============================================= #define TFT_CS_PIN 10 #define TFT_DC_PIN 8 #define TFT_RST_PIN 9 // Panel resolution in native (portrait) orientation - change to match your module #define TFT_WIDTH 240 #define TFT_HEIGHT 320 // ============================================= // Touch pin definitions (XPT2046 / HR2046 SPI touch controller) // ============================================= #define TOUCH_CS_PIN 2 // T_CS (any GPIO) #define TOUCH_IRQ_PIN -1 // T_IRQ (any GPIO, or -1 if not connected) // ============================================= // ============================================= // Create display object (uncomment matching driver) // ============================================= // DIYables_ILI9341_SPI TFT_display(TFT_WIDTH, TFT_HEIGHT, TFT_CS_PIN, TFT_DC_PIN, TFT_RST_PIN); // DIYables_ILI9488_SPI TFT_display(TFT_WIDTH, TFT_HEIGHT, TFT_CS_PIN, TFT_DC_PIN, TFT_RST_PIN); DIYables_ST7789_SPI TFT_display(TFT_WIDTH, TFT_HEIGHT, TFT_CS_PIN, TFT_DC_PIN, TFT_RST_PIN); // Minimum pressure to count as a valid touch. #define TOUCH_Z_MIN 10 // How many consecutive valid samples required before a corner is accepted. #define SAMPLES_NEEDED 10 // Delay between samples (ms). #define SAMPLE_DELAY_MS 30 #define DOT_RADIUS 12 #define BLACK DIYables_TFT_SPI::colorRGB( 0, 0, 0) #define WHITE DIYables_TFT_SPI::colorRGB(255, 255, 255) #define RED DIYables_TFT_SPI::colorRGB(255, 0, 0) // Corner pixel positions — filled in setup() once display size is known. // Order: 0=top-left, 1=top-right, 2=bottom-right, 3=bottom-left int cx[4], cy[4]; // Captured averaged raw values per corner. int cap_x[4], cap_y[4]; // ----------------------------------------------------------------------- void drawDot(int corner, bool on) { uint16_t color = on ? RED : WHITE; TFT_display.fillCircle(cx[corner], cy[corner], DOT_RADIUS, color); TFT_display.setTextSize(2); TFT_display.setTextColor(BLACK, color); TFT_display.setCursor(cx[corner] - 6, cy[corner] - 8); TFT_display.print(corner + 1); } void captureCorner(int corner) { const char* names[] = { "Top-left", "Top-right", "Bottom-right", "Bottom-left" }; Monitor.println(); Monitor.print("Corner "); Monitor.print(corner + 1); Monitor.print(" ("); Monitor.print(names[corner]); Monitor.println(")"); Monitor.println(" Press and HOLD firmly on the blinking dot."); Monitor.println(" Keep holding until you see 'Captured!'"); unsigned long lastBlink = 0; unsigned long lastPrint = 0; bool dotOn = false; int goodSamples = 0; long sumX = 0, sumY = 0; while (true) { // Blink the dot if (millis() - lastBlink > 400) { lastBlink = millis(); dotOn = !dotOn; drawDot(corner, dotOn); } int raw_x, raw_y, z; TFT_display.readTouchRaw(raw_x, raw_y, z); // Print live readings every 500 ms if (millis() - lastPrint > 500) { lastPrint = millis(); Monitor.print(" Z="); Monitor.print(z); Monitor.print(" X="); Monitor.print(raw_x); Monitor.print(" Y="); Monitor.println(raw_y); } if (z >= TOUCH_Z_MIN) { sumX += raw_x; sumY += raw_y; goodSamples++; if (goodSamples >= SAMPLES_NEEDED) { cap_x[corner] = sumX / goodSamples; cap_y[corner] = sumY / goodSamples; Monitor.print(" Captured! raw_x="); Monitor.print(cap_x[corner]); Monitor.print(" raw_y="); Monitor.println(cap_y[corner]); drawDot(corner, false); delay(500); return; } } else { goodSamples = 0; sumX = 0; sumY = 0; } delay(SAMPLE_DELAY_MS); } } // ----------------------------------------------------------------------- void setup() { Monitor.begin(9600); TFT_display.begin(); TFT_display.setRotation(0); // Always calibrate in rotation 0 TFT_display.fillScreen(WHITE); TFT_display.initTouchSPI(TOUCH_CS_PIN, TOUCH_IRQ_PIN); // If touch X is mirrored on your board, uncomment the line below // BEFORE calibrating (so the printed values match your panel): //TFT_display.setTouchInvertX(true); // If touch Y is mirrored on your board, uncomment: //TFT_display.setTouchInvertY(false); int w = TFT_display.width(); int h = TFT_display.height(); int m = DOT_RADIUS + 4; cx[0] = m; cy[0] = m; cx[1] = w - m; cy[1] = m; cx[2] = w - m; cy[2] = h - m; cx[3] = m; cy[3] = h - m; Monitor.println("=== Touch Calibration ==="); for (int i = 0; i < 4; i++) { captureCorner(i); } // Derive calibration values from the four corners int min_x = (cap_x[0] + cap_x[3]) / 2; // left edge int max_x = (cap_x[1] + cap_x[2]) / 2; // right edge int min_y = (cap_y[0] + cap_y[1]) / 2; // top edge int max_y = (cap_y[2] + cap_y[3]) / 2; // bottom edge Monitor.println(); Monitor.println("=== Calibration Results ==="); Monitor.print(" Left X (min_x): "); Monitor.println(min_x); Monitor.print(" Right X (max_x): "); Monitor.println(max_x); Monitor.print(" Top Y (min_y): "); Monitor.println(min_y); Monitor.print(" Bot Y (max_y): "); Monitor.println(max_y); Monitor.println(); Monitor.println("Copy this line into your sketch:"); Monitor.print(" TFT_display.setTouchCalibration("); Monitor.print(min_x); Monitor.print(", "); Monitor.print(max_x); Monitor.print(", "); Monitor.print(min_y); Monitor.print(", "); Monitor.print(max_y); Monitor.println(");"); TFT_display.fillScreen(WHITE); TFT_display.setTextColor(BLACK); TFT_display.setTextSize(2); TFT_display.setCursor(10, 10); TFT_display.println("Done! Check"); TFT_display.setCursor(10, 35); TFT_display.println("App Lab console"); } void loop() {}

    빠른 단계

    • 위의 코드를 복사하여 sketch/sketch.ino에 붙여넣습니다.
    • Arduino App Lab에서 Run 버튼을 클릭합니다.
    Arduino UNO Q의 아두이노 app lab에서 run 버튼 클릭
    • Console 탭을 열고 Serial Monitor 서브탭을 선택합니다.
    • 깜빡이는 모서리 점을 차례대로 눌러 유지합니다: 왼쪽 위, 오른쪽 위, 오른쪽 아래, 왼쪽 아래.
    • 출력된 setTouchCalibration() 줄을 다른 터치 스케치의 setup()에 복사합니다.

    App Lab 콘솔 출력

    DIYables_Apps
    Stop
    sketch.ino
    1#include "Arduino_RouterBridge.h"
    Serial Monitor
    Python
    Message (Enter to send a message to "Newbiely" on usb(2820070321))
    New Line
    9600 baud
    [2026-08-20 09:15:00] === Touch Calibration === [2026-08-20 09:15:04] Captured! raw_x=312 raw_y=289 [2026-08-20 09:15:11] Captured! raw_x=3704 raw_y=305 [2026-08-20 09:15:19] Captured! raw_x=3688 raw_y=3712 [2026-08-20 09:15:26] Captured! raw_x=298 raw_y=3695 [2026-08-20 09:15:27] TFT_display.setTouchCalibration(305, 3696, 297, 3703);

    메서드 빠른 참조

    메서드 기능 사용법
    initTouchSPI(cs, irq) XPT2046 터치 컨트롤러를 초기화합니다. TFT_display.initTouchSPI(7, 2);
    readTouchRaw(x, y, z) 캘리브레이션 범위를 측정하기 위해 원시 ADC 값을 읽습니다. TFT_display.readTouchRaw(x, y, z);
    setTouchCalibration(minX,maxX,minY,maxY) getTouch()가 픽셀 좌표로 올바르게 매핑되도록 캘리브레이션 값을 저장합니다. TFT_display.setTouchCalibration(305, 3696, 297, 3703);
    setTouchInvertX(invert) / setTouchInvertY(invert) 패널에서 X 또는 Y가 반전되어 있을 때 터치 축을 뒤집습니다. 저장되는 값이 일치하도록 캘리브레이션을 실행하기 전에 호출하세요. TFT_display.setTouchInvertY(true);

    Arduino UNO Q 코드 — 커스텀 SPI 버스

    이 스케치는 디스플레이 생성자에 명시적인 SPIClass 인스턴스를 전달하는 방법을 보여줍니다. 버스 이름을 명시적으로 지정하거나, 추가 설정과 함께 공유하거나, 두 번째 SPI 인터페이스가 있는 보드에서 디스플레이를 그쪽으로 옮기고 싶을 때 이 방법을 사용합니다.

    Arduino UNO Q MCU는 D11, D13, D12에 하나의 하드웨어 SPI 버스만 제공하므로, 여기서는 MY_SPI가 &SPI로 유지됩니다. 버스가 두 개인 보드에서는 이 define 하나만 바꾸면 같은 스케치가 그대로 동작합니다.

    코드가 하는 일:

    • 사용할 SPI 버스를 가리키는 포인터로 MY_SPI를 정의합니다
    • 그 포인터를 생성자의 마지막 인수로 전달합니다
    • 빨강, 초록, 파랑 컬러 바 테스트 패턴을 그립니다
    • 바 위에 확인용 라벨을 출력합니다
    /* * 이 Arduino UNO Q 코드는 newbiely.kr 에서 개발되었습니다 * 이 Arduino UNO Q 코드는 어떠한 제한 없이 공개 사용을 위해 제공됩니다. * 상세한 지침 및 연결도에 대해서는 다음을 방문하세요: * https://newbiely.kr/tutorials/arduino-uno-q/arduino-uno-q-tft-lcd-touch-display-spi */ /* Created by DIYables This example code is in the public domain Product page: https://diyables.io This example demonstrates how to use a custom (non-default) SPI bus with the DIYables TFT SPI library. This is useful on boards that have multiple SPI interfaces, such as: - ESP32: HSPI / VSPI - Arduino Giga / Portenta: SPI1 - Raspberry Pi Pico: SPI1 */ // ============================================= // Single include brings in the base class plus all driver classes. // ============================================= #include <DIYables_TFT_SPI.h> // ============================================= // Wiring (Arduino UNO Q - default SPI bus) // --------------------------------------------- // NOTE: The Arduino UNO Q MCU exposes ONE hardware SPI bus on the Uno // headers, so this example is most useful on boards with multiple buses // (ESP32, Giga, RP2040...). On the Arduino UNO Q, MY_SPI must remain // &SPI and the wiring is the standard hardware SPI mapping below. // // TFT module Arduino UNO Q // ------------ --------------------------------- // VCC -> 3.3V // GND -> GND // CS -> D10 (TFT_CS_PIN) // RESET -> D9 (TFT_RST_PIN) // DC / RS -> D8 (TFT_DC_PIN) // SDI / MOSI -> D11 (hardware SPI MOSI) // SCK -> D13 (hardware SPI SCK) // LED -> 3.3V (or any GPIO via initBacklight) // SDO / MISO -> D12 (only needed when reading from display) // // The Arduino UNO Q MCU pins are 3.3V - no level converter is needed. // ============================================= // ============================================= // SPI pin definitions (adjust for your board) // ============================================= #define TFT_CS_PIN 10 #define TFT_DC_PIN 8 #define TFT_RST_PIN 9 // Panel resolution in native (portrait) orientation - change to match your module #define TFT_WIDTH 240 #define TFT_HEIGHT 320 // ============================================= // Select alternate SPI bus (uncomment for your board) // ============================================= // --- ESP32: use HSPI --- // SPIClass hspi(HSPI); // #define MY_SPI &hspi // --- Arduino Giga / Portenta / RP2040: use SPI1 --- // #define MY_SPI &SPI1 // --- Default SPI (fallback, and the correct choice on Arduino UNO Q) --- #define MY_SPI &SPI // ============================================= // Create display object with custom SPI bus // (uncomment matching driver) // ============================================= // DIYables_ILI9341_SPI TFT_display(TFT_WIDTH, TFT_HEIGHT, TFT_CS_PIN, TFT_DC_PIN, TFT_RST_PIN, MY_SPI); // DIYables_ILI9488_SPI TFT_display(TFT_WIDTH, TFT_HEIGHT, TFT_CS_PIN, TFT_DC_PIN, TFT_RST_PIN, MY_SPI); DIYables_ST7789_SPI TFT_display(TFT_WIDTH, TFT_HEIGHT, TFT_CS_PIN, TFT_DC_PIN, TFT_RST_PIN, MY_SPI); #define BLACK DIYables_TFT_SPI::colorRGB(0, 0, 0) #define WHITE DIYables_TFT_SPI::colorRGB(255, 255, 255) #define RED DIYables_TFT_SPI::colorRGB(255, 0, 0) #define GREEN DIYables_TFT_SPI::colorRGB(0, 255, 0) #define BLUE DIYables_TFT_SPI::colorRGB(0, 0, 255) void setup() { // For ESP32 HSPI: optionally remap pins before begin() // hspi.begin(14, 12, 13, -1); // SCK, MISO, MOSI, SS TFT_display.begin(); TFT_display.setRotation(1); // Landscape TFT_display.fillScreen(BLACK); uint16_t w = TFT_display.width(); uint16_t h = TFT_display.height(); // Draw a simple test pattern TFT_display.fillRect(0, 0, w / 3, h, RED); TFT_display.fillRect(w / 3, 0, w / 3, h, GREEN); TFT_display.fillRect(w * 2 / 3, 0, w / 3, h, BLUE); TFT_display.setTextColor(WHITE); TFT_display.setTextSize(2); TFT_display.setCursor(10, h / 2 - 10); TFT_display.print("Custom SPI bus OK"); } void loop() { // Nothing to do }

    빠른 단계

    • 위의 코드를 복사하여 sketch/sketch.ino에 붙여넣습니다.
    • Arduino App Lab에서 Run 버튼을 클릭합니다.
    Arduino UNO Q의 아두이노 app lab에서 run 버튼 클릭

    디스플레이가 명시적인 SPI 버스에서 시작되어 컬러 바 테스트 패턴을 렌더링합니다.

    메서드 빠른 참조

    메서드 기능 사용법
    DIYables_ILI9341_SPI(w,h,cs,dc,rst,spi) 임의의 SPIClass 포인터를 받는 생성자 형태입니다. 인수를 생략하면 기본값은 &SPI입니다. DIYables_ILI9341_SPI tft(240, 320, 10, 9, 8, &SPI);
    begin() 설정된 SPI 버스에서 디스플레이를 초기화합니다. TFT_display.begin();

    Bridge: Linux + MCU

    이 섹션에서는 Linux 측이 SPI TFT 디스플레이를 제어하고 터치 입력을 원격으로 읽을 수 있도록 Arduino UNO Q의 두 프로세서를 모두 프로그래밍하는 방법을 보여줍니다:

    • SPI TFT 디스플레이와 XPT2046 터치 컨트롤러는 MCU(STM32)에 연결됩니다 — MCU가 모든 출력을 렌더링하고 모든 터치를 읽습니다
    • MPU는 TFT를 구동하거나 터치를 직접 읽을 수 없습니다 — Bridge.call()로 MCU에 결과를 요청해야 하며, 이는 MCU에서 해당하는 Bridge.provide() 콜백을 실행합니다
    • MPU에는 Wi-Fi가 있습니다 — 완전한 Debian Linux를 실행하므로, 인터넷에 접속하고, REST API를 호출하고, 어디서든 디스플레이 업데이트를 보낼 수 있습니다
    • Arduino_RouterBridge는 두 프로세서 간의 RPC 통신을 가능하게 합니다 — Linux의 Arduino Router 서비스가 모든 트래픽을 관리합니다
    • ⚠️ /dev/ttyHS1(Linux)과 Serial1(MCU)은 라우터가 예약한 것입니다 — 사용자 코드에서 절대 열지 마세요

    요약하면: MCU가 SPI TFT 디스플레이를 구동하고 터치를 읽음 → MPU가 명령과 터치 데이터를 요청 → MPU가 인터넷을 통해 이를 활용.

    MCU 코드 (Bridge)

    /* * 이 Arduino UNO Q 코드는 newbiely.kr 에서 개발되었습니다 * 이 Arduino UNO Q 코드는 어떠한 제한 없이 공개 사용을 위해 제공됩니다. * 상세한 지침 및 연결도에 대해서는 다음을 방문하세요: * https://newbiely.kr/tutorials/arduino-uno-q/arduino-uno-q-tft-lcd-touch-display-spi */ #include "Arduino_RouterBridge.h" #include <DIYables_TFT_SPI.h> // SPI TFT display pins on the Arduino UNO Q MCU #define TFT_CS_PIN 10 #define TFT_DC_PIN 8 #define TFT_RST_PIN 9 // Panel resolution in native (portrait) orientation #define TFT_WIDTH 240 #define TFT_HEIGHT 320 // XPT2046 touch controller pins (shared SPI bus) #define TOUCH_CS_PIN 2 // T_CS #define TOUCH_IRQ_PIN -1 // T_IRQ (-1 if not connected) // Touch calibration - run the TouchCalibration sketch and update these #define TOUCH_LEFT_X 300 #define TOUCH_RIGHT_X 3700 #define TOUCH_TOP_Y 300 #define TOUCH_BOT_Y 3700 // Uncomment the line that matches your driver chip // DIYables_ILI9341_SPI TFT_display(TFT_WIDTH, TFT_HEIGHT, TFT_CS_PIN, TFT_DC_PIN, TFT_RST_PIN); // DIYables_ILI9488_SPI TFT_display(TFT_WIDTH, TFT_HEIGHT, TFT_CS_PIN, TFT_DC_PIN, TFT_RST_PIN); DIYables_ST7789_SPI TFT_display(TFT_WIDTH, TFT_HEIGHT, TFT_CS_PIN, TFT_DC_PIN, TFT_RST_PIN); #define WHITE DIYables_TFT_SPI::colorRGB(255, 255, 255) #define BLUE DIYables_TFT_SPI::colorRGB(0, 0, 255) #define RED DIYables_TFT_SPI::colorRGB(255, 0, 0) String current_text = ""; int last_touch_x = -1; int last_touch_y = -1; // Called from Linux via Bridge.call("display_text", "...") String display_text(String text) { current_text = text; TFT_display.fillScreen(WHITE); TFT_display.setTextColor(BLUE); TFT_display.setTextSize(2); TFT_display.setCursor(10, 40); TFT_display.println(text); return "TFT shows: " + text; } // Called from Linux via Bridge.call("clear_tft") String clear_tft() { current_text = ""; TFT_display.fillScreen(WHITE); return "TFT is clear"; } // Called from Linux via Bridge.call("get_touch") String get_touch() { if (last_touch_x < 0) return "No touch detected"; return "Touch: " + String(last_touch_x) + ", " + String(last_touch_y); } // Called from Linux via Bridge.call("get_status") String get_status() { if (current_text == "") return "TFT is clear"; return "TFT shows: " + current_text; } void setup() { Bridge.begin(); Monitor.begin(9600); TFT_display.begin(); TFT_display.setRotation(0); TFT_display.fillScreen(WHITE); TFT_display.initTouchSPI(TOUCH_CS_PIN, TOUCH_IRQ_PIN); TFT_display.setTouchCalibration(TOUCH_LEFT_X, TOUCH_RIGHT_X, TOUCH_TOP_Y, TOUCH_BOT_Y); // Expose MCU functions to the Linux side. // provide_safe is used for callbacks that call standard Arduino APIs. Bridge.provide_safe("display_text", display_text); Bridge.provide_safe("clear_tft", clear_tft); Bridge.provide("get_touch", get_touch); Bridge.provide("get_status", get_status); Monitor.println("SPI TFT Bridge ready"); } void loop() { int x, y; if (TFT_display.getTouch(x, y)) { last_touch_x = x; last_touch_y = y; Monitor.println("Touch at: " + String(x) + ", " + String(y)); TFT_display.fillCircle(x, y, 4, RED); delay(150); // Debounce } }

    Python 코드 (Bridge)

    /* * 이 Arduino UNO Q 코드는 newbiely.kr 에서 개발되었습니다 * 이 Arduino UNO Q 코드는 어떠한 제한 없이 공개 사용을 위해 제공됩니다. * 상세한 지침 및 연결도에 대해서는 다음을 방문하세요: * https://newbiely.kr/tutorials/arduino-uno-q/arduino-uno-q-tft-lcd-touch-display-spi */ from arduino.app_utils import * import time def loop(): # Ask the MCU to show text on the SPI TFT display result = Bridge.call("display_text", "Hello UNO Q") print(result) time.sleep(3) result = Bridge.call("display_text", "Touch the screen!") print(result) time.sleep(5) # Ask the MCU for the last touch point it detected result = Bridge.call("get_touch") print(result) time.sleep(2) result = Bridge.call("clear_tft") print(result) time.sleep(2) result = Bridge.call("get_status") print(result) time.sleep(2) App.run(user_loop=loop)

    빠른 단계

    • 연결: SPI TFT 디스플레이와 XPT2046 터치 컨트롤러를 Arduino UNO Q에 연결한 다음, USB-C 케이블을 꽂습니다.
    • Arduino App Lab 열기: Arduino App Lab을 실행하고 보드가 감지될 때까지 기다립니다.
    • 새 App 만들기: Create New App을 클릭하고, 이름을 DIYables_TftSpiBridge로 지정한 다음 Create를 클릭합니다.
    • MCU 스케치 붙여넣기: 위의 MCU Bridge 코드를 복사하여 sketch/sketch.ino에 붙여넣습니다.
    • Python 코드 붙여넣기: 위의 Python Bridge 코드를 복사하여 App의 Python 파일에 붙여넣습니다.
    • Install the library: Click the Add sketch library button (the open book icon with a + sign) in the left sidebar.
    add sketch 라이브러리 in 아두이노 app lab on Arduino UNO Q
    • Search for Arduino_RouterBridge created by Arduino and click the Install button.
    My Apps / DIYables Apps
    Run
    Bricks
    No bricks added...
    Sketch Libraries
    No sketch libra...
    Files
    python
    sketch
    .gitignore
    README.md
    app.yaml
    sketch.ino
    Add sketch library
    Arduino_RouterBridge Arduino

    This library provides a simple RPC bridge for Arduino UNO Q boards, allowing communication between the board and other devices using MsgPack serialization.

    0.4.1
    Install
    More Info
    • Search for DIYables TFT SPI created by DIYables.io and click the Install button.
    My Apps / DIYables Apps
    Run
    Bricks
    No bricks added...
    Sketch Libraries
    No sketch libra...
    Files
    python
    sketch
    .gitignore
    README.md
    app.yaml
    sketch.ino
    Add sketch library
    DIYables TFT SPI DIYables.io

    Works with both touch and non-touch versions of the same SPI TFT modules. Supports ILI9341 (240x320, 16-bit RGB565), ILI9488 (320x480, 18-bit RGB666), and ST7789 (240x320, 16-bit RGB565) displays over SPI. Includes built-in driver for XPT2046 / HR2046 / ADS7843 SPI touch controllers and 4-wire resistive touch panels - no separate touch library required. Use the display-only API for non-touch panels, or add initTouchSPI() to enable touch on modules that include a touch controller. Extends Adafruit GFX for full graphics support. Works with any Arduino-compatible board that has SPI.

    1.0.3
    Install
    More Info
    • 업로드: Arduino App Lab에서 Run 버튼을 클릭합니다.
    Arduino UNO Q의 아두이노 app lab에서 run 버튼 클릭
    • 참고: Linux 측에서 Python 스크립트를 실행하기 전에 MCU 스케치에서 Bridge.begin()이 호출되고 스케치가 업로드되어 있는지 확인하세요.
    • ⚠️ 경고: 코드에서 /dev/ttyHS1(Linux)을 직접 열거나 Serial1(MCU)을 사용하지 마세요 — 이들은 Arduino Router가 예약한 것이며, 접근하면 Bridge가 동작하지 않습니다.

    App Lab 콘솔 출력

    DIYables_Apps
    Stop
    sketch.ino
    1#include "Arduino_RouterBridge.h"
    Serial Monitor
    Python
    Message (Enter to send a message to "Newbiely" on usb(2820070321))
    New Line
    9600 baud
    [2026-08-20 09:20:00] SPI TFT Bridge ready [2026-08-20 09:20:06] Touch at: 118, 96 [2026-08-20 09:20:09] Touch at: 63, 210 [2026-08-20 09:20:14] Touch at: 187, 148
    DIYables_Apps
    Stop
    sketch.ino
    1#include "Arduino_RouterBridge.h"
    Serial Monitor
    Python
    [2026-08-20 09:20:00] TFT shows: Hello UNO Q [2026-08-20 09:20:03] TFT shows: Touch the screen! [2026-08-20 09:20:08] Touch: 118, 96 [2026-08-20 09:20:10] TFT is clear [2026-08-20 09:20:12] TFT is clear

    Telegram

    Telegram을 사용하여 어디서든 SPI TFT 디스플레이를 제어하세요. 휴대폰에서 메시지를 보내면 디스플레이가 실시간으로 업데이트되며, 마지막으로 화면을 터치한 위치를 보드에 물어볼 수도 있습니다.

    아직 Telegram 봇이 없다면, 계속하기 전에 아두이노 우노 Q - 텔레그램 봇을 참고하여 봇 토큰을 받으세요.

    이 섹션에서 다루는 내용:

    • Arduino UNO Q의 Linux 측에서 Telegram 메시지를 수신하는 Python 스크립트 실행
    • Telegram의 명령을 MCU 측으로 전달하여 SPI TFT 디스플레이에 글쓰기
    • MCU의 결과 — 디스플레이 상태 또는 마지막 터치 지점 — 를 Telegram 답장으로 보내기

    MCU 스케치: 이전 Bridge 섹션의 MCU 스케치를 그대로 사용합니다 — 변경할 필요가 없습니다. 진행하기 전에 STM32에 이미 업로드되어 실행 중인지 확인하세요.

    Python 코드 (Telegram)

    /* * 이 Arduino UNO Q 코드는 newbiely.kr 에서 개발되었습니다 * 이 Arduino UNO Q 코드는 어떠한 제한 없이 공개 사용을 위해 제공됩니다. * 상세한 지침 및 연결도에 대해서는 다음을 방문하세요: * https://newbiely.kr/tutorials/arduino-uno-q/arduino-uno-q-tft-lcd-touch-display-spi */ from arduino.app_utils import * import requests import time TELEGRAM_TOKEN = "YOUR_TELEGRAM_BOT_TOKEN" CHAT_ID = "YOUR_CHAT_ID" last_update_id = 0 def get_updates(): global last_update_id url = f"https://api.telegram.org/bot{TELEGRAM_TOKEN}/getUpdates" params = {"offset": last_update_id + 1, "timeout": 5} try: response = requests.get(url, params=params, timeout=10) data = response.json() if data["ok"]: return data["result"] except Exception: pass return [] def send_message(text): url = f"https://api.telegram.org/bot{TELEGRAM_TOKEN}/sendMessage" requests.post(url, data={"chat_id": CHAT_ID, "text": text}) def loop(): global last_update_id updates = get_updates() for update in updates: last_update_id = update["update_id"] message = update.get("message", {}) text = message.get("text", "") if text.startswith("/display "): display_text = text[9:].strip() result = Bridge.call("display_text", display_text) send_message(result) elif text == "/clear": result = Bridge.call("clear_tft") send_message(result) elif text == "/touch": result = Bridge.call("get_touch") send_message(result) elif text == "/status": result = Bridge.call("get_status") send_message(result) elif text == "/start": send_message("Commands:\n/display <text> - Show text on the SPI TFT\n/clear - Clear the display\n/touch - Get the last touch point\n/status - Get the current display status") App.run(user_loop=loop)

    빠른 단계

    • YOUR_TELEGRAM_BOT_TOKEN을 BotFather에서 받은 실제 봇 토큰으로 바꿉니다.
    • YOUR_CHAT_ID를 여러분의 Telegram 채팅 ID로 바꿉니다.
    • 이 Python 코드를 App의 Python 파일에 붙여넣습니다. Bridge 섹션의 MCU 스케치는 그대로 둡니다.
    • Arduino App Lab에서 Run 버튼을 클릭합니다.
    Arduino UNO Q의 아두이노 app lab에서 run 버튼 클릭
    • Telegram을 열고 봇에 /start를 보내 명령 목록을 확인합니다.
    • 참고: YOUR_BOT_TOKEN을 Telegram의 @BotFather에서 받은 토큰으로 바꾸세요.

    App Lab 콘솔 출력

    DIYables_Apps
    Stop
    sketch.ino
    1#include "Arduino_RouterBridge.h"
    Serial Monitor
    Python
    [2026-08-20 09:30:00] Waiting for Telegram messages... [2026-08-20 09:30:12] Received: /display Hello from Telegram [2026-08-20 09:30:28] Received: /touch [2026-08-20 09:30:41] Received: /status [2026-08-20 09:30:55] Received: /clear
    Telegram
    Telegram 12:45
    Welcome to Telegram!
    ArduinoBot 10:19
    Chatting with Arduino...
    telegram-botfather
    BotFather Yesterday
    Your bot has been created.

    ArduinoBot

    bot
    Today
    /display Hello from Telegram
    10:15 AM ✓✓
    TFT shows: Hello from Telegram
    10:16 AM
    /touch
    10:17 AM ✓✓
    Touch: 118, 96
    10:18 AM
    /status
    10:19 AM ✓✓
    TFT shows: Hello from Telegram
    10:20 AM
    /clear
    10:21 AM ✓✓
    TFT is clear
    10:22 AM

    OpenClaw

    You can adapt the OpenClaw to this tutorial by refering the instruction on 아두이노 우노 Q - OpenClaw Tutorial

    문제 해결

    디스플레이가 예상대로 동작하지 않으면 먼저 다음을 확인하세요:

    • 검은 화면 — CS, DC, MOSI, SCK가 모두 연결되어 있는지 확인하세요. CS 라인이 빠지면 디스플레이가 비활성 상태로 남습니다.
    • 잘못된 드라이버 — 생성자 줄은 하나만 활성화되어 있어야 합니다. 나머지 두 줄은 주석 처리된 상태여야 합니다.
    • 이미지가 밀리거나 잘림 — 생성자의 너비와 높이가 실제 패널 크기와 일치해야 합니다.
    • 백라이트는 밝은데 아무것도 표시되지 않음 — VCC와 LED / BL이 5V가 아니라 3.3V에 연결되어 있는지 확인하세요.
    • 터치가 동작하지 않음 — Touch Calibration 스케치를 실행하여 여러분 패널에 맞는 캘리브레이션 값을 얻으세요.
    • 터치 축이 반대 — setTouchCalibration() 전에 setTouchInvertX(true) 또는 setTouchInvertY(true)를 호출하세요.

    플랫폼 지원

    DIYables_TFT_SPI 라이브러리는 표준 Arduino API — SPI, digitalWrite, millis — 만 사용합니다:

    • Arduino App Lab을 통해 Arduino UNO Q MCU(STM32)에서 실행됩니다
    • 같은 스케치를 다른 Arduino 호환 보드에서도 그대로 실행할 수 있습니다
    • 보드가 바뀌면 생성자의 핀 번호와 패널 크기만 조정하면 됩니다

    프로젝트 아이디어

    Arduino UNO Q와 SPI TFT 디스플레이로 다양한 창의적인 프로젝트를 만들 수 있습니다:

    • Wi-Fi 날씨 대시보드: Linux 측이 온라인 API에서 일기 예보를 가져오고, MCU가 이를 TFT 화면에 그립니다
    • 터치 제어판: MCU에 연결된 LED, 릴레이, 모터를 켜고 끄는 화면 버튼을 그립니다
    • 원격 메시지 보드: Telegram으로 보낸 텍스트가 세계 어디서든 즉시 디스플레이에 나타납니다
    • 디지털 액자: Micro SD 카드에 저장된 BMP 이미지를 슬라이드쇼로 순환 표시합니다
    • 서명 패드: 손가락으로 그린 서명을 캡처하고, Linux 측이 이를 클라우드에 업로드합니다
    • 실시간 센서 모니터: 온도, 습도, 거리 측정값을 크고 읽기 쉬운 숫자로 표시합니다

    스스로 도전해 보기

    Arduino UNO Q에서 SPI TFT 디스플레이로 더 나아갈 준비가 되셨나요? 다음 도전 과제를 시도해 보세요:

    • 쉬움: Touch Draw 스케치에서 펜 색상과 반지름을 바꿔, 새로 터치할 때마다 다른 색으로 그려지게 합니다.
    • 보통: 첫 번째 버튼 옆에 두 번째 화면 버튼을 추가하고, 버튼마다 App Lab 콘솔에 다른 메시지를 출력합니다.
    • 고급: Telegram으로 제어하는 대시보드를 만듭니다: Python 측이 Wi-Fi로 실시간 날씨 데이터를 가져와 Bridge로 보내고, MCU가 SPI TFT 디스플레이에 색 막대가 있는 온도 게이지를 그립니다.