ESP8266 SSD1309 OLED 디스플레이 128x64 | 2.42인치 I2C OLED 튜토리얼

이 튜토리얼은 ESP8266으로 2.42인치(2.4") SSD1309 I2C OLED 디스플레이(128×64 해상도)를 사용하는 방법을 안내합니다. 구체적으로 배우는 내용:

ESP8266 NodeMCU ssd1309 oLED i2c 디스플레이

필요한 하드웨어

1×ESP8266 NodeMCU 쿠팡 | 아마존
1×USB 케이블 타입-A to 타입-C (USB-A PC용) 쿠팡 | 아마존
1×USB 케이블 타입-C to 타입-C (USB-C PC용) 아마존
1×SSD1309 I2C OLED Display 2.42 inch 128x64 아마존
1×점퍼케이블 쿠팡 | 아마존
1×(추천) ESP8266용 스크루 터미널 확장 보드 쿠팡 | 아마존
1×(추천) ESP8266 Type-C용 전원 분배기 쿠팡 | 아마존
공개: 이 포스팅 에 제공된 일부 링크는 아마존 제휴 링크입니다. 이 포스팅은 쿠팡 파트너스 활동의 일환으로, 이에 따른 일정액의 수수료를 제공받습니다.

SSD1309 OLED 디스플레이에 대하여

SSD1309는 단색 OLED 디스플레이 드라이버 칩입니다. 2.42인치 버전은 128×64 픽셀 해상도를 제공합니다. I2C 프로토콜로 통신하며 전원 연결 외에 두 개의 핀(SDA와 SCL)만 필요합니다. 핀이 제한적인 ESP8266 프로젝트에 이상적입니다.

SSD1309 OLED의 주요 특징:

  • 디스플레이 크기: 2.42인치 (대각선)
  • 해상도: 128×64 픽셀
  • 통신: I2C (2선 인터페이스)
  • 기본 I2C 주소: 0x3C
  • 동작 전압: 3.3V 또는 5V 호환 (ESP8266은 3.3V 사용)
  • 하드웨어 스크롤 지원 내장
  • 대비/밝기 조절 가능
  • 낮은 전력 소비

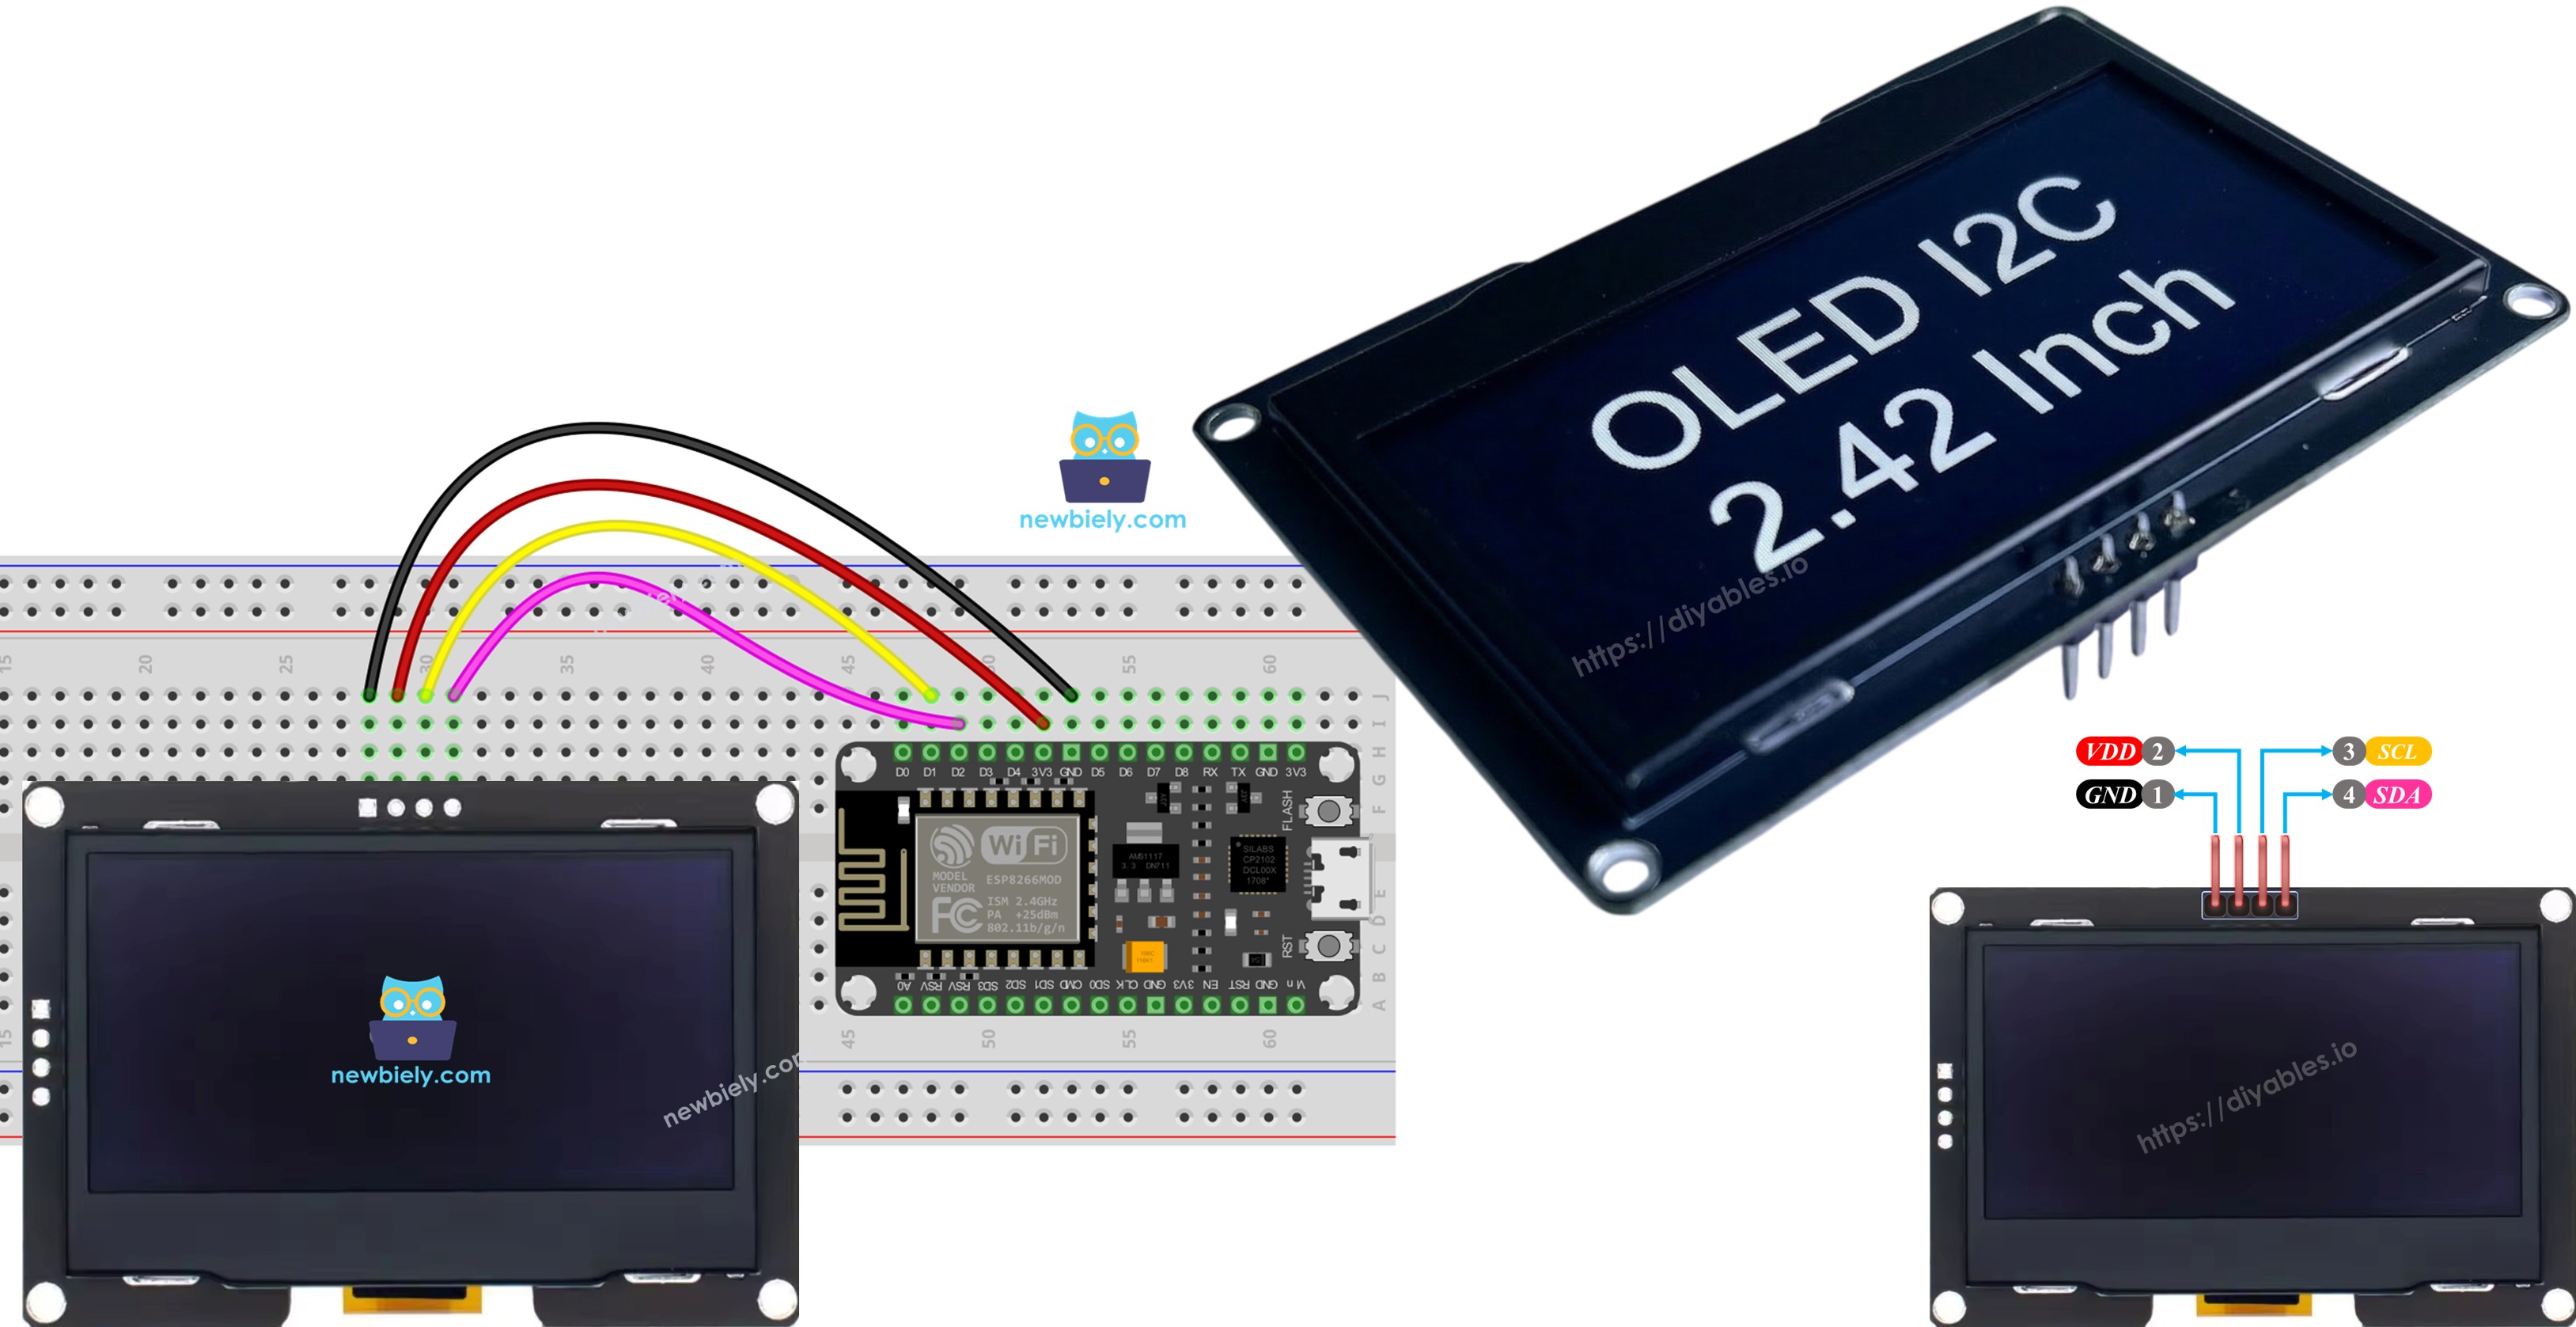
SSD1309 OLED 디스플레이 핀아웃

2.42인치 SSD1309 I2C OLED 모듈에는 일반적으로 4개의 핀이 있습니다:

  • GND: 접지 핀 - ESP8266 GND에 연결
  • VCC: 전원 공급 핀 - ESP8266 3.3V에 연결
  • SDA: I2C 데이터 라인 - ESP8266 D2 (GPIO4)에 연결
  • SCL: I2C 클럭 라인 - ESP8266 D1 (GPIO5)에 연결
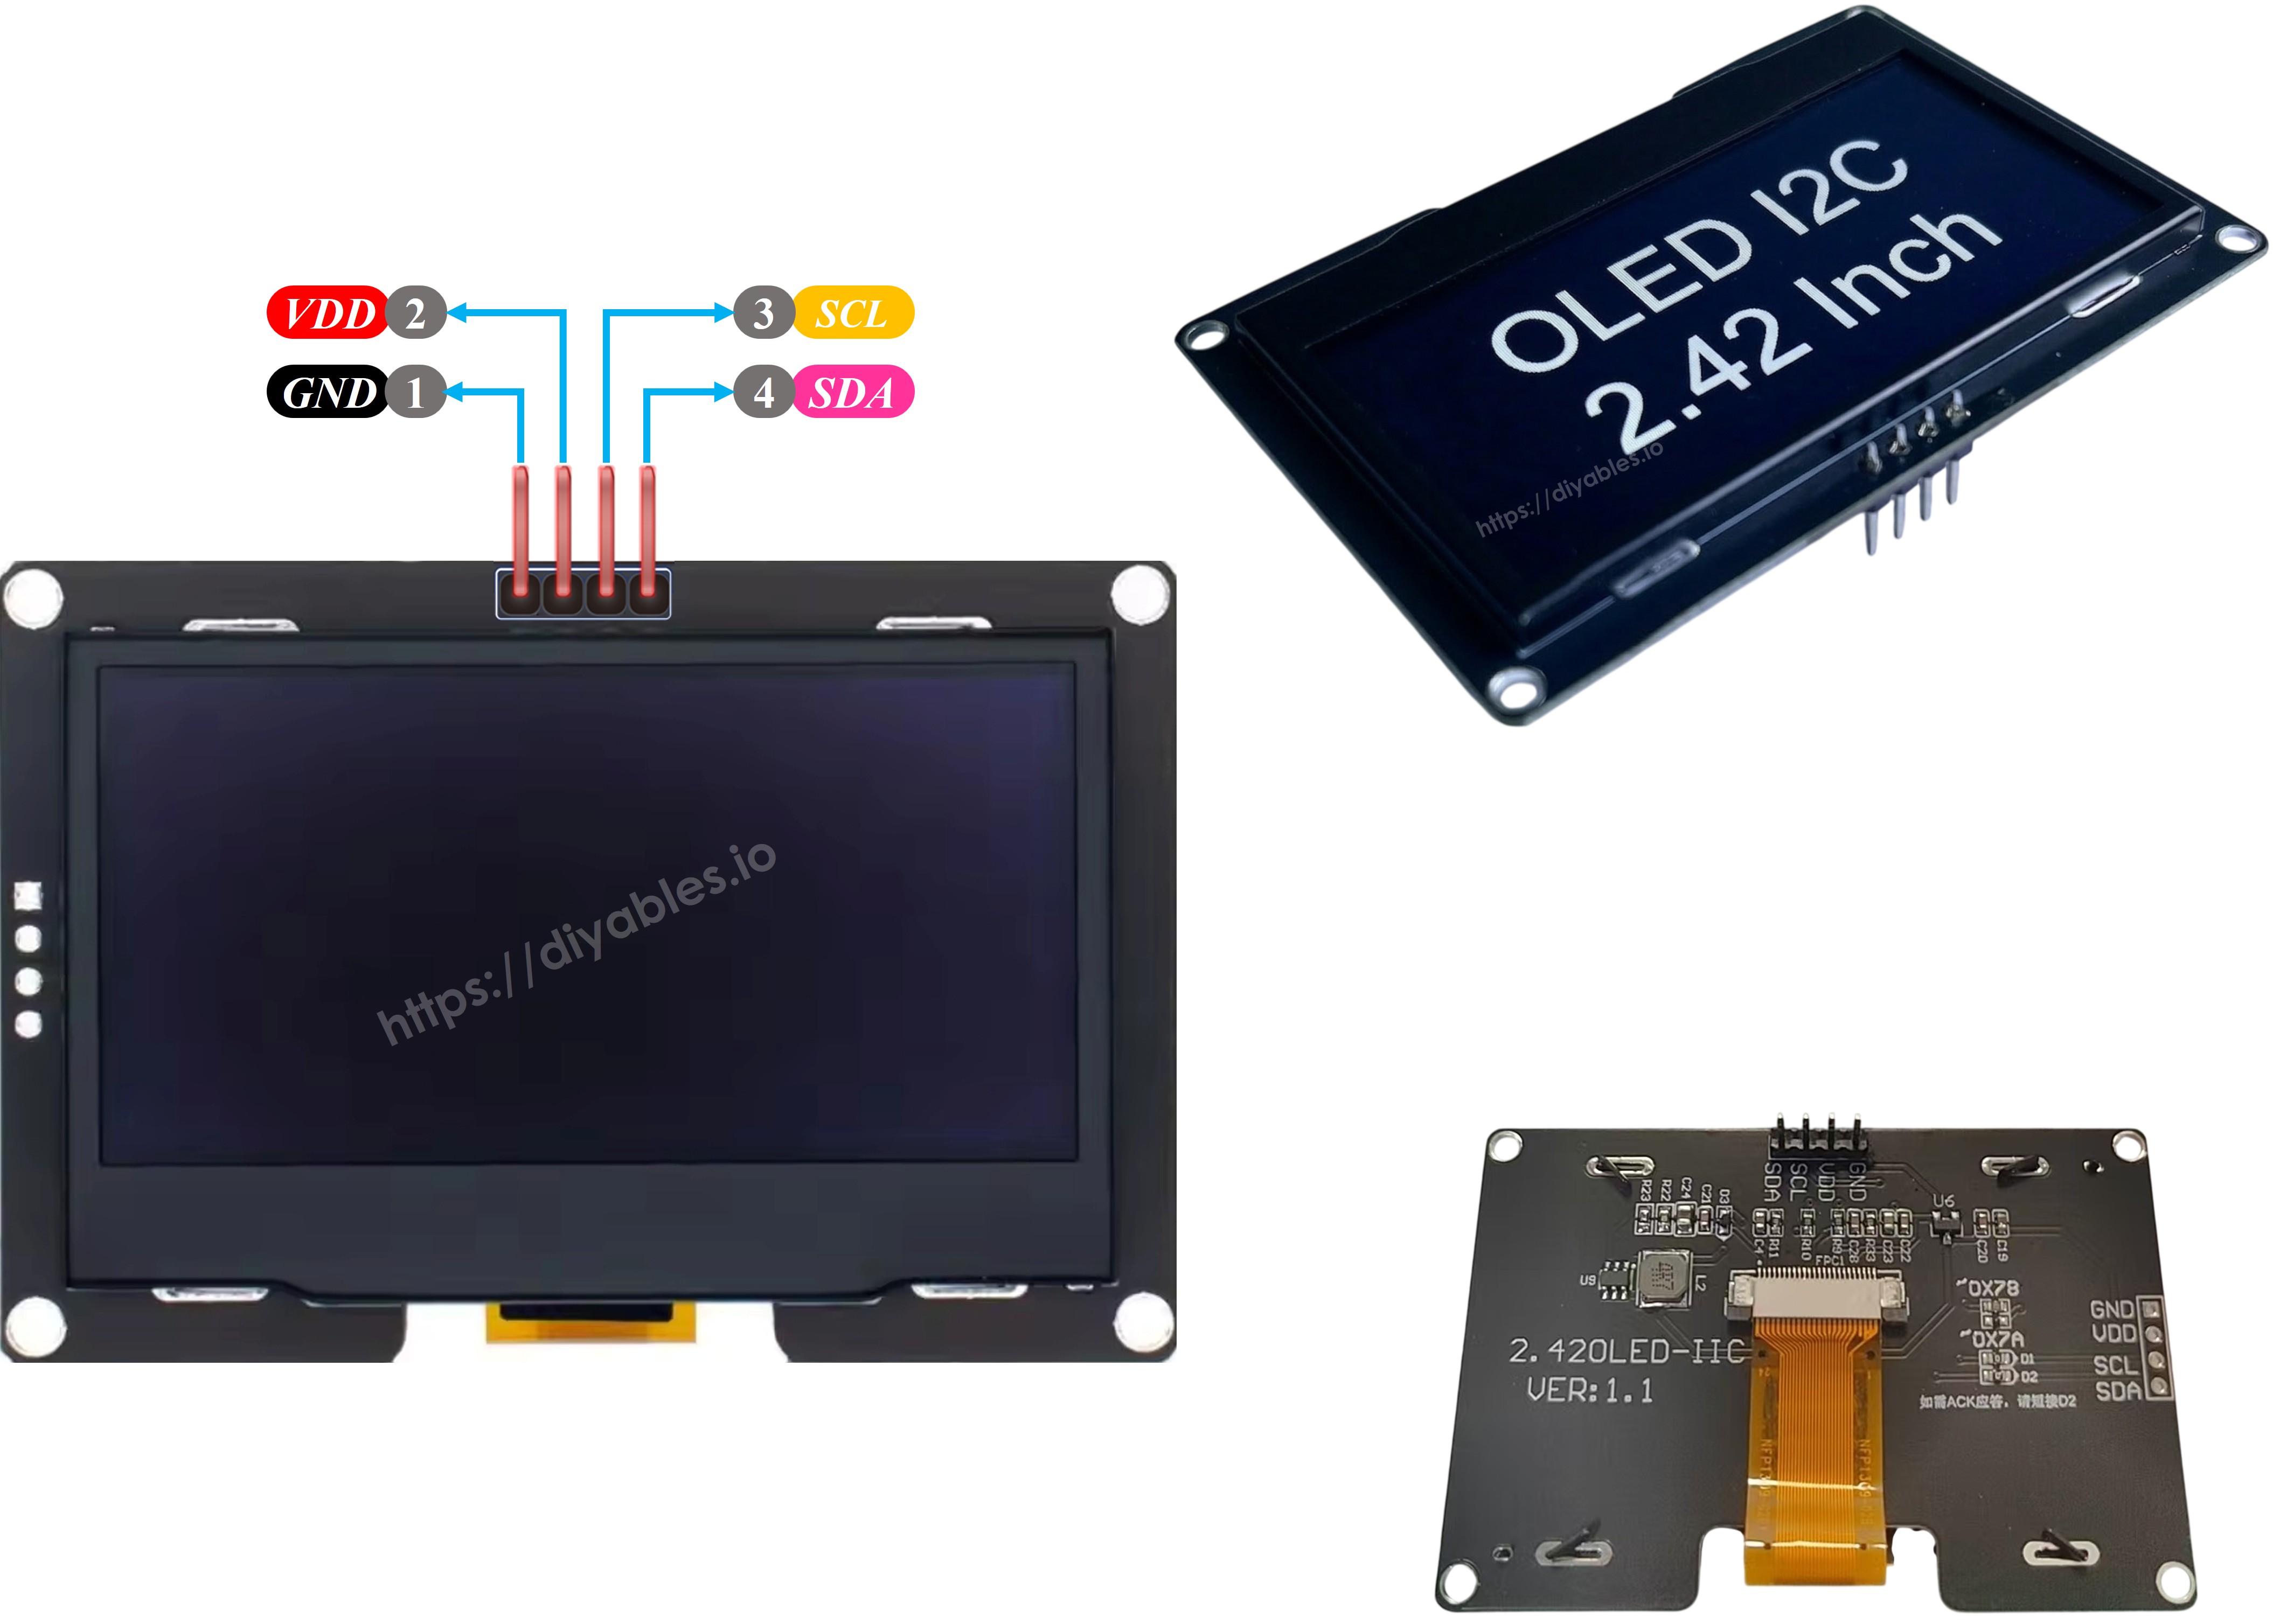
ssd1309 oLED 핀아웃

※ 주의:

  • OLED 모듈의 핀은 제조사와 모듈 유형에 따라 다를 수 있습니다. 항상 OLED 모듈에 인쇄된 레이블을 참조하세요. 주의하세요!
  • 이 튜토리얼은 SSD1309 I2C 드라이버가 있는 OLED 디스플레이를 사용합니다. DIYables의 OLED 디스플레이로 테스트하였으며 완벽하게 작동합니다.

배선도

ESP8266에 2.42인치 SSD1309 OLED 디스플레이를 다음과 같이 연결합니다:

ESP8266 NodeMCU ssd1309 oLED 배선도

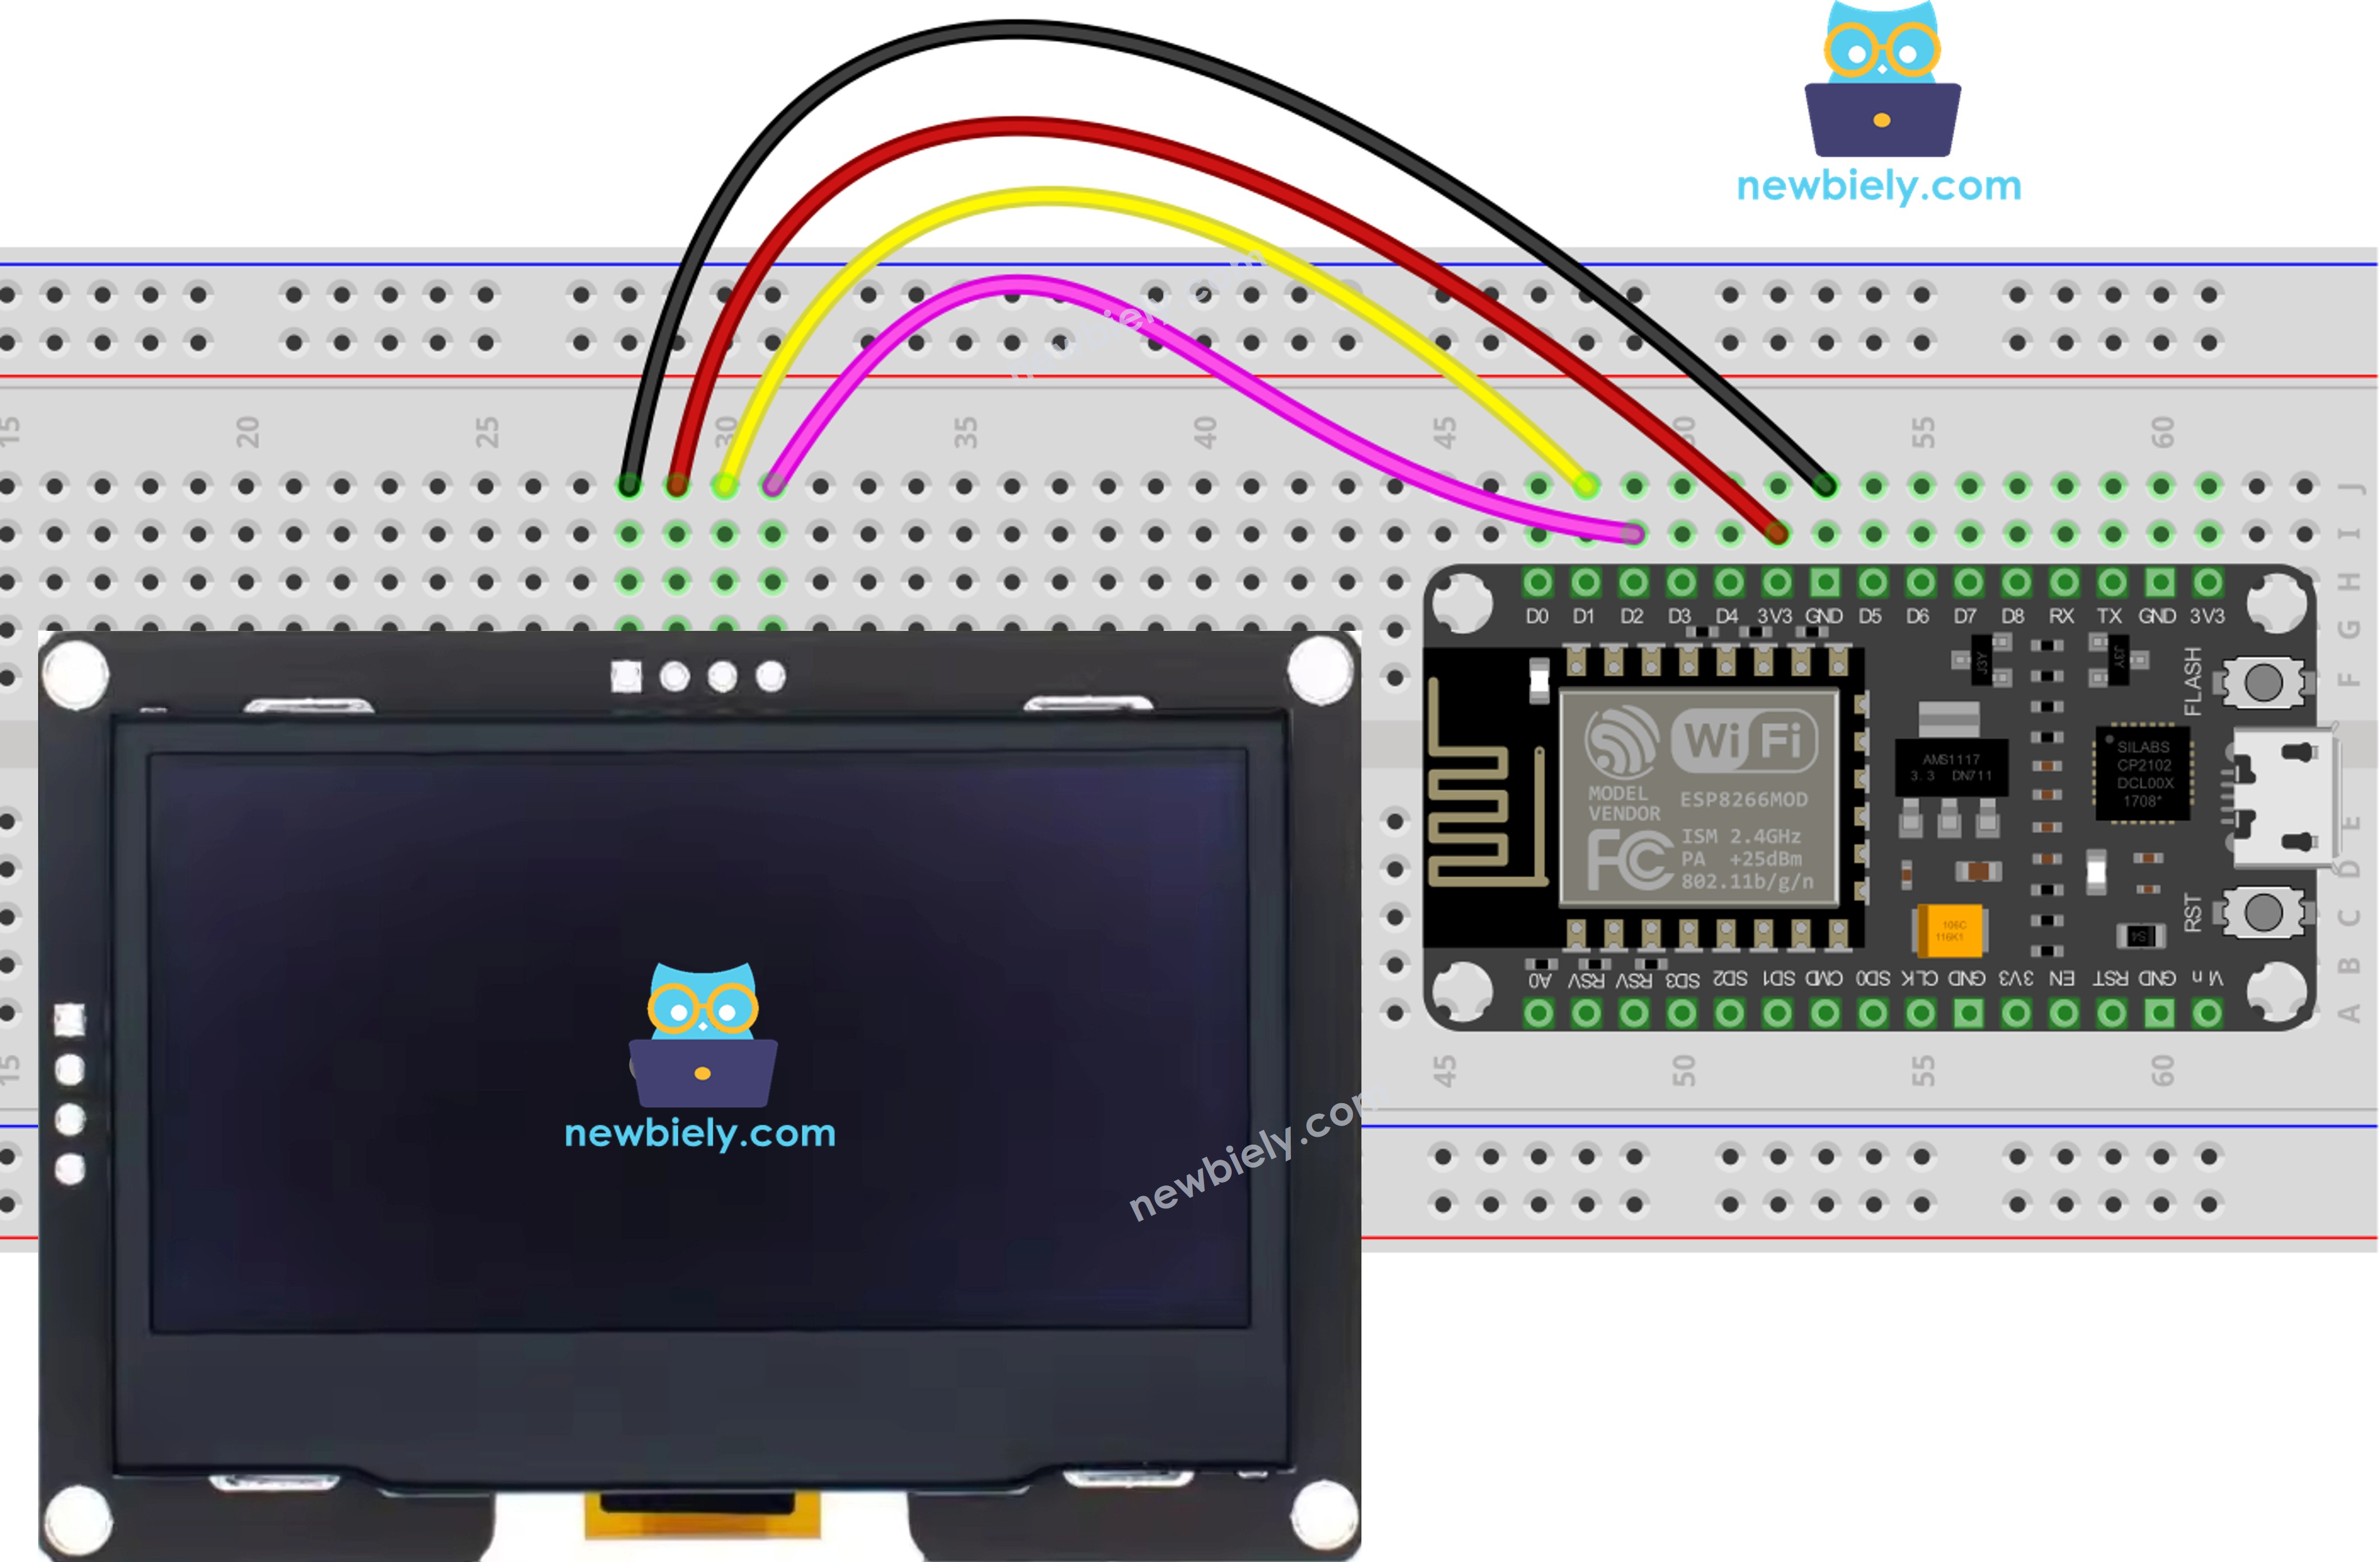
이 이미지는 Fritzing을 사용하여 만들어졌습니다. 이미지를 확대하려면 클릭하세요.

ESP8266 핀배열ESP8266 전원을 켜는 방법에 대해 더 많이 보십시오.

SSD1309 OLED ESP8266
VCC 3.3V
GND GND
SDA D2 (GPIO4)
SCL D1 (GPIO5)

ESP8266에서 SSD1309 OLED 사용 방법

DIYables_OLED_SSD1309 라이브러리 설치

  • Arduino IDE 왼쪽 탐색 모음의 Libraries 아이콘을 클릭합니다.
  • 검색창에 DIYables_OLED_SSD1309를 입력하고 DIYables의 라이브러리를 찾습니다.
  • Install 버튼을 클릭하여 라이브러리를 추가합니다.
ESP8266 NodeMCU ssd1309 oLED 라이브러리

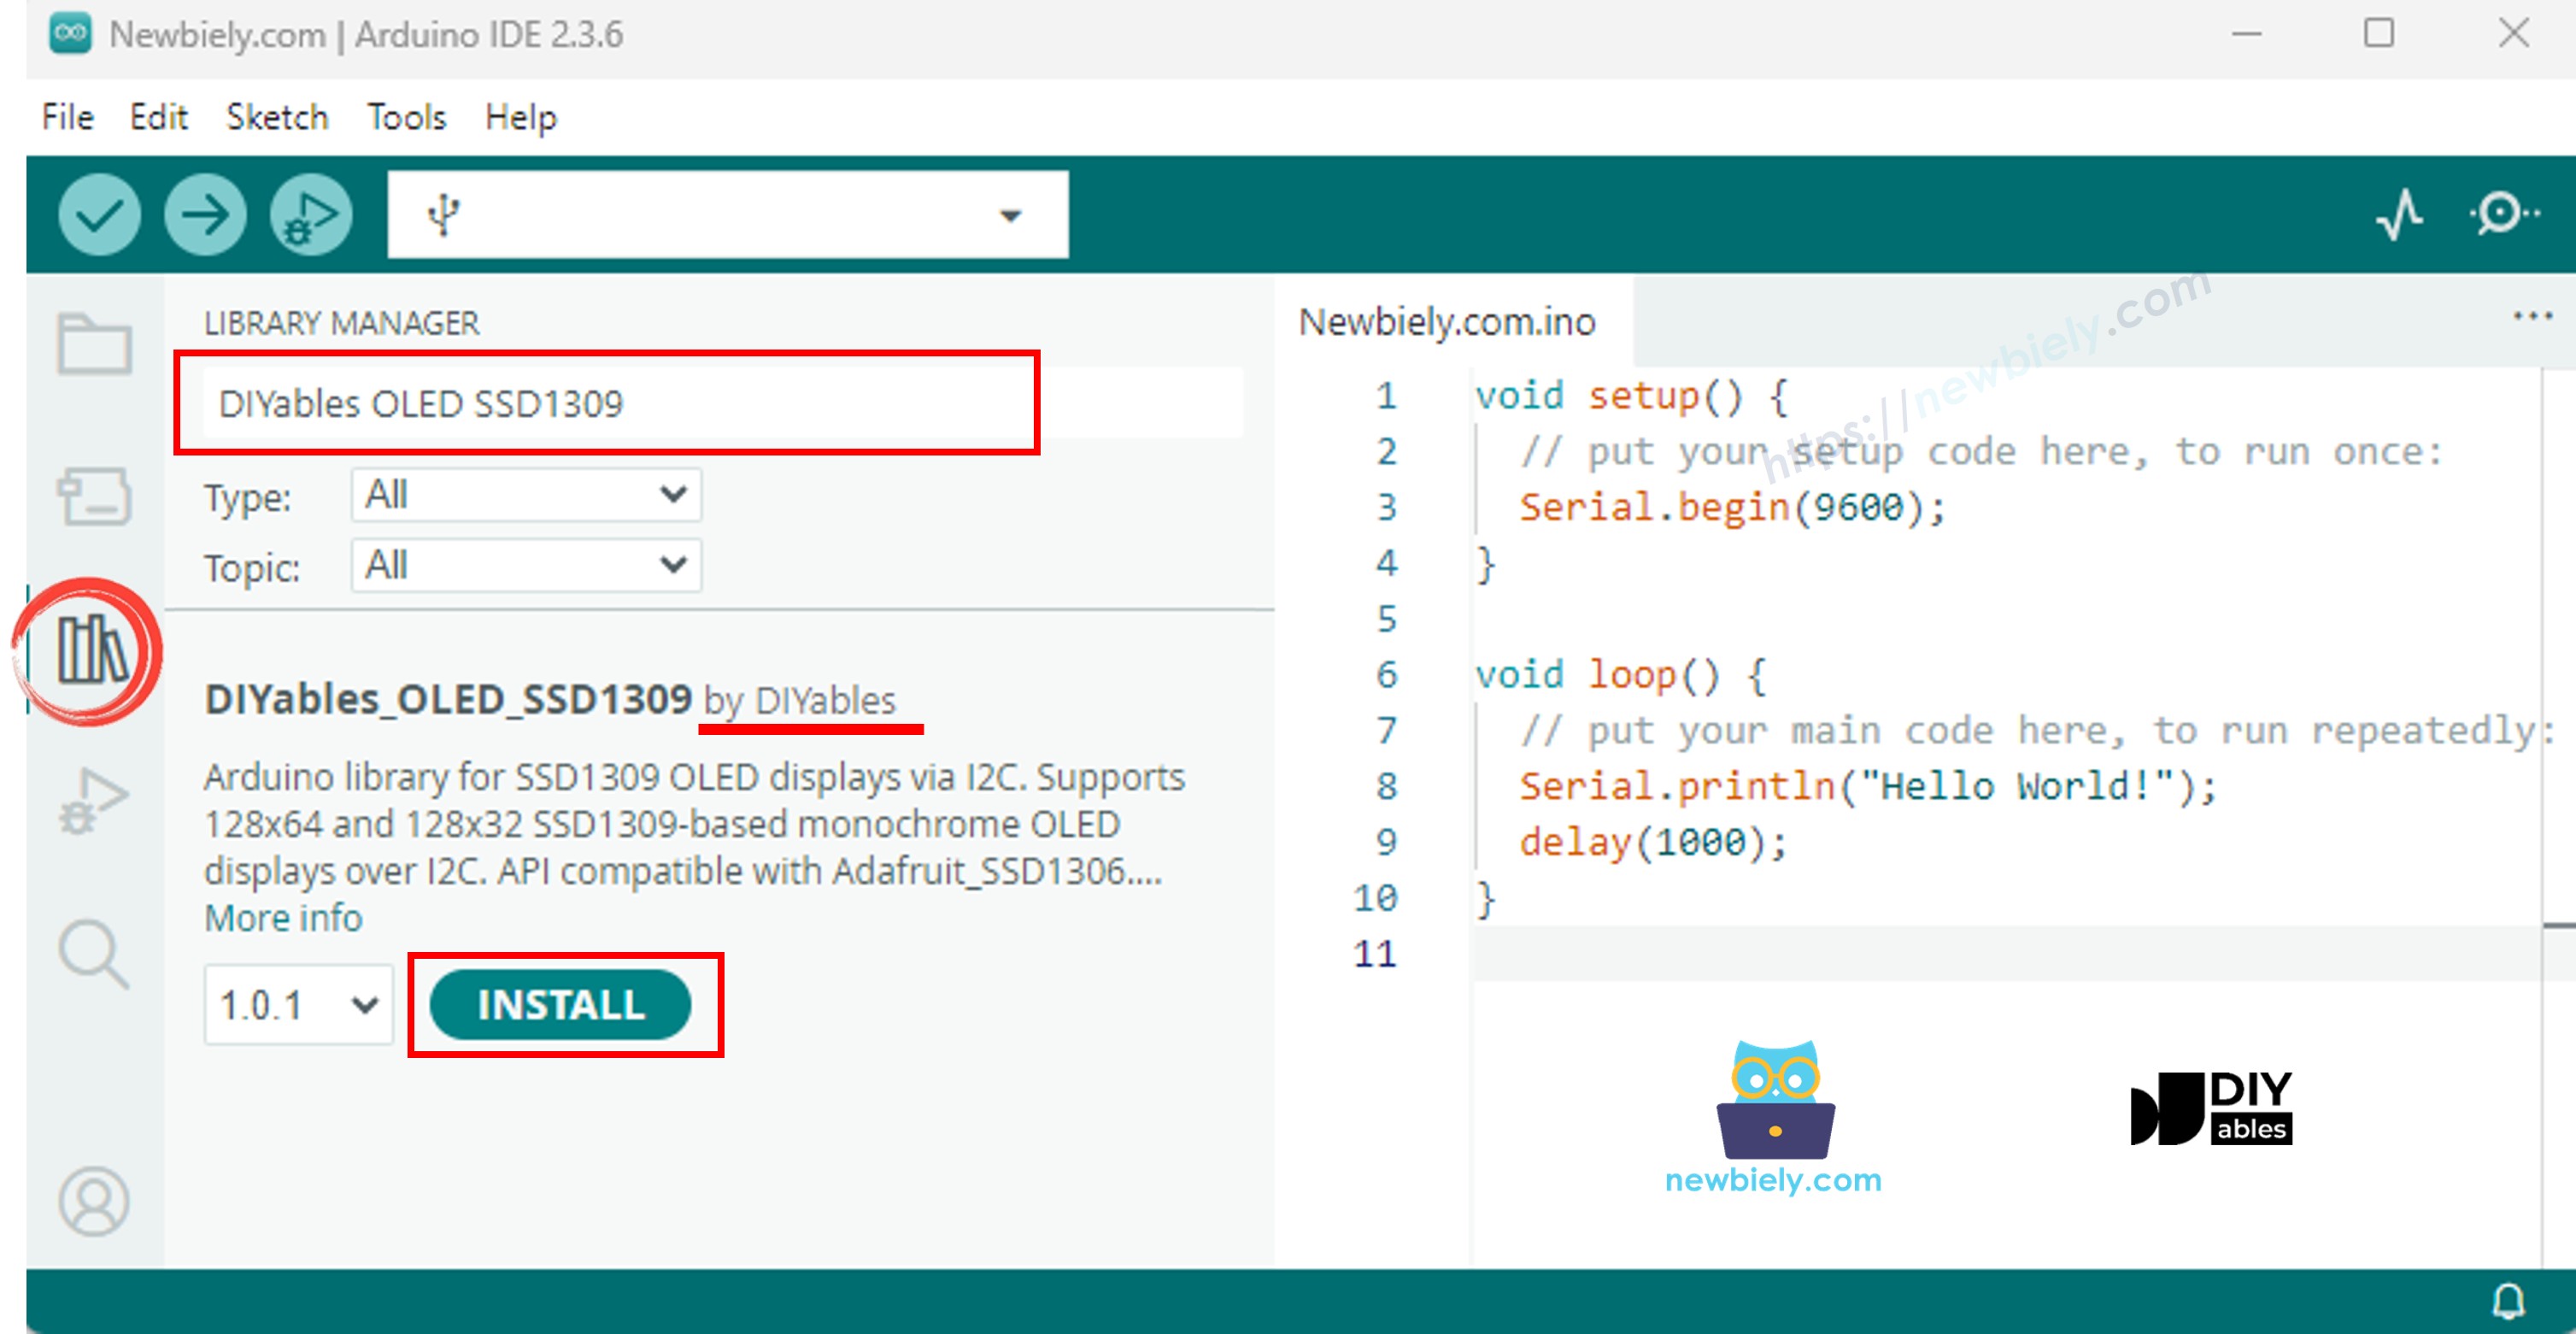
DIYables_OLED_SSD1309 라이브러리는 Adafruit_GFX 라이브러리에 의존합니다. Adafruit_GFX가 아직 설치되지 않은 경우 Arduino IDE가 DIYables_OLED_SSD1309 설치 시 자동으로 설치를 요청합니다.

ESP8266 코드 - SSD1309 OLED에 "Hello World" 표시

아래 코드는 2.42인치 SSD1309 OLED 디스플레이에 텍스트를 표시하는 방법을 보여줍니다:

/* * 이 ESP8266 NodeMCU 코드는 newbiely.kr 에서 개발되었습니다 * 이 ESP8266 NodeMCU 코드는 어떠한 제한 없이 공개 사용을 위해 제공됩니다. * 상세한 지침 및 연결도에 대해서는 다음을 방문하세요: * https://newbiely.kr/tutorials/esp8266/esp8266-ssd1309-oled-display */ /* * DIYables OLED SSD1309 – Hello World * Prints text in two sizes on the 2.42 inch 128x64 I2C OLED with ESP8266. */ #include <Wire.h> #include <Adafruit_GFX.h> #include <DIYables_OLED_SSD1309.h> #define SCREEN_WIDTH 128 #define SCREEN_HEIGHT 64 #define OLED_RESET -1 #define SCREEN_ADDRESS 0x3C DIYables_OLED_SSD1309 display(SCREEN_WIDTH, SCREEN_HEIGHT, &Wire, OLED_RESET); void setup() { Serial.begin(115200); if (!display.begin(SSD1309_SWITCHCAPVCC, SCREEN_ADDRESS)) { Serial.println(F("SSD1309 allocation failed")); for (;;); } display.clearDisplay(); display.setTextSize(1); // 6x8 pixels per character display.setTextColor(SSD1309_PIXEL_ON); // turn pixels on display.setCursor(0, 0); display.println(F("Hello, World!")); display.println(); display.setTextSize(2); // 12x16 pixels per character display.println(F("DIYables")); display.setTextSize(1); display.println(); display.println(F("SSD1309 OLED 128x64")); display.display(); // push buffer to screen } void loop() { }

설명

  • 필요한 라이브러리를 포함하고 상수를 정의합니다.
  • I2C 주소 0x3C로 디스플레이 객체를 생성합니다.
  • Setup()에서 디스플레이를 초기화합니다.
  • 텍스트 크기, 색상, 커서 위치를 설정합니다.
  • Print()와 println()을 사용하여 디스플레이 버퍼에 텍스트를 출력합니다.
  • Display.display()를 호출하여 버퍼 내용을 화면에 표시합니다.

※ 주의:

F() 매크로는 문자열을 RAM 대신 플래시 메모리에 저장합니다. 이렇게 하면 ESP8266의 귀중한 RAM을 절약할 수 있습니다.

ESP8266 코드 - 다양한 형식으로 텍스트 표시

이 코드는 다양한 크기와 숫자 형식으로 텍스트 표시를 보여줍니다:

/* * 이 ESP8266 NodeMCU 코드는 newbiely.kr 에서 개발되었습니다 * 이 ESP8266 NodeMCU 코드는 어떠한 제한 없이 공개 사용을 위해 제공됩니다. * 상세한 지침 및 연결도에 대해서는 다음을 방문하세요: * https://newbiely.kr/tutorials/esp8266/esp8266-ssd1309-oled-display */ /* * DIYables OLED SSD1309 – Display Text * Displays text in various sizes and formats on the 2.42" SSD1309 OLED with ESP8266. */ #include <Wire.h> #include <Adafruit_GFX.h> #include <DIYables_OLED_SSD1309.h> #define SCREEN_WIDTH 128 #define SCREEN_HEIGHT 64 #define OLED_RESET -1 #define SCREEN_ADDRESS 0x3C DIYables_OLED_SSD1309 display(SCREEN_WIDTH, SCREEN_HEIGHT, &Wire, OLED_RESET); void setup() { Serial.begin(115200); if (!display.begin(SSD1309_SWITCHCAPVCC, SCREEN_ADDRESS)) { Serial.println(F("SSD1309 allocation failed")); for (;;); } display.clearDisplay(); // Various text sizes display.setTextSize(1); display.setTextColor(SSD1309_PIXEL_ON); display.setCursor(0, 0); display.println(F("Size 1 - DIYables")); display.setTextSize(2); display.println(F("Size 2")); display.setTextSize(3); display.println(F("Sz3")); display.display(); delay(3000); // Number formatting display.clearDisplay(); display.setTextSize(1); display.setCursor(0, 0); int value = 42; float pi = 3.14159; display.print(F("Integer: ")); display.println(value); display.print(F("Float: ")); display.println(pi, 2); // 2 decimal places display.print(F("Hex: 0x")); display.println(value, HEX); display.print(F("Binary: 0b")); display.println(value, BIN); display.display(); } void loop() { }

ESP8266 코드 - SSD1309 OLED에 도형 그리기

아래 코드는 픽셀, 선, 사각형, 원, 삼각형을 그리는 방법을 보여줍니다:

/* * 이 ESP8266 NodeMCU 코드는 newbiely.kr 에서 개발되었습니다 * 이 ESP8266 NodeMCU 코드는 어떠한 제한 없이 공개 사용을 위해 제공됩니다. * 상세한 지침 및 연결도에 대해서는 다음을 방문하세요: * https://newbiely.kr/tutorials/esp8266/esp8266-ssd1309-oled-display */ /* * DIYables OLED SSD1309 – Draw Shapes * Demonstrates drawing pixels, lines, rectangles, circles, and triangles on the 2.42" OLED with ESP8266. */ #include <Wire.h> #include <Adafruit_GFX.h> #include <DIYables_OLED_SSD1309.h> #define SCREEN_WIDTH 128 #define SCREEN_HEIGHT 64 #define OLED_RESET -1 #define SCREEN_ADDRESS 0x3C DIYables_OLED_SSD1309 display(SCREEN_WIDTH, SCREEN_HEIGHT, &Wire, OLED_RESET); void setup() { Serial.begin(115200); if (!display.begin(SSD1309_SWITCHCAPVCC, SCREEN_ADDRESS)) { Serial.println(F("SSD1309 allocation failed")); for (;;); } display.clearDisplay(); display.display(); } void loop() { // Draw pixels display.clearDisplay(); for (int i = 0; i < 20; i++) { display.drawPixel(random(SCREEN_WIDTH), random(SCREEN_HEIGHT), SSD1309_PIXEL_ON); } display.display(); delay(2000); // Draw lines display.clearDisplay(); for (int y = 0; y < SCREEN_HEIGHT; y += 8) { display.drawLine(0, 0, SCREEN_WIDTH - 1, y, SSD1309_PIXEL_ON); } display.display(); delay(2000); // Draw rectangles display.clearDisplay(); display.drawRect(10, 10, 40, 30, SSD1309_PIXEL_ON); // outline display.fillRect(60, 10, 40, 30, SSD1309_PIXEL_ON); // filled display.drawRoundRect(10, 45, 40, 15, 5, SSD1309_PIXEL_ON); // rounded corners display.display(); delay(2000); // Draw circles display.clearDisplay(); display.drawCircle(32, 32, 20, SSD1309_PIXEL_ON); // outline display.fillCircle(96, 32, 20, SSD1309_PIXEL_ON); // filled display.display(); delay(2000); // Draw triangles display.clearDisplay(); display.drawTriangle(20, 10, 10, 50, 30, 50, SSD1309_PIXEL_ON); // outline display.fillTriangle(90, 10, 70, 50, 110, 50, SSD1309_PIXEL_ON); // filled display.display(); delay(2000); }

사용 가능한 드로잉 함수:

  • drawPixel(x, y, color) - 단일 픽셀 그리기
  • drawLine(x0, y0, x1, y1, color) - 선 그리기
  • drawRect(x, y, w, h, color) - 사각형 외곽선 그리기
  • fillRect(x, y, w, h, color) - 채워진 사각형 그리기
  • drawRoundRect(x, y, w, h, radius, color) - 모서리가 둥근 사각형 그리기
  • drawCircle(x, y, radius, color) - 원 외곽선 그리기
  • fillCircle(x, y, radius, color) - 채워진 원 그리기
  • drawTriangle(x0, y0, x1, y1, x2, y2, color) - 삼각형 외곽선 그리기
  • fillTriangle(x0, y0, x1, y1, x2, y2, color) - 채워진 삼각형 그리기

ESP8266 코드 - SSD1309 OLED 하드웨어 스크롤

SSD1309는 하드웨어 기반 스크롤을 지원합니다. 이 코드는 네 가지 스크롤 방향을 모두 보여줍니다:

/* * 이 ESP8266 NodeMCU 코드는 newbiely.kr 에서 개발되었습니다 * 이 ESP8266 NodeMCU 코드는 어떠한 제한 없이 공개 사용을 위해 제공됩니다. * 상세한 지침 및 연결도에 대해서는 다음을 방문하세요: * https://newbiely.kr/tutorials/esp8266/esp8266-ssd1309-oled-display */ /* * DIYables OLED SSD1309 – Scroll Text * Demonstrates all four hardware scroll directions on the 2.42" OLED with ESP8266. */ #include <Wire.h> #include <Adafruit_GFX.h> #include <DIYables_OLED_SSD1309.h> #define SCREEN_WIDTH 128 #define SCREEN_HEIGHT 64 #define OLED_RESET -1 #define SCREEN_ADDRESS 0x3C DIYables_OLED_SSD1309 display(SCREEN_WIDTH, SCREEN_HEIGHT, &Wire, OLED_RESET); void setup() { Serial.begin(115200); if (!display.begin(SSD1309_SWITCHCAPVCC, SCREEN_ADDRESS)) { Serial.println(F("SSD1309 allocation failed")); for (;;); } display.clearDisplay(); display.setTextSize(2); display.setTextColor(SSD1309_PIXEL_ON); display.setCursor(10, 24); display.println(F("DIYables")); display.display(); delay(2000); } void loop() { // Scroll right across all pages display.startscrollright(0x00, 0x07); delay(3000); display.stopscroll(); delay(500); // Scroll left display.startscrollleft(0x00, 0x07); delay(3000); display.stopscroll(); delay(500); // Diagonal scroll right display.startscrolldiagright(0x00, 0x07); delay(3000); display.stopscroll(); delay(500); // Diagonal scroll left display.startscrolldiagleft(0x00, 0x07); delay(3000); display.stopscroll(); delay(500); }

스크롤 함수:

  • startscrollright(start, stop) - 오른쪽으로 스크롤
  • startscrollleft(start, stop) - 왼쪽으로 스크롤
  • startscrolldiagright(start, stop) - 오른쪽 대각선 스크롤
  • startscrolldiagleft(start, stop) - 왼쪽 대각선 스크롤
  • stopscroll() - 스크롤 중지

start와 stop 매개변수는 페이지 범위를 정의합니다(전체 화면에는 0x00~0x07).

ESP8266 코드 - SSD1309 OLED에 비트맵 이미지 표시

이 코드는 프로그램 메모리에 저장된 비트맵 이미지를 표시하는 방법을 보여줍니다:

/* * 이 ESP8266 NodeMCU 코드는 newbiely.kr 에서 개발되었습니다 * 이 ESP8266 NodeMCU 코드는 어떠한 제한 없이 공개 사용을 위해 제공됩니다. * 상세한 지침 및 연결도에 대해서는 다음을 방문하세요: * https://newbiely.kr/tutorials/esp8266/esp8266-ssd1309-oled-display */ /* * DIYables OLED SSD1309 – Display Bitmap Image * Shows a 16x16 heart icon and 128x64 DIYables logo on the 2.42" OLED with ESP8266. */ #include <Wire.h> #include <Adafruit_GFX.h> #include <DIYables_OLED_SSD1309.h> #define SCREEN_WIDTH 128 #define SCREEN_HEIGHT 64 #define OLED_RESET -1 #define SCREEN_ADDRESS 0x3C DIYables_OLED_SSD1309 display(SCREEN_WIDTH, SCREEN_HEIGHT, &Wire, OLED_RESET); // 16x16 heart icon bitmap const unsigned char heart_icon[] PROGMEM = { 0x00, 0x00, 0x0c, 0x30, 0x1e, 0x78, 0x3f, 0xfc, 0x7f, 0xfe, 0xff, 0xff, 0xff, 0xff, 0xff, 0xff, 0xff, 0xff, 0xff, 0xff, 0x7f, 0xfe, 0x3f, 0xfc, 0x1f, 0xf8, 0x0f, 0xf0, 0x03, 0xc0, 0x00, 0x00 }; // 128x64 DIYables logo bitmap const unsigned char diyables_logo[] PROGMEM = { 0xff, 0xff, 0xff, 0xff, 0xff, 0xff, 0xff, 0xff, 0xff, 0xff, 0xff, 0xff, 0xff, 0xff, 0xff, 0xff, 0xff, 0xff, 0xff, 0xff, 0xff, 0xff, 0xff, 0xff, 0xff, 0xff, 0xff, 0xff, 0xff, 0xff, 0xff, 0xff, 0xff, 0xff, 0xff, 0xff, 0xff, 0xff, 0xff, 0xff, 0xff, 0xff, 0xff, 0xff, 0xff, 0xff, 0xff, 0xff, 0xff, 0xff, 0xff, 0xff, 0xff, 0xff, 0xff, 0xff, 0xff, 0xff, 0xff, 0xff, 0xff, 0xff, 0xff, 0xff, 0xff, 0xff, 0xff, 0xff, 0xff, 0xff, 0xff, 0xff, 0xff, 0xff, 0xff, 0xff, 0xff, 0xff, 0xff, 0xff, 0xff, 0xff, 0xff, 0xff, 0xff, 0xff, 0xff, 0xff, 0xff, 0xff, 0xff, 0xff, 0xff, 0xff, 0xff, 0xff, 0xff, 0xff, 0xff, 0xff, 0xff, 0xff, 0xff, 0xff, 0xff, 0xff, 0xff, 0xff, 0xff, 0xff, 0xff, 0xff, 0xff, 0xff, 0xff, 0xff, 0xff, 0xff, 0xff, 0xff, 0xff, 0xff, 0xff, 0xff, 0xff, 0xff, 0xff, 0xff, 0xff, 0xff, 0xff, 0xff, 0xff, 0xff, 0xff, 0xff, 0xff, 0xff, 0xff, 0xff, 0xff, 0xff, 0xff, 0xff, 0xff, 0xff, 0xff, 0xff, 0xff, 0xff, 0xff, 0xff, 0xff, 0xff, 0xff, 0xff, 0xff, 0xff, 0xff, 0xff, 0xff, 0xff, 0xff, 0xff, 0xff, 0xff, 0xff, 0xff, 0xff, 0xff, 0xff, 0xff, 0xff, 0xff, 0xff, 0xff, 0xff, 0xff, 0xff, 0xff, 0xff, 0xff, 0xff, 0xff, 0xff, 0xff, 0xff, 0xff, 0xff, 0xff, 0xff, 0xff, 0xff, 0xff, 0xff, 0xff, 0xff, 0xff, 0xff, 0xff, 0xff, 0xff, 0xff, 0xff, 0xff, 0xff, 0xff, 0xff, 0xff, 0xff, 0xff, 0xff, 0xff, 0xff, 0xff, 0xff, 0xff, 0xff, 0xff, 0xff, 0xff, 0xff, 0xff, 0xff, 0xff, 0xff, 0xff, 0xff, 0xff, 0xff, 0xff, 0xff, 0xff, 0xff, 0xff, 0xff, 0xff, 0xff, 0xff, 0xff, 0xff, 0xff, 0xff, 0xff, 0xff, 0xff, 0xff, 0xff, 0xff, 0xff, 0xff, 0xff, 0xff, 0xff, 0xff, 0xff, 0xff, 0xff, 0xff, 0xf0, 0x00, 0x00, 0x00, 0x00, 0x00, 0x00, 0x00, 0x00, 0x00, 0x00, 0x0f, 0xff, 0xff, 0xff, 0xff, 0x80, 0x00, 0x00, 0x00, 0x00, 0x00, 0x00, 0x00, 0x00, 0x00, 0x00, 0x01, 0xff, 0xff, 0xff, 0xff, 0x00, 0x00, 0x00, 0x00, 0x00, 0x00, 0x00, 0x00, 0x00, 0x00, 0x00, 0x00, 0xff, 0xff, 0xff, 0xfe, 0x00, 0x07, 0xff, 0xc1, 0xff, 0xe0, 0x7f, 0xf0, 0x1f, 0xfc, 0x03, 0x00, 0x7f, 0xff, 0xff, 0xfc, 0x00, 0x1f, 0xff, 0xf7, 0xff, 0xf9, 0xff, 0xfc, 0x7f, 0xff, 0x0f, 0x80, 0x3f, 0xff, 0xff, 0xf8, 0x00, 0x3f, 0xff, 0xff, 0xff, 0xfd, 0xff, 0xfe, 0xff, 0xff, 0x9f, 0xc0, 0x1f, 0xff, 0xff, 0xf8, 0x00, 0x7f, 0x80, 0xff, 0x00, 0x7f, 0xc0, 0x3f, 0xf0, 0x0f, 0xfc, 0x00, 0x1f, 0xff, 0xff, 0xf0, 0x00, 0xfe, 0x00, 0x7f, 0x00, 0x3f, 0x80, 0x1f, 0xe0, 0x07, 0xf8, 0x00, 0x0f, 0xff, 0xff, 0xe0, 0x01, 0xfc, 0x00, 0x3e, 0x00, 0x1f, 0x00, 0x0f, 0xc0, 0x03, 0xf0, 0x00, 0x0f, 0xff, 0xff, 0xe0, 0x03, 0xf8, 0x00, 0x3e, 0x00, 0x1f, 0x00, 0x0f, 0xc0, 0x03, 0xf0, 0x00, 0x07, 0xff, 0xff, 0xc0, 0x07, 0xf8, 0x00, 0x3e, 0x00, 0x1f, 0x00, 0x0f, 0xc0, 0x03, 0xf0, 0x00, 0x03, 0xff, 0xff, 0xc0, 0x0f, 0xf8, 0x00, 0x3e, 0x00, 0x1f, 0x00, 0x0f, 0xc0, 0x03, 0xf0, 0x00, 0x03, 0xff, 0xff, 0x80, 0x0f, 0xf8, 0x00, 0x3e, 0x00, 0x1f, 0x00, 0x0f, 0xc0, 0x03, 0xf0, 0x00, 0x01, 0xff, 0xff, 0x80, 0x1f, 0xf8, 0x00, 0x3e, 0x00, 0x1f, 0x00, 0x0f, 0xc0, 0x03, 0xf0, 0x00, 0x01, 0xff, 0xff, 0x00, 0x3f, 0xf8, 0x00, 0x3e, 0x00, 0x1f, 0x00, 0x0f, 0xc0, 0x03, 0xf0, 0x00, 0x00, 0xff, 0xff, 0x00, 0x3f, 0xf8, 0x00, 0x3e, 0x00, 0x1f, 0x00, 0x0f, 0xc0, 0x03, 0xf0, 0x00, 0x00, 0xff, 0xfe, 0x00, 0x7f, 0xf8, 0x00, 0x3e, 0x00, 0x1f, 0x00, 0x0f, 0xc0, 0x03, 0xf0, 0x00, 0x00, 0xff, 0xfe, 0x00, 0x7f, 0xf8, 0x00, 0x3e, 0x00, 0x1f, 0x00, 0x0f, 0xc0, 0x03, 0xf0, 0x00, 0x00, 0xff, 0xfc, 0x00, 0xff, 0xf8, 0x00, 0x3e, 0x00, 0x1f, 0x00, 0x0f, 0xc0, 0x03, 0xf0, 0x00, 0x00, 0xff, 0xfc, 0x00, 0xff, 0xf8, 0x00, 0x3e, 0x00, 0x1f, 0x00, 0x0f, 0xc0, 0x03, 0xf0, 0x00, 0x00, 0xff, 0xfc, 0x01, 0xff, 0xf8, 0x00, 0x3e, 0x00, 0x1f, 0x00, 0x0f, 0xc0, 0x03, 0xf0, 0x00, 0x00, 0xff, 0xf8, 0x01, 0xff, 0xf8, 0x00, 0x3e, 0x00, 0x1f, 0x00, 0x0f, 0xc0, 0x03, 0xf0, 0x00, 0x00, 0xff, 0xf8, 0x03, 0xff, 0xf8, 0x00, 0x3e, 0x00, 0x1f, 0x00, 0x0f, 0xc0, 0x03, 0xf0, 0x00, 0x00, 0xff, 0xf0, 0x03, 0xff, 0xfc, 0x00, 0x7e, 0x00, 0x1f, 0x80, 0x1f, 0xe0, 0x07, 0xf8, 0x00, 0x00, 0xff, 0xf0, 0x07, 0xff, 0x7f, 0x80, 0xff, 0x00, 0x7f, 0xc0, 0x3f, 0xf0, 0x0f, 0xfc, 0x00, 0x00, 0xff, 0xf0, 0x07, 0xfe, 0x3f, 0xff, 0xff, 0xff, 0xfd, 0xff, 0xfe, 0xff, 0xff, 0x9f, 0xc0, 0x00, 0xff, 0xe0, 0x0f, 0xfc, 0x1f, 0xff, 0xf7, 0xff, 0xf9, 0xff, 0xfc, 0x7f, 0xff, 0x0f, 0x80, 0x00, 0xff, 0xe0, 0x0f, 0xf8, 0x07, 0xff, 0xc1, 0xff, 0xe0, 0x7f, 0xf0, 0x1f, 0xfc, 0x03, 0x00, 0x00, 0xff, 0xe0, 0x1f, 0xf0, 0x00, 0x00, 0x00, 0x00, 0x00, 0x00, 0x00, 0x00, 0x00, 0x00, 0x00, 0x00, 0xff, 0xc0, 0x1f, 0xe0, 0x00, 0x00, 0x00, 0x00, 0x00, 0x00, 0x00, 0x00, 0x00, 0x00, 0x00, 0x00, 0xff, 0xc0, 0x3f, 0xc0, 0x00, 0x00, 0x00, 0x00, 0x00, 0x00, 0x00, 0x00, 0x00, 0x00, 0x00, 0x00, 0xff, 0xc0, 0x3f, 0x80, 0x00, 0x00, 0x00, 0x00, 0x00, 0x00, 0x00, 0x00, 0x00, 0x00, 0x00, 0x00, 0xff, 0x80, 0x7f, 0x00, 0xff, 0xff, 0xff, 0xff, 0xff, 0xff, 0xff, 0xff, 0xff, 0xff, 0xff, 0xff, 0xff, 0x80, 0x7f, 0x00, 0xff, 0xff, 0xff, 0xff, 0xff, 0xff, 0xff, 0xff, 0xff, 0xff, 0xff, 0xff, 0xff, 0x80, 0xfe, 0x00, 0xff, 0xff, 0xff, 0xff, 0xff, 0xff, 0xff, 0xff, 0xff, 0xff, 0xff, 0xff, 0xff, 0x00, 0xfc, 0x00, 0xff, 0xff, 0xff, 0xff, 0xff, 0xff, 0xff, 0xff, 0xff, 0xff, 0xff, 0xff, 0xff, 0x01, 0xf8, 0x00, 0xff, 0xff, 0xff, 0xff, 0xff, 0xff, 0xff, 0xff, 0xff, 0xff, 0xff, 0xff, 0xff, 0x01, 0xf0, 0x00, 0xff, 0xff, 0xff, 0xff, 0xff, 0xff, 0xff, 0xff, 0xff, 0xff, 0xff, 0xff, 0xfe, 0x03, 0xe0, 0x00, 0xff, 0xff, 0xff, 0xff, 0xff, 0xff, 0xff, 0xff, 0xff, 0xff, 0xff, 0xff, 0xfe, 0x07, 0xc0, 0x00, 0xff, 0xff, 0xff, 0xff, 0xff, 0xff, 0xff, 0xff, 0xff, 0xff, 0xff, 0xff, 0xfc, 0x0f, 0x80, 0x00, 0xff, 0xff, 0xff, 0xff, 0xff, 0xff, 0xff, 0xff, 0xff, 0xff, 0xff, 0xff, 0xf8, 0x1f, 0x00, 0x00, 0xff, 0xff, 0xff, 0xff, 0xff, 0xff, 0xff, 0xff, 0xff, 0xff, 0xff, 0xff, 0xf0, 0x3e, 0x00, 0x00, 0xff, 0xff, 0xff, 0xff, 0xff, 0xff, 0xff, 0xff, 0xff, 0xff, 0xff, 0xff, 0xe0, 0x7c, 0x00, 0x00, 0xff, 0xff, 0xff, 0xff, 0xff, 0xff, 0xff, 0xff, 0xff, 0xff, 0xff, 0xff, 0xc0, 0xf8, 0x00, 0x00, 0xff, 0xff, 0xff, 0xff, 0xff, 0xff, 0xff, 0xff, 0xff, 0xff, 0xff, 0xff, 0x81, 0xf0, 0x00, 0x00, 0xff, 0xff, 0xff, 0xff, 0xff, 0xff, 0xff, 0xff, 0xff, 0xff, 0xff, 0xff, 0x03, 0xe0, 0x00, 0x00, 0xff, 0xff, 0xff, 0xff, 0xff, 0xff, 0xff, 0xff, 0xff, 0xff, 0xff, 0xff }; void setup() { Serial.begin(115200); if (!display.begin(SSD1309_SWITCHCAPVCC, SCREEN_ADDRESS)) { Serial.println(F("SSD1309 allocation failed")); for (;;); } display.clearDisplay(); display.display(); } void loop() { // Display small heart icon centered display.clearDisplay(); display.drawBitmap((SCREEN_WIDTH - 16) / 2, (SCREEN_HEIGHT - 16) / 2, heart_icon, 16, 16, SSD1309_PIXEL_ON); display.display(); delay(3000); // Display full-screen DIYables logo display.clearDisplay(); display.drawBitmap(0, 0, diyables_logo, SCREEN_WIDTH, SCREEN_HEIGHT, SSD1309_PIXEL_ON); display.display(); delay(3000); // Invert display display.invertDisplay(true); delay(2000); display.invertDisplay(false); delay(1000); }

이미지를 표시하려면:

  • 이미지를 단색 비트맵 배열로 변환합니다(온라인 도구 또는 image2cpp 사용).
  • RAM 절약을 위해 배열을 PROGMEM에 저장합니다.
  • drawBitmap(x, y, bitmap, width, height, color)를 사용하여 표시합니다.

ESP8266 코드 - 밝기/대비 조절

SSD1309 OLED 디스플레이의 밝기와 대비를 조절합니다:

/* * 이 ESP8266 NodeMCU 코드는 newbiely.kr 에서 개발되었습니다 * 이 ESP8266 NodeMCU 코드는 어떠한 제한 없이 공개 사용을 위해 제공됩니다. * 상세한 지침 및 연결도에 대해서는 다음을 방문하세요: * https://newbiely.kr/tutorials/esp8266/esp8266-ssd1309-oled-display */ /* * DIYables OLED SSD1309 – Contrast & Dim * Sweeps contrast from 0→255→0 then toggles dim mode on the 2.42" OLED with ESP8266. */ #include <Wire.h> #include <Adafruit_GFX.h> #include <DIYables_OLED_SSD1309.h> #define SCREEN_WIDTH 128 #define SCREEN_HEIGHT 64 #define OLED_RESET -1 #define SCREEN_ADDRESS 0x3C DIYables_OLED_SSD1309 display(SCREEN_WIDTH, SCREEN_HEIGHT, &Wire, OLED_RESET); void setup() { Serial.begin(115200); if (!display.begin(SSD1309_SWITCHCAPVCC, SCREEN_ADDRESS)) { Serial.println(F("SSD1309 allocation failed")); for (;;); } // Draw a test pattern so the contrast changes are visible display.clearDisplay(); display.fillRect(0, 0, 64, 32, SSD1309_PIXEL_ON); display.fillRect(64, 32, 64, 32, SSD1309_PIXEL_ON); display.setTextSize(1); display.setTextColor(SSD1309_PIXEL_INVERSE); display.setCursor(16, 28); display.println(F("Contrast Demo")); display.display(); delay(2000); } void loop() { // Ramp up for (int c = 0; c <= 255; c += 5) { display.setContrast((uint8_t)c); delay(30); } delay(1000); // Ramp down for (int c = 255; c >= 0; c -= 5) { display.setContrast((uint8_t)c); delay(30); } delay(1000); // Quick dim toggle display.dim(true); // minimum brightness delay(2000); display.dim(false); // restore delay(2000); }

밝기 조절 함수:

  • setContrast(value) - 대비 수준 설정(0-255, 높을수록 밝음)
  • dim(true/false) - 어두운 상태와 일반 밝기 사이를 빠르게 전환
  • invertDisplay(true/false) - 모든 픽셀 반전(흑↔백)

ESP8266 코드 - 외부 폰트 사용

Adafruit_GFX 라이브러리에는 FreeFont 서체가 포함되어 있습니다. 이 코드는 세 가지 다른 폰트를 보여줍니다:

/* * 이 ESP8266 NodeMCU 코드는 newbiely.kr 에서 개발되었습니다 * 이 ESP8266 NodeMCU 코드는 어떠한 제한 없이 공개 사용을 위해 제공됩니다. * 상세한 지침 및 연결도에 대해서는 다음을 방문하세요: * https://newbiely.kr/tutorials/esp8266/esp8266-ssd1309-oled-display */ /* * DIYables OLED SSD1309 – External Fonts * Cycles through three FreeFont typefaces on the 2.42" SSD1309 OLED with ESP8266. */ #include <Wire.h> #include <Adafruit_GFX.h> #include <DIYables_OLED_SSD1309.h> #include <Fonts/FreeSerif9pt7b.h> #include <Fonts/FreeSansBold12pt7b.h> #include <Fonts/FreeMono9pt7b.h> #define SCREEN_WIDTH 128 #define SCREEN_HEIGHT 64 #define OLED_RESET -1 #define SCREEN_ADDRESS 0x3C DIYables_OLED_SSD1309 display(SCREEN_WIDTH, SCREEN_HEIGHT, &Wire, OLED_RESET); void setup() { Serial.begin(115200); if (!display.begin(SSD1309_SWITCHCAPVCC, SCREEN_ADDRESS)) { Serial.println(F("SSD1309 allocation failed")); for (;;); } display.clearDisplay(); display.display(); } void loop() { // ── Built-in 5×7 font ── display.clearDisplay(); display.setFont(NULL); display.setTextSize(1); display.setTextColor(SSD1309_PIXEL_ON); display.setCursor(0, 0); display.println(F("Built-in 5x7 font")); display.println(); display.setTextSize(2); display.println(F("DIYables")); display.display(); delay(3000); // ── FreeSerif 9pt ── display.clearDisplay(); display.setFont(&FreeSerif9pt7b); display.setTextSize(1); display.setTextColor(SSD1309_PIXEL_ON); display.setCursor(0, 14); // Y = baseline display.println(F("FreeSerif 9pt")); display.setCursor(0, 38); display.println(F("DIYables OLED")); display.setCursor(0, 58); display.println(F("Hello World!")); display.display(); delay(3000); // ── FreeSansBold 12pt ── display.clearDisplay(); display.setFont(&FreeSansBold12pt7b); display.setTextSize(1); display.setTextColor(SSD1309_PIXEL_ON); display.setCursor(0, 20); display.println(F("SansBold")); display.setCursor(0, 52); display.println(F("DIYables")); display.display(); delay(3000); // ── FreeMono 9pt ── display.clearDisplay(); display.setFont(&FreeMono9pt7b); display.setTextSize(1); display.setTextColor(SSD1309_PIXEL_ON); display.setCursor(0, 14); display.println(F("FreeMono 9pt")); display.setCursor(0, 34); display.println(F("0123456789")); display.setCursor(0, 54); display.println(F("!@#$%^&*()")); display.display(); delay(3000); }

※ 주의:

FreeFont 파일은 큽니다. ESP8266은 제한된 플래시 메모리(일반적으로 4MB)를 가지고 있습니다. 필요한 폰트만 사용하거나, 메모리가 제한된 경우 더 작은 폰트 크기를 사용하는 것을 고려하세요.

폰트 사용법:

  • 폰트 헤더 포함: #include <Fonts/FreeSans9pt7b.h>
  • 폰트 설정: display.setFont(&FreeSans9pt7b)
  • 기본값으로 재설정: display.setFont(NULL)
  • 외부 폰트 사용 시, Y 좌표는 상단이 아닌 기준선을 나타냅니다.

동영상

비디오 제작은 시간이 많이 걸리는 작업입니다. 비디오 튜토리얼이 학습에 도움이 되었다면, YouTube 채널 을 구독하여 알려 주시기 바랍니다. 비디오에 대한 높은 수요가 있다면, 비디오를 만들기 위해 노력하겠습니다.