아두이노 나노 ESP32 블루투스 아날로그 게이지 예제 BLE를 통한 게이지 표시 튜토리얼
개요
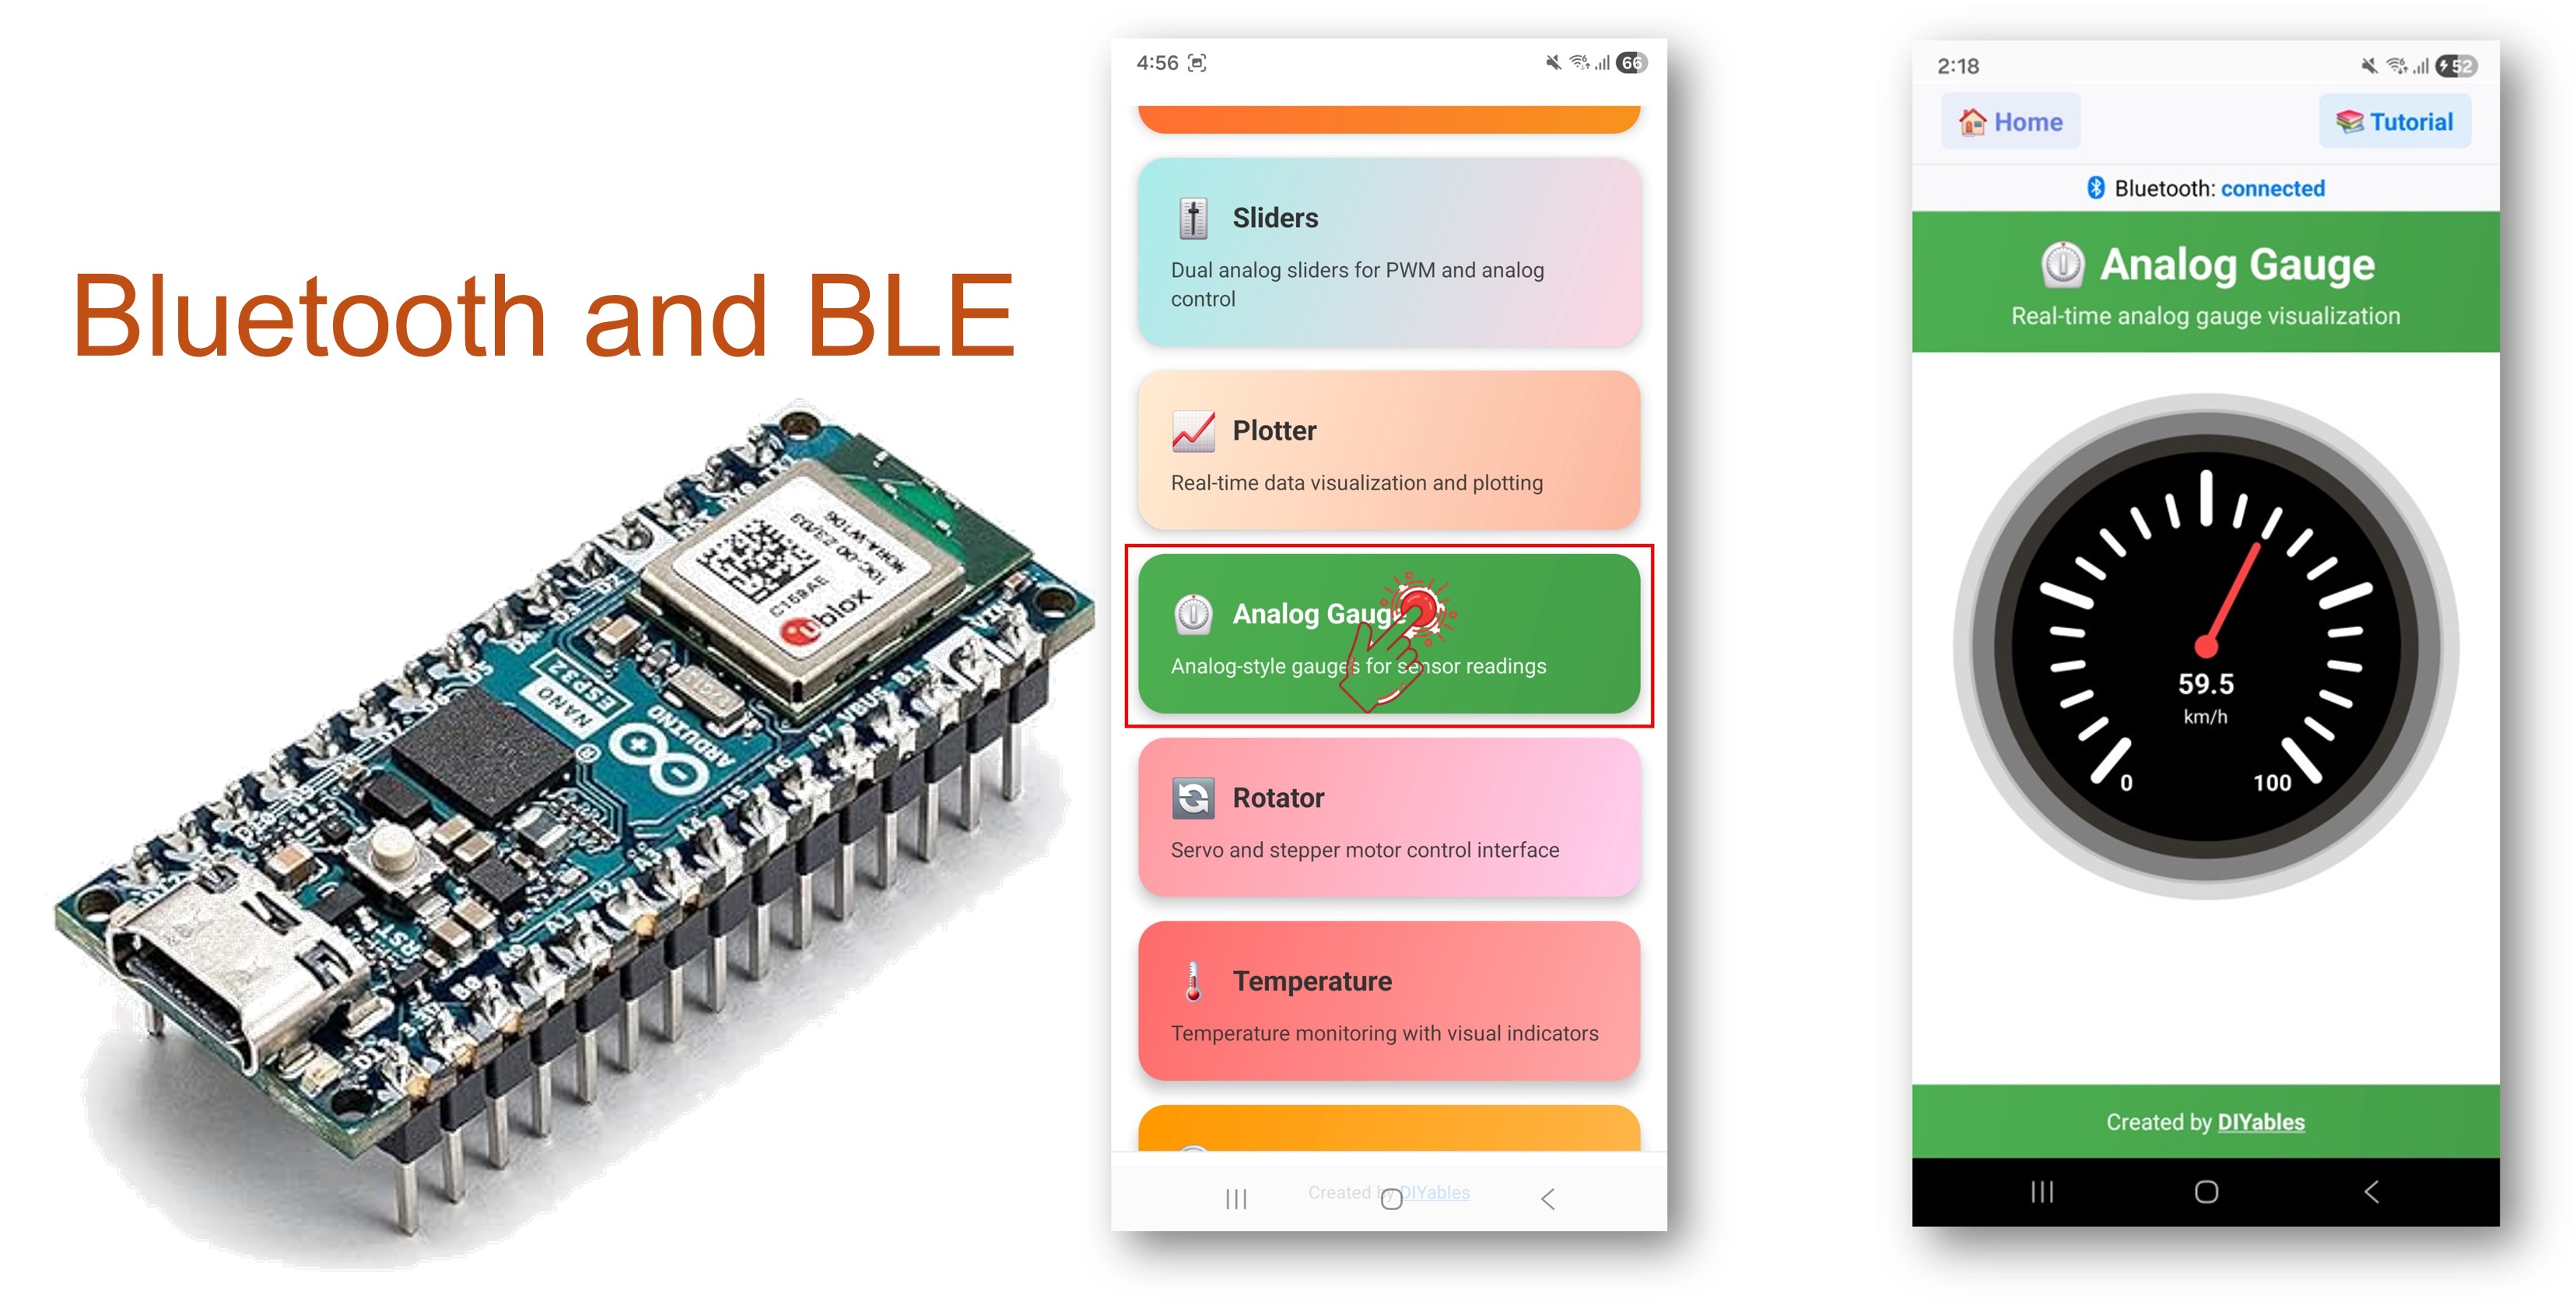
이 예제는 DIYables Bluetooth STEM 앱을 통한 BLE(블루투스 로우 에너지)를 사용하여 Arduino Nano ESP32에 아날로그 스타일 게이지 표시를 구현합니다. 스마트폰에서 설정 가능한 범위와 단위로 다이얼 스타일 게이지에 모든 값을 표시하세요. 속도계, 압력 게이지, RPM 표시, 유사한 애플리케이션에 적합합니다.
참고: Arduino Nano ESP32는 BLE만 지원하며 클래식 블루투스는 지원하지 않습니다. DIYables 블루투스 앱은 BLE를 통해 Android와 iOS 모두에서 작동합니다.
기능
- 아날로그 게이지 표시: 스마트폰에 다이얼 스타일 게이지
- 설정 가능한 범위: 최솟값 및 최댓값 설정
- 커스텀 단위: km/h, RPM, PSI 또는 원하는 단위 표시
- 빠른 업데이트: 초당 최대 5회 업데이트 (200ms 간격)
- 요청 시 응답: 앱이 언제든지 현재 값을 요청할 수 있음
- Android 및 iOS 지원: BLE는 두 플랫폼 모두 호환
- 페어링 불필요: BLE는 수동 페어링 없이 연결
필요한 하드웨어
| 1 | × | 아두이노 나노 ESP32 | 쿠팡 | 아마존 | |
| 1 | × | USB 케이블 타입-A to 타입-C (USB-A PC용) | 쿠팡 | 아마존 | |
| 1 | × | USB 케이블 타입-C to 타입-C (USB-C PC용) | 아마존 | |
| 1 | × | (추천) 아두이노 나노용 스크루 터미널 확장 보드 | 쿠팡 | 아마존 | |
| 1 | × | (추천) 아두이노 나노용 브레이크아웃 확장 보드 | 쿠팡 | 아마존 | |
| 1 | × | (추천) 아두이노 나노 ESP32용 전원 분배기 | 쿠팡 | 아마존 |
공개: 이 포스팅 에 제공된 일부 링크는 아마존 제휴 링크입니다. 이 포스팅은 쿠팡 파트너스 활동의 일환으로, 이에 따른 일정액의 수수료를 제공받습니다.
Arduino Nano ESP32 코드
빠른 시작
- Arduino Nano ESP32가 처음이신가요? 아두이노 나노 ESP32 - 소프트웨어 설치를 참조하세요.
- USB로 Arduino Nano ESP32를 컴퓨터에 연결하세요.
- Arduino IDE를 열어주세요.
- Arduino Nano ESP32 보드와 올바른 COM 포트를 선택하세요.
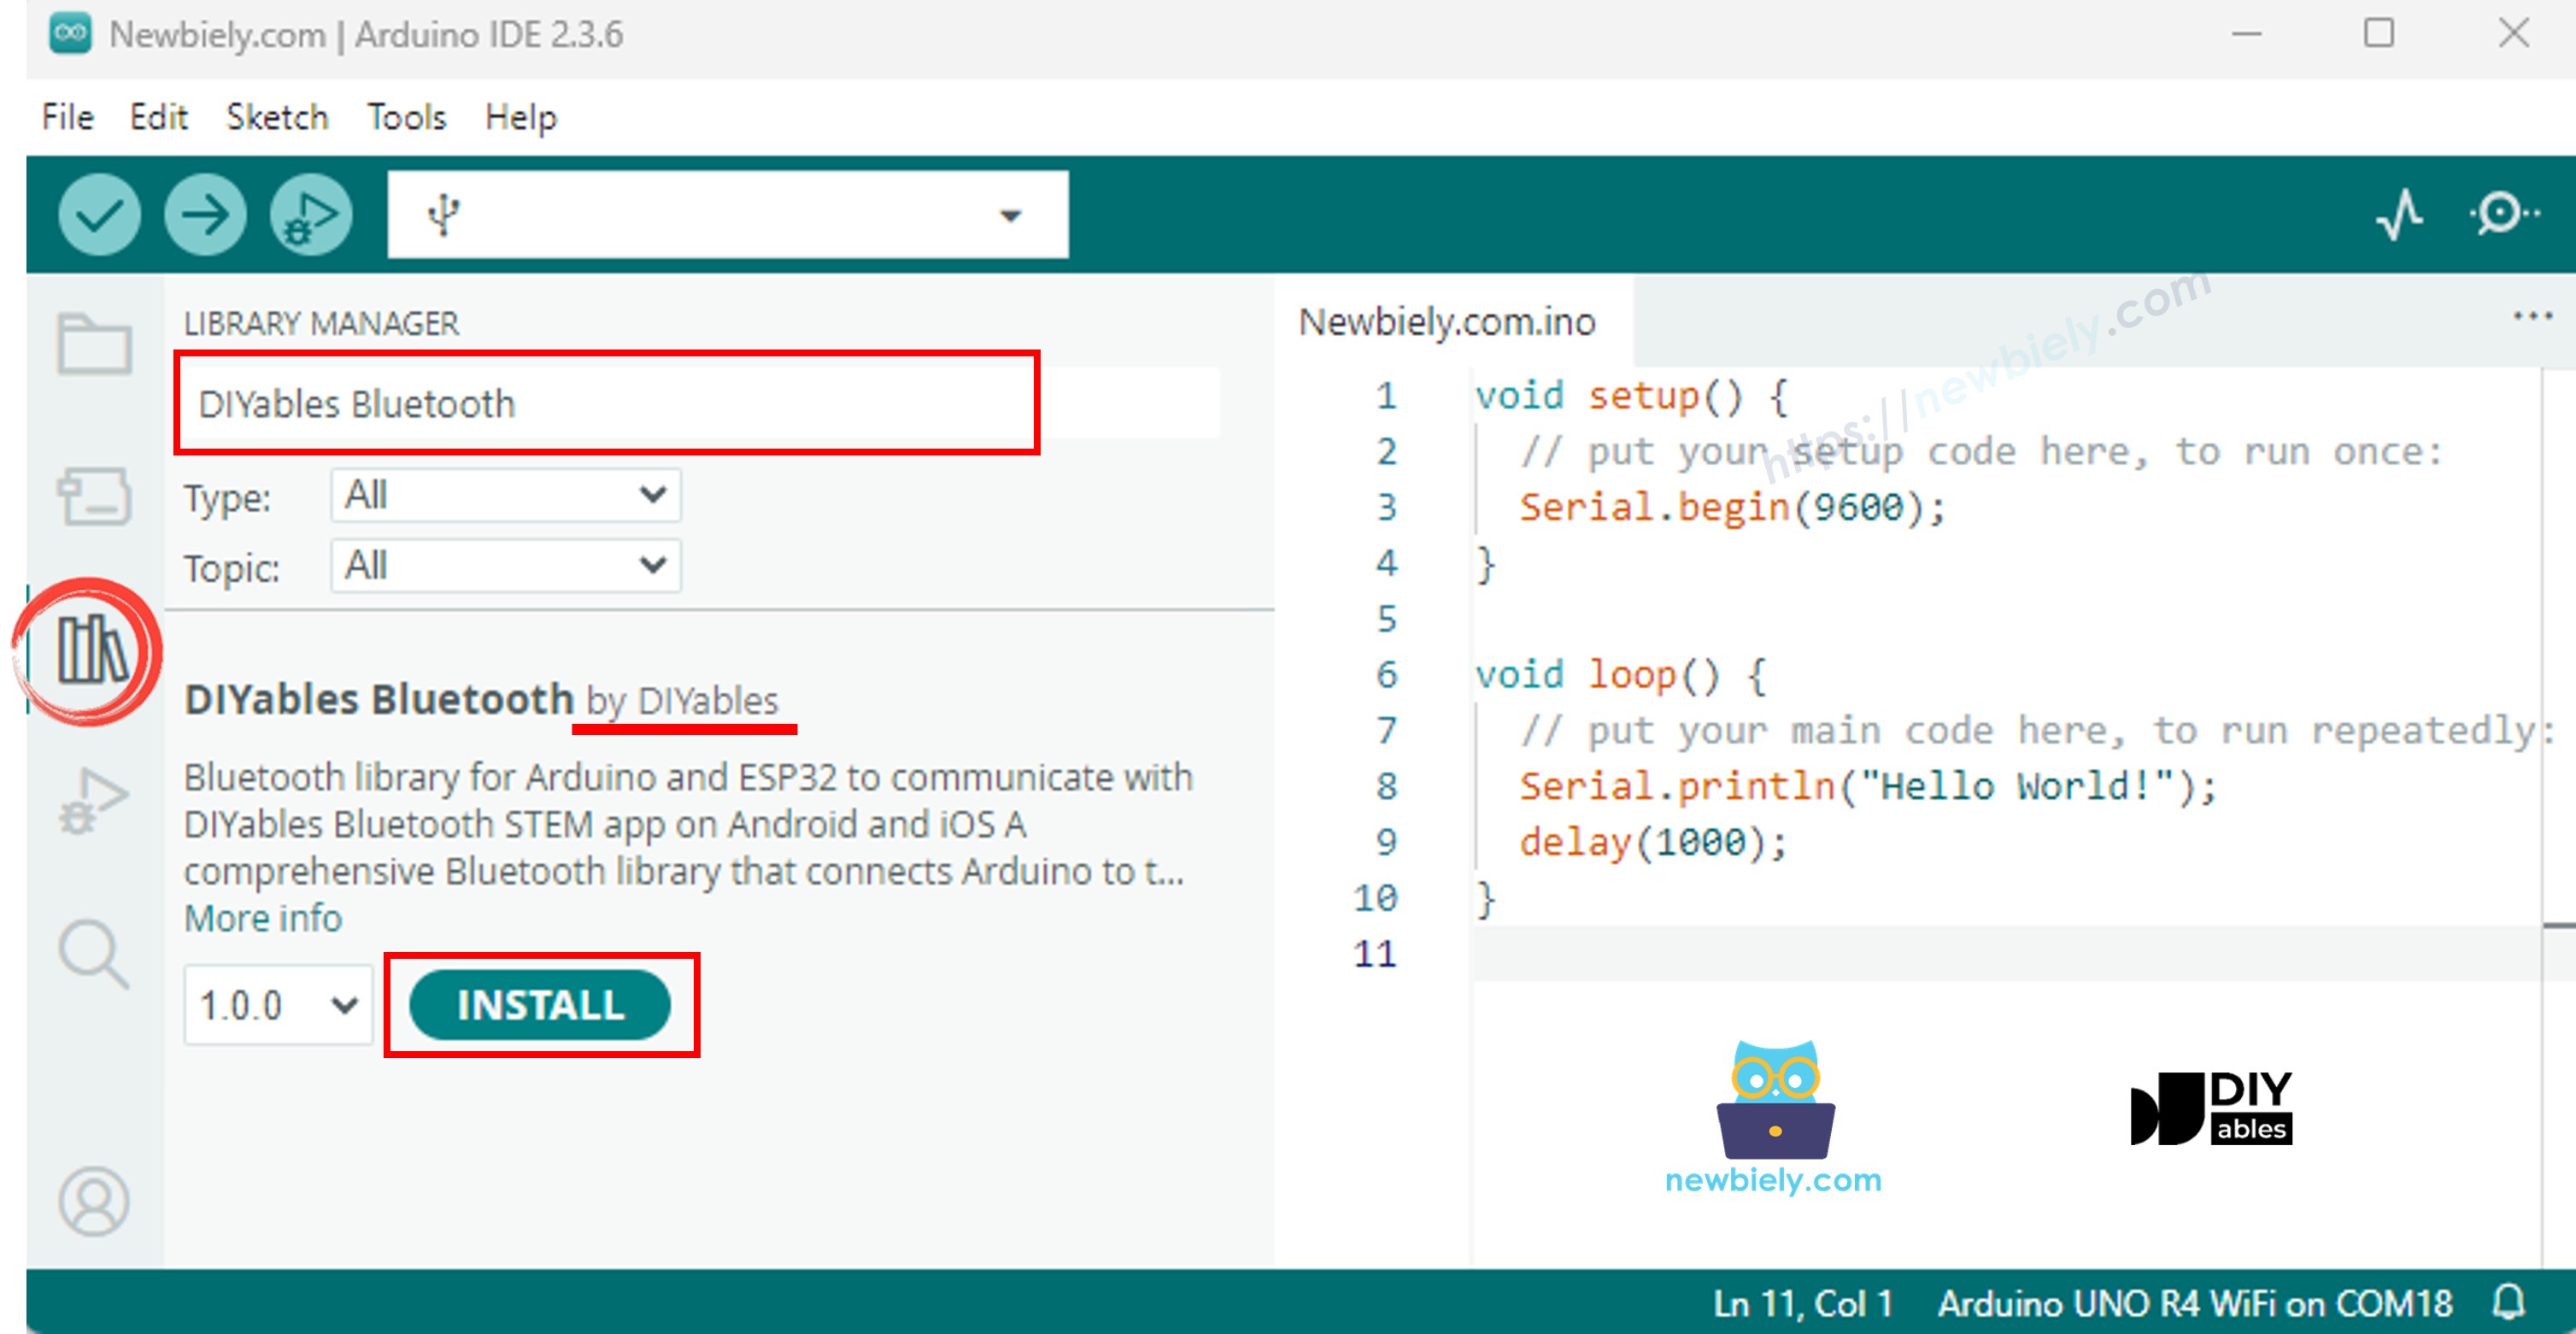
- 왼쪽 사이드바에서 라이브러리 아이콘을 클릭하세요.
- "DIYables Bluetooth"를 검색하고 DIYables의 DIYables Bluetooth 라이브러리를 선택하세요.
- 설치를 클릭하세요.
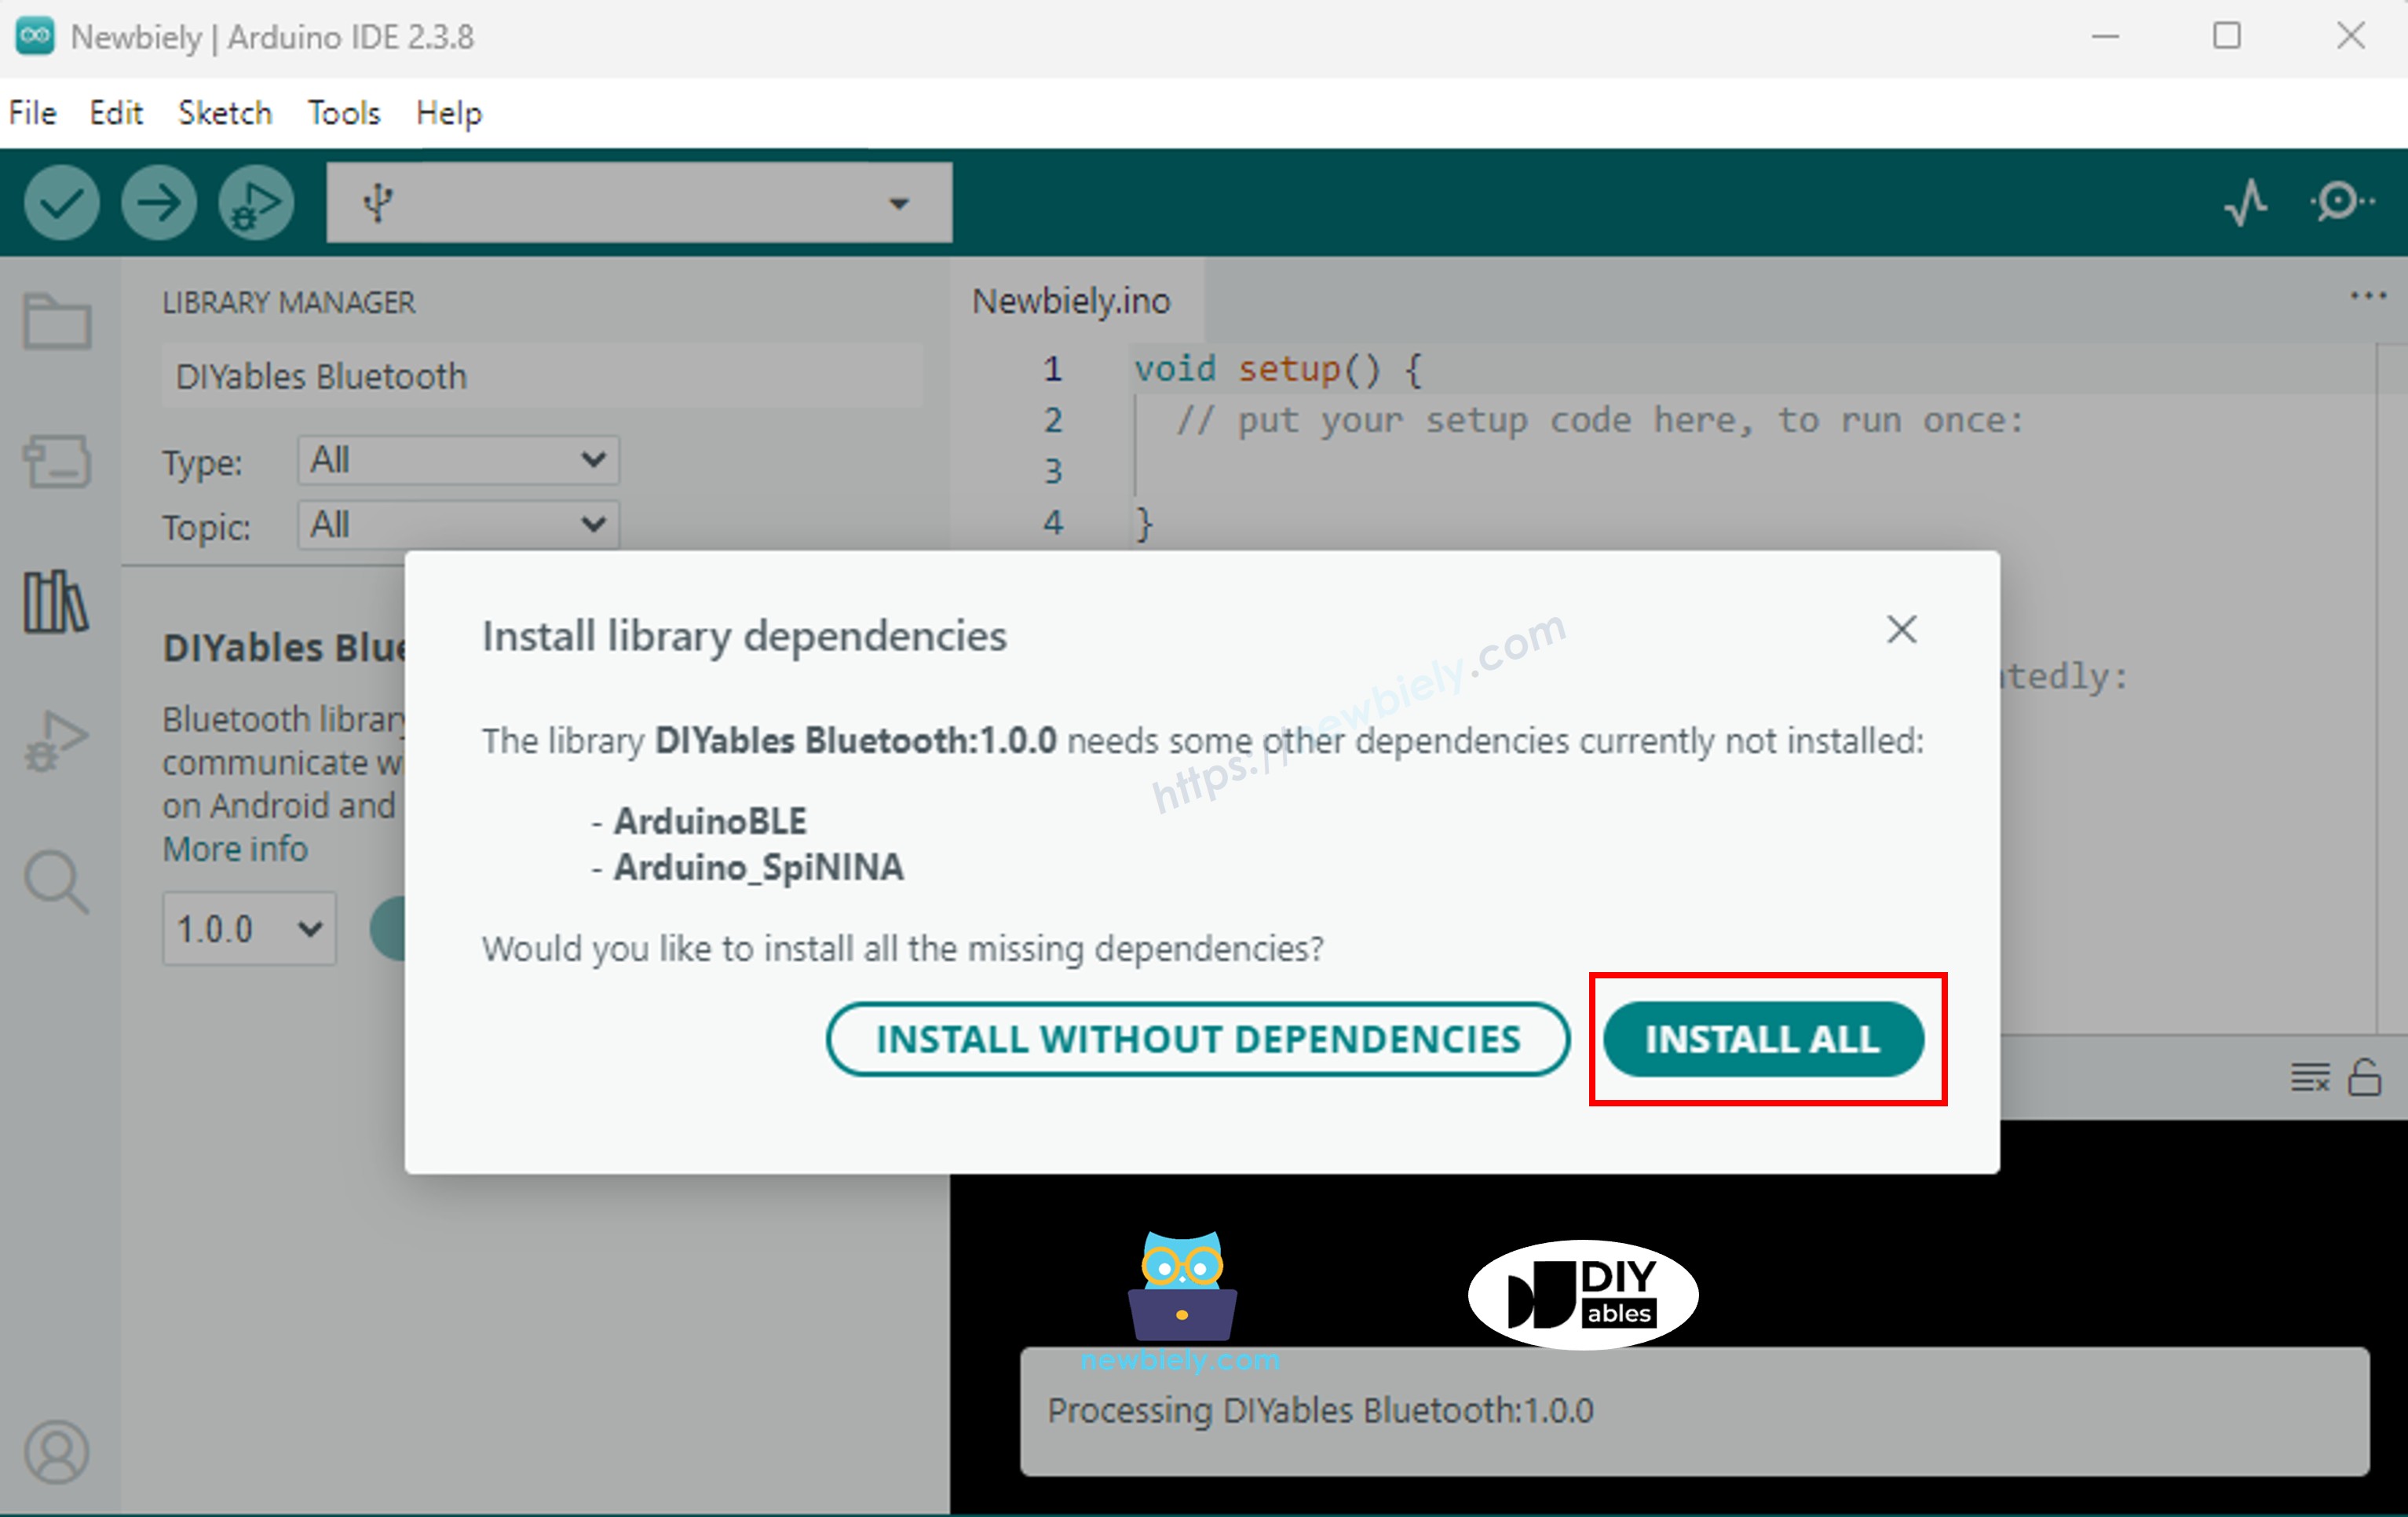
- 종속성 설치 메시지가 나타나면 모두 설치를 클릭하세요.
BLE 코드
- Arduino IDE에서 파일 예제 DIYables Bluetooth ArduinoBLE_AnalogGauge를 열거나, 코드를 편집기에 붙여 넣으세요.
/*
* DIYables Bluetooth Library - ESP32 BLE Analog Gauge Example
* Works with DIYables Bluetooth STEM app on Android and iOS
*
* This example demonstrates the Bluetooth Analog Gauge feature:
* - Display values on an analog meter/gauge
* - Configurable range and unit
* - Perfect for sensor monitoring (speed, pressure, voltage, etc.)
*
* Tutorial: https://diyables.io/bluetooth-app
* Author: DIYables
*/
#include <DIYables_BluetoothServer.h>
#include <DIYables_BluetoothAnalogGauge.h>
#include <platforms/DIYables_Esp32BLE.h>
// BLE Configuration
const char* DEVICE_NAME = "ESP32BLE_Gauge";
const char* SERVICE_UUID = "19B10000-E8F2-537E-4F6C-D104768A1214";
const char* TX_UUID = "19B10001-E8F2-537E-4F6C-D104768A1214";
const char* RX_UUID = "19B10002-E8F2-537E-4F6C-D104768A1214";
// Create Bluetooth instances
DIYables_Esp32BLE bluetooth(DEVICE_NAME, SERVICE_UUID, TX_UUID, RX_UUID);
DIYables_BluetoothServer bluetoothServer(bluetooth);
// Create Analog Gauge app instance (min=0, max=100, unit="km/h")
DIYables_BluetoothAnalogGauge bluetoothGauge(0.0, 100.0, "km/h");
// Variables for gauge value
float currentValue = 0.0;
unsigned long lastUpdate = 0;
const unsigned long UPDATE_INTERVAL = 200; // Update every 200ms
// Optional: Analog input pin for sensor
const int ANALOG_PIN = A0; // ESP32 ADC pin
// Function to read sensor value
float readSensorValue() {
// TODO: Replace with actual sensor reading
// Option 1: Read from analog pin and map to gauge range
// int rawValue = analogRead(ANALOG_PIN);
// return map(rawValue, 0, 4095, 0, 100); // ESP32 has 12-bit ADC
// Option 2: Simulated data (sine wave)
static float phase = 0;
phase += 0.05;
if (phase > 2 * PI) phase = 0;
return 50 + 50 * sin(phase); // Oscillates between 0-100
}
void setup() {
Serial.begin(115200);
delay(1000);
Serial.println("DIYables Bluetooth - ESP32 BLE Analog Gauge Example");
// Initialize Bluetooth server with platform-specific implementation
bluetoothServer.begin();
// Add gauge app to server
bluetoothServer.addApp(&bluetoothGauge);
// Set up connection event callbacks
bluetoothServer.setOnConnected([]() {
Serial.println("Bluetooth connected!");
currentValue = readSensorValue();
bluetoothGauge.send(currentValue);
Serial.print("Initial value sent: ");
Serial.print(currentValue);
Serial.print(" ");
Serial.println(bluetoothGauge.getUnit());
});
bluetoothServer.setOnDisconnected([]() {
Serial.println("Bluetooth disconnected!");
});
bluetoothGauge.onValueRequest([]() {
currentValue = readSensorValue();
bluetoothGauge.send(currentValue);
Serial.print("Value requested - Sent: ");
Serial.print(currentValue);
Serial.print(" ");
Serial.println(bluetoothGauge.getUnit());
});
Serial.println("Waiting for Bluetooth connection...");
Serial.print("Gauge range: ");
Serial.print(bluetoothGauge.getMin());
Serial.print(" - ");
Serial.print(bluetoothGauge.getMax());
Serial.print(" ");
Serial.println(bluetoothGauge.getUnit());
}
void loop() {
bluetoothServer.loop();
if (bluetooth.isConnected() && millis() - lastUpdate >= UPDATE_INTERVAL) {
lastUpdate = millis();
currentValue = readSensorValue();
bluetoothGauge.send(currentValue);
Serial.print("Gauge: ");
Serial.print(currentValue, 1);
Serial.print(" ");
Serial.println(bluetoothGauge.getUnit());
}
delay(10);
}
- 업로드를 클릭하여 스케치를 보드에 플래시하세요.
- 시리얼 모니터를 열어주세요.
- 시리얼 모니터 출력은 다음과 같아야 합니다:
8
Serial.println("Hello World!");
Message (Enter to send message to 'Arduino Nano ESP32' on 'COM15')
New Line
9600 baud
DIYables Bluetooth - Analog Gauge Example
Waiting for Bluetooth connection...
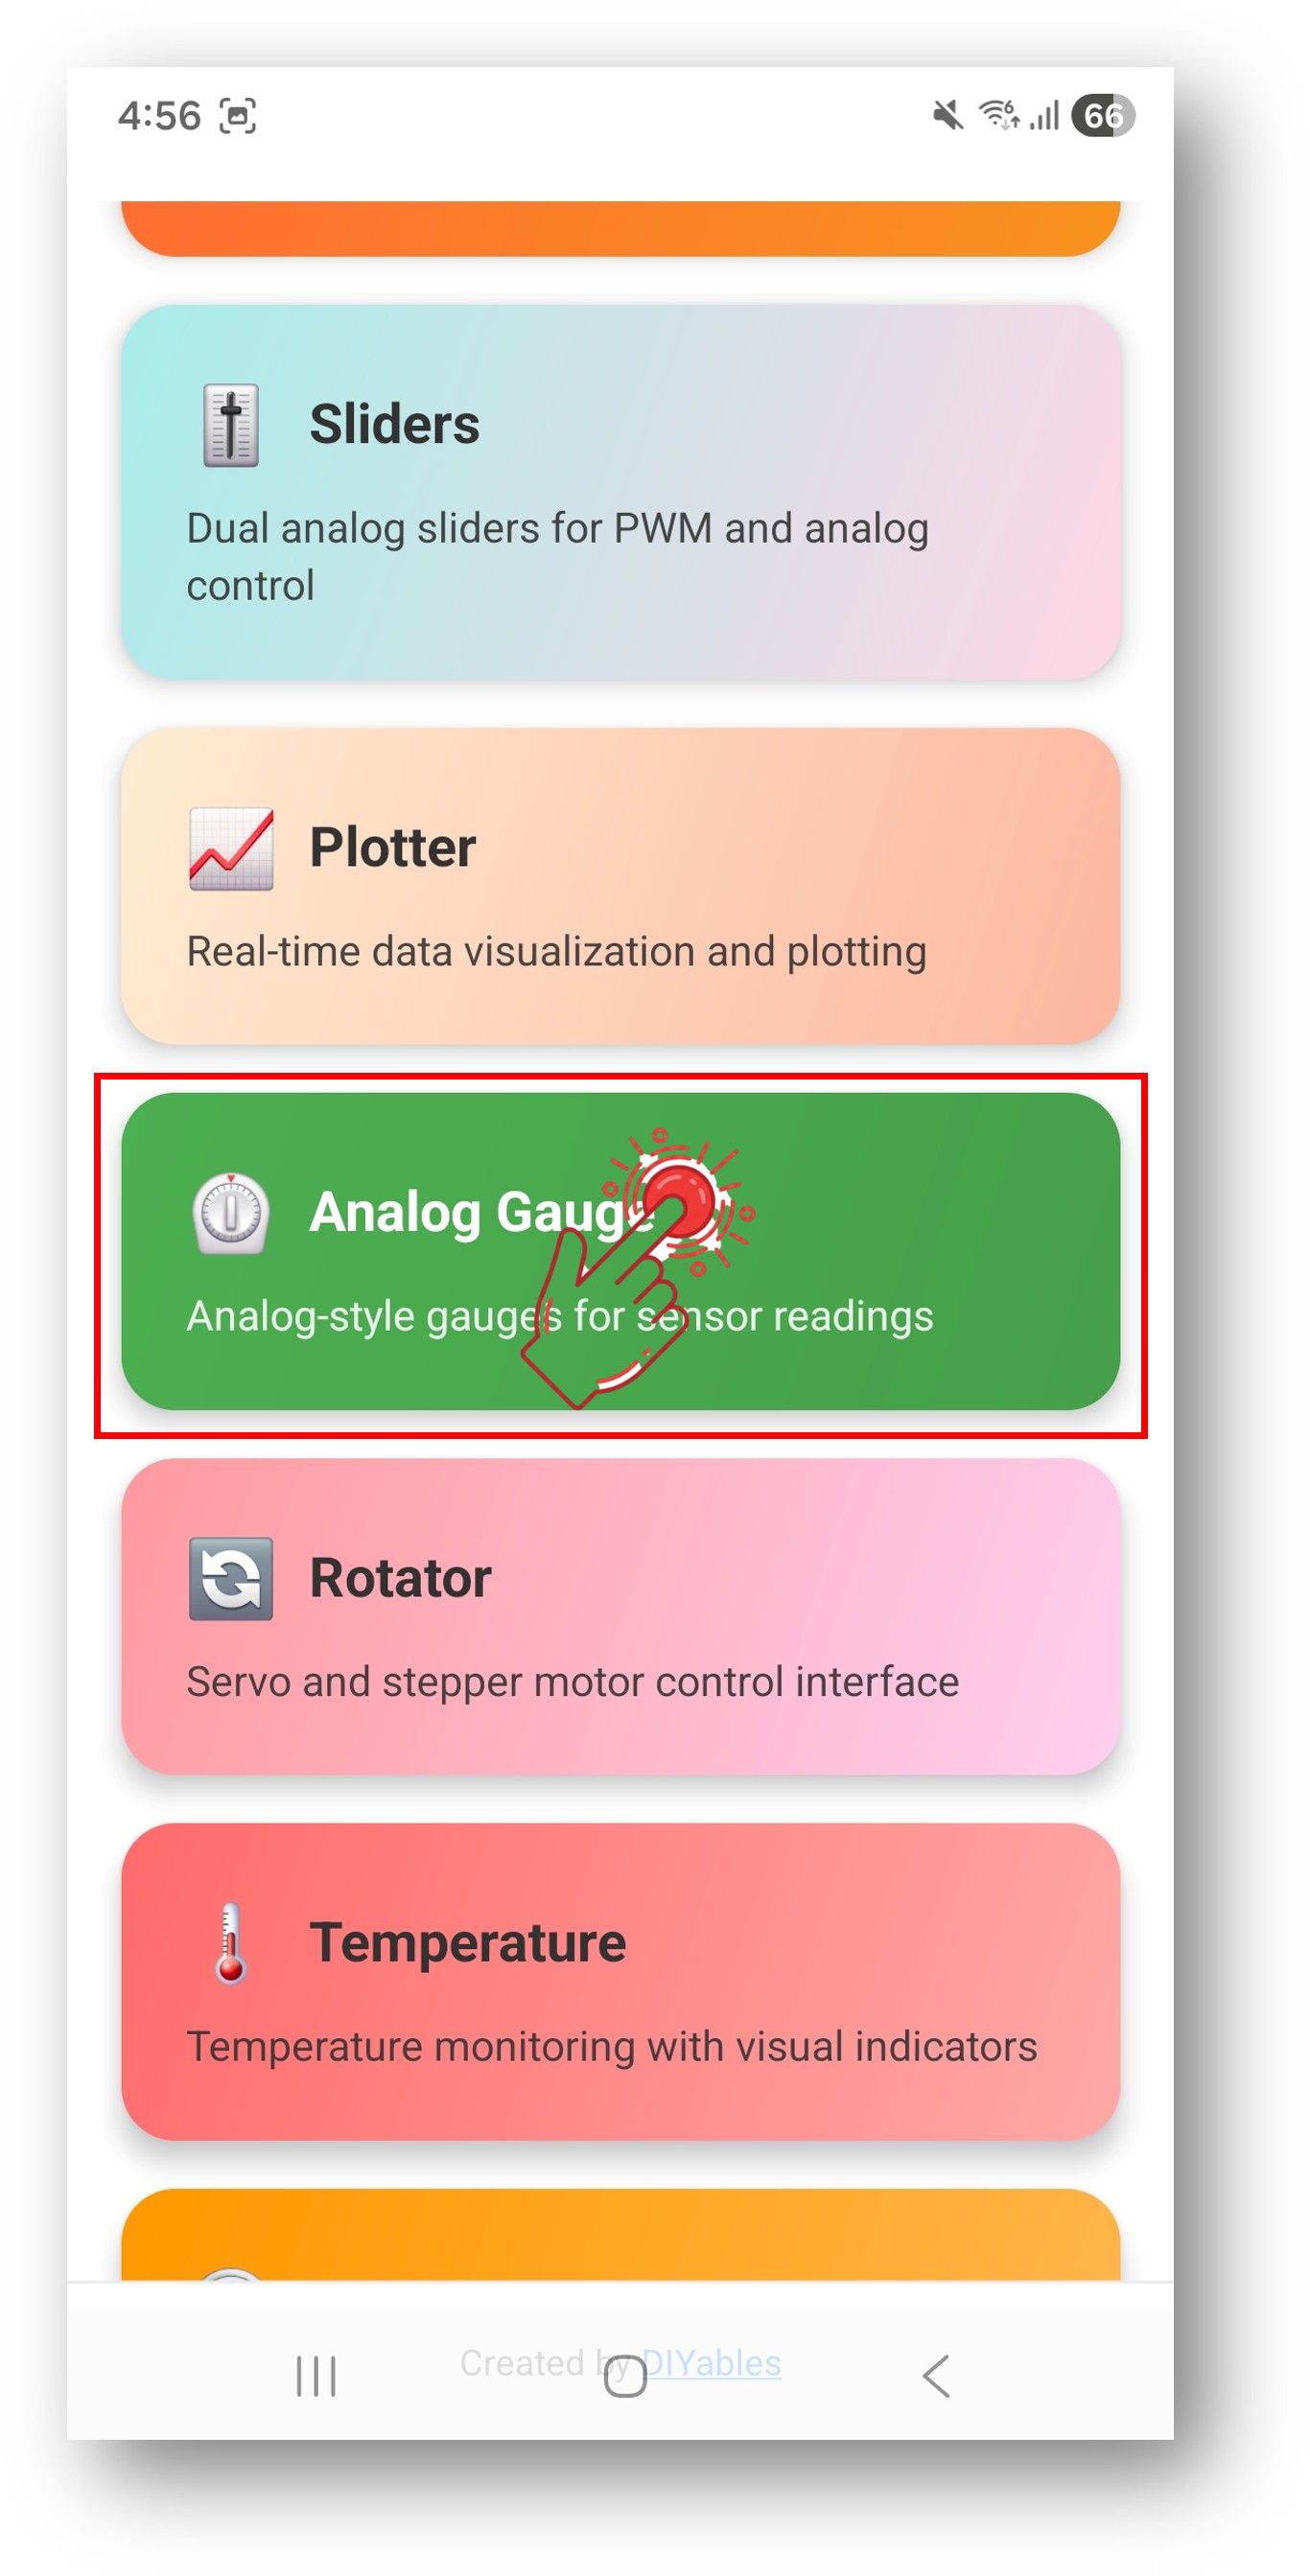
모바일 앱
참고: DIYables 블루투스 앱은 BLE를 통해 Android와 iOS 모두에서 작동합니다. 수동 페어링이 필요 없습니다.
- DIYables 블루투스 앱을 실행하세요.
- 처음 실행 시 다음 권한을 허용하세요:
- 근처 기기 (Android 12+) / 블루투스 (iOS) — 블루투스 기기 스캔 및 연결에 필요
- 위치 (Android 11 이하에만 해당) — 구형 Android 버전에서 BLE 스캔에 필요
- 기기에서 블루투스가 활성화되어 있는지 확인하세요.
- 홈 화면에서 연결을 탭하세요. 앱이 BLE 기기를 스캔합니다.
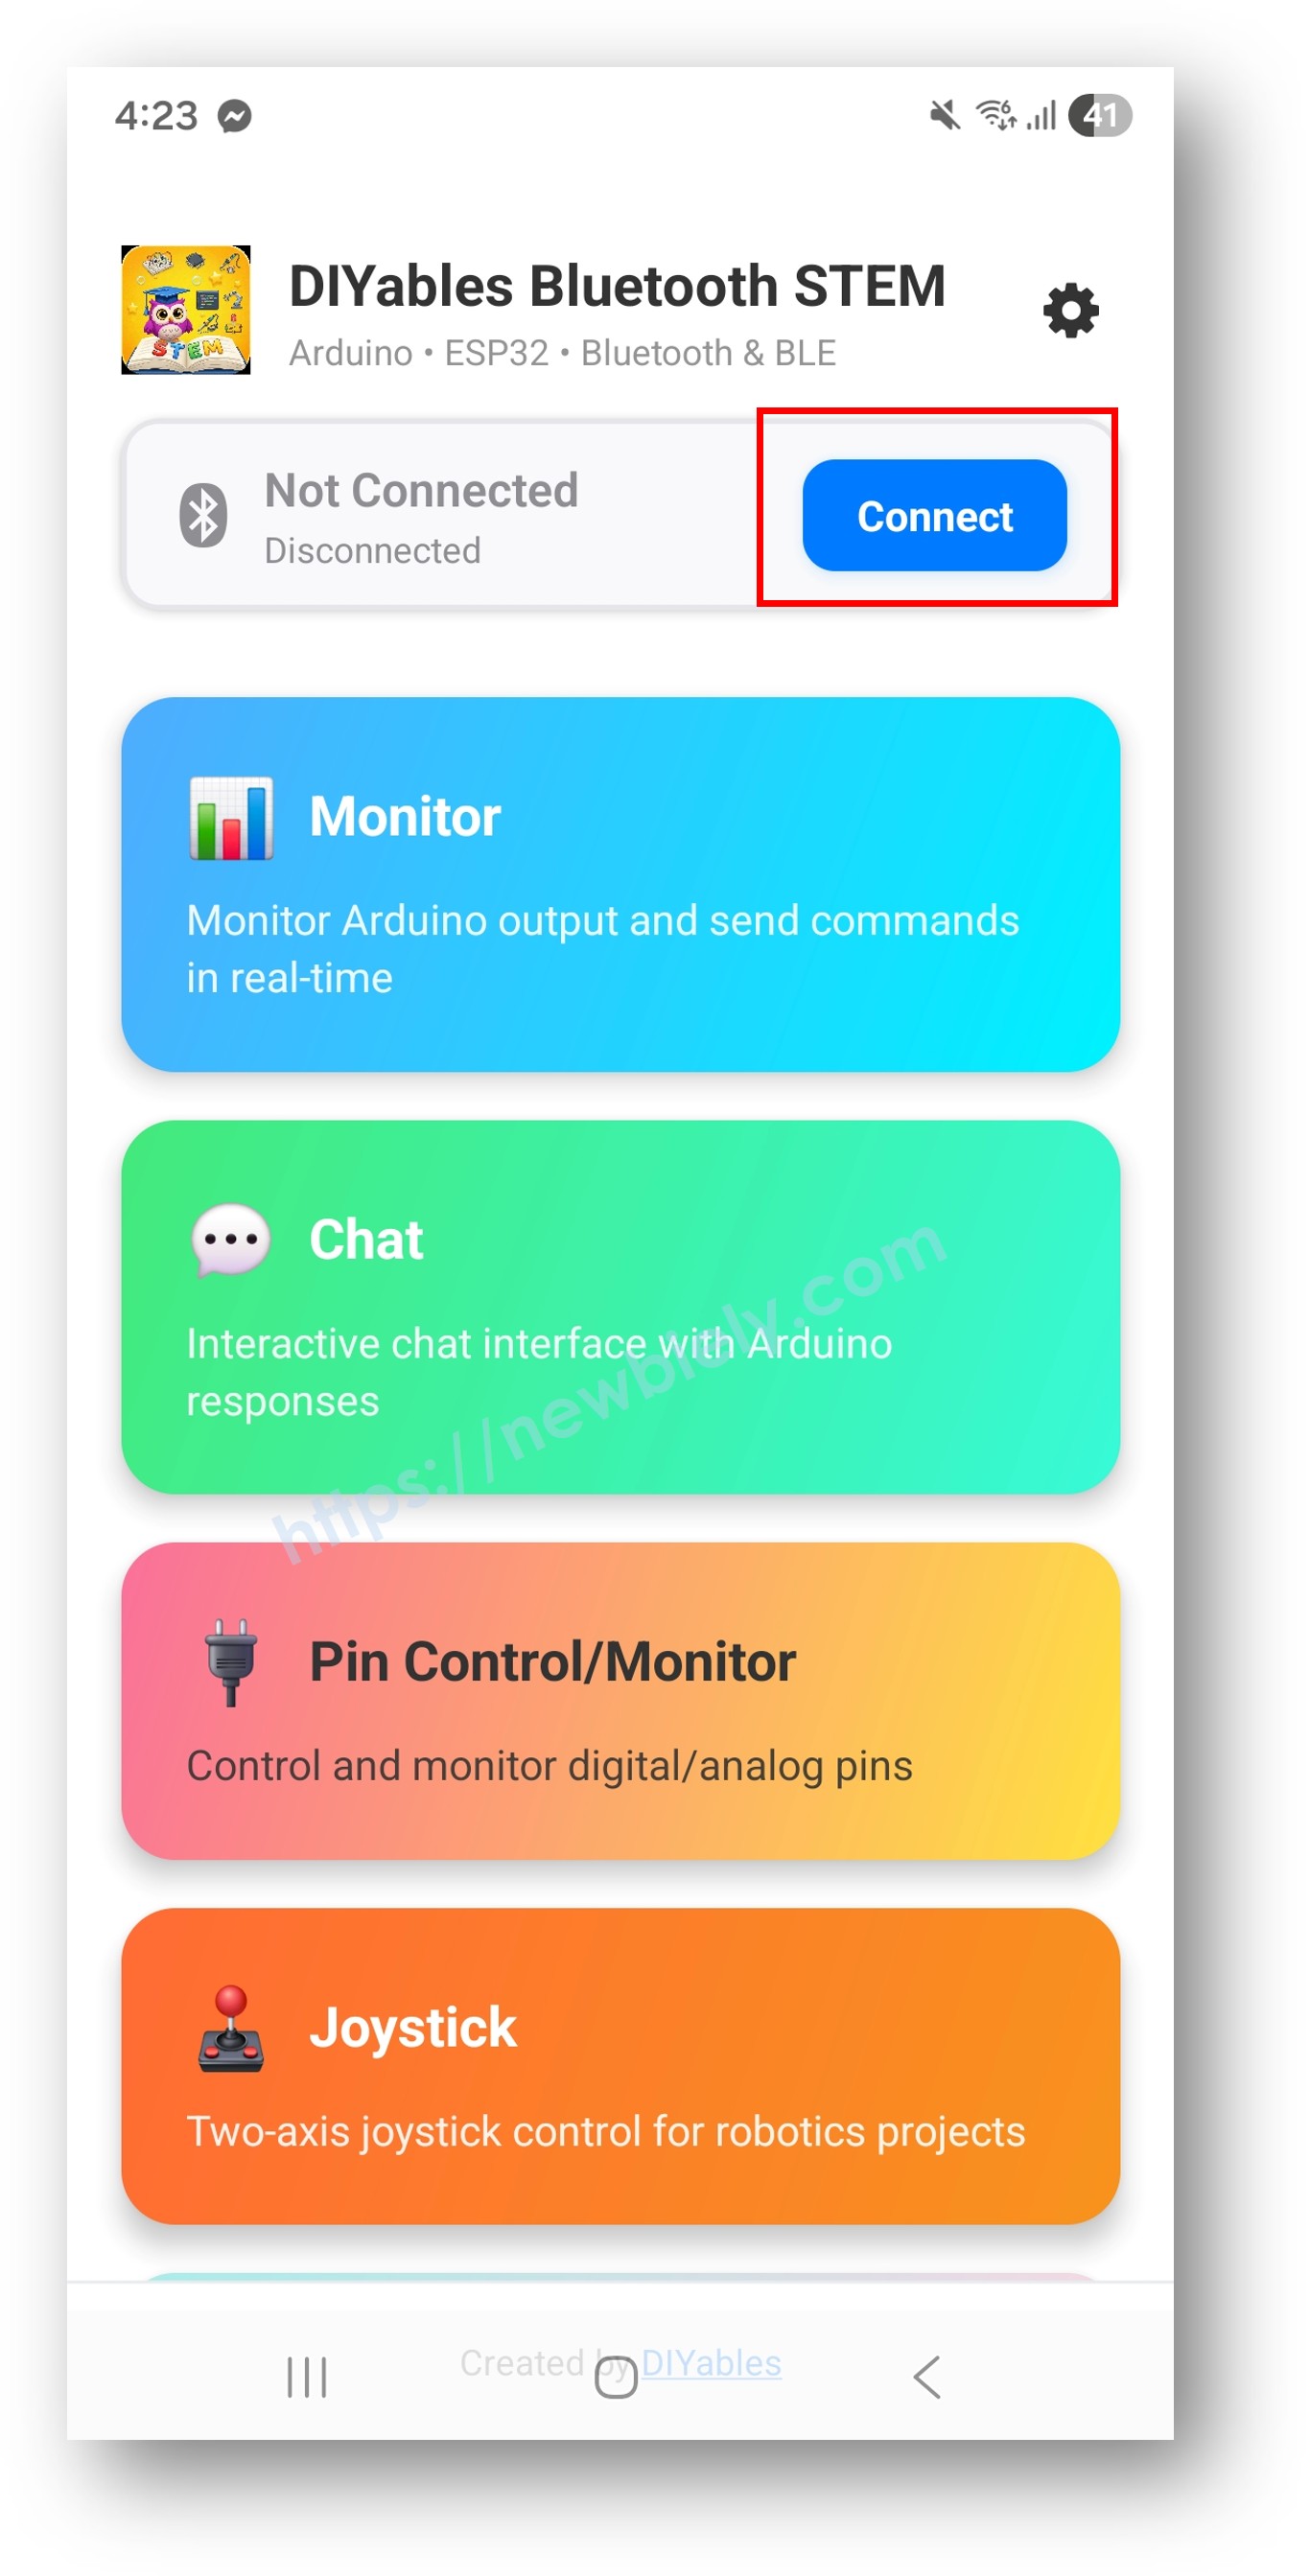
- 스캔 결과에서 "Arduino_Gauge"를 탭하세요.
- 연결 후 홈 화면으로 돌아가 아날로그 게이지 앱을 여세요.
홈 화면의 설정 아이콘을 탭하여 앱을 표시하거나 숨길 수 있습니다. 자세한 내용은 DIYables 블루투스 앱 사용 설명서를 참조하세요.
- 아날로그 게이지가 속도계를 시뮬레이션하여 부드러운 바늘 움직임으로 값을 표시합니다.
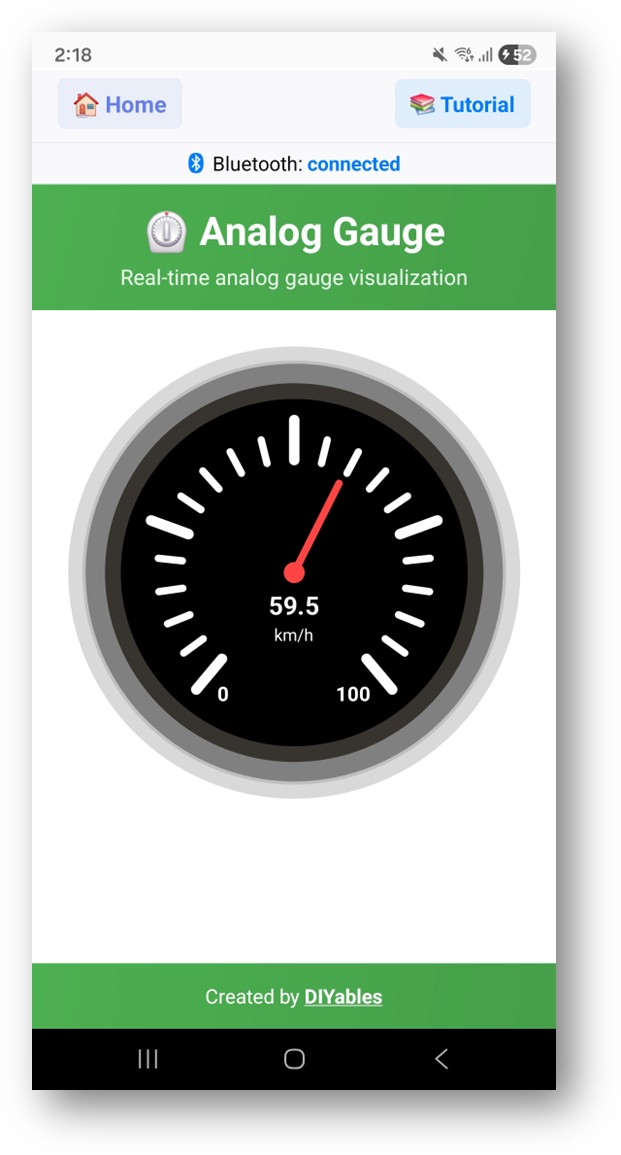
Arduino IDE의 시리얼 모니터를 다시 확인하면 다음과 같이 표시됩니다:
8
Serial.println("Hello World!");
Message (Enter to send message to 'Arduino Nano ESP32' on 'COM15')
New Line
9600 baud
Bluetooth connected!
Gauge value: 50.00 km/h
Gauge value: 59.76 km/h
Gauge value: 68.78 km/h
창의적인 커스터마이징 - 프로젝트에 코드 적용하기
게이지 범위 및 단위 설정
// Speedometer: 0-200 km/h
DIYables_BluetoothAnalogGauge bluetoothGauge(bluetoothServer, 0.0, 200.0, "km/h");
// Pressure gauge: 0-100 PSI
DIYables_BluetoothAnalogGauge bluetoothGauge(bluetoothServer, 0.0, 100.0, "PSI");
// RPM gauge: 0-8000 RPM
DIYables_BluetoothAnalogGauge bluetoothGauge(bluetoothServer, 0.0, 8000.0, "RPM");
// Percentage: 0-100%
DIYables_BluetoothAnalogGauge bluetoothGauge(bluetoothServer, 0.0, 100.0, "%");
게이지 값 전송
// Send a value to the gauge
bluetoothGauge.send(75.5);
// Read from sensor and send
float sensorValue = analogRead(A0) * (100.0 / 1023.0);
bluetoothGauge.send(sensorValue);
값 요청 처리
bluetoothGauge.onValueRequest([]() {
float value = readSensor();
bluetoothGauge.send(value);
Serial.print("Requested: ");
Serial.println(value);
});
프로그래밍 예제
가변저항 게이지
DIYables_BluetoothAnalogGauge bluetoothGauge(bluetoothServer, 0.0, 100.0, "%");
void loop() {
bluetoothServer.loop();
static unsigned long lastTime = 0;
if (millis() - lastTime >= 200) {
lastTime = millis();
float percent = analogRead(A0) * (100.0 / 1023.0);
bluetoothGauge.send(percent);
}
}
배터리 수준 모니터
DIYables_BluetoothAnalogGauge bluetoothGauge(bluetoothServer, 0.0, 100.0, "%");
float readBatteryLevel() {
float voltage = analogRead(A0) * (5.0 / 1023.0) * 2; // voltage divider
float percent = map(voltage * 100, 300, 420, 0, 100);
return constrain(percent, 0, 100);
}
void loop() {
bluetoothServer.loop();
static unsigned long lastTime = 0;
if (millis() - lastTime >= 1000) {
lastTime = millis();
bluetoothGauge.send(readBatteryLevel());
}
}
문제 해결
일반적인 문제
1. 앱에서 기기가 보이지 않음
- 보드에 전원이 공급되고 스케치가 업로드되었는지 확인하세요
- 스마트폰에서 블루투스가 활성화되어 있는지 확인하세요
- Android 11 이하에서는 위치 서비스도 활성화하세요
2. 게이지가 업데이트되지 않음
- send()가 루프 내에서 호출되는지 확인하세요
- 업데이트 간격 타이밍을 확인하세요
- 각 반복에서 bluetoothServer.loop()가 호출되는지 확인하세요
3. 게이지가 잘못된 범위를 표시함
- 생성자의 min/max 값을 확인하세요
- 단위 문자열이 올바른지 확인하세요
- 설정된 범위를 벗어난 값은 클램핑됩니다
4. 바늘이 불규칙하게 움직임
- 센서 읽기값에 스무딩이나 평균 적용을 고려하세요
- 필요 시 업데이트 빈도를 줄이세요
- 노이즈가 있는 아날로그 입력을 확인하세요
5. 업로드 실패 또는 보드 인식 불가
- 보드 매니저를 통해 최신 Arduino Nano ESP32 보드 패키지를 설치하세요
- 다른 USB 케이블이나 포트를 시도해 보세요
프로젝트 아이디어
- RC카 속도계
- 공압 시스템 압력 게이지
- 배터리 수준 표시기
- 모터 RPM 게이지
- 신호 강도 미터
다음 단계
블루투스 아날로그 게이지 예제를 완료한 후 다음을 살펴보세요:
- 블루투스 온도 — 온도 전용 게이지 표시
- 블루투스 플로터 — 시간에 따른 데이터 시각화
- 블루투스 슬라이더 — 아두이노로 값 전송
- 블루투스 다중 앱 — 게이지와 다른 앱 위젯 결합


