DIYables ESP32 WebApps 라이브러리를 사용한 아두이노 나노 ESP32 다중 웹 앱
개요
이 튜토리얼은 DIYables ESP32 WebApps 라이브러리를 사용하여 Arduino Nano ESP32에서 여러 웹 애플리케이션 페이지를 동시에 실행하는 방법을 보여줍니다. 각 페이지는 독립적이며, 프로젝트에 필요한 페이지만 등록하면 됩니다. 홈 페이지는 등록된 모든 앱을 자동으로 나열합니다.
이 튜토리얼에서 다루는 내용
- 하나의 서버 인스턴스에 여러 페이지 객체 등록하기
- 페이지 간에 공유되는 상태 변수 구성하기
- 웹 디지털 핀 페이지를 위한 디지털 핀 모드 사전 구성하기
- 스케치에서 조이스틱 감도 및 자동 복귀 구성하기
- 홈 페이지에서 페이지 간 탐색하기
준비물
| 1 | × | 아두이노 나노 ESP32 | 쿠팡 | 아마존 | |
| 1 | × | USB 케이블 타입-A to 타입-C (USB-A PC용) | 쿠팡 | 아마존 | |
| 1 | × | USB 케이블 타입-C to 타입-C (USB-C PC용) | 아마존 | |
| 1 | × | (추천) 아두이노 나노용 스크루 터미널 확장 보드 | 쿠팡 | 아마존 | |
| 1 | × | (추천) 아두이노 나노용 브레이크아웃 확장 보드 | 쿠팡 | 아마존 | |
| 1 | × | (추천) 아두이노 나노 ESP32용 전원 분배기 | 쿠팡 | 아마존 |
공개: 이 포스팅 에 제공된 일부 링크는 아마존 제휴 링크입니다. 이 포스팅은 쿠팡 파트너스 활동의 일환으로, 이에 따른 일정액의 수수료를 제공받습니다.
단계
다음 지침을 단계별로 따르세요:
- Arduino Nano ESP32가 처음이라면, 아두이노 나노 ESP32 - 소프트웨어 설치 튜토리얼을 참조하세요.
- USB 케이블을 사용하여 Arduino Nano ESP32 보드를 컴퓨터에 연결합니다.
- 컴퓨터에서 Arduino IDE를 실행합니다.
- 적절한 보드(예: Arduino Nano ESP32)와 COM 포트를 선택합니다.
- Arduino IDE 왼쪽 바의 Libraries 아이콘으로 이동합니다.
- "DIYables ESP32 WebApps"를 검색하여 DIYables의 DIYables ESP32 WebApps 라이브러리를 찾습니다
- Install 버튼을 클릭하여 라이브러리를 설치합니다.
- Search for DIYables ESP32 WebApps created by DIYables and click the Install button.
1
void setup() {
- 다른 라이브러리 의존성 설치 요청을 받게 됩니다
- Install All 버튼을 클릭하여 모든 라이브러리 의존성을 설치합니다.
- Arduino IDE에서 File Examples DIYables ESP32 WebApps MultipleWebApps 예제로 이동하거나, 위의 코드를 복사하여 Arduino IDE 편집기에 붙여넣습니다
/*
* DIYables WebApp Library - Multiple WebApps Example
*
* This example demonstrates multiple web apps of the DIYables WebApp library:
* - Home page with links to multiple web apps
* - Web Monitor: Real-time serial monitoring via WebSocket
* - Web Slider: Dual slider control
* - Web Joystick: Interactive joystick control
* - Web Rotator: Interactive rotatable disc control
* - Web Analog Gauge: Professional circular gauge for sensor monitoring
* - Web Table: Two-column data table with real-time updates
* - Web Plotter: See WebPlotter example for real-time data visualization
*
* Features:
* - Simplified callback system - no manual command parsing needed
* - Automatic state synchronization and JSON handling
* - All protocol details handled by the library
* - Template for hardware control
*
* Hardware: ESP32 Boards
*
* Setup:
* 1. Update WiFi credentials below
* 2. Upload the sketch to your Arduino
* 3. Open Serial Monitor to see the IP address
* 4. Navigate to the IP address in your web browser
*/
#include <DIYables_ESP32_Platform.h>
#include <DIYablesWebApps.h>
// WiFi credentials - UPDATE THESE WITH YOUR NETWORK
const char WIFI_SSID[] = "YOUR_WIFI_SSID";
const char WIFI_PASSWORD[] = "YOUR_WIFI_PASSWORD";
// Create WebApp server and page instances
ESP32ServerFactory factory;
DIYablesWebAppServer webAppsServer(factory, 80, 81);
DIYablesHomePage homePage;
DIYablesWebMonitorPage webMonitorPage;
DIYablesWebSliderPage webSliderPage;
DIYablesWebJoystickPage webJoystickPage(false, 5); // autoReturn=false, sensitivity=5
DIYablesWebRotatorPage webRotatorPage(ROTATOR_MODE_CONTINUOUS); // Continuous rotation mode (0-360°)
DIYablesWebAnalogGaugePage webAnalogGaugePage(0.0, 100.0, "%"); // Range: 0-100%, units: %
DIYablesWebTablePage webTablePage;
// Variables to track states
int currentSlider1 = 64; // Slider 1 value (0-255)
int currentSlider2 = 128; // Slider 2 value (0-255)
int currentJoystickX = 0; // Current joystick X value (-100 to 100)
int currentJoystickY = 0; // Current joystick Y value (-100 to 100)
int currentRotatorAngle = 0; // Current rotator angle (0-360°)
float currentGaugeValue = 50.0; // Current gauge value (0.0-100.0)
void setup() {
Serial.begin(9600);
delay(1000);
// TODO: Initialize your hardware pins here
Serial.println("DIYables ESP32 WebApp - Multiple Apps Example");
// Add all web applications to the server
webAppsServer.addApp(&homePage);
webAppsServer.addApp(&webMonitorPage);
webAppsServer.addApp(&webSliderPage);
webAppsServer.addApp(&webJoystickPage);
webAppsServer.addApp(&webRotatorPage);
webAppsServer.addApp(&webAnalogGaugePage);
webAppsServer.addApp(&webTablePage);
// Add more web apps here (e.g., WebPlotter)
// Set 404 Not Found page (optional - for better user experience)
webAppsServer.setNotFoundPage(DIYablesNotFoundPage());
// Configure table structure (only attribute names, values will be updated dynamically)
webTablePage.addRow("Arduino Status");
webTablePage.addRow("WiFi Connected");
webTablePage.addRow("Uptime");
webTablePage.addRow("Slider 1");
webTablePage.addRow("Slider 2");
webTablePage.addRow("Joystick X");
webTablePage.addRow("Joystick Y");
webTablePage.addRow("Rotator Angle");
webTablePage.addRow("Gauge Value");
// Start the WebApp server
if (!webAppsServer.begin(WIFI_SSID, WIFI_PASSWORD)) {
while (1) {
Serial.println("Failed to start WebApp server!");
delay(1000);
}
}
setupCallbacks();
}
void setupCallbacks() {
// Web Monitor callback - echo messages back
webMonitorPage.onWebMonitorMessage([](const String& message) {
Serial.println("Web Monitor: " + message);
webMonitorPage.sendToWebMonitor("Arduino received: " + message);
});
// Web Slider callback - handle slider values
webSliderPage.onSliderValueFromWeb([](int slider1, int slider2) {
// Store the received values
currentSlider1 = slider1;
currentSlider2 = slider2;
// Print slider values (0-255) without String concatenation
Serial.print("Slider 1: ");
Serial.print(slider1);
Serial.print(", Slider 2: ");
Serial.println(slider2);
// Update table with new slider values using String() conversion
webTablePage.sendValueUpdate("Slider 1", String(slider1));
webTablePage.sendValueUpdate("Slider 2", String(slider2));
// TODO: Add your control logic here based on slider values
// Examples:
// - Control PWM: analogWrite(LED_PIN, slider1);
// - Control servos: servo.write(map(slider1, 0, 255, 0, 180));
// - Control motor speed: analogWrite(MOTOR_PIN, slider2);
// Update gauge based on slider1 value (map 0-255 to 0-100)
currentGaugeValue = map(slider1, 0, 255, 0, 100);
webAnalogGaugePage.sendToWebAnalogGauge(currentGaugeValue);
char gaugeStr[16];
snprintf(gaugeStr, sizeof(gaugeStr), "%.1f%%", currentGaugeValue);
webTablePage.sendValueUpdate("Gauge Value", String(gaugeStr));
});
// Handle slider value requests
webSliderPage.onSliderValueToWeb([]() {
webSliderPage.sendToWebSlider(currentSlider1, currentSlider2);
});
// Web Joystick callback - handle joystick movement
webJoystickPage.onJoystickValueFromWeb([](int x, int y) {
// Store the received values
currentJoystickX = x;
currentJoystickY = y;
// Print joystick position values (-100 to +100)
Serial.print("Joystick - X: ");
Serial.print(x);
Serial.print(", Y: ");
Serial.println(y);
Serial.print(x);
Serial.print(", Y: ");
Serial.println(y);
// Update table with new joystick values
webTablePage.sendValueUpdate("Joystick X", String(x));
webTablePage.sendValueUpdate("Joystick Y", String(y));
// TODO: Add your control logic here based on joystick position
// Examples:
// - Control motors: if (x > 50) { /* move right */ }
// - Control servos: servo.write(map(y, -100, 100, 0, 180));
// - Control LEDs: analogWrite(LED_PIN, map(abs(x), 0, 100, 0, 255));
});
// Handle joystick values requests (when web page loads/reconnects)
webJoystickPage.onJoystickValueToWeb([]() {
webJoystickPage.sendToWebJoystick(currentJoystickX, currentJoystickY);
});
// Web Rotator callback - handle rotation angle changes
webRotatorPage.onRotatorAngleFromWeb([](float angle) {
// Store the received angle
currentRotatorAngle = (int)angle;
// Print rotator angle (0-360°)
Serial.println("Rotator angle: " + String(angle) + "°");
// Update table with new rotator angle
webTablePage.sendValueUpdate("Rotator Angle", String(angle, 0) + "°");
// TODO: Add your control logic here based on rotator angle
// Examples:
// - Control servo: servo.write(map(angle, 0, 360, 0, 180));
// - Control stepper motor: stepper.moveTo(angle);
// - Control directional LED strip: setLEDDirection(angle);
});
// Handle analog gauge value requests (when web page loads/reconnects)
webAnalogGaugePage.onGaugeValueRequest([]() {
webAnalogGaugePage.sendToWebAnalogGauge(currentGaugeValue);
});
// Handle table data requests (when web page loads/reconnects)
webTablePage.onTableValueRequest([]() {
// Send initial values to the table
webTablePage.sendValueUpdate("Arduino Status", "Running");
webTablePage.sendValueUpdate("WiFi Connected", "Yes");
webTablePage.sendValueUpdate("Uptime", "0 seconds");
webTablePage.sendValueUpdate("Slider 1", String(currentSlider1));
webTablePage.sendValueUpdate("Slider 2", String(currentSlider2));
webTablePage.sendValueUpdate("Joystick X", String(currentJoystickX));
webTablePage.sendValueUpdate("Joystick Y", String(currentJoystickY));
webTablePage.sendValueUpdate("Rotator Angle", String(currentRotatorAngle) + "°");
webTablePage.sendValueUpdate("Gauge Value", String(currentGaugeValue, 1) + "%");
});
}
void loop() {
// Handle WebApp server communications
webAppsServer.loop();
// Update table with current uptime every 5 seconds
static unsigned long lastUptimeUpdate = 0;
if (millis() - lastUptimeUpdate > 5000) {
lastUptimeUpdate = millis();
unsigned long uptimeSeconds = millis() / 1000;
String uptimeStr = String(uptimeSeconds) + " seconds";
if (uptimeSeconds >= 60) {
uptimeStr = String(uptimeSeconds / 60) + "m " + String(uptimeSeconds % 60) + "s";
}
webTablePage.sendValueUpdate("Uptime", uptimeStr);
}
// Simulate sensor data updates every 3 seconds
static unsigned long lastSensorUpdate = 0;
if (millis() - lastSensorUpdate > 3000) {
lastSensorUpdate = millis();
// Simulate a sensor reading that varies over time
float sensorValue = 50.0 + 30.0 * sin(millis() / 10000.0); // Oscillates between 20-80
currentGaugeValue = sensorValue;
// Update gauge and table
webAnalogGaugePage.sendToWebAnalogGauge(currentGaugeValue);
webTablePage.sendValueUpdate("Gauge Value", String(currentGaugeValue, 1) + "%");
}
// TODO: Add your main application code here
delay(10);
}
- 스케치의 WiFi 자격 증명을 업데이트합니다:
const char WIFI_SSID[] = "YOUR_WIFI_NETWORK";
const char WIFI_PASSWORD[] = "YOUR_WIFI_PASSWORD";
- Arduino IDE의 Upload 버튼을 클릭하여 코드를 Arduino Nano ESP32에 업로드합니다
- 시리얼 모니터를 엽니다
- 시리얼 모니터 출력은 다음과 유사해야 합니다:
8
Serial.println("Hello World!");
Message (Enter to send message to 'Arduino Nano ESP32' on 'COM15')
New Line
9600 baud
DIYables WebApp - Multiple Apps Example
INFO: Added app /
INFO: Added app /web-monitor
INFO: Added app /web-slider
INFO: Added app /web-joystick
INFO: Added app /web-rotator
INFO: Added app /web-gauge
INFO: Added app /web-table
DIYables WebApp Library
Platform: Arduino Nano ESP32
Network connected!
IP address: 192.168.0.2
HTTP server started on port 80
Configuring WebSocket server callbacks...
WebSocket server started on port 81
WebSocket URL: ws://192.168.0.2:81
WebSocket server started on port 81
==========================================
DIYables WebApp Ready!
==========================================
Web Interface: http://192.168.0.2
WebSocket: ws://192.168.0.2:81
Available Applications:
Home Page: http://192.168.0.2/
Web Monitor: http://192.168.0.2/web-monitor
Web Slider: http://192.168.0.2/web-slider
Web Joystick: http://192.168.0.2/web-joystick
Web Rotator: http://192.168.0.2/web-rotator
Web Analog Gauge: http://192.168.0.2/web-gauge
Web Table: http://192.168.0.2/web-table
==========================================
- 아무것도 표시되지 않으면 보드의 리셋 버튼을 누르세요.
- IP 주소를 확인하고 동일한 WiFi 네트워크에 연결된 기기의 브라우저에 입력합니다.
- 예: http://192.168.0.2
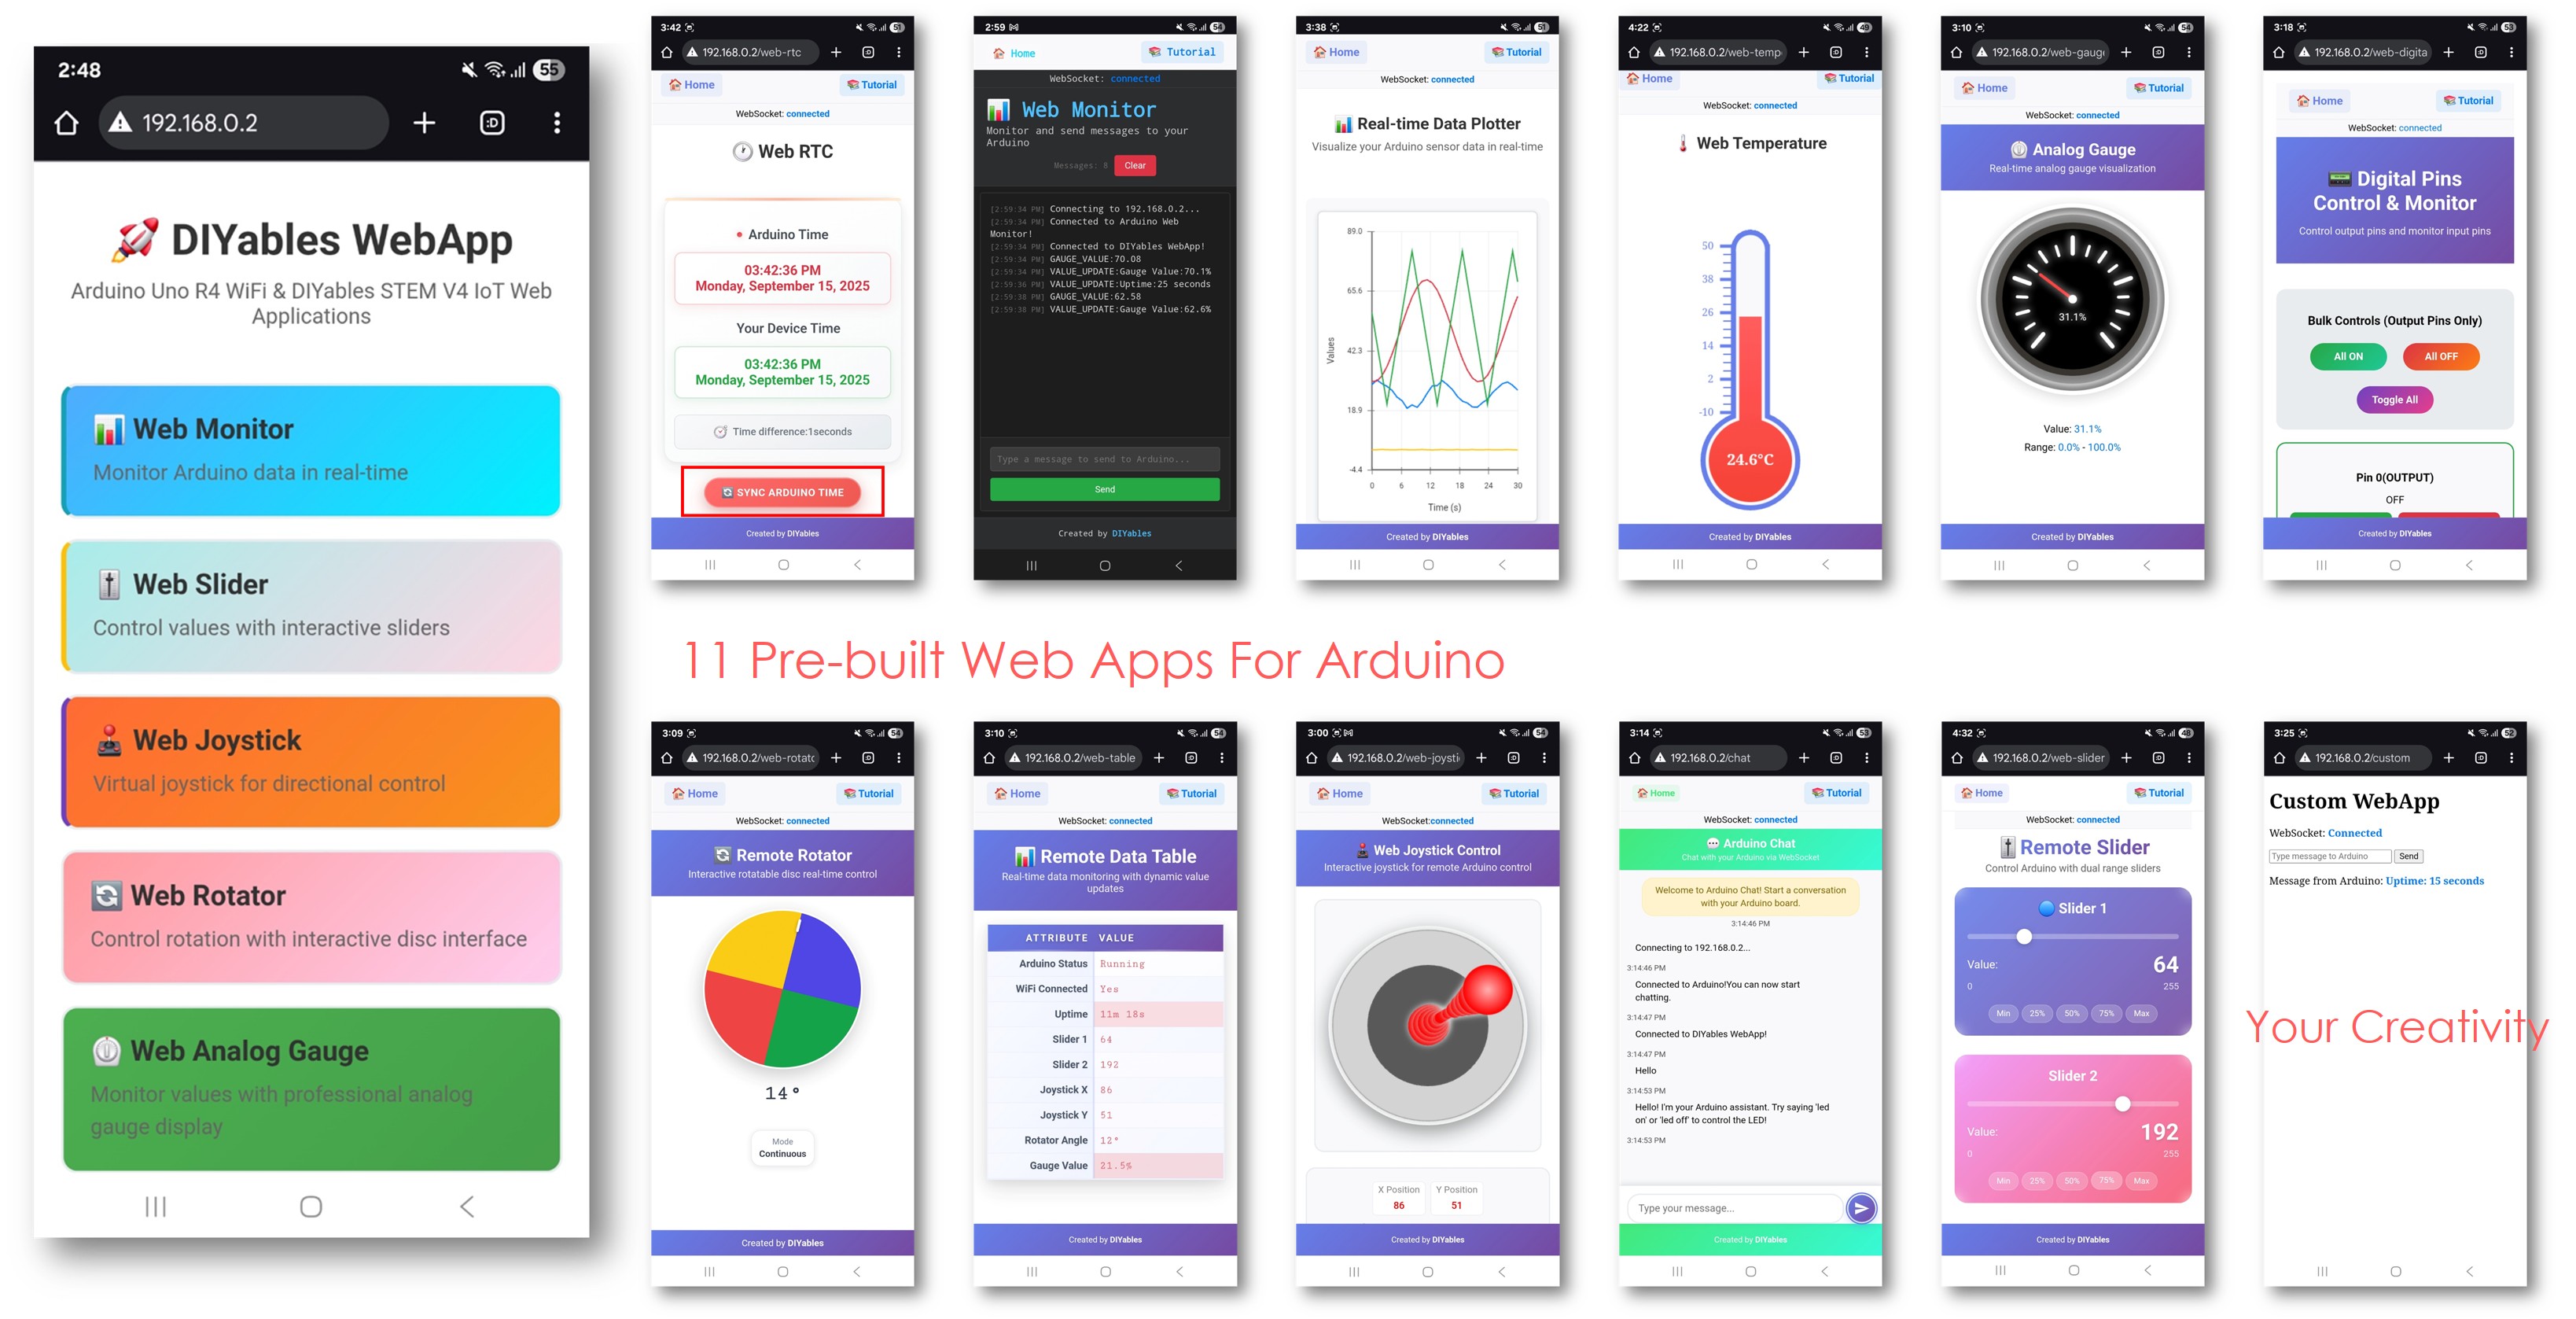
- 홈 페이지에 등록된 모든 애플리케이션의 카드가 표시됩니다:
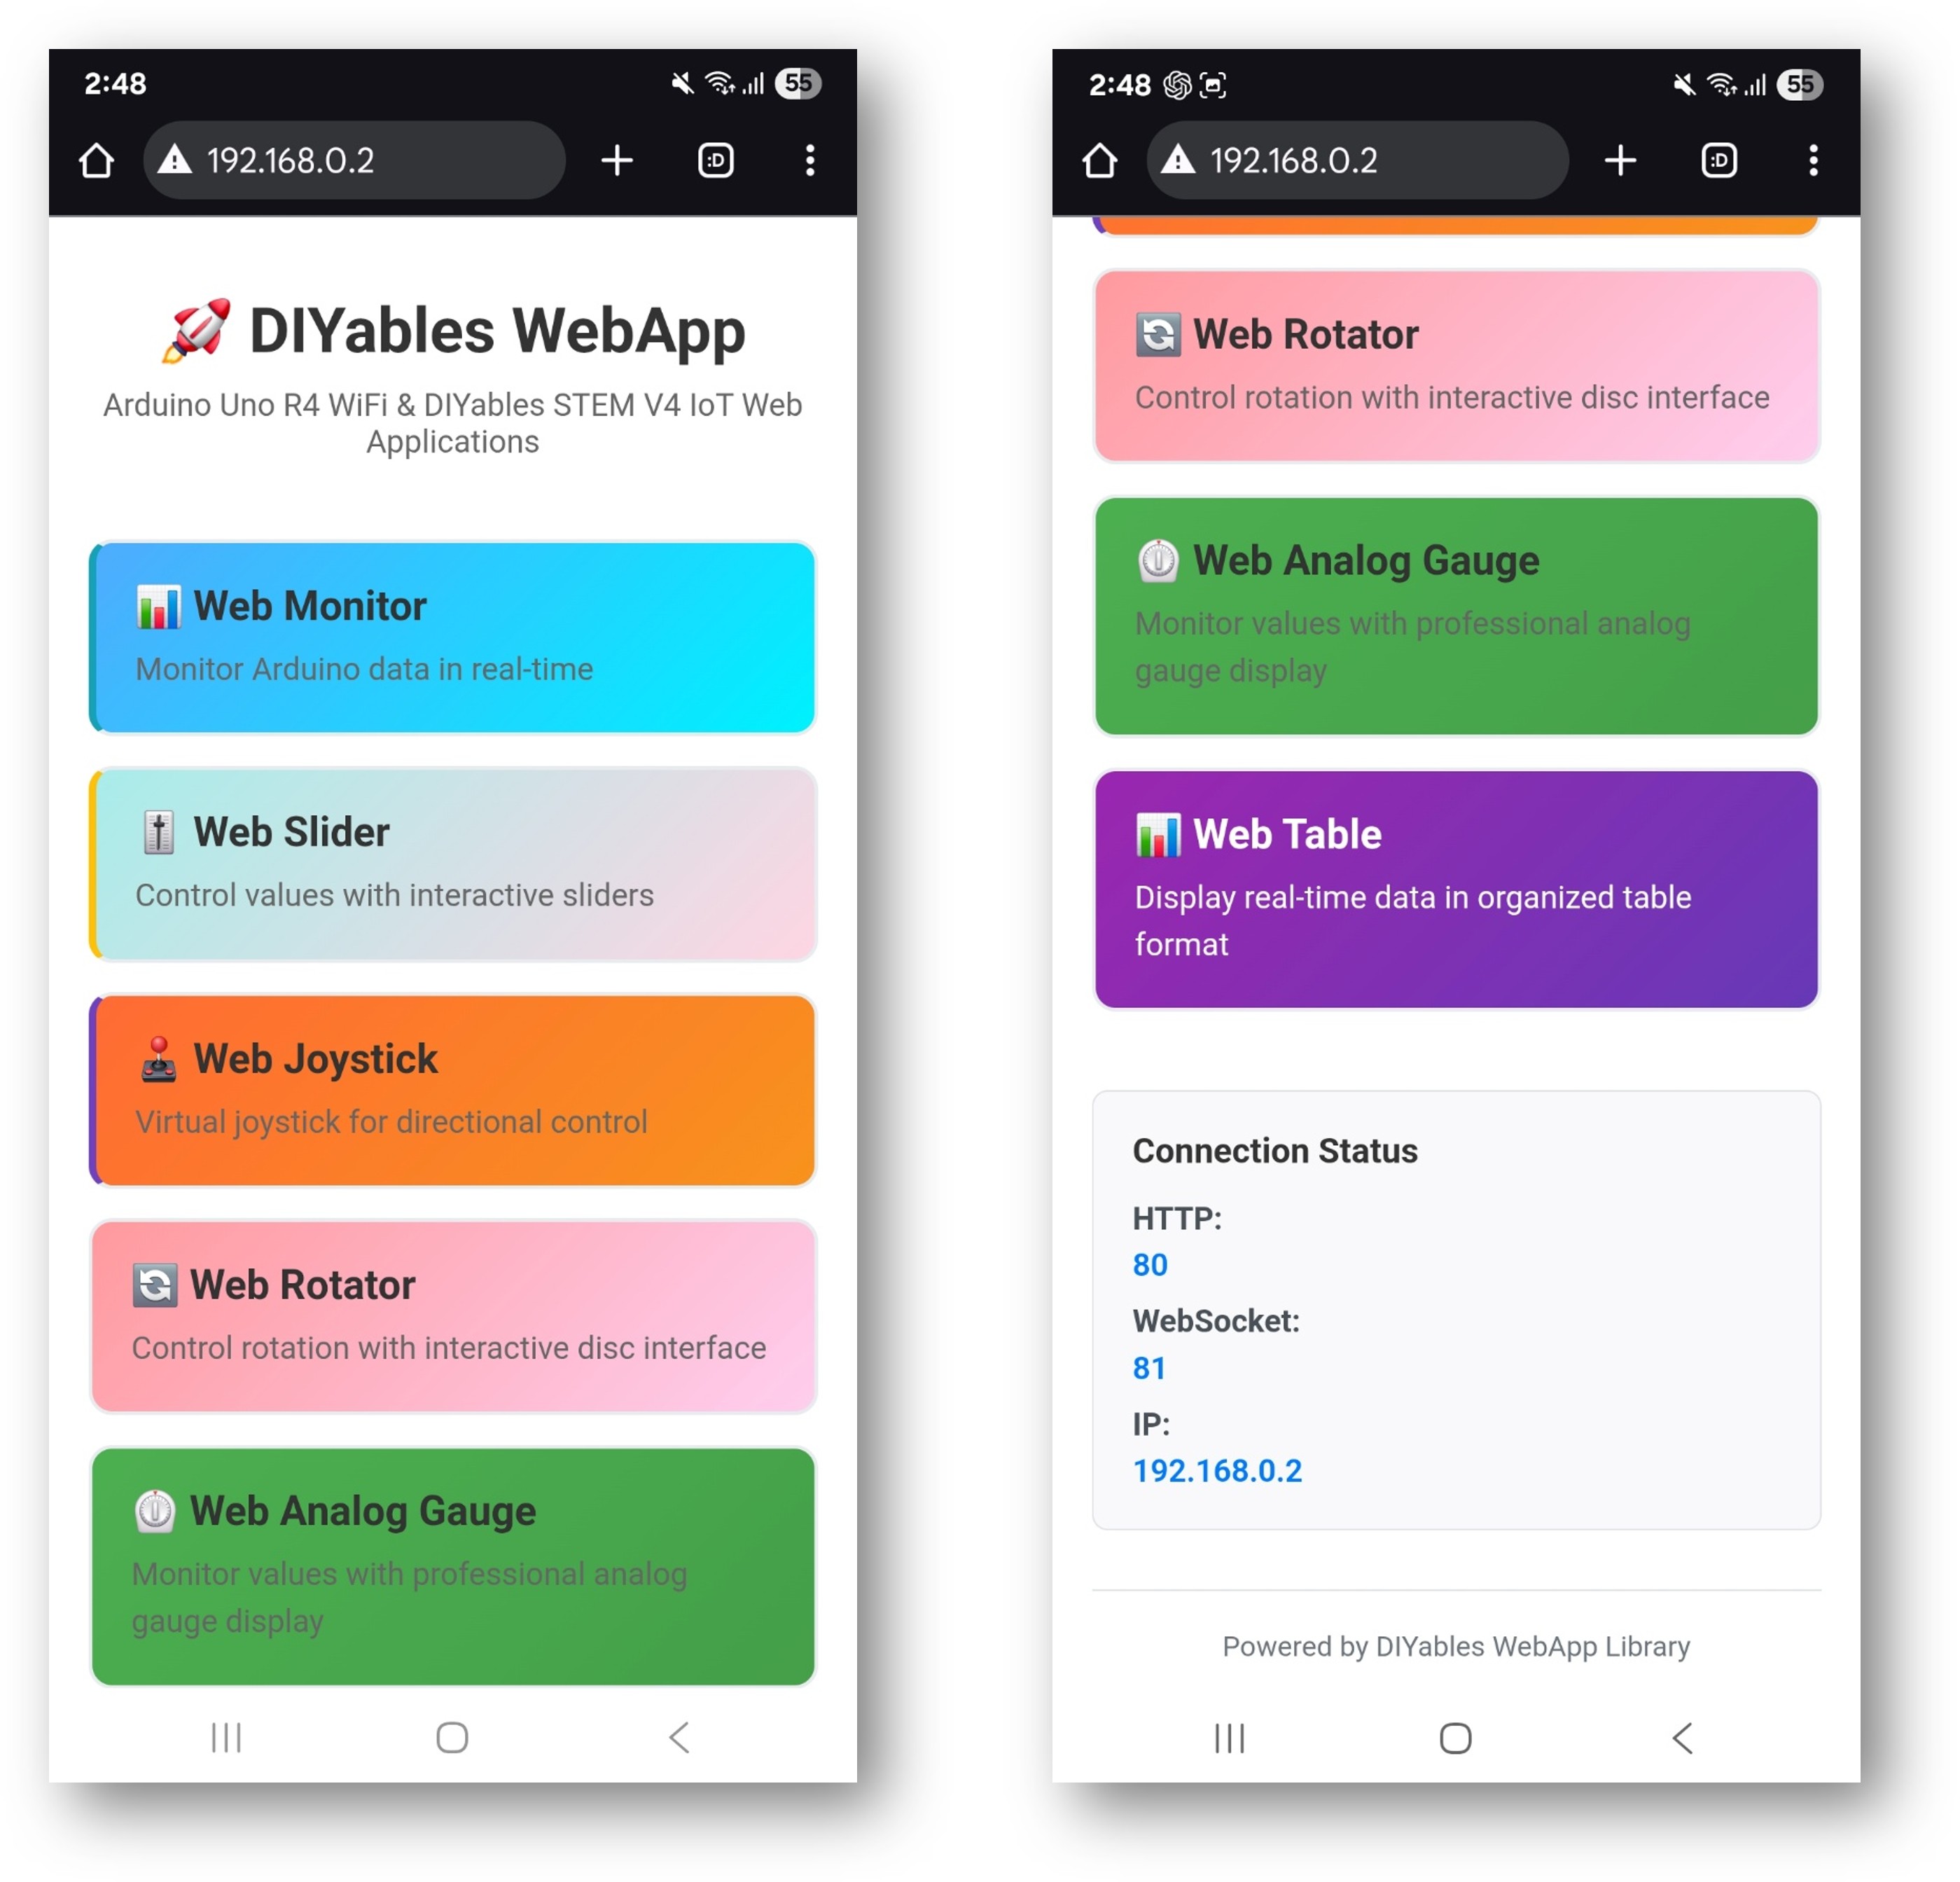
- 카드를 선택하면 해당 애플리케이션이 열립니다. 각 페이지는 경로로도 직접 접근할 수 있습니다. 예: http://192.168.0.2/web-monitor 또는 http://192.168.0.2/web-slider.
애플리케이션 URL
| 애플리케이션 | URL 경로 | |
|---|---|---|
| 홈 페이지 | http | //[board-ip]/ |
| 웹 모니터 | http | //[board-ip]/web-monitor |
| 웹 슬라이더 | http | //[board-ip]/web-slider |
| 웹 조이스틱 | http | //[board-ip]/web-joystick |
| 웹 로테이터 | http | //[board-ip]/web-rotator |
| 웹 아날로그 게이지 | http | //[board-ip]/web-gauge |
| 웹 테이블 | http | //[board-ip]/web-table |
구성 세부사항
디지털 핀 설정
출력 핀은 브라우저에서 쓸 수 있고, 입력 핀은 현재 상태를 표시합니다:
webDigitalPinsPage.enablePin(2, WEB_PIN_OUTPUT); // General output
webDigitalPinsPage.enablePin(3, WEB_PIN_OUTPUT); // General output
webDigitalPinsPage.enablePin(4, WEB_PIN_OUTPUT); // General output
webDigitalPinsPage.enablePin(13, WEB_PIN_OUTPUT); // Built-in LED
webDigitalPinsPage.enablePin(8, WEB_PIN_INPUT); // Sensor input
webDigitalPinsPage.enablePin(9, WEB_PIN_INPUT); // Switch input
조이스틱 구성
// autoReturn=false: joystick stays at released position
// sensitivity=5: updates only when movement exceeds 5%
DIYablesWebJoystickPage webJoystickPage(false, 5);
공유 상태 변수
상태 변수는 모든 페이지가 실제 하드웨어 값과 일관성을 유지하도록 합니다:
int pinStates[16] = { LOW }; // Digital pin states for pins 0-13
int currentSlider1 = 64; // Slider 1 value (0-255), starts at 25%
int currentSlider2 = 128; // Slider 2 value (0-255), starts at 50%
int currentJoystickX = 0; // Last joystick X (-100 to 100)
int currentJoystickY = 0; // Last joystick Y (-100 to 100)
내장 채팅 명령어
예제 스케치는 다음 채팅 입력을 처리합니다:
- hello — 인사 메시지 반환
- time — 보드 가동 시간(초)을 보고
- status — 시스템 상태 및 LED 상태를 보고
- help — 인식된 명령어 목록 표시
- led on — 내장 LED 켜기
- led off — 내장 LED 끄기
예시 대화:
User: hello
ESP32: Hello! I'm your Arduino. How can I help you?
User: led on
ESP32: Built-in LED is now ON
User: time
ESP32: I've been running for 1245 seconds.
User: status
ESP32: Status: Running smoothly! LED is ON
예제 응용
모터 제어에 조이스틱 사용하기
콜백을 사용하여 조이스틱 X/Y 값을 좌우 모터 속도에 매핑합니다:
webJoystickPage.onJoystickValueFromWeb([](int x, int y) {
int leftSpeed = constrain(y + (x / 2), -100, 100);
int rightSpeed = constrain(y - (x / 2), -100, 100);
// Scale by slider 1 for speed limiting
leftSpeed = map(leftSpeed, -100, 100, -currentSlider1, currentSlider1);
rightSpeed = map(rightSpeed, -100, 100, -currentSlider1, currentSlider1);
analogWrite(MOTOR_LEFT_PWM, abs(leftSpeed));
analogWrite(MOTOR_RIGHT_PWM, abs(rightSpeed));
});
모니터에 센서 데이터 보내기
시리얼 포트 대신 모니터 페이지를 사용하여 센서 읽음값을 표시합니다:
void loop() {
webAppsServer.loop();
float temperature = readTemperature();
webMonitorPage.sendToWebMonitor("Temp: " + String(temperature) + " C");
delay(1000);
}
메모리 고려사항
등록된 각 페이지는 플래시 및 RAM 사용량을 증가시킵니다. 프로젝트에서 사용하지 않는 페이지는 제거하세요. 모듈식 설계로 인해 필요한 페이지에 대해서만 addApp()을 호출하는 것으로 충분합니다 — 사용하지 않는 페이지 클래스는 링크되지 않습니다.
각 구성 요소의 메모리 사용량 추정은 메모리 참조 테이블을 참조하세요.


