Nano ESP32는 하드웨어 시리얼 포트가 있으므로 SoftwareSerial 대신 Serial1을 사용합니다:
#include <DIYables_MiniMp3.h>DIYables_MiniMp3 mp3;voidsetup() {Serial.begin(115200);Serial1.begin(9600); // Hardware serial for the mp3 module mp3.begin(Serial1);delay(1000); // Wait for the module to boot mp3.setVolume(25);}voidloop() {// Your code here}
SoftwareSerial 라이브러리가 필요 없습니다! 하드웨어 시리얼이 더 안정적이며, 특히 이 모듈이 사용하는 낮은 9600 보드 속도에서도 그렇습니다.
Nano ESP32 코드 — 단일 트랙 재생
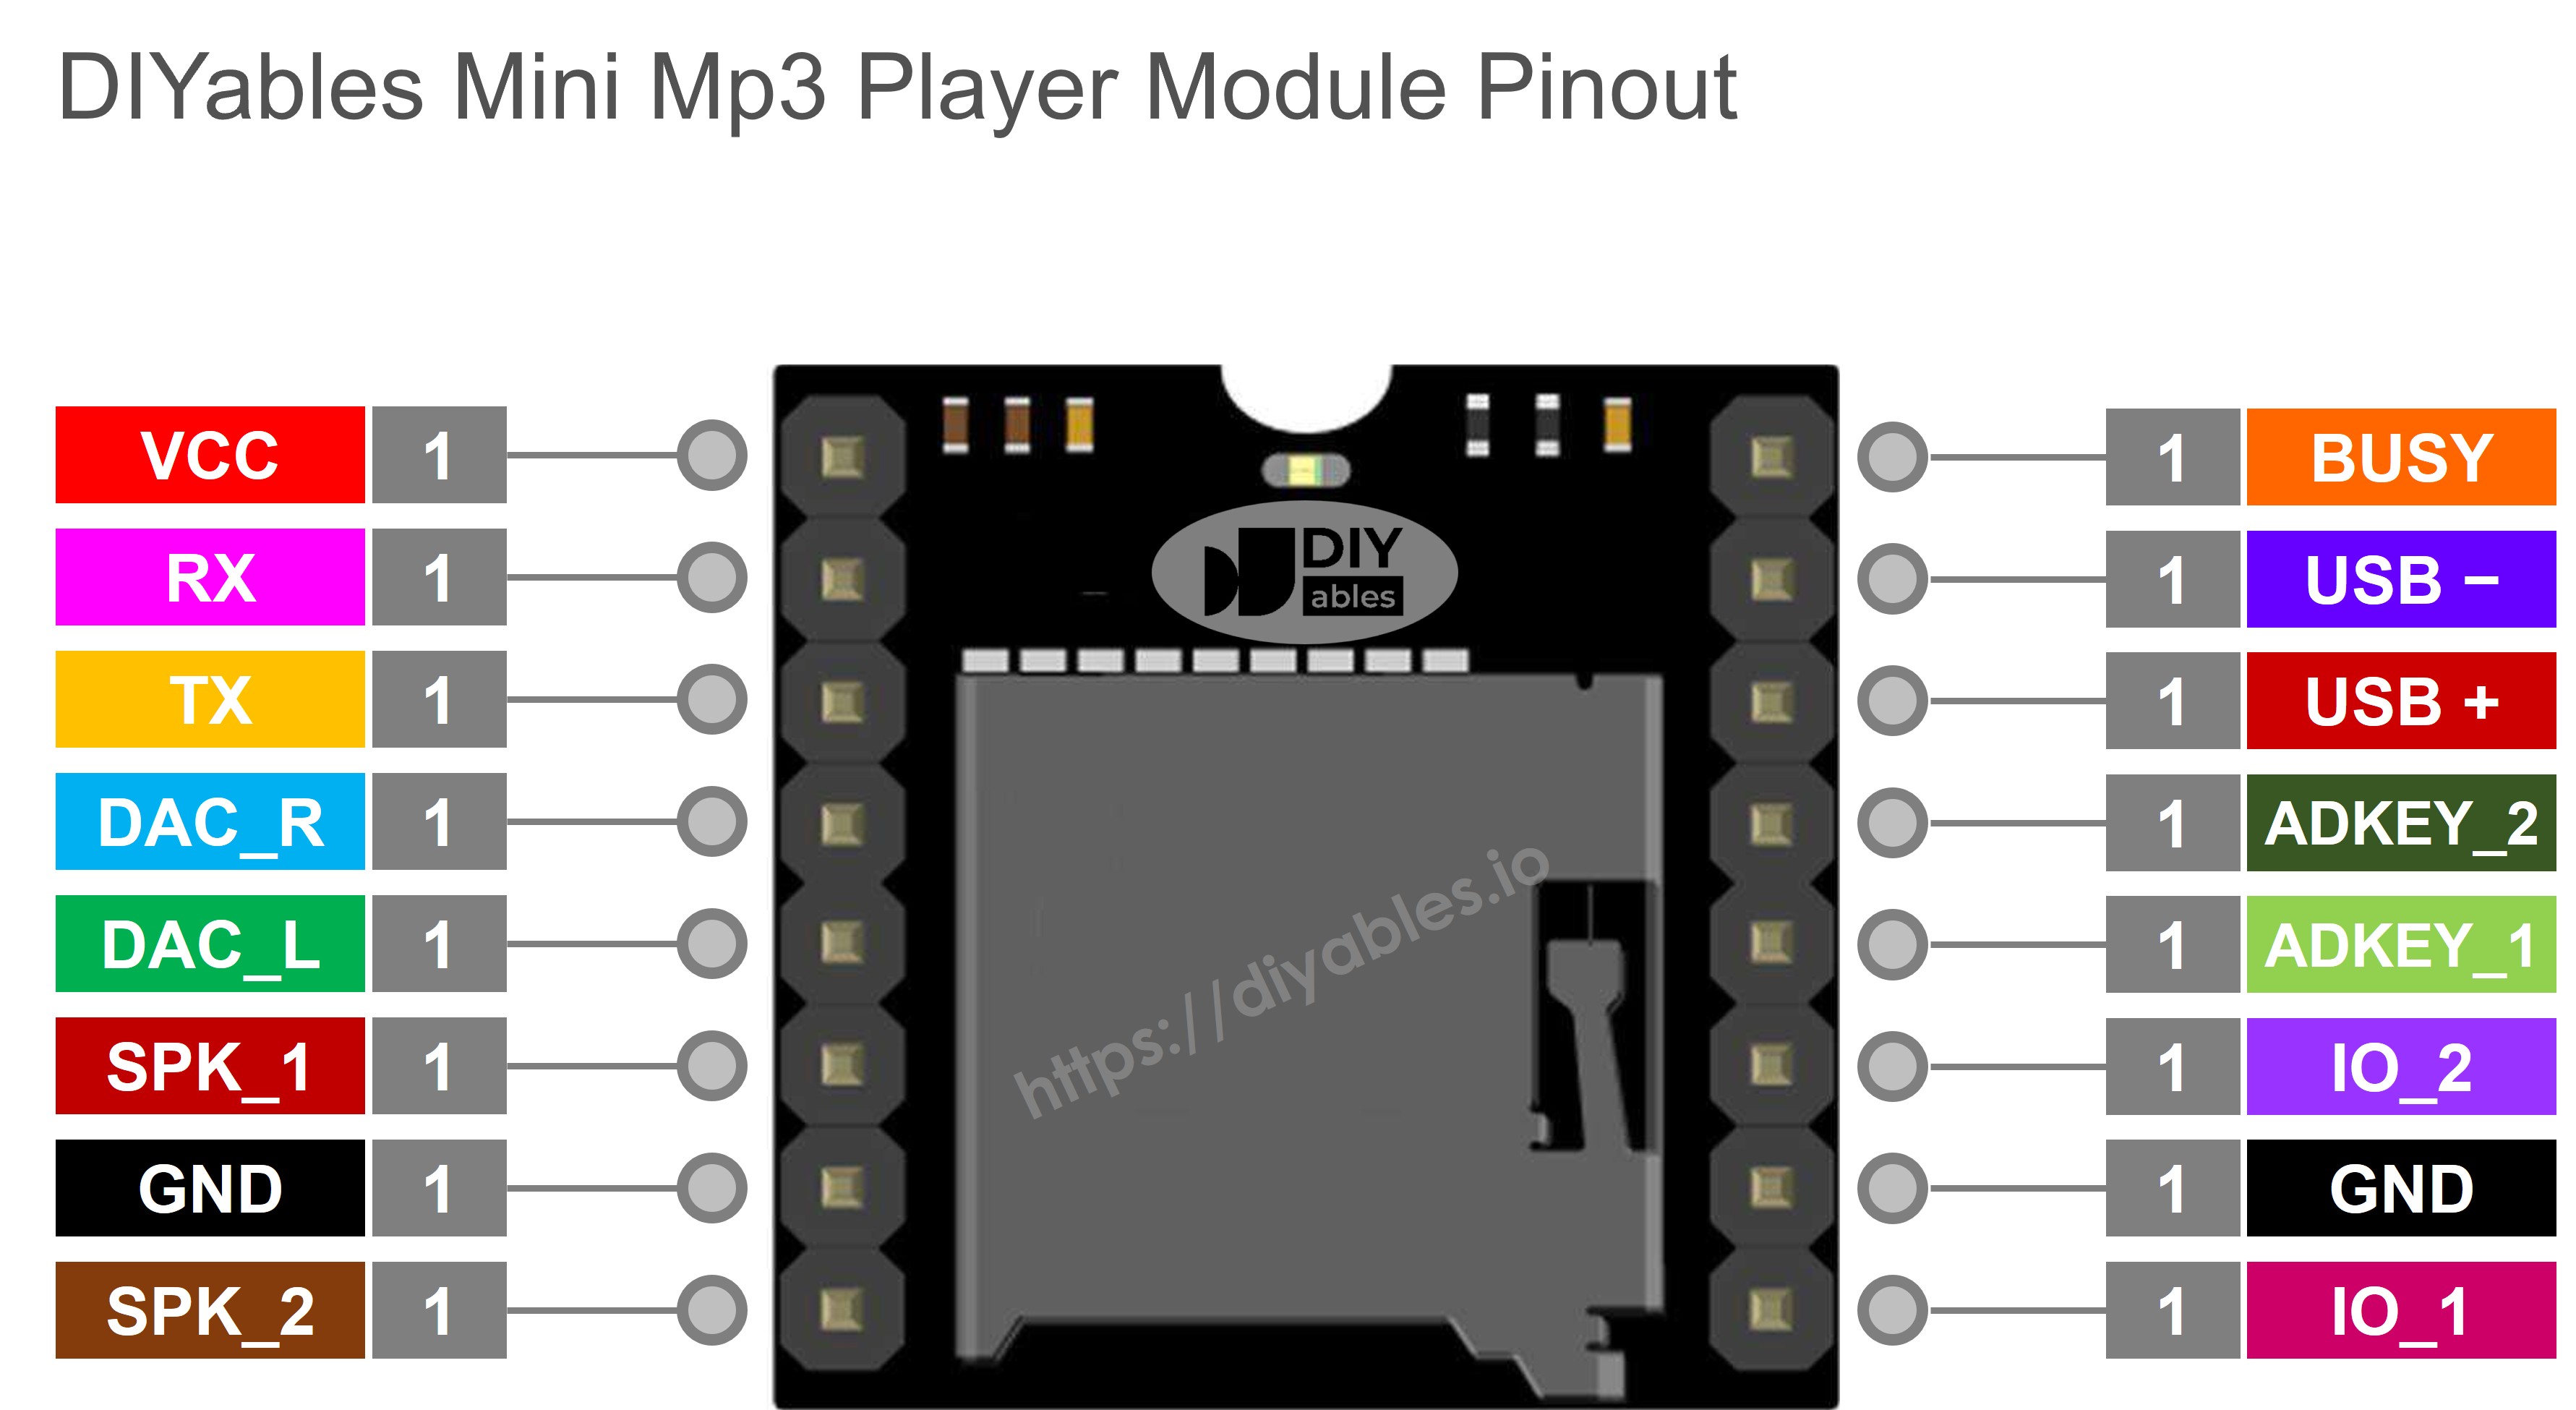
/* * DIYables Mini Mp3 Player - Play One Track * * Product: DIYables Mini Mp3 Player Module * https://diyables.io/products/mini-mp3-player-module * * Plays track 001 once, then stops. * * Wiring Table: * Mini Mp3 RX -> Arduino Pin D11 * Mini Mp3 TX -> Arduino Pin D10 * Mini Mp3 VCC -> Vbus * Mini Mp3 GND -> GND * Speaker connected to SPK_1 and SPK_2 pins * * SD Card: Put mp3 files in root, named 001.mp3, 002.mp3, etc. */#include <DIYables_MiniMp3.h>#include <SoftwareSerial.h>SoftwareSerial mp3Serial(D10, D11); // RX, TXDIYables_MiniMp3 mp3;voidsetup(){Serial.begin(9600); mp3Serial.begin(9600); mp3.begin(mp3Serial);delay(1000); // Wait for the module to initialize mp3.setVolume(25); // Set volume (0 to 30)Serial.println("Playing track 1..."); mp3.play(1); // Play track 001.mp3}voidloop(){// Nothing to do here}
테스트 방법
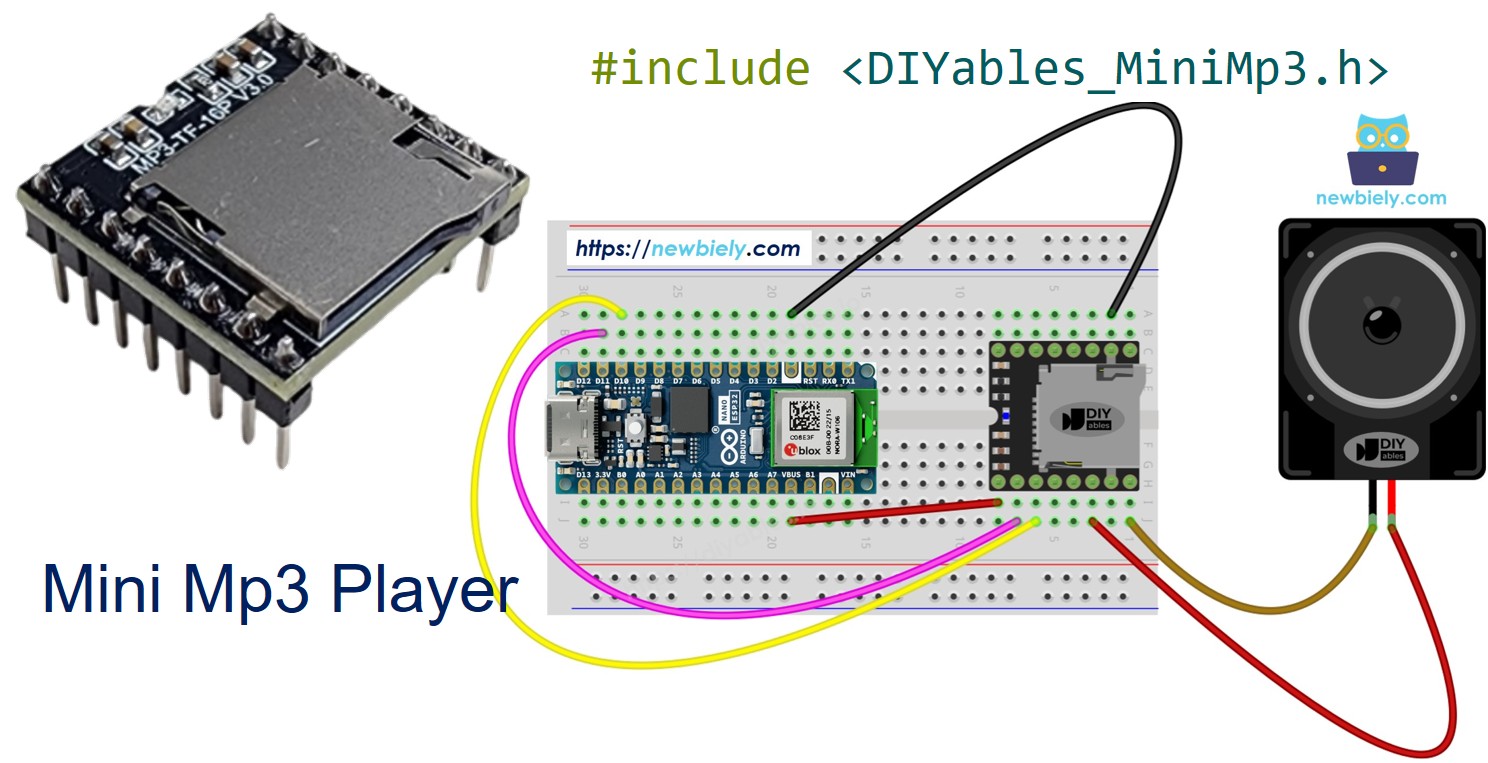
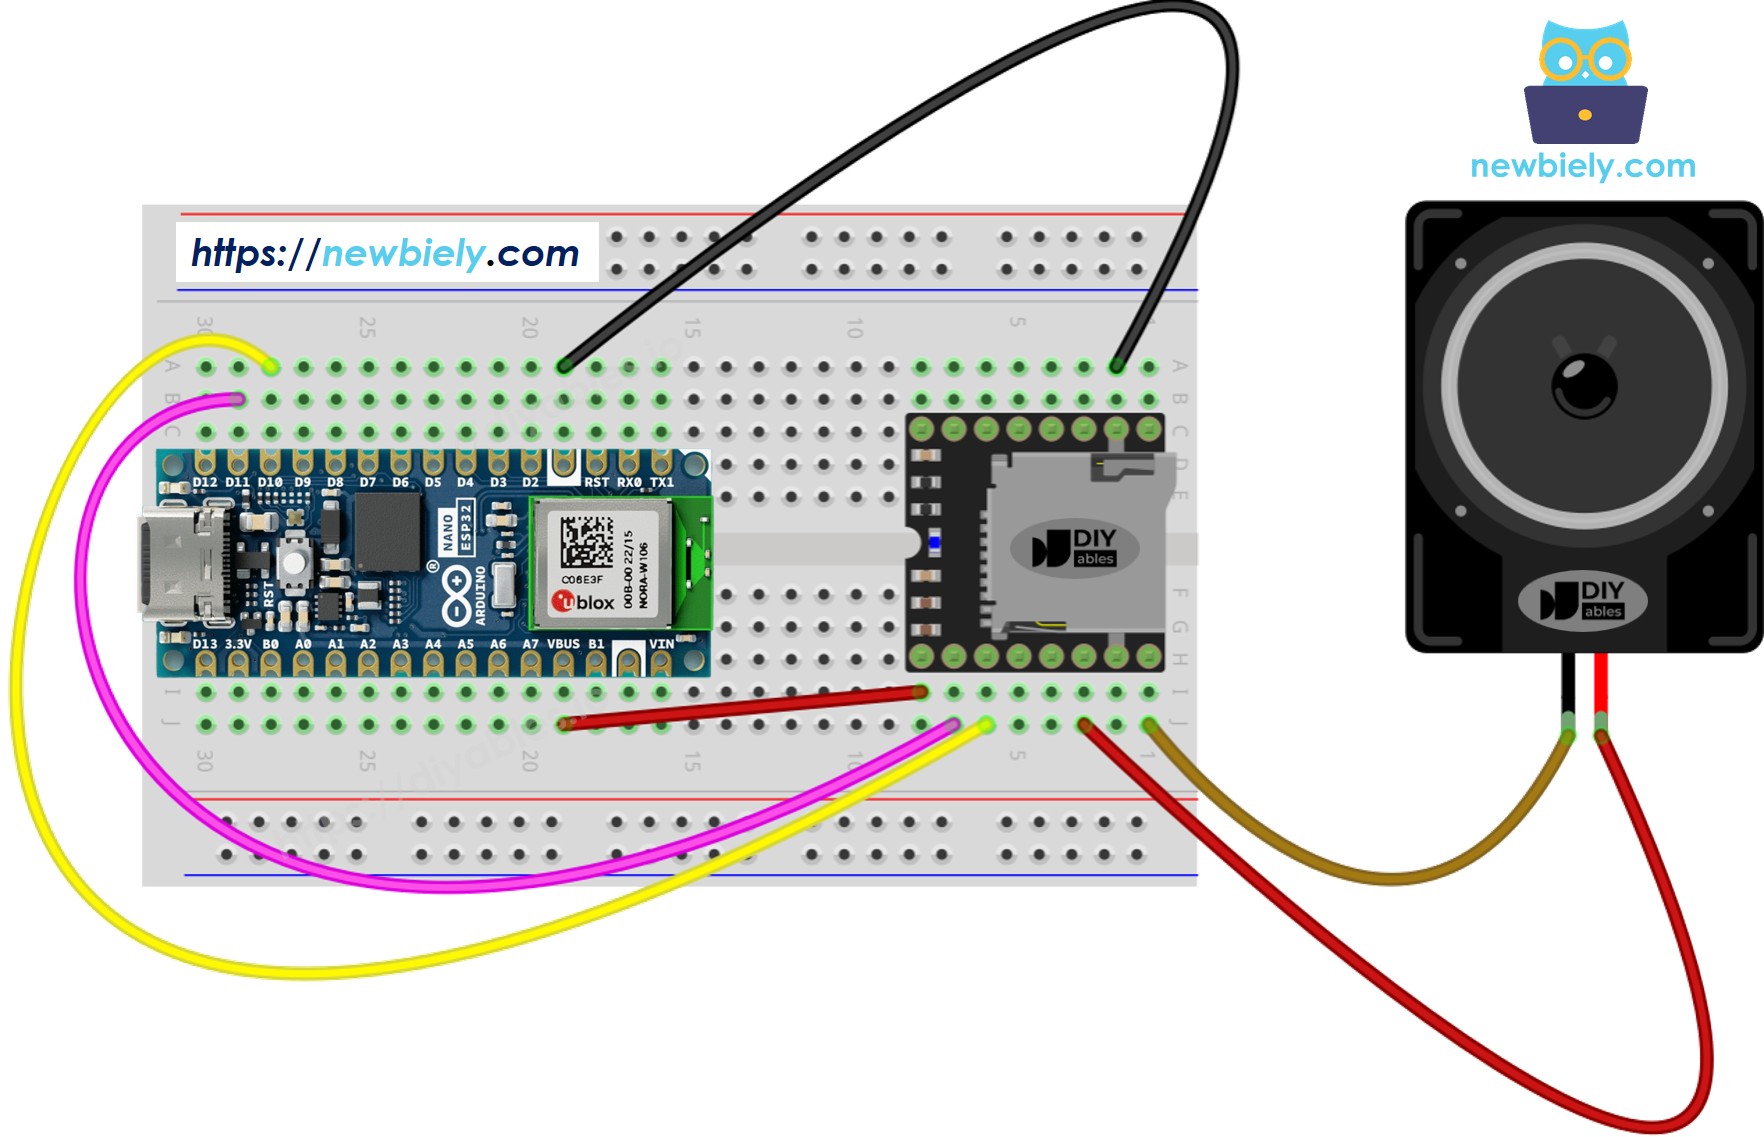
SD 카드에 MP3 파일을 로드하고 모듈에 삽입합니다.
위에 표시된 대로 모듈을 Nano ESP32에 연결합니다(저항 없이!).
USB-C를 통해 보드를 연결하고, Arduino Nano ESP32를 선택하고 업로드합니다.
연결된 스피커를 통해 001.mp3 트랙이 들려야 합니다.
재생 명령
Method
Purpose
Example
play(trackNum)
특정 트랙 시작
mp3.play(1)
playNext()
다음 트랙으로 이동
mp3.playNext()
playPrevious()
이전 트랙으로 이동
mp3.playPrevious()
pause()
활성 트랙 일시 정지
mp3.pause()
resume()
트랙 재개
mp3.resume()
stop()
재생 중지
mp3.stop()
Nano ESP32 코드 — 여러 트랙 재생
/* * DIYables Mini Mp3 Player - Play Multiple Tracks * * Product: DIYables Mini Mp3 Player Module * https://diyables.io/products/mini-mp3-player-module * * Plays tracks one after another with a delay between them. * * Wiring Table: * Mini Mp3 RX -> Arduino Pin D11 * Mini Mp3 TX -> Arduino Pin D10 * Mini Mp3 VCC -> Vbus * Mini Mp3 GND -> GND * Speaker connected to SPK_1 and SPK_2 pins * * SD Card: Put mp3 files in root, named 001.mp3, 002.mp3, 003.mp3 */#include <DIYables_MiniMp3.h>#include <SoftwareSerial.h>SoftwareSerial mp3Serial(D10, D11); // RX, TXDIYables_MiniMp3 mp3;int currentTrack = 1;int totalTracks = 3; // Change this to match your SD cardunsignedlong lastTrackTime = 0;unsignedlong trackDuration = 5000; // Wait 5 seconds between tracks (adjust as needed)voidsetup(){Serial.begin(9600); mp3Serial.begin(9600); mp3.begin(mp3Serial);delay(1000); mp3.setVolume(20);Serial.println("Playing track 1..."); mp3.play(currentTrack); lastTrackTime = millis();}voidloop(){// After trackDuration, play the next trackif (millis() - lastTrackTime >= trackDuration) { currentTrack++;if (currentTrack > totalTracks) currentTrack = 1; // Loop back to first trackSerial.print("Playing track ");Serial.println(currentTrack); mp3.play(currentTrack); lastTrackTime = millis(); }}
테스트 방법
SD 카드에 최소 3개의 트랙이 있는지 확인합니다. 업로드하면 5초마다 트랙이 순환합니다.
Nano ESP32 코드 — 볼륨 제어
/* * DIYables Mini Mp3 Player - Volume Control * * Product: DIYables Mini Mp3 Player Module * https://diyables.io/products/mini-mp3-player-module * * Use two buttons to increase/decrease the volume. * Press button on pin D2 to volume up, pin D3 to volume down. * * Wiring Table: * Mini Mp3 RX -> Arduino Pin D11 * Mini Mp3 TX -> Arduino Pin D10 * Mini Mp3 VCC -> Vbus * Mini Mp3 GND -> GND * Speaker connected to SPK_1 and SPK_2 pins * Button UP -> Pin D2 (other leg to GND) * Button DOWN -> Pin D3 (other leg to GND) * * SD Card: Put mp3 files in root, named 001.mp3, 002.mp3, etc. */#include <DIYables_MiniMp3.h>#include <SoftwareSerial.h>SoftwareSerial mp3Serial(D10, D11); // RX, TXDIYables_MiniMp3 mp3;constint BUTTON_VOL_UP = D2;constint BUTTON_VOL_DOWN = D3;int volume = 15; // Start at half volumevoidsetup(){Serial.begin(9600); mp3Serial.begin(9600);pinMode(BUTTON_VOL_UP, INPUT_PULLUP);pinMode(BUTTON_VOL_DOWN, INPUT_PULLUP); mp3.begin(mp3Serial);delay(1000); mp3.setVolume(volume); mp3.loopTrack(1); // Play track 1 on repeatSerial.print("Volume: ");Serial.println(volume);}voidloop(){// Volume Up button (pressed = LOW because of INPUT_PULLUP)if (digitalRead(BUTTON_VOL_UP) == LOW) {if (volume < 30) { volume++; mp3.setVolume(volume);Serial.print("Volume: ");Serial.println(volume); }delay(200); // Simple debounce }// Volume Down buttonif (digitalRead(BUTTON_VOL_DOWN) == LOW) {if (volume > 0) { volume--; mp3.setVolume(volume);Serial.print("Volume: ");Serial.println(volume); }delay(200); // Simple debounce }}
테스트 방법
두 개의 버튼을 연결하고 스케치를 업로드한 다음, 음악이 재생되는 동안 버튼을 누릅니다.
볼륨 명령
Method
Purpose
Example
setVolume(v)
특정 볼륨 레벨로 이동
mp3.setVolume(20)
volumeUp()
1단계 증가
mp3.volumeUp()
volumeDown()
1단계 감소
mp3.volumeDown()
getVolume()
현재 레벨 쿼리
mp3.getVolume()
Nano ESP32 코드 — 다음/이전 버튼
/* * DIYables Mini Mp3 Player - Next/Previous with Buttons * * Product: DIYables Mini Mp3 Player Module * https://diyables.io/products/mini-mp3-player-module * * Use two buttons to play next/previous tracks. * Displays the current track number on the Serial Monitor. * * Wiring Table: * Mini Mp3 RX -> Arduino Pin D11 * Mini Mp3 TX -> Arduino Pin D10 * Mini Mp3 VCC -> Vbus * Mini Mp3 GND -> GND * Speaker connected to SPK_1 and SPK_2 pins * Button NEXT -> Pin D2 (other leg to GND) * Button PREV -> Pin D3 (other leg to GND) * * SD Card: Put mp3 files in root, named 001.mp3, 002.mp3, etc. */#include <DIYables_MiniMp3.h>#include <SoftwareSerial.h>SoftwareSerial mp3Serial(D10, D11); // RX, TXDIYables_MiniMp3 mp3;constint BUTTON_NEXT = D2;constint BUTTON_PREV = D3;voidsetup(){Serial.begin(9600); mp3Serial.begin(9600);pinMode(BUTTON_NEXT, INPUT_PULLUP);pinMode(BUTTON_PREV, INPUT_PULLUP); mp3.begin(mp3Serial);delay(1000); mp3.setVolume(20); mp3.play(1); // Start with track 1Serial.println("Press NEXT or PREV button to change track");}voidloop(){if (digitalRead(BUTTON_NEXT) == LOW) {Serial.println("Next track"); mp3.playNext();delay(300); // Simple debounce }if (digitalRead(BUTTON_PREV) == LOW) {Serial.println("Previous track"); mp3.playPrevious();delay(300); // Simple debounce }}
테스트 방법
버튼을 연결하고 업로드합니다. NEXT 또는 PREV를 눌러 트랙을 탐색합니다.
Nano ESP32 코드 — 일시 정지/재개 토글
/* * DIYables Mini Mp3 Player - Pause and Resume * * Product: DIYables Mini Mp3 Player Module * https://diyables.io/products/mini-mp3-player-module * * Demonstrates pausing and resuming playback using a single button. * Press the button to toggle between pause and resume. * * Wiring Table: * Mini Mp3 RX -> Arduino Pin D11 * Mini Mp3 TX -> Arduino Pin D10 * Mini Mp3 VCC -> Vbus * Mini Mp3 GND -> GND * Speaker connected to SPK_1 and SPK_2 pins * Button -> Pin D2 (other leg to GND) * * SD Card: Put mp3 files in root, named 001.mp3, 002.mp3, etc. */#include <DIYables_MiniMp3.h>#include <SoftwareSerial.h>SoftwareSerial mp3Serial(D10, D11); // RX, TXDIYables_MiniMp3 mp3;constint BUTTON_PIN = D2;bool paused = false;voidsetup(){Serial.begin(9600); mp3Serial.begin(9600);pinMode(BUTTON_PIN, INPUT_PULLUP); mp3.begin(mp3Serial);delay(1000); mp3.setVolume(20); mp3.play(1);Serial.println("Playing. Press button to pause/resume.");}voidloop(){if (digitalRead(BUTTON_PIN) == LOW) {if (paused) { mp3.resume();Serial.println("Resumed"); }else { mp3.pause();Serial.println("Paused"); } paused = !paused;delay(300); // Simple debounce }}
Nano ESP32 코드 — 트랙 루프
/* * DIYables Mini Mp3 Player - Loop Track * * Product: DIYables Mini Mp3 Player Module * https://diyables.io/products/mini-mp3-player-module * * Loops (repeats) a track continuously with EQ setting. * * Wiring Table: * Mini Mp3 RX -> Arduino Pin D11 * Mini Mp3 TX -> Arduino Pin D10 * Mini Mp3 VCC -> Vbus * Mini Mp3 GND -> GND * Speaker connected to SPK_1 and SPK_2 pins * * SD Card file structure: * /001.mp3 * /002.mp3 * ... */#include <DIYables_MiniMp3.h>#include <SoftwareSerial.h>SoftwareSerial mp3Serial(D10, D11); // RX, TXDIYables_MiniMp3 mp3;voidsetup(){Serial.begin(9600); mp3Serial.begin(9600); mp3.begin(mp3Serial);delay(1000); // Wait for the module to initialize mp3.setVolume(25); // Volume: 0 to 30 mp3.setEQ(DIYables_MiniMp3::EQ_NORMAL);Serial.println("Playing track 1 on loop..."); mp3.loopTrack(1);}voidloop(){// Your code here}
반복 및 셔플 명령
Method
Purpose
Example
loopTrack(t)
하나의 트랙 계속 반복
mp3.loopTrack(1)
loopFolder(f)
폴더의 모든 트랙 반복
mp3.loopFolder(1)
loopAll()
카드의 모든 트랙 반복
mp3.loopAll()
stopLoop()
현재 반복 모드 종료
mp3.stopLoop()
shuffle()
재생 순서 무작위화
mp3.shuffle()
Nano ESP32 코드 — 폴더에서 재생
/* * DIYables Mini Mp3 Player - Play from Folder * * Product: DIYables Mini Mp3 Player Module * https://diyables.io/products/mini-mp3-player-module * * Plays tracks from specific folders on the SD card. * * Wiring Table: * Mini Mp3 RX -> Arduino Pin D11 * Mini Mp3 TX -> Arduino Pin D10 * Mini Mp3 VCC -> Vbus * Mini Mp3 GND -> GND * Speaker connected to SPK_1 and SPK_2 pins * * SD Card file structure: * /01/001.mp3 <- playFolder(1, 1) * /01/002.mp3 <- playFolder(1, 2) * /02/001.mp3 <- playFolder(2, 1) * /02/002.mp3 <- playFolder(2, 2) * * IMPORTANT: * - Numbering starts from 1, NOT 0 * - Folder names must be 2-digit zero-padded (01-99) * - Track names must be 3-digit zero-padded (001-255) * - Format SD card as FAT32, then copy files one by one in order * - Track order is determined by the order files were copied, * NOT by filename. So copy them in the correct sequence. */#include <DIYables_MiniMp3.h>#include <SoftwareSerial.h>SoftwareSerial mp3Serial(D10, D11); // RX, TXDIYables_MiniMp3 mp3;voidsetup(){Serial.begin(9600); mp3Serial.begin(9600); mp3.begin(mp3Serial);delay(1000); mp3.setVolume(20);// Play track 1 from folder 01Serial.println("Playing folder 01, track 001..."); mp3.playFolder(1, 1);delay(5000);// Play track 2 from folder 01Serial.println("Playing folder 01, track 002..."); mp3.playFolder(1, 2);delay(5000);// Play track 1 from folder 02Serial.println("Playing folder 02, track 001..."); mp3.playFolder(2, 1);}voidloop(){// Nothing to do here}
폴더 메서드
Method
Purpose
Example
playFolder(f, t)
폴더 f에서 트랙 t 선택
mp3.playFolder(1, 1)
playLargeFolder(f, t)
대용량 폴더 모드 (최대 3000 트랙)
mp3.playLargeFolder(1, 1500)
playFromMP3Folder(t)
특수 /mp3 폴더 액세스
mp3.playFromMP3Folder(1)
Nano ESP32 코드 — 시리얼 모니터 제어
/* * DIYables Mini Mp3 Player - Serial Command Control * * Product: DIYables Mini Mp3 Player Module * https://diyables.io/products/mini-mp3-player-module * * Control the Mp3 player by typing commands in the Serial Monitor. * Great for testing all functions without extra hardware. * * Commands (type in Serial Monitor, then press Enter): * 1-9 Play track 1 to 9 * + Volume up * - Volume down * p Pause * r Resume * s Stop * n Next track * b Previous track (back) * ? Show current status * * Wiring Table: * Mini Mp3 RX -> Arduino Pin D11 * Mini Mp3 TX -> Arduino Pin D10 * Mini Mp3 VCC -> Vbus * Mini Mp3 GND -> GND * Speaker connected to SPK_1 and SPK_2 pins * * SD Card: Put mp3 files in root, named 001.mp3, 002.mp3, etc. */#include <DIYables_MiniMp3.h>#include <SoftwareSerial.h>SoftwareSerial mp3Serial(D10, D11); // RX, TXDIYables_MiniMp3 mp3;voidsetup(){Serial.begin(9600); mp3Serial.begin(9600); mp3.begin(mp3Serial);delay(1000); mp3.setVolume(20);Serial.println("=== DIYables Mini Mp3 Player ===");Serial.println("Commands:");Serial.println(" 1-9 Play track number");Serial.println(" + Volume up");Serial.println(" - Volume down");Serial.println(" p Pause");Serial.println(" r Resume");Serial.println(" s Stop");Serial.println(" n Next track");Serial.println(" b Previous track");Serial.println(" ? Show status");Serial.println("================================");}voidloop(){if (Serial.available()) {char cmd = Serial.read();switch (cmd) {case'1': case'2': case'3':case'4': case'5': case'6':case'7': case'8': case'9':Serial.print("Playing track ");Serial.println(cmd - '0'); mp3.play(cmd - '0');break;case'+':Serial.println("Volume up"); mp3.volumeUp();break;case'-':Serial.println("Volume down"); mp3.volumeDown();break;case'p':Serial.println("Paused"); mp3.pause();break;case'r':Serial.println("Resumed"); mp3.resume();break;case's':Serial.println("Stopped"); mp3.stop();break;case'n':Serial.println("Next track"); mp3.playNext();break;case'b':Serial.println("Previous track"); mp3.playPrevious();break;case'?': {Serial.println("--- Status ---");int16_t vol = mp3.getVolume();Serial.print("Volume: ");Serial.println(vol);int16_t track = mp3.getCurrentTrack();Serial.print("Current track: ");Serial.println(track);bool playing = mp3.isPlaying();Serial.print("Playing: ");Serial.println(playing ? "Yes" : "No");int16_t total = mp3.getTrackCount();Serial.print("Total tracks: ");Serial.println(total);Serial.println("--------------");break; }default:break; } }}