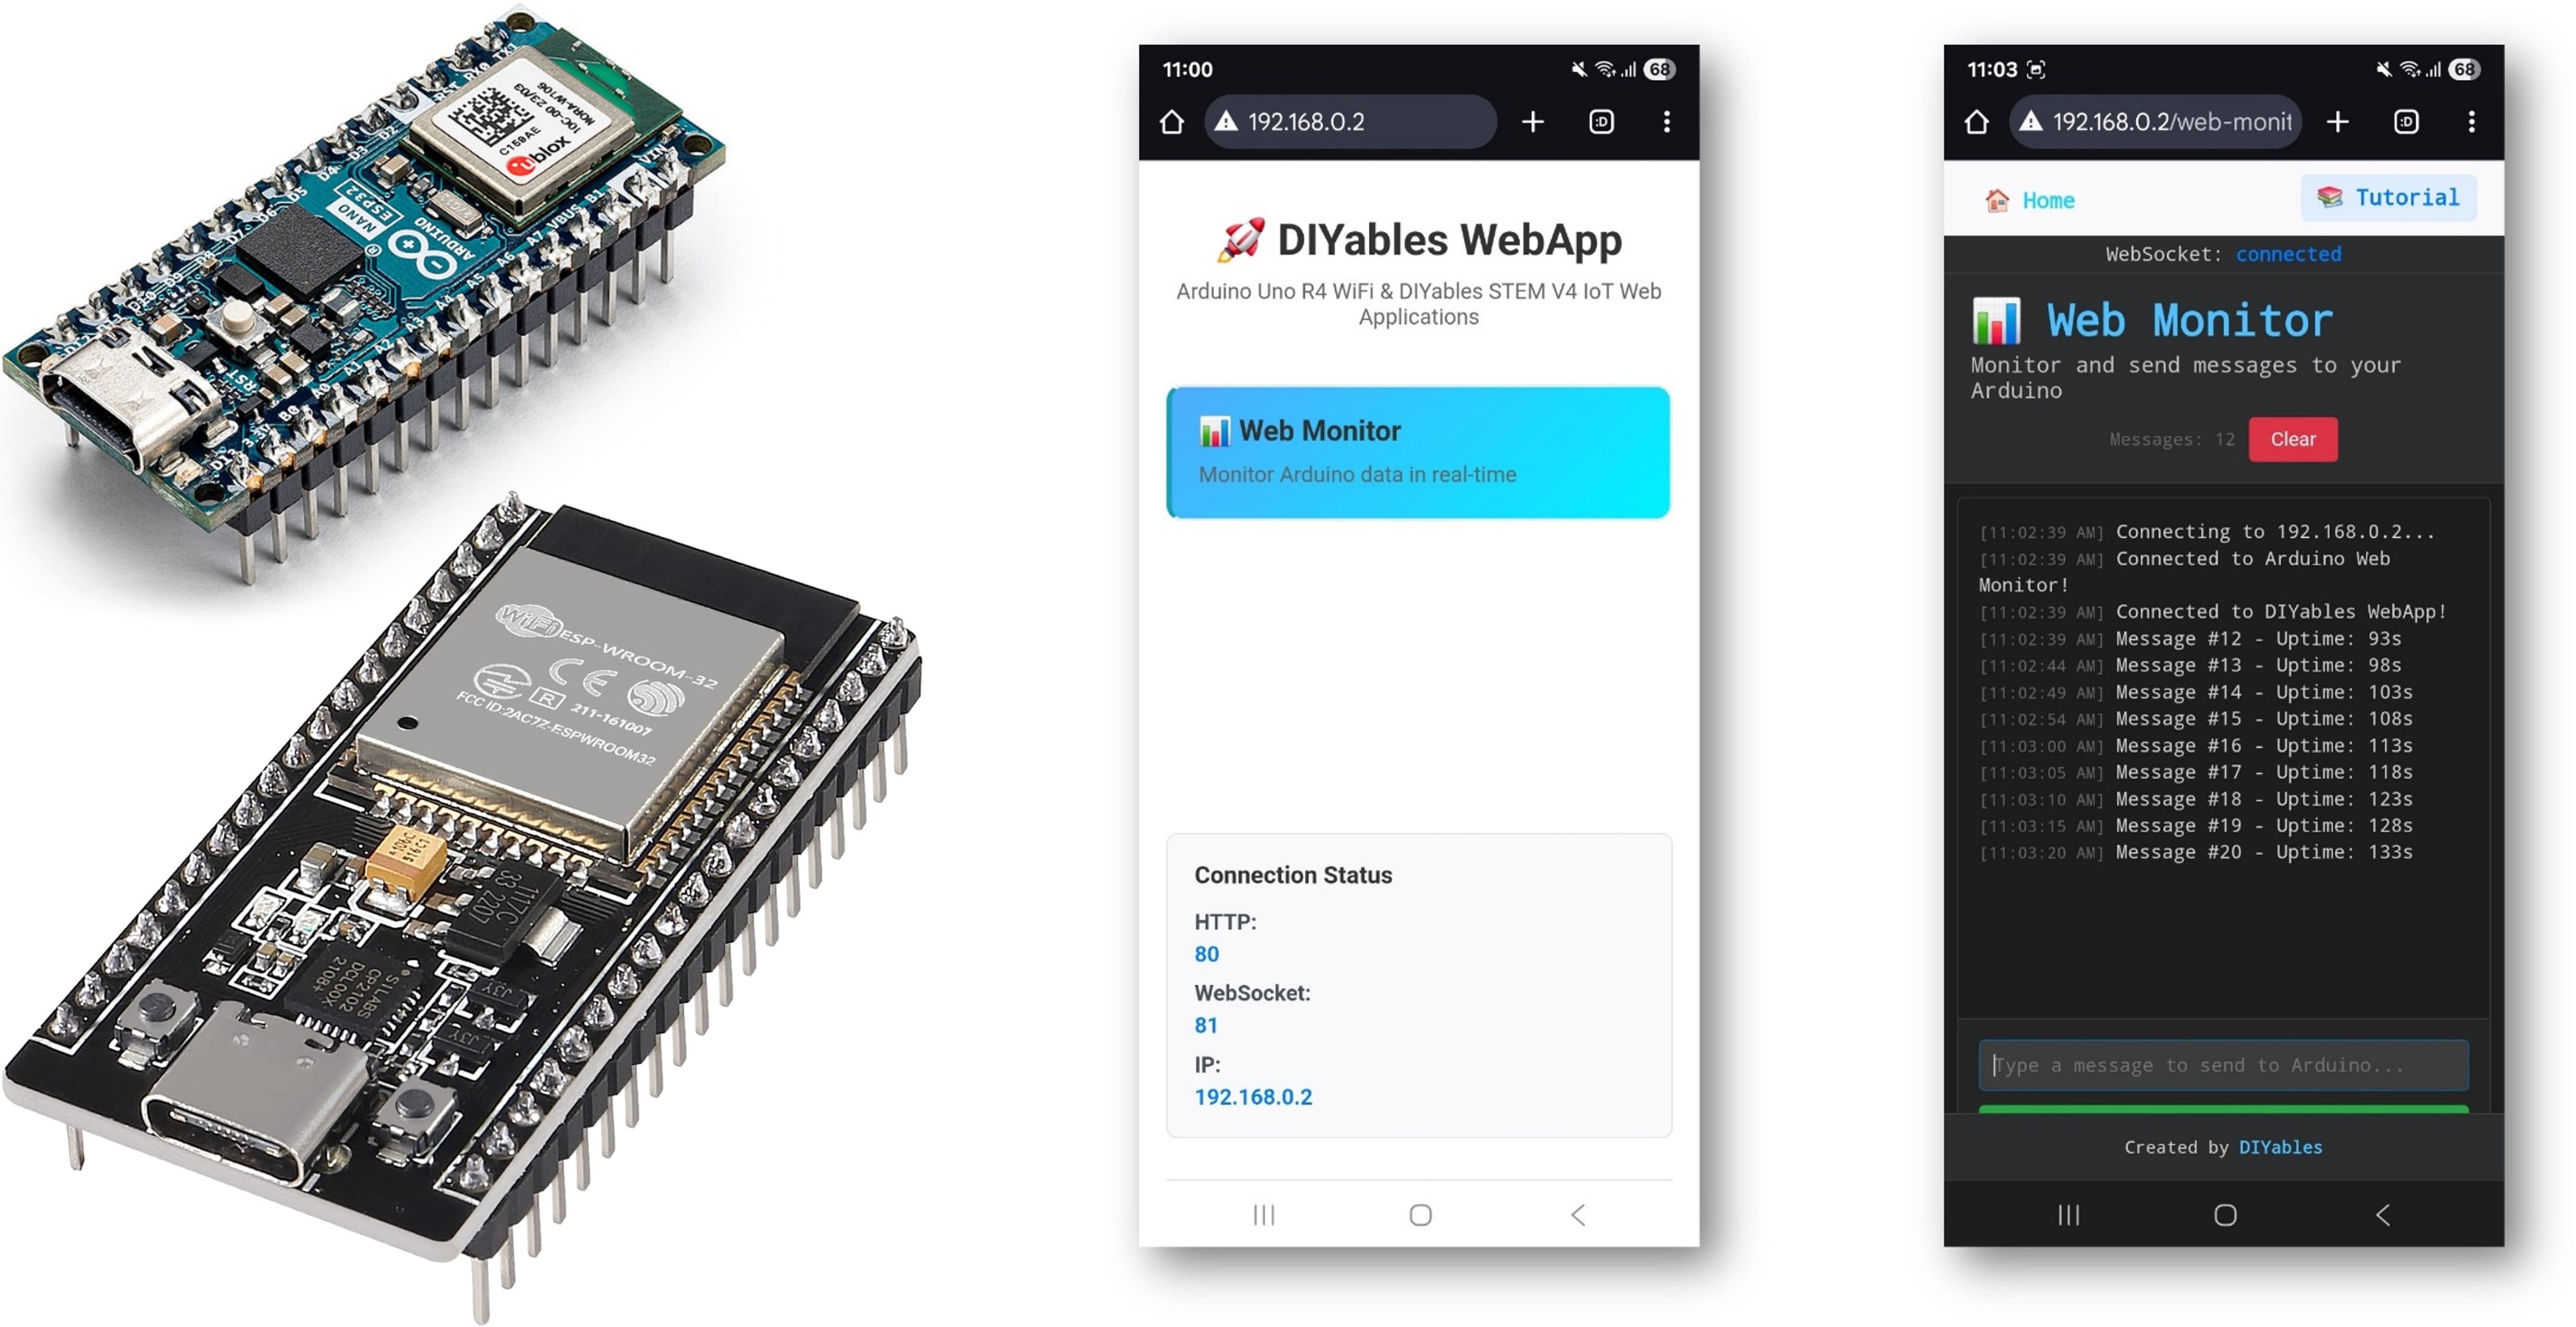
DIYables ESP32 WebApps 라이브러리를 사용한 아두이노 나노 ESP32 웹 모니터
개요
이 튜토리얼은 DIYables ESP32 WebApps 라이브러리의 DIYablesWebMonitorPage 클래스를 다룹니다. 이 페이지는 브라우저에서 터미널 스타일의 인터페이스를 제공합니다. 스케치에서 전송된 텍스트는 브라우저 디스플레이에 나타나고, 브라우저에서 입력된 텍스트는 스케치 콜백으로 전달됩니다. 이를 통해 USB 시리얼 연결 없이 동일한 네트워크의 모든 기기에서 Arduino Nano ESP32를 모니터링하고 명령할 수 있습니다.
DIYables ESP32 WebApps로 WebMonitor를 사용하는 방법을 보여주는 단계별 영상 튜토리얼:
이 튜토리얼에서 다루는 내용
- sendToWebMonitor()를 사용하여 스케치 출력을 브라우저 모니터에 보내기
- 스케치 콜백에서 브라우저 입력 명령 수신하기
- LED 제어 및 상태 쿼리와 같은 내장 명령 처리하기
- 스마트폰 또는 PC에서 모니터 인터페이스 접근하기
준비물
| 1 | × | 아두이노 나노 ESP32 | 쿠팡 | 아마존 | |
| 1 | × | USB 케이블 타입-A to 타입-C (USB-A PC용) | 쿠팡 | 아마존 | |
| 1 | × | USB 케이블 타입-C to 타입-C (USB-C PC용) | 아마존 | |
| 1 | × | (추천) 아두이노 나노용 스크루 터미널 확장 보드 | 쿠팡 | 아마존 | |
| 1 | × | (추천) 아두이노 나노용 브레이크아웃 확장 보드 | 쿠팡 | 아마존 | |
| 1 | × | (추천) 아두이노 나노 ESP32용 전원 분배기 | 쿠팡 | 아마존 |
공개: 이 포스팅 에 제공된 일부 링크는 아마존 제휴 링크입니다. 이 포스팅은 쿠팡 파트너스 활동의 일환으로, 이에 따른 일정액의 수수료를 제공받습니다.
단계
다음 지침을 단계별로 따르세요:
- Arduino Nano ESP32가 처음이라면, 아두이노 나노 ESP32 - 소프트웨어 설치 튜토리얼을 참조하세요.
- USB 케이블을 사용하여 Arduino Nano ESP32 보드를 컴퓨터에 연결합니다.
- 컴퓨터에서 Arduino IDE를 실행합니다.
- 적절한 보드(예: Arduino Nano ESP32)와 COM 포트를 선택합니다.
- Arduino IDE 왼쪽 바의 Libraries 아이콘으로 이동합니다.
- "DIYables ESP32 WebApps"를 검색하여 DIYables의 DIYables ESP32 WebApps 라이브러리를 찾습니다
- Install 버튼을 클릭하여 라이브러리를 설치합니다.
- Search for DIYables ESP32 WebApps created by DIYables and click the Install button.
1
void setup() {
- 다른 라이브러리 의존성 설치 요청을 받게 됩니다
- Install All 버튼을 클릭하여 모든 라이브러리 의존성을 설치합니다.
- Arduino IDE에서 File Examples DIYables ESP32 WebApps WebMonitor 예제로 이동하거나, 위의 코드를 복사하여 Arduino IDE 편집기에 붙여넣습니다
/*
* DIYables WebApp Library - Web Monitor Example
*
* This example demonstrates the Web Monitor feature:
* - Real-time serial monitor in web browser
* - Send commands from browser to Arduino
* - Automatic message timestamping
*
* Hardware: ESP32 Boards
*
* Setup:
* 1. Update WiFi credentials below
* 2. Upload the sketch to your Arduino
* 3. Open Serial Monitor to see the IP address
* 4. Navigate to http://[IP_ADDRESS]/webmonitor
*/
#include <DIYables_ESP32_Platform.h>
#include <DIYablesWebApps.h>
// WiFi credentials - UPDATE THESE WITH YOUR NETWORK
const char WIFI_SSID[] = "YOUR_WIFI_SSID";
const char WIFI_PASSWORD[] = "YOUR_WIFI_PASSWORD";
// Create WebApp server and page instances
ESP32ServerFactory serverFactory;
DIYablesWebAppServer webAppsServer(serverFactory, 80, 81);
DIYablesHomePage homePage;
DIYablesWebMonitorPage webMonitorPage;
// Demo variables
unsigned long lastMessage = 0;
int messageCount = 0;
void setup() {
Serial.begin(9600);
delay(1000);
Serial.println("DIYables ESP32 WebApp - Web Monitor Example");
// Add home and web monitor pages
webAppsServer.addApp(&homePage);
webAppsServer.addApp(&webMonitorPage);
// Optional: Add 404 page for better user experience
webAppsServer.setNotFoundPage(DIYablesNotFoundPage());
// Initialize LED for status indication
pinMode(LED_BUILTIN, OUTPUT);
// Start the WebApp server
if (!webAppsServer.begin(WIFI_SSID, WIFI_PASSWORD)) {
while (1) {
Serial.println("Failed to start WebApp server!");
delay(1000);
}
}
// Set up monitor callback for incoming commands
webMonitorPage.onWebMonitorMessage([](const String& message) {
Serial.println("Command from web: " + message);
// Process simple commands
if (message == "LED_ON") {
digitalWrite(LED_BUILTIN, HIGH);
webMonitorPage.sendToWebMonitor("LED turned ON");
return;
}
if (message == "LED_OFF") {
digitalWrite(LED_BUILTIN, LOW);
webMonitorPage.sendToWebMonitor("LED turned OFF");
return;
}
if (message == "STATUS") {
String status = "Arduino Status: LED=" + String(digitalRead(LED_BUILTIN) ? "ON" : "OFF");
webMonitorPage.sendToWebMonitor(status);
return;
}
if (message == "HELP") {
webMonitorPage.sendToWebMonitor("Available commands: LED_ON, LED_OFF, STATUS, HELP");
return;
}
webMonitorPage.sendToWebMonitor("Unknown command: " + message);
});
// Send welcome message
webMonitorPage.sendToWebMonitor("Arduino Web Monitor ready!");
webMonitorPage.sendToWebMonitor("Type HELP for available commands");
}
void loop() {
// Handle WebApp server communications
webAppsServer.loop();
// Send periodic updates to web monitor
if (millis() - lastMessage > 5000) { // Every 5 seconds
messageCount++;
// Send sensor readings or status updates
String message = "Message #" + String(messageCount) + " - Uptime: " + String(millis() / 1000) + "s";
webMonitorPage.sendToWebMonitor(message);
lastMessage = millis();
}
// Add your main application code here
delay(10);
}
- 스케치의 WiFi 자격 증명을 업데이트합니다:
const char WIFI_SSID[] = "YOUR_WIFI_NETWORK";
const char WIFI_PASSWORD[] = "YOUR_WIFI_PASSWORD";
- Arduino IDE의 Upload 버튼을 클릭하여 코드를 Arduino Nano ESP32에 업로드합니다
- 시리얼 모니터를 엽니다
- 시리얼 모니터 출력은 다음과 유사해야 합니다:
8
Serial.println("Hello World!");
Message (Enter to send message to 'Arduino Nano ESP32' on 'COM15')
New Line
9600 baud
DIYables WebApp - Web Monitor Example
INFO: Added app /
INFO: Added app /web-monitor
DIYables WebApp Library
Platform: Arduino Nano ESP32
Network connected!
IP address: 192.168.0.2
HTTP server started on port 80
Configuring WebSocket server callbacks...
WebSocket server started on port 81
WebSocket URL: ws://192.168.0.2:81
WebSocket server started on port 81
==========================================
DIYables WebApp Ready!
==========================================
Web Interface: http://192.168.0.2
WebSocket: ws://192.168.0.2:81
Available Applications:
Home Page: http://192.168.0.2/
Web Monitor: http://192.168.0.2/web-monitor
==========================================
- 아무것도 표시되지 않으면 보드의 리셋 버튼을 누르세요.
- 시리얼 모니터의 IP 주소를 동일한 네트워크의 브라우저에 입력합니다.
- 예: http://192.168.0.2
- 홈 페이지에 모니터 애플리케이션 카드가 표시됩니다:
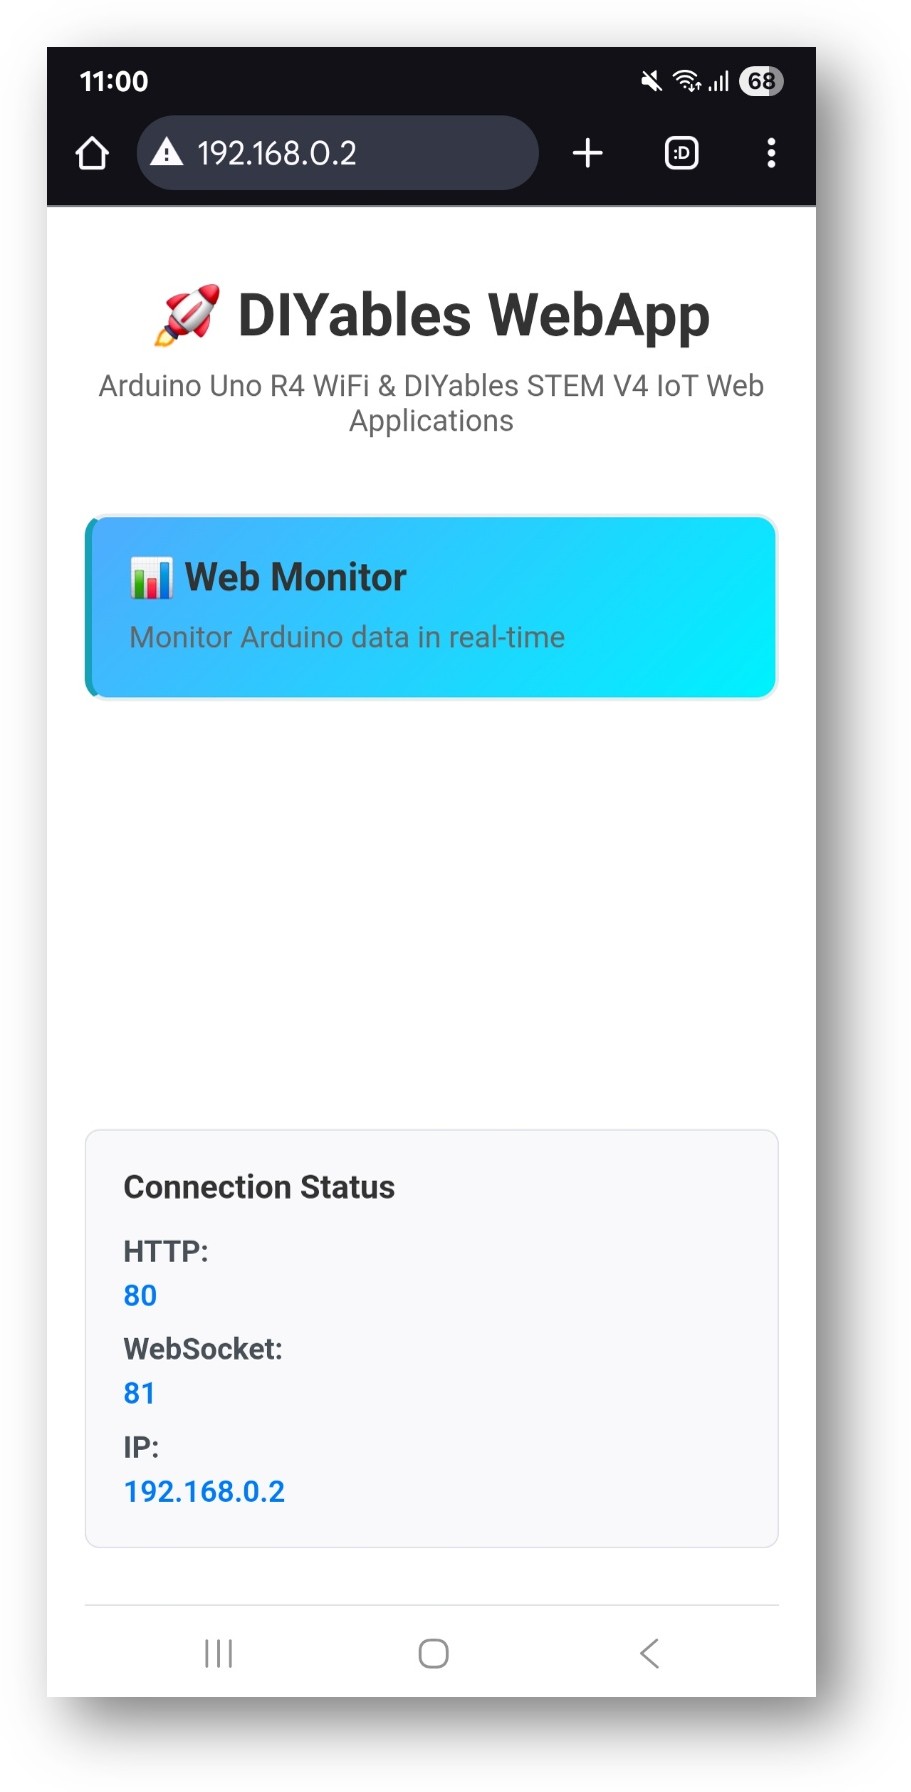
- 웹 모니터 카드를 선택하여 터미널 인터페이스를 엽니다:
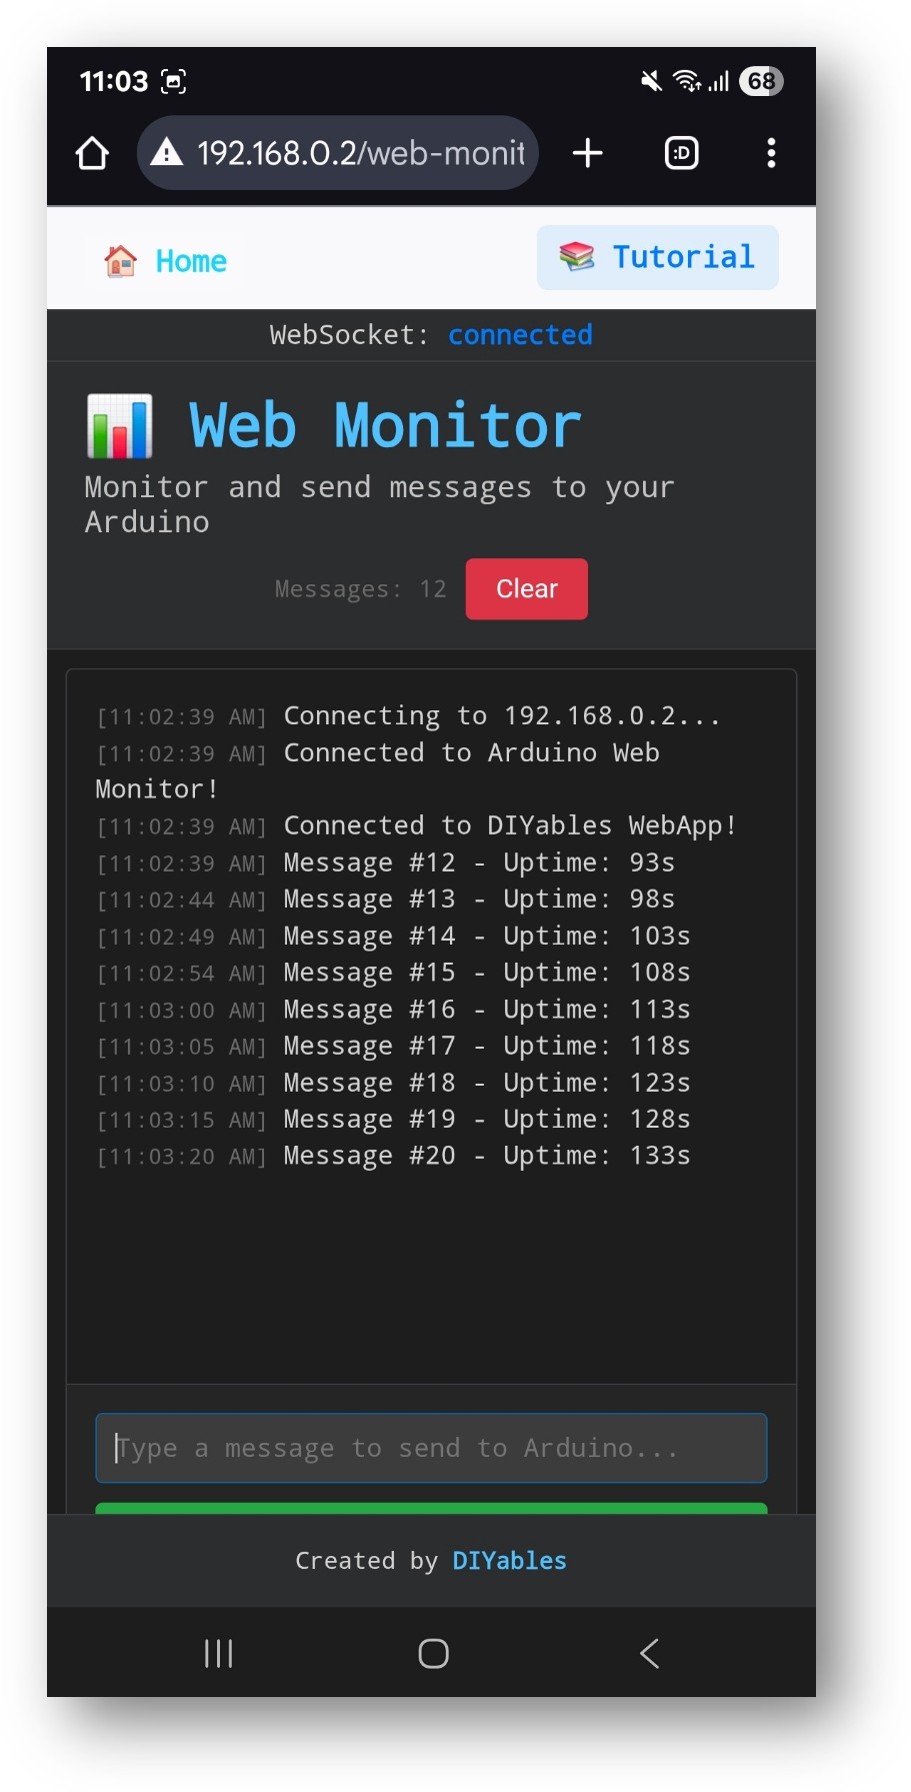
- 페이지는 http://192.168.0.2/web-monitor에서 직접 접근할 수도 있습니다.
- 입력 필드에 명령을 입력하고 Enter를 누릅니다. 보드가 응답하고 터미널에 응답이 표시됩니다.
내장 명령어
예제 스케치는 브라우저에서 입력된 다음 명령어를 인식합니다:
| 명령어 | 동작 |
|---|---|
| led on | 내장 LED를 켭니다 |
| led off | 내장 LED를 끕니다 |
| led toggle | LED 상태를 토글합니다 |
| blink | LED를 3번 깜박입니다 |
| status | 보드 상태 및 가동 시간을 출력합니다 |
| help | 인식된 명령어 목록 표시 |
| reset counter | 메시지 카운터 초기화 |
| memory | 여유 힙 메모리 보고 |
| test | 테스트 메시지 전송 |
| echo [text] | 입력된 텍스트를 반환합니다 |
| repeat [n] [text] | 텍스트를 n번 반복합니다 |
스케치에서 데이터 보내기
스케치의 어디서나 sendToWebMonitor()를 호출하여 브라우저에 텍스트를 푸시합니다:
void loop() {
webAppsServer.loop();
// Send a periodic status message
static unsigned long lastSend = 0;
if (millis() - lastSend >= 5000) {
lastSend = millis();
webMonitorPage.sendToWebMonitor("Uptime: " + String(millis() / 1000) + " s");
}
}
브라우저에서 명령 수신하기
브라우저 입력 필드에서 입력된 텍스트를 처리하기 위해 콜백을 등록합니다:
webMonitorPage.onWebMonitorMessage([](const String& command) {
Serial.println("Received: " + command);
if (command == "led on") {
digitalWrite(LED_BUILTIN, HIGH);
webMonitorPage.sendToWebMonitor("LED is now ON");
} else if (command == "led off") {
digitalWrite(LED_BUILTIN, LOW);
webMonitorPage.sendToWebMonitor("LED is now OFF");
} else {
webMonitorPage.sendToWebMonitor("Unknown command: " + command);
}
});
문제 해결
모니터에 스케치 출력이 표시되지 않음
- sendToWebMonitor()가 호출되고 있는지 확인합니다. 실행을 확인하기 위해 옆에 Serial.println()을 추가합니다
- 브라우저의 WebSocket 상태 표시기를 확인합니다
- webAppsServer.loop()가 차단 지연 없이 모든 loop() 반복에서 실행되는지 확인합니다
브라우저에서 보낸 명령이 수신되지 않음
- webAppsServer.begin() 전에 onWebMonitorMessage가 등록되었는지 확인합니다
- 원시 명령 텍스트에 대해 시리얼 모니터를 확인합니다
페이지를 열 수 없음
- 시리얼 모니터에 표시된 IP 주소를 확인합니다
- 브라우저 기기와 보드가 동일한 2.4GHz WiFi 네트워크에 있는지 확인합니다


