DIYables ESP32 WebApps 라이브러리를 사용한 아두이노 나노 ESP32 웹 테이블
개요
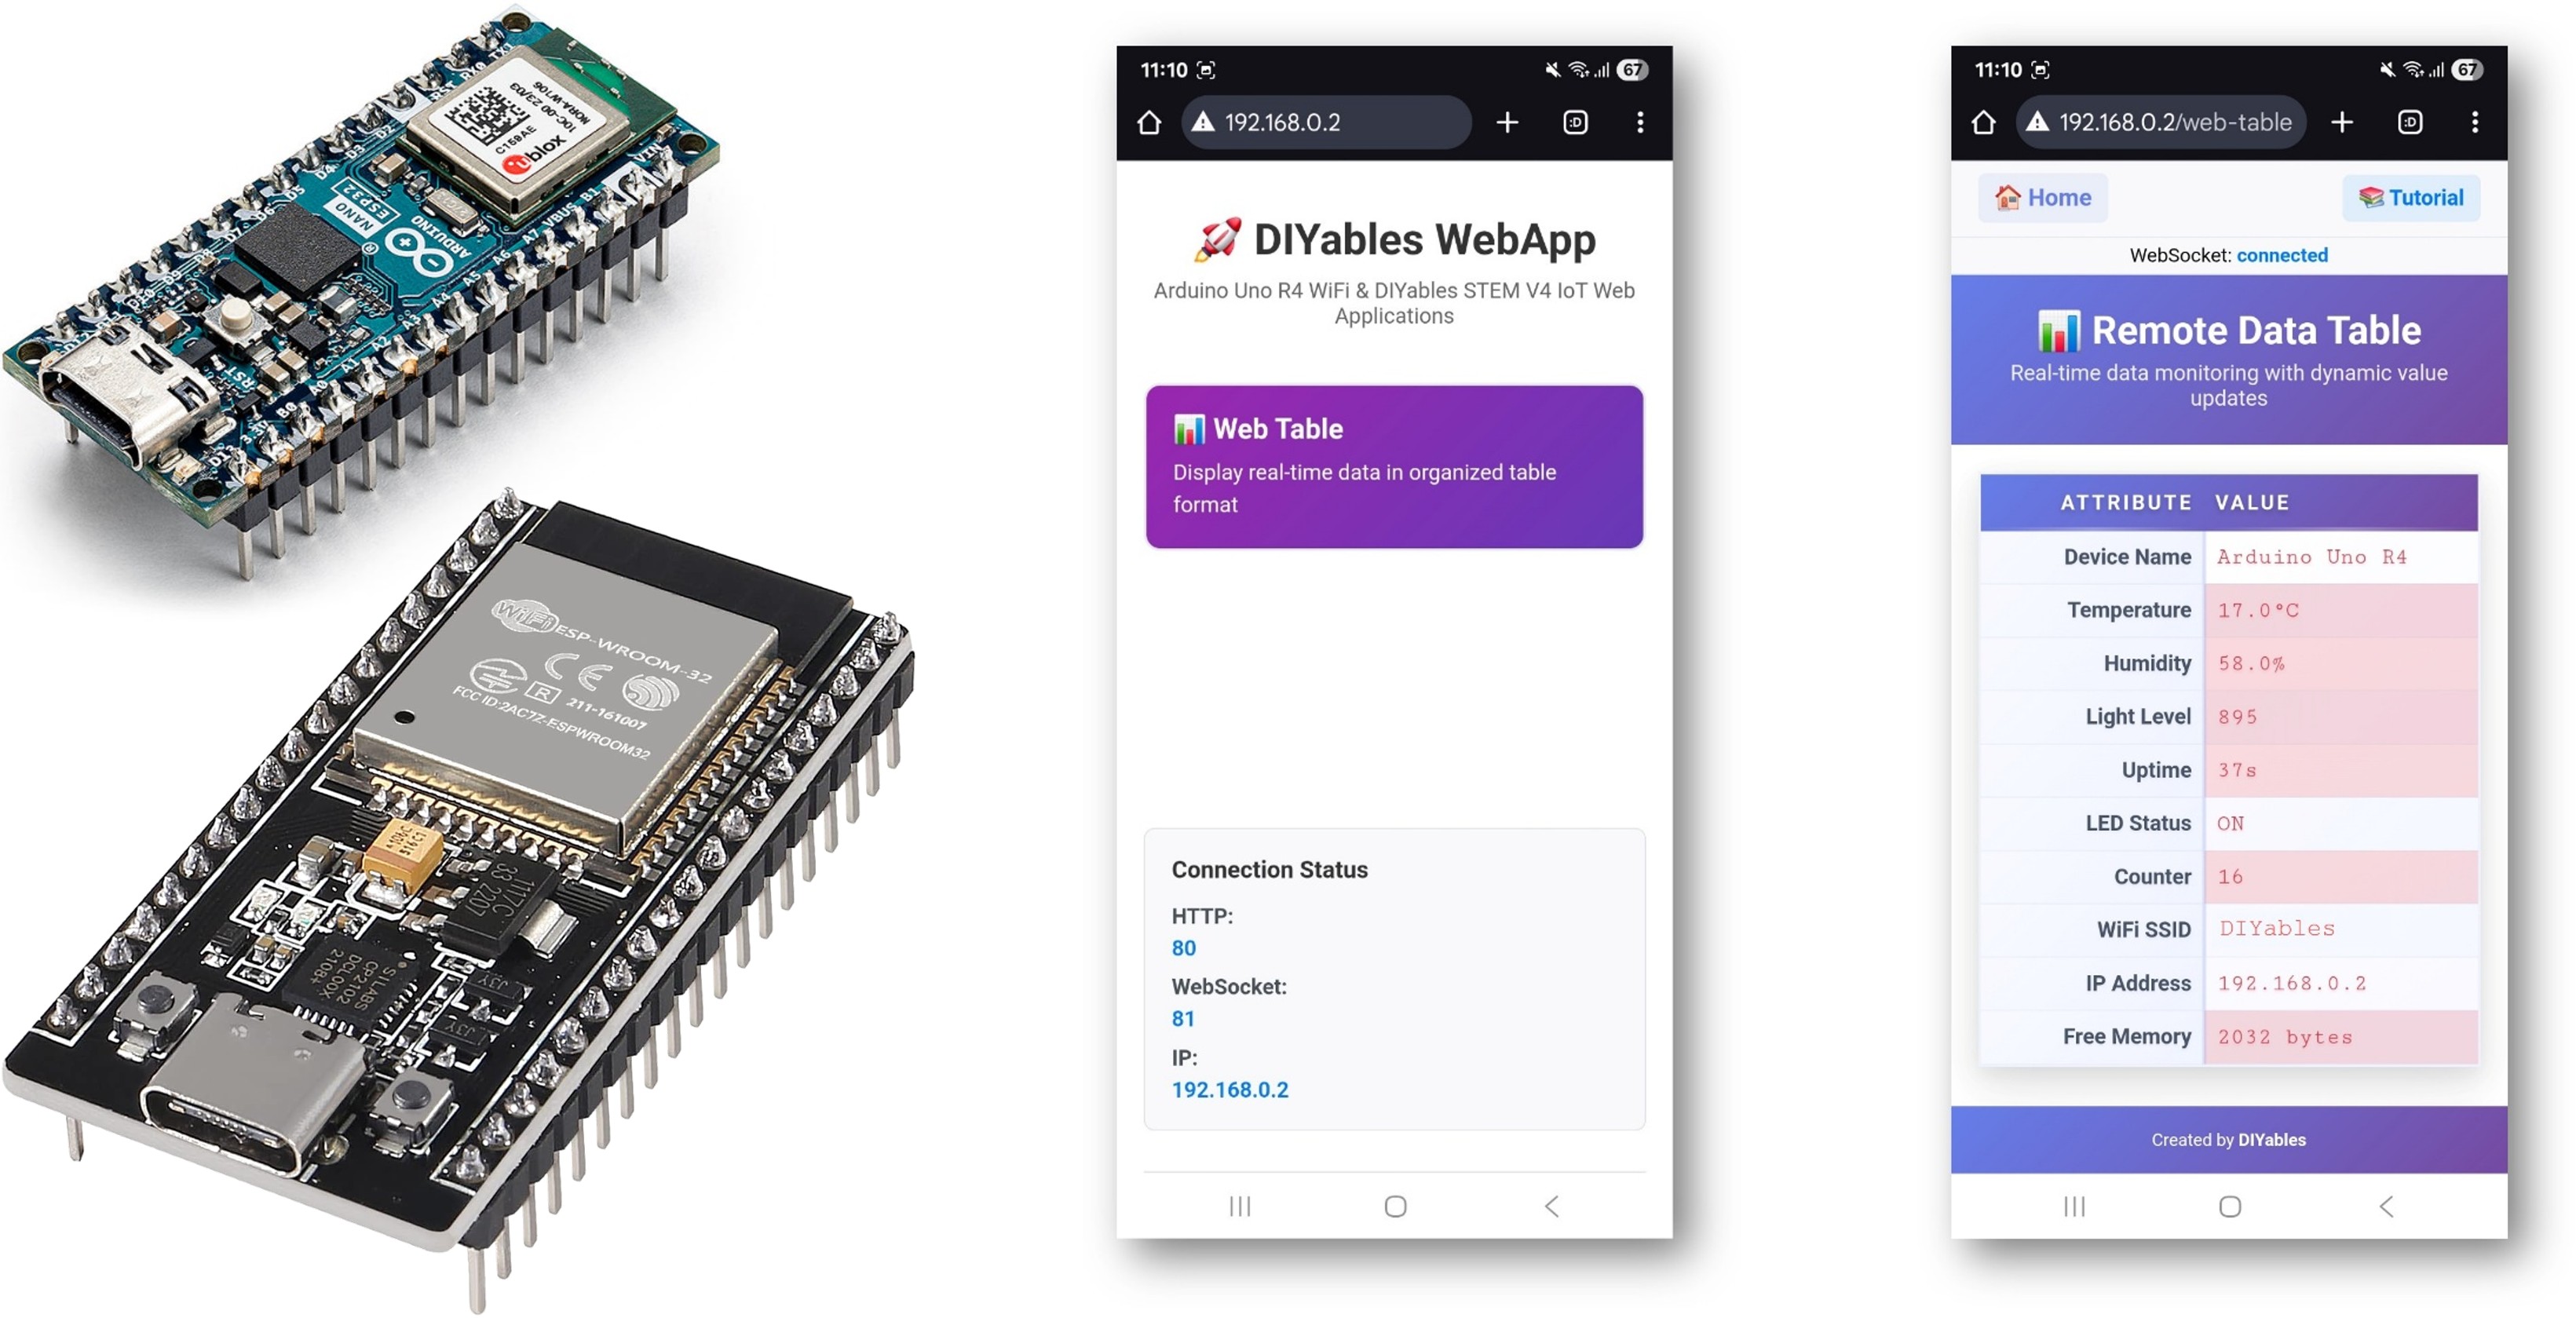
이 튜토리얼은 DIYables ESP32 WebApps 라이브러리의 DIYablesWebTablePage 클래스를 다룹니다. 이 페이지는 브라우저에서 두 열짜리 속성-값 테이블을 렌더링합니다. 행은 시작 시 Arduino Nano ESP32에서 addRow()를 사용하여 한 번 정의됩니다. 작동 중에 updateValue()를 호출하여 WebSocket을 통해 개별 값을 업데이트합니다. 브라우저는 추가적인 스케치 코드 없이 활발하게 변경 중인 값(빨간색)과 안정된 값(파란색)을 자동으로 강조 표시합니다.
이 튜토리얼에서 다루는 내용
- setup()에서 속성 이름으로 테이블 행 정의하기
- 런타임에 값 업데이트 보내기
- 브라우저의 자동 변경 감지 강조 표시 이해하기
- 테이블 행 수 제한
준비물
| 1 | × | 아두이노 나노 ESP32 | 쿠팡 | 아마존 | |
| 1 | × | USB 케이블 타입-A to 타입-C (USB-A PC용) | 쿠팡 | 아마존 | |
| 1 | × | USB 케이블 타입-C to 타입-C (USB-C PC용) | 아마존 | |
| 1 | × | (추천) 아두이노 나노용 스크루 터미널 확장 보드 | 쿠팡 | 아마존 | |
| 1 | × | (추천) 아두이노 나노용 브레이크아웃 확장 보드 | 쿠팡 | 아마존 | |
| 1 | × | (추천) 아두이노 나노 ESP32용 전원 분배기 | 쿠팡 | 아마존 |
공개: 이 포스팅 에 제공된 일부 링크는 아마존 제휴 링크입니다. 이 포스팅은 쿠팡 파트너스 활동의 일환으로, 이에 따른 일정액의 수수료를 제공받습니다.
단계
다음 지침을 단계별로 따르세요:
- Arduino Nano ESP32가 처음이라면, 아두이노 나노 ESP32 - 소프트웨어 설치 튜토리얼을 참조하세요.
- USB 케이블을 사용하여 Arduino Nano ESP32 보드를 컴퓨터에 연결합니다.
- 컴퓨터에서 Arduino IDE를 실행합니다.
- 적절한 보드(예: Arduino Nano ESP32)와 COM 포트를 선택합니다.
- Arduino IDE 왼쪽 바의 Libraries 아이콘으로 이동합니다.
- "DIYables ESP32 WebApps"를 검색하여 DIYables의 DIYables ESP32 WebApps 라이브러리를 찾습니다
- Install 버튼을 클릭하여 라이브러리를 설치합니다.
- Search for DIYables ESP32 WebApps created by DIYables and click the Install button.
1
void setup() {
- 다른 라이브러리 의존성 설치 요청을 받게 됩니다
- Install All 버튼을 클릭하여 모든 라이브러리 의존성을 설치합니다.
- Arduino IDE에서 File Examples DIYables ESP32 WebApps WebTable 예제로 이동하거나, 위의 코드를 복사하여 Arduino IDE 편집기에 붙여넣습니다
/*
* DIYables ESP32 WebApps Library - WebTable Example
*
* This example demonstrates how to create a web-based table interface
* that displays real-time data in a two-column format (attribute-value pairs).
*
* Features:
* - Two-column table with attributes and real-time values
* - WebSocket-based real-time updates
* - Configurable table rows in setup()
* - Dynamic value updates during runtime
* - Modern responsive web interface
*
* Hardware: ESP32 Boards
*
* Instructions:
* 1. Update WiFi credentials below
* 2. Upload the code to your Arduino
* 3. Open Serial Monitor to get the IP address
* 4. Open web browser and go to:
* - Home page: http://[ARDUINO_IP]/
* - WebTable: http://[ARDUINO_IP]/web-table
* 5. Watch real-time data updates in the table
*
* Created by DIYables
* Visit: https://diyables.com for more tutorials and projects
*/
#include <DIYables_ESP32_Platform.h>
#include <DIYablesWebApps.h>
// WiFi credentials - Update these with your network details
const char WIFI_SSID[] = "YOUR_WIFI_SSID";
const char WIFI_PASSWORD[] = "YOUR_WIFI_PASSWORD";
// Initialize web server and pages
ESP32ServerFactory serverFactory;
DIYablesWebAppServer server(serverFactory, 80, 81);
DIYablesHomePage homePage;
DIYablesWebTablePage tablePage;
// Variables to simulate sensor data
float temperature = 20.5;
float humidity = 65.0;
int lightLevel = 512;
unsigned long uptime = 0;
bool ledState = false;
int counter = 0;
void setup() {
Serial.begin(9600);
Serial.println("DIYables ESP32 WebApp - Web Table Example");
// Initialize built-in LED
pinMode(LED_BUILTIN, OUTPUT);
// Add web apps
server.addApp(&homePage);
server.addApp(&tablePage);
// Optional: Add 404 page for better user experience
server.setNotFoundPage(DIYablesNotFoundPage());
// Start the WebApp server
server.begin(WIFI_SSID, WIFI_PASSWORD);
// Set up callback for data requests
tablePage.onTableValueRequest(onDataRequested);
// Configure table structure in setup - attributes are set once
setupTableStructure();
Serial.println("WebTable Server started!");
}
void loop() {
server.loop();
// Update sensor values every 2 seconds
static unsigned long lastUpdate = 0;
if (millis() - lastUpdate > 2000) {
updateSensorValues();
sendRealTimeUpdates();
lastUpdate = millis();
}
// Toggle LED every 5 seconds
static unsigned long lastLedToggle = 0;
if (millis() - lastLedToggle > 5000) {
ledState = !ledState;
digitalWrite(LED_BUILTIN, ledState);
// Send LED status update to web interface
tablePage.sendValueUpdate("LED Status", ledState ? "ON" : "OFF");
lastLedToggle = millis();
}
delay(10);
}
// Setup table structure - called once in setup()
void setupTableStructure() {
Serial.println("Setting up table structure...");
// Add table rows with attributes only (no values stored)
tablePage.addRow("Device Name");
tablePage.addRow("Temperature");
tablePage.addRow("Humidity");
tablePage.addRow("Light Level");
tablePage.addRow("Uptime");
tablePage.addRow("LED Status");
tablePage.addRow("Counter");
tablePage.addRow("WiFi SSID");
tablePage.addRow("IP Address");
tablePage.addRow("Free Memory");
Serial.println("Table structure configured with " + String(tablePage.getRowCount()) + " rows");
}
// Simulate sensor readings and send values to web interface
void updateSensorValues() {
// Simulate temperature sensor (20-30°C range)
temperature = 20.0 + (sin(millis() / 10000.0) * 5.0) + random(-10, 10) / 10.0;
// Simulate humidity sensor (40-80% range)
humidity = 60.0 + (cos(millis() / 8000.0) * 15.0) + random(-20, 20) / 10.0;
// Simulate light sensor (0-1023 range)
lightLevel = 512 + (sin(millis() / 5000.0) * 400) + random(-50, 50);
if (lightLevel < 0) lightLevel = 0;
if (lightLevel > 1023) lightLevel = 1023;
// Update uptime
uptime = millis() / 1000;
// Increment counter
counter++;
}
// Send real-time updates to web interface
void sendRealTimeUpdates() {
// Send individual value updates to web clients
tablePage.sendValueUpdate("Temperature", String(temperature, 1) + "°C");
tablePage.sendValueUpdate("Humidity", String(humidity, 1) + "%");
tablePage.sendValueUpdate("Light Level", String(lightLevel));
tablePage.sendValueUpdate("Uptime", formatUptime(uptime));
tablePage.sendValueUpdate("Counter", String(counter));
tablePage.sendValueUpdate("Free Memory", String(getFreeMemory()) + " bytes");
}
// Callback function called when web client requests table data
void onDataRequested() {
Serial.println("Web client requested table data");
// Send all current values to web interface
tablePage.sendValueUpdate("Device Name", "ESP32");
tablePage.sendValueUpdate("Temperature", String(temperature, 1) + "°C");
tablePage.sendValueUpdate("Humidity", String(humidity, 1) + "%");
tablePage.sendValueUpdate("Light Level", String(lightLevel));
tablePage.sendValueUpdate("Uptime", formatUptime(uptime));
tablePage.sendValueUpdate("LED Status", ledState ? "ON" : "OFF");
tablePage.sendValueUpdate("Counter", String(counter));
tablePage.sendValueUpdate("WiFi SSID", WIFI_SSID);
tablePage.sendValueUpdate("IP Address", WiFi.localIP().toString());
tablePage.sendValueUpdate("Free Memory", String(getFreeMemory()) + " bytes");
}
// Format uptime in human-readable format
String formatUptime(unsigned long seconds) {
unsigned long days = seconds / 86400;
unsigned long hours = (seconds % 86400) / 3600;
unsigned long minutes = (seconds % 3600) / 60;
unsigned long secs = seconds % 60;
String result = "";
if (days > 0) result += String(days) + "d ";
if (hours > 0) result += String(hours) + "h ";
if (minutes > 0) result += String(minutes) + "m ";
result += String(secs) + "s";
return result;
}
// Get approximate free memory
int getFreeMemory() {
// Simple approximation for demonstration
// In a real application, you might use a more accurate method
return 2048 - (counter % 1024);
}
- 스케치의 WiFi 자격 증명을 업데이트합니다:
const char WIFI_SSID[] = "YOUR_WIFI_NETWORK";
const char WIFI_PASSWORD[] = "YOUR_WIFI_PASSWORD";
- Arduino IDE의 Upload 버튼을 클릭하여 코드를 Arduino Nano ESP32에 업로드합니다
- 시리얼 모니터를 엽니다
- 시리얼 모니터 출력은 다음과 유사해야 합니다:
8
Serial.println("Hello World!");
Message (Enter to send message to 'Arduino Nano ESP32' on 'COM15')
New Line
9600 baud
DIYables WebApp - Web Table Example
INFO: Added app /
INFO: Added app /web-table
DIYables WebApp Library
Platform: Arduino Nano ESP32
Network connected!
IP address: 192.168.0.2
HTTP server started on port 80
Configuring WebSocket server callbacks...
WebSocket server started on port 81
WebSocket URL: ws://192.168.0.2:81
WebSocket server started on port 81
==========================================
DIYables WebApp Ready!
==========================================
Web Interface: http://192.168.0.2
WebSocket: ws://192.168.0.2:81
Available Applications:
Home Page: http://192.168.0.2/
Web Table: http://192.168.0.2/web-table
==========================================
- 아무것도 표시되지 않으면 보드의 리셋 버튼을 누르세요.
- 시리얼 모니터의 IP 주소를 동일한 네트워크의 브라우저에 입력합니다.
- 예: http://192.168.0.2
- 홈 페이지에 테이블 애플리케이션 카드가 표시됩니다:
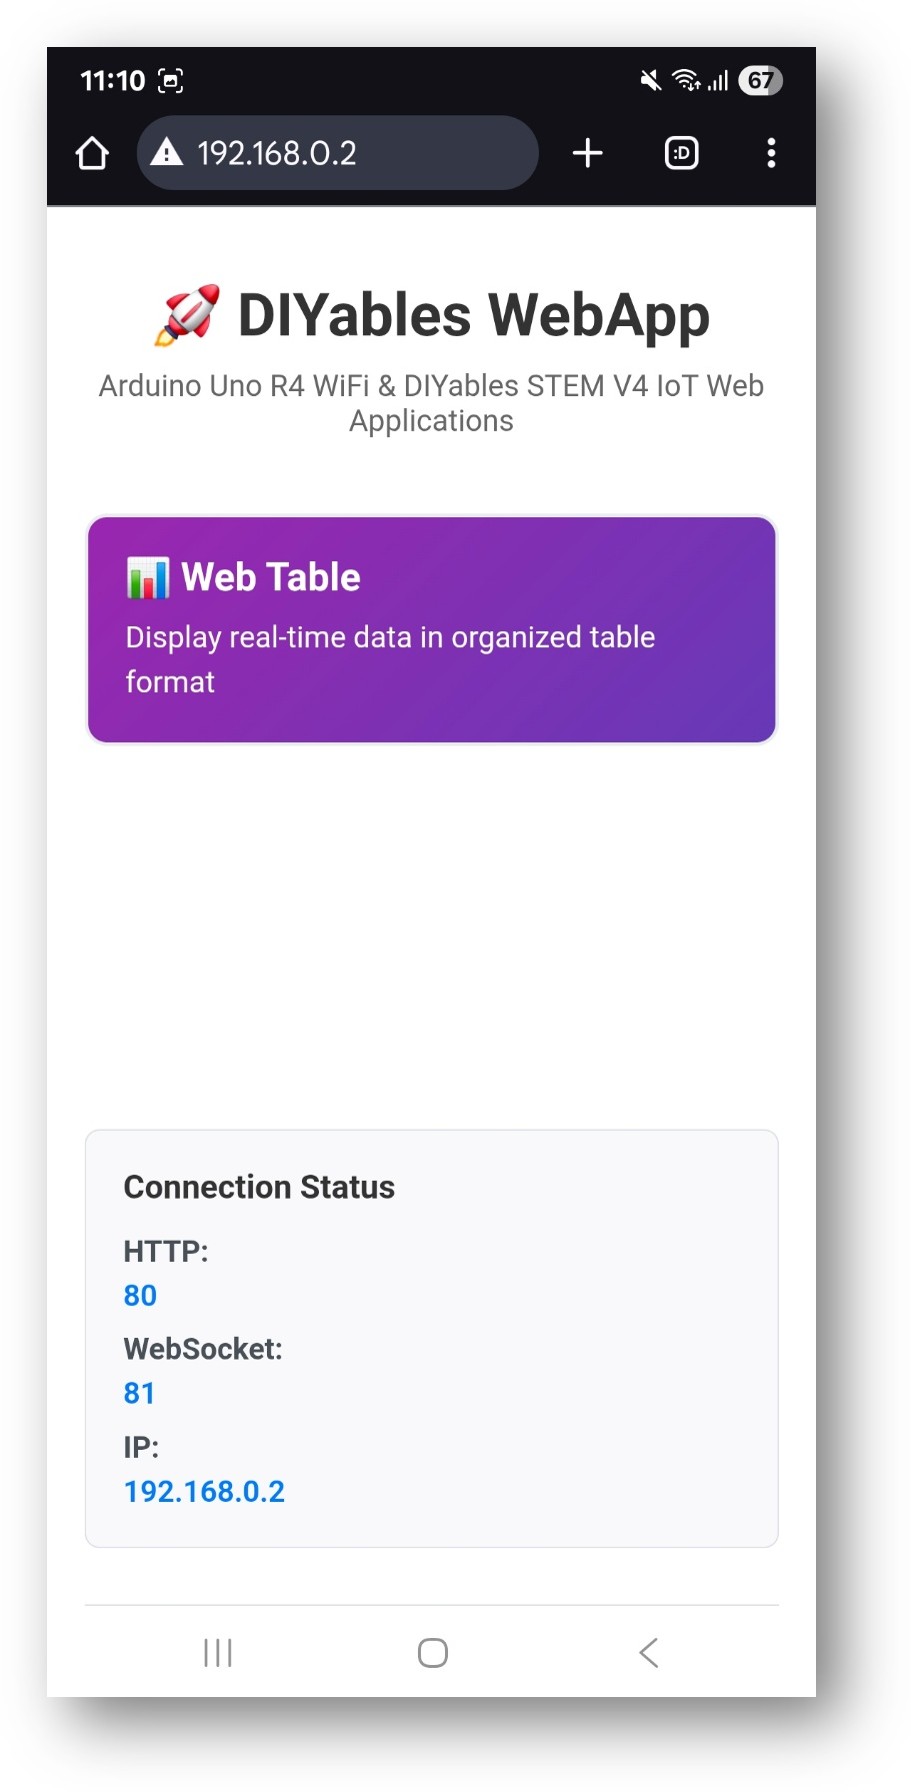
- 웹 테이블 카드를 선택하여 데이터 테이블 페이지를 엽니다:
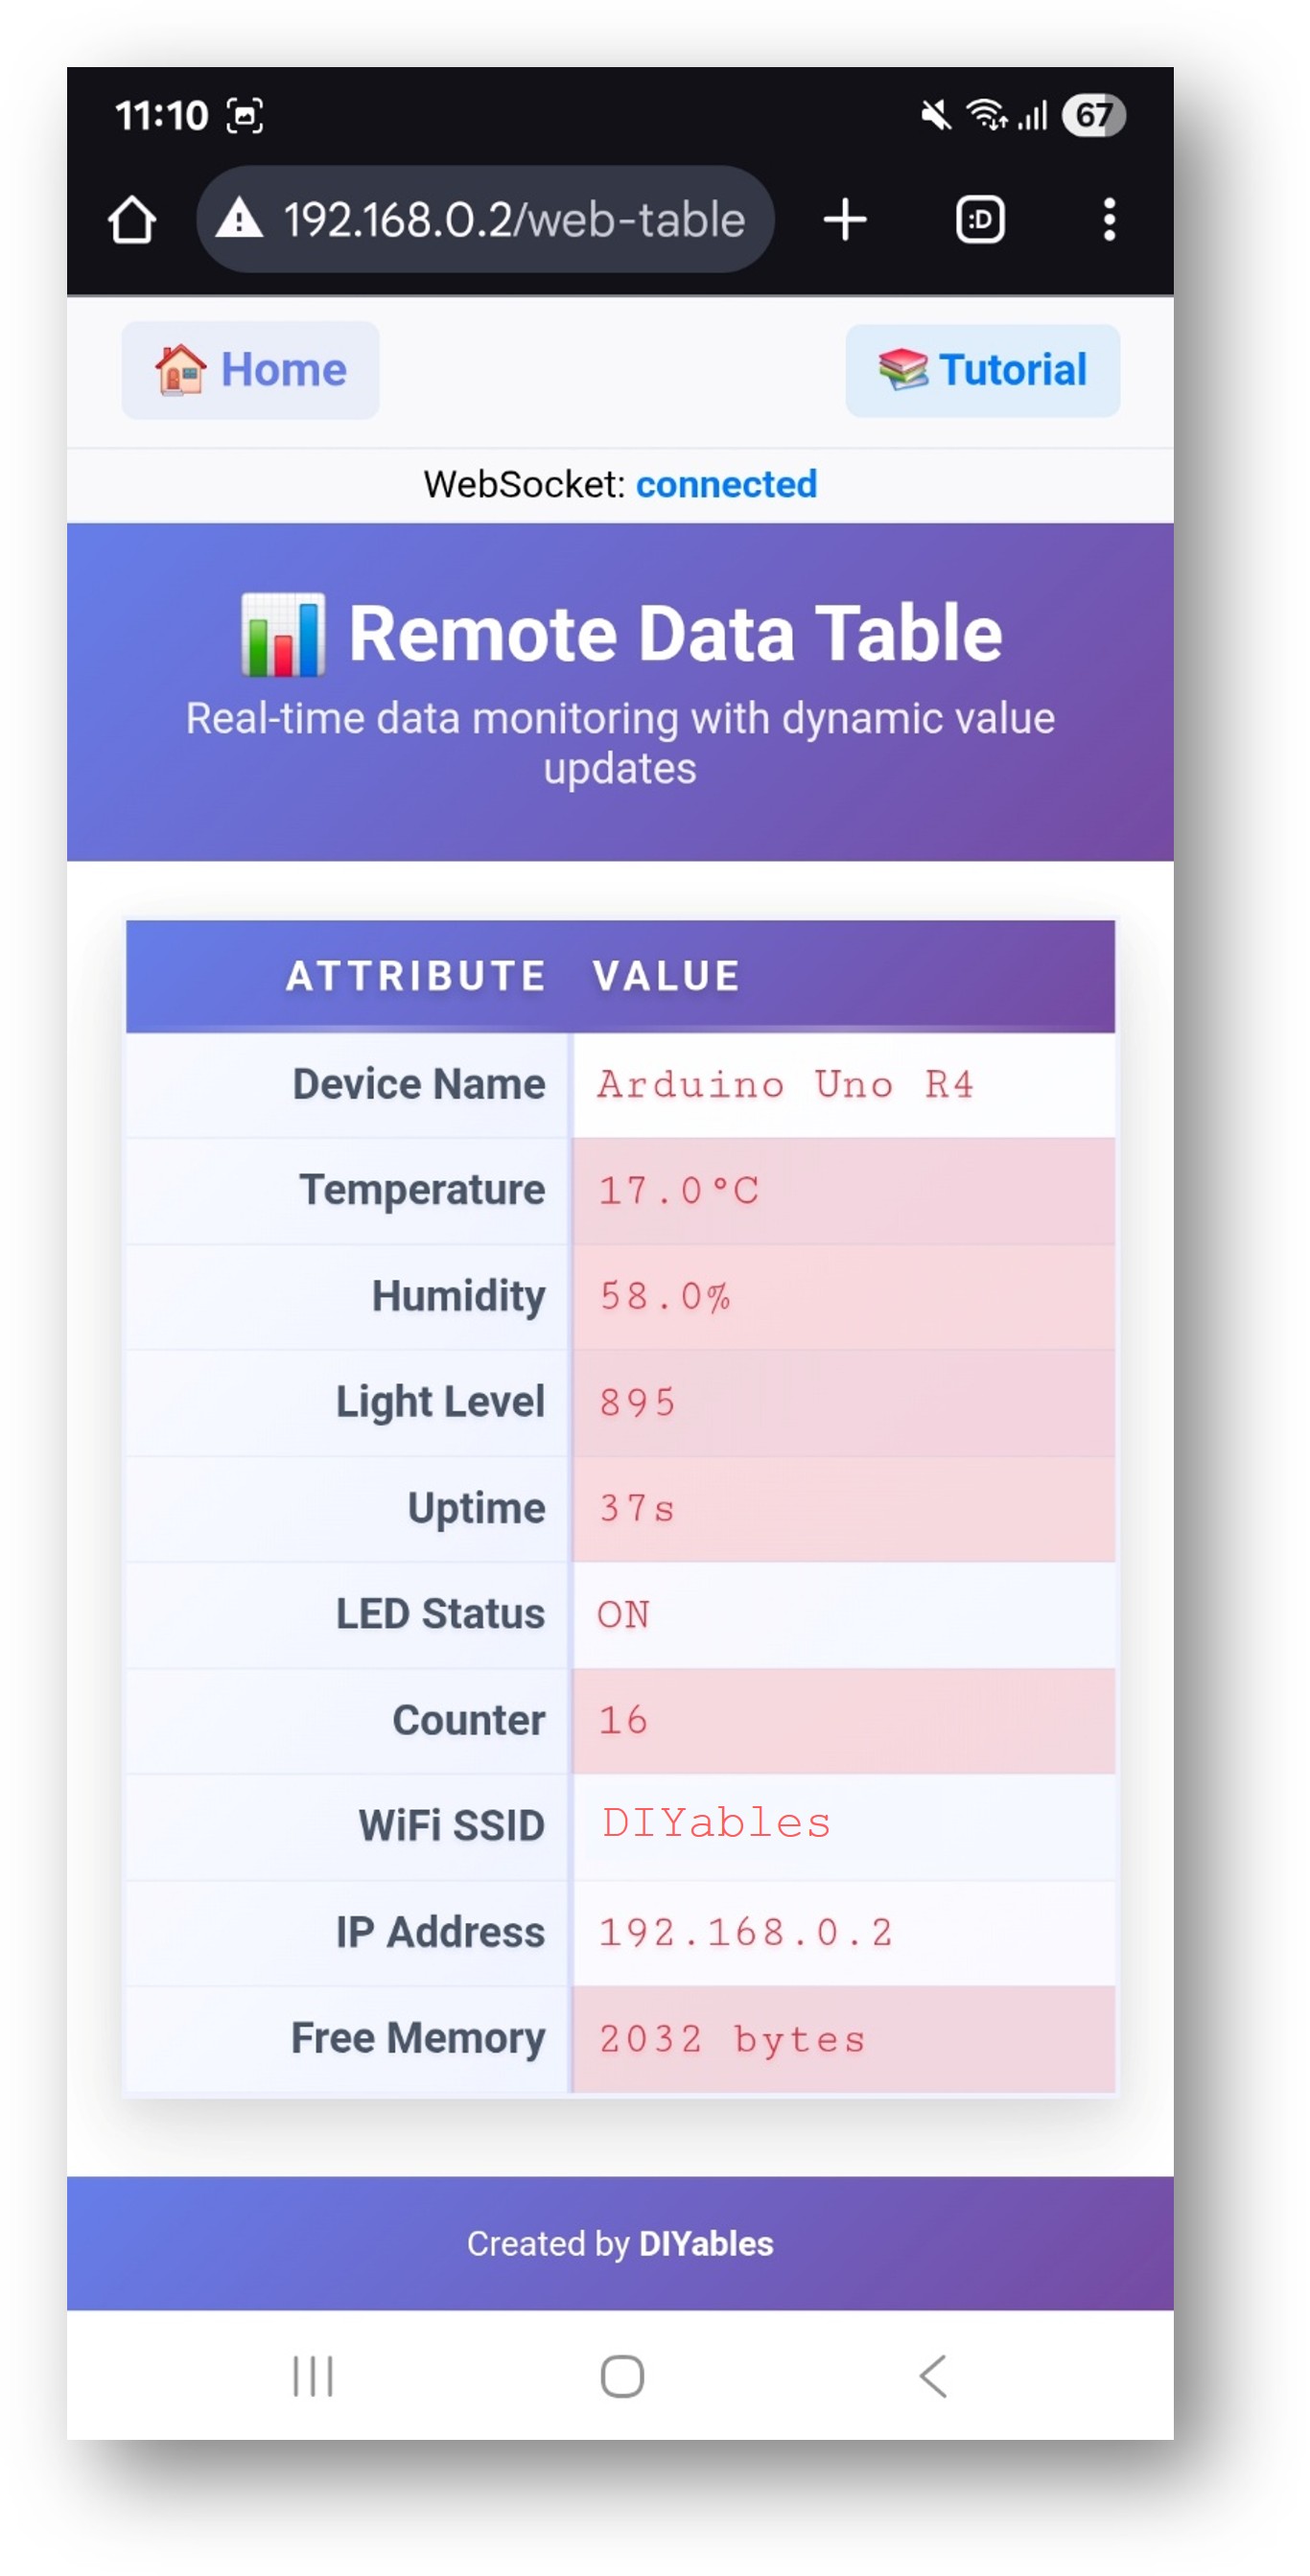
- 페이지는 http://192.168.0.2/web-table에서 직접 접근할 수도 있습니다.
테이블 구조 정의하기
setupTableStructure() 안에서 addRow()를 호출하여 각 속성 이름을 정의합니다. addRow() 호출 순서가 브라우저의 표시 순서를 결정합니다.
void setupTableStructure() {
tablePage.addRow("Device Name");
tablePage.addRow("Firmware Version");
tablePage.addRow("Uptime (s)");
tablePage.addRow("Temperature (C)");
tablePage.addRow("Free Heap (bytes)");
}
최대 행 수는 20개입니다.
값 업데이트 보내기
시작 시 초기값 설정
구조를 정의한 직후 각 행의 초기값을 설정합니다:
tablePage.updateValue("Device Name", "Arduino Nano ESP32");
tablePage.updateValue("Firmware Version", "1.0.0");
루프에서 런타임 업데이트
작동 중에 새 값을 보냅니다. 각 호출은 전체 테이블을 다시 빌드하지 않고 브라우저의 해당 속성 행을 업데이트합니다:
void loop() {
webAppsServer.loop();
tablePage.updateValue("Uptime (s)", String(millis() / 1000));
tablePage.updateValue("Temperature (C)", String(readTemperature(), 1));
delay(1000);
}
변경 감지 강조 표시
브라우저는 각 행의 값 히스토리를 내부적으로 추적합니다. 스케치 측 상태는 필요하지 않습니다:
| 색상 | 의미 |
|---|---|
| 빨간색 | 마지막 업데이트 간격에서 값이 변경됨 |
| 파란색 | 여러 간격 동안 값이 안정적임 |
| 흰색 | 값이 한 번 전송되어 재전송되지 않음 |
값 추적은 완전히 클라이언트 측에서 수행됩니다. Arduino Nano ESP32는 이전 값을 저장하지 않습니다.
문제 해결
테이블 행이 순서 없이 표시됨
- 행은 setupTableStructure()에서 addRow()가 호출된 순서로 표시됩니다
- webAppsServer.begin() 후에 addRow()를 호출하지 마세요
값 업데이트가 멈춤
- webAppsServer.loop()가 loop()의 모든 반복에서 호출되는지 확인합니다
- 업데이트 간격보다 큰 delay() 값을 피합니다
행 수가 최대를 초과함
- 라이브러리는 최대 20개의 행을 지원합니다
- 필요한 경우 관련 값을 단일 문자열로 결합하여 행 수를 줄입니다
페이지에 접근할 수 없음
- 시리얼 모니터의 IP 주소를 확인합니다
- 브라우저 기기와 보드가 동일한 WiFi 네트워크에 있는지 확인합니다


