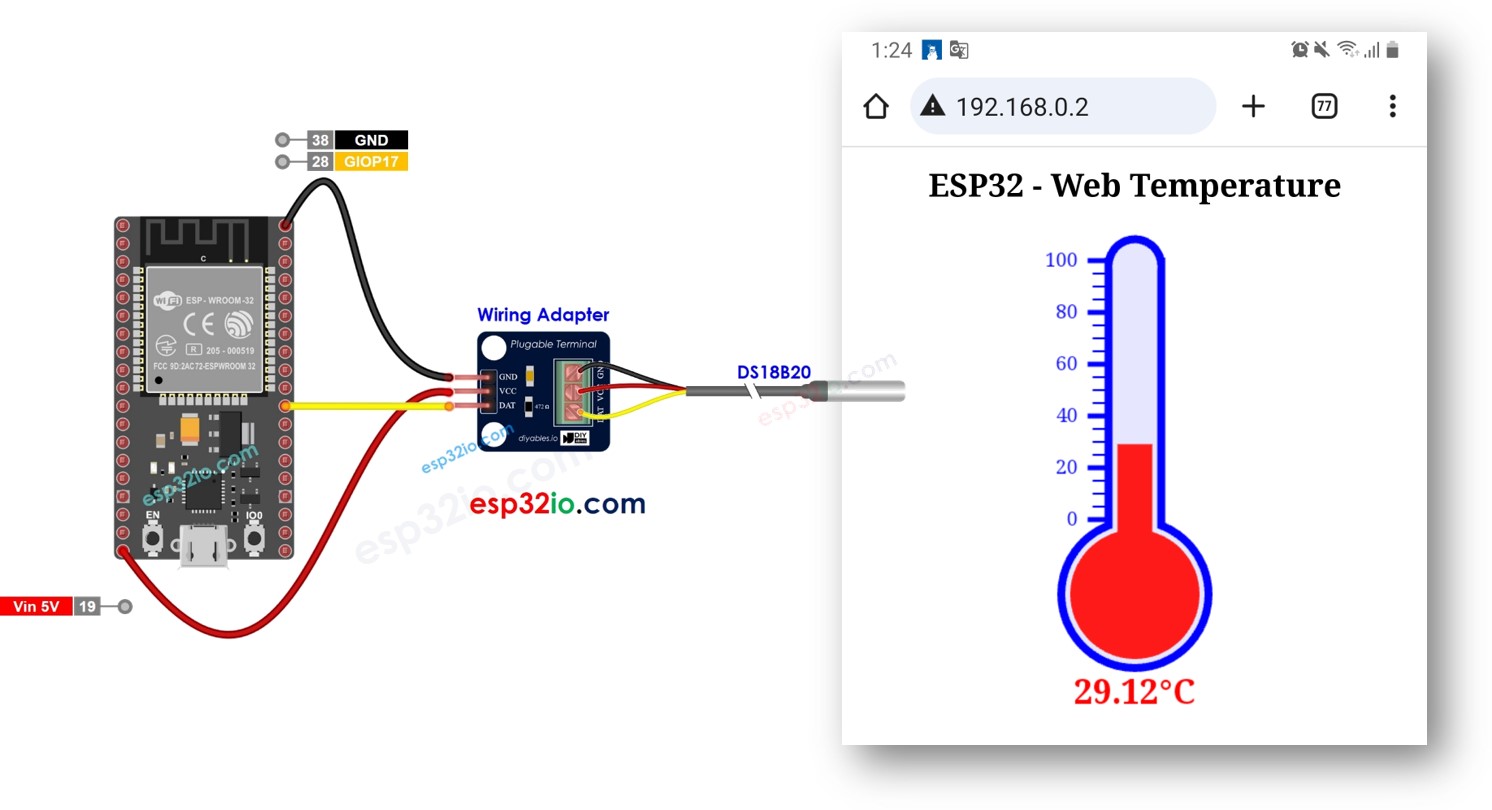
이 가이드에서는 ESP32를 웹 서버로 기능하도록 프로그래밍하는 과정을 탐색할 것입니다. 이를 통해 웹 인터페이스를 통해 온도 데이터에 접근할 수 있습니다. 부착된 DS18B20 온도 센서를 사용하여 스마트폰이나 PC로 ESP32가 제공하는 웹 페이지를 방문함으로써 현재 온도를 쉽게 확인할 수 있습니다. 작동 방식에 대한 간략한 개요는 다음과 같습니다:
ESP32는 웹 서버로 프로그래밍됩니다.
스마트폰이나 PC의 웹 브라우저에서 ESP32의 IP 주소를 입력합니다.
ESP32는 웹 브라우저의 요청에 응답하여 DS18B20 센서에서 읽은 온도가 포함된 웹 페이지를 제공합니다.
우리는 두 가지 예제 코드를 살펴볼 것입니다:
DS18B20 센서로부터의 온도를 보여주는 아주 간단한 웹 페이지를 제공하는 ESP32 코드입니다. 이를 통해 작동 방식을 쉽게 이해할 수 있습니다. HTML 내용은 ESP32 코드에 내장되어 있습니다.
DS18B20 센서로부터의 온도를 보여주는 그래픽 웹 페이지를 제공하는 ESP32 코드로, HTML 내용이 ESP32 코드와 분리되어 있습니다.
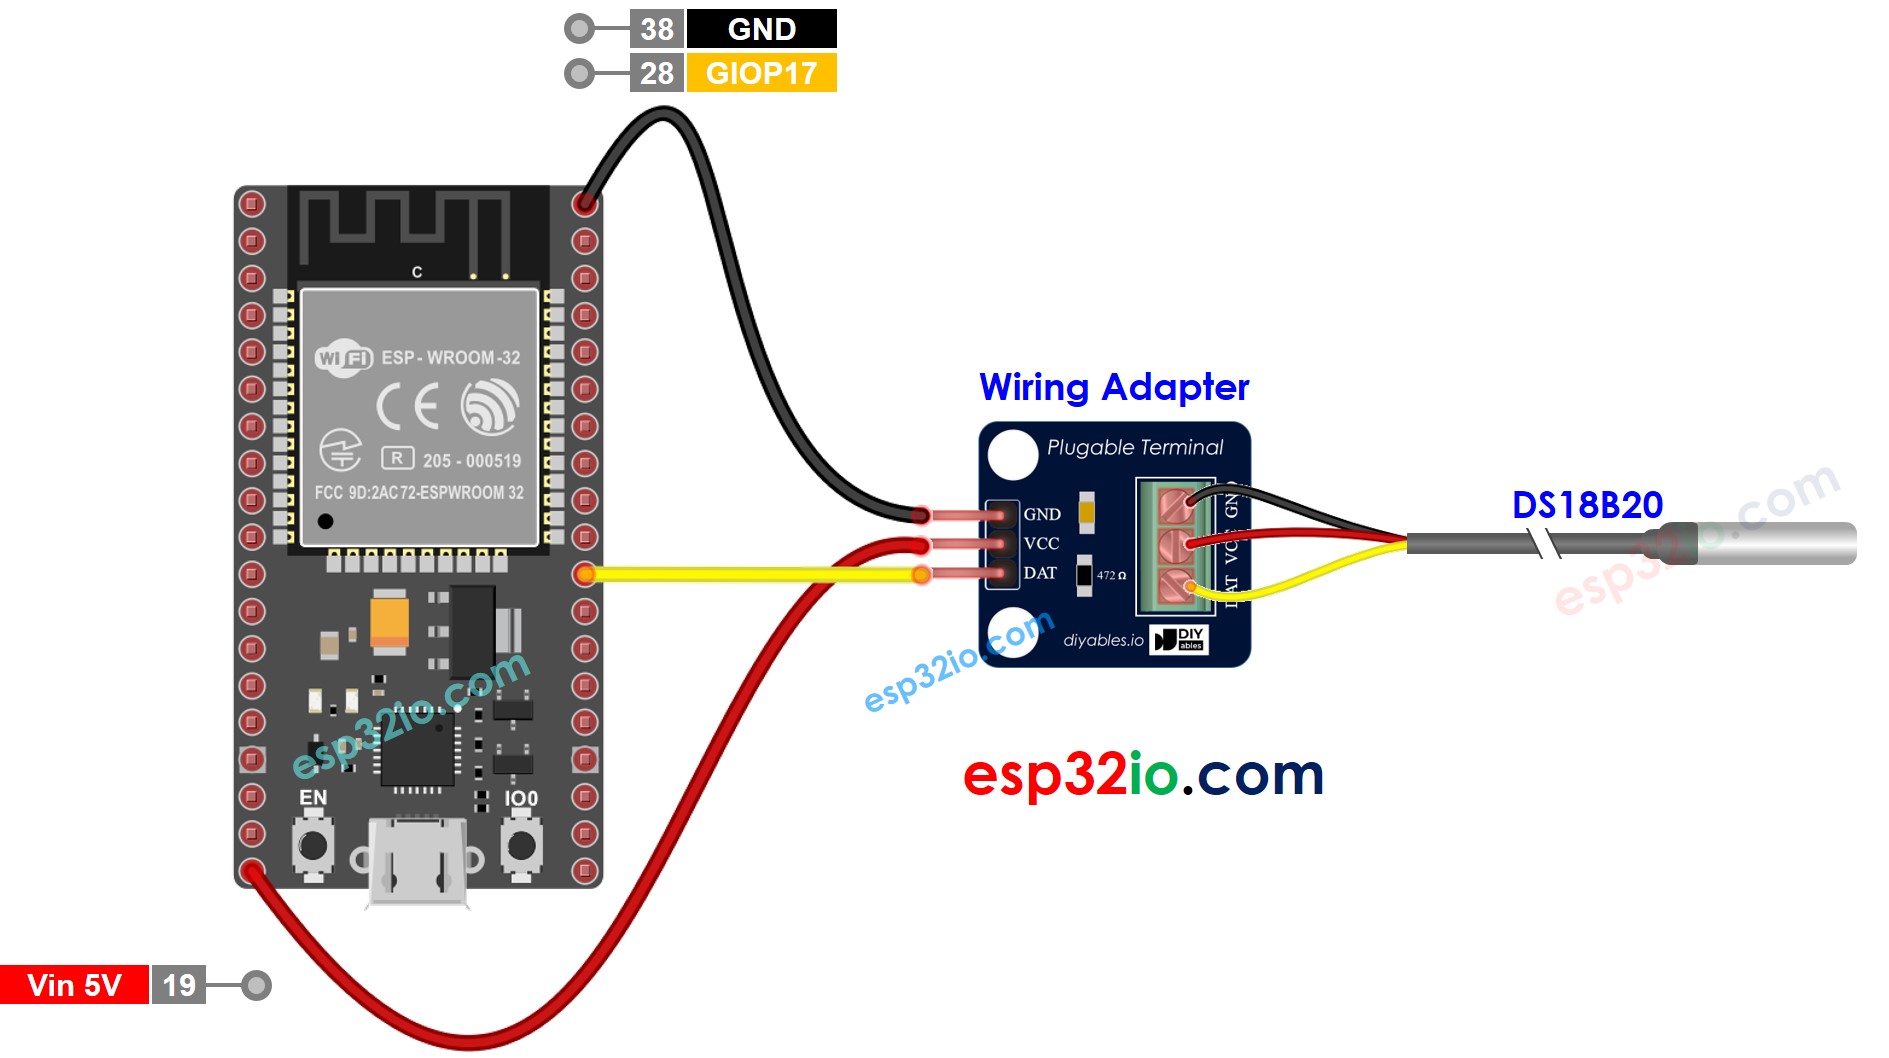
ESP32 및 다른 구성 요소에 전원을 공급하는 방법에 대해 잘 알지 못하는 경우, 다음 튜토리얼에서 안내를 찾을 수 있습니다: ESP32 전원 공급 방법.
ESP32 코드 - 간단한 웹 페이지
/* * 이 ESP32 코드는 newbiely.kr 에서 개발되었습니다 * 이 ESP32 코드는 어떠한 제한 없이 공개 사용을 위해 제공됩니다. * 상세한 지침 및 연결도에 대해서는 다음을 방문하세요: * https://newbiely.kr/tutorials/esp32/esp32-temperature-via-web */#include <DIYables_ESP32_WebServer.h>#include <OneWire.h>#include <DallasTemperature.h>#define SENSOR_PIN 17 // ESP32 pin GPIO17 connected to DS18B20 sensor's DATA pin// WiFi credentialsconstchar WIFI_SSID[] = "YOUR_WIFI_SSID";constchar WIFI_PASSWORD[] = "YOUR_WIFI_PASSWORD";// Create web server instanceDIYables_ESP32_WebServer server;OneWire oneWire(SENSOR_PIN); // setup a oneWire instanceDallasTemperature DS18B20(&oneWire); // pass oneWire to DallasTemperature libraryfloatgetTemperature() { DS18B20.requestTemperatures(); // send the command to get temperaturesfloat tempC = DS18B20.getTempCByIndex(0); // read temperature in °Creturn tempC;}// Page handlersvoid handleHome(WiFiClient& client, const String& method, const String& request, const QueryParams& params, const String& jsonData) {Serial.println("ESP32 Web Server: New request received"); // for debugging// get temperature from sensorfloat temperature = getTemperature();// Format the temperature with two decimal placesString temperatureStr = String(temperature, 2);String html = "<!DOCTYPE HTML>"; html += "<html>"; html += "<head>"; html += "<link rel=\"icon\" href=\"data:,\">"; html += "</head>"; html += "<p>"; html += "Temperature: <span style=\"color: red;\">"; html += temperature; html += "°C</span>"; html += "</p>"; html += "</html>"; server.sendResponse(client, html.c_str());}voidsetup() {Serial.begin(9600);delay(1000); DS18B20.begin(); // initialize the DS18B20 sensorSerial.println("ESP32 Web Server");// Configure routes server.addRoute("/", handleHome);// Start web server with WiFi connection server.begin(WIFI_SSID, WIFI_PASSWORD);}voidloop() { server.handleClient();}
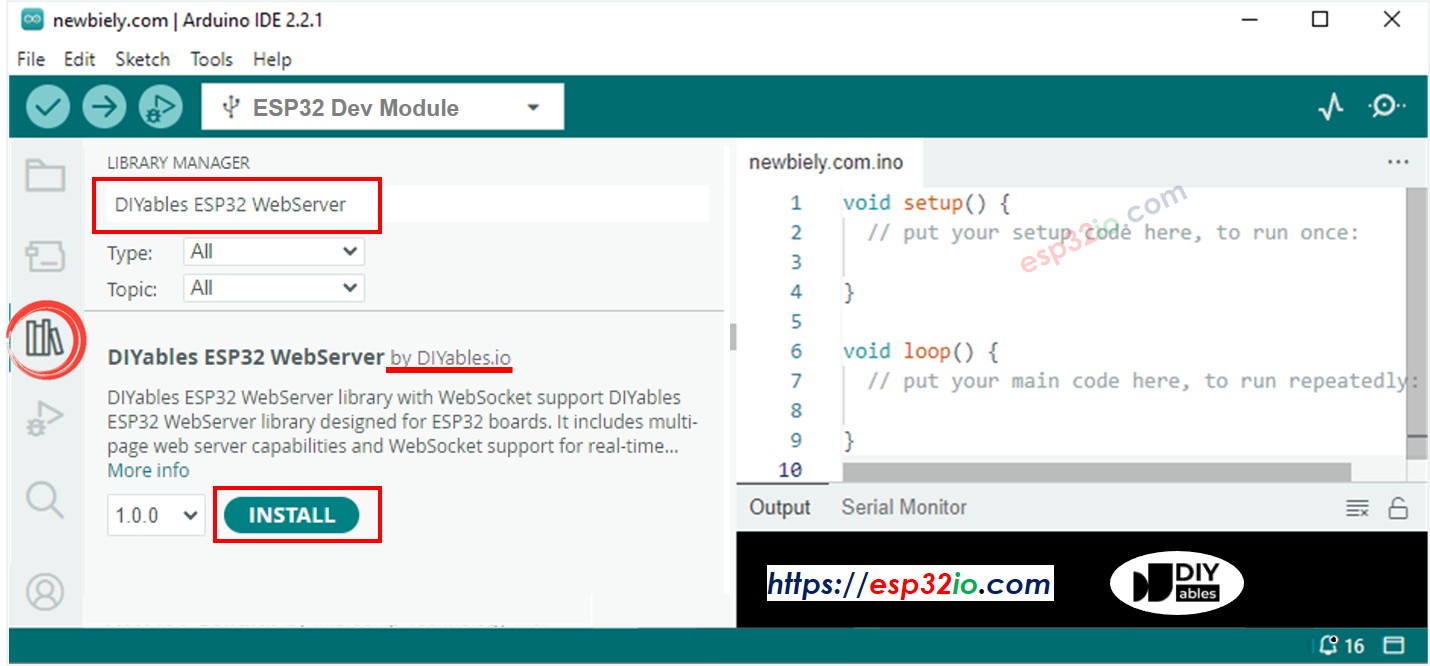
“DIYables ESP32 WebServer”를 검색하고, DIYables가 만든 DIYables ESP32 WebServer를 찾으세요.
Install 버튼을 클릭해 DIYables ESP32 WebServer 라이브러리를 설치하세요.
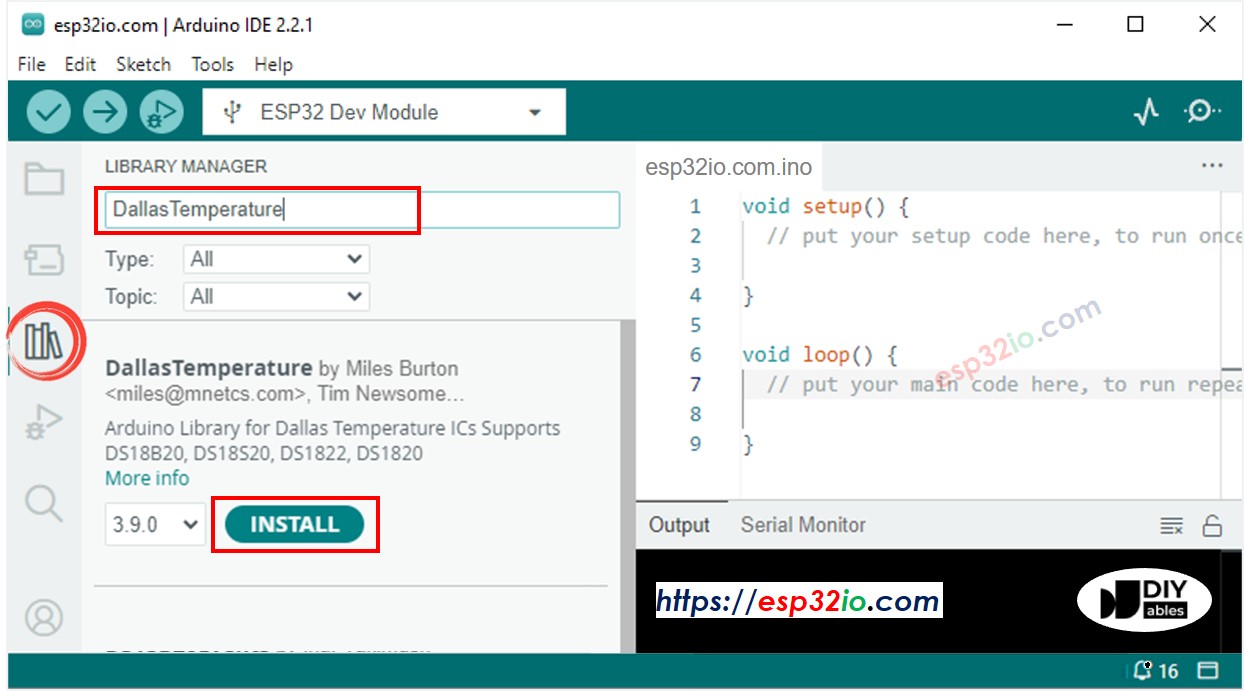
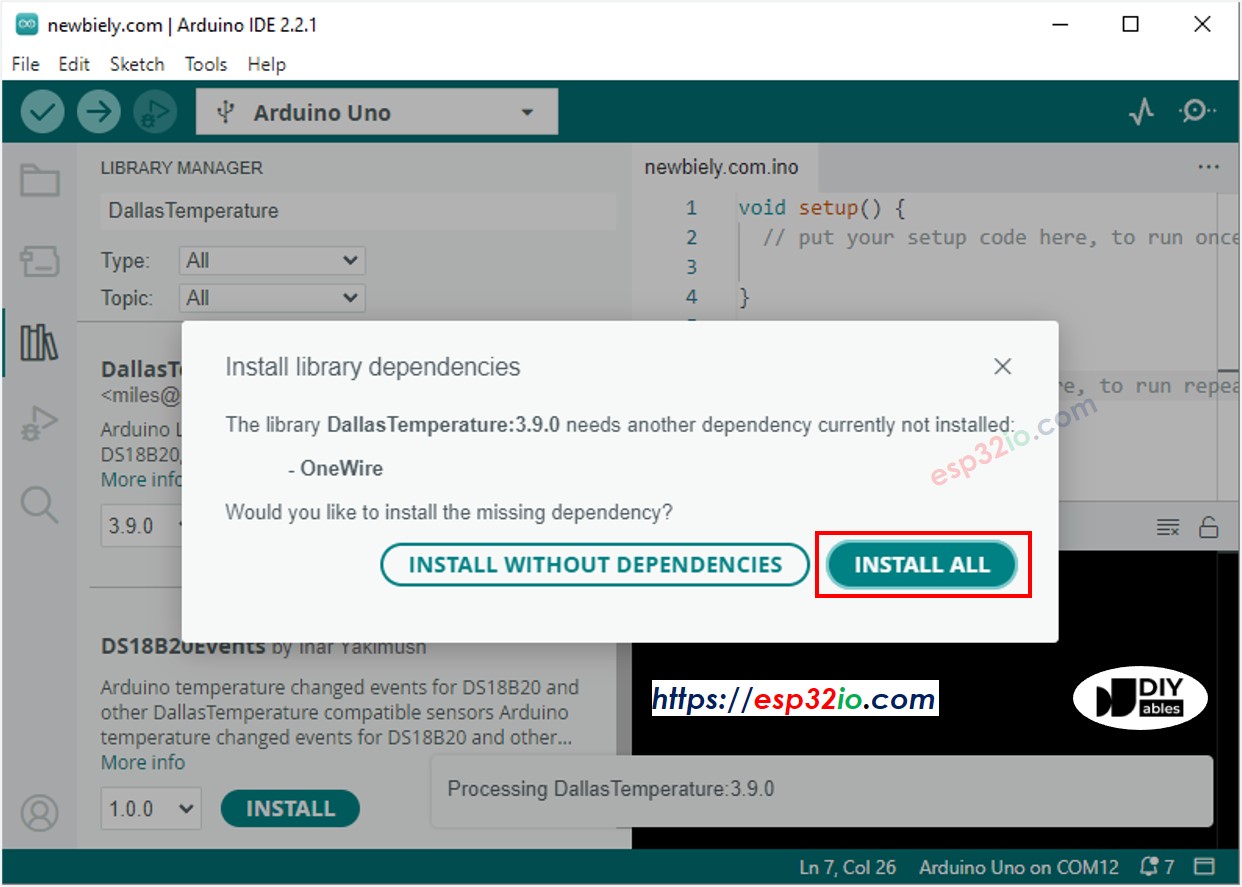
검색 창에서 “DallasTemperature”을 검색한 다음, Miles Burton의 DallasTemperature 라이브러리를 찾아보세요.
DallasTemperature 라이브러리를 설치하려면 Install 버튼을 클릭하세요.
의존성을 설치하라는 요청을 받게 됩니다. OneWire 라이브러리를 설치하려면 Install All 버튼을 클릭하세요.
위의 코드를 복사하고 아두이노 IDE로 열기
코드에서 와이파이 정보(SSID와 비밀번호)를 본인 것으로 변경하기
아두이노 IDE에서 Upload 버튼을 클릭하여 ESP32에 코드를 업로드
시리얼 모니터 열기
시리얼 모니터에서 결과 확인하기
Newbiely | Arduino IDE 2.3.8
──
☐
✕
File
Edit
Sketch
Tools
Help
ESP32 Dev Module
Newbiely.ino
···
8Serial.println("Hello World!");
Output
Serial Monitor
Message (Enter to send message to 'ESP32 Dev Module' on 'COM15')
New Line
9600 baud
Connecting to WiFi...
Connected to WiFi
ESP32 Web Server's IP address: 192.168.0.2
Ln 11, Col 1
ESP32 Dev Module on COM15
2
IP 주소를 찾을 겁니다. 이 IP 주소를 스마트폰이나 컴퓨터의 웹 브라우저 주소 창에 입력하세요.
시리얼 모니터에서 다음과 같은 출력을 볼 수 있습니다.
Newbiely | Arduino IDE 2.3.8
──
☐
✕
File
Edit
Sketch
Tools
Help
ESP32 Dev Module
Newbiely.ino
···
8Serial.println("Hello World!");
Output
Serial Monitor
Message (Enter to send message to 'ESP32 Dev Module' on 'COM15')
New Line
9600 baud
Connecting to WiFi...
Connected to WiFi
ESP32 Web Server's IP address: 192.168.0.2
ESP32 Web Server: New request received:
GET /
Ln 11, Col 1
ESP32 Dev Module on COM15
2
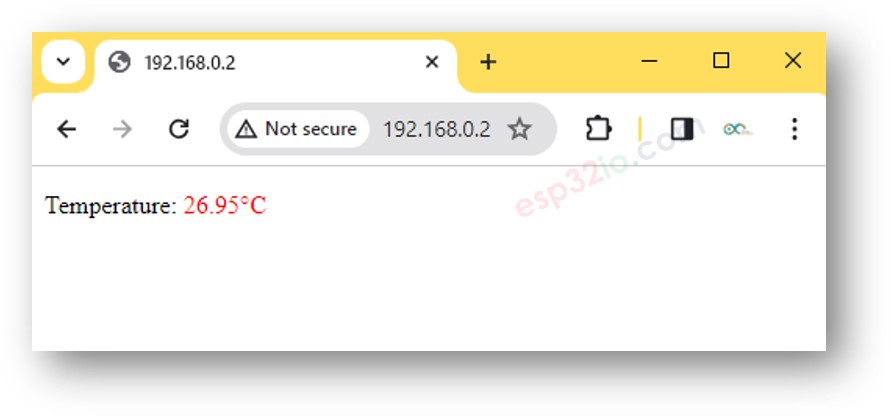
아래와 같이 웹 브라우저에서 ESP32 보드의 매우 간단한 웹 페이지를 볼 수 있습니다:
※ 주의:
위에 제공된 코드를 사용하여 온도 업데이트를 받으려면 웹 브라우저에서 페이지를 다시 로드해야 합니다. 다음 부분에서는 웹 페이지를 다시 로드하지 않고 배경에서 온도 값을 업데이트하는 방법을 배우게 됩니다.
ESP32 코드 - 그래픽 웹 페이지
그래픽 웹 페이지에는 많은 양의 HTML 콘텐츠가 포함되어 있으므로 이전과 같이 ESP32 코드에 내장하는 것이 불편해집니다. 이 문제를 해결하기 위해, ESP32 코드와 HTML 코드를 다른 파일로 분리할 필요가 있습니다:
ESP32 코드는 .ino 파일에 위치할 것입니다.
HTML 코드(HTML, CSS, 및 Javascript를 포함)는 .h 파일에 위치할 것입니다.
HTML 코드를 ESP32 코드에서 분리하는 방법에 대한 자세한 내용은 ESP32 - 웹 서버 튜토리얼을 참조하십시오.
사용 방법
Arduino IDE를 열고 새 스케치를 생성하고 이름을 지정하십시오. 예를 들어, newbiely.kr.ino
아래 코드를 복사하여 Arduino IDE로 열십시오.
/* * 이 ESP32 코드는 newbiely.kr 에서 개발되었습니다 * 이 ESP32 코드는 어떠한 제한 없이 공개 사용을 위해 제공됩니다. * 상세한 지침 및 연결도에 대해서는 다음을 방문하세요: * https://newbiely.kr/tutorials/esp32/esp32-temperature-via-web */#include <DIYables_ESP32_WebServer.h>#include"index.h"// Include the index.h file#include <OneWire.h>#include <DallasTemperature.h>#define SENSOR_PIN 17 // ESP32 pin GPIO17 connected to DS18B20 sensor's DATA pinOneWire oneWire(SENSOR_PIN); // setup a oneWire instanceDallasTemperature DS18B20(&oneWire); // pass oneWire to DallasTemperature library// WiFi credentialsconstchar WIFI_SSID[] = "YOUR_WIFI_SSID";constchar WIFI_PASSWORD[] = "YOUR_WIFI_PASSWORD";// Create web server instanceDIYables_ESP32_WebServer server;floatgetTemperature() { DS18B20.requestTemperatures(); // send the command to get temperaturesfloat tempC = DS18B20.getTempCByIndex(0); // read temperature in °Creturn tempC;}// Page handlersvoid handleHome(WiFiClient& client, const String& method, const String& request, const QueryParams& params, const String& jsonData) {Serial.println("ESP32 Web Server: New request received"); // for debugging server.sendResponse(client, webpage); // webpage is from index}// Page handlersvoid handleTemperature(WiFiClient& client, const String& method, const String& request, const QueryParams& params, const String& jsonData) {Serial.println("ESP32 Web Server: New request received"); // for debuggingfloat temperature = getTemperature();String temperatureStr = String(temperature, 2); server.sendResponse(client, temperatureStr.c_str(), "text/plain");}voidsetup() {Serial.begin(9600);delay(1000); DS18B20.begin(); // initialize the DS18B20 sensorSerial.println("ESP32 Web Server");// Define a route to get the web page server.addRoute("/", handleHome);// Define a route to get the temperature data server.addRoute("/temperature", handleTemperature);// Start web server with WiFi connection server.begin(WIFI_SSID, WIFI_PASSWORD);}voidloop() { server.handleClient();}
코드에서 WiFi 정보 (SSID 및 비밀번호)를 귀하의 것으로 변경하세요.
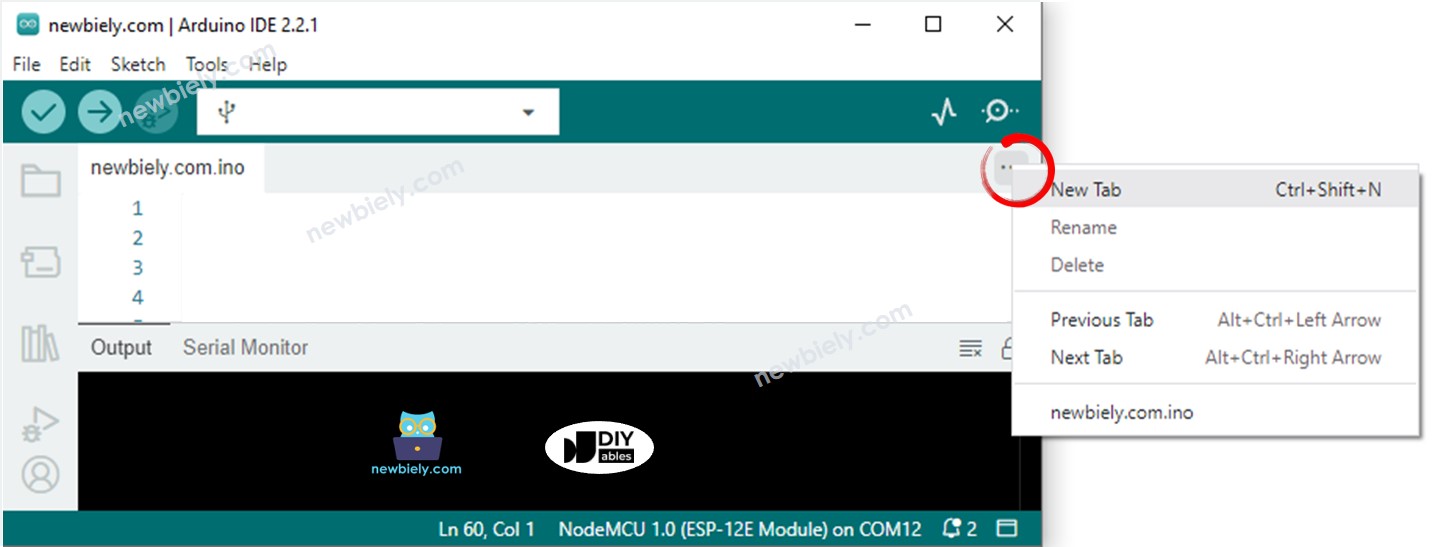
아두이노 IDE에서 index.h 파일을 생성하는 방법:
직렬 모니터 아이콘 아래 버튼을 클릭한 다음 새 탭을 선택하거나 Ctrl+Shift+N 키를 사용하세요.
파일 이름을 index.h로 지정하고 OK 버튼을 클릭하세요.
아래 코드를 복사해서 index.h에 붙여넣으세요.
/* * 이 ESP32 코드는 newbiely.kr 에서 개발되었습니다 * 이 ESP32 코드는 어떠한 제한 없이 공개 사용을 위해 제공됩니다. * 상세한 지침 및 연결도에 대해서는 다음을 방문하세요: * https://newbiely.kr/tutorials/esp32/esp32-temperature-via-web */#ifndef WEBPAGE_H#define WEBPAGE_Hconst char* webpage = R"=====(<!DOCTYPE html><html><head><title>ESP32 - Web Temperature</title><meta name="viewport" content="width=device-width, initial-scale=0.7, maximum-scale=0.7"><meta charset="utf-8"><link rel="icon" href="https://diyables.io/images/page/diyables.svg"><style>body { font-family: "Georgia"; text-align: center; font-size: width/2pt;}h1 { font-weight: bold; font-size: width/2pt;}h2 { font-weight: bold; font-size: width/2pt;}button { font-weight: bold; font-size: width/2pt;}</style><script>var cvs_width = 200, cvs_height = 450;function init() { var canvas = document.getElementById("cvs"); canvas.width = cvs_width; canvas.height = cvs_height + 50; var ctx = canvas.getContext("2d"); ctx.translate(cvs_width/2, cvs_height - 80); fetchTemperature(); setInterval(fetchTemperature, 4000); // Update temperature every 4 seconds}function fetchTemperature() { fetch("/temperature") .then(response => response.text()) .then(data => {update_view(data);});}function update_view(temp) { var canvas = document.getElementById("cvs"); var ctx = canvas.getContext("2d"); var radius = 70; var offset = 5; var width = 45; var height = 330; ctx.clearRect(-cvs_width/2, -cvs_height + 80, cvs_width, cvs_height + 50); ctx.strokeStyle="blue"; ctx.fillStyle="blue";//5-step Degree var x = -width/2; ctx.lineWidth=2;for (var i = 0; i <= 100; i+=5) { var y = -(height - radius)*i/100 - radius - 5; ctx.beginPath(); ctx.lineTo(x, y); ctx.lineTo(x - 20, y); ctx.stroke(); }//20-step Degree ctx.lineWidth=5;for (var i = 0; i <= 100; i+=20) { var y = -(height - radius)*i/100 - radius - 5; ctx.beginPath(); ctx.lineTo(x, y); ctx.lineTo(x - 25, y); ctx.stroke(); ctx.font="20px Georgia"; ctx.textBaseline="middle"; ctx.textAlign="right"; ctx.fillText(i.toString(), x - 35, y); }// shape ctx.lineWidth=16; ctx.beginPath(); ctx.arc(0, 0, radius, 0, 2 * Math.PI); ctx.stroke(); ctx.beginPath(); ctx.rect(-width/2, -height, width, height); ctx.stroke(); ctx.beginPath(); ctx.arc(0, -height, width/2, 0, 2 * Math.PI); ctx.stroke(); ctx.fillStyle="#e6e6ff"; ctx.beginPath(); ctx.arc(0, 0, radius, 0, 2 * Math.PI); ctx.fill(); ctx.beginPath(); ctx.rect(-width/2, -height, width, height); ctx.fill(); ctx.beginPath(); ctx.arc(0, -height, width/2, 0, 2 * Math.PI); ctx.fill(); ctx.fillStyle="#ff1a1a"; ctx.beginPath(); ctx.arc(0, 0, radius - offset, 0, 2 * Math.PI); ctx.fill(); temp = Math.round(temp * 100) / 100; var y = (height - radius)*temp/100.0 + radius + 5; ctx.beginPath(); ctx.rect(-width/2 + offset, -y, width - 2*offset, y); ctx.fill(); ctx.fillStyle="red"; ctx.font="bold 34px Georgia"; ctx.textBaseline="middle"; ctx.textAlign="center"; ctx.fillText(temp.toString() + "°C", 0, 100);}window.onload = init;</script></head><body><h1>ESP32 - Web Temperature</h1><canvas id="cvs"></canvas></body></html>)=====";#endif
이제 두 개의 파일에 코드를 가지고 있습니다: newbiely.kr.ino 및 index.h
Arduino IDE에서 Upload 버튼을 클릭하여 ESP32에 코드를 업로드하세요.
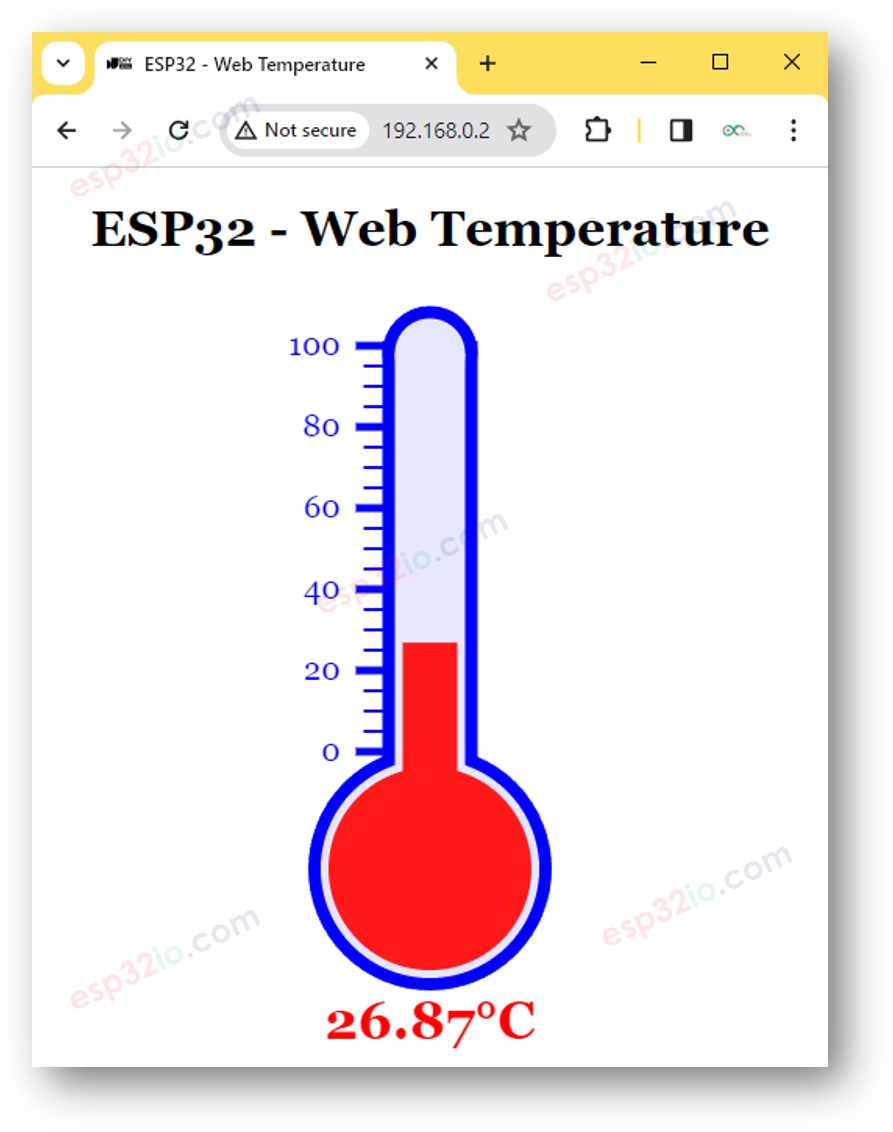
이전과 같이 PC나 스마트폰의 웹 브라우저를 통해 ESP32 보드의 웹 페이지에 접속하세요. 아래와 같이 보일 것입니다:
※ 주의:
index.h의 HTML 내용을 수정하고 newbiely.kr.ino 파일을 건드리지 않는 경우, 코드를 ESP32에 컴파일하고 업로드할 때 Arduino IDE는 HTML 내용을 업데이트하지 않습니다.
이 경우 Arduino IDE가 HTML 내용을 업데이트하게 하려면, newbiely.kr.ino 파일을 변경해야 합니다 (예: 빈 줄 추가, 주석 추가...).