이 튜토리얼에서는 MQTT 프로토콜을 사용하여 데이터를 MQTT 브로커로 보내고 받기 위해 ESP32를 어떻게 활용하는지 탐구할 것입니다. 구체적으로 다룰 내용은:
| 1 | × | ESP32 ESP-WROOM-32 개발 모듈 | 쿠팡 | 아마존 | |
| 1 | × | USB 케이블 타입-A to 타입-C (USB-A PC용) | 쿠팡 | 아마존 | |
| 1 | × | USB 케이블 타입-C to 타입-C (USB-C PC용) | 아마존 | |
| 1 | × | (추천) ESP32용 스크루 터미널 확장 보드 | 쿠팡 | 아마존 | |
| 1 | × | (추천) Breakout Expansion Board for ESP32 | 쿠팡 | 아마존 | |
| 1 | × | (추천) ESP32용 전원 분배기 | 쿠팡 | 아마존 | |
공개: 이 포스팅 에 제공된 일부 링크는 아마존 제휴 링크입니다. 이 포스팅은 쿠팡 파트너스 활동의 일환으로, 이에 따른 일정액의 수수료를 제공받습니다.
MQTT 프로토콜에 이미 익숙하다면 좋습니다! 그렇지 않다면 온라인에서 찾아볼 수 있습니다. 이 튜토리얼은 ESP32를 사용하여 MQTT를 통해 데이터를 송수신하는 방법에 관한 것입니다.
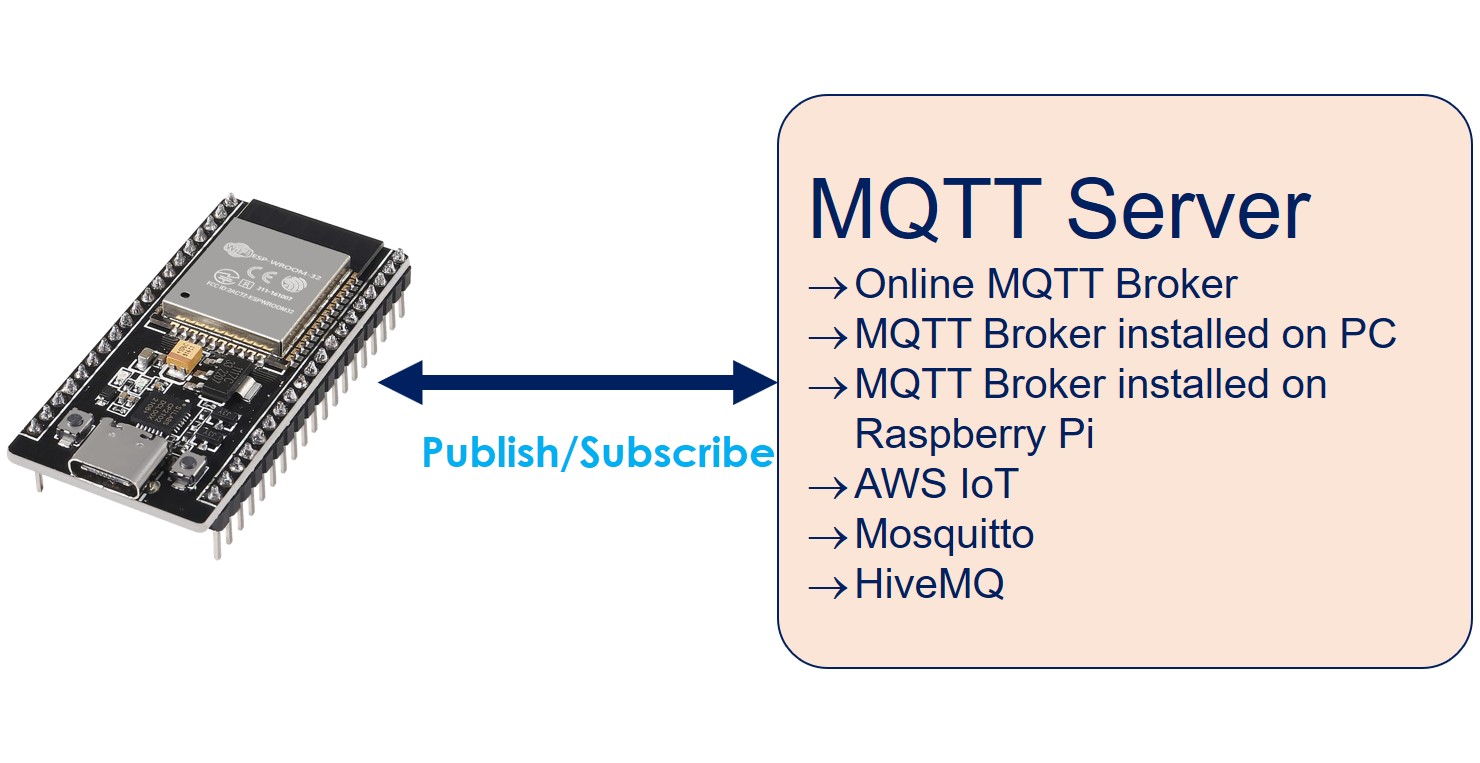
다음은 ESP32가 MQTT와 함께 작동할 수 있는 몇 가지 방법입니다:
ESP32를 Mosquitto나 AWS IoT와 같은 온라인 MQTT 브로커에 연결하세요.
Mosquitto나 HiveMQ와 같이 컴퓨터에 설치된 MQTT 브로커에 ESP32를 연결하세요.
예를 들어 Mosquitto가 실행 중인 라즈베리 파이에 ESP32를 MQTT 브로커에 연결하세요.
AWS EC2 상의 Mosquitto나 HiveMQ와 같은 클라우드 기반 MQTT 브로커에 ESP32를 연결하세요.
이 튜토리얼에서는 ESP32가 온라인 Mosquitto 브로커에 연결할 수 있는지 확인하는 것부터 시작하겠습니다. ESP32가 이 브로커를 통해 인터넷을 통해 데이터를 송수신하도록 하겠습니다.
그런 다음, 우리 컴퓨터에 Mosquitto 브로커를 설정할 것입니다. 우리는 ESP32를 이 로컬 브로커에 연결하고 데이터를 계속해서 보내고 받을 것입니다.
이 튜토리얼을 완료하면, 이 다른 튜토리얼들을 확인함으로써 더 많이 탐색할 수 있습니다:
이 링크들은 관련 주제에 대한 추가적인 안내를 제공할 것입니다.
이 부분에서는 Mosquitto에서 만든 온라인 MQTT 브로커인 test.mosquitto.org에 ESP32를 연결하는 방법을 배우게 됩니다. 이 브로커는 테스트 용도로만 사용해야 한다는 점을 유의하십시오.
아래의 ESP32 코드는 다음을 수행합니다:
#include <WiFi.h>
#include <MQTTClient.h>
#include <ArduinoJson.h>
const char WIFI_SSID[] = "YOUR_WIFI_SSID";
const char WIFI_PASSWORD[] = "YOUR_WIFI_PASSWORD";
const char MQTT_BROKER_ADRRESS[] = "test.mosquitto.org";
const int MQTT_PORT = 1883;
const char MQTT_CLIENT_ID[] = "YOUR-NAME-esp32-001";
const char MQTT_USERNAME[] = "";
const char MQTT_PASSWORD[] = "";
const char PUBLISH_TOPIC[] = "YOUR-NAME-esp32-001/loopback";
const char SUBSCRIBE_TOPIC[] = "YOUR-NAME-esp32-001/loopback";
const int PUBLISH_INTERVAL = 5000;
WiFiClient network;
MQTTClient mqtt = MQTTClient(256);
unsigned long lastPublishTime = 0;
void setup() {
Serial.begin(9600);
WiFi.mode(WIFI_STA);
WiFi.begin(WIFI_SSID, WIFI_PASSWORD);
Serial.println("ESP32 - Wi-Fi에 연결 중");
while (WiFi.status() != WL_CONNECTED) {
delay(500);
Serial.print(".");
}
Serial.println();
connectToMQTT();
}
void loop() {
mqtt.loop();
if (millis() - lastPublishTime > PUBLISH_INTERVAL) {
sendToMQTT();
lastPublishTime = millis();
}
}
void connectToMQTT() {
mqtt.begin(MQTT_BROKER_ADRRESS, MQTT_PORT, network);
mqtt.onMessage(messageHandler);
Serial.print("ESP32 - MQTT 브로커에 연결 중");
while (!mqtt.connect(MQTT_CLIENT_ID, MQTT_USERNAME, MQTT_PASSWORD)) {
Serial.print(".");
delay(100);
}
Serial.println();
if (!mqtt.connected()) {
Serial.println("ESP32 - MQTT 브로커 연결 시간 초과!");
return;
}
if (mqtt.subscribe(SUBSCRIBE_TOPIC))
Serial.print("ESP32 - 토픽 구독됨: ");
else
Serial.print("ESP32 - 토픽 구독 실패: ");
Serial.println(SUBSCRIBE_TOPIC);
Serial.println("ESP32 - MQTT 브로커 연결됨!");
}
void sendToMQTT() {
StaticJsonDocument<200> message;
message["timestamp"] = millis();
message["data"] = analogRead(0);
char messageBuffer[512];
serializeJson(message, messageBuffer);
mqtt.publish(PUBLISH_TOPIC, messageBuffer);
Serial.println("ESP32 - MQTT로 전송됨:");
Serial.print("- 토픽: ");
Serial.println(PUBLISH_TOPIC);
Serial.print("- 페이로드:");
Serial.println(messageBuffer);
}
void messageHandler(String &topic, String &payload) {
Serial.println("ESP32 - MQTT에서 수신됨:");
Serial.println("- 토픽: " + topic);
Serial.println("- 페이로드:");
Serial.println(payload);
}
위 이미지에 나와 있는 대로 배선을 하세요.
USB 케이블을 통해 ESP32 보드를 PC에 연결하세요.
PC에서 Arduino IDE를 엽니다.
적절한 ESP32 보드(예: ESP32 Dev Module)와 COM 포트를 선택하세요.
PC에서 Arduino IDE를 엽니다.
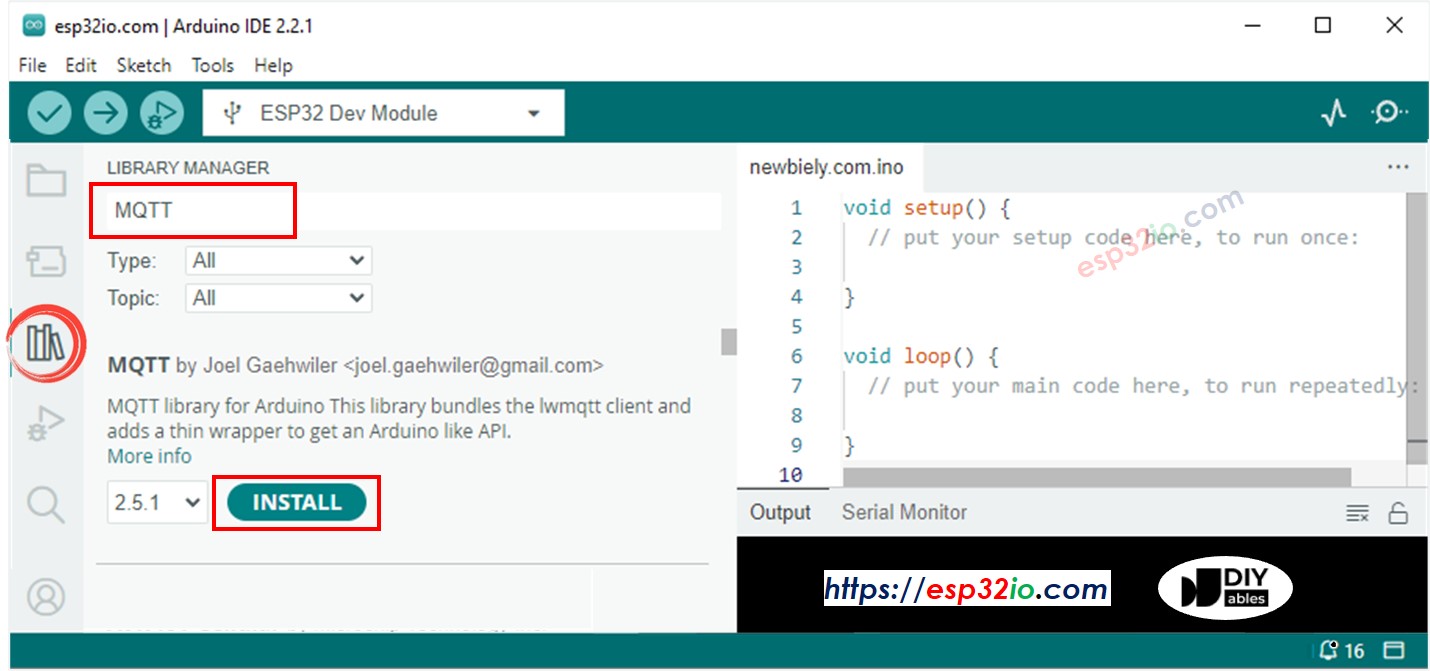
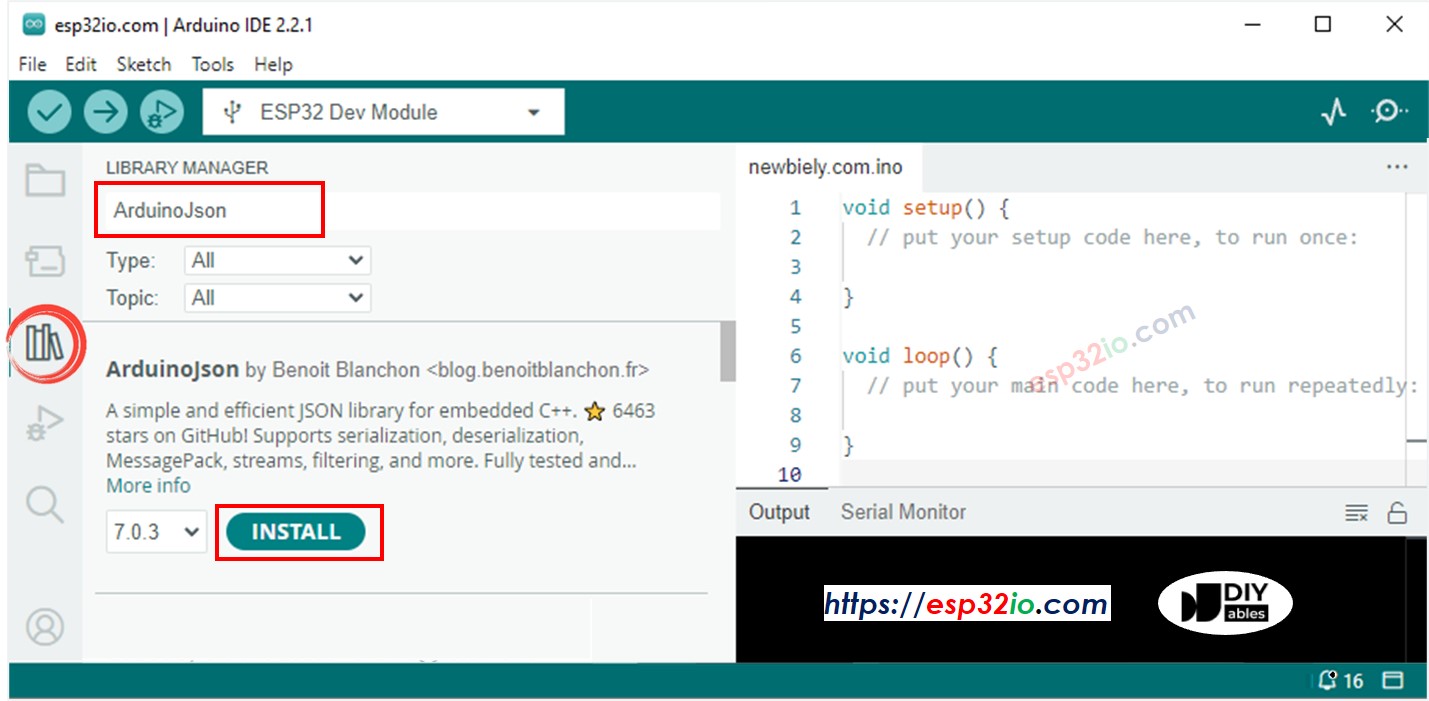
Arduino IDE의 왼쪽 탐색 바에 있는 Library Manager 아이콘을 클릭하여 라이브러리 관리자를 엽니다.
검색 상자에 MQTT를 입력한 후, Joel Gaehwiler에 의한 MQTT 라이브러리를 찾습니다.
Install 버튼을 클릭하여 MQTT 라이브러리를 설치하세요.
검색 상자에 ArduinoJson을 입력한 다음, Benoit Blanchon의 ArduinoJson 라이브러리를 찾으세요.
Install 버튼을 클릭하여 ArduinoJson 라이브러리를 설치하세요.
위의 코드를 복사하고 Arduino IDE로 열기
코드에서 WiFi 정보(SSID와 비밀번호)를 자신의 것으로 바꾸세요.
코드에서 'YOUR-NAME'이라는 단어를 세 번 볼 수 있습니다. 이 단어를 귀하의 이름 또는 무작위 문자(알파벳 문자만, 공백 없음)로 바꾸세요. 이 변경을 하지 않으면 동시에 이 코드를 실행하는 사람이 여러 명 있을 수 있으며, MQTT 클라이언트 ID와 주제가 모두 같기 때문에 충돌이 발생할 수 있기 때문에 필요합니다.
Arduino IDE에서 Upload 버튼을 클릭하여 ESP32에 코드를 업로드하세요.
시리얼 모니터 열기
시리얼 모니터에서 결과를 확인하세요.
ESP32 - Connecting to MQTT broker
ESP32 - Subscribed to the topic: YOUR-NAME-esp32-001/loopback
ESP32 - MQTT broker Connected!
ESP32 - sent to MQTT:
- topic: YOUR-NAME-esp32-001/loopback
- payload:{"timestamp":11757,"data":255}
ESP32 - received from MQTT:
- topic: YOUR-NAME-esp32-001/loopback
- payload:
{"timestamp":11757,"data":255}
ESP32 - sent to MQTT:
- topic: YOUR-NAME-esp32-001/loopback
- payload:{"timestamp":16896,"data":259}
ESP32 - received from MQTT:
- topic: YOUR-NAME-esp32-001/loopback
- payload:
{"timestamp":16896,"data":259}
보시다시피, ESP32는 MQTT 브로커에 메시지를 게시한 다음 동일한 메시지를 다시 받습니다. 제공된 코드가 데이터를 게시하는 동일한 주제를 구독하기 때문에 이러한 현상이 발생합니다. ESP32가 게시한 메시지를 받지 않기를 원한다면, SUBSCRIBE 주제를 PUBLISH 주제와 다르게 설정함으로써 쉽게 달성할 수 있습니다.
이제 다음 단계를 따라 MQTT 브로커가 제대로 작동하는지 확인해 봅시다:
Mosquitto가 설치된 디렉토리로 이동하세요. 예를 들면: D:\Draft\mosquitto>
새 파일 test.conf를 만들고 아래 내용을 복사하여 해당 디렉토리에 저장하세요:
listener 1883
allow_anonymous true
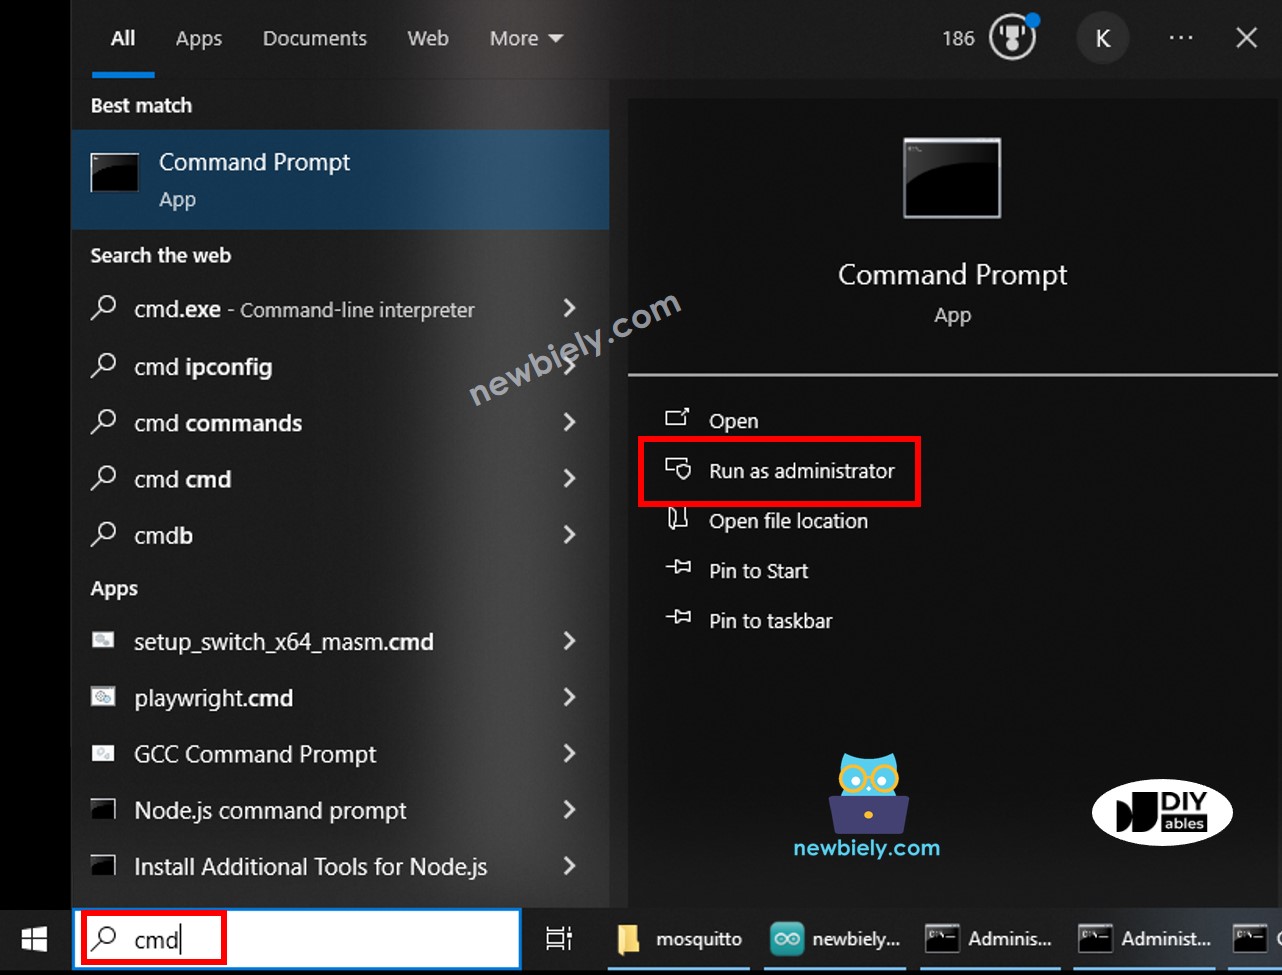
PC에서 관리자 권한으로 명령 프롬프트를 실행하십시오. 이것을 Broker Window라고 부릅시다. 튜토리얼이 끝날 때까지 이 창을 닫지 마십시오.
아래의 명령어들을 차례대로 실행하세요:
cd /d D:\Draft\mosquitto
mosquitto -v -c test.conf
당신은 보게 될 것입니다:
Microsoft Windows [Version 10.0.19045.3930]
(c) Microsoft Corporation. All rights reserved.
C:\WINDOWS\system32>cd /d D:\Draft\mosquitto
D:\Draft\mosquitto>mosquitto -v -c test.conf
1710918939: mosquitto version 2.0.18 starting
1710918939: Config loaded from test.conf.
1710918939: Opening ipv6 listen socket on port 1883.
1710918939: Opening ipv4 listen socket on port 1883.
1710918939: mosquitto version 2.0.18 running
C:\WINDOWS\system32>ipconfig
Windows IP Configuration
Ethernet adapter:
Subnet Mask . . . . . . . . . . . : 255.0.0.0
IPv4 Address. . . . . . . . . . . : 192.168.0.26
Subnet Mask . . . . . . . . . . . : 255.255.255.0
Default Gateway . . . . . . . . . :
나중에 사용하기 위해 IP 주소를 적어두세요. 위의 예제에서: 192.168.0.26
cd /d D:\Draft\mosquitto
mosquitto_sub -h 192.168.0.26 -p 1883 -t esp32-001/send
cd /d D:\Draft\mosquitto
mosquitto_pub -h 192.168.0.26 -p 1883 -t esp32-001/send -m "Hello, MQTT!"
당신은 보게 될 것입니다:
Microsoft Windows [Version 10.0.19045.3930]
(c) Microsoft Corporation. All rights reserved.
C:\WINDOWS\system32>cd /d D:\Draft\mosquitto
D:\Draft\mosquitto>mosquitto_pub -h 192.168.0.26 -p 1883 -t esp32-001/send -m "Hello, MQTT!"
D:\Draft\mosquitto>
다음과 같이 그 메시지가 구독자 창으로 전달되었음을 보게 될 것입니다:
Microsoft Windows [Version 10.0.19045.3930]
(c) Microsoft Corporation. All rights reserved.
C:\WINDOWS\system32>cd /d D:\Draft\mosquitto
D:\Draft\mosquitto>mosquitto_sub -h 192.168.0.26 -p 1883 -t esp32-001/send
Hello, MQTT!
이제 PC에 Mosquitto MQTT 브로커를 성공적으로 설치했습니다. 브로커 창, 구독자 창, 그리고 게시자 창 세 개의 창을 닫지 말아 주세요. 곧 이 창들을 사용할 것입니다.
아래의 ESP32 코드는 다음과 같은 기능을 합니다:
MQTT 브로커에 연결하기
주제를 구독하기
다른 주제에 주기적으로 메시지를 게시하기
#include <WiFi.h>
#include <MQTTClient.h>
#include <ArduinoJson.h>
#define CLIENT_ID "ESP32-001"
const char WIFI_SSID[] = "YOUR_WIFI_SSID";
const char WIFI_PASSWORD[] = "YOUR_WIFI_PASSWORD";
const char MQTT_BROKER_ADRRESS[] = "192.168.0.26";
const int MQTT_PORT = 1883;
const char MQTT_USERNAME[] = "";
const char MQTT_PASSWORD[] = "";
#define PUBLISH_TOPIC "esp32-001/send"
#define SUBSCRIBE_TOPIC "esp32-001/receive"
#define PUBLISH_INTERVAL 5000
WiFiClient network;
MQTTClient mqtt = MQTTClient(256);
unsigned long lastPublishTime = 0;
void setup() {
Serial.begin(9600);
WiFi.mode(WIFI_STA);
WiFi.begin(WIFI_SSID, WIFI_PASSWORD);
Serial.println("ESP32 - Wi-Fi에 연결 중");
while (WiFi.status() != WL_CONNECTED) {
delay(500);
Serial.print(".");
}
Serial.println();
connectToMQTT();
}
void loop() {
mqtt.loop();
if (millis() - lastPublishTime > PUBLISH_INTERVAL) {
sendToMQTT();
lastPublishTime = millis();
}
}
void connectToMQTT() {
mqtt.begin(MQTT_BROKER_ADRRESS, MQTT_PORT, network);
mqtt.onMessage(messageHandler);
Serial.print("ESP32 - MQTT 브로커에 연결 중");
while (!mqtt.connect(CLIENT_ID, MQTT_USERNAME, MQTT_PASSWORD)) {
Serial.print(".");
delay(100);
}
Serial.println();
if (!mqtt.connected()) {
Serial.println("ESP32 - MQTT 브로커 연결 시간 초과!");
return;
}
if (mqtt.subscribe(SUBSCRIBE_TOPIC))
Serial.print("ESP32 - 토픽 구독 성공: ");
else
Serial.print("ESP32 - 토픽 구독 실패: ");
Serial.println(SUBSCRIBE_TOPIC);
Serial.println("ESP32 - MQTT 브로커 연결됨!");
}
void sendToMQTT() {
StaticJsonDocument<200> message;
message["timestamp"] = millis();
message["data"] = analogRead(0);
char messageBuffer[512];
serializeJson(message, messageBuffer);
mqtt.publish(PUBLISH_TOPIC, messageBuffer);
Serial.println("ESP32 - MQTT로 전송됨:");
Serial.print("- 토픽: ");
Serial.println(PUBLISH_TOPIC);
Serial.print("- 페이로드:");
Serial.println(messageBuffer);
}
void messageHandler(String &topic, String &payload) {
Serial.println("ESP32 - MQTT에서 수신됨:");
Serial.println("- 토픽: " + topic);
Serial.println("- 페이로드:");
Serial.println(payload);
}
위의 코드를 복사하고 Arduino IDE로 열기
코드의 WiFi 정보(SSID 및 비밀번호)를 자신의 것으로 교체하십시오.
코드에서 MQTT 브로커 주소(도메인 이름 또는 IP 주소)를 교체하십시오.
Arduino IDE에서 Upload 버튼을 클릭하여 코드를 ESP32에 업로드하십시오.
ESP32 코드는 esp32-001/send MQTT 토픽에 데이터를 게시하고, PC의 구독자 창에서는 해당 토픽을 구독하여 데이터를 수신합니다.
시리얼 모니터를 열면 ESP32가 주기적으로 토픽에 메시지를 게시하는 것을 볼 수 있습니다.
ESP32 - Connecting to MQTT broker
ESP32 - Subscribed to the topic: esp32-001/receive
ESP32 - MQTT broker Connected!
ESP32 - sent to MQTT:
- topic: esp32-001/send
- payload:{"timestamp":10708,"data":311}
ESP32 - sent to MQTT:
- topic: esp32-001/send
- payload:{"timestamp":15837,"data":298}
ESP32 - sent to MQTT:
- topic: esp32-001/send
- payload:{"timestamp":20965,"data":291}
ESP32 - sent to MQTT:
- topic: esp32-001/send
- payload:{"timestamp":26094,"data":286}
Microsoft Windows [Version 10.0.19045.3930]
(c) Microsoft Corporation. All rights reserved.
C:\WINDOWS\system32>cd /d D:\Draft\mosquitto
D:\Draft\mosquitto>mosquitto_sub -h 192.168.0.26 -p 1883 -t esp32-001/send
Hello, MQTT!
{"timestamp":10708,"data":311}
{"timestamp":15837,"data":298}
{"timestamp":20965,"data":291}
{"timestamp":26094,"data":286}
ESP32는 esp32-001/receive라는 토픽을 구독하고, PC의 발행자 창에서 그 토픽에 메시지를 발행하여 ESP32로 전송합니다.
다음 명령어를 실행하여 ESP32가 구독한 주제에 메세지를 게시하십시오: Publisher Window에서
mosquitto_pub -h 192.168.0.26 -p 1883 -t esp32-001/receive -m "Hello, ESP32!"
아래와 같이 이 메시지가 ESP32의 시리얼 모니터에서 받아졌음을 확인할 수 있습니다:
ESP32 - received from MQTT:
- topic: esp32-001/receive
- payload:
Hello, ESP32!
비디오 제작은 시간이 많이 걸리는 작업입니다. 비디오 튜토리얼이 학습에 도움이 되었다면, YouTube 채널 을 구독하여 알려 주시기 바랍니다. 비디오에 대한 높은 수요가 있다면, 비디오를 만들기 위해 노력하겠습니다.


