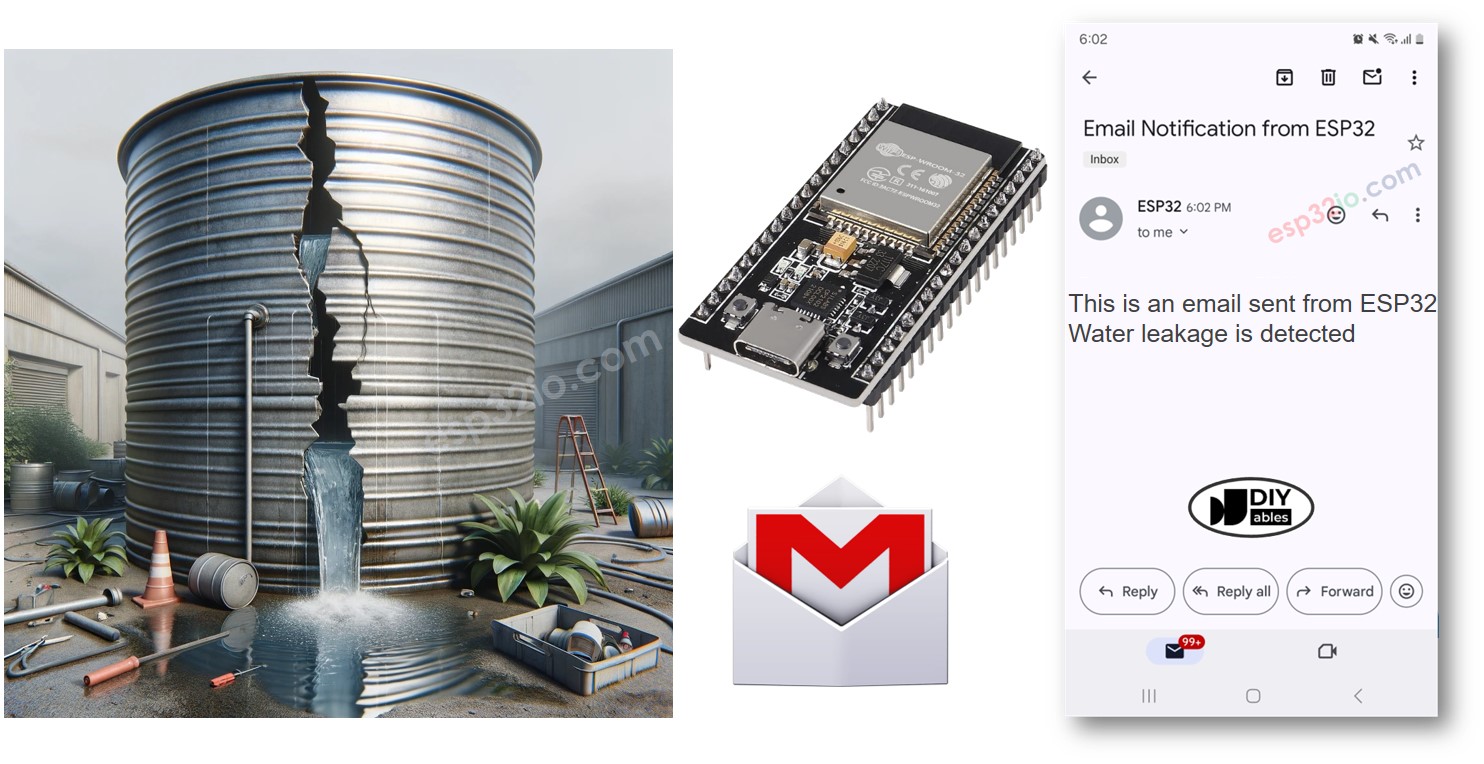
ESP32 물 새는 것에 대한 이메일 알림
이 튜혠리얼에서는 ESP32를 사용하여 물 새는 것을 감지하고 이메일을 통해 실시간 알림을 보내는 방범을 배우게 됩니다. 센서 설정, 코드 예시, 이메일 서비스와의 통합을 다루는 단계별 튜토리얼로, 집이나 사무실이 잠재적인 물 피해로부터 보호될 수 있도록 합니다. 물 새는 감지 시스템을 개선하고자 하는 DIY 애호가 및 스마트 홈 개발자에게 적합합니다.
준비물
| 1 | × | 38-pin ESP32 ESP-WROOM-32 Dev Module - Narrow | 쿠팡 | 아마존 | |
| 1 | × | (또는) 38-pin ESP32 ESP-WROOM-32 Dev Module - Wide | 쿠팡 | 아마존 | |
| 1 | × | (또는) 30-pin ESP32 ESP-WROOM-32 Dev Module - Wide | 아마존 | |
| 1 | × | (또는) ESP32 Uno-form board | 아마존 | |
| 1 | × | (또는) ESP32 S3 Uno-form board | 아마존 | |
| 1 | × | USB 케이블 타입-A to 타입-C (USB-A PC용) | 쿠팡 | 아마존 | |
| 1 | × | USB 케이블 타입-C to 타입-C (USB-C PC용) | 아마존 | |
| 1 | × | Water Leak Detector | 아마존 | |
| 1 | × | 브레드보드 | 쿠팡 | 아마존 | |
| 1 | × | 점퍼케이블 | 쿠팡 | 아마존 | |
| 1 | × | (옵션) DC 커넥터 전원 연결 잭 플러그 소켓 | 쿠팡 | 아마존 | |
| 1 | × | (추천) ESP32용 스크루 터미널 확장 보드 | 쿠팡 | 아마존 | |
| 1 | × | (추천) Breakout Expansion Board for ESP32 | 쿠팡 | 아마존 | |
| 1 | × | (추천) ESP32용 전원 분배기 | 쿠팡 | 아마존 |
공개: 이 포스팅 에 제공된 일부 링크는 아마존 제휴 링크입니다. 이 포스팅은 쿠팡 파트너스 활동의 일환으로, 이에 따른 일정액의 수수료를 제공받습니다.
워터 센서와 Gmail에 대하여
저희는 워터 센서와 Gmail에 대한 구체적인 튜토리얼을 제공합니다. 각 튜토리얼에는 하드웨어 핀 배치, 작동 원리, ESP32와의 배선 연결, ESP32 코드 등에 대한 자세한 정보와 단계별 지침이 포함되어 있습니다. 다음 링크에서 자세한 내용을 알아보세요:
- ESP32 - 물 샘 감지기 튜토리얼
- ESP32 - Gmail 튜토리얼
물 센서와 ESP32 간의 배선도
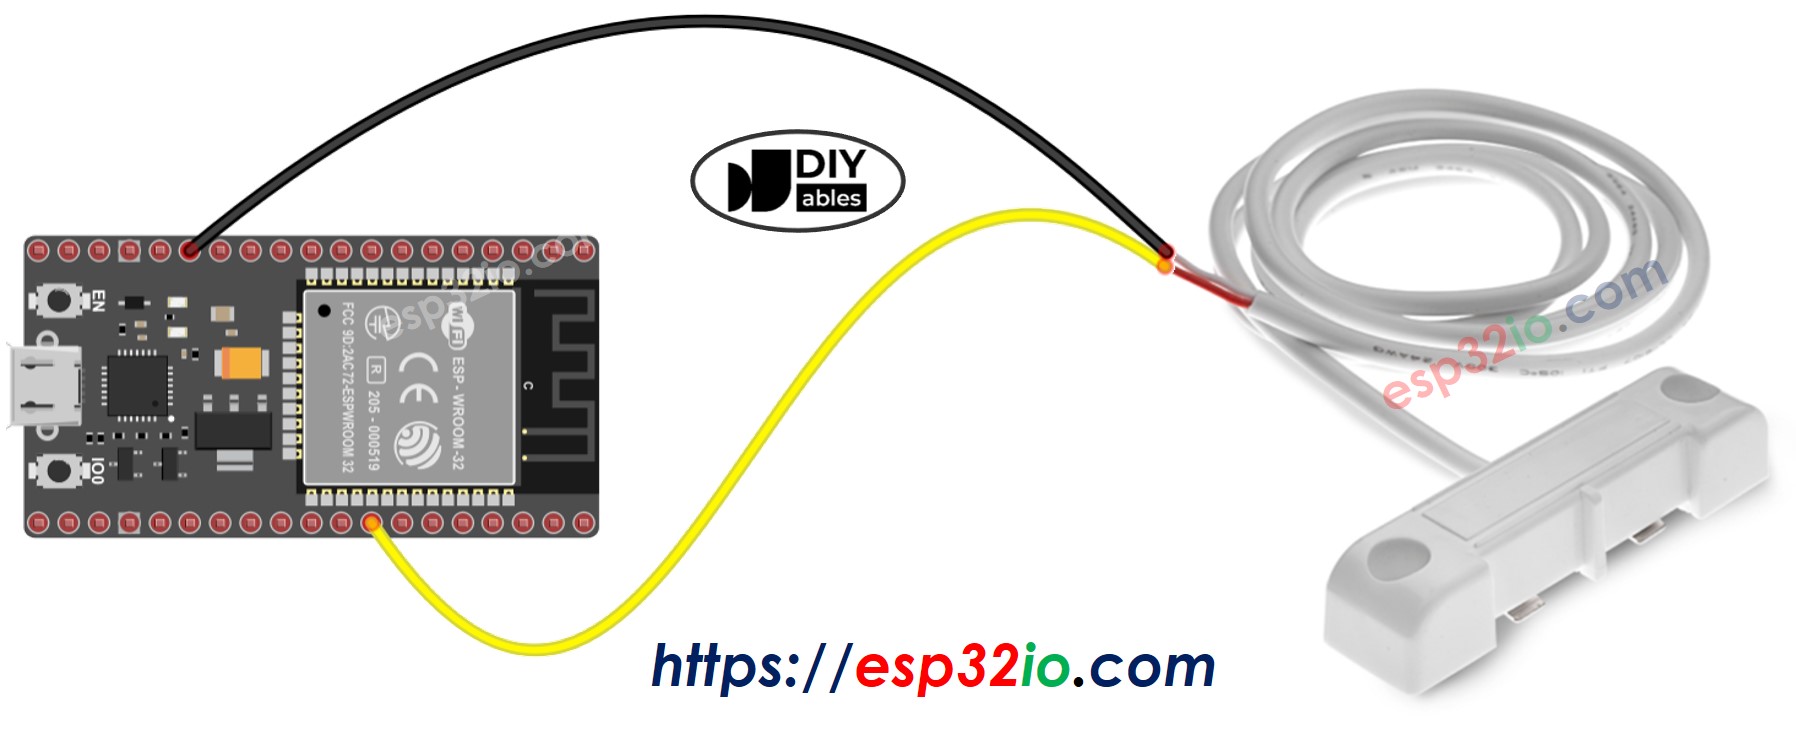
이 이미지는 Fritzing을 사용하여 만들어졌습니다. 이미지를 확대하려면 클릭하세요.
ESP32 및 다른 구성 요소에 전원을 공급하는 방법에 대해 잘 알지 못하는 경우, 다음 튜토리얼에서 안내를 찾을 수 있습니다: ESP32 전원 공급 방법.
ESP32 코드
/*
* 이 ESP32 코드는 newbiely.kr 에서 개발되었습니다
* 이 ESP32 코드는 어떠한 제한 없이 공개 사용을 위해 제공됩니다.
* 상세한 지침 및 연결도에 대해서는 다음을 방문하세요:
* https://newbiely.kr/tutorials/esp32/esp32-water-leak-email-notification
*/
#include <WiFi.h>
#include <ESP_Mail_Client.h>
#define WIFI_SSID "YOUR_WIFI_SSID" // CHANGE IT
#define WIFI_PASSWORD "YOUR_WIFI_PASSWORD" // CHANGE IT
// the sender email credentials
#define SENDER_EMAIL "xxxxxx@gmail.com" // CHANGE IT
#define SENDER_PASSWORD "xxxx xxxx xxxx xxxx" // CHANGE IT to your Google App password
#define RECIPIENT_EMAIL "xxxxxx@gmail.com" // CHANGE IT
#define SMTP_HOST "smtp.gmail.com"
#define SMTP_PORT 587
#define WATER_SENSOR_PIN 19 // ESP32 pin GPIO19 connected to water sensor's pin
int water_state; // current state of water sensor
int prev_water_state; // previous state of water sensor
SMTPSession smtp;
void setup() {
Serial.begin(9600);
WiFi.begin(WIFI_SSID, WIFI_PASSWORD);
Serial.print("Connecting to Wi-Fi");
while (WiFi.status() != WL_CONNECTED) {
Serial.print(".");
delay(300);
}
Serial.println();
Serial.print("Connected with IP: ");
Serial.println(WiFi.localIP());
Serial.println();
pinMode(WATER_SENSOR_PIN, INPUT_PULLUP); // set ESP32 pin to input pull-up mode
water_state = digitalRead(WATER_SENSOR_PIN); // read state
}
void loop() {
prev_water_state = water_state; // save the last state
water_state = digitalRead(WATER_SENSOR_PIN); // read new state
if (prev_water_state == HIGH && water_state == LOW) {
Serial.println("Water leakage is detected!");
String subject = "Email Notification from ESP32";
String textMsg = "This is an email sent from ESP32.\n";
textMsg += "Water leakage is detected";
gmail_send(subject, textMsg);
}
}
void gmail_send(String subject, String textMsg) {
// set the network reconnection option
MailClient.networkReconnect(true);
smtp.debug(1);
smtp.callback(smtpCallback);
Session_Config config;
// set the session config
config.server.host_name = SMTP_HOST;
config.server.port = SMTP_PORT;
config.login.email = SENDER_EMAIL;
config.login.password = SENDER_PASSWORD;
config.login.user_domain = F("127.0.0.1");
config.time.ntp_server = F("pool.ntp.org,time.nist.gov");
config.time.gmt_offset = 3;
config.time.day_light_offset = 0;
// declare the message class
SMTP_Message message;
// set the message headers
message.sender.name = F("ESP32");
message.sender.email = SENDER_EMAIL;
message.subject = subject;
message.addRecipient(F("To Whom It May Concern"), RECIPIENT_EMAIL);
message.text.content = textMsg;
message.text.transfer_encoding = "base64";
message.text.charSet = F("utf-8");
message.priority = esp_mail_smtp_priority::esp_mail_smtp_priority_low;
// set the custom message header
message.addHeader(F("Message-ID: <abcde.fghij@gmail.com>"));
// connect to the server
if (!smtp.connect(&config)) {
Serial.printf("Connection error, Status Code: %d, Error Code: %d, Reason: %s\n", smtp.statusCode(), smtp.errorCode(), smtp.errorReason().c_str());
return;
}
if (!smtp.isLoggedIn()) {
Serial.println("Not yet logged in.");
} else {
if (smtp.isAuthenticated())
Serial.println("Successfully logged in.");
else
Serial.println("Connected with no Auth.");
}
// start sending Email and close the session
if (!MailClient.sendMail(&smtp, &message))
Serial.printf("Error, Status Code: %d, Error Code: %d, Reason: %s\n", smtp.statusCode(), smtp.errorCode(), smtp.errorReason().c_str());
}
// callback function to get the Email sending status
void smtpCallback(SMTP_Status status) {
// print the current status
Serial.println(status.info());
// print the sending result
if (status.success()) {
Serial.println("----------------");
Serial.printf("Email sent success: %d\n", status.completedCount());
Serial.printf("Email sent failed: %d\n", status.failedCount());
Serial.println("----------------\n");
for (size_t i = 0; i < smtp.sendingResult.size(); i++) {
// get the result item
SMTP_Result result = smtp.sendingResult.getItem(i);
Serial.printf("Message No: %d\n", i + 1);
Serial.printf("Status: %s\n", result.completed ? "success" : "failed");
Serial.printf("Date/Time: %s\n", MailClient.Time.getDateTimeString(result.timestamp, "%B %d, %Y %H:%M:%S").c_str());
Serial.printf("Recipient: %s\n", result.recipients.c_str());
Serial.printf("Subject: %s\n", result.subject.c_str());
}
Serial.println("----------------\n");
// free the memory
smtp.sendingResult.clear();
}
}
자세한 사용 방법
- ESP32를 처음 사용하는 경우, ESP32 - 소프트웨어 설치을 참조하세요.
- 물 샐 위험이 있는 장소에 수분 센서를 설치하세요.
- ESP32 보드를 수분 센서에 연결하세요.
- ESP32 보드를 마이크로 USB 케이블을 이용해 PC에 연결하세요.
- PC에서 Arduino IDE를 엽니다.
- 올바른 ESP32 보드(예: ESP32 Dev Module)와 COM 포트를 선택하세요.
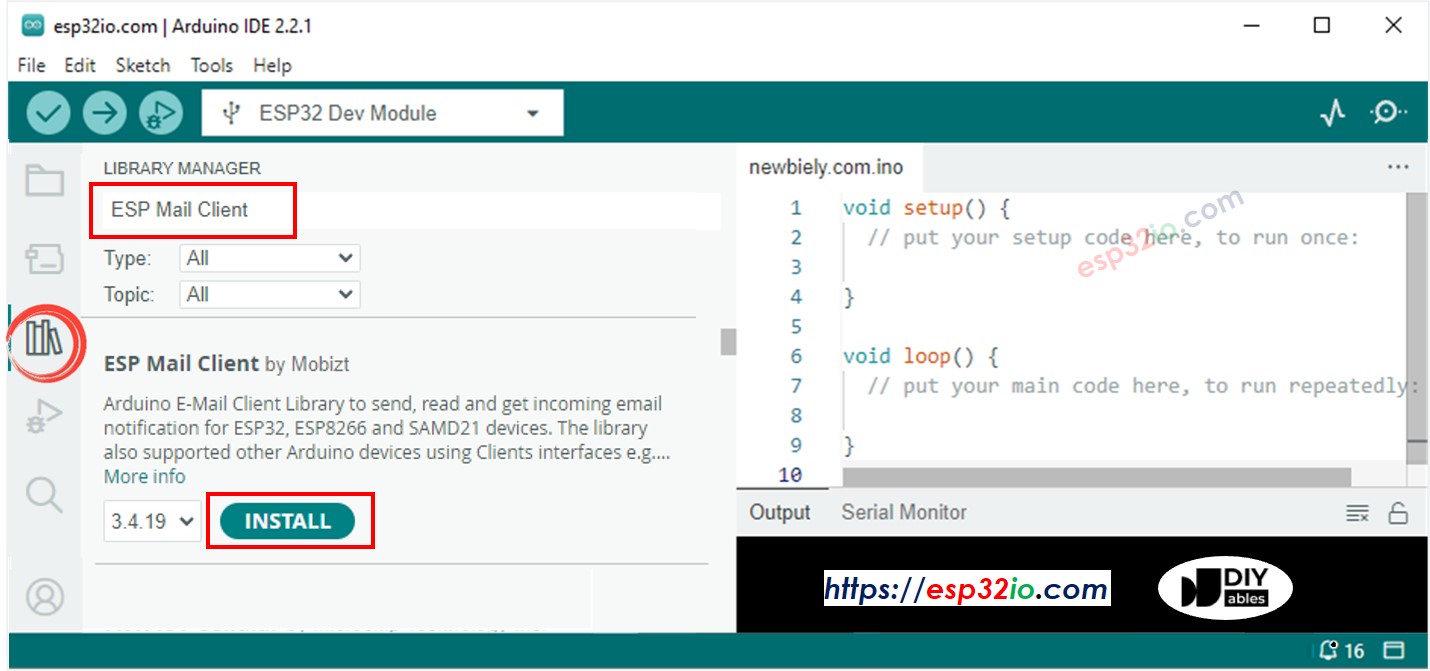
- Arduino IDE의 왼쪽 내비게이션 바에 있는 Library Manager 아이콘을 클릭하여 라이브러리 매니저를 엽니다.
- ESP Mail Client를 검색한 다음, Mobizt가 만든 ESP Mail Client를 찾으세요.
- Install 버튼을 클릭하여 ESP Mail Client 라이브러리를 설치하세요.
- 위의 코드를 복사하고 아두이노 IDE에서 열기
- 코드 내의 두 상수 WIFI_SSID, WIFI_PASSWORD를 변경하여 WiFi 정보(SSID 및 비밀번호)를 본인 것으로 변경
- 코드 내의 두 상수 SENDER_EMAIL, SENDER_PASSWORD를 변경하여 발신자 이메일과 비밀번호를 본인 것으로 변경
- 코드 내의 상수 RECIPIENT_EMAIL을 변경하여 수신자 이메일을 본인 것으로 변경. 수신자 이메일은 발신자 이메일과 동일할 수 있음
※ 주의:
- 발신자 이메일은 반드시 Gmail이어야 합니다.
- 발신자 비밀번호는 이전 단계에서 받은 앱 비밀번호입니다.
- 수신자 이메일은 어떠한 유형의 이메일도 가능합니다.
- 아두이노 IDE에서 Upload 버튼을 클릭하여 ESP32에 코드를 업로드하세요.
- 시리얼 모니터를 엽니다.
- 수분 센서에 물을 부어주세요.
- 시리얼 모니터에서 결과를 확인하세요.
8
Serial.println("Hello World!");
Message (Enter to send message to 'ESP32 Dev Module' on 'COM15')
New Line
9600 baud
Water leakage is detected
#### Email sent successfully
> C: Email sent successfully
----------------
Message sent success: 1
Message sent failed: 0
----------------
Message No: 1
Status: success
Date/Time: May 27, 2024 04:42:50
Recipient: xxxxxx@gmail.com
Subject: Email Notification from ESP32
----------------
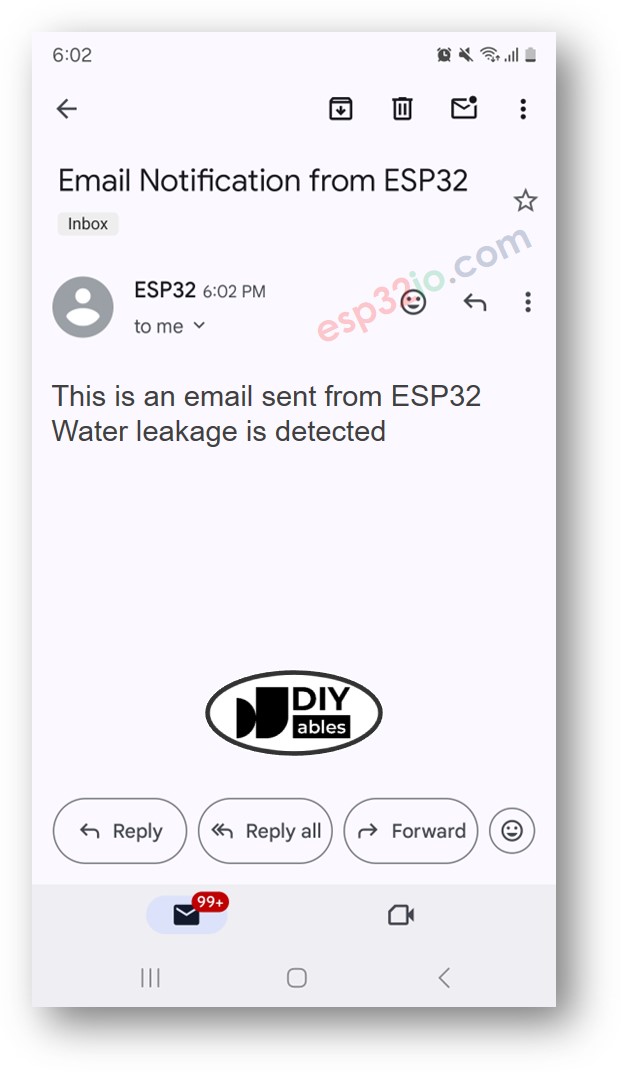
- 수신자 이메일 상자를 확인하세요. 다음과 같은 이메일을 받게 될 것입니다:
동영상
비디오 제작은 시간이 많이 걸리는 작업입니다. 비디오 튜토리얼이 학습에 도움이 되었다면, YouTube 채널 을 구독하여 알려 주시기 바랍니다. 비디오에 대한 높은 수요가 있다면, 비디오를 만들기 위해 노력하겠습니다.