아두이노 우노 R4 LED 매트릭스가 숫자 문자를 표시합니다
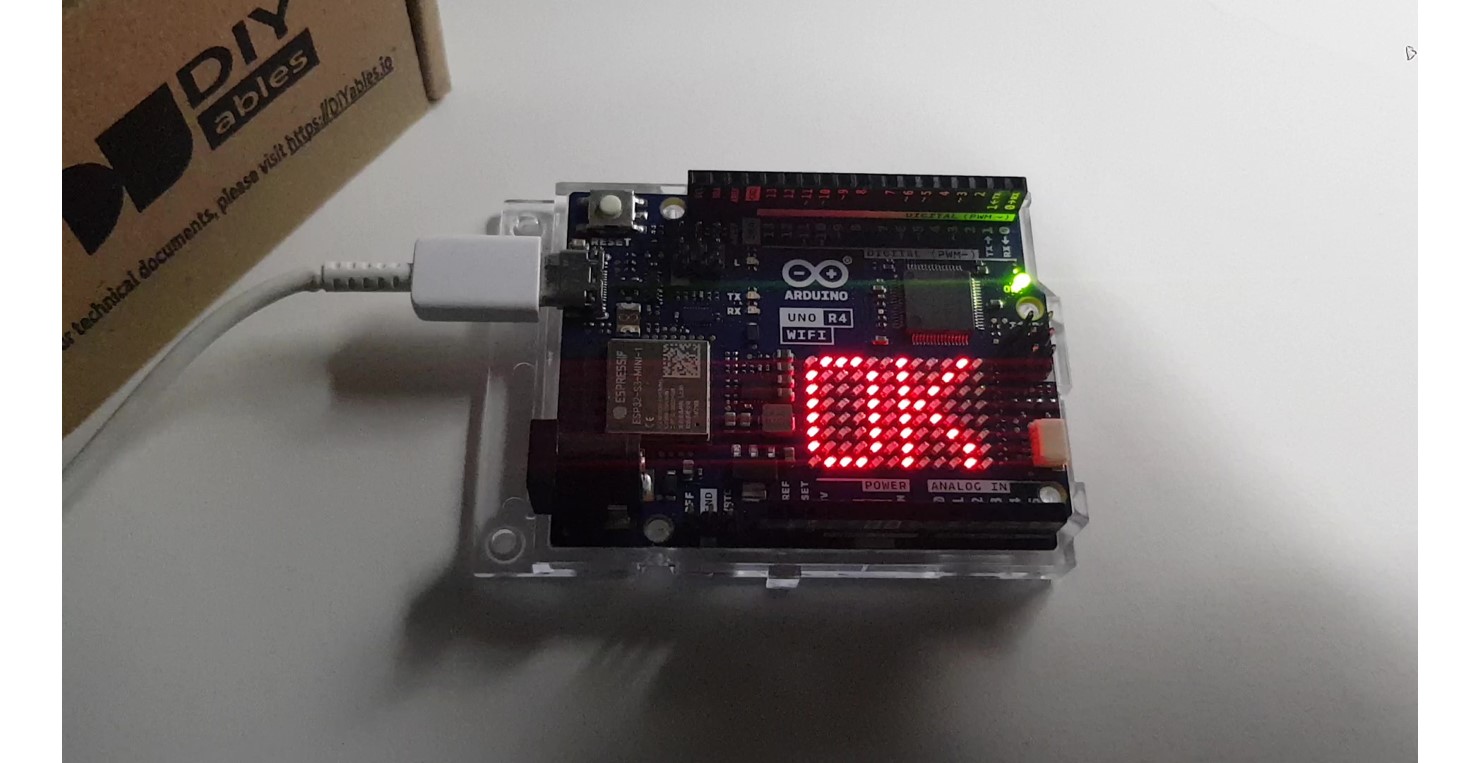
Arduino Uno R4 WiFi는 12x8 LED 매트릭스가 포함되어 있습니다. 이 튜토리얼에서는 내장 LED 매트릭스를 사용하여 숫자와 문자를 표시하는 방법을 탐구할 것입니다. 구체적으로, 다음 내용을 다룰 것입니다:
- 아두이노 우노 R4 WiFi를 프로그래밍하여 단일 숫자(0-9) 또는 문자(A-Z)를 조절 가능한 위치에 표시합니다.
- 아두이노 우노 R4 WiFi를 프로그래밍하여 두 개의 숫자나 문자를 동시에 표시합니다.
준비물
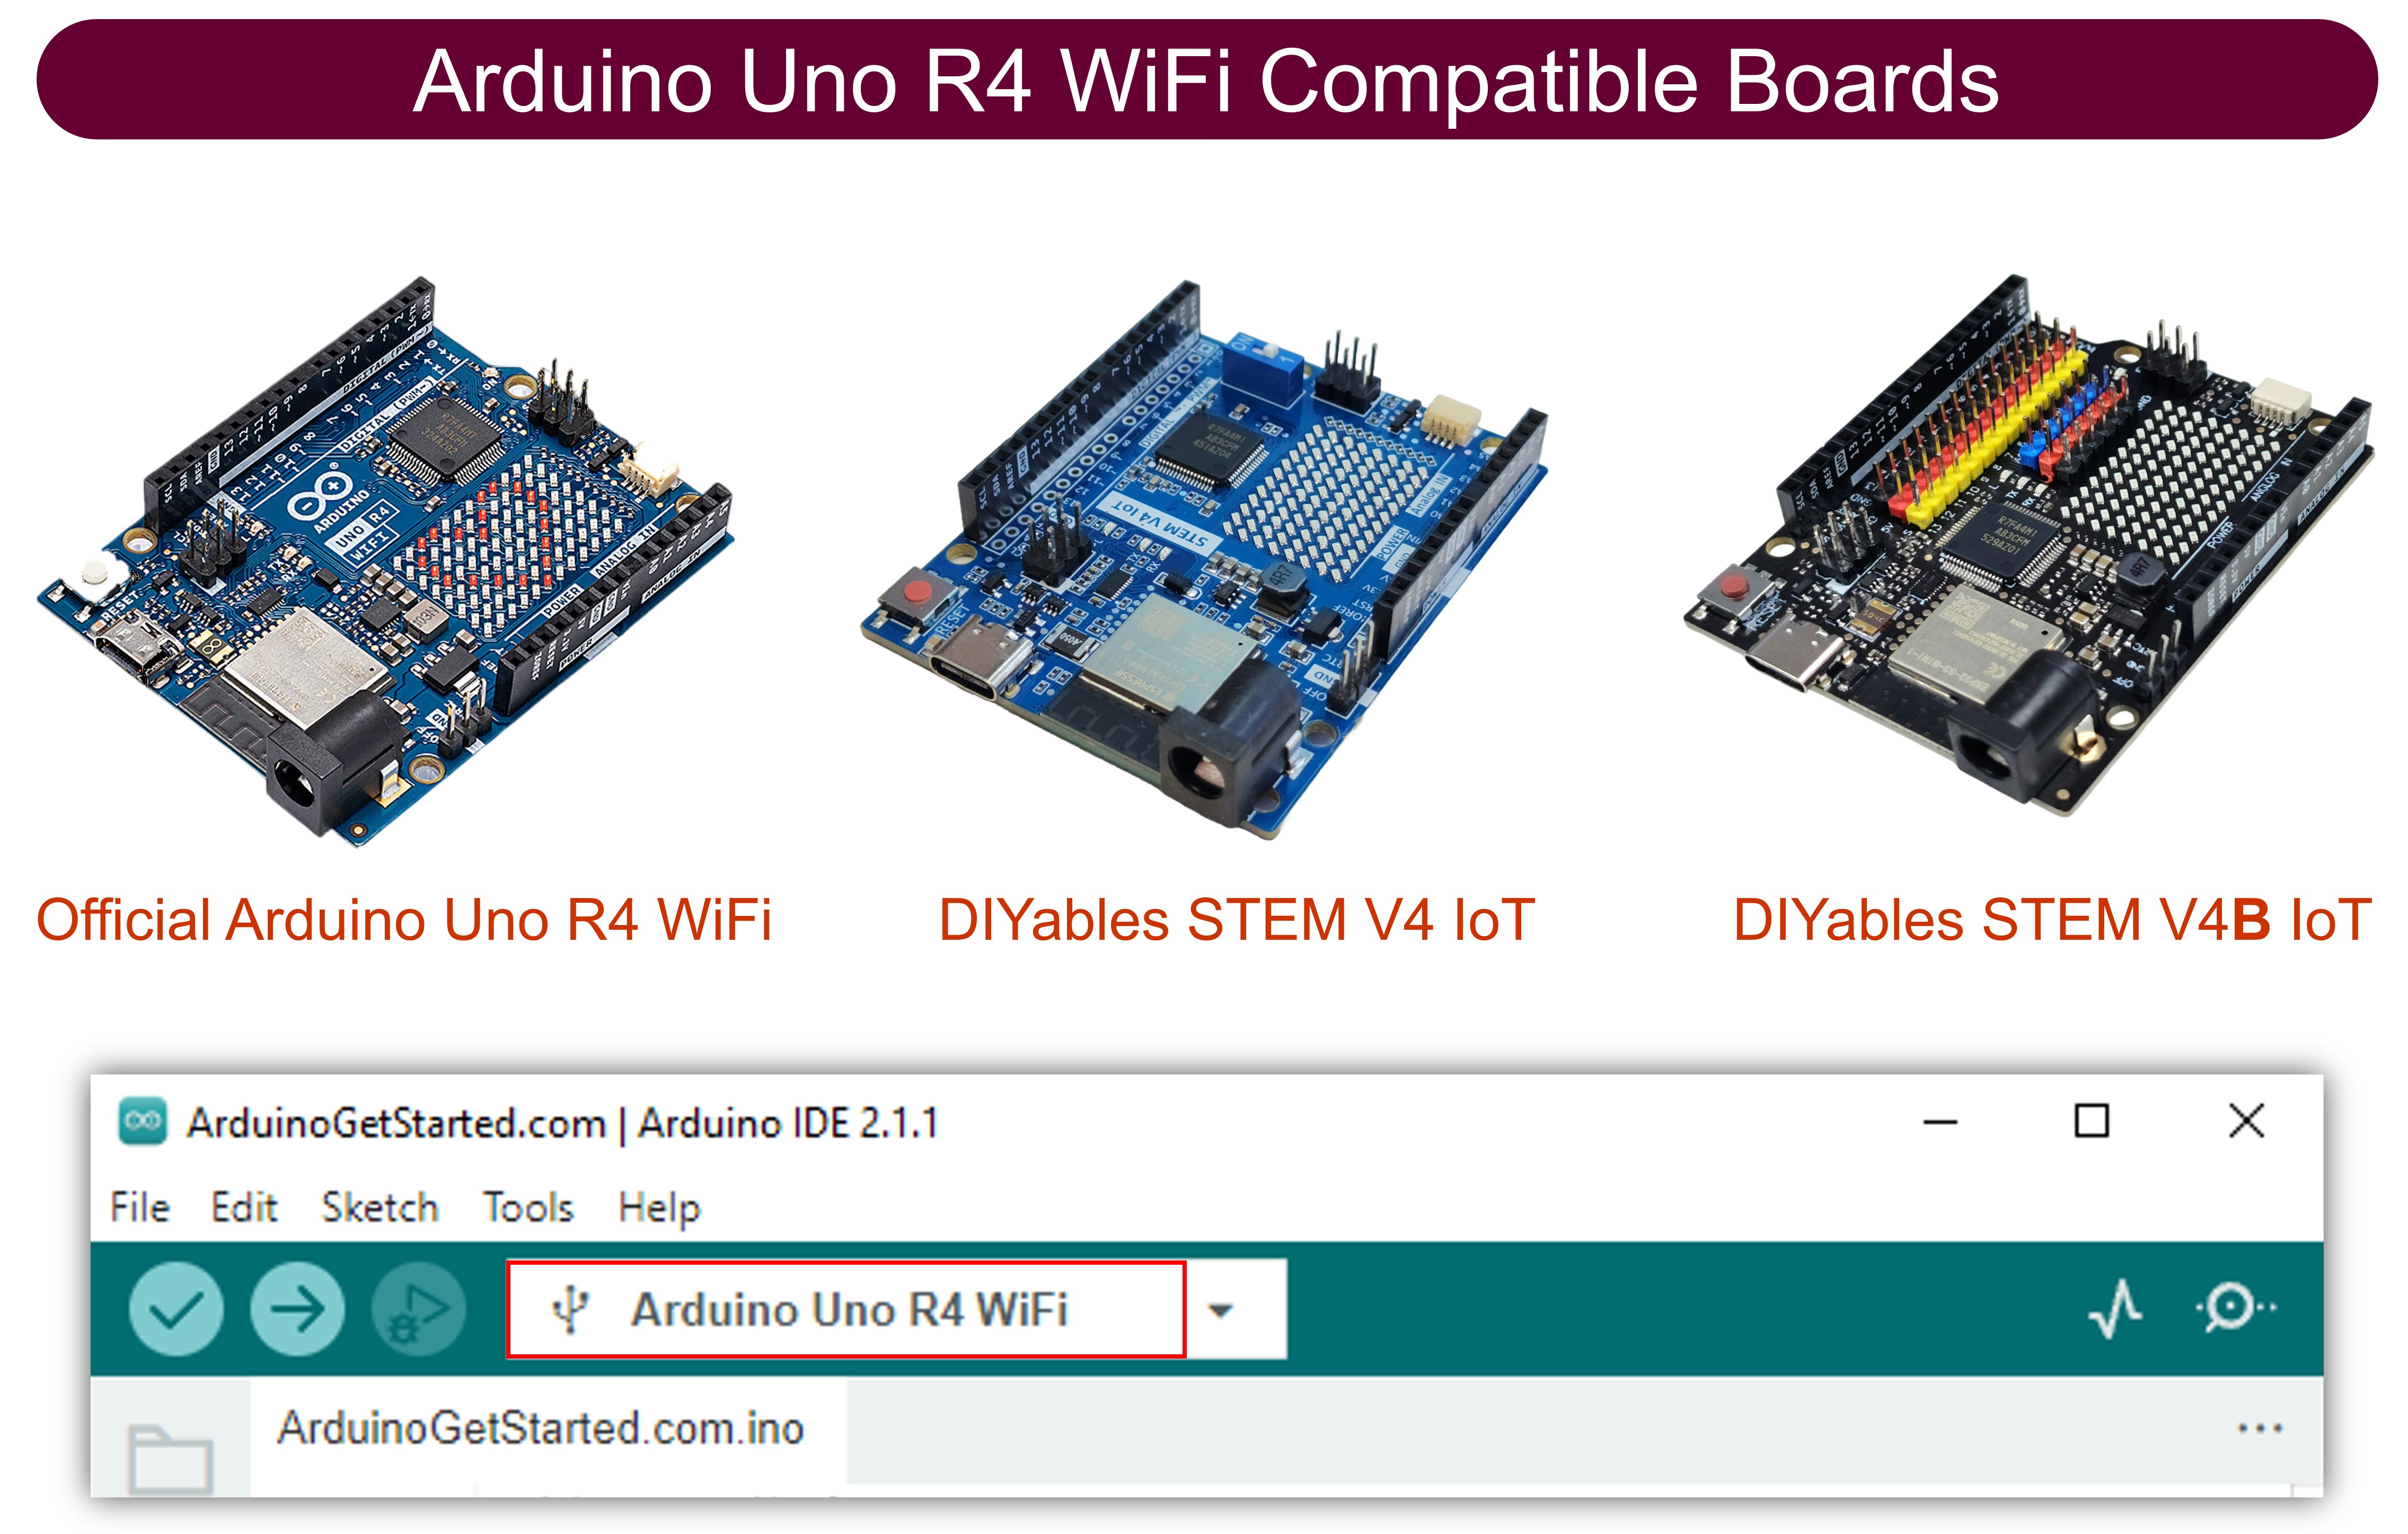
| 1 | × | 아두이노 우노 R4 와이파이 | 쿠팡 | 아마존 | |
| 1 | × | (또는) DIYables STEM V4 IoT | 쿠팡 | 아마존 | |
| 1 | × | USB 케이블 타입-A to 타입-C (USB-A PC용) | 쿠팡 | 아마존 | |
| 1 | × | USB 케이블 타입-C to 타입-C (USB-C PC용) | 아마존 | |
| 1 | × | (추천) 아두이노 우노 R4용 스크루 터미널 블록 쉴드 | 쿠팡 | 아마존 | |
| 1 | × | (추천) Sensors/Servo Expansion Shield for Arduino UNO R4 | 쿠팡 | 아마존 | |
| 1 | × | (추천) 아두이노 우노 R4용 브레드보드 쉴드 | 쿠팡 | 아마존 | |
| 1 | × | (추천) 아두이노 우노 R4용 케이스 | 쿠팡 | 아마존 | |
| 1 | × | (추천) 아두이노 우노 R4용 전원 분배기 | 쿠팡 | 아마존 | |
| 1 | × | (추천) 아두이노 우노용 프로토타이핑 베이스 플레이트 & 브레드보드 키트 | 아마존 |
공개: 이 포스팅 에 제공된 일부 링크는 아마존 제휴 링크입니다. 이 포스팅은 쿠팡 파트너스 활동의 일환으로, 이에 따른 일정액의 수수료를 제공받습니다.
시위
아두이노 코드 - 숫자(0-9) 또는 문자(A-Z) 표시
아래 코드는 LED 매트릭스의 중앙에서 0부터 9까지의 숫자와 A부터 Z까지의 문자를 차례대로 하나씩 표시합니다.
/*
* 이 아두이노 코드는 newbiely.kr 에서 개발되었습니다
* 이 아두이노 코드는 어떠한 제한 없이 공개 사용을 위해 제공됩니다.
* 상세한 지침 및 연결도에 대해서는 다음을 방문하세요:
* https://newbiely.kr/tutorials/arduino/arduino-uno-r4-led-matrix-displays-number-character
*/
#include "Arduino_LED_Matrix.h"
#include "fonts.h"
ArduinoLEDMatrix matrix;
uint8_t frame[8][12] = {
{ 0, 0, 0, 0, 0, 0, 0, 0, 0, 0, 0, 0 },
{ 0, 0, 0, 0, 0, 0, 0, 0, 0, 0, 0, 0 },
{ 0, 0, 0, 0, 0, 0, 0, 0, 0, 0, 0, 0 },
{ 0, 0, 0, 0, 0, 0, 0, 0, 0, 0, 0, 0 },
{ 0, 0, 0, 0, 0, 0, 0, 0, 0, 0, 0, 0 },
{ 0, 0, 0, 0, 0, 0, 0, 0, 0, 0, 0, 0 },
{ 0, 0, 0, 0, 0, 0, 0, 0, 0, 0, 0, 0 },
{ 0, 0, 0, 0, 0, 0, 0, 0, 0, 0, 0, 0 }
};
void setup() {
// 여기에 설치 코드를 넣으세요. 한 번 실행됩니다:
Serial.begin(115200);
delay(1500);
matrix.begin();
}
void loop() {
for (char c = '0'; c <= '9'; c++) {
clear_frame();
add_to_frame(c, 4);
display_frame();
delay(1000);
}
for (char c = 'A'; c <= 'Z'; c++) {
clear_frame();
add_to_frame(c, 4);
display_frame();
delay(1000);
}
}
void clear_frame() {
for (int row = 0; row < 8; row++) {
for (int col = 0; col < 12; col++) {
frame[row][col] = 0;
}
}
}
void display_frame() {
matrix.renderBitmap(frame, 8, 12);
}
void add_to_frame(char c, int pos) {
int index = -1;
if (c >= '0' && c <= '9')
index = c - '0';
else if (c >= 'A' && c <= 'Z')
index = c - 'A' + 10;
else {
Serial.println("WARNING: unsupported character");
return;
}
for (int row = 0; row < 8; row++) {
uint32_t temp = fonts[index][row] << (7 - pos);
for (int col = 0; col < 12; col++) {
frame[row][col] |= (temp >> (11 - col)) & 1;
}
}
}
사용 방법
- 아두이노 우노 R4를 처음 사용하는 경우, 아두이노 우노 R4를 시작하는 방법을 확인하세요.
- 위의 코드를 복사하고 아두이노 IDE로 엽니다
- 아두이노 IDE에서 fonts.h 파일을 생성합니다:
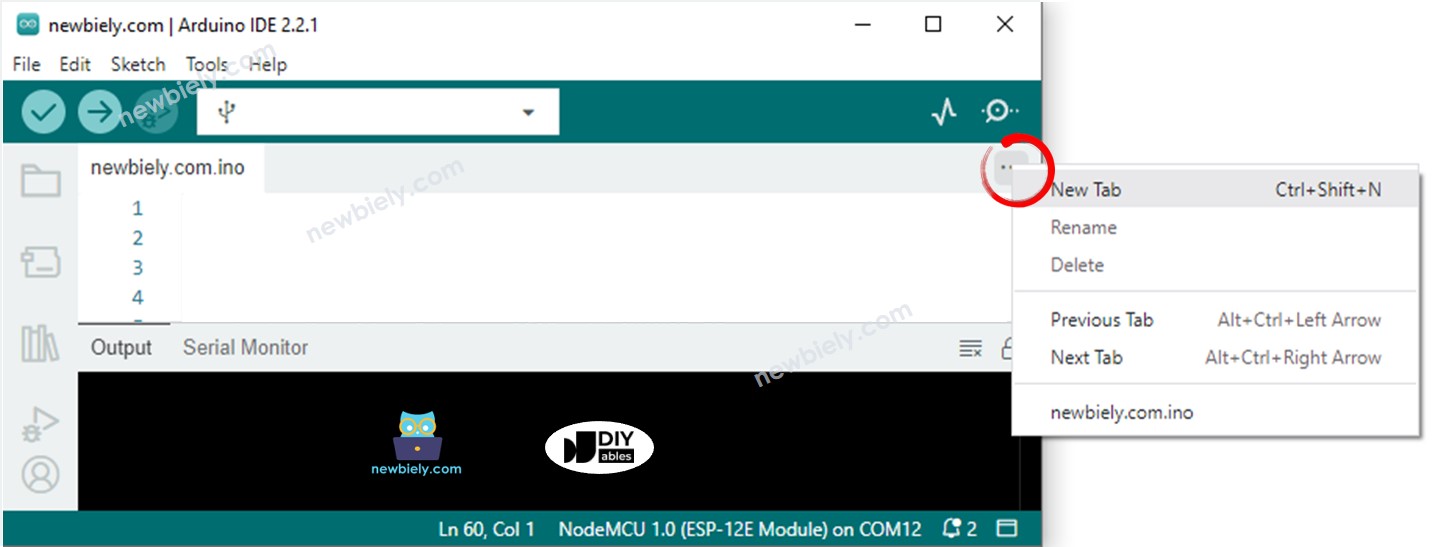
- 직렬 모니터 아이콘 바로 아래의 버튼을 클릭하고 "새 탭"을 선택하거나, Ctrl+Shift+N을 사용하세요.
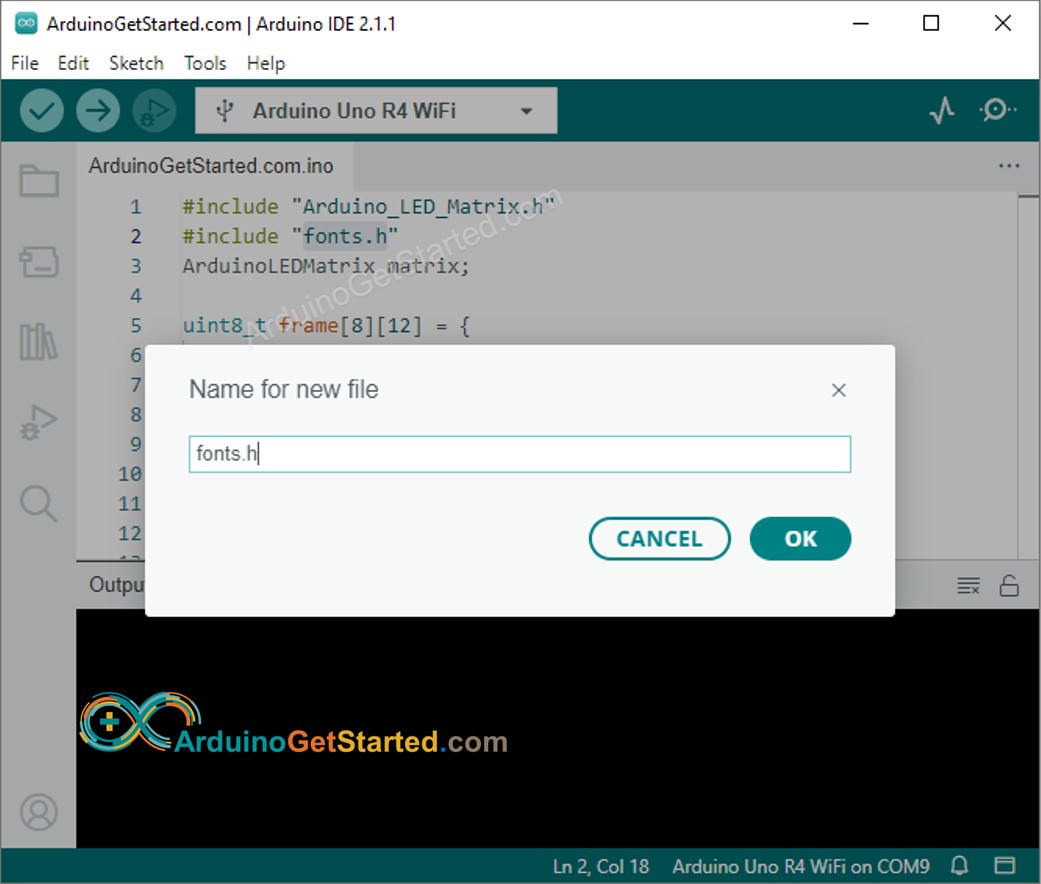
- 파일 이름으로 fonts.h를 입력하고 OK 버튼을 클릭하세요.
아래 코드를 복사해서 해당 파일에 붙여넣으세요.
/*
* 이 아두이노 코드는 newbiely.kr 에서 개발되었습니다
* 이 아두이노 코드는 어떠한 제한 없이 공개 사용을 위해 제공됩니다.
* 상세한 지침 및 연결도에 대해서는 다음을 방문하세요:
* https://newbiely.kr/tutorials/arduino/arduino-uno-r4-led-matrix-displays-number-character
*/
uint8_t fonts[36][8] = {
{
// 0
0b01110,
0b10001,
0b10001,
0b10001,
0b10001,
0b10001,
0b10001,
0b01110,
},
{
// 1
0b00110,
0b01110,
0b10110,
0b00110,
0b00110,
0b00110,
0b00110,
0b11111,
},
{
// 2
0b11110,
0b00001,
0b00010,
0b00100,
0b01000,
0b10000,
0b10000,
0b11111,
},
{
// 3
0b11110,
0b00001,
0b00010,
0b00100,
0b00110,
0b00001,
0b00001,
0b11110,
},
{
// 4
0b00010,
0b00110,
0b01010,
0b10010,
0b11111,
0b00010,
0b00010,
0b00010,
},
{
// 5
0b11111,
0b10000,
0b10000,
0b11110,
0b00001,
0b00001,
0b10001,
0b01110,
},
{
// 6
0b01110,
0b10000,
0b10000,
0b11110,
0b10001,
0b10001,
0b10001,
0b01110,
},
{
// 7
0b11111,
0b00001,
0b00010,
0b00100,
0b01000,
0b01000,
0b10000,
0b10000,
},
{
// 8
0b01110,
0b10001,
0b10001,
0b01110,
0b10001,
0b10001,
0b10001,
0b01110,
},
{
// 9
0b01110,
0b10001,
0b10001,
0b10001,
0b11110,
0b00001,
0b00001,
0b11110,
},
{
// A
0b00100,
0b01010,
0b10001,
0b11111,
0b10001,
0b10001,
0b10001,
0b10001,
},
{
// B
0b11110,
0b10001,
0b10001,
0b11110,
0b10001,
0b10001,
0b10001,
0b11110,
},
{
// C
0b01110,
0b10001,
0b10000,
0b10000,
0b10000,
0b10000,
0b10001,
0b01110,
},
{
// D
0b11110,
0b10001,
0b10001,
0b10001,
0b10001,
0b10001,
0b10001,
0b11110,
},
{
// E
0b11111,
0b10000,
0b10000,
0b11110,
0b10000,
0b10000,
0b10000,
0b11111,
},
{
// F
0b11111,
0b10000,
0b10000,
0b11110,
0b10000,
0b10000,
0b10000,
0b10000,
},
{
// G
0b01110,
0b10001,
0b10000,
0b10000,
0b10111,
0b10001,
0b10001,
0b01110,
},
{
// H
0b10001,
0b10001,
0b10001,
0b11111,
0b10001,
0b10001,
0b10001,
0b10001,
},
{
// I
0b11111,
0b00100,
0b00100,
0b00100,
0b00100,
0b00100,
0b00100,
0b11111,
},
{
// J
0b11111,
0b00010,
0b00010,
0b00010,
0b00010,
0b00010,
0b10010,
0b01100,
},
{
// K
0b10001,
0b10010,
0b10100,
0b11000,
0b10100,
0b10010,
0b10001,
0b10001,
},
{
// L
0b10000,
0b10000,
0b10000,
0b10000,
0b10000,
0b10000,
0b10000,
0b11111,
},
{
// M
0b10001,
0b11011,
0b10101,
0b10101,
0b10001,
0b10001,
0b10001,
0b10001,
},
{
// N
0b10001,
0b10001,
0b11001,
0b10101,
0b10011,
0b10001,
0b10001,
0b10001,
},
{
// O
0b01110,
0b10001,
0b10001,
0b10001,
0b10001,
0b10001,
0b10001,
0b01110,
},
{
// P
0b11110,
0b10001,
0b10001,
0b11110,
0b10000,
0b10000,
0b10000,
0b10000,
},
{
// Q
0b01110,
0b10001,
0b10001,
0b10001,
0b10001,
0b10101,
0b10010,
0b01101,
},
{
// R
0b11110,
0b10001,
0b10001,
0b11110,
0b10010,
0b10001,
0b10001,
0b10001,
},
{
// S
0b01110,
0b10001,
0b10000,
0b01110,
0b00001,
0b00001,
0b10001,
0b01110,
},
{
// T
0b11111,
0b00100,
0b00100,
0b00100,
0b00100,
0b00100,
0b00100,
0b00100,
},
{
// U
0b10001,
0b10001,
0b10001,
0b10001,
0b10001,
0b10001,
0b10001,
0b01110,
},
{
// V
0b10001,
0b10001,
0b10001,
0b10001,
0b01010,
0b01010,
0b00100,
0b00100,
},
{
// W
0b10001,
0b10001,
0b10001,
0b10101,
0b10101,
0b11011,
0b11011,
0b10001,
},
{
// X
0b10001,
0b10001,
0b01010,
0b00100,
0b00100,
0b01010,
0b10001,
0b10001,
},
{
// Y
0b10001,
0b10001,
0b01010,
0b00100,
0b00100,
0b00100,
0b00100,
0b00100,
},
{
// Z
0b11111,
0b00001,
0b00010,
0b00100,
0b01000,
0b10000,
0b10000,
0b11111,
}
};
- Arduino IDE에서 Upload 버튼을 클릭하여 코드를 Arduino로 업로드하세요.
- LED 매트릭스의 상태를 확인하세요.
코드 설명
제공된 코드에서는 add_to_frame(char c, int pos) 함수에 집중하는 것이 중요합니다. 이 함수는 두 개의 인자를 받습니다:
- char c: 표시될 문자입니다. 유효한 값의 범위는 0부터 9까지 그리고 A부터 Z까지입니다.
- int pos: 문자가 표시될 열 위치입니다. 유효한 값의 범위는 0부터 11까지입니다.
아두이노 코드 - 두 문자 동시에 표시
다음 아두이노 코드는 LED 매트릭스에 동시에 두 글자를 표시합니다.
/*
* 이 아두이노 코드는 newbiely.kr 에서 개발되었습니다
* 이 아두이노 코드는 어떠한 제한 없이 공개 사용을 위해 제공됩니다.
* 상세한 지침 및 연결도에 대해서는 다음을 방문하세요:
* https://newbiely.kr/tutorials/arduino/arduino-uno-r4-led-matrix-displays-number-character
*/
#include "Arduino_LED_Matrix.h"
#include "fonts.h"
ArduinoLEDMatrix matrix;
uint8_t frame[8][12] = {
{ 0, 0, 0, 0, 0, 0, 0, 0, 0, 0, 0, 0 },
{ 0, 0, 0, 0, 0, 0, 0, 0, 0, 0, 0, 0 },
{ 0, 0, 0, 0, 0, 0, 0, 0, 0, 0, 0, 0 },
{ 0, 0, 0, 0, 0, 0, 0, 0, 0, 0, 0, 0 },
{ 0, 0, 0, 0, 0, 0, 0, 0, 0, 0, 0, 0 },
{ 0, 0, 0, 0, 0, 0, 0, 0, 0, 0, 0, 0 },
{ 0, 0, 0, 0, 0, 0, 0, 0, 0, 0, 0, 0 },
{ 0, 0, 0, 0, 0, 0, 0, 0, 0, 0, 0, 0 }
};
void setup() {
// 여기에 설정 코드를 넣으세요. 한 번만 실행됩니다.
Serial.begin(115200);
delay(1500);
matrix.begin();
}
void loop() {
clear_frame();
add_to_frame('A', 0);
add_to_frame('5', 6);
display_frame();
delay(1000);
clear_frame();
add_to_frame('7', 0);
add_to_frame('F', 6);
display_frame();
delay(1000);
}
void clear_frame() {
for (int row = 0; row < 8; row++) {
for (int col = 0; col < 12; col++) {
frame[row][col] = 0;
}
}
}
void display_frame() {
matrix.renderBitmap(frame, 8, 12);
}
void add_to_frame(char c, int pos) {
int index = -1;
if (c >= '0' && c <= '9')
index = c - '0';
else if (c >= 'A' && c <= 'Z')
index = c - 'A' + 10;
else {
Serial.println("WARNING: 지원하지 않는 문자입니다");
return;
}
for (int row = 0; row < 8; row++) {
uint32_t temp = fonts[index][row] << (7 - pos);
for (int col = 0; col < 12; col++) {
frame[row][col] |= (temp >> (11 - col)) & 1;
}
}
}


