아두이노 웹을 통한 온도 확인
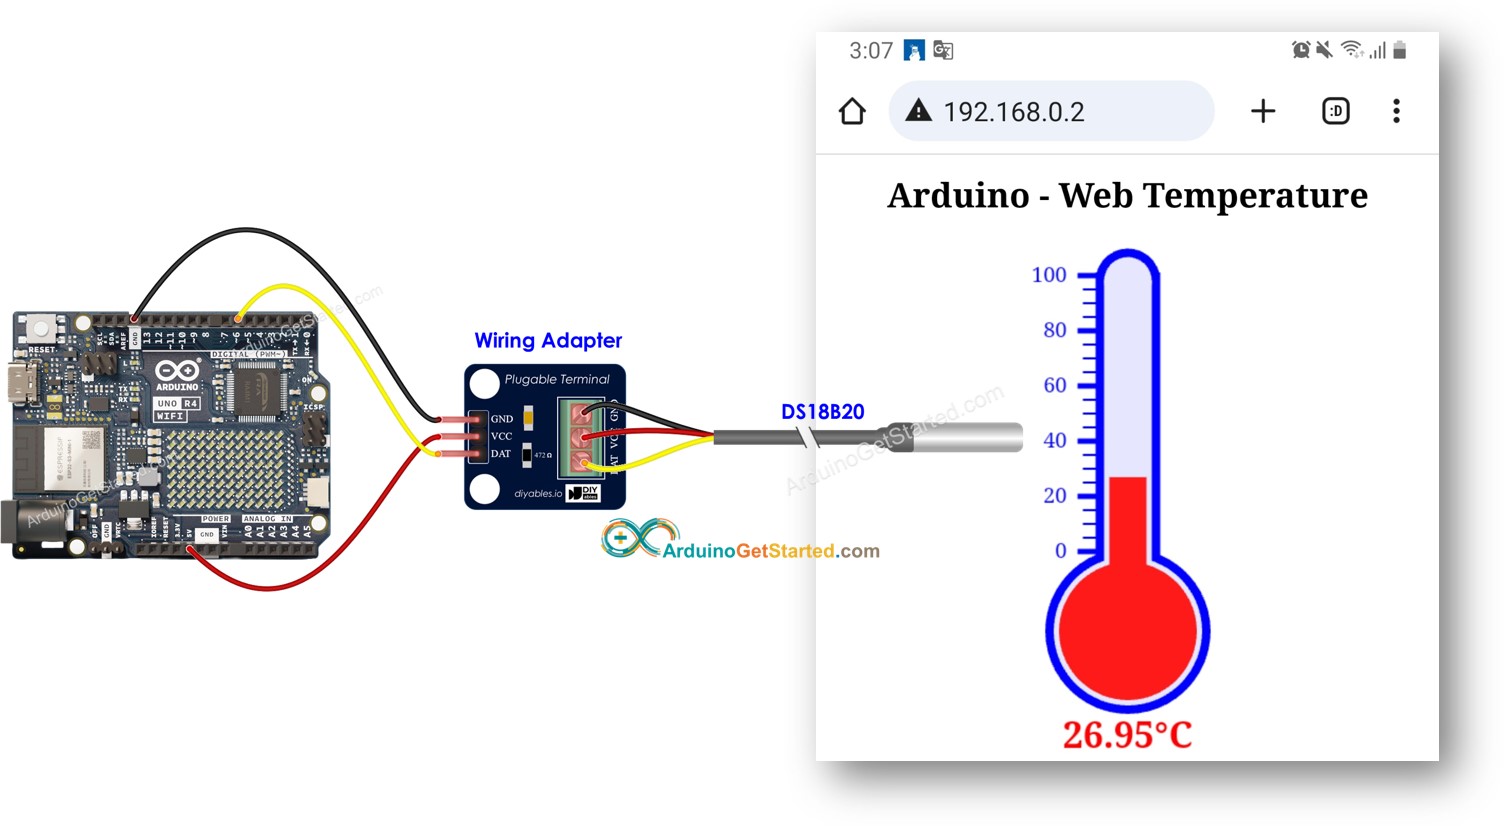
이 튜토리얼에서는 웹을 통해 온도를 제공하는 웹 서버가 되도록 아두이노를 프로그래밍하는 방법을 배워보겠습니다. DS18B20 온도 센서에서 온도를 확인하기 위해 아두이노가 제공하는 웹 페이지에 접속할 수 있습니다. 아래는 그 작동 방식입니다:
두 개의 예제 코드를 살펴보겠습니다:
| 1 | × | 아두이노 우노 R4 와이파이 | 쿠팡 | 아마존 | |
| 1 | × | (또는) DIYables STEM V4 IoT | 쿠팡 | 아마존 | |
| 1 | × | USB 케이블 타입-A to 타입-C (USB-A PC용) | 쿠팡 | 아마존 | |
| 1 | × | USB 케이블 타입-C to 타입-C (USB-C PC용) | 아마존 | |
| 1 | × | DS18B20 온도 센서 (어댑터 포함) | 쿠팡 | 아마존 | |
| 1 | × | DS18B20 온도 센서(어댑터 없음) | 아마존 | |
| 1 | × | 점퍼케이블 | 쿠팡 | 아마존 | |
| 1 | × | (추천) 아두이노 우노 R4용 스크루 터미널 블록 쉴드 | 쿠팡 | 아마존 | |
| 1 | × | (추천) 아두이노 우노 R4용 브레드보드 쉴드 | 쿠팡 | 아마존 | |
| 1 | × | (추천) 아두이노 우노 R4용 케이스 | 쿠팡 | 아마존 | |
| 1 | × | (추천) 아두이노 우노 R4용 전원 분배기 | 쿠팡 | 아마존 | |
| 1 | × | (추천) 아두이노 우노용 프로토타이핑 베이스 플레이트 & 브레드보드 키트 | 아마존 | |
공개: 이 포스팅 에 제공된 일부 링크는 아마존 제휴 링크입니다. 이 포스팅은 쿠팡 파트너스 활동의 일환으로, 이에 따른 일정액의 수수료를 제공받습니다.
아두이노 우노 R4와 DS18B20 온도 센서(핀배열, 작동 방식, 프로그래밍 방법 등)에 대해 잘 모른다면, 다음 튜토리얼에서 그들에 대해 배워보세요:
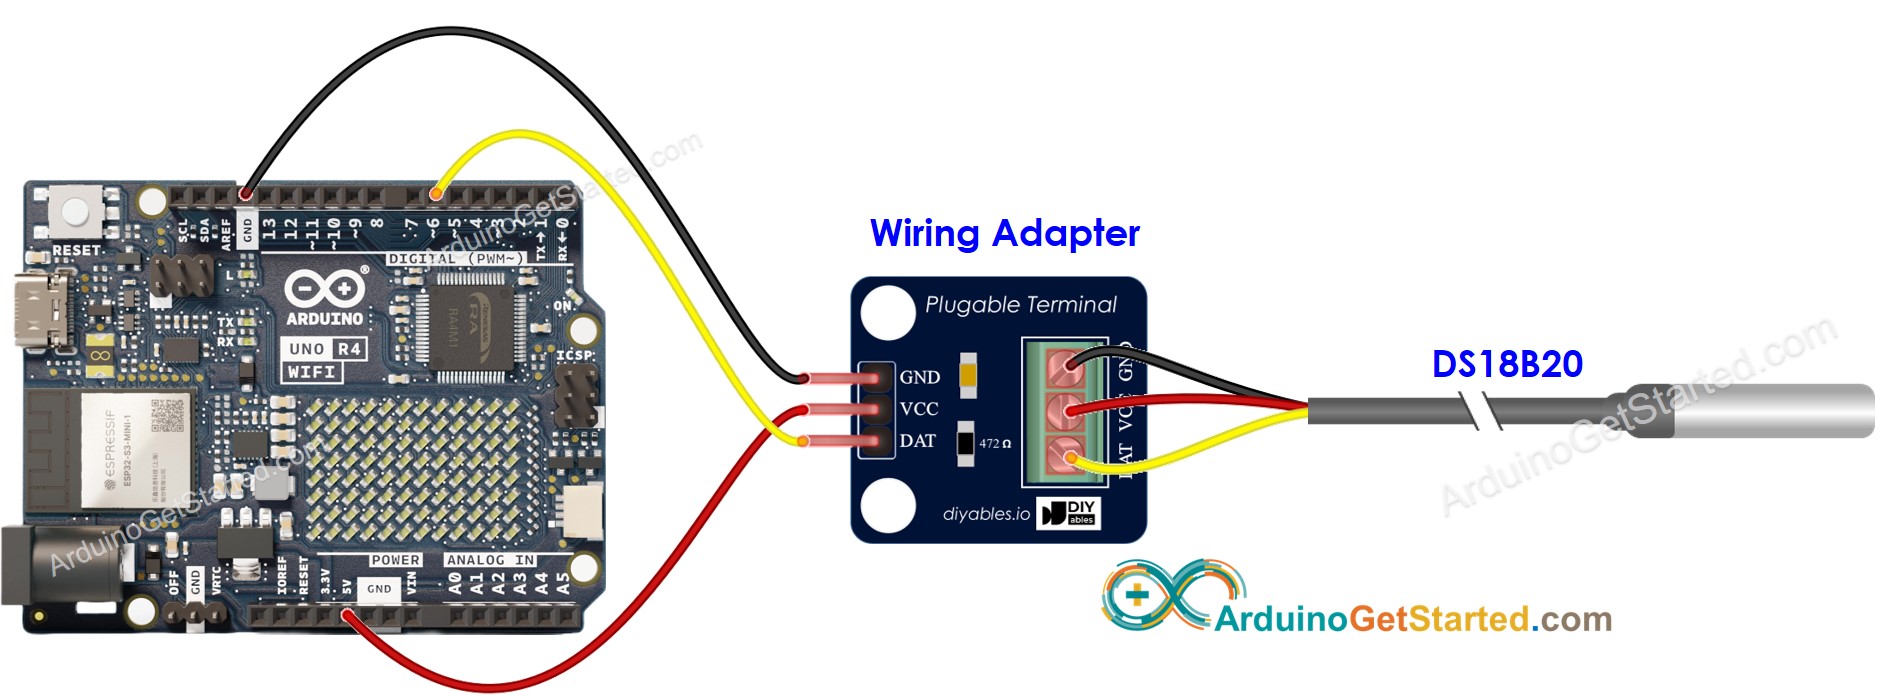
이 이미지는 Fritzing을 사용하여 만들어졌습니다. 이미지를 확대하려면 클릭하세요.
#include <WiFiS3.h>
#include <OneWire.h>
#include <DallasTemperature.h>
const char ssid[] = "YOUR_WIFI";
const char pass[] = "YOUR_WIFI_PASSWORD";
const int SENSOR_PIN = 6;
OneWire oneWire(SENSOR_PIN);
DallasTemperature tempSensor(&oneWire);
int status = WL_IDLE_STATUS;
WiFiServer server(80);
float getTemperature() {
tempSensor.requestTemperatures();
float tempCelsius = tempSensor.getTempCByIndex(0);
return tempCelsius;
}
void setup() {
Serial.begin(9600);
tempSensor.begin();
String fv = WiFi.firmwareVersion();
if (fv < WIFI_FIRMWARE_LATEST_VERSION)
Serial.println("펌웨어를 업그레이드하세요");
while (status != WL_CONNECTED) {
Serial.print("SSID에 연결을 시도중: ");
Serial.println(ssid);
status = WiFi.begin(ssid, pass);
delay(10000);
}
server.begin();
printWifiStatus();
}
void loop() {
WiFiClient client = server.available();
if (client) {
while (client.connected()) {
if (client.available()) {
String HTTP_header = client.readStringUntil('\n');
if (HTTP_header.equals("\r"))
break;
Serial.print("<< ");
Serial.println(HTTP_header);
}
}
client.println("HTTP/1.1 200 OK");
client.println("Content-Type: text/html");
client.println("Connection: close");
client.println();
client.println("<!DOCTYPE HTML>");
client.println("<html>");
client.println("<head>");
client.println("<link rel=\"icon\" href=\"data:,\">");
client.println("</head>");
client.println("<p>");
client.print("온도: <span style=\"color: red;\">");
float temperature = getTemperature();
client.print(temperature, 2);
client.println("°C</span>");
client.println("</p>");
client.println("</html>");
client.flush();
delay(10);
client.stop();
}
}
void printWifiStatus() {
Serial.print("IP 주소: ");
Serial.println(WiFi.localIP());
Serial.print("신호 강도 (RSSI):");
Serial.print(WiFi.RSSI());
Serial.println(" dBm");
}
위의 코드를 복사하여 아두이노 IDE에서 열기* Open the Library Manager by clicking on the Library Manager icon on the left side of the Arduino IDE.
Search for Web Server for Arduino Uno R4 WiFi and locate the Web Server library created by DIYables.
Click on the Install button to add the Web Server library.
Arduino Uno R4 WiFi - Temperature via Web
Connecting to YOUR_WIFI_SSID
connected!
IP address: 192.168.0.254
Starting web server on IP: 192.168.0.254
=== Web Server Ready! ===
Visit: http://192.168.0.254
Arduino Uno R4 WiFi - Temperature via Web
Connecting to YOUR_WIFI_SSID
connected!
IP address: 192.168.0.254
Starting web server on IP: 192.168.0.254
=== Web Server Ready! ===
Visit: http://192.168.0.254
Method: GET
Requested path: /
Client disconnected
아래와 같이 웹 브라우저에서 아주 간단한 아두이노 보드 웹 페이지를 보게 될 것입니다:
그래픽 웹 페이지에는 많은 양의 HTML 콘텐츠가 포함되어 있으므로, 이전처럼 아두이노 코드에 그것을 내장하는 것이 불편해집니다. 이를 해결하기 위해, 우리는 아두이노 코드와 HTML 코드를 다른 파일로 분리할 필요가 있습니다:
아두이노 코드는 .ino 파일에 배치될 것입니다.
HTML 코드(HTML, CSS, Javascript 포함)는 .h 파일에 배치될 것입니다.
아두이노 IDE를 열고 새 스케치를 만들고, 이름을 입력하세요. 예를 들어, ArduinoGetStarted.com.ino라고 하면 됩니다.
아래 코드를 복사하고 아두이노 IDE로 엽니다.
#include <WiFiS3.h>
#include "index.h"
#include <OneWire.h>
#include <DallasTemperature.h>
const char ssid[] = "YOUR_WIFI";
const char pass[] = "YOUR_WIFI_PASSWORD";
const int SENSOR_PIN = 6;
OneWire oneWire(SENSOR_PIN);
DallasTemperature tempSensor(&oneWire);
int status = WL_IDLE_STATUS;
WiFiServer server(80);
float getTemperature() {
tempSensor.requestTemperatures();
float tempCelsius = tempSensor.getTempCByIndex(0);
return tempCelsius;
}
void setup() {
Serial.begin(9600);
tempSensor.begin();
String fv = WiFi.firmwareVersion();
if (fv < WIFI_FIRMWARE_LATEST_VERSION)
Serial.println("Please upgrade the firmware");
while (status != WL_CONNECTED) {
Serial.print("Attempting to connect to SSID: ");
Serial.println(ssid);
status = WiFi.begin(ssid, pass);
delay(10000);
}
server.begin();
printWifiStatus();
}
void loop() {
WiFiClient client = server.available();
if (client) {
while (client.connected()) {
if (client.available()) {
String HTTP_header = client.readStringUntil('\n');
if (HTTP_header.equals("\r"))
break;
Serial.print("<< ");
Serial.println(HTTP_header);
}
}
client.println("HTTP/1.1 200 OK");
client.println("Content-Type: text/html");
client.println("Connection: close");
client.println();
float temp = getTemperature();
String html = String(HTML_CONTENT);
html.replace("TEMPERATURE_MARKER", String(temp, 2));
client.println(html);
client.flush();
delay(10);
client.stop();
}
}
void printWifiStatus() {
Serial.print("IP Address: ");
Serial.println(WiFi.localIP());
Serial.print("signal strength (RSSI):");
Serial.print(WiFi.RSSI());
Serial.println(" dBm");
}
코드 내의 WiFi 정보(SSID 및 비밀번호)를 자신의 것으로 변경하세요
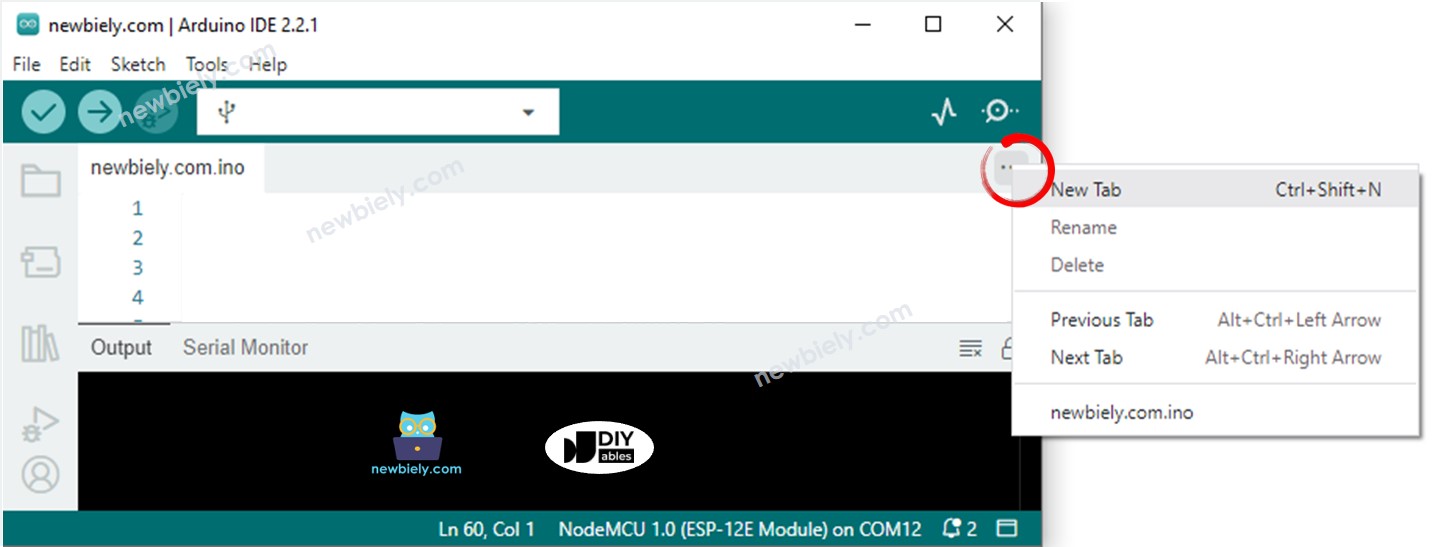
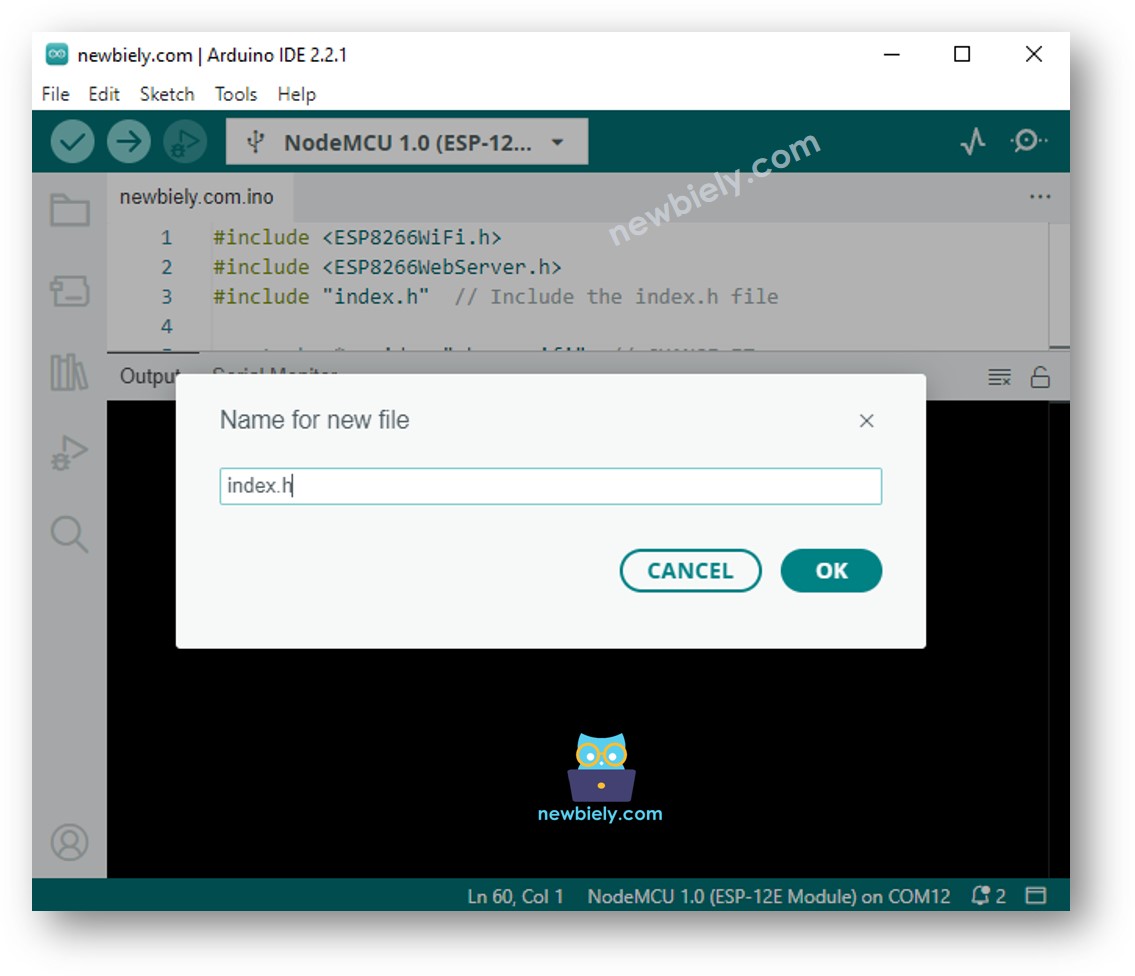
아두이노 IDE에서 index.h 파일을 생성하려면:
파일 이름을 index.h로 지정하고 OK 버튼을 클릭하세요.
아래 코드를 복사하여 index.h에 붙여넣으세요.
const char *HTML_CONTENT = R""""(
<!DOCTYPE html>
<html>
<head>
<title>Arduino - Web Temperature</title>
<meta name="viewport" content="width=device-width, initial-scale=0.7, maximum-scale=0.7">
<meta charset="utf-8">
<link rel="icon" href="https://diyables.io/images/page/diyables.svg">
<style>
body { font-family: "Georgia"; text-align: center; font-size: width/2pt;}
h1 { font-weight: bold; font-size: width/2pt;}
h2 { font-weight: bold; font-size: width/2pt;}
button { font-weight: bold; font-size: width/2pt;}
</style>
<script>
var cvs_width = 200, cvs_height = 450;
function init() {
var canvas = document.getElementById("cvs");
canvas.width = cvs_width;
canvas.height = cvs_height + 50;
var ctx = canvas.getContext("2d");
ctx.translate(cvs_width/2, cvs_height - 80);
update_view(TEMPERATURE_MARKER);
}
function update_view(temp) {
var canvas = document.getElementById("cvs");
var ctx = canvas.getContext("2d");
var radius = 70;
var offset = 5;
var width = 45;
var height = 330;
ctx.clearRect(-cvs_width/2, -350, cvs_width, cvs_height);
ctx.strokeStyle="blue";
ctx.fillStyle="blue";
var x = -width/2;
ctx.lineWidth=2;
for (var i = 0; i <= 100; i+=5) {
var y = -(height - radius)*i/100 - radius - 5;
ctx.beginPath();
ctx.lineTo(x, y);
ctx.lineTo(x - 20, y);
ctx.stroke();
}
ctx.lineWidth=5;
for (var i = 0; i <= 100; i+=20) {
var y = -(height - radius)*i/100 - radius - 5;
ctx.beginPath();
ctx.lineTo(x, y);
ctx.lineTo(x - 25, y);
ctx.stroke();
ctx.font="20px Georgia";
ctx.textBaseline="middle";
ctx.textAlign="right";
ctx.fillText(i.toString(), x - 35, y);
}
ctx.lineWidth=16;
ctx.beginPath();
ctx.arc(0, 0, radius, 0, 2 * Math.PI);
ctx.stroke();
ctx.beginPath();
ctx.rect(-width/2, -height, width, height);
ctx.stroke();
ctx.beginPath();
ctx.arc(0, -height, width/2, 0, 2 * Math.PI);
ctx.stroke();
ctx.fillStyle="#e6e6ff";
ctx.beginPath();
ctx.arc(0, 0, radius, 0, 2 * Math.PI);
ctx.fill();
ctx.beginPath();
ctx.rect(-width/2, -height, width, height);
ctx.fill();
ctx.beginPath();
ctx.arc(0, -height, width/2, 0, 2 * Math.PI);
ctx.fill();
ctx.fillStyle="#ff1a1a";
ctx.beginPath();
ctx.arc(0, 0, radius - offset, 0, 2 * Math.PI);
ctx.fill();
temp = Math.round(temp * 100) / 100;
var y = (height - radius)*temp/100.0 + radius + 5;
ctx.beginPath();
ctx.rect(-width/2 + offset, -y, width - 2*offset, y);
ctx.fill();
ctx.fillStyle="red";
ctx.font="bold 34px Georgia";
ctx.textBaseline="middle";
ctx.textAlign="center";
ctx.fillText(temp.toString() + "°C", 0, 100);
}
window.onload = init;
</script>
</head>
<body>
<h1>Arduino - Web Temperature</h1>
<canvas id="cvs"></canvas>
</body>
</html>
)"""";
이제 두 개의 파일에 코드를 가지고 있습니다: ArduinoGetStarted.com.ino와 index.h
아두이노 IDE에서 Upload 버튼을 클릭하여 아두이노에 코드를 업로드하세요
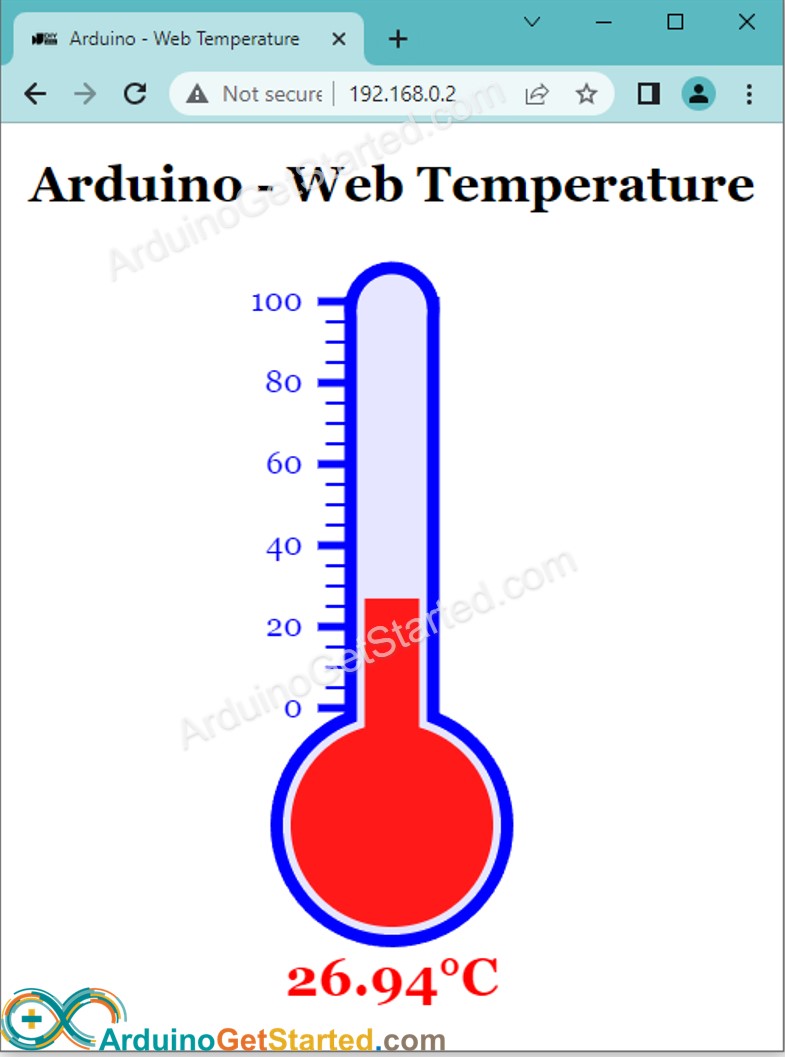
이전과 같이 웹 브라우저를 통해 아두이노 보드의 웹 페이지에 접속하면 아래와 같이 보여집니다:
※ 주의:
index.h 파일 내의 HTML 콘텐츠를 변경하되 ArduinoGetStarted.com.ino 파일을 수정하지 않으면 아두이노 IDE는 ESP32에 코드를 컴파일하고 업로드 할 때 HTML 콘텐츠를 새로 고치거나 업데이트하지 않습니다.
이 상황에서 아두이노 IDE가 HTML 콘텐츠를 업데이트하도록 하려면 ArduinoGetStarted.com.ino 파일에서 수정을 해야 합니다. 예를 들어, 빈 줄을 추가하거나 주석을 삽입할 수 있습니다. 이 작업은 IDE가 프로젝트에 변경사항이 있음을 인식하게 하여 업데이트된 HTML 콘텐츠가 업로드에 포함되도록 보장합니다.
