아두이노 토양 수분 센서 펌프
이 튜토리얼에서는 아두이노와 전기용량식 토양 습도 센서를 사용하여 펌프를 제어하는 방법을 배울 것입니다.
준비물
| 1 | × | 아두이노 우노 R3 | 쿠팡 | 아마존 | |
| 1 | × | USB 2.0 타입 A-to-B 케이블 (USB-A PC용) | 쿠팡 | 아마존 | |
| 1 | × | USB 2.0 타입 C-to-B 케이블 (USB-C PC용) | 아마존 | |
| 1 | × | 용량성 토양 수분 센서 | 쿠팡 | 아마존 | |
| 1 | × | 릴레이 | 아마존 | |
| 1 | × | 12V 펌프 | 쿠팡 | 아마존 | |
| 1 | × | Vinyl Tube | 아마존 | |
| 1 | × | 12V 전원 어댑터 | 아마존 | |
| 1 | × | DC 커넥터 전원 연결 잭 플러그 소켓 | 쿠팡 | 아마존 | |
| 1 | × | 점퍼케이블 | 쿠팡 | 아마존 | |
| 1 | × | (추천) 아두이노 우노용 스크루 터미널 블록 쉴드 | 쿠팡 | 아마존 | |
| 1 | × | (추천) 아두이노 우노용 브레드보드 쉴드 | 쿠팡 | 아마존 | |
| 1 | × | (추천) 아두이노 우노용 케이스 | 쿠팡 | 아마존 | |
| 1 | × | (추천) 아두이노 우노용 프로토타이핑 베이스 플레이트 & 브레드보드 키트 | 아마존 |
공개: 이 포스팅 에 제공된 일부 링크는 아마존 제휴 링크입니다. 이 포스팅은 쿠팡 파트너스 활동의 일환으로, 이에 따른 일정액의 수수료를 제공받습니다.
토양 수분 센서 및 펌프에 관하여
펌프와 토양 수분 센서(핀 배치, 작동 방식, 프로그래밍 방법 등)에 대해 모른다면, 다음 자습서에서 그것들에 대해 배워보세요:
- 아두이노 - 토양 수분 센서 튜토리얼
- 아두이노 - 펌프 제어 튜토리얼
작동 원리
아두이노는 주기적으로 전기용량식 토양 수분 센서에서 값을 읽습니다. 토양 수분 값에 기초하여, 다음과 같은 조치를 취할 것입니다:
- 토양 수분 값이 한계치보다 낮은 경우, 아두이노는 자동으로 릴레이를 활성화하여 펌프를 켭니다.
- 그렇지 않으면, 아두이노는 자동으로 릴레이를 비활성화하여 펌프를 끕니다.
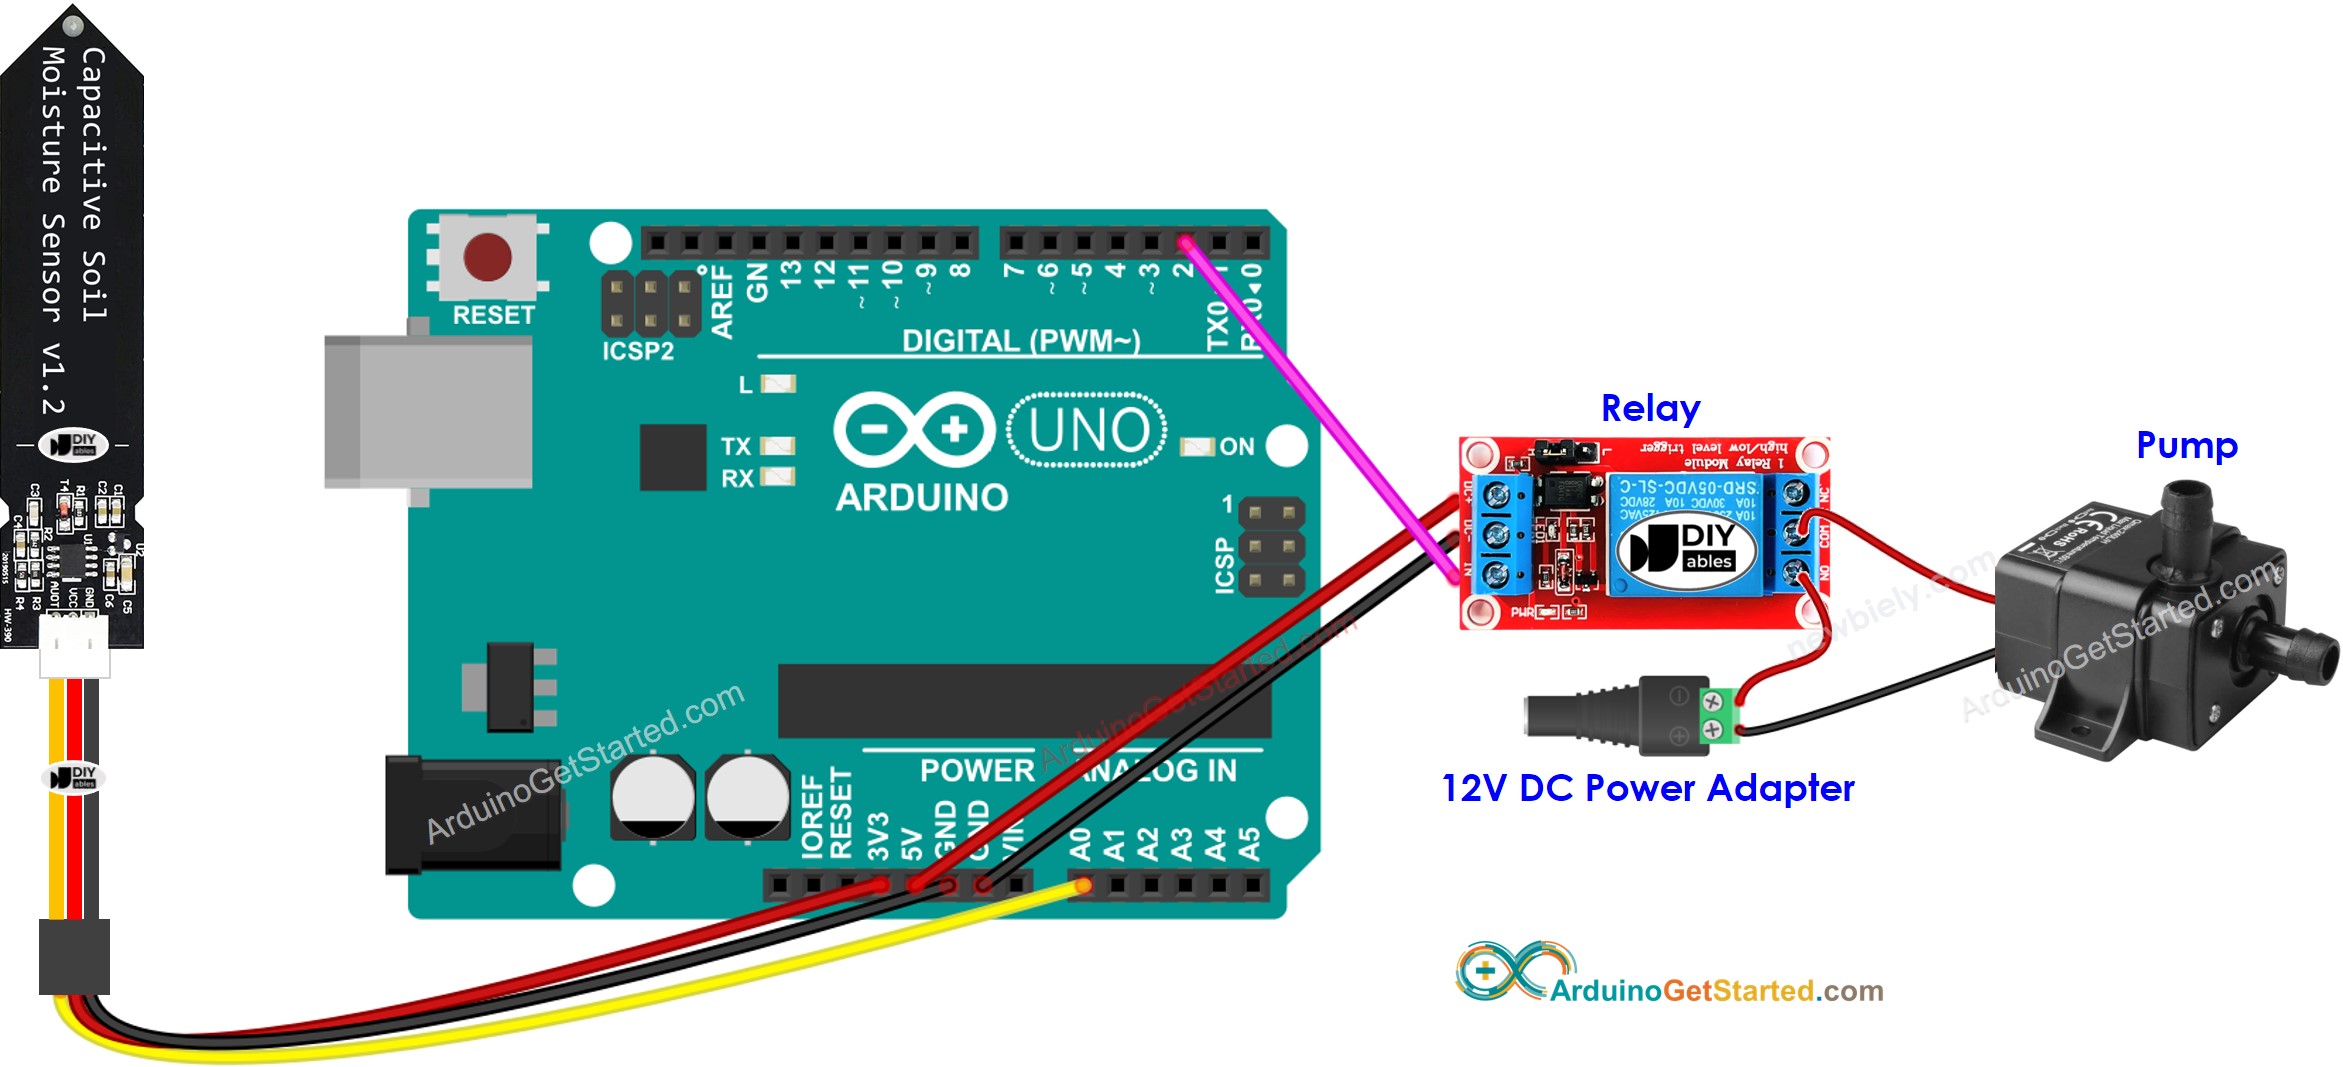
선연결

이 이미지는 Fritzing을 사용하여 만들어졌습니다. 이미지를 확대하려면 클릭하세요.
아두이노 코드
/*
* 이 아두이노 코드는 newbiely.kr 에서 개발되었습니다
* 이 아두이노 코드는 어떠한 제한 없이 공개 사용을 위해 제공됩니다.
* 상세한 지침 및 연결도에 대해서는 다음을 방문하세요:
* https://newbiely.kr/tutorials/arduino/arduino-soil-moisture-sensor-pump
*/
#define RELAY_PIN 2 // 아두이노 핀은 릴레이를 통해 펌프를 제어합니다
#define MOISTURE_PIN A0 // 아두이노 핀은 모이스처 센서의 AOUT 핀에 연결됩니다
#define THRESHOLD 530 // => 여기서 임계값을 변하십시오
void setup() {
Serial.begin(9600);
pinMode(RELAY_PIN, OUTPUT);
}
void loop() {
int value = analogRead(MOISTURE_PIN); // 센서에서 아날로그 값을 읽습니다
if (value > THRESHOLD) {
Serial.print("The soil moisture is DRY => activate pump");
digitalWrite(RELAY_PIN, HIGH);
} else {
Serial.print("The soil moisture is WET => deactivate the pump");
digitalWrite(RELAY_PIN, LOW);
}
Serial.print(" (");
Serial.print(value);
Serial.println(")");
delay(1000);
}
사용 방법
습-건 THRESHOLD를 결정하기 위한 보정을 하십시오. 아두이노 - 토양 수분 센서 참조
코드에서 THRESHOLD 값을 보정된 값으로 업데이트하십시오.
Arduino IDE에서 시리얼 모니터 열기
코드를 Arduino에 업로드하십시오.
시리얼 모니터에서 결과를 확인하십시오.
COM6
The soil moisture is DRY => activate the pump
The soil moisture is DRY => activate the pump
The soil moisture is DRY => activate the pump
The soil moisture is DRY => activate the pump
The soil moisture is WET => deactivate the pump
The soil moisture is WET => deactivate the pump
The soil moisture is WET => deactivate the pump
The soil moisture is WET => deactivate the pump
Autoscroll
Clear output
9600 baud
Newline
코드 설명
소스 코드의 주석 줄에 있는 줄별 설명을 읽으세요!
동영상
비디오 제작은 시간이 많이 걸리는 작업입니다. 비디오 튜토리얼이 학습에 도움이 되었다면, YouTube 채널 을 구독하여 알려 주시기 바랍니다. 비디오에 대한 높은 수요가 있다면, 비디오를 만들기 위해 노력하겠습니다.
