아두이노 OLED 시계
이 튜토리얼에서는 OLED 시계를 만드는 방법을 배워보겠습니다:
- DS3231 RTC 모듈에서 시간(시, 분, 초)을 읽고 그것을 OLED에 표시하기
- DS1307 RTC 모듈에서 시간(시, 분, 초)을 읽고 그것을 OLED에 표시하기
다음 두 RTC 모듈 중 하나를 선택할 수 있습니다: DS3231과 DS1307. DS3231과 DS1307 비교를 참조하세요.
준비물
| 1 | × | 아두이노 우노 R3 | 쿠팡 | 아마존 | |
| 1 | × | USB 2.0 타입 A-to-B 케이블 (USB-A PC용) | 쿠팡 | 아마존 | |
| 1 | × | USB 2.0 타입 C-to-B 케이블 (USB-C PC용) | 아마존 | |
| 1 | × | SSD1306 I2C OLED 디스플레이 128x64 | 쿠팡 | 아마존 | |
| 1 | × | SSD1306 I2C OLED 디스플레이 128x32 | 아마존 | |
| 1 | × | DS3231 실시간 클록(RTC) 모듈 | 아마존 | |
| 1 | × | (옵션) Real-Time Clock DS1307 Module | 아마존 | |
| 1 | × | CR2032 배터리 | 아마존 | |
| 1 | × | 브레드보드 | 쿠팡 | 아마존 | |
| 1 | × | 점퍼케이블 | 쿠팡 | 아마존 | |
| 1 | × | (추천) 아두이노 우노용 스크루 터미널 블록 쉴드 | 쿠팡 | 아마존 | |
| 1 | × | (추천) Sensors/Servo Expansion Shield for Arduino Uno | 쿠팡 | 아마존 | |
| 1 | × | (추천) 아두이노 우노용 브레드보드 쉴드 | 쿠팡 | 아마존 | |
| 1 | × | (추천) 아두이노 우노용 케이스 | 쿠팡 | 아마존 | |
| 1 | × | (추천) 아두이노 우노용 프로토타이핑 베이스 플레이트 & 브레드보드 키트 | 아마존 |
공개: 이 포스팅 에 제공된 일부 링크는 아마존 제휴 링크입니다. 이 포스팅은 쿠팡 파트너스 활동의 일환으로, 이에 따른 일정액의 수수료를 제공받습니다.
OLED, DS3231 및 DS1307 RTC 모듈에 대하여
OLED, DS3231 및 DS1307(핀배열, 작동 방식, 프로그래밍 방법 등)에 대해 잘 모른다면, 다음 튜토리얼에서 배우십시오:
OLED 및 RTC 라이브러리 설치
- Arduino IDE의 왼쪽 바에 있는 Libraries 아이콘으로 이동하세요.
- “SSD1306”을 검색한 다음, Adafruit의 SSD1306 라이브러리를 찾으세요.
- 라이브러리를 설치하려면 Install 버튼을 클릭하세요.
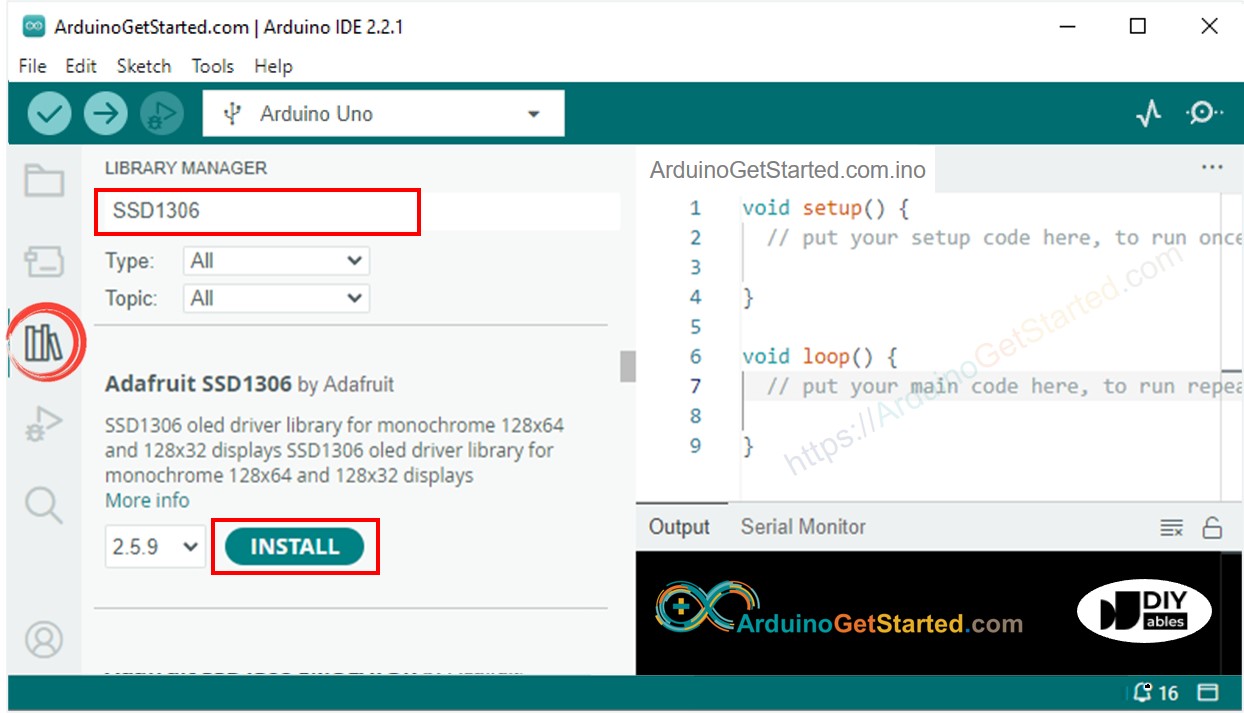
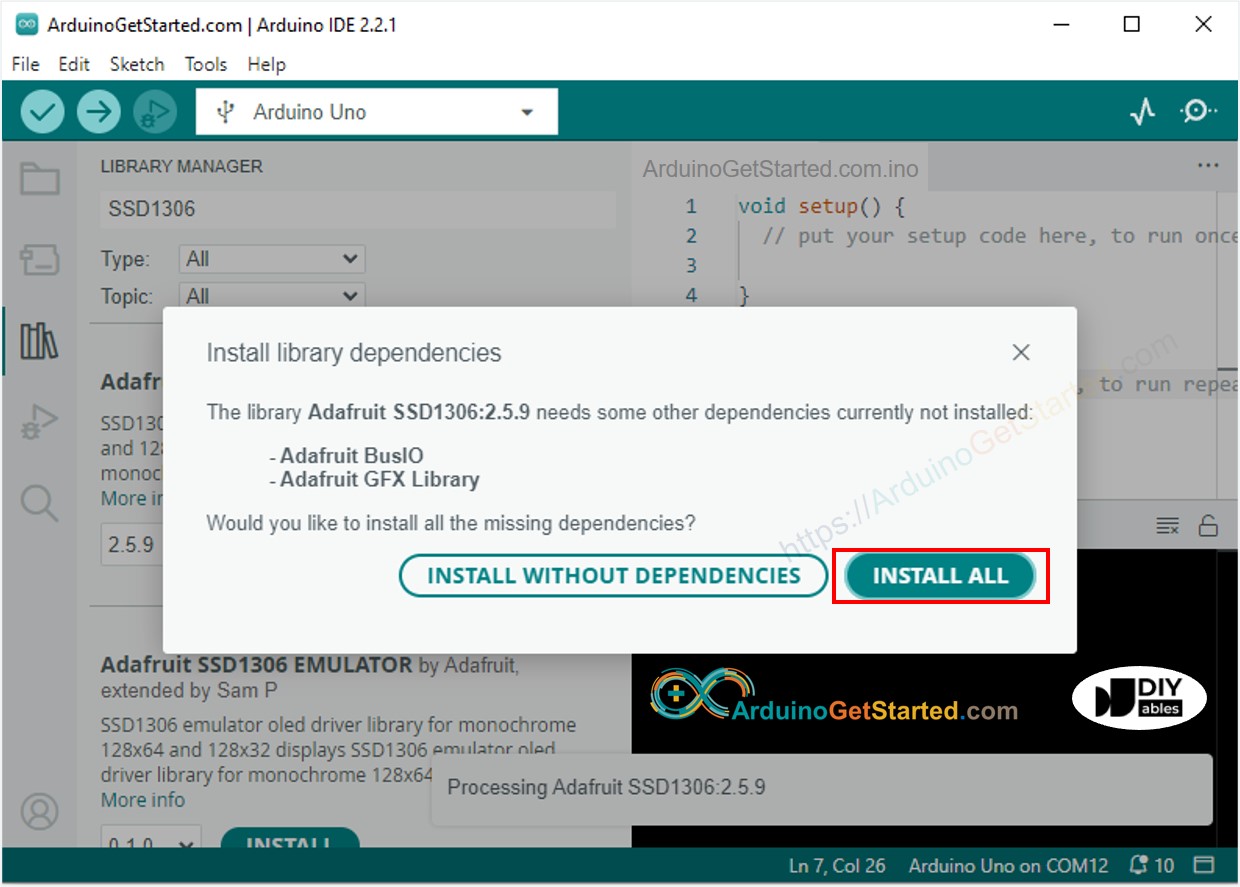
- 다른 라이브러리 종속성을 설치하라는 요청을 받게 됩니다.
- 모든 라이브러리 종속성을 설치하려면 Install All 버튼을 클릭하세요.
- "RTClib"을 검색한 다음, Adafruit에서 제작한 RTC 라이브러리를 찾으십시오. 이 라이브러리는 DS3231과 DS1307 모두와 호환됩니다.
- RTC 라이브러리를 설치하려면 Install 버튼을 클릭하십시오.
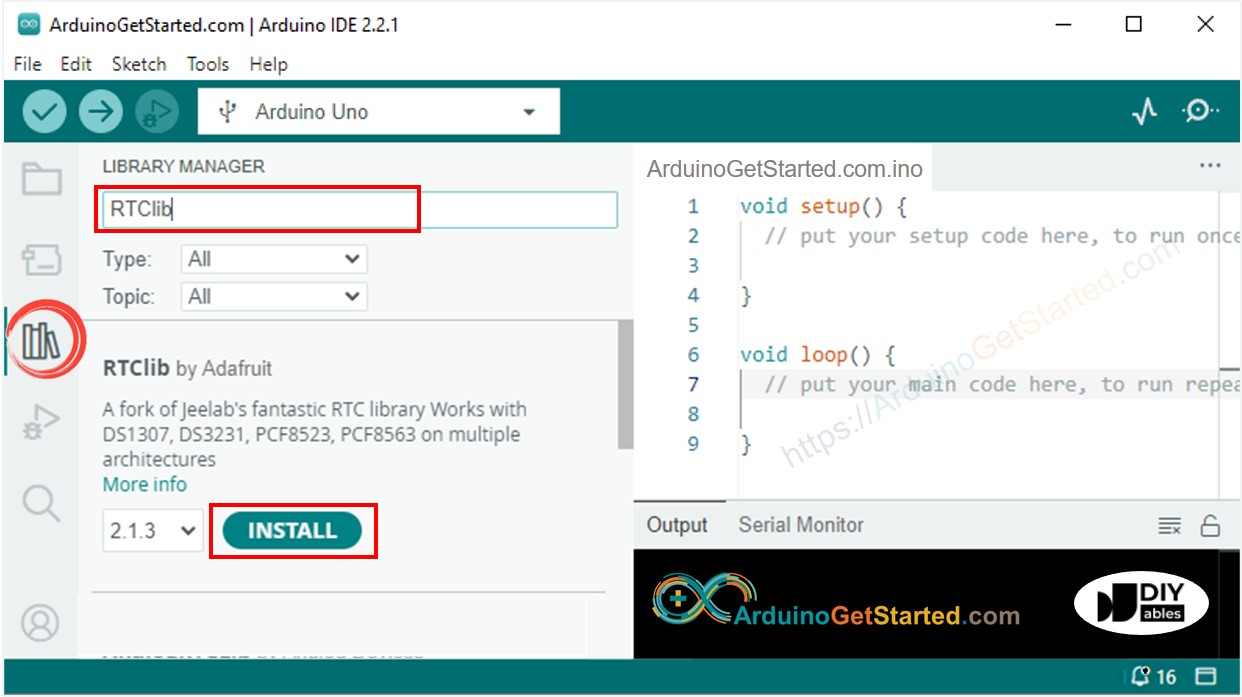
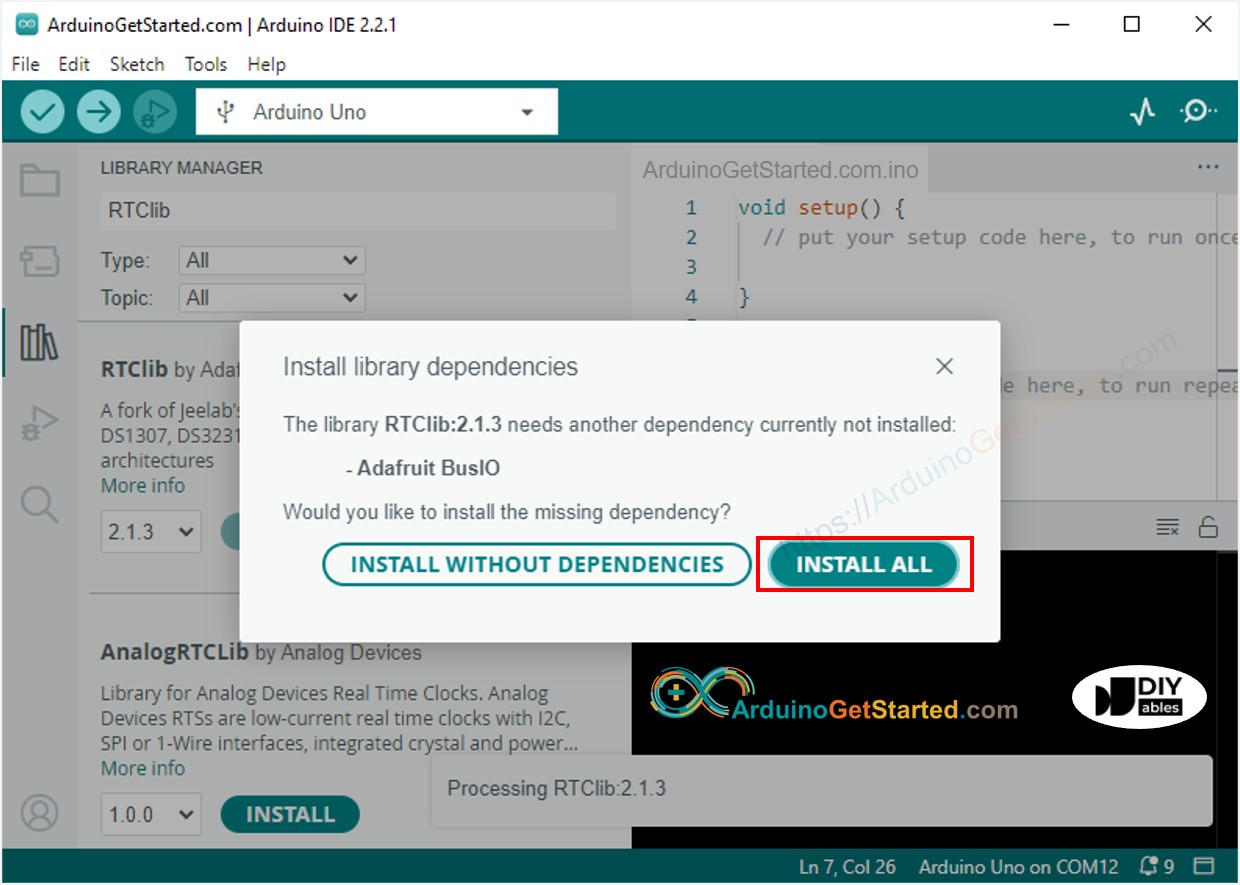
- 다른 라이브러리 종속성을 설치하라는 요청을 받을 수 있습니다
- 모든 라이브러리 종속성을 설치하려면 Install All 버튼을 클릭하세요.
DS3231 RTC 모듈에서 시간을 읽고 OLED에 표시하기
배선도
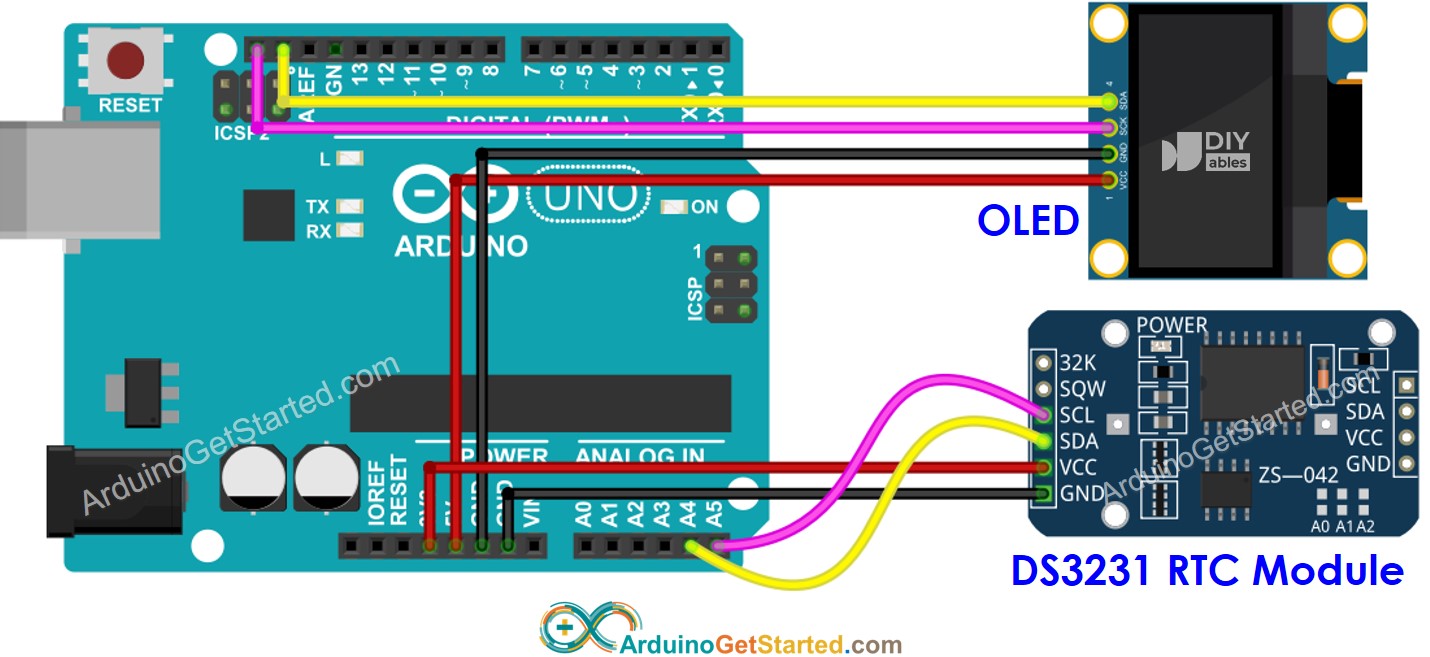
이 이미지는 Fritzing을 사용하여 만들어졌습니다. 이미지를 확대하려면 클릭하세요.
아두이노 코드 - DS3231과 OLED
/*
* 이 아두이노 코드는 newbiely.kr 에서 개발되었습니다
* 이 아두이노 코드는 어떠한 제한 없이 공개 사용을 위해 제공됩니다.
* 상세한 지침 및 연결도에 대해서는 다음을 방문하세요:
* https://newbiely.kr/tutorials/arduino/arduino-oled-clock
*/
#include <Wire.h>
#include <Adafruit_GFX.h>
#include <Adafruit_SSD1306.h>
#include <RTClib.h>
#define SCREEN_WIDTH 128 // OLED 디스플레이 너비, 픽셀 단위
#define SCREEN_HEIGHT 64 // OLED 디스플레이 높이, 픽셀 단위
Adafruit_SSD1306 oled(SCREEN_WIDTH, SCREEN_HEIGHT, &Wire, -1); // I2C에 연결된 SSD1306 디스플레이 객체 생성
RTC_DS3231 rtc;
String time;
void setup() {
Serial.begin(9600);
// 128x64 크기에 대한 주소 0x3C로 OLED 디스플레이 초기화
if (!oled.begin(SSD1306_SWITCHCAPVCC, 0x3C)) {
Serial.println(F("SSD1306 allocation failed"));
while (true);
}
delay(2000); // 초기화를 위해 대기
oled.clearDisplay(); // 디스플레이 지우기
oled.setTextSize(1); // 텍스트 크기
oled.setTextColor(WHITE); // 텍스트 색상
oled.setCursor(0, 10); // 디스플레이할 위치
// RTC 모듈 설정
if (! rtc.begin()) {
Serial.println("Couldn't find RTC");
Serial.flush();
while (true);
}
// 이 스케치가 컴파일된 PC의 날짜 & 시간으로 자동 설정
rtc.adjust(DateTime(F(__DATE__), F(__TIME__)));
time.reserve(10); // String 사용 시 메모리 단편화 방지
}
void loop() {
DateTime now = rtc.now();
time = "";
time += now.hour();
time += ':';
time += now.minute();
time += ':';
time += now.second();
oledDisplayCenter(time);
}
void oledDisplayCenter(String text) {
int16_t x1;
int16_t y1;
uint16_t width;
uint16_t height;
oled.getTextBounds(text, 0, 0, &x1, &y1, &width, &height);
// 수평 및 수직 중심에 표시
oled.clearDisplay(); // 디스플레이 지우기
oled.setCursor((SCREEN_WIDTH - width) / 2, (SCREEN_HEIGHT - height) / 2);
oled.println(text); // 디스플레이할 텍스트
oled.display();
}
사용 방법
- 위의 코드를 복사하고 Arduino IDE로 열기
- Arduino IDE에서 Upload 버튼을 클릭하여 코드를 Arduino에 업로드하기
- OLED에서 결과 보기
DS1307 RTC 모듈에서 시간을 읽고 OLED에 표시하기
배선도

이 이미지는 Fritzing을 사용하여 만들어졌습니다. 이미지를 확대하려면 클릭하세요.
아두이노 코드 - DS1307과 OLED
/*
* 이 아두이노 코드는 newbiely.kr 에서 개발되었습니다
* 이 아두이노 코드는 어떠한 제한 없이 공개 사용을 위해 제공됩니다.
* 상세한 지침 및 연결도에 대해서는 다음을 방문하세요:
* https://newbiely.kr/tutorials/arduino/arduino-oled-clock
*/
#include <Wire.h>
#include <Adafruit_GFX.h>
#include <Adafruit_SSD1306.h>
#include <RTClib.h>
#define SCREEN_WIDTH 128 // OLED 디스플레이 너비, 픽셀 단위
#define SCREEN_HEIGHT 64 // OLED 디스플레이 높이, 픽셀 단위
Adafruit_SSD1306 oled(SCREEN_WIDTH, SCREEN_HEIGHT, &Wire, -1); // I2C에 연결된 SSD1306 디스플레이 객체 생성
RTC_DS1307 rtc;
String time;
void setup() {
Serial.begin(9600);
// 128x64 크기의 OLED 디스플레이를 주소 0x3C로 초기화
if (!oled.begin(SSD1306_SWITCHCAPVCC, 0x3C)) {
Serial.println(F("SSD1306 할당 실패"));
while (true);
}
delay(2000); // 초기화를 위한 대기 시간
oled.clearDisplay(); // 디스플레이 지우기
oled.setTextSize(1); // 텍스트 크기
oled.setTextColor(WHITE); // 텍스트 색상
oled.setCursor(0, 10); // 표시할 위치
// RTC 모듈 설정
if (! rtc.begin()) {
Serial.println("RTC를 찾을 수 없습니다");
Serial.flush();
while (true);
}
// 이 스케치가 컴파일된 PC의 날짜 및 시간으로 RTC 자동 설정
rtc.adjust(DateTime(F(__DATE__), F(__TIME__)));
time.reserve(10); // String 사용 시 메모리 단편화를 피하기 위해
}
void loop() {
DateTime now = rtc.now();
time = "";
time += now.hour();
time += ':';
time += now.minute();
time += ':';
time += now.second();
oledDisplayCenter(time);
}
void oledDisplayCenter(String text) {
int16_t x1;
int16_t y1;
uint16_t width;
uint16_t height;
oled.getTextBounds(text, 0, 0, &x1, &y1, &width, &height);
// 수평 및 수직 중앙에 표시
oled.clearDisplay(); // 디스플레이 지우기
oled.setCursor((SCREEN_WIDTH - width) / 2, (SCREEN_HEIGHT - height) / 2);
oled.println(text); // 표시할 텍스트
oled.display();
}
사용 방법
- 위의 코드를 복사하고 아두이노 IDE로 열기
- 아두이노 IDE에서 Upload 버튼을 클릭하여 코드를 아두이노에 업로드하기
- OLED에서 결과 보기
동영상
비디오 제작은 시간이 많이 걸리는 작업입니다. 비디오 튜토리얼이 학습에 도움이 되었다면, YouTube 채널 을 구독하여 알려 주시기 바랍니다. 비디오에 대한 높은 수요가 있다면, 비디오를 만들기 위해 노력하겠습니다.


