아두이노 온도 센서 LED 매트릭스
이 튜토리얼에서는 DS18B20 원와이어 센서에서 온도를 읽고 LED 매트릭스에 표시하도록 아두이노를 프로그래밍하는 방법을 배울 것입니다.
준비물
| 1 | × | 아두이노 우노 R3 | 쿠팡 | 아마존 | |
| 1 | × | USB 2.0 타입 A-to-B 케이블 (USB-A PC용) | 쿠팡 | 아마존 | |
| 1 | × | USB 2.0 타입 C-to-B 케이블 (USB-C PC용) | 아마존 | |
| 1 | × | FC-16 LED Matrix 32x8 | 쿠팡 | 아마존 | |
| 1 | × | FC-16 LED Matrix 8x8 | 쿠팡 | 아마존 | |
| 1 | × | DS18B20 온도 센서 (어댑터 포함) | 쿠팡 | 아마존 | |
| 1 | × | 브레드보드 | 쿠팡 | 아마존 | |
| 1 | × | 점퍼케이블 | 쿠팡 | 아마존 | |
| 1 | × | (옵션) DC 커넥터 전원 연결 잭 플러그 소켓 | 쿠팡 | 아마존 | |
| 1 | × | (추천) 아두이노 우노용 스크루 터미널 블록 쉴드 | 쿠팡 | 아마존 | |
| 1 | × | (추천) 아두이노 우노용 브레드보드 쉴드 | 쿠팡 | 아마존 | |
| 1 | × | (추천) 아두이노 우노용 케이스 | 쿠팡 | 아마존 | |
| 1 | × | (추천) 아두이노 우노용 프로토타이핑 베이스 플레이트 & 브레드보드 키트 | 아마존 |
공개: 이 포스팅 에 제공된 일부 링크는 아마존 제휴 링크입니다. 이 포스팅은 쿠팡 파트너스 활동의 일환으로, 이에 따른 일정액의 수수료를 제공받습니다.
LED 매트릭스 및 DS18B20 온도 센서 소개
LED 매트릭스와 DS18B20 온도 센서(핀 구성, 작동 방식, 프로그래밍 방법 등)에 대해 모른다면, 다음 튜토리얼에서 학습하세요:
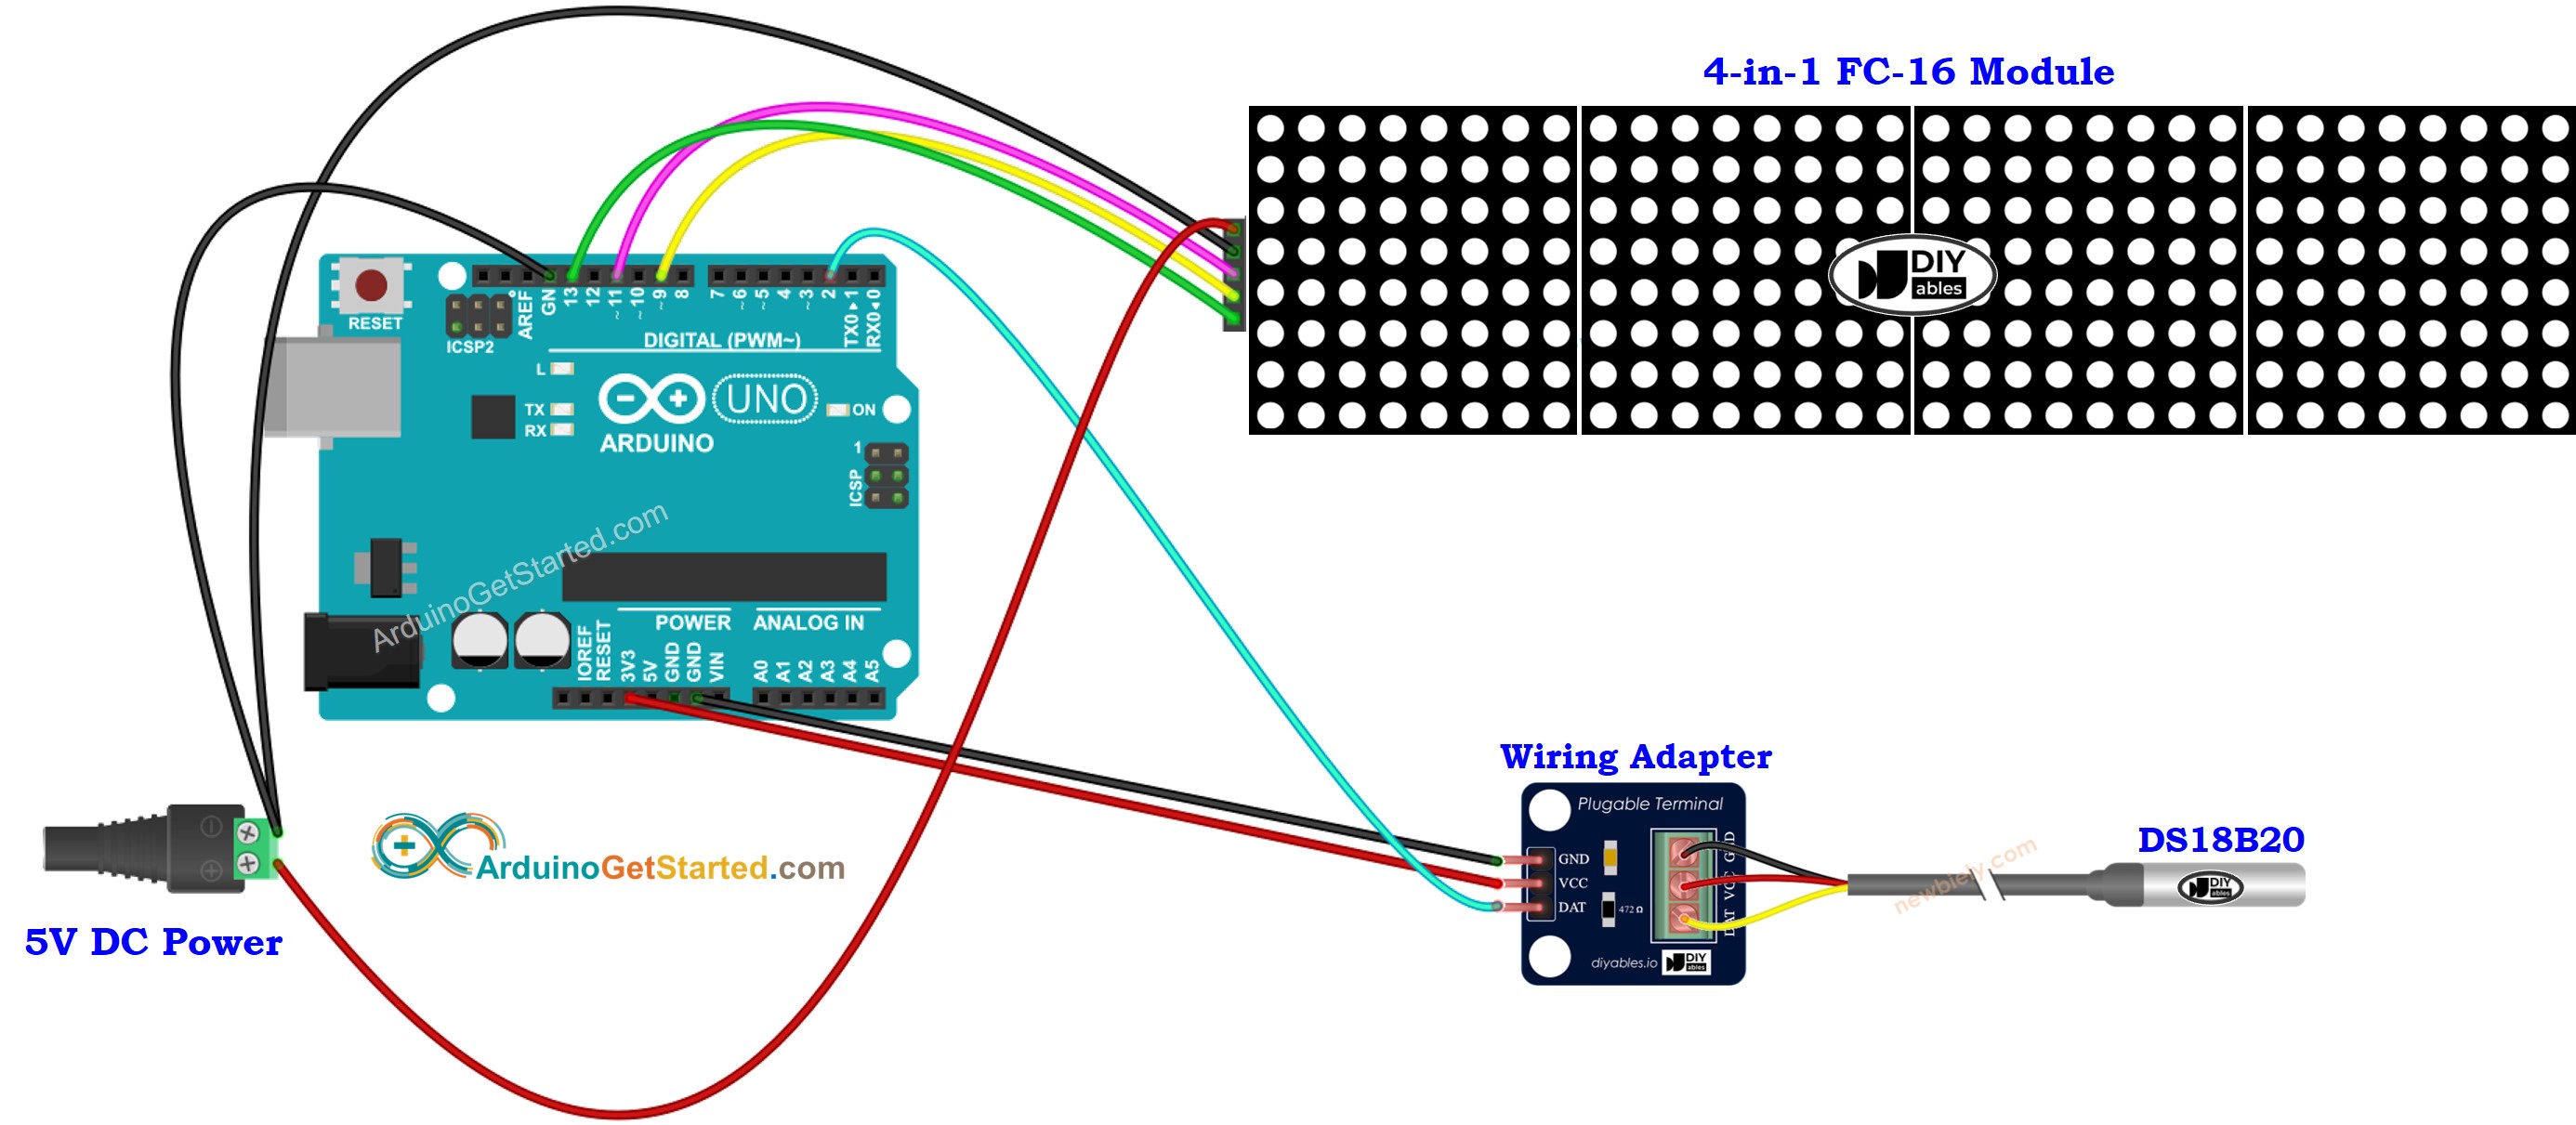
선연결

이 이미지는 Fritzing을 사용하여 만들어졌습니다. 이미지를 확대하려면 클릭하세요.
쉽게 연결할 수 있도록 배선 어댑터가 포함된 DS18B20 센서를 구입할 것을 권장합니다. 어댑터에는 내장된 저항이 있어 배선에 별도의 저항이 필요하지 않습니다.
아두이노 코드 - DS18B20 온도 센서로부터 온도를 측정하고 LED 매트릭스에 표시하기
/*
* 이 아두이노 코드는 newbiely.kr 에서 개발되었습니다
* 이 아두이노 코드는 어떠한 제한 없이 공개 사용을 위해 제공됩니다.
* 상세한 지침 및 연결도에 대해서는 다음을 방문하세요:
* https://newbiely.kr/tutorials/arduino/arduino-temperature-sensor-led-matrix
*/
#include <OneWire.h>
#include <DallasTemperature.h>
#include <DIYables_LED_Matrix.h>
#define SENSOR_PIN 2 // DS18B20 data pin
OneWire oneWire(SENSOR_PIN);
DallasTemperature tempSensor(&oneWire);
float tempCelsius;
float tempFahrenheit;
#define CS_PIN 9 // Chip Select pin for MAX7219
#define NUM_MATRICES 4 // Number of cascaded MAX7219 modules
#define SPACING 2 // Spacing between characters
DIYables_Max7219 display(CS_PIN, NUM_MATRICES);
void setup() {
Serial.begin(9600);
delay(500);
// Initialize temperature sensor
tempSensor.begin();
// Initialize the LED matrix display
display.setBrightness(1); // Brightness level: 0 to 15
display.clear();
display.show();
}
void loop() {
// Request and read the temperature
tempSensor.requestTemperatures();
tempCelsius = tempSensor.getTempCByIndex(0);
tempFahrenheit = (tempCelsius * 9.0 / 5.0) + 32.0;
// Print temperature to Serial Monitor
Serial.print("Temperature: ");
Serial.print(tempCelsius);
Serial.print("°C ~ ");
Serial.print(tempFahrenheit);
Serial.println("°F");
// Clear the display, then print temperature (Celsius)
display.clear();
// Convert to C-style string before passing to the print() function
String tempStr = String(tempCelsius, 1) + "°C"; // 1 decimal place
display.print(tempStr.c_str(), SPACING, 0);
display.show();
delay(2000); // Wait 2 seconds before taking the next reading
}
자세한 사용 방법
- PC에서 Arduino IDE를 엽니다.
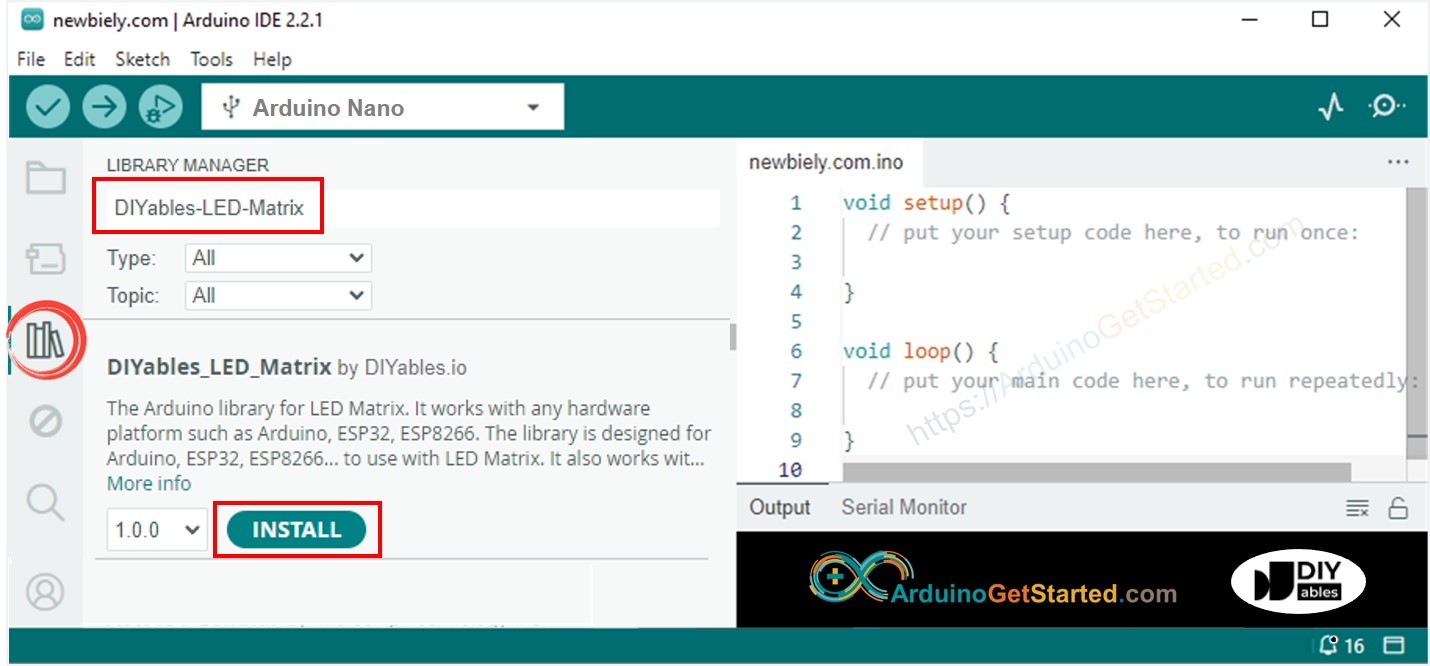
- Arduino IDE의 왼쪽 막대에서 Libraries 아이콘으로 이동합니다.
- “DIYables-LED-Matrix”를 검색한 후, DIYables의 LED 매트릭스 라이브러리를 찾습니다.
- Install 버튼을 클릭하여 라이브러리를 설치합니다.

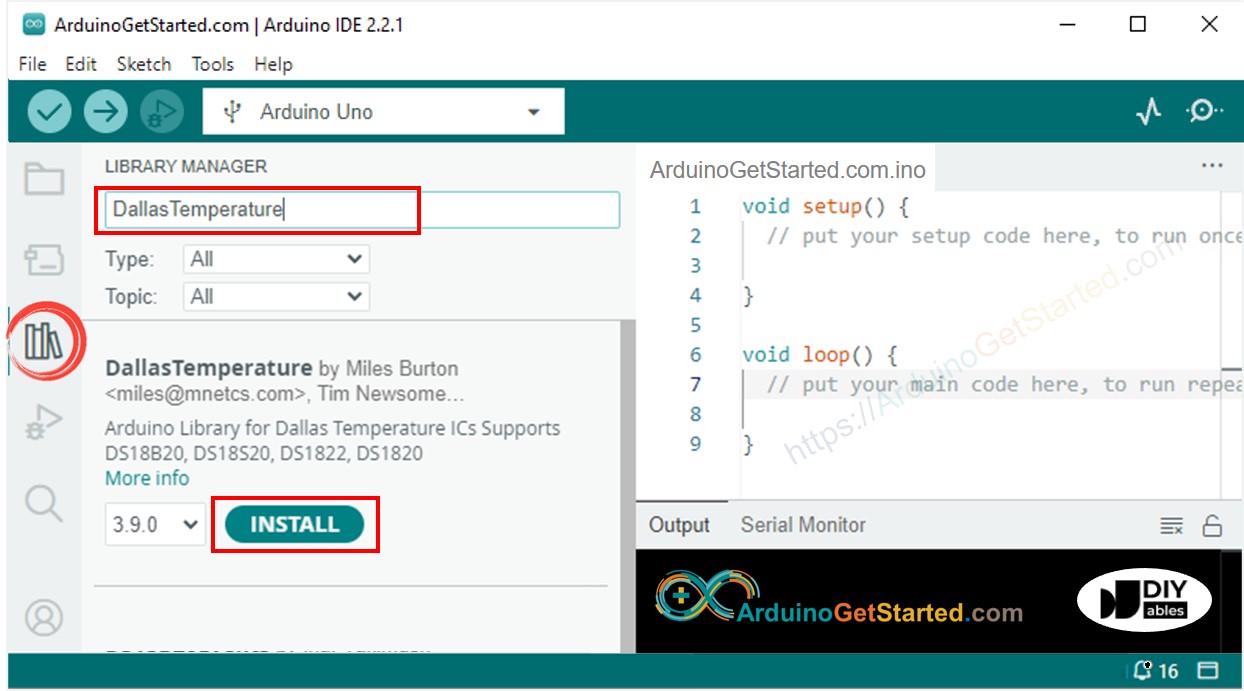
- “DallasTemperature”를 검색한 후, Miles Burton의 DallasTemperature 라이브러리를 찾습니다.
- DallasTemperature 라이브러리를 설치하려면 Install 버튼을 클릭합니다.

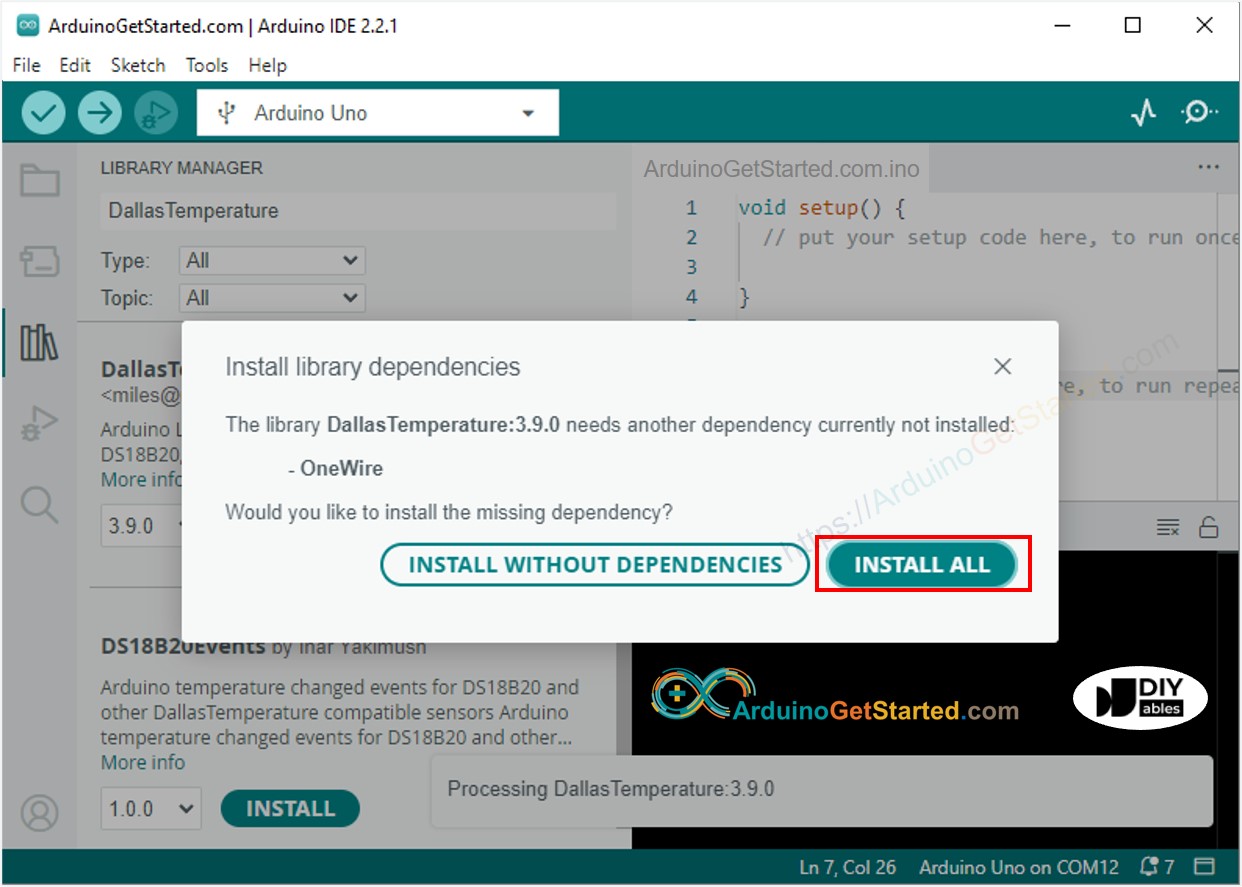
- 라이브러리 종속성을 설치하라는 요청을 받을 것입니다.
- Install All 버튼을 클릭하여 OneWire 라이브러리를 설치하세요.

- 위의 코드를 복사하여 Arduino IDE에서 엽니다
- Arduino IDE에서 Upload 버튼을 클릭하여 코드를 Arduino에 업로드합니다
- 센서를 뜨거운 물과 차가운 물에 놓거나 손으로 센서를 잡으세요
- LED 매트릭스에서 결과를 확인하세요
동영상
비디오 제작은 시간이 많이 걸리는 작업입니다. 비디오 튜토리얼이 학습에 도움이 되었다면, YouTube 채널 을 구독하여 알려 주시기 바랍니다. 비디오에 대한 높은 수요가 있다면, 비디오를 만들기 위해 노력하겠습니다.
