아두이노 모션 센서 릴레이
우리는 어떻게 하는지 배울 것입니다:
- 움직임이 감지되면 릴레이를 켭니다
- 움직임이 감지되지 않으면 릴레이를 끕니다
릴레이를 전구, LED 스트립, 모터 또는 액추에이터에 연결함으로써... 우리는 모션 센서를 이용하여 전구, LED 스트립, 모터 또는 액추에이터를 제어할 수 있습니다...
준비물
| 1 | × | 아두이노 우노 R3 | 쿠팡 | 아마존 | |
| 1 | × | USB 2.0 타입 A-to-B 케이블 (USB-A PC용) | 쿠팡 | 아마존 | |
| 1 | × | USB 2.0 타입 C-to-B 케이블 (USB-C PC용) | 아마존 | |
| 1 | × | HC-SR501 모션 센서 | 쿠팡 | 아마존 | |
| 1 | × | 릴레이 | 아마존 | |
| 1 | × | 점퍼케이블 | 쿠팡 | 아마존 | |
| 1 | × | (옵션) 솔레노이드 잠금장치 | 쿠팡 | 아마존 | |
| 1 | × | (옵션) 12V 전원 어댑터 | 아마존 | |
| 1 | × | (옵션) DC 커넥터 전원 연결 잭 플러그 소켓 | 쿠팡 | 아마존 | |
| 1 | × | (추천) 아두이노 우노용 스크루 터미널 블록 쉴드 | 쿠팡 | 아마존 | |
| 1 | × | (추천) Sensors/Servo Expansion Shield for Arduino Uno | 쿠팡 | 아마존 | |
| 1 | × | (추천) 아두이노 우노용 브레드보드 쉴드 | 쿠팡 | 아마존 | |
| 1 | × | (추천) 아두이노 우노용 케이스 | 쿠팡 | 아마존 | |
| 1 | × | (추천) 아두이노 우노용 프로토타이핑 베이스 플레이트 & 브레드보드 키트 | 아마존 |
공개: 이 포스팅 에 제공된 일부 링크는 아마존 제휴 링크입니다. 이 포스팅은 쿠팡 파트너스 활동의 일환으로, 이에 따른 일정액의 수수료를 제공받습니다.
릴레이 및 모션 센서에 관하여
만약 여러분이 릴레이와 모션 센서(핀배열, 작동 원리, 프로그래밍 방법 등)에 대해 잘 모른다면, 다음 튜토리얼에서 배워보세요:
선연결
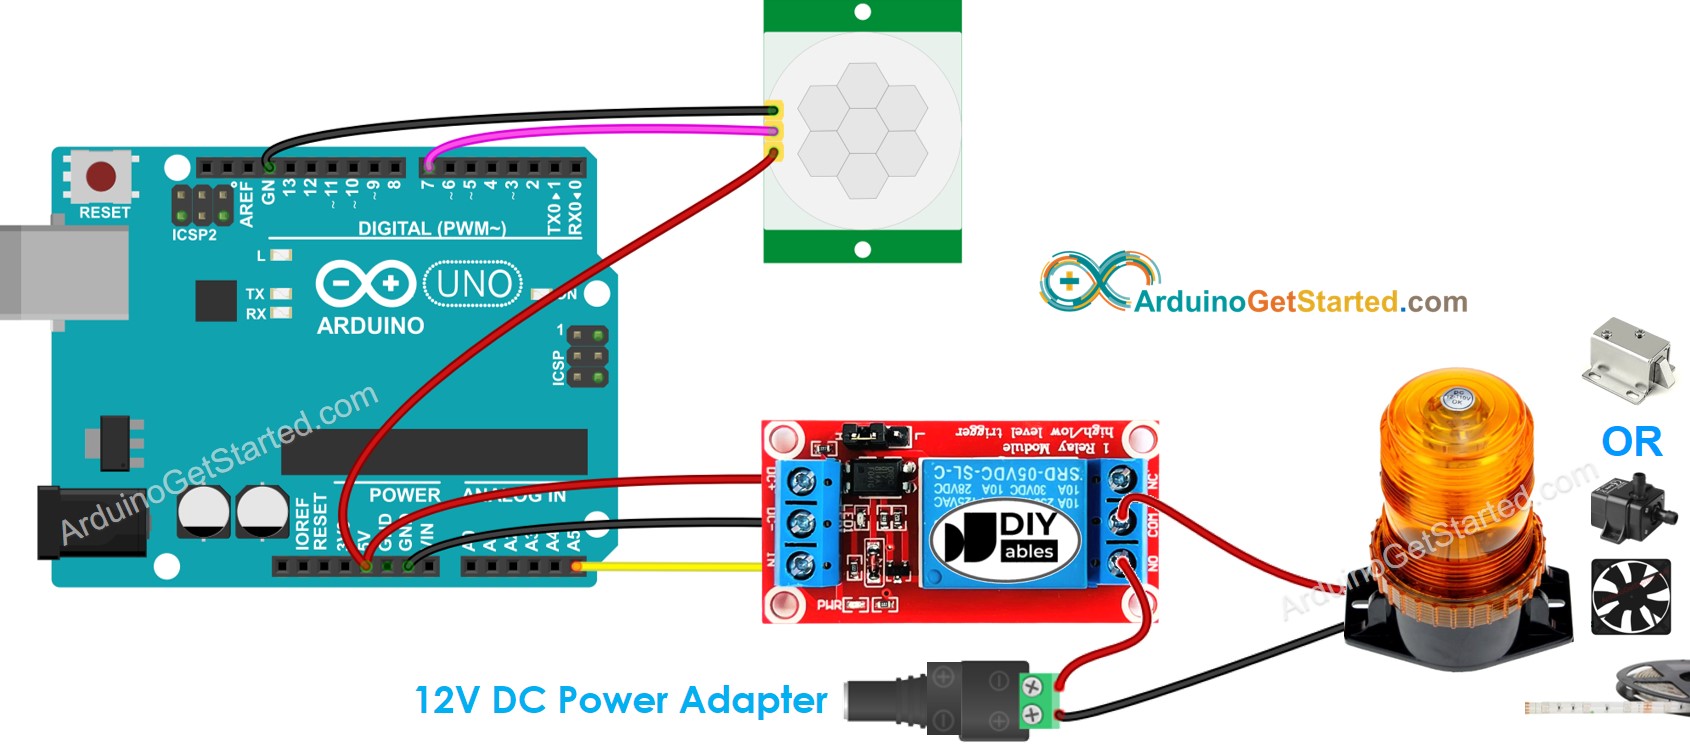
이 이미지는 Fritzing을 사용하여 만들어졌습니다. 이미지를 확대하려면 클릭하세요.
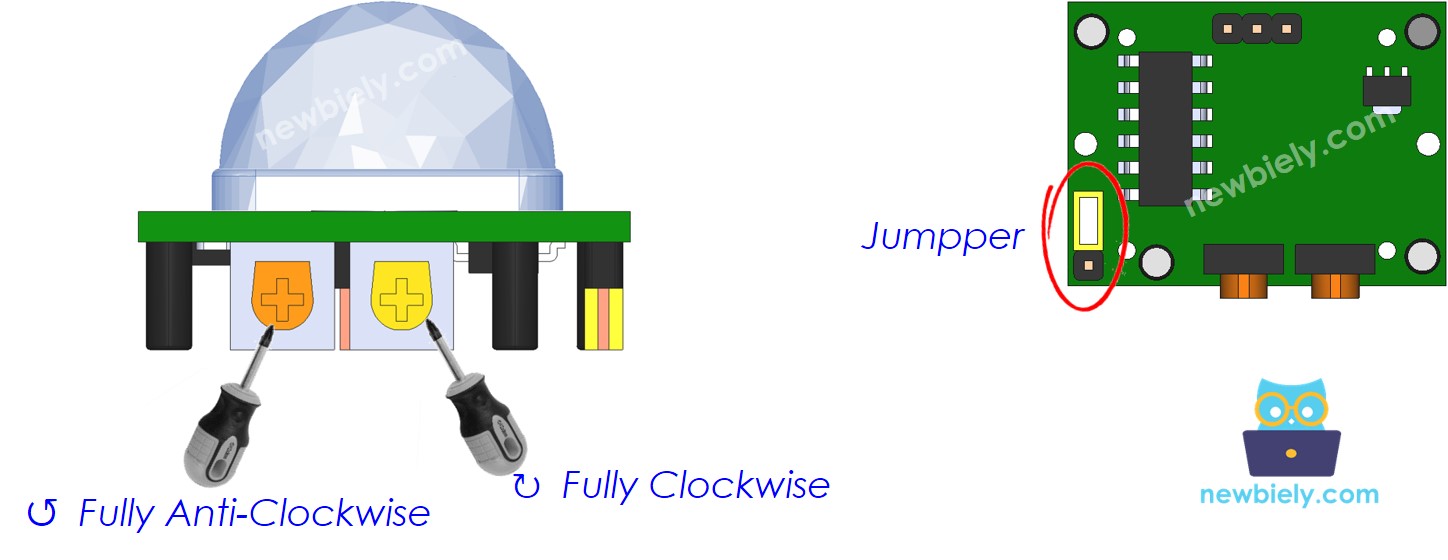
초기 설정
| Time Delay Adjuster | Screw it in anti-clockwise direction fully. |
| Detection Range Adjuster | Screw it in clockwise direction fully. |
| Repeat Trigger Selector | Put jumper as shown on the image. |
아두이노 코드
/*
* 이 아두이노 코드는 newbiely.kr 에서 개발되었습니다
* 이 아두이노 코드는 어떠한 제한 없이 공개 사용을 위해 제공됩니다.
* 상세한 지침 및 연결도에 대해서는 다음을 방문하세요:
* https://newbiely.kr/tutorials/arduino/arduino-motion-sensor-relay
*/
const int MOTION_SENSOR_PIN = 7; // 모션 센서의 OUTPUT 핀에 연결된 Arduino 핀
const int RELAY_PIN = A5; // 릴레이의 IN 핀에 연결된 Arduino 핀
int motionStateCurrent = LOW; // 모션 센서의 핀의 현재 상태
int motionStatePrevious = LOW; // 모션 센서의 핀의 이전 상태
void setup() {
Serial.begin(9600); // 시리얼 초기화
pinMode(MOTION_SENSOR_PIN, INPUT); // 아두이노 핀을 입력 모드로 설정
pinMode(RELAY_PIN, OUTPUT); // 아두이노 핀을 출력 모드로 설정
}
void loop() {
motionStatePrevious = motionStateCurrent; // 이전 상태 저장
motionStateCurrent = digitalRead(MOTION_SENSOR_PIN); // 새로운 상태 읽기
if (motionStatePrevious == LOW && motionStateCurrent == HIGH) { // 핀 상태 변경: LOW -> HIGH
Serial.println("Motion detected!");
digitalWrite(RELAY_PIN, HIGH); // 켜기
}
else
if (motionStatePrevious == HIGH && motionStateCurrent == LOW) { // 핀 상태 변경: HIGH -> LOW
Serial.println("Motion stopped!");
digitalWrite(RELAY_PIN, LOW); // 끄기
}
}
사용 방법
- Arduino를 USB 케이블을 통해 PC에 연결합니다
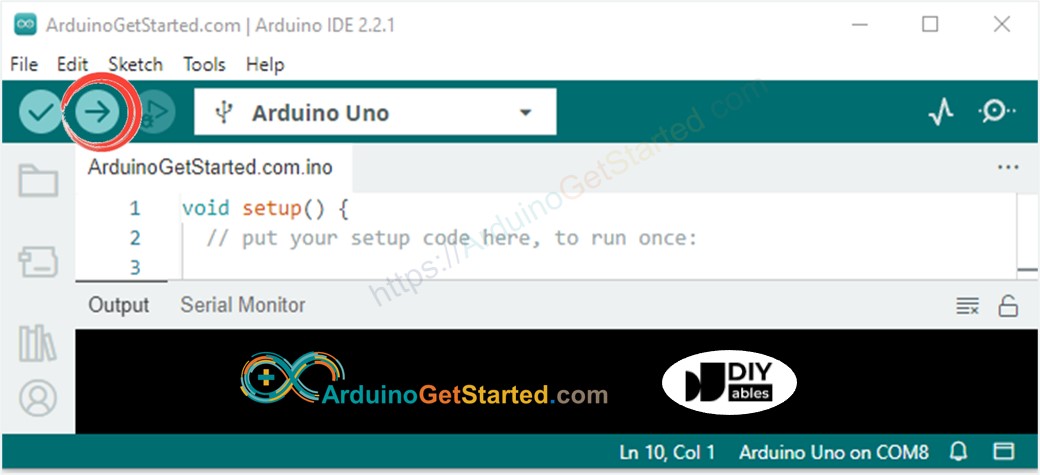
- Arduino IDE를 열고, 올바른 보드와 포트를 선택합니다
- 위의 코드를 복사하고 Arduino IDE로 엽니다
- Arduino IDE에서 Upload 버튼을 클릭하여 코드를 Arduino에 업로드합니다
- 센서 앞으로 손을 움직이세요.
- 릴레이 상태의 변화를 확인하세요.
코드 설명
소스 코드의 주석 라인에서 라인별 설명을 읽어보세요!
동영상
비디오 제작은 시간이 많이 걸리는 작업입니다. 비디오 튜토리얼이 학습에 도움이 되었다면, YouTube 채널 을 구독하여 알려 주시기 바랍니다. 비디오에 대한 높은 수요가 있다면, 비디오를 만들기 위해 노력하겠습니다.


