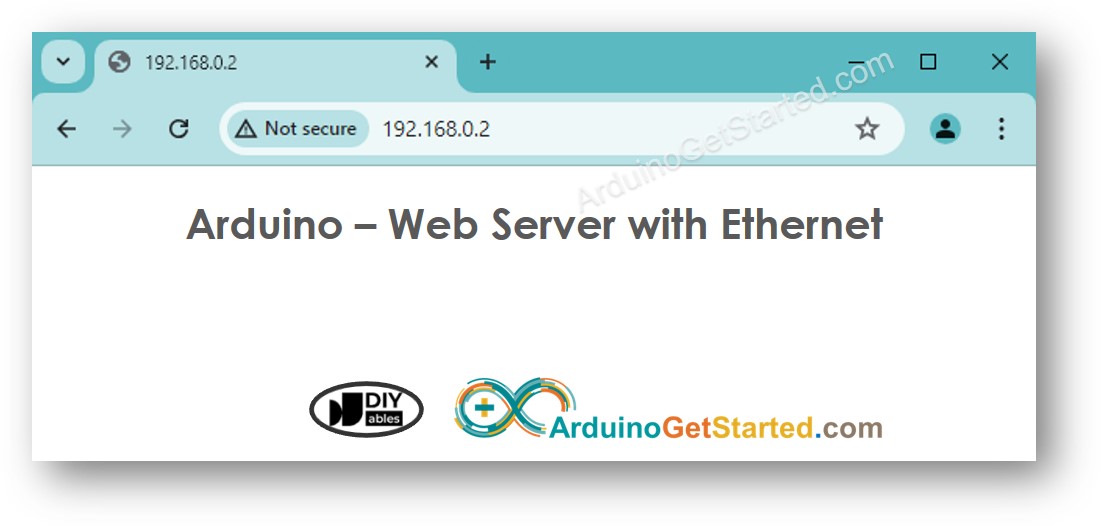
아두이노 이더넷
이 튜토리얼은 Arduino와 이더넷 모듈을 사용하여 인터넷 또는 LAN 네트워크에 연결하는 방법을 보여줍니다. 다룰 내용은 다음과 같습니다:
- 아두이노를 W5500 이더넷 모듈에 연결하기
- 이더넷을 통해 HTTP 요청을 보내도록 아두이노 프로그래밍하기
- 이더넷을 통해 웹 서버를 생성하도록 아두이노 프로그래밍하기
준비물
| 1 | × | 아두이노 우노 R3 | 쿠팡 | 아마존 | |
| 1 | × | USB 2.0 타입 A-to-B 케이블 (USB-A PC용) | 쿠팡 | 아마존 | |
| 1 | × | USB 2.0 타입 C-to-B 케이블 (USB-C PC용) | 아마존 | |
| 1 | × | W5500 Ethernet Module | 쿠팡 | 아마존 | |
| 1 | × | Ethernet Cable | 쿠팡 | 아마존 | |
| 1 | × | 점퍼케이블 | 쿠팡 | 아마존 | |
| 1 | × | 브레드보드 | 쿠팡 | 아마존 | |
| 1 | × | (추천) 아두이노 우노용 스크루 터미널 블록 쉴드 | 쿠팡 | 아마존 | |
| 1 | × | (추천) 아두이노 우노용 브레드보드 쉴드 | 쿠팡 | 아마존 | |
| 1 | × | (추천) 아두이노 우노용 케이스 | 쿠팡 | 아마존 | |
| 1 | × | (추천) 아두이노 우노용 프로토타이핑 베이스 플레이트 & 브레드보드 키트 | 아마존 |
공개: 이 포스팅 에 제공된 일부 링크는 아마존 제휴 링크입니다. 이 포스팅은 쿠팡 파트너스 활동의 일환으로, 이에 따른 일정액의 수수료를 제공받습니다.
W5500 이더넷 모듈에 대하여
W5500 이더넷 모듈은 두 가지 방법으로 연결할 수 있습니다:
- RJ45 이더넷 인터페이스: 이더넷 케이블을 사용하여 라우터나 스위치에 연결합니다.
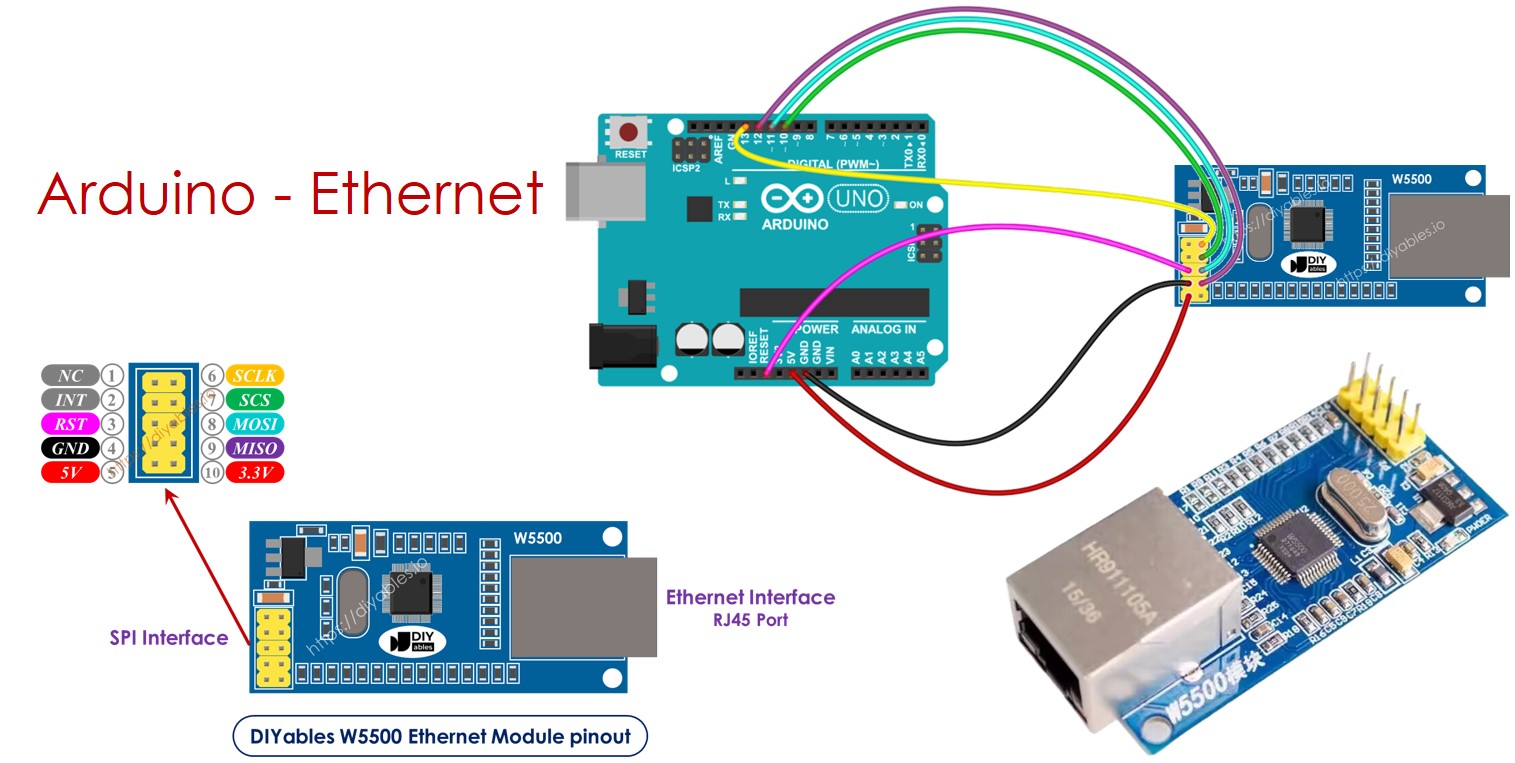
- SPI 인터페이스: 아두이노 보드에 연결하는 데 사용합니다. 10개의 핀이 있습니다. 이 핀들은 아래 표와 같이 아두이노에 연결해야 합니다.
| Ethenet Module Pins | Arduino Pins |
|---|---|
| NC pin | NOT connected |
| INT pin | NOT connected |
| RST pin | Reset pin |
| GND pin | GND pin |
| 5V pin | 5V pin |
| 3.3V pin | NOT connected |
| MISO pin | 12 (MISO) |
| MOSI pin | 11 (MOSI) |
| SCS pin | 10 (SS) |
| SCLK pin | 13 (SCK) |
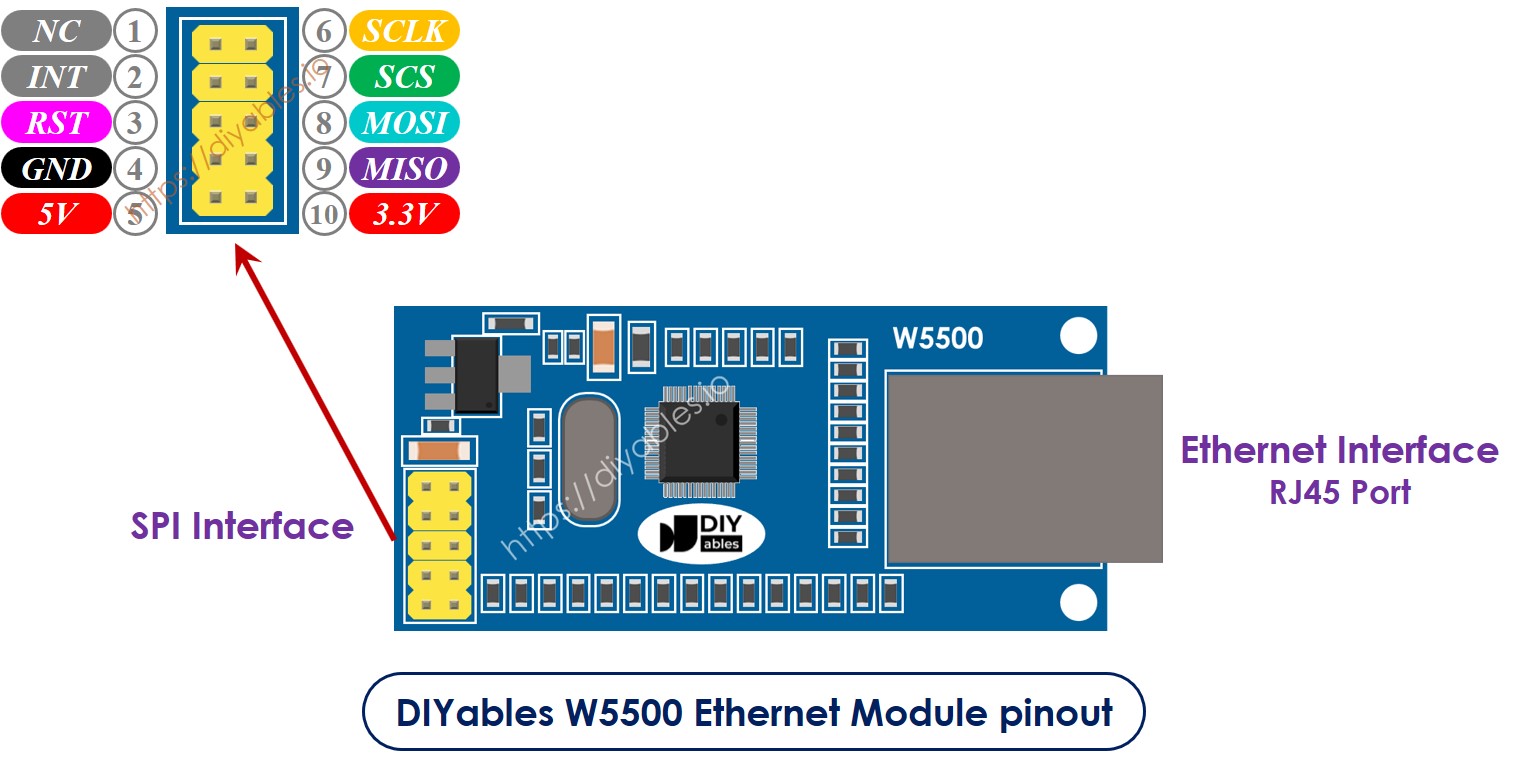
image source: diyables.io
아두이노와 W5500 이더넷 모듈 간의 배선도
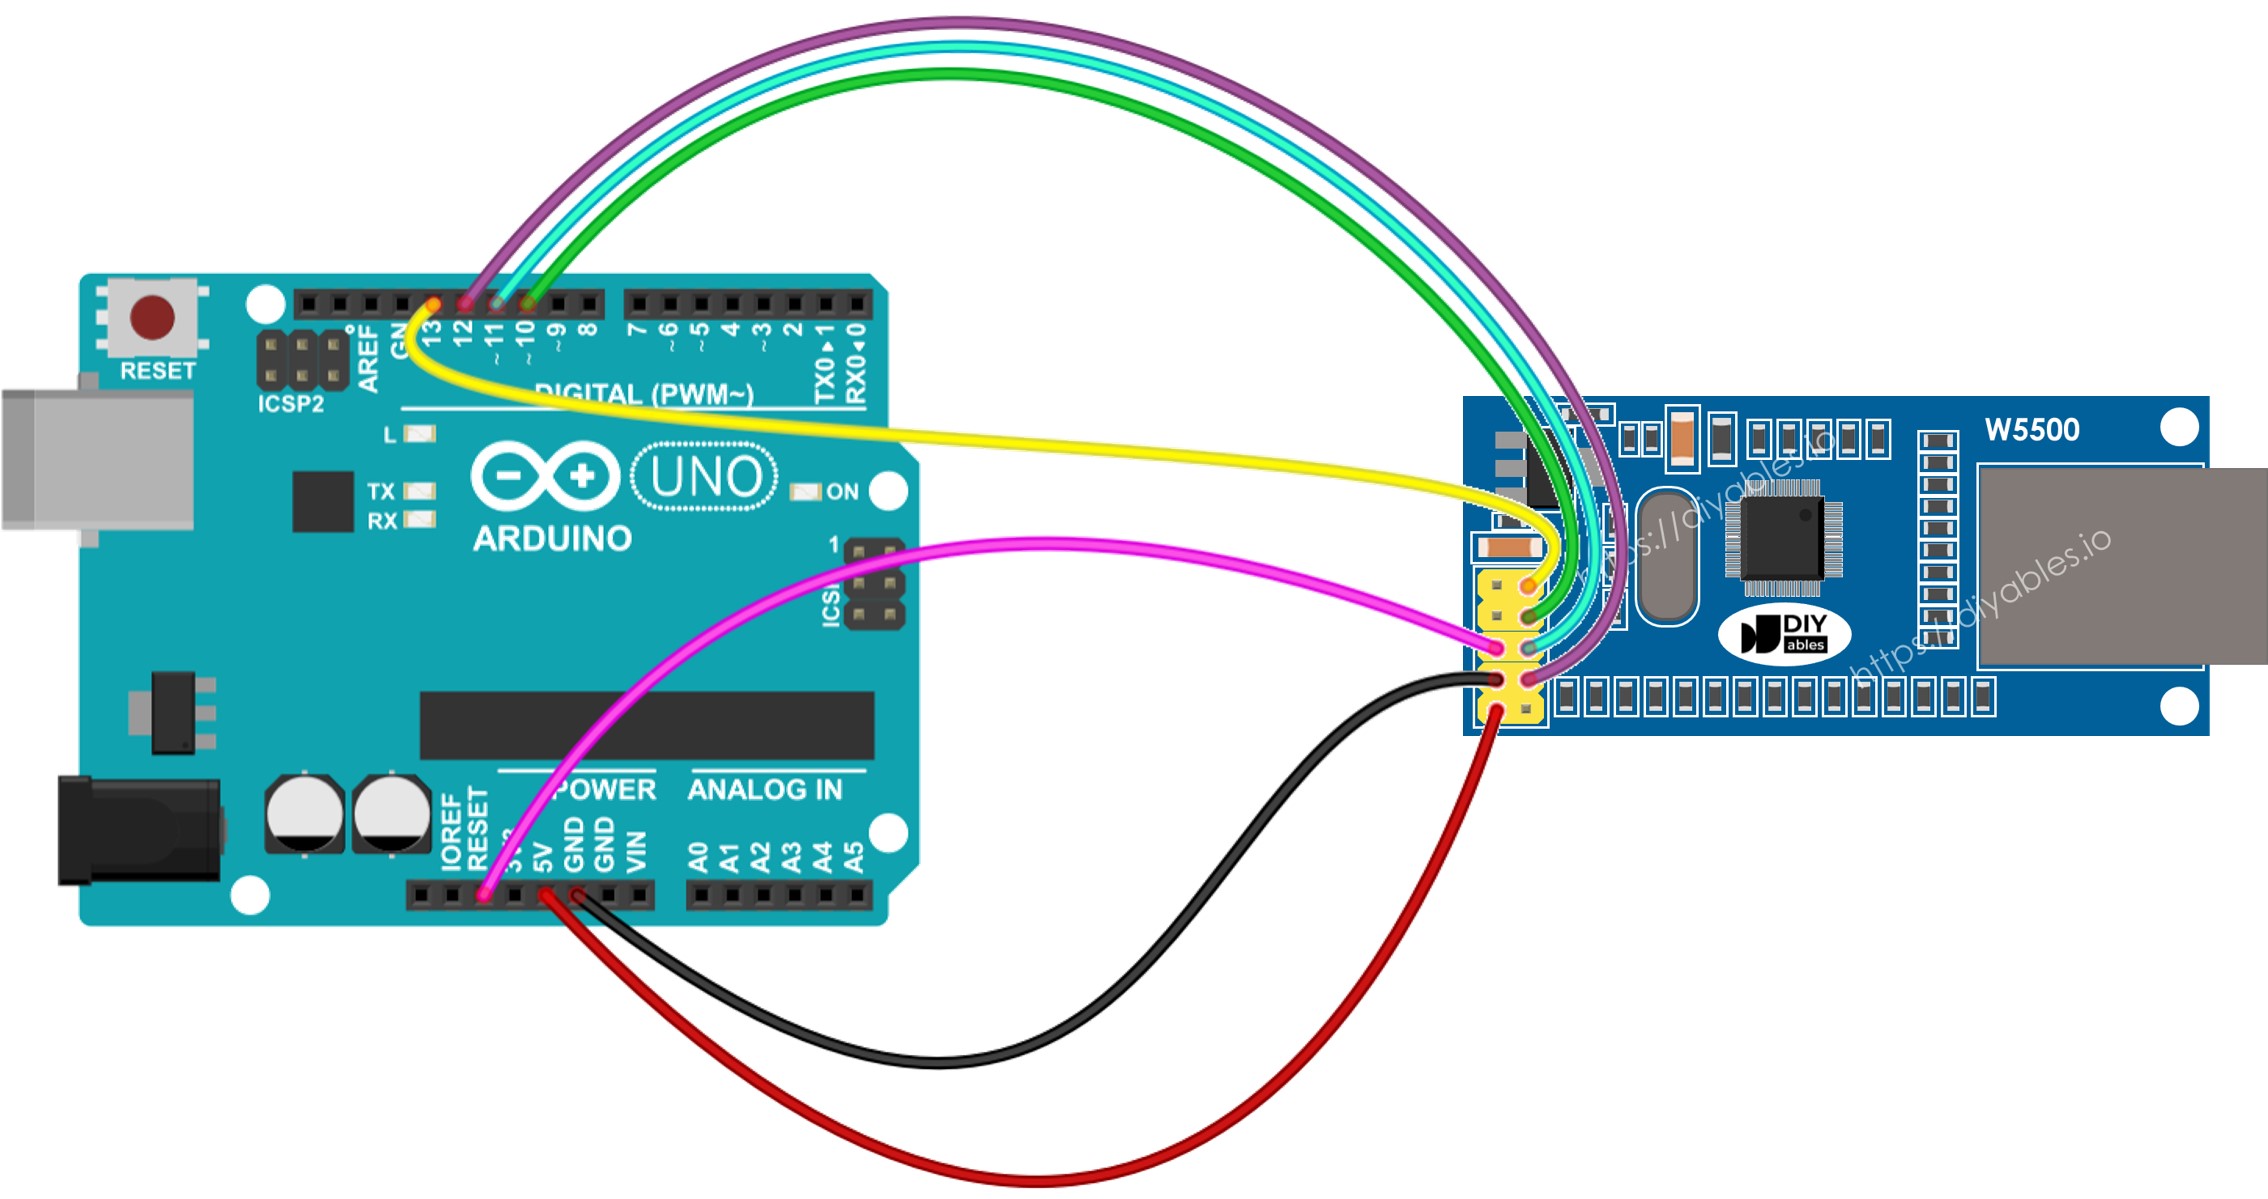
이 이미지는 Fritzing을 사용하여 만들어졌습니다. 이미지를 확대하려면 클릭하세요.
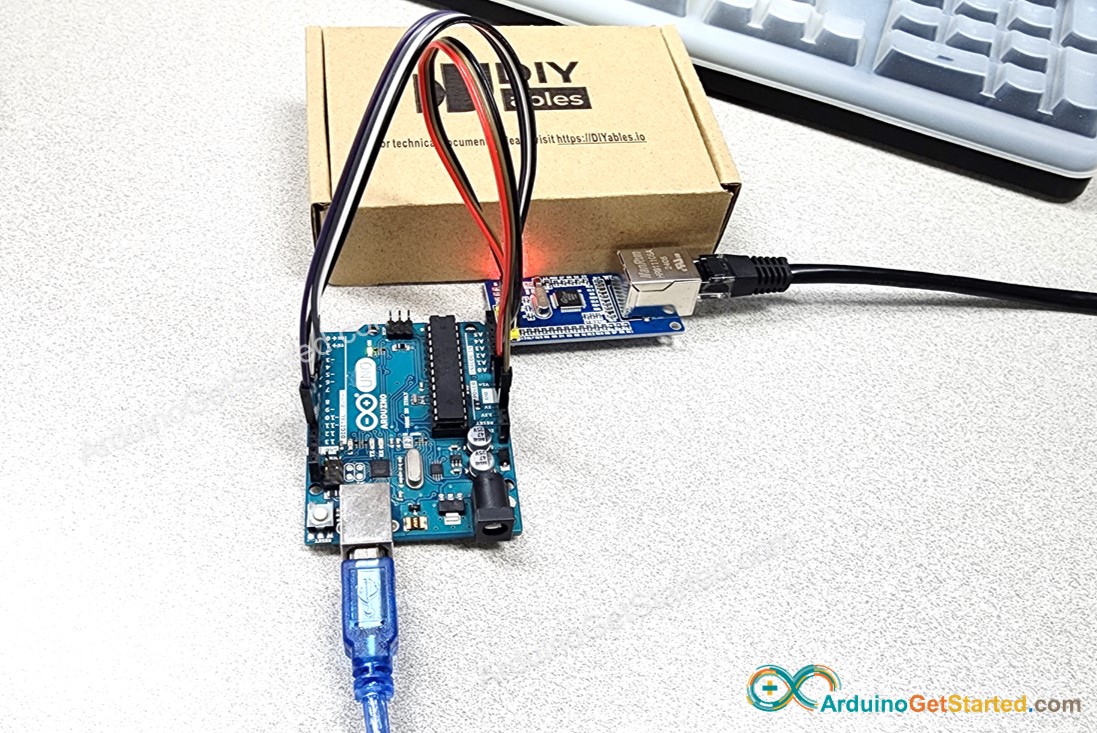
아래는 아두이노와 W5500 이더넷 모듈 간의 실제 연결입니다.
이더넷 모듈을 이용한 HTTP 요청 - 아두이노 코드
이 코드는 웹 클라이언트로 작동합니다. http://example.com/에 위치한 웹 서버에 HTTP 요청을 보냅니다.
/*
* 이 아두이노 코드는 newbiely.kr 에서 개발되었습니다
* 이 아두이노 코드는 어떠한 제한 없이 공개 사용을 위해 제공됩니다.
* 상세한 지침 및 연결도에 대해서는 다음을 방문하세요:
* https://newbiely.kr/tutorials/arduino/arduino-ethernet-module
*/
#include <SPI.h>
#include <Ethernet.h>
// replace the MAC address below by the MAC address printed on a sticker on the Arduino Shield 2
byte mac[] = { 0xDE, 0xAD, 0xBE, 0xEF, 0xFE, 0xED };
EthernetClient client;
int HTTP_PORT = 80;
String HTTP_METHOD = "GET"; // or POST
char HOST_NAME[] = "example.com";
String PATH_NAME = "/";
void setup() {
Serial.begin(9600);
delay(1000);
Serial.println("Arduino - Ethernet Tutorial");
// initialize the Ethernet shield using DHCP:
if (Ethernet.begin(mac) == 0) {
Serial.println("Failed to obtaining an IP address");
// check for Ethernet hardware present
if (Ethernet.hardwareStatus() == EthernetNoHardware)
Serial.println("Ethernet shield was not found");
// check for Ethernet cable
if (Ethernet.linkStatus() == LinkOFF)
Serial.println("Ethernet cable is not connected.");
while (true)
;
}
// connect to web server on port 80:
if (client.connect(HOST_NAME, HTTP_PORT)) {
// if connected:
Serial.println("Connected to server");
// make a HTTP request:
// send HTTP header
client.println(HTTP_METHOD + " " + PATH_NAME + " HTTP/1.1");
client.println("Host: " + String(HOST_NAME));
client.println("Connection: close");
client.println(); // end HTTP header
while (client.connected()) {
if (client.available()) {
// read an incoming byte from the server and print it to serial monitor:
char c = client.read();
Serial.print(c);
}
}
// the server's disconnected, stop the client:
client.stop();
Serial.println();
Serial.println("disconnected");
} else { // if not connected:
Serial.println("connection failed");
}
}
void loop() {
}
자세한 사용 방법
다음 단계를 차례대로 따라 주세요:
- 제공된 다이어그램에 표시된 대로 아두이노에 이더넷 모듈을 연결하세요.
- 이더넷 케이블을 사용하여 이더넷 모듈을 라우터나 스위치에 연결하세요.
- USB 케이블을 사용하여 아두이노 보드를 컴퓨터에 연결하세요.
- 컴퓨터에서 아두이노 IDE를 열세요.
- 올바른 아두이노 보드와 COM 포트를 선택하세요.
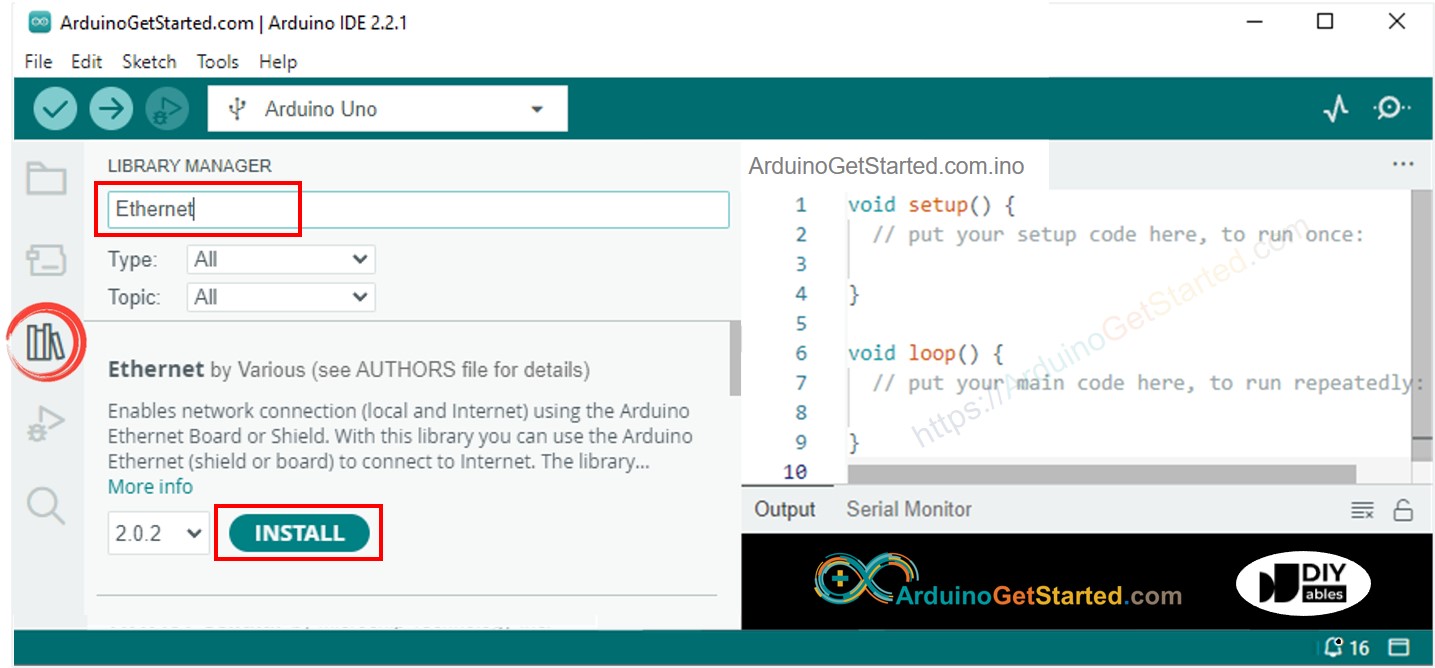
- 아두이노 IDE의 왼쪽에 있는 Libraries 아이콘을 클릭하세요.
- 검색 창에서 "이더넷"이라고 입력하고 Various에 의한 이더넷 라이브러리를 찾으세요.
- Install 버튼을 클릭하여 이더넷 라이브러리를 추가하세요.
- 아두이노 IDE에서 시리얼 모니터를 엽니다.
- 제공된 코드를 복사하여 아두이노 IDE에 붙여넣습니다.
- 아두이노 IDE에서 Upload 버튼을 클릭하여 코드를 아두이노로 전송합니다.
- 결과가 아래와 같이 표시될 시리얼 모니터를 확인합니다.
COM6
Arduino - Ethernet Tutorial
Connected to server
HTTP/1.1 200 OK
Accept-Ranges: bytes
Age: 208425
Cache-Control: max-age=604800
Content-Type: text/html; charset=UTF-8
Date: Fri, 12 Jul 2024 07:08:42 GMT
Etag: "3147526947"
Expires: Fri, 19 Jul 2024 07:08:42 GMT
Last-Modified: Thu, 17 Oct 2019 07:18:26 GMT
Server: ECAcc (lac/55B8)
Vary: Accept-Encoding
X-Cache: HIT
Content-Length: 1256
Connection: close
<!doctype html>
<html>
<head>
<title>Example Domain</title>
<meta charset="utf-8" />
<meta http-equiv="Content-type" content="text/html; charset=utf-8" />
<meta name="viewport" content="width=device-width, initial-scale=1" />
</head>
<body>
<div>
<h1>Example Domain</h1>
<p>This domain is for use in illustrative examples in documents. You may use this
domain in literature without prior coordination or asking for permission.</p>
<p><a href="https://www.iana.org/domains/example">More information...</a></p>
</div>
</body>
</html>
disconnected
Autoscroll
Clear output
9600 baud
Newline
※ 주의:
다른 기기가 같은 네트워크에서 MAC 주소를 공유한다면 문제가 발생할 수 있습니다.
이더넷 모듈을 위한 아두이노 코드 - 웹 서버
아래 코드는 아두이노에서 웹 서버를 생성합니다. 이 웹 서버는 웹 브라우저에 간단한 웹페이지를 전송합니다.
/*
* 이 아두이노 코드는 newbiely.kr 에서 개발되었습니다
* 이 아두이노 코드는 어떠한 제한 없이 공개 사용을 위해 제공됩니다.
* 상세한 지침 및 연결도에 대해서는 다음을 방문하세요:
* https://newbiely.kr/tutorials/arduino/arduino-ethernet-module
*/
#include <SPI.h>
#include <Ethernet.h>
// replace the MAC address below by the MAC address printed on a sticker on the Arduino Shield 2
byte mac[] = { 0xDE, 0xAD, 0xBE, 0xEF, 0xFE, 0xED };
EthernetServer server(80);
void setup() {
Serial.begin(9600);
delay(1000);
Serial.println("Arduino - Ethernet Tutorial");
// initialize the Ethernet shield using DHCP:
if (Ethernet.begin(mac) == 0) {
Serial.println("Failed to obtaining an IP address");
// check for Ethernet hardware present
if (Ethernet.hardwareStatus() == EthernetNoHardware)
Serial.println("Ethernet shield was not found");
// check for Ethernet cable
if (Ethernet.linkStatus() == LinkOFF)
Serial.println("Ethernet cable is not connected.");
while (true)
;
}
server.begin();
Serial.print("Arduino - Web Server IP Address: ");
Serial.println(Ethernet.localIP());
}
void loop() {
// listen for incoming clients
EthernetClient client = server.available();
if (client) {
Serial.println("new client");
// an HTTP request ends with a blank line
bool currentLineIsBlank = true;
while (client.connected()) {
if (client.available()) {
char c = client.read();
Serial.write(c);
// if you've gotten to the end of the line (received a newline
// character) and the line is blank, the HTTP request has ended,
// so you can send a reply
if (c == '\n' && currentLineIsBlank) {
// send a standard HTTP response header
client.println("HTTP/1.1 200 OK");
client.println("Content-Type: text/html");
client.println("Connection: close"); // the connection will be closed after completion of the response
client.println();
client.println("<!DOCTYPE HTML>");
client.println("<html>");
client.println("<body>");
client.println("<h1>Arduino - Web Server with Ethernet</h1>");
client.println("</body>");
client.println("</html>");
break;
}
if (c == '\n') {
// you're starting a new line
currentLineIsBlank = true;
} else if (c != '\r') {
// you've gotten a character on the current line
currentLineIsBlank = false;
}
}
}
// give the web browser time to receive the data
delay(1);
// close the connection:
client.stop();
Serial.println("client disconnected");
}
}
자세한 사용 방법
- 위 코드를 복사하여 아두이노 IDE에 붙여넣으세요.
- 아두이노 IDE에서 Upload 버튼을 클릭하여 코드를 아두이노에 업로드하세요.
- 시리얼 모니터에서 결과를 확인하세요. 다음과 같이 표시됩니다:
COM6
Arduino - Ethernet Tutorial
Arduino - Web Server IP Address: 192.168.0.2
Autoscroll
Clear output
9600 baud
Newline
- 위에 언급된 IP 주소를 복사하여 웹 브라우저의 주소 창에 붙여넣으세요. 그러면 아두이노에서 제공하는 간단한 웹페이지를 볼 수 있습니다.
