
아두이노 RS232에서 WiFi로
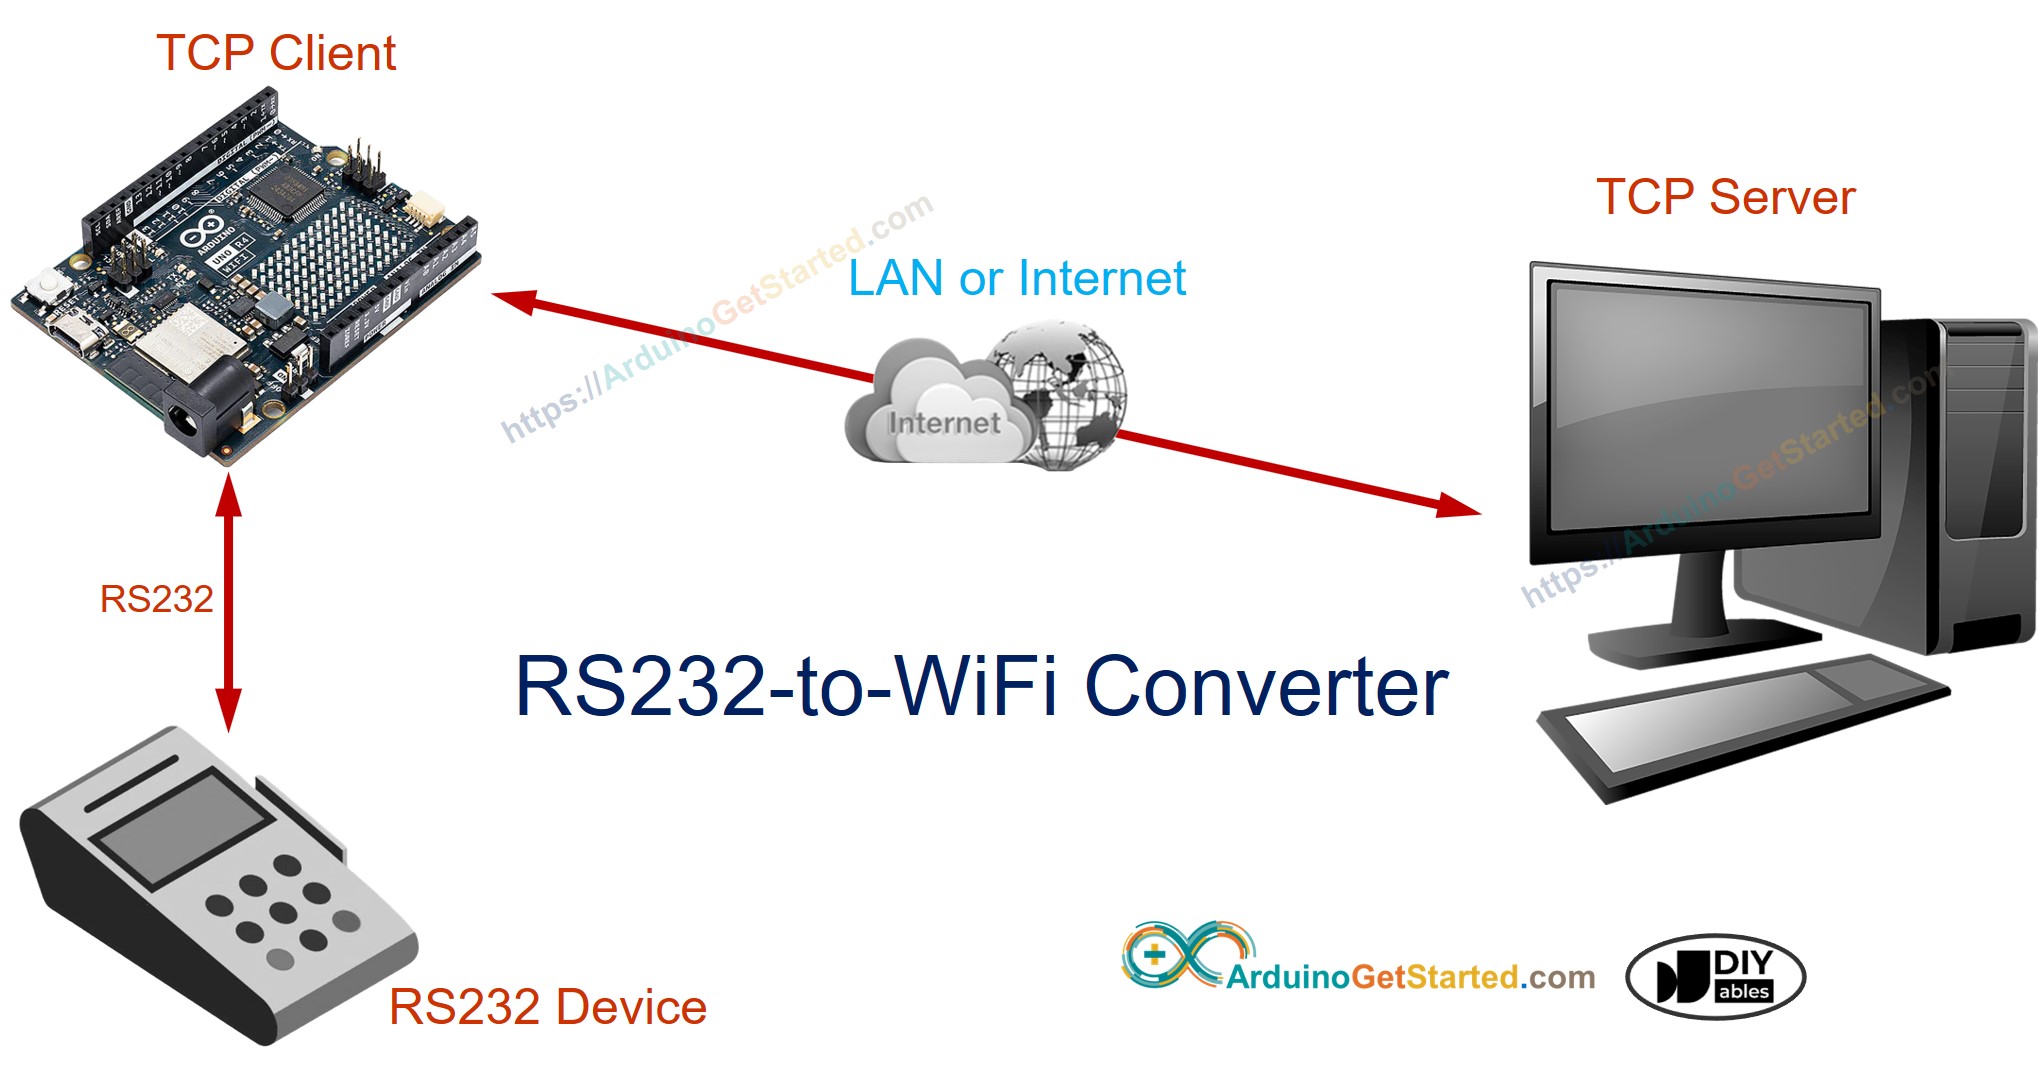
이 튜토리얼에서는 아두이노 우노 R4 와이파이를 사용하여 시리얼 RS232 장치를 와이파이에 연결하는 변환기를 만드는 방법을 배우게 됩니다. 이 설정을 사용하면, 아두이노는 시리얼 RS232 인터페이스에서 데이터를 읽고 TCP 서버에 데이터를 전송할 수 있으며, 이는 동일한 로컬 네트워크나 인터넷을 통해 가능합니다. 또한 TCP 서버로부터 데이터를 받아 시리얼 RS232 인터페이스를 통해 다시 전송할 수도 있습니다.
다음 단계를 따르면 Arduino를 사용하여 시리얼 RS-232 장치와 TCP/IP 서버 간의 유연한 통신 연결을 설정할 수 있습니다.
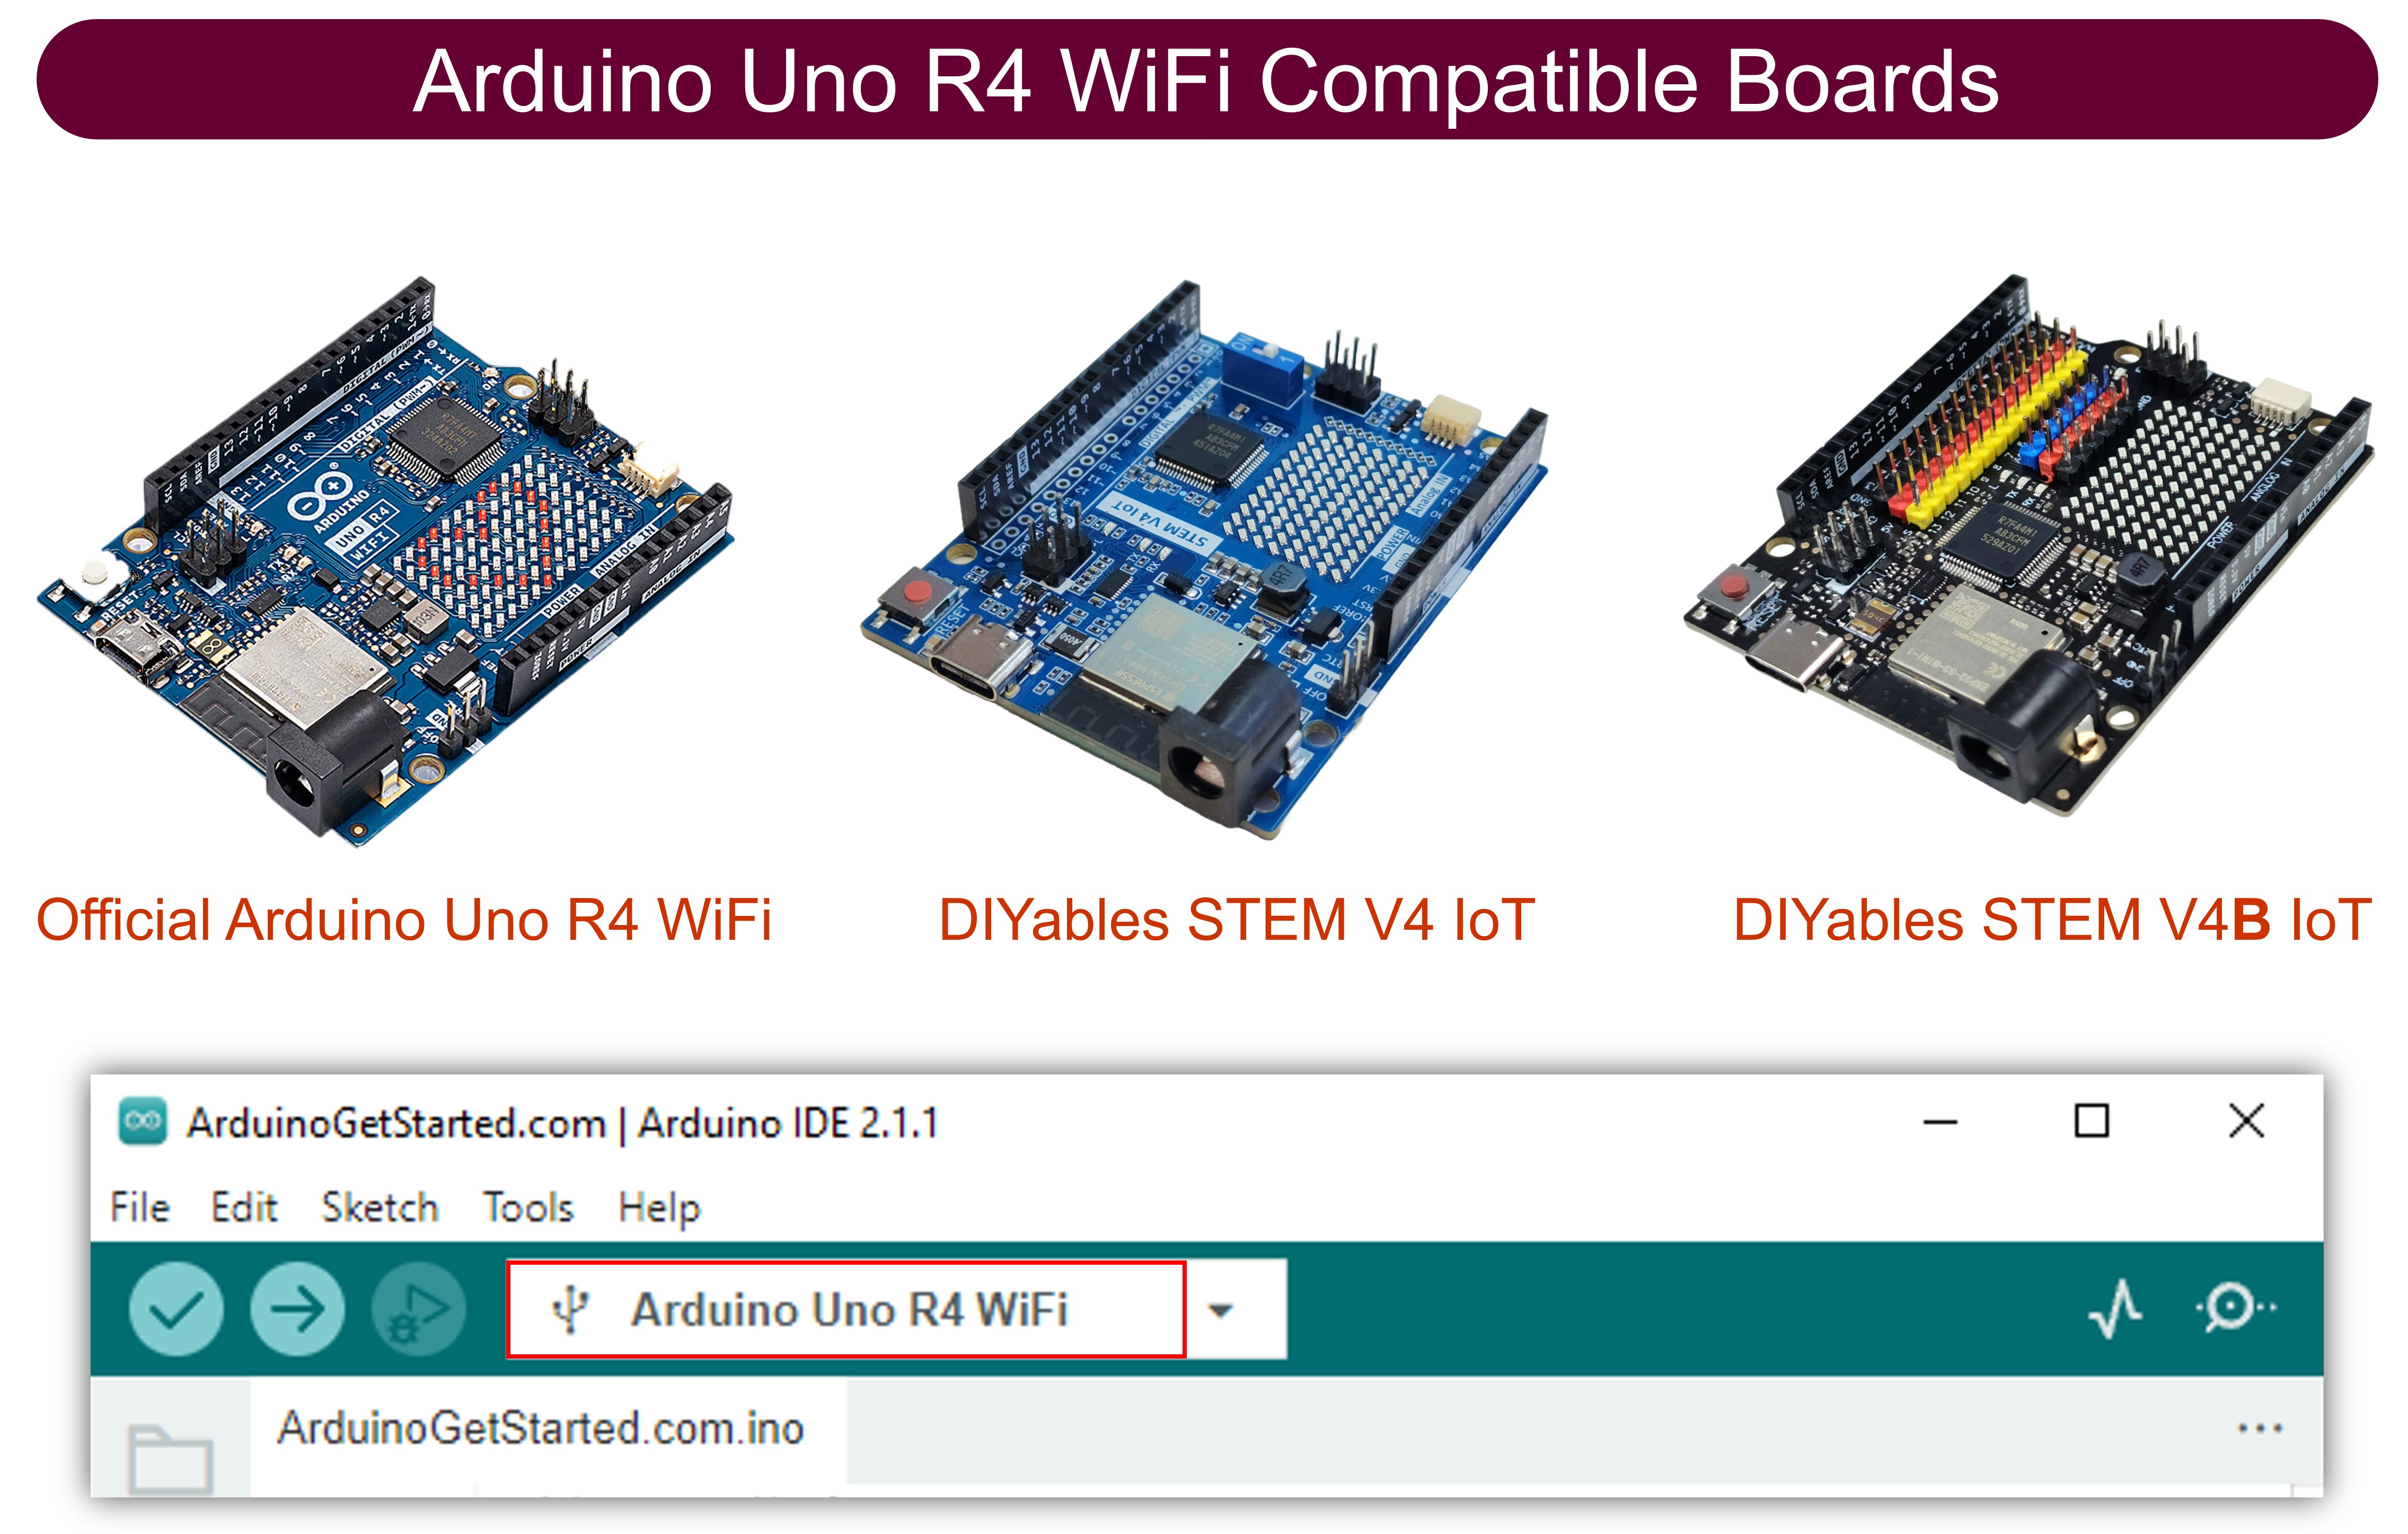
준비물
| 1 | × | 아두이노 우노 R4 와이파이 | 쿠팡 | 아마존 | |
| 1 | × | (또는) DIYables STEM V4 IoT | 쿠팡 | 아마존 | |
| 1 | × | USB 케이블 타입-A to 타입-C (USB-A PC용) | 쿠팡 | 아마존 | |
| 1 | × | USB 케이블 타입-C to 타입-C (USB-C PC용) | 아마존 | |
| 1 | × | TTL-RS232 변환 모듈 | 쿠팡 | 아마존 | |
| 1 | × | (또는) MAX3232 RS232 to TTL Module | 아마존 | |
| 1 | × | 점퍼케이블 | 쿠팡 | 아마존 | |
| 1 | × | (옵션) USB to RS232 Cable | 쿠팡 | 아마존 | |
| 1 | × | (옵션) USB to RS232 Converter | 쿠팡 | 아마존 | |
| 1 | × | (추천) 아두이노 우노 R4용 스크루 터미널 블록 쉴드 | 쿠팡 | 아마존 | |
| 1 | × | (추천) Sensors/Servo Expansion Shield for Arduino UNO R4 | 쿠팡 | 아마존 | |
| 1 | × | (추천) 아두이노 우노 R4용 브레드보드 쉴드 | 쿠팡 | 아마존 | |
| 1 | × | (추천) 아두이노 우노 R4용 케이스 | 쿠팡 | 아마존 | |
| 1 | × | (추천) 아두이노 우노 R4용 전원 분배기 | 쿠팡 | 아마존 | |
| 1 | × | (추천) 아두이노 우노용 프로토타이핑 베이스 플레이트 & 브레드보드 키트 | 아마존 |
공개: 이 포스팅 에 제공된 일부 링크는 아마존 제휴 링크입니다. 이 포스팅은 쿠팡 파트너스 활동의 일환으로, 이에 따른 일정액의 수수료를 제공받습니다.
RS232 및 TCP에 대하여
RS232 및 TCP 통신을 아두이노와 사용하는 방법을 모른다면, 다음 튜토리얼에서 배워보세요:
- 아두이노 RS232 튜토리얼
- 아두이노 - TCP 클라이언트 튜토리얼
RS232에서 WiFi 변환기 작동 방식
- 아두이노는 RS232 인터페이스를 통해 시리얼 장치에 연결됩니다.
- 아두이노는 TCP 클라이언트처럼 동작하여 TCP 서버에 연결합니다. TCP 서버는 컴퓨터에서 실행되는 소프트웨어나 TCP 서버로 프로그래밍된 다른 아두이노일 수 있습니다.
- 아두이노는 시리얼 RS232 인터페이스에서 정보를 읽고 그 정보를 TCP 서버로 보냅니다.
- 아두이노는 또한 TCP 연결에서 데이터를 읽고 그것을 시리얼 RS232 인터페이스를 통해 다시 보냅니다.
선연결
하드웨어 시리얼 사용시 배선도
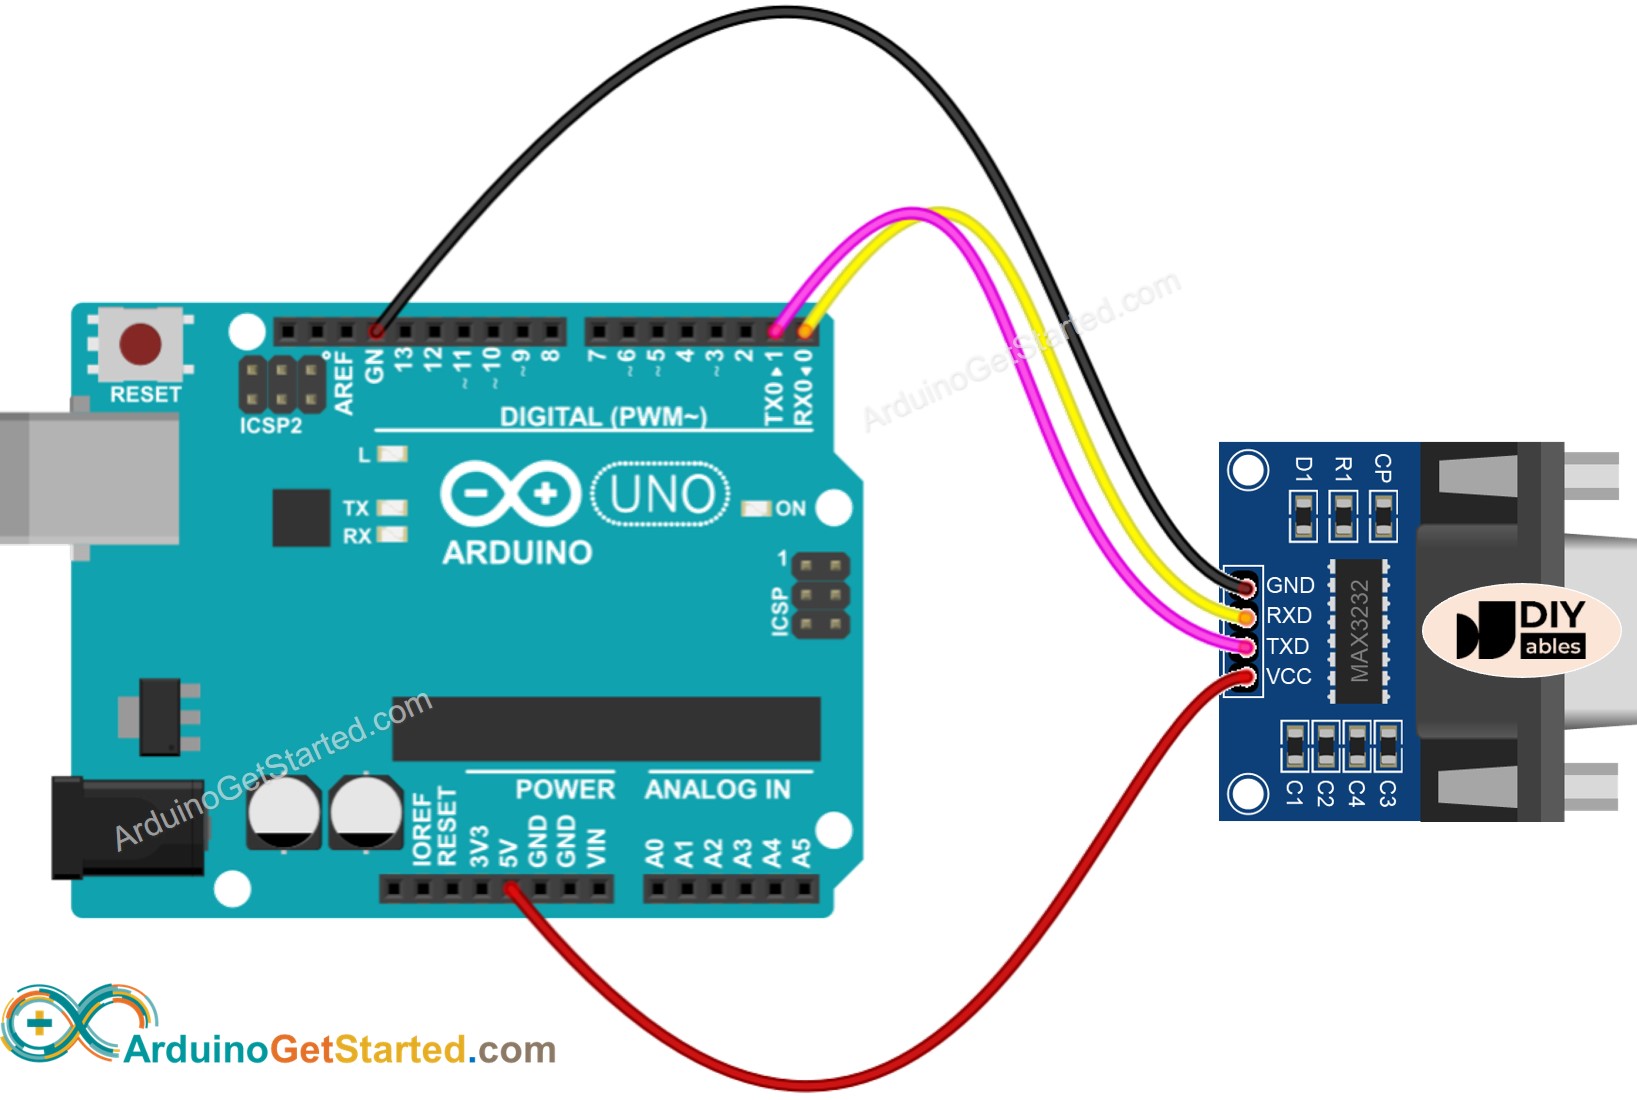
이 이미지는 Fritzing을 사용하여 만들어졌습니다. 이미지를 확대하려면 클릭하세요.
소프트웨어 시리얼 사용 시 배선도
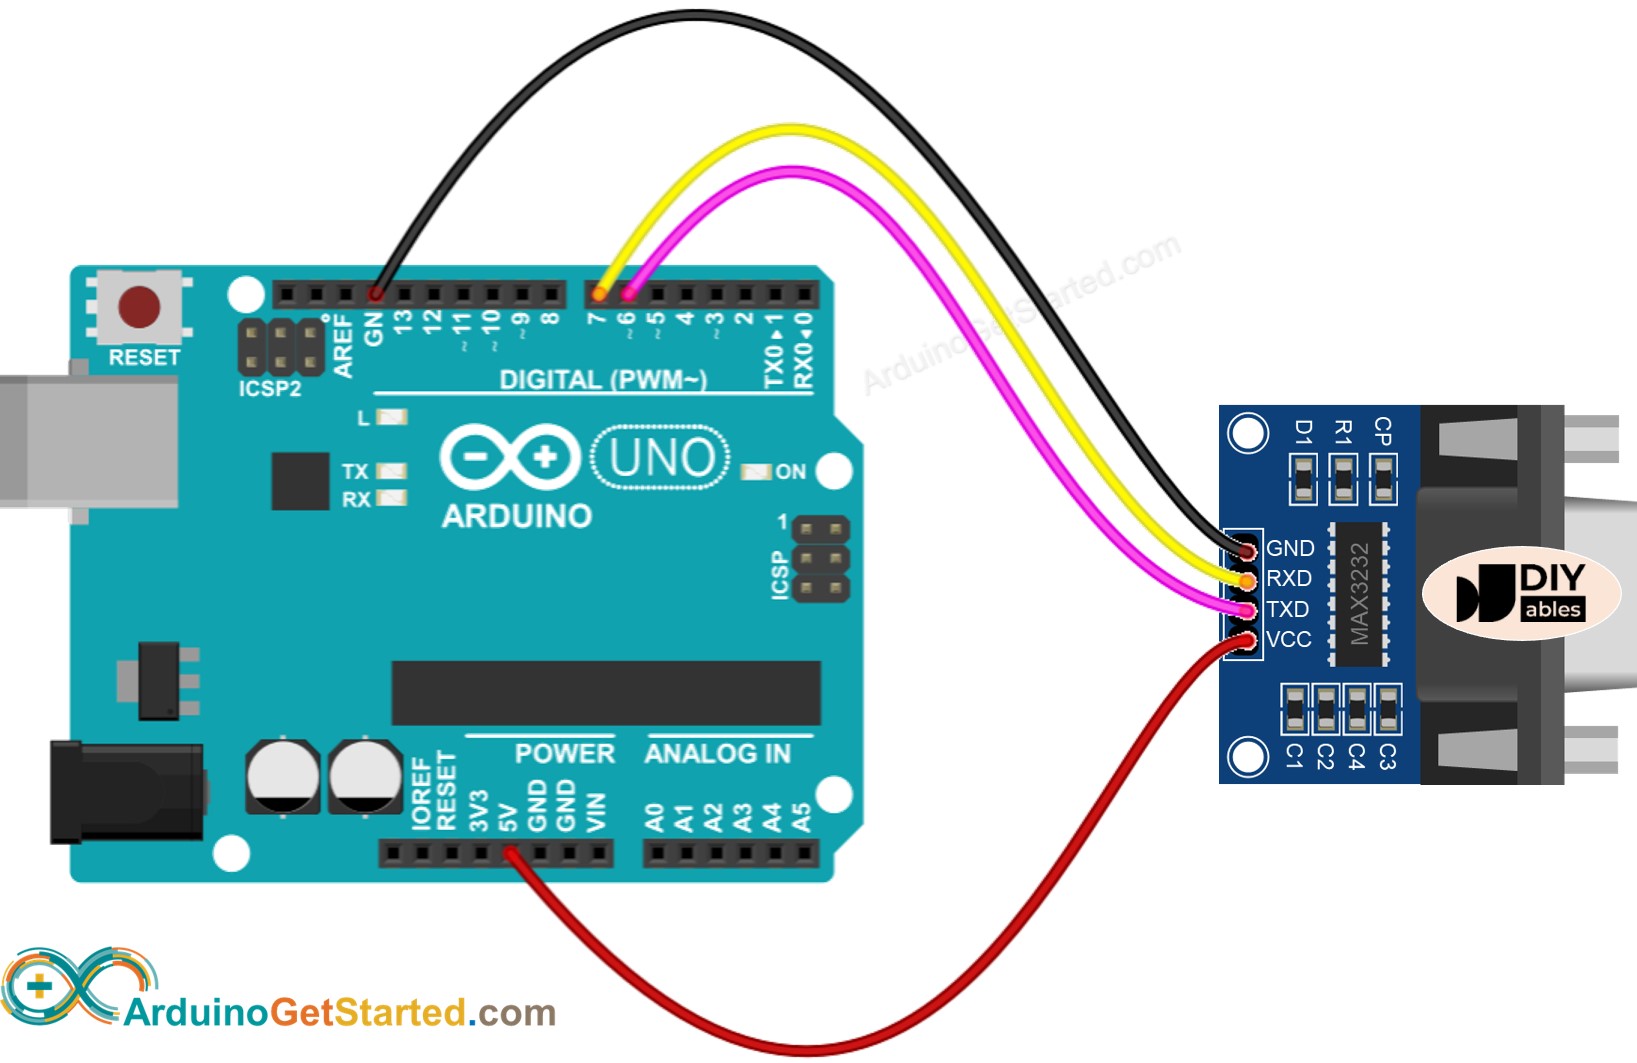
이 이미지는 Fritzing을 사용하여 만들어졌습니다. 이미지를 확대하려면 클릭하세요.
하드웨어 시리얼을 위한 아두이노 코드
/*
* 이 아두이노 코드는 newbiely.kr 에서 개발되었습니다
* 이 아두이노 코드는 어떠한 제한 없이 공개 사용을 위해 제공됩니다.
* 상세한 지침 및 연결도에 대해서는 다음을 방문하세요:
* https://newbiely.kr/tutorials/arduino/arduino-rs232-to-wifi
*/
#include <WiFiS3.h>
const char* WIFI_SSID = "YOUR_WIFI_SSID"; // 귀하의 WIFI SSID로 변경하세요
const char* WIFI_PASSWORD = "YOUR_WIFI_PASSWORD"; // 귀하의 WIFI 비밀번호로 변경하세요
const char* TCP_SERVER_ADDR = "192.168.0.26"; // TCP 서버의 IP 주소로 변경하세요
const int TCP_SERVER_PORT = 1470;
WiFiClient TCP_client;
void setup() {
Serial.begin(9600);
Serial.println("Arduino: TCP CLIENT");
// check for the WiFi module:
if (WiFi.status() == WL_NO_MODULE) {
Serial.println("WiFi 모듈과의 통신 실패!");
// don't continue
while (true)
;
}
String fv = WiFi.firmwareVersion();
if (fv < WIFI_FIRMWARE_LATEST_VERSION) {
Serial.println("펌웨어를 업그레이드하십시오");
}
Serial.print("SSID에 연결을 시도합니다: ");
Serial.println(WIFI_SSID);
// attempt to connect to WiFi network:
while (WiFi.begin(WIFI_SSID, WIFI_PASSWORD) != WL_CONNECTED) {
delay(10000); // 연결을 위해 10초 동안 기다립니다:
}
Serial.print("WiFi에 연결됨 ");
Serial.println(WIFI_SSID);
// connect to TCP server
if (TCP_client.connect(TCP_SERVER_ADDR, TCP_SERVER_PORT))
Serial.println("TCP 서버에 연결됨");
else
Serial.println("TCP 서버에 연결 실패");
}
void loop() {
if (TCP_client.connected()) {
// read data from TCP and send them to RS232 interface
if (TCP_client.available()) {
char c = TCP_client.read();
Serial.write(c);
}
// read data from RS232 interface and send them to TCP
if (Serial.available()) {
char c = Serial.read();
TCP_client.write(c);
}
} else {
Serial.println("연결이 끊어졌습니다");
TCP_client.stop();
// reconnect to TCP server
if (TCP_client.connect(TCP_SERVER_ADDR, TCP_SERVER_PORT)) {
Serial.println("TCP 서버에 다시 연결됨");
} else {
Serial.println("TCP 서버에 다시 연결 실패");
delay(1000);
}
}
}
소프트웨어 시리얼을 위한 아두이노 코드
/*
* 이 아두이노 코드는 newbiely.kr 에서 개발되었습니다
* 이 아두이노 코드는 어떠한 제한 없이 공개 사용을 위해 제공됩니다.
* 상세한 지침 및 연결도에 대해서는 다음을 방문하세요:
* https://newbiely.kr/tutorials/arduino/arduino-rs232-to-wifi
*/
#include <WiFiS3.h>
#include <SoftwareSerial.h>
SoftwareSerial rs232(7, 6); // RX: 7, TX: 6
const char* WIFI_SSID = "YOUR_WIFI_SSID"; // 자신의 WIFI SSID로 변경하세요
const char* WIFI_PASSWORD = "YOUR_WIFI_PASSWORD"; // 자신의 WIFI 비밀번호로 변경하세요
const char* TCP_SERVER_ADDR = "192.168.0.26"; // TCP 서버의 IP 주소로 변경하세요
const int TCP_SERVER_PORT = 1470;
WiFiClient TCP_client;
void setup() {
Serial.begin(9600);
rs232.begin(9600);
Serial.println("Arduino: TCP CLIENT");
// check for the WiFi module:
if (WiFi.status() == WL_NO_MODULE) {
Serial.println("WiFi 모듈과의 통신 실패!");
// don't continue
while (true)
;
}
String fv = WiFi.firmwareVersion();
if (fv < WIFI_FIRMWARE_LATEST_VERSION) {
Serial.println("펌웨어 업그레이드가 필요합니다");
}
Serial.print("SSID에 연결을 시도합니다: ");
Serial.println(WIFI_SSID);
// attempt to connect to WiFi network:
while (WiFi.begin(WIFI_SSID, WIFI_PASSWORD) != WL_CONNECTED) {
delay(10000); // 연결을 위해 10초 기다립니다:
}
Serial.print("WiFi에 연결되었습니다 ");
Serial.println(WIFI_SSID);
// connect to TCP server
if (TCP_client.connect(TCP_SERVER_ADDR, TCP_SERVER_PORT))
Serial.println("TCP 서버에 연결되었습니다");
else
Serial.println("TCP 서버에 연결 실패");
}
void loop() {
if (TCP_client.connected()) {
// read data from TCP and send them to RS232 interface
if (TCP_client.available()) {
char c = TCP_client.read();
rs232.write(c);
}
// read data from RS232 interface and send them to TCP
if (rs232.available()) {
char c = rs232.read();
TCP_client.write(c);
}
} else {
Serial.println("연결이 끊어졌습니다");
TCP_client.stop();
// reconnect to TCP server
if (TCP_client.connect(TCP_SERVER_ADDR, TCP_SERVER_PORT)) {
Serial.println("TCP 서버에 다시 연결되었습니다");
} else {
Serial.println("TCP 서버에 재연결 실패");
delay(1000);
}
}
}
테스팅
다음 흐름으로 데이터를 보내어 테스트를 할 수 있습니다:
- PC상의 직렬 소프트웨어 → RS-232 → 아두이노 → 와이파이 → PC상의 TCP 서버 소프트웨어.
- PC상의 TCP 서버 소프트웨어 → 와이파이 → 아두이노 → RS-232 → PC상의 직렬 소프트웨어.
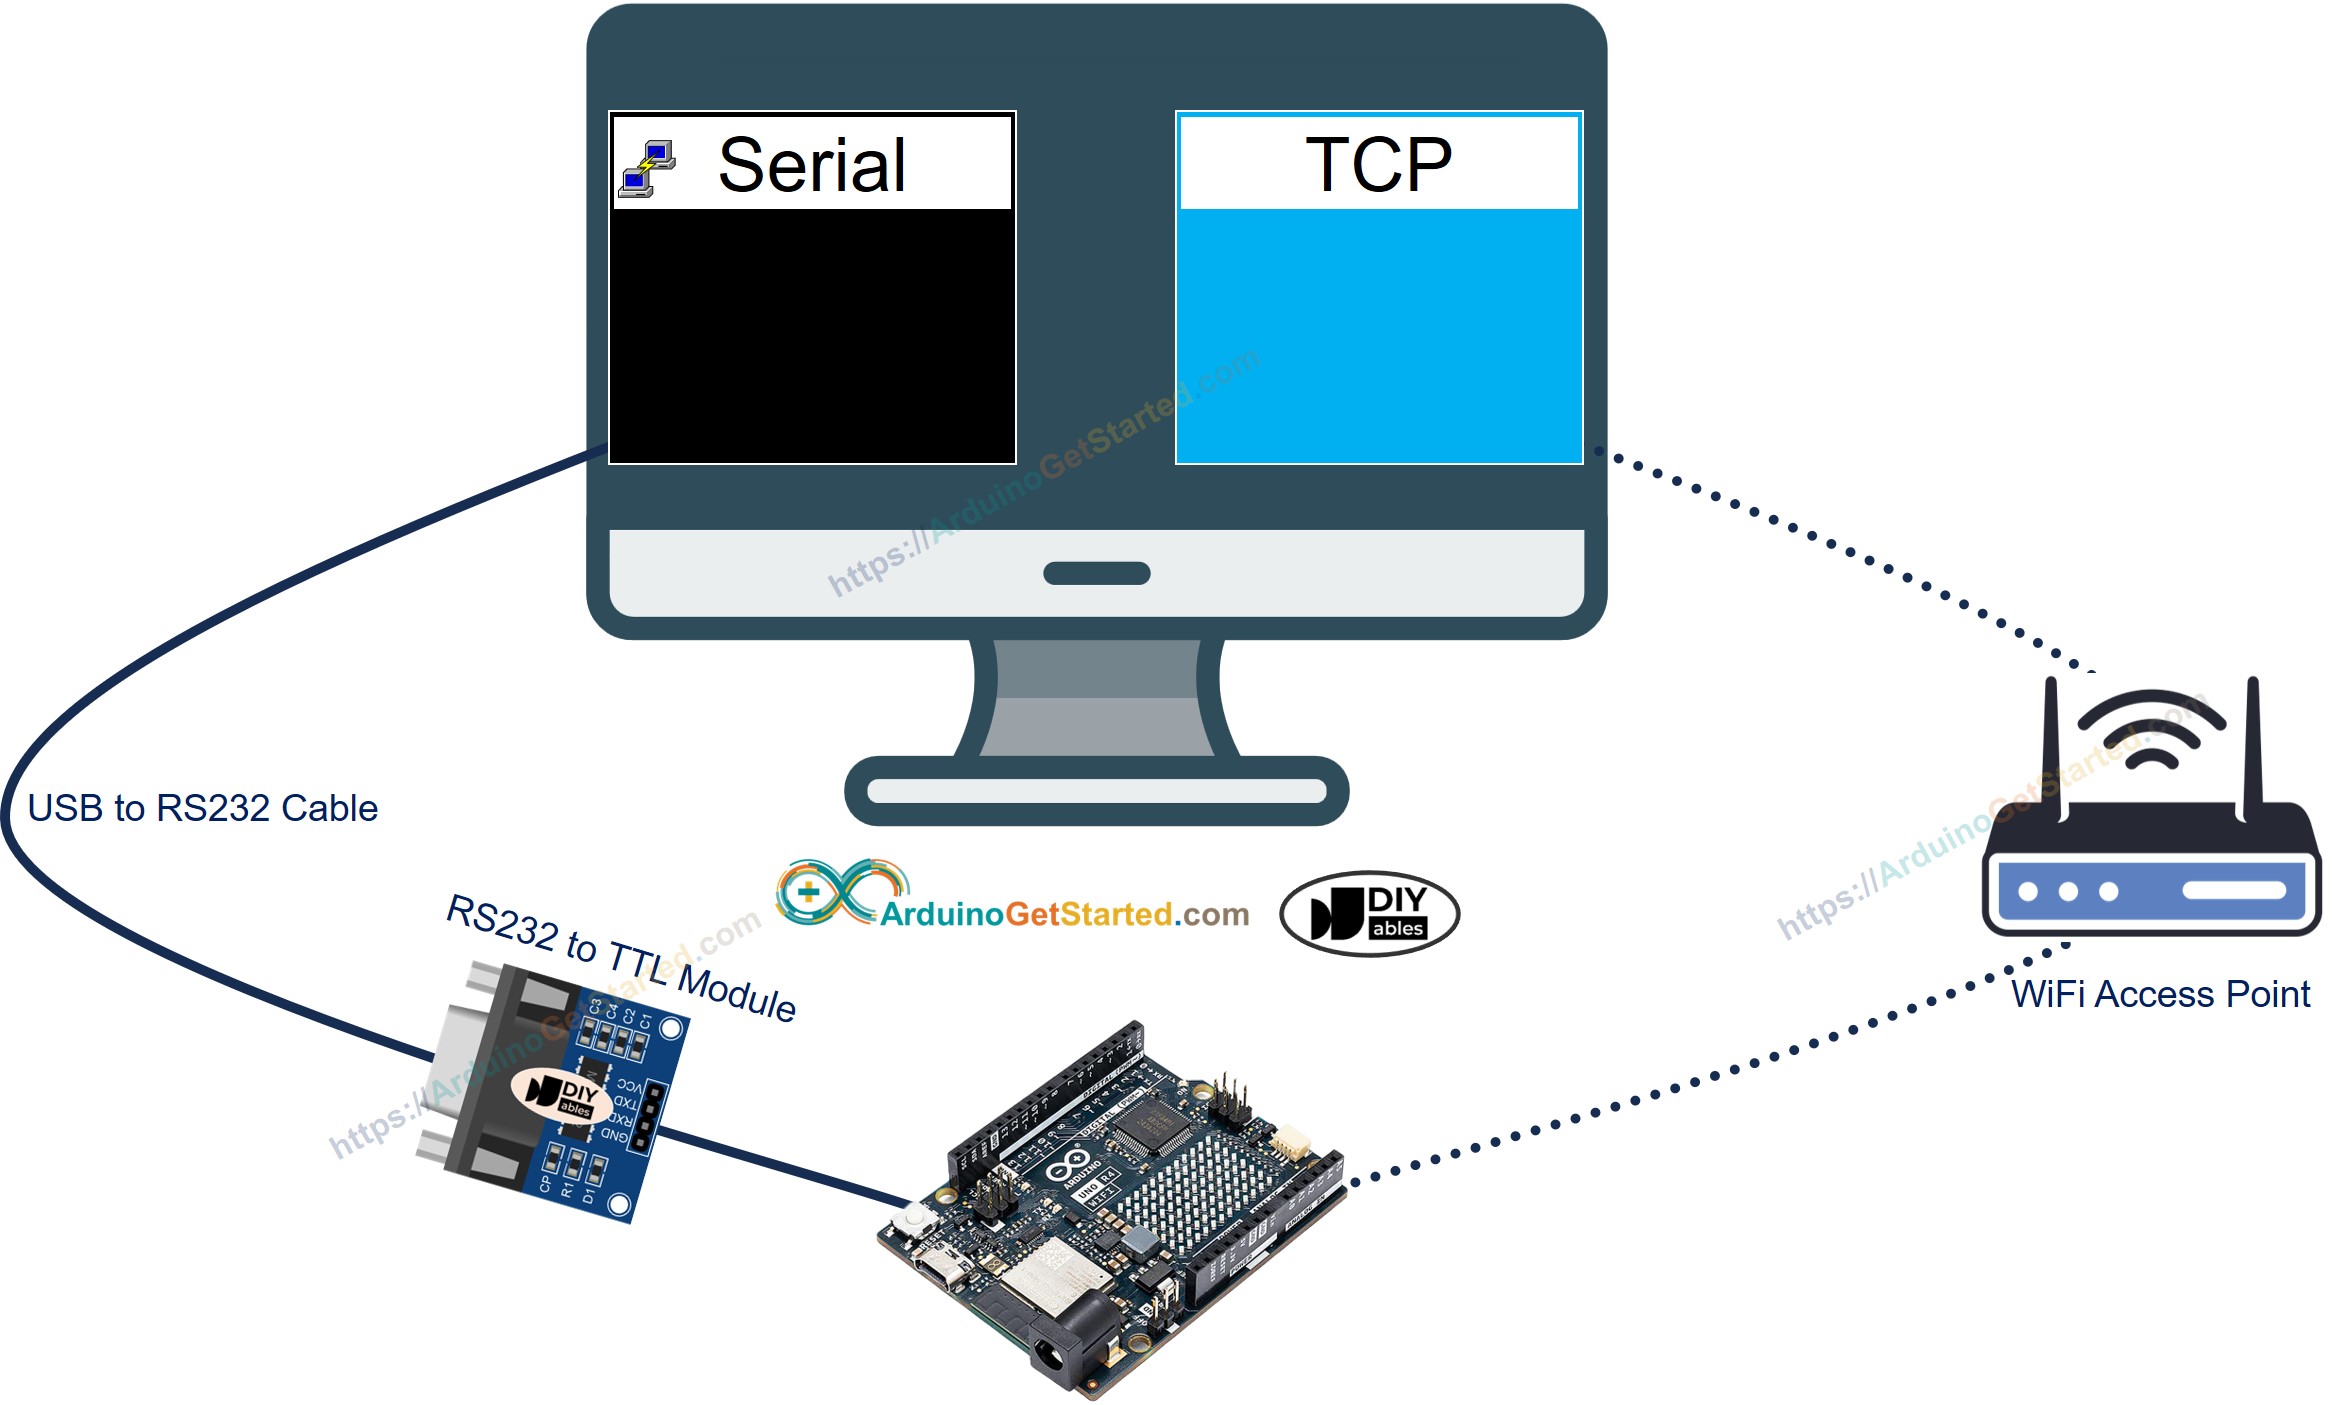
그것을 하기 위해, 아래 단계들을 따르세요:
- Arduino Uno R4를 처음 사용하는 경우, 아두이노 우노 R4를 시작하는 방법을 확인하세요.
- 위의 배선도와 같이 TTL-to-RS232 모듈과 RS232-to-USB 케이블을 사용하여 Arduino Uno R4 WiFi를 PC에 연결하세요.
- ezTerm과 같은 TCP 서버 소프트웨어 프로그램을 설치하세요.
- 시리얼 프로그램을 열고 시리얼 매개변수(COM 포트, 보율...)을 설정하세요.
- TCP 서버 프로그램을 열고 TCP 서버로 설정한 다음, 듣기(Listen) 버튼을 클릭하세요.
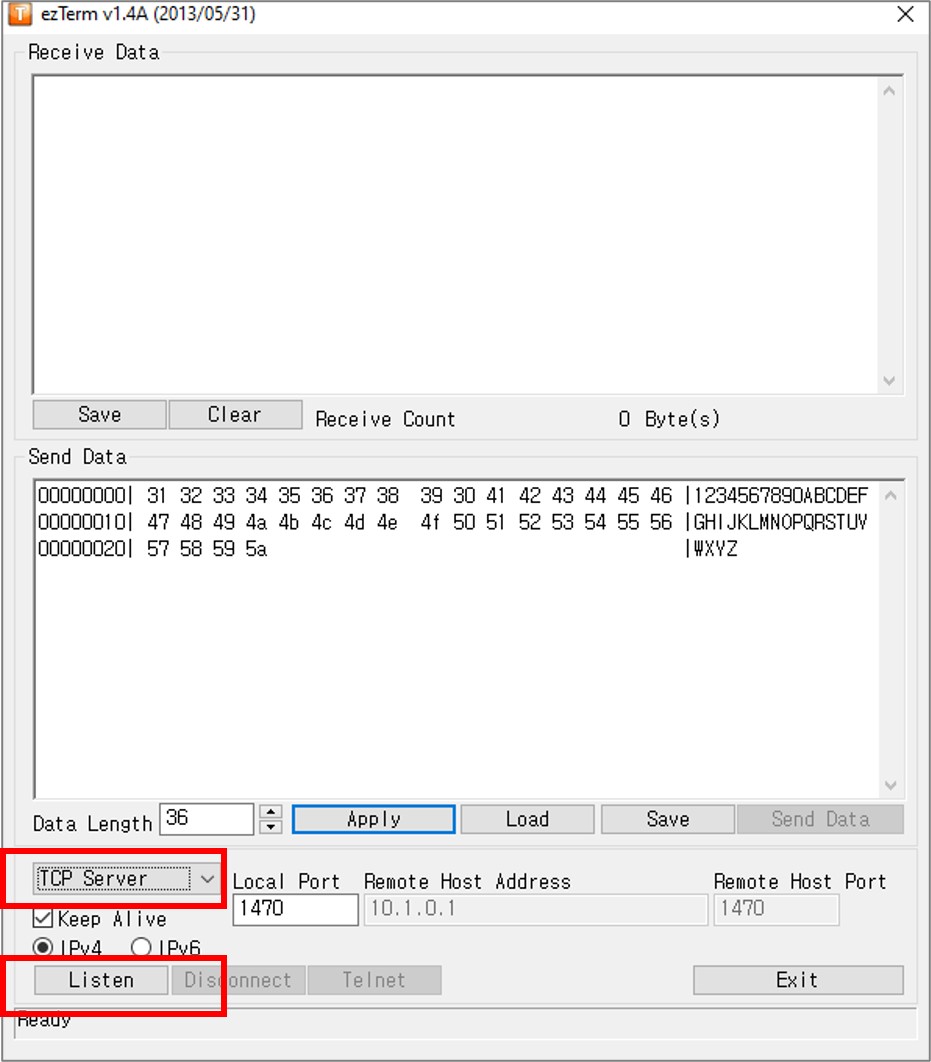
- PC에서 명령 프롬프트를 열어주세요.
- 아래의 명령어를 실행하여 PC의 IP 주소를 찾으세요:
ipconfig
출력은 아래와 같습니다:
Command Prompt
C:\WINDOWS\system32>ipconfig
Windows IP Configuration
Ethernet adapter:
Subnet Mask . . . . . . . . . . . : 255.0.0.0
IPv4 Address. . . . . . . . . . . : 192.168.0.26
Subnet Mask . . . . . . . . . . . : 255.255.255.0
Default Gateway . . . . . . . . . :
- 아두이노 코드에서 TCP 서버(당신의 PC)의 IP 주소를 업데이트하십시오. 위 예에서: 192.168.0.26
- Arduino IDE에서 Upload 버튼을 클릭하여 아두이노 보드에 코드를 컴파일하고 업로드하십시오.
- 시리얼 프로그램에서 일부 데이터를 입력하여 시리얼을 통해 아두이노로 전송하십시오.
- 성공하면 TCP 서버 소프트웨어에서 에코 데이터를 볼 수 있습니다.
- TCP 서버 프로그램에서 일부 데이터를 입력하여 TCP를 통해 아두이노로 전송하십시오.
- 성공하면 시리얼 프로그램에서 에코 데이터를 볼 수 있습니다.
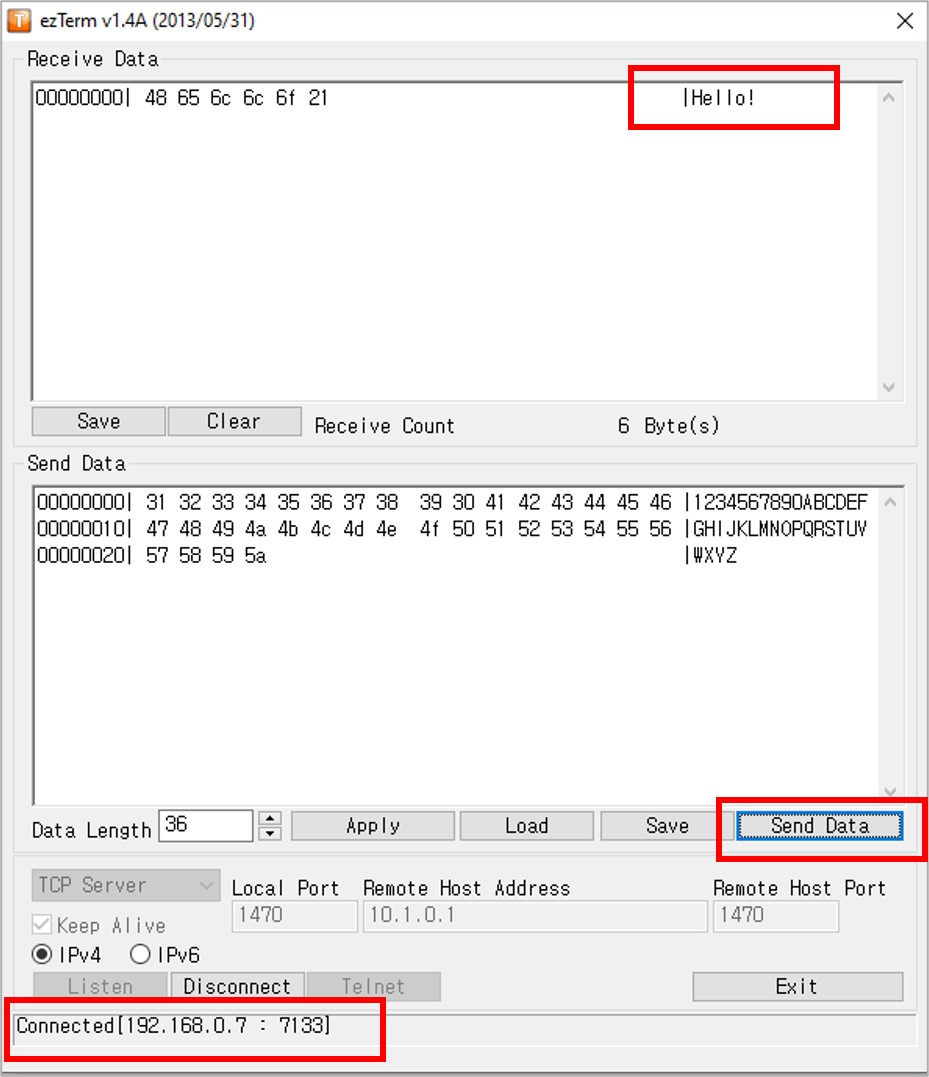
상업용 RS232-To-Ethernet 변환기를 사용하려면 CSE-H53N 시리얼 투 이더넷 변환기를 구입할 수 있습니다.
동영상
비디오 제작은 시간이 많이 걸리는 작업입니다. 비디오 튜토리얼이 학습에 도움이 되었다면, YouTube 채널 을 구독하여 알려 주시기 바랍니다. 비디오에 대한 높은 수요가 있다면, 비디오를 만들기 위해 노력하겠습니다.


