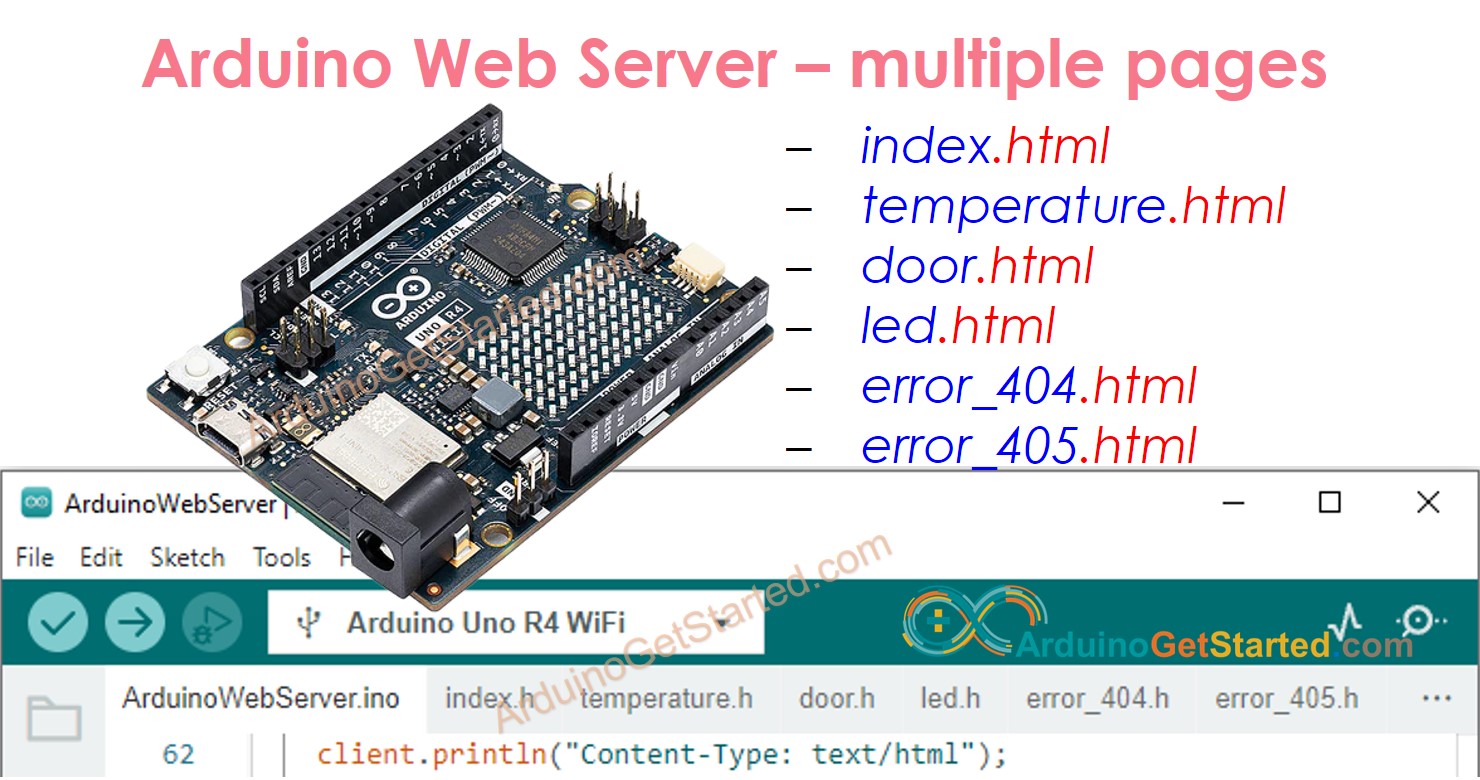
이 튜토리얼에서는 Arduino를 웹 서버로 전환하는 방법을 알아볼 것입니다. 이 서버는 index.html, temperature.html, led.html, error_404.html, error_405.html 등과 같이 동시에 여러 페이지를 처리할 수 있습니다. 각 페이지의 내용, HTML, CSS, JavaScript를 포함하여 다른 파일에 Arduino IDE에 저장됩니다. PC 또는 스마트폰의 웹 브라우저에서 Arduino 웹 서버에 접속하면 웹을 통해 Arduino에 연결된 센서와 액츄에이터를 보고 제어할 수 있습니다. 또한, 웹 서버는 .html 확장자가 있는 링크와 없는 링크 모두를 수용하도록 설계될 것입니다.
이 튜토리얼을 따라 하면 아두이노를 몇 가지 멋진 기능이 있는 웹 서버로 만들 수 있습니다:
여러 웹 페이지가 동시에 활성화되어 있습니다.
각 페이지의 HTML 내용(HTML, CSS, Javascript 포함)은 별도의 파일에 따로 저장됩니다.
HTML 내용은 센서에서 실시간 값을 동적으로 업데이트할 수 있어, 웹 페이지들을 동적이고 반응형으로 만듭니다.
.html 확장자가 있거나 없이 페이지에 접근할 수 있습니다. 예를 들어, http://192.168.0.2/led 또는 http://192.168.0.2/led.html 링크를 사용해서 동일한 LED 제어 페이지에 도달할 수 있습니다.
웹 서버는 404 Not Found, 405 Method Not Allowed 와 같은 HTTP 오류 코드를 처리합니다.
복잡하게 들릴 수도 있지만 걱정하지 마세요! 이 튜토리얼은 단계별 지침을 제공하며, 코드는 초보자도 쉽게 이해하고 자신만의 아두이노 웹 서버를 만들 수 있도록 초보자 친화적으로 설계되었습니다.
웹 브라우저가 아두이노 보드에 HTTP 요청을 보낼 때, 아두이노는 다음 작업을 수행하도록 프로그래밍되어야 합니다:
웹 브라우저로부터 HTTP 요청을 수신할 수 있는 웹 서버를 만드세요.
HTTP 요청을 받으면 요청 헤더의 첫 번째 줄을 읽으세요.
HTTP 요청의 첫 번째 줄을 기반으로 요청을 라우팅하여 아두이노가 반환해야 할 웹 페이지를 결정하세요.
(선택사항) 사용자가 보낸 제어 명령어를 식별하기 위해 HTTP 요청 헤더를 분석하세요.
(선택사항) 받은 제어 명령어에 따라 아두이노에 연결된 장치들을 제어하세요.
다음을 포함하는 HTTP 응답을 웹 브라우저로 돌려보내세요:
HTTP 응답 헤더.
HTML 내용과 (해당되는 경우) 센서 데이터 또는 장치 상태를 포함하는 HTTP 응답 본문.
이러한 작업을 수행함으로써 아두이노는 HTTP 요청을 효과적으로 처리하고 웹 브라우저에 적절한 응답을 제공할 수 있으며, 이를 통해 웹 기반 제어 및 아두이노에 연결된 장치와의 상호작용이 가능해집니다.
라우팅 기능은 가장 중요한 작업으로 자세히 설명될 것입니다. 다른 부분들은 아두이노 - 웹 서버 튜토리얼에서 다루어집니다. 라우팅 알고리즘을 이해하게 되면, 여러 페이지를 가진 웹 서버를 위한 전체 코드를 살펴볼 것입니다.
아두이노 웹 서버 - 라우팅 알고리즘
라우팅 기능을 위한 코드를 작성하기 전에, 아두이노에서 사용할 웹 페이지와 해당 HTTP 메소드의 목록을 만들어야 합니다. 이 튜토리얼에서는 GET 메소드만 지원할 것입니다. 하지만 필요하다면 다른 HTTP 메소드를 쉽게 추가할 수 있습니다. 여기 예시 목록이 있습니다:
홈 페이지 가져오기
온도 페이지 가져오기
문 페이지 가져오기
LED 페이지 가져오기
그 다음, 페이지 목록에 해당하는 첫 번째 줄 HTTP 요청 헤더 목록을 만들어야 합니다.
홈 페이지 가져오기:
GET /
GET /index.html
온도 페이지 가져오기
GET /temperature.html
문 페이지 가져오기
GET /door
LED 페이지 가져오기
GET /led.html
요약하자면, 다음과 같은 목록을 가지고 있습니다:
GET /
GET /index.html
GET /temperature.html
GET /door.html
GET /led.html
아두이노 코드 - 다중 페이지 웹 서버
아래는 여러 페이지를 가진 웹 서버를 생성하는 완전한 Arduino 코드입니다. 단순하게 유지하기 위해, 각 페이지에 대한 HTML 내용은 매우 간단하며 Arduino 코드에 직접 포함되어 있습니다. 다음 파트에서는 각 페이지에 대한 HTML 콘텐츠를 별도의 파일로 분리하는 방법을 배워, 코드를 더 정돈되고 관리하기 쉽게 만들 것입니다.
/* * 이 아두이노 코드는 newbiely.kr 에서 개발되었습니다 * 이 아두이노 코드는 어떠한 제한 없이 공개 사용을 위해 제공됩니다. * 상세한 지침 및 연결도에 대해서는 다음을 방문하세요: * https://newbiely.kr/tutorials/arduino/arduino-web-server-multiple-pages */#include <WiFiS3.h>#define PAGE_HOME 0#define PAGE_TEMPERATURE 1#define PAGE_DOOR 2#define PAGE_LED 3#define PAGE_ERROR_404 -1#define PAGE_ERROR_405 -2constchar ssid[] = "YOUR_WIFI"; // 네트워크 SSID(이름) 변경constchar pass[] = "YOUR_WIFI_PASSWORD"; // 네트워크 비밀번호 변경 (WPA용으로 사용하거나, WEP 키로 사용)intstatus = WL_IDLE_STATUS;WiFiServer server(80);voidsetup() {//시리얼을 초기화하고 포트가 열릴 때까지 기다림:Serial.begin(9600);String fv = WiFi.firmwareVersion();if (fv < WIFI_FIRMWARE_LATEST_VERSION)Serial.println("Please upgrade the firmware");// WiFi 네트워크에 연결을 시도:while (status != WL_CONNECTED) {Serial.print("Attempting to connect to SSID: ");Serial.println(ssid);// WPA/WPA2 네트워크에 연결. 오픈 또는 WEP 네트워크를 사용하는 경우 이 줄을 변경:status = WiFi.begin(ssid, pass);// 연결을 위해 10초간 대기:delay(10000); } server.begin();// 이제 연결되었으므로, 상태를 출력:printWifiStatus();}voidloop() {// 들어오는 클라이언트 대기WiFiClient client = server.available();if (client) {// HTTP 요청 헤더의 첫 줄 읽기String HTTP_req = "";while (client.connected()) {if (client.available()) {Serial.println("New HTTP Request"); HTTP_req = client.readStringUntil('\n'); // HTTP 요청의 첫 번째 줄 읽기Serial.print("<< ");Serial.println(HTTP_req); // 시리얼 모니터에 HTTP 요청 출력break; } }// HTTP 요청 헤더의 남은 줄 읽기while (client.connected()) {if (client.available()) {String HTTP_header = client.readStringUntil('\n'); // HTTP 요청의 헤더 라인 읽기if (HTTP_header.equals("\r")) // HTTP 요청의 끝break;//Serial.print("<< ");//Serial.println(HTTP_header); // 시리얼 모니터에 HTTP 요청 출력 } }// 라우팅// 이 예제는 다음을 지원함:// - GET /// - GET /index// - GET /index.html// - GET /temperature// - GET /temperature.html// - GET /door// - GET /door.html// - GET /led// - GET /led.htmlint page_id = 0;if (HTTP_req.indexOf("GET") == 0) { // 요청 메서드가 GET인지 확인if (HTTP_req.indexOf("GET / ") > -1 || HTTP_req.indexOf("GET /index ") > -1 || HTTP_req.indexOf("GET /index.html ") > -1) {Serial.println("home page"); page_id = PAGE_HOME; } elseif (HTTP_req.indexOf("GET /temperature ") > -1 || HTTP_req.indexOf("GET /temperature.html ") > -1) {Serial.println("temperature page"); page_id = PAGE_TEMPERATURE; } elseif (HTTP_req.indexOf("GET /door ") > -1 || HTTP_req.indexOf("GET /door.html ") > -1) {Serial.println("door page"); page_id = PAGE_DOOR; } elseif (HTTP_req.indexOf("GET /led ") > -1 || HTTP_req.indexOf("GET /led.html ") > -1) {Serial.println("led page"); page_id = PAGE_LED; } else { // 404 Not FoundSerial.println("404 Not Found"); page_id = PAGE_ERROR_404; } } else { // 405 Method Not AllowedSerial.println("405 Method Not Allowed"); page_id = PAGE_ERROR_405; }// HTTP 응답 보내기// HTTP 응답 헤더 보내기if (page_id == PAGE_ERROR_404) client.println("HTTP/1.1 404 Not Found");if (page_id == PAGE_ERROR_405) client.println("HTTP/1.1 405 Method Not Allowed");else client.println("HTTP/1.1 200 OK"); client.println("Content-Type: text/html"); client.println("Connection: close"); // 응답 완료 후 연결이 닫힘 client.println(); // HTTP 헤더와 본문 사이의 구분자// 간단한 HTTP 응답 본문 보내기 client.println("<!DOCTYPE HTML>"); client.println("<html>"); client.println("<head>"); client.println("<link rel=\"icon\" href=\"data:,\">"); client.println("</head>");String html;switch (page_id) {case PAGE_HOME: client.println("This is home page");break;case PAGE_TEMPERATURE: client.println("This is temperature page");break;case PAGE_DOOR: client.println("This is door page");break;case PAGE_LED: client.println("This is LED page");break;case PAGE_ERROR_404: client.println("Page Not Found");break;case PAGE_ERROR_405: client.println("Method Not Allowed");break; } client.println("</html>"); client.flush(); client.flush();// 웹 브라우저가 데이터를 받는 시간을 줌delay(10);// 연결을 닫음: client.stop(); }}voidprintWifiStatus() {// 보드의 IP 주소 출력:Serial.print("IP Address: ");Serial.println(WiFi.localIP());// 수신 신호 강도 출력:Serial.print("signal strength (RSSI):");Serial.print(WiFi.RSSI());Serial.println(" dBm");}
Message (Enter to send message to 'Arduino Uno' on 'COM15')
New Line
9600 baud
Connecting to YOUR_WIFI_SSID
connected!
IP address: 192.168.0.254
Starting web server on IP: 192.168.0.254
=== Web Server Ready! ===
Visit: http://192.168.0.254
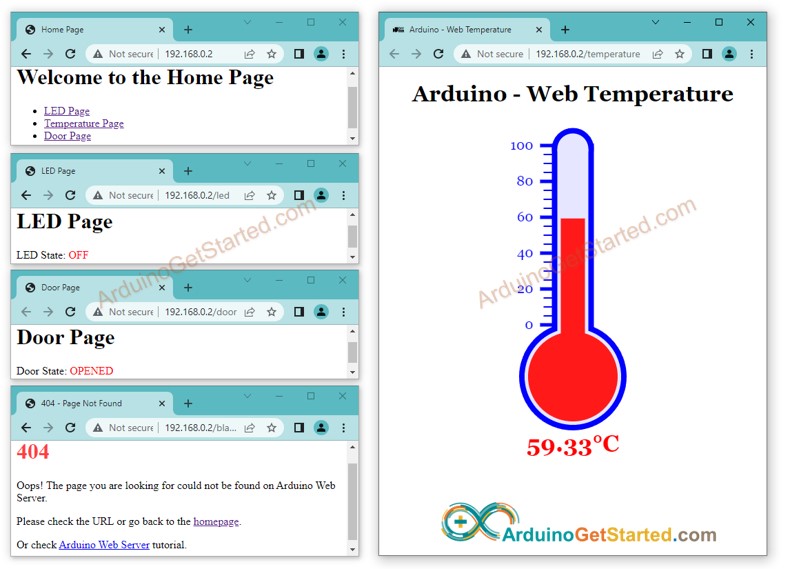
다음과 같은 페이지들을 볼 수 있습니다: 홈 페이지, LED 페이지, 문 페이지, 온도 페이지, 그리고 찾을 수 없는 페이지
시리얼 모니터에서 출력도 확인할 수 있습니다.
이전 코드에는 각 페이지에 대해 아주 간단한 HTML 내용이 있습니다. 하지만 많은 HTML을 사용한 화려한 인터페이스를 만들고 싶다면, 코드가 크고 지저분해질 수 있습니다. 이를 간단하게 만들기 위해, HTML을 아두이노 코드에서 분리하는 방법을 배워보도록 하겠습니다. 이를 통해 HTML을 별도의 파일로 유지하여 관리하고 작업하기가 더 쉬워집니다.
아두이노 코드 - 다중 페이지 웹 서버 완성
아두이노 IDE를 엽니다.
새 스케치를 생성하고 이름을 지정하세요. 예를 들어, ArduinoWebServer.ino와 같이 합니다.
제공된 코드를 복사하여 그 파일에 붙여넣으세요.
/* * 이 아두이노 코드는 newbiely.kr 에서 개발되었습니다 * 이 아두이노 코드는 어떠한 제한 없이 공개 사용을 위해 제공됩니다. * 상세한 지침 및 연결도에 대해서는 다음을 방문하세요: * https://newbiely.kr/tutorials/arduino/arduino-web-server-multiple-pages */#include <WiFiS3.h>#include"index.h"#include"temperature.h"#include"door.h"#include"led.h"#include"error_404.h"#include"error_405.h"#define PAGE_HOME 0#define PAGE_TEMPERATURE 1#define PAGE_DOOR 2#define PAGE_LED 3#define PAGE_ERROR_404 -1#define PAGE_ERROR_405 -2constchar ssid[] = "YOUR_WIFI"; // 네트워크 SSID(이름)를 변경하세요constchar pass[] = "YOUR_WIFI_PASSWORD"; // 네트워크 비밀번호를 변경하세요 (WPA용이거나 WEP용 키로 사용)intstatus = WL_IDLE_STATUS;WiFiServer server(80);floatgetTemperature() {// 여기에 센서 구현을 넣으세요// 온도 값을 시뮬레이션합니다float temp_x100 = random(0, 10000); // 0에서 10000까지의 임의의 값return temp_x100 / 100; // 0에서 100 사이의 시뮬레이션된 온도 값을 float으로 반환}voidsetup() {//시리얼을 초기화하고 포트가 열릴 때까지 기다립니다:Serial.begin(9600);String fv = WiFi.firmwareVersion();if (fv < WIFI_FIRMWARE_LATEST_VERSION)Serial.println("Please upgrade the firmware");// WiFi 네트워크에 연결을 시도합니다:while (status != WL_CONNECTED) {Serial.print("Attempting to connect to SSID: ");Serial.println(ssid);// WPA/WPA2 네트워크에 연결합니다. 오픈 또는 WEP 네트워크를 사용하는 경우 이 줄을 변경하세요:status = WiFi.begin(ssid, pass);// 연결을 위해 10초간 대기합니다:delay(10000); } server.begin();// 이제 연결되었으므로 상태를 출력하세요:printWifiStatus();}voidloop() {// 들어오는 클라이언트를 청취합니다WiFiClient client = server.available();if (client) {// HTTP 요청 헤더의 첫 번째 줄을 읽습니다String HTTP_req = "";while (client.connected()) {if (client.available()) {Serial.println("New HTTP Request"); HTTP_req = client.readStringUntil('\n'); // HTTP 요청의 첫 번째 줄을 읽습니다Serial.print("<< ");Serial.println(HTTP_req); // 시리얼 모니터에 HTTP 요청을 출력합니다break; } }// HTTP 요청 헤더의 나머지 줄을 읽습니다while (client.connected()) {if (client.available()) {String HTTP_header = client.readStringUntil('\n'); // HTTP 요청의 헤더 줄을 읽습니다if (HTTP_header.equals("\r")) // HTTP 요청의 끝break;//Serial.print("<< ");//Serial.println(HTTP_header); // 시리얼 모니터에 HTTP 요청을 출력합니다 } }// 라우팅// 이 예제는 다음을 지원합니다:// - GET /// - GET /index// - GET /index.html// - GET /temperature// - GET /temperature.html// - GET /door// - GET /door.html// - GET /led// - GET /led.htmlint page_id = 0;if (HTTP_req.indexOf("GET") == 0) { // 요청 메소드가 GET인지 확인합니다if (HTTP_req.indexOf("GET / ") > -1 || HTTP_req.indexOf("GET /index ") > -1 || HTTP_req.indexOf("GET /index.html ") > -1) {Serial.println("home page"); page_id = PAGE_HOME; } elseif (HTTP_req.indexOf("GET /temperature ") > -1 || HTTP_req.indexOf("GET /temperature.html ") > -1) {Serial.println("temperature page"); page_id = PAGE_TEMPERATURE; } elseif (HTTP_req.indexOf("GET /door ") > -1 || HTTP_req.indexOf("GET /door.html ") > -1) {Serial.println("door page"); page_id = PAGE_DOOR; } elseif (HTTP_req.indexOf("GET /led ") > -1 || HTTP_req.indexOf("GET /led.html ") > -1) {Serial.println("led page"); page_id = PAGE_LED; } else { // 404 Not FoundSerial.println("404 Not Found"); page_id = PAGE_ERROR_404; } } else { // 405 Method Not AllowedSerial.println("405 Method Not Allowed"); page_id = PAGE_ERROR_405; }// send the HTTP response// HTTP 응답 헤더를 보냅니다if (page_id == PAGE_ERROR_404) client.println("HTTP/1.1 404 Not Found");if (page_id == PAGE_ERROR_405) client.println("HTTP/1.1 405 Method Not Allowed");else client.println("HTTP/1.1 200 OK"); client.println("Content-Type: text/html"); client.println("Connection: close"); // 응답 완료 후 연결이 닫힙니다 client.println(); // HTTP 헤더와 본문 사이의 구분자// HTTP 응답 본문을 보냅니다String html;switch (page_id) {case PAGE_HOME: html = String(HTML_CONTENT_HOME);break;case PAGE_TEMPERATURE: html = String(HTML_CONTENT_TEMPERATURE); html.replace("TEMPERATURE_MARKER", String(getTemperature(), 2)); // 마커를 실제 값으로 교체합니다break;case PAGE_DOOR: html = String(HTML_CONTENT_DOOR); html.replace("DOOR_STATE_MARKER", "OPENED"); // 마커를 실제 값으로 교체합니다break;case PAGE_LED: html = String(HTML_CONTENT_LED); html.replace("LED_STATE_MARKER", "OFF"); // 마커를 실제 값으로 교체합니다break;case PAGE_ERROR_404: html = String(HTML_CONTENT_404);break;case PAGE_ERROR_405: html = String(HTML_CONTENT_405);break; } client.println(html); client.flush();// 웹 브라우저가 데이터를 받는 시간을 제공합니다delay(10);// 연결을 종료합니다: client.stop(); }}voidprintWifiStatus() {// 보드의 IP 주소를 출력합니다:Serial.print("IP Address: ");Serial.println(WiFi.localIP());// 수신 신호 강도를 출력합니다:Serial.print("signal strength (RSSI):");Serial.print(WiFi.RSSI());Serial.println(" dBm");}
코드에서 WiFi 정보(SSID 및 비밀번호)를 본인 것으로 변경하세요.
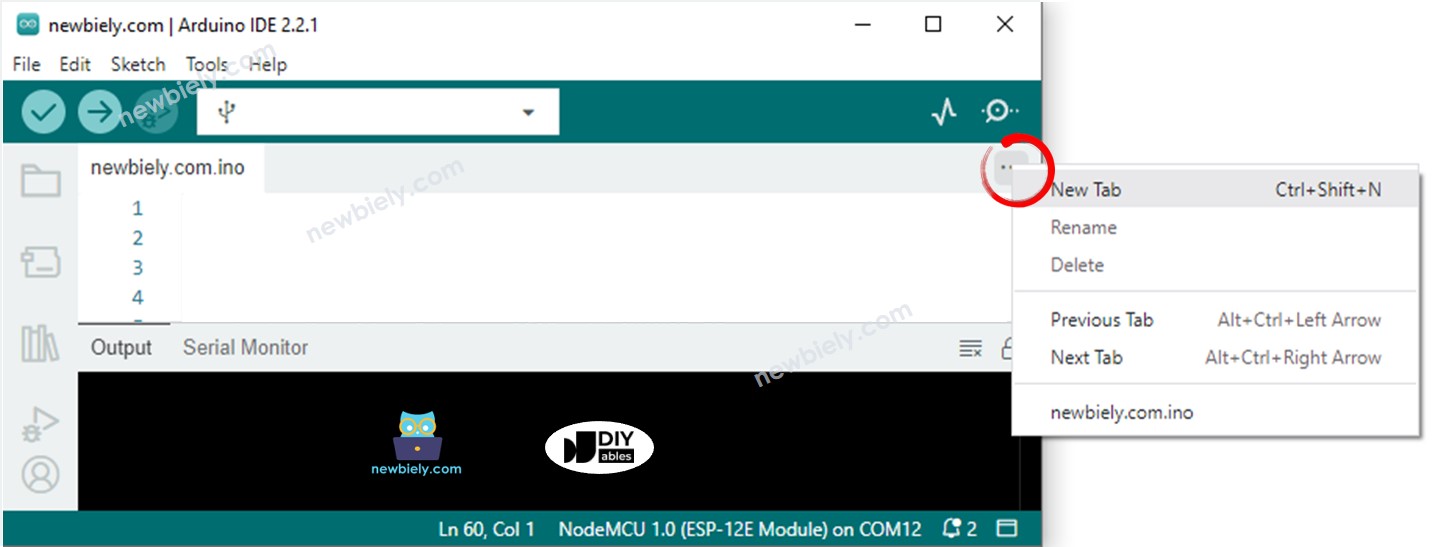
다음 방법으로 Arduino IDE에서 index.h 파일을 생성하세요:
시리얼 모니터 아이콘 바로 아래 버튼을 클릭하고 새 탭을 선택하거나, Ctrl+Shift+N 키를 사용하세요.
파일 이름을 index.h로 지정하고 OK 버튼을 클릭하세요.
아래 코드를 복사하여 index.h 파일에 붙여넣으세요.
/* * 이 아두이노 코드는 newbiely.kr 에서 개발되었습니다 * 이 아두이노 코드는 어떠한 제한 없이 공개 사용을 위해 제공됩니다. * 상세한 지침 및 연결도에 대해서는 다음을 방문하세요: * https://newbiely.kr/tutorials/arduino/arduino-web-server-multiple-pages */constchar *HTML_CONTENT_HOME = R""""(<!DOCTYPE html><html lang="en"><head> <meta charset="UTF-8"> <meta name="viewport" content="width=device-width, initial-scale=1.0"> <link rel="icon" href="data:,"> <title>Home Page</title></head><body> <h1>Welcome to the Home Page</h1> <ul> <li><a href="/led">LED Page</a></li> <li><a href="/temperature">Temperature Page</a></li> <li><a href="/door">Door Page</a></li> </ul></body></html>)"""";
마찬가지로, 아래의 내용을 포함하여 Arduino IDE에서 temperature.h 파일을 생성하세요.
/* * 이 아두이노 코드는 newbiely.kr 에서 개발되었습니다 * 이 아두이노 코드는 어떠한 제한 없이 공개 사용을 위해 제공됩니다. * 상세한 지침 및 연결도에 대해서는 다음을 방문하세요: * https://newbiely.kr/tutorials/arduino/arduino-web-server-multiple-pages */constchar *HTML_CONTENT_TEMPERATURE = R""""(<!DOCTYPE html><html><head><title>Arduino - Web Temperature</title><meta name="viewport" content="width=device-width, initial-scale=0.7, maximum-scale=0.7"><meta charset="utf-8"><link rel="icon" href="https://diyables.io/images/page/diyables.svg"><style>body { font-family: "Georgia"; text-align: center; font-size: width/2pt;}h1 { font-weight: bold; font-size: width/2pt;}h2 { font-weight: bold; font-size: width/2pt;}button { font-weight: bold; font-size: width/2pt;}</style><script>var cvs_width = 200, cvs_height = 450;function init() { var canvas = document.getElementById("cvs"); canvas.width = cvs_width; canvas.height = cvs_height + 50; var ctx = canvas.getContext("2d"); ctx.translate(cvs_width/2, cvs_height - 80); update_view(TEMPERATURE_MARKER);}function update_view(temp) { var canvas = document.getElementById("cvs"); var ctx = canvas.getContext("2d"); var radius = 70; var offset = 5; var width = 45; var height = 330; ctx.clearRect(-cvs_width/2, -350, cvs_width, cvs_height); ctx.strokeStyle="blue"; ctx.fillStyle="blue";//5-step Degree var x = -width/2; ctx.lineWidth=2;for (var i = 0; i <= 100; i+=5) { var y = -(height - radius)*i/100 - radius - 5; ctx.beginPath(); ctx.lineTo(x, y); ctx.lineTo(x - 20, y); ctx.stroke(); }//20-step Degree ctx.lineWidth=5;for (var i = 0; i <= 100; i+=20) { var y = -(height - radius)*i/100 - radius - 5; ctx.beginPath(); ctx.lineTo(x, y); ctx.lineTo(x - 25, y); ctx.stroke(); ctx.font="20px Georgia"; ctx.textBaseline="middle"; ctx.textAlign="right"; ctx.fillText(i.toString(), x - 35, y); }// shape ctx.lineWidth=16; ctx.beginPath(); ctx.arc(0, 0, radius, 0, 2 * Math.PI); ctx.stroke(); ctx.beginPath(); ctx.rect(-width/2, -height, width, height); ctx.stroke(); ctx.beginPath(); ctx.arc(0, -height, width/2, 0, 2 * Math.PI); ctx.stroke(); ctx.fillStyle="#e6e6ff"; ctx.beginPath(); ctx.arc(0, 0, radius, 0, 2 * Math.PI); ctx.fill(); ctx.beginPath(); ctx.rect(-width/2, -height, width, height); ctx.fill(); ctx.beginPath(); ctx.arc(0, -height, width/2, 0, 2 * Math.PI); ctx.fill(); ctx.fillStyle="#ff1a1a"; ctx.beginPath(); ctx.arc(0, 0, radius - offset, 0, 2 * Math.PI); ctx.fill(); temp = Math.round(temp * 100) / 100; var y = (height - radius)*temp/100.0 + radius + 5; ctx.beginPath(); ctx.rect(-width/2 + offset, -y, width - 2*offset, y); ctx.fill(); ctx.fillStyle="red"; ctx.font="bold 34px Georgia"; ctx.textBaseline="middle"; ctx.textAlign="center"; ctx.fillText(temp.toString() + "°C", 0, 100);}window.onload = init;</script></head><body><h1>Arduino - Web Temperature</h1><canvas id="cvs"></canvas></body></html>)"""";
마찬가지로, 다음 내용으로 Arduino IDE에서 door.h 파일을 생성하세요.
/* * 이 아두이노 코드는 newbiely.kr 에서 개발되었습니다 * 이 아두이노 코드는 어떠한 제한 없이 공개 사용을 위해 제공됩니다. * 상세한 지침 및 연결도에 대해서는 다음을 방문하세요: * https://newbiely.kr/tutorials/arduino/arduino-web-server-multiple-pages */constchar *HTML_CONTENT_DOOR = R""""(<!DOCTYPE html><html lang="en"><head> <meta charset="UTF-8"> <meta name="viewport" content="width=device-width, initial-scale=1.0"> <link rel="icon" href="data:,"> <title>Door Page</title></head><body> <h1>Door Page</h1> <p>Door State: <span style="color: red;">DOOR_STATE_MARKER</span></p></body></html>)"""";
마찬가지로, 아래의 내용으로 Arduino IDE에 led.h 파일을 생성하세요.
/* * 이 아두이노 코드는 newbiely.kr 에서 개발되었습니다 * 이 아두이노 코드는 어떠한 제한 없이 공개 사용을 위해 제공됩니다. * 상세한 지침 및 연결도에 대해서는 다음을 방문하세요: * https://newbiely.kr/tutorials/arduino/arduino-web-server-multiple-pages */constchar *HTML_CONTENT_LED = R""""(<!DOCTYPE html><html lang="en"><head> <meta charset="UTF-8"> <meta name="viewport" content="width=device-width, initial-scale=1.0"> <link rel="icon" href="data:,"> <title>LED Page</title></head><body> <h1>LED Page</h1> <p>LED State: <span style="color: red;">LED_STATE_MARKER</span></p></body></html>)"""";
마찬가지로, 아래의 내용으로 Arduino IDE에서 error_404.h 파일을 만드세요.
/* * 이 아두이노 코드는 newbiely.kr 에서 개발되었습니다 * 이 아두이노 코드는 어떠한 제한 없이 공개 사용을 위해 제공됩니다. * 상세한 지침 및 연결도에 대해서는 다음을 방문하세요: * https://newbiely.kr/tutorials/arduino/arduino-web-server-multiple-pages */constchar *HTML_CONTENT_404 = R""""(<!DOCTYPE html><html lang="en"><head> <meta charset="UTF-8"> <meta name="viewport" content="width=device-width, initial-scale=1.0"> <link rel="icon" href="data:,"> <title>404 - Page Not Found</title> <style> h1 {color: #ff4040;} </style></head><body> <h1>404</h1> <p>Oops! The page you are looking for could not be found on Arduino Web Server.</p> <p>Please check the URL or go back to the <a href="/">homepage</a>.</p> <p>Or check <a href="https://arduinogetstarted.com/tutorials/arduino-web-server-multiple-pages"> Arduino Web Server</a> tutorial.</p></body></html>)"""";
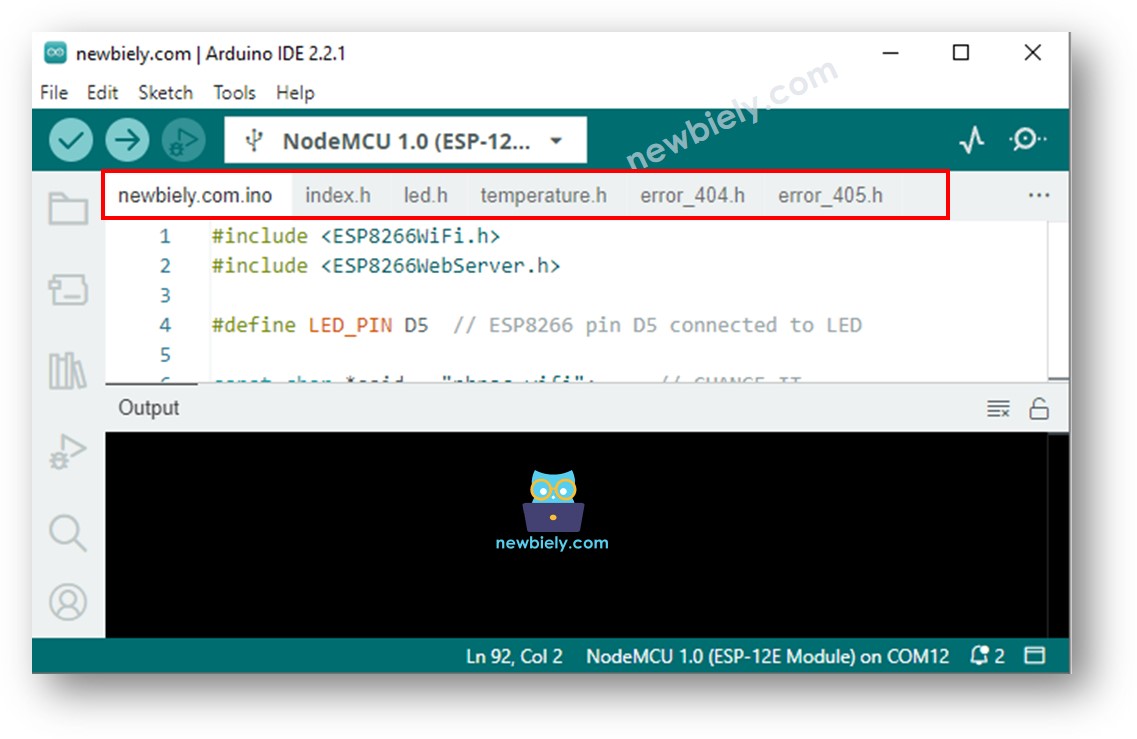
이제 아래와 같이 Arduino IDE에서 여러 파일이 있습니다:
아두이노 IDE에서 Upload 버튼을 클릭하여 아두이노에 코드를 업로드하세요.
이전과 같이 웹 브라우저를 통해 아두이노 보드의 웹 페이지에 하나씩 접속하세요. 아래와 같이 모든 웹 페이지를 보게 될 것입니다:
※ 주의:
index.h 파일 내의 HTML 내용에 변경 사항을 만들었지만 ArduinoWebServer.ino 파일을 수정하지 않으면, 아두이노 IDE는 코드를 컴파일하고 ESP32에 업로드할 때 HTML 내용을 새로 고치거나 업데이트하지 않습니다.
이 상황에서 아두이노 IDE가 HTML 내용을 업데이트하도록 강제하려면 ArduinoWebServer.ino 파일에서 수정을 해야 합니다. 예를 들어, 빈 줄을 추가하거나 주석을 삽입할 수 있습니다. 이 작업은 IDE가 프로젝트에 변경이 있었다고 인식하게 하여 업로드할 때 업데이트된 HTML 내용이 포함되도록 합니다.