ESP32 WebDigitalPins 예제 디지털 핀 제어 인터페이스 튜토리얼
개요
WebDigitalPins 예제는 Arduino의 모든 디지털 핀을 제어하고 모니터링하기 위한 웹 기반 인터페이스를 제공합니다. ESP32 교육 플랫폼용으로 설계되어 향상된 GPIO 기능, 확장된 핀 구성, 디지털 전자학습을 위한 내장 교육 기능이 포함되어 있습니다. 핀을 켜고 끄고, 핀의 상태를 실시간으로 모니터링하며, 직관적인 웹 인터페이스를 통해 다수의 핀에 대해 일괄 작업을 수행할 수 있습니다.
특징
- 개별 핀 제어: 각 디지털 핀(0-13)을 개별적으로 제어
- 실시간 상태: 시각적 표시기로 핀 상태를 모니터링
- 일괄 작업: 한 번에 모든 핀 제어(모두 켜기, 모두 끄기, 전체 전환)
- 핀 구성: 핀을 입력 또는 출력으로 웹 인터페이스에서 설정
- 시각적 피드백: 핀 상태를 보여주는 색상 코드가 적용된 버튼(초록=켜짐, 빨강=꺼짐)
- 반응형 디자인: 데스크톱, 태블릿 및 모바일 기기에서 작동
- WebSocket 통신: 페이지 새로고침 없이 즉시 업데이트
준비물
| 1 | × | 38-pin ESP32 ESP-WROOM-32 Dev Module - Narrow | 쿠팡 | 아마존 | |
| 1 | × | (또는) 38-pin ESP32 ESP-WROOM-32 Dev Module - Wide | 쿠팡 | 아마존 | |
| 1 | × | (또는) 30-pin ESP32 ESP-WROOM-32 Dev Module - Wide | 아마존 | |
| 1 | × | (또는) ESP32 Uno-form board | 아마존 | |
| 1 | × | (또는) ESP32 S3 Uno-form board | 아마존 | |
| 1 | × | USB 케이블 타입-A to 타입-C (USB-A PC용) | 쿠팡 | 아마존 | |
| 1 | × | USB 케이블 타입-C to 타입-C (USB-C PC용) | 아마존 | |
| 1 | × | (추천) ESP32용 스크루 터미널 확장 보드 | 쿠팡 | 아마존 | |
| 1 | × | (추천) Breakout Expansion Board for ESP32 | 쿠팡 | 아마존 | |
| 1 | × | (추천) ESP32용 전원 분배기 | 쿠팡 | 아마존 |
공개: 이 포스팅 에 제공된 일부 링크는 아마존 제휴 링크입니다. 이 포스팅은 쿠팡 파트너스 활동의 일환으로, 이에 따른 일정액의 수수료를 제공받습니다.
설정 지침
빠른 단계
다음 지시를 단계별로 따라가세요:
- ESP32 - 소프트웨어 설치을 참고하세요.
- ESP32 보드를 USB 케이블로 컴퓨터에 연결합니다.
- 컴퓨터에서 Arduino IDE를 실행합니다.
- 적절한 ESP32 보드(예: ESP32 Dev Module)와 COM 포트를 선택합니다.
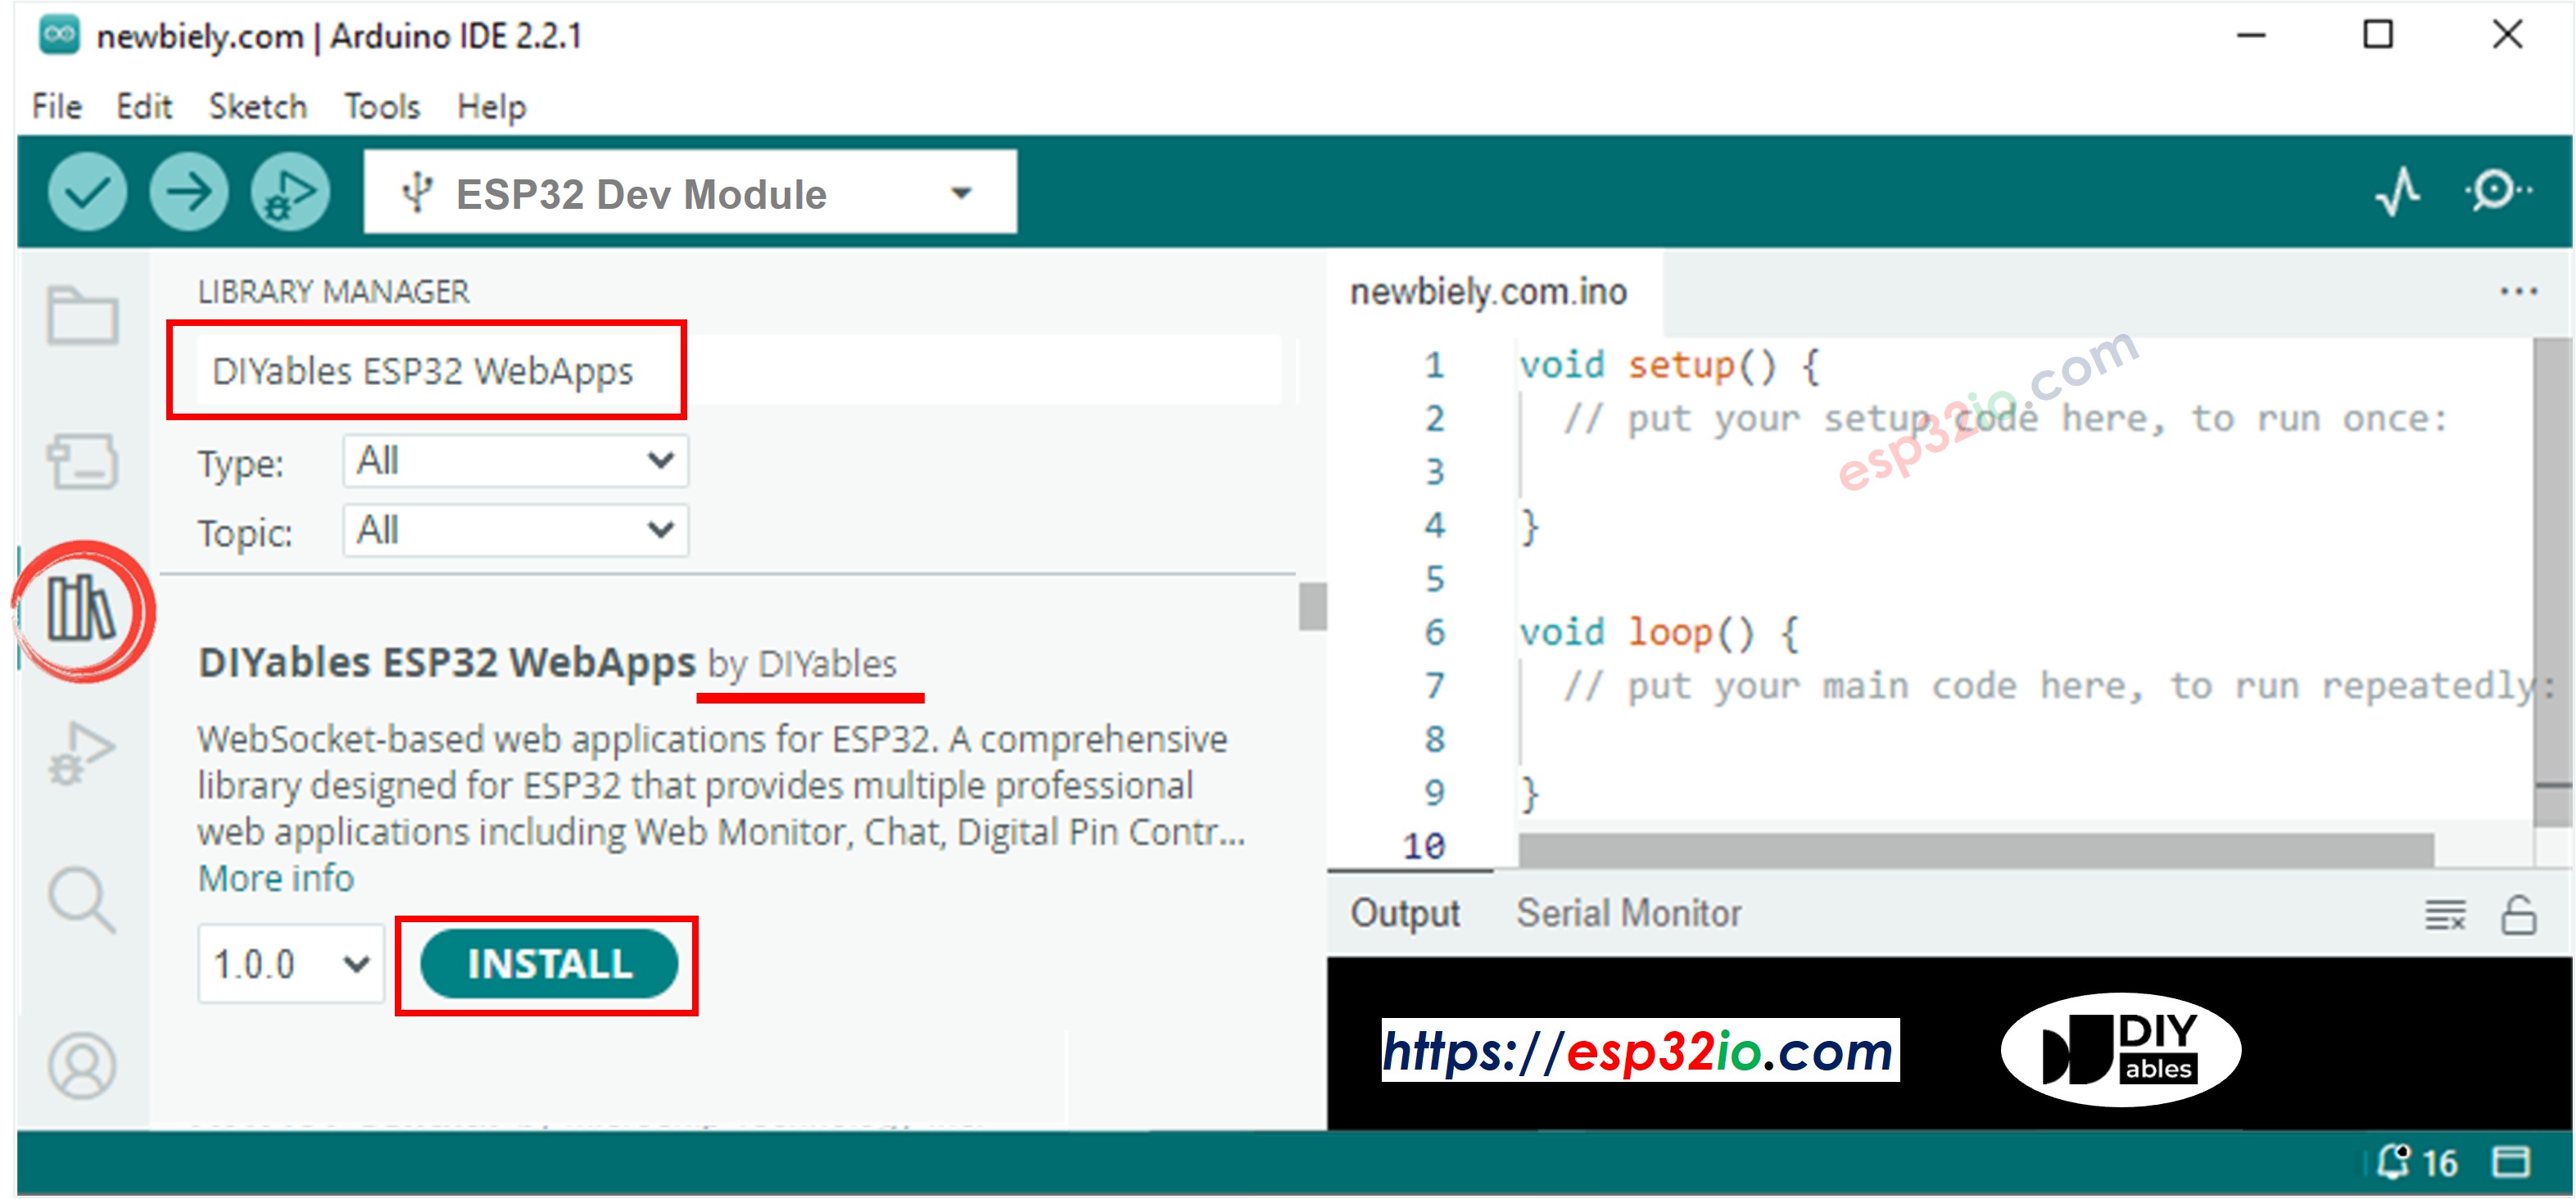
- Arduino IDE의 왼쪽 바에 있는 Libraries 아이콘으로 이동합니다.
- "DIYables ESP32 WebApps"를 검색한 다음 DIYables에서 제공하는 DIYables ESP32 WebApps 라이브러리를 찾습니다.
- Install 버튼을 클릭하여 라이브러리를 설치합니다.
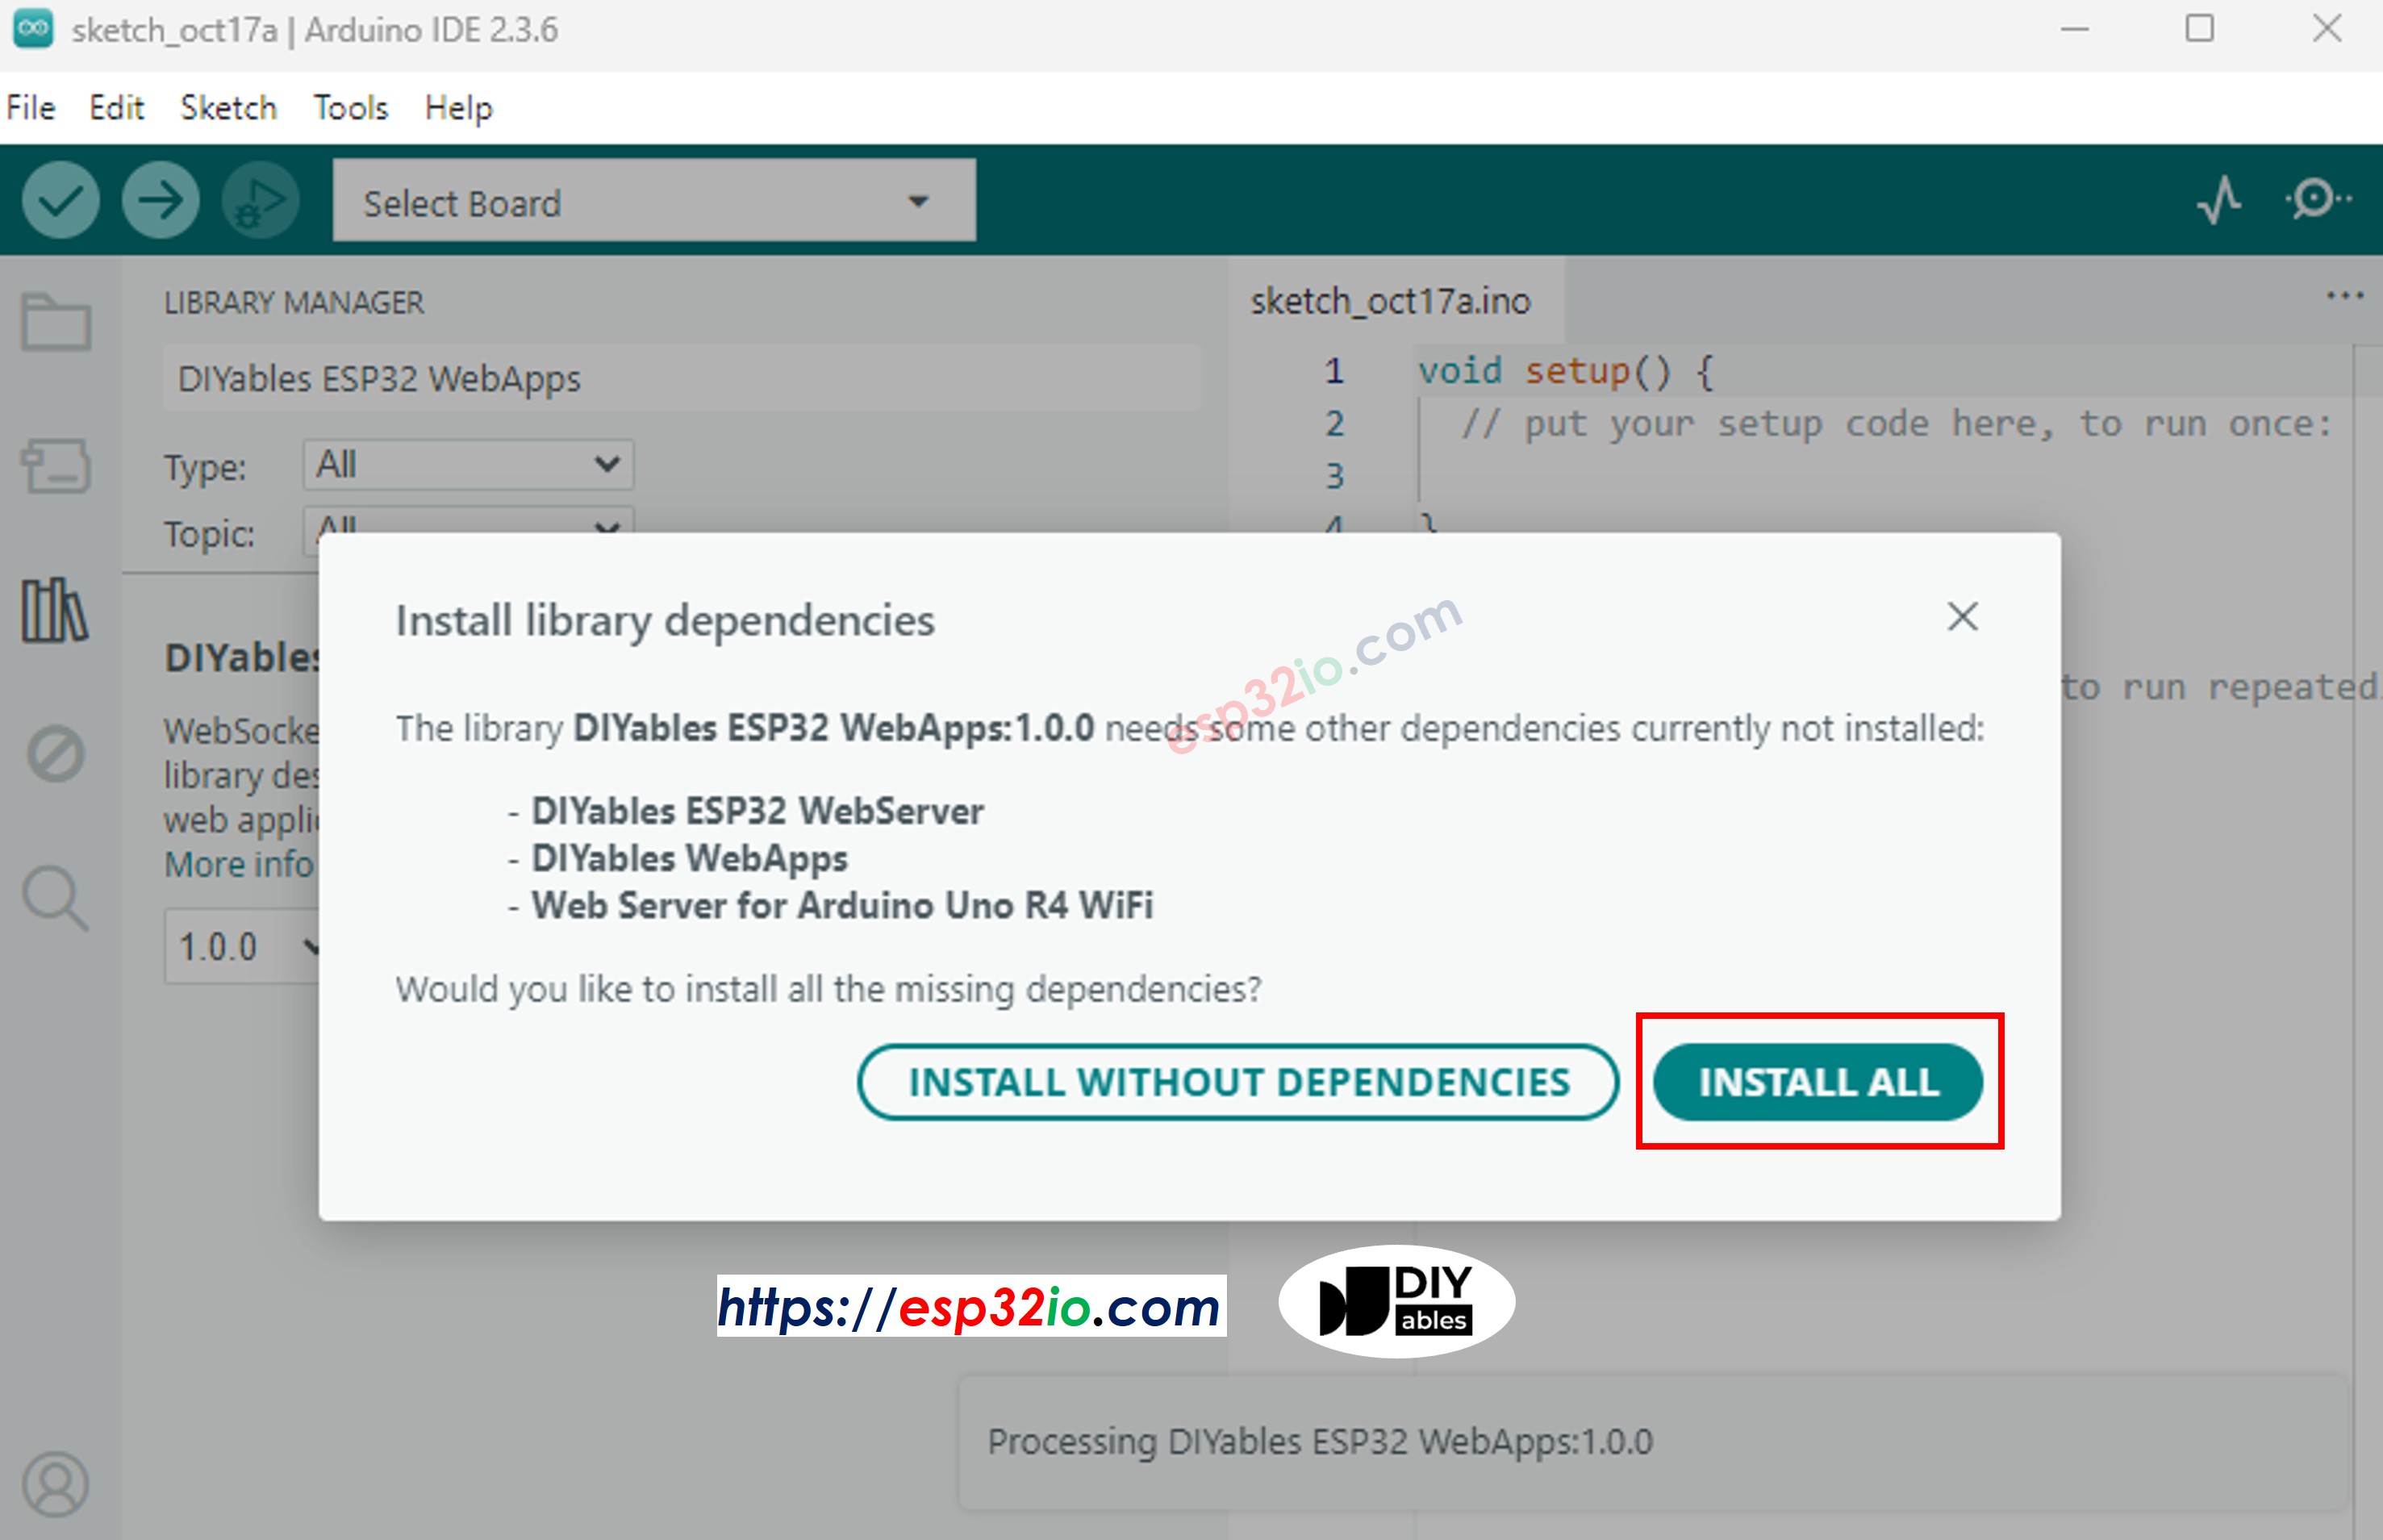
- 다른 라이브러리 의존성 설치를 요청받게 됩니다.
- 모든 라이브러리 의존성을 설치하려면 Install All 버튼을 클릭하십시오.
- Arduino IDE에서 File 예제 DIYables ESP32 WebApps WebDigitalPins 예제로 이동하거나, 위의 코드를 복사하여 Arduino IDE의 에디터에 붙여넣으세요
/*
* DIYables WebApp Library - Web Digital Pins Example
*
* This example demonstrates the Web Digital Pins feature with automatic command handling:
* - Control output pins 0-13 via web interface
* - Monitor input pins 0-13 in real-time
* - Individual pin ON/OFF control for outputs
* - Real-time pin status feedback for inputs
* - Bulk operations (All ON, All OFF, Toggle All) for outputs
*
* Hardware: ESP32 Boards
*
* Setup:
* 1. Update WiFi credentials below
* 2. Upload the sketch to your Arduino
* 3. Open Serial Monitor to see the IP address
* 4. Navigate to http://[IP_ADDRESS]/webdigitalpins
*/
#include <DIYables_ESP32_Platform.h>
#include <DIYablesWebApps.h>
// WiFi credentials - UPDATE THESE WITH YOUR NETWORK
const char WIFI_SSID[] = "YOUR_WIFI_SSID";
const char WIFI_PASSWORD[] = "YOUR_WIFI_PASSWORD";
// Create WebApp server and page instances using platform abstraction
ESP32ServerFactory serverFactory;
DIYablesWebAppServer webAppsServer(serverFactory, 80, 81);
DIYablesHomePage homePage;
DIYablesWebDigitalPinsPage webDigitalPinsPage;
// Array to store the state of each digital pin (0-13). Index corresponds to pin number.
int pinStates[16] = { 0 }; // Initialize all states to LOW (0)
void setup() {
Serial.begin(9600);
delay(1000);
Serial.println("DIYables ESP32 WebApp - Web Digital Pins Example");
// Add home and digital pins pages
webAppsServer.addApp(&homePage);
webAppsServer.addApp(&webDigitalPinsPage);
// Optional: Add 404 page for better user experience
webAppsServer.setNotFoundPage(DIYablesNotFoundPage());
// Pin Configuration Examples:
// Method 1: Enable specific pins individually for output control
webDigitalPinsPage.enablePin(0, WEB_PIN_OUTPUT); // Enable pin 0 (TX - use with caution)
webDigitalPinsPage.enablePin(1, WEB_PIN_OUTPUT); // Enable pin 1 (RX - use with caution)
webDigitalPinsPage.enablePin(2, WEB_PIN_OUTPUT);
webDigitalPinsPage.enablePin(3, WEB_PIN_OUTPUT);
webDigitalPinsPage.enablePin(4, WEB_PIN_OUTPUT);
//webDigitalPinsPage.enablePin(5, WEB_PIN_OUTPUT); // Comment/uncomment to disable/enable
//webDigitalPinsPage.enablePin(6, WEB_PIN_OUTPUT); // Comment/uncomment to disable/enable
webDigitalPinsPage.enablePin(13, WEB_PIN_OUTPUT); // Enable pin 13 (built-in LED)
// Method 2: Enable pins for input monitoring
webDigitalPinsPage.enablePin(8, WEB_PIN_INPUT);
webDigitalPinsPage.enablePin(9, WEB_PIN_INPUT);
//webDigitalPinsPage.enablePin(10, WEB_PIN_INPUT); // Comment/uncomment to disable/enable
//webDigitalPinsPage.enablePin(11, WEB_PIN_INPUT); // Comment/uncomment to disable/enable
// Method 3: Enable all pins at once (uncomment to use)
// for (int pin = 0; pin <= 13; pin++) {
// webDigitalPinsPage.enablePin(pin, WEB_PIN_OUTPUT); // or WEB_PIN_INPUT as needed
// }
// Method 4: Enable pins in a range using for loop (uncomment to use)
// for (int pin = 7; pin <= 11; pin++) {
// webDigitalPinsPage.enablePin(pin, WEB_PIN_OUTPUT); // or WEB_PIN_INPUT as needed
// }
// Initialize enabled pins
int outputPins[] = { 0, 1, 2, 3, 4, 13 }; // Note: Pins 0,1 are TX/RX - use with caution
for (int i = 0; i < 6; i++) {
int pin = outputPins[i];
pinMode(pin, OUTPUT);
digitalWrite(pin, LOW);
pinStates[pin] = LOW;
}
int inputPins[] = { 8, 9 };
for (int i = 0; i < 2; i++) {
int pin = inputPins[i];
pinMode(pin, INPUT); // Use INPUT_PULLUP if needed
pinStates[pin] = digitalRead(pin);
}
// Start the WebApp server
if (!webAppsServer.begin(WIFI_SSID, WIFI_PASSWORD)) {
while (1) {
Serial.println("Failed to start WebApp server!");
delay(1000);
}
}
// Return the current state to display on Web App
webDigitalPinsPage.onPinRead([](int pin) {
return pinStates[pin]; // Return the current state of the pin
// You can implement custom read logic here if needed
});
// Handle the control request from Web App (for output pins)
webDigitalPinsPage.onPinWrite([](int pin, int state) {
digitalWrite(pin, state);
pinStates[pin] = state;
// You can implement custom control logic here if needed
});
// Handle pin mode change requests (optional)
webDigitalPinsPage.onPinModeChange([](int pin, int mode) {
if (mode == WEB_PIN_OUTPUT) {
pinMode(pin, OUTPUT);
digitalWrite(pin, LOW);
pinStates[pin] = LOW;
} else if (mode == WEB_PIN_INPUT) {
pinMode(pin, INPUT); // or INPUT_PULLUP as needed
pinStates[pin] = digitalRead(pin);
}
// You can implement custom mode change logic here if needed
});
}
void loop() {
// Handle WebApp server communications
webAppsServer.loop();
// Monitor input pins for real-time updates
static unsigned long lastInputCheck = 0;
if (millis() - lastInputCheck > 100) { // Check every 100ms
lastInputCheck = millis();
// Check input pins for changes and send real-time updates
int inputPins[] = { 8, 9 };
for (int i = 0; i < 2; i++) {
int pin = inputPins[i];
int currentState = digitalRead(pin);
if (currentState != pinStates[pin]) {
pinStates[pin] = currentState;
// Send real-time update to web clients
webDigitalPinsPage.updatePinState(pin, currentState);
}
}
}
// Add your main application code here
delay(10);
}
- 코드에서 Wi-Fi 자격 증명을 구성하려면 다음 줄들을 업데이트하십시오:
const char WIFI_SSID[] = "YOUR_WIFI_NETWORK";
const char WIFI_PASSWORD[] = "YOUR_WIFI_PASSWORD";
- ESP32에 코드를 업로드하려면 Arduino IDE에서 Upload 버튼을 클릭하세요.
- 시리얼 모니터를 여세요.
- 시리얼 모니터에서 결과를 확인하세요. 아래와 같습니다.
8
Serial.println("Hello World!");
Message (Enter to send message to 'ESP32 Dev Module' on 'COM15')
New Line
9600 baud
WebSocket client connected from: 192.168.0.5
New WebSocket connection established
WebSocket message received: SLIDER:GET_VALUES
WebSocket client connected from: 192.168.0.5
New WebSocket connection established
WebSocket message received: SLIDER:64,128
DIYables WebApp - Web Digital Pins Example
INFO: Added app /
INFO: Added app /web-digital-pins
DEBUG: Enabling pin 0 with mode OUTPUT
DEBUG: Enabling pin 1 with mode OUTPUT
DEBUG: Enabling pin 2 with mode OUTPUT
DEBUG: Enabling pin 3 with mode OUTPUT
DEBUG: Enabling pin 4 with mode OUTPUT
DEBUG: Enabling pin 13 with mode OUTPUT
DEBUG: Enabling pin 8 with mode INPUT
DEBUG: Enabling pin 9 with mode INPUT
DIYables WebApp Library
Platform: ESP32
Network connected!
IP address: 192.168.0.2
HTTP server started on port 80
Configuring WebSocket server callbacks...
WebSocket server started on port 81
WebSocket URL: ws://192.168.0.2:81
WebSocket server started on port 81
==========================================
DIYables WebApp Ready!
==========================================
📱 Web Interface: http://192.168.0.2
🔗 WebSocket: ws://192.168.0.2:81
📋 Available Applications:
🏠 Home Page: http://192.168.0.2/
📟 Digital Pins: http://192.168.0.2/web-digital-pins
==========================================
- 아무 것도 보이지 않는 경우 ESP32 보드를 재부팅하십시오.
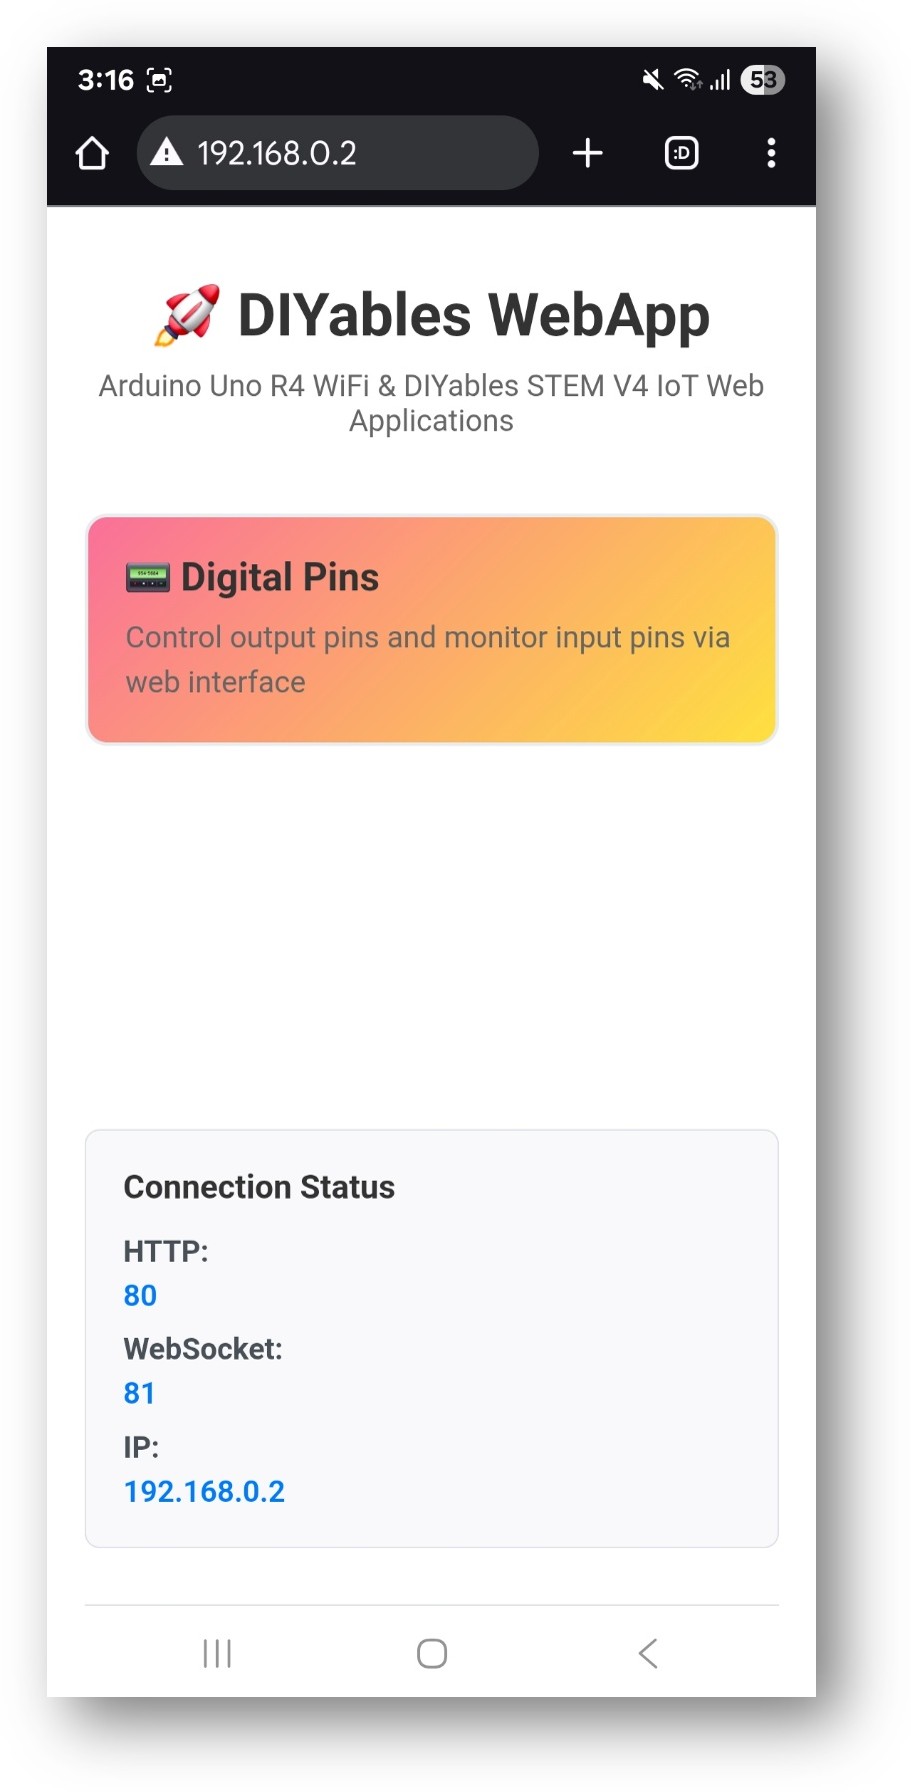
- 표시된 IP 주소를 확인해 두고, 이 주소를 스마트폰 또는 PC의 웹 브라우저 주소창에 입력하십시오.
- 예: http://192.168.0.2
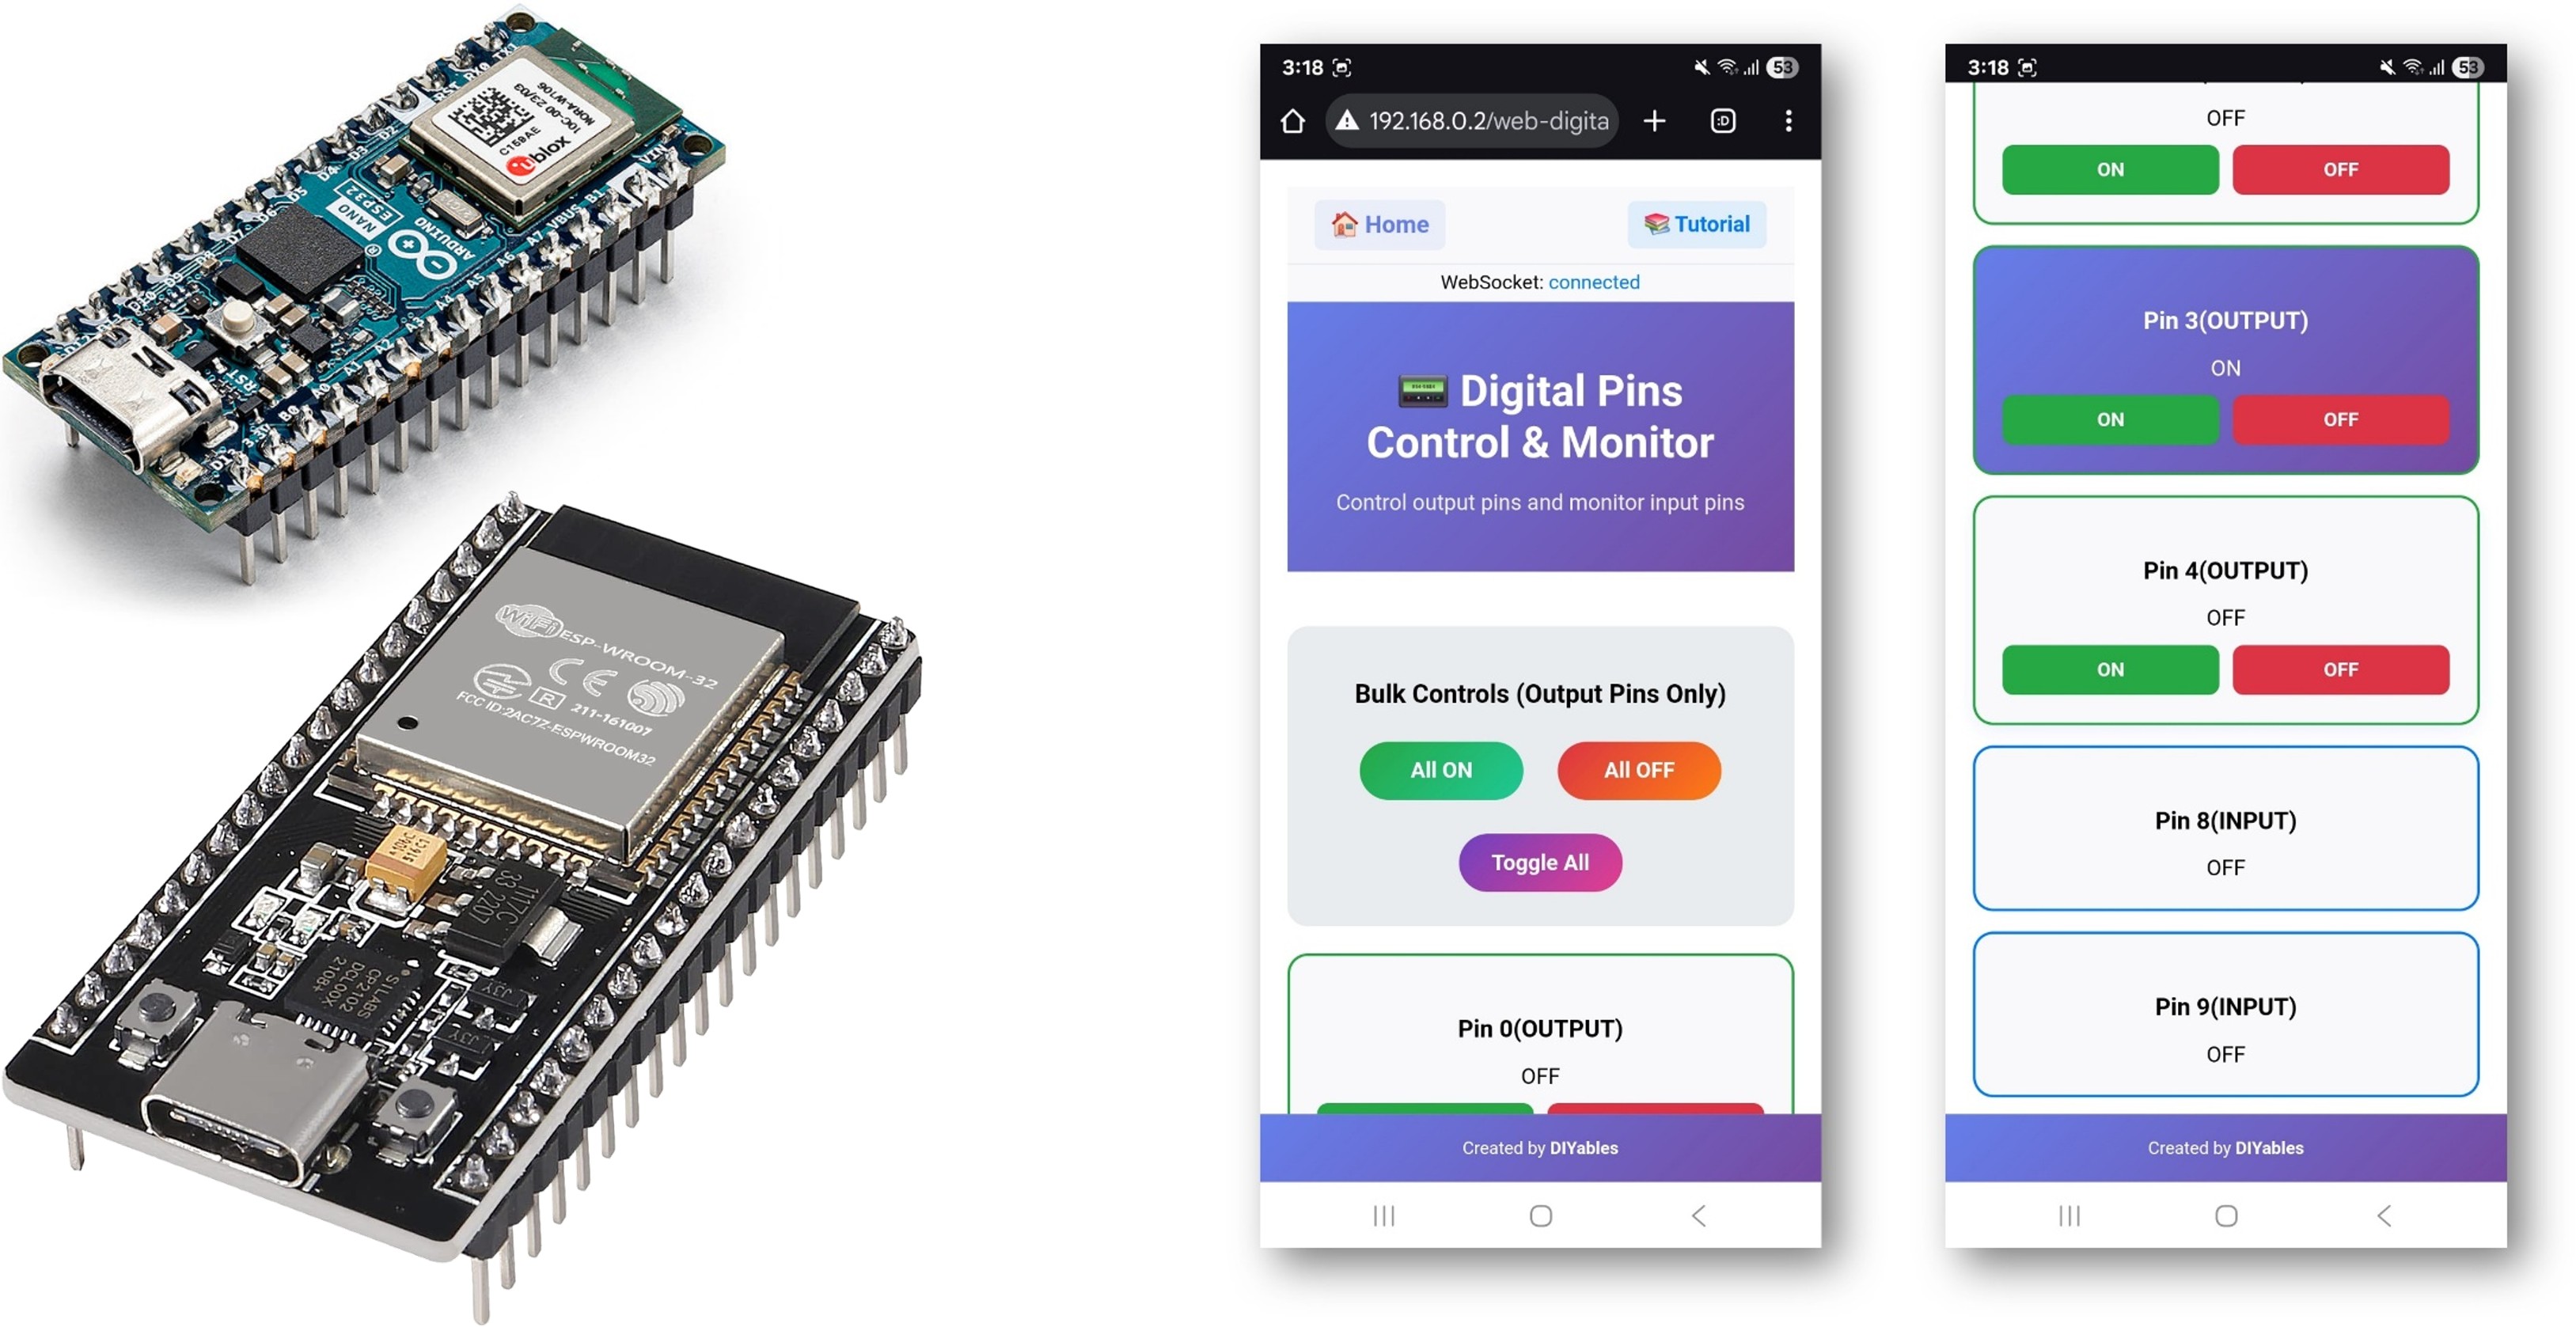
- 아래 이미지와 같은 홈 페이지가 표시됩니다:
- Web Digital Pins 링크를 클릭하면 아래와 같은 Web Digital Pins 앱의 UI가 표시됩니다:
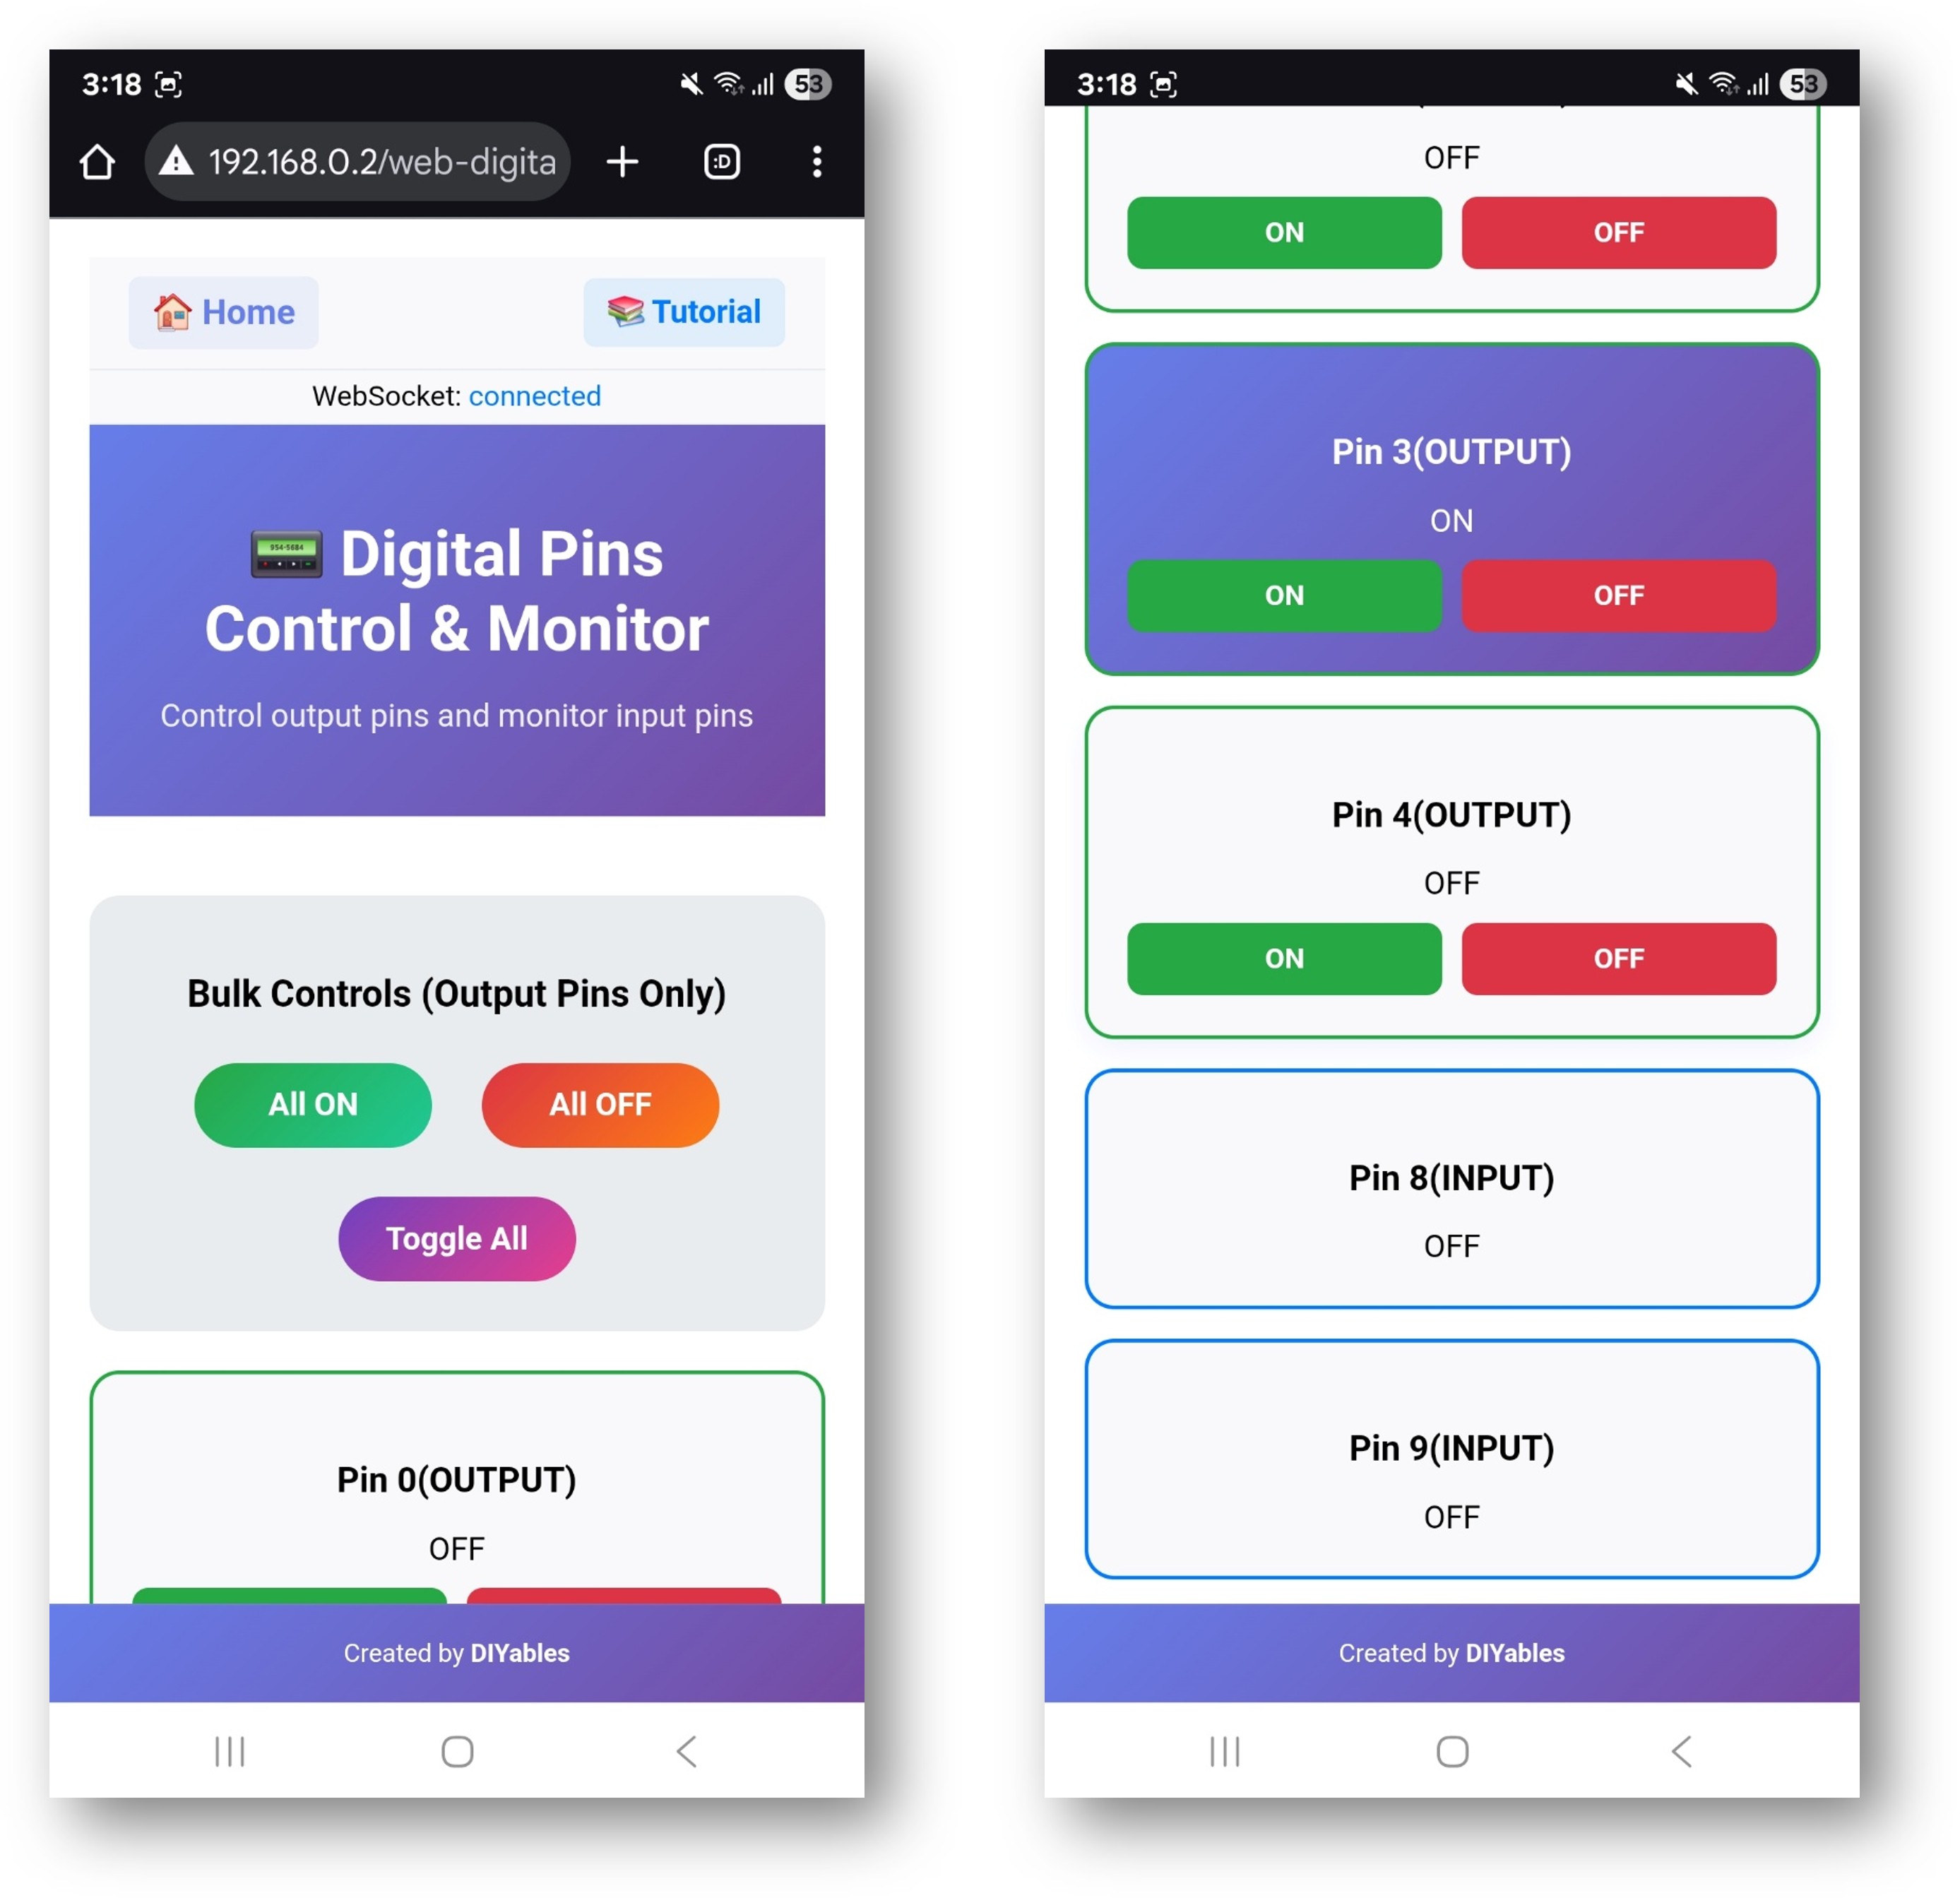
- 또한 IP 주소에 /web-digital-pins를 붙여 페이지에 직접 접속할 수도 있습니다. 예를 들어: http://192.168.0.2/web-digital-pins
- 핀 버튼을 클릭해 디지털 핀을 ON/OFF로 제어하고, 명령에 응답하는 내장 LED(핀 13)를 관찰해 보세요.
창의적인 맞춤화 - 코드를 프로젝트에 맞게 조정
예제는 창의적인 프로젝트의 필요에 맞게 핀을 구성하는 다양한 방법을 보여줍니다:
2. 핀 설정 구성
예제는 핀을 구성하는 다양한 방법을 보여줍니다:
방법 1: 특정 핀 활성화
// Enable individual pins for output control
webDigitalPinsPage.enablePin(2, WEB_PIN_OUTPUT); // Pin 2 as output
webDigitalPinsPage.enablePin(3, WEB_PIN_OUTPUT); // Pin 3 as output
webDigitalPinsPage.enablePin(4, WEB_PIN_INPUT); // Pin 4 as input
방법 2: 핀 범위 활성화
// Enable a range of pins for output control
webDigitalPinsPage.enableOutputPins(2, 13); // Pins 2-13 as outputs
방법 3: 모든 핀 활성화
// Enable all pins 0-13 for control (use with caution for pins 0,1)
webDigitalPinsPage.enableAllPins();
4. 스케치 업로드
- I. ESP32 보드를 선택하세요: Tools → Board → ESP32
- I. 올바른 포트를 선택하세요: Tools → Port → [당신의 ESP32 포트]
- I. 업로드 버튼을 클릭하세요
5. IP 주소 가져오기
- 도구 → 시리얼 모니터 열기
- 시리얼 속도(baud rate)를 9600으로 설정
- ESP32가 WiFi에 연결될 때까지 기다리세요
- 표시된 IP 주소를 기록해 두세요(예: 192.168.1.100)
6. 디지털 핀 인터페이스에 접근하기
웹 브라우저를 열고 다음 위치로 이동하세요:
http://[ARDUINO_IP_ADDRESS]/digital-pins
예시: http://192.168.1.100/digital-pins
사용하는 방법
핀 제어 인터페이스
웹 인터페이스는 구성된 모든 핀을 다음과 같이 표시합니다:
- 핀 번호: ESP32 핀(0-13)을 표시
- 현재 상태: ON(초록) 또는 OFF(빨강) 표시
- 제어 버튼: 핀 상태를 토글하려면 클릭
- 핀 타입: 입력(Input) 또는 출력(Output)으로 구성되었는지 표시
개별 핀 제어
- 핀 켜기: 핀 버튼이 "OFF"로 표시될 때 클릭하세요
- 핀 끄기: 핀 버튼이 "ON"으로 표시될 때 클릭하세요
- 모니터 상태: 핀 버튼은 현재 상태를 표시하도록 자동으로 업데이트됩니다
대량 작업
여러 핀을 한 번에 제어하려면 일괄 제어 버튼을 사용하십시오:
모두 켜짐
- 구성된 모든 출력 핀을 HIGH 상태로 설정합니다
- 입력 핀은 영향을 받지 않습니다
- 연결된 모든 장치를 테스트하는 데 유용합니다
모두 끄기
- 구성된 모든 출력 핀을 LOW 상태로 설정합니다
- 입력 핀은 영향을 받지 않습니다
- 모든 출력을 안전하게 비활성화하는 방법
모두 선택
- 모든 출력 핀의 상태를 반전시킵니다
- ON 핀은 OFF가 되고, OFF 핀은 ON이 됩니다
- 흥미로운 조명 효과를 만듭니다
실시간 모니터링
- 핀 상태가 WebSocket을 통해 자동으로 업데이트됩니다
- 코드에서 이루어진 변경 내용이 웹 인터페이스에 반영됩니다
- 여러 사용자가 동시에 동일한 ESP32를 모니터링할 수 있습니다
하드웨어 연결
출력 핀 예시
LED 제어
Arduino Pin → LED (with resistor) → Ground
Pin 2 → LED Anode → 220Ω Resistor → Ground
Pin 3 → LED Anode → 220Ω Resistor → Ground
릴레이 제어
Arduino Pin → Relay Input
Pin 4 → Relay IN1
Pin 5 → Relay IN2
모터 제어 (모터 드라이버를 통한)
Arduino Pin → Motor Driver Input
Pin 6 → Motor Driver IN1
Pin 7 → Motor Driver IN2
Pin 9 → Motor Driver ENA (PWM)
입력 핀 예시
스위치 입력
Switch → ESP32 Pin (with pull-up resistor)
Switch → Pin 8 → 10kΩ resistor → 5V
→ GND
센서 입력
Sensor Signal → ESP32 Pin
PIR Sensor → Pin 10
Ultrasonic → Pin 11 (Echo)
코드 커스터마이징
핀 변경 콜백 추가
핀의 상태가 변경될 때 모니터링:
void setup() {
// Set callback for pin state changes
webDigitalPinsPage.onPinChange([](int pin, bool state) {
Serial.print("Pin ");
Serial.print(pin);
Serial.print(" changed to: ");
Serial.println(state ? "HIGH" : "LOW");
// Add your custom logic here
if (pin == 13 && state == HIGH) {
Serial.println("Built-in LED turned ON!");
}
});
}
사용자 정의 핀 초기화
시작 시 특정 핀을 원하는 상태로 설정:
void setup() {
// Initialize pins to specific states
webDigitalPinsPage.setPinState(2, HIGH); // Turn on pin 2
webDigitalPinsPage.setPinState(3, LOW); // Turn off pin 3
// Configure pin modes
pinMode(4, INPUT_PULLUP); // Pin 4 as input with pull-up
pinMode(5, OUTPUT); // Pin 5 as output
}
입력 핀 읽기
메인 루프에서 입력 핀을 모니터링:
void loop() {
static unsigned long lastRead = 0;
if (millis() - lastRead > 1000) { // Read every second
// Read input pins and update web interface
for (int pin = 0; pin <= 13; pin++) {
if (webDigitalPinsPage.isPinEnabled(pin) &&
webDigitalPinsPage.getPinMode(pin) == WEB_PIN_INPUT) {
bool currentState = digitalRead(pin);
webDigitalPinsPage.updatePinState(pin, currentState);
}
}
lastRead = millis();
}
}
고급 기능
핀 그룹
관련 기능을 위한 핀을 논리적으로 그룹화합니다:
// Define pin groups
const int LED_PINS[] = {2, 3, 4, 5};
const int RELAY_PINS[] = {6, 7, 8, 9};
void controlLEDGroup(bool state) {
for (int pin : LED_PINS) {
webDigitalPinsPage.setPinState(pin, state);
}
}
void controlRelayGroup(bool state) {
for (int pin : RELAY_PINS) {
webDigitalPinsPage.setPinState(pin, state);
}
}
패턴 생성
조명 패턴 또는 시퀀스 만들기:
void runLightPattern() {
static unsigned long lastChange = 0;
static int currentPin = 2;
if (millis() - lastChange > 500) { // Change every 500ms
// Turn off all pins
for (int pin = 2; pin <= 13; pin++) {
webDigitalPinsPage.setPinState(pin, LOW);
}
// Turn on current pin
webDigitalPinsPage.setPinState(currentPin, HIGH);
// Move to next pin
currentPin++;
if (currentPin > 13) currentPin = 2;
lastChange = millis();
}
}
PWM 제어 통합
고급 기능을 위해 아날로그 제어와 결합:
void setup() {
// Enable digital pins for on/off control
webDigitalPinsPage.enablePin(9, WEB_PIN_OUTPUT);
webDigitalPinsPage.enablePin(10, WEB_PIN_OUTPUT);
// Set PWM pins for brightness control
analogWrite(9, 128); // 50% brightness
analogWrite(10, 255); // 100% brightness
}
안전 고려 사항
핀 사용 지침
핀 0과 1 (송신/수신)
- 직렬 통신에 사용됩니다
- 절대 필요할 때를 제외하고는 사용하지 마십시오
- 프로그래밍 및 디버깅에 방해가 될 수 있습니다
핀 13 (내장 LED)
- 테스트에 사용하기에 안전합니다
- 내장 LED가 시각적 피드백을 제공합니다
- 초기 테스트에 적합합니다
핀 2-12
- 일반 디지털 입출력에 안전합니다
- 대부분의 애플리케이션에 권장됩니다
- 특별한 주의사항은 필요하지 않습니다
현재의 한계
핀당 최대 전류: 40mA
- LED에는 전류 제한 저항을 사용하십시오.
- 고전류 부하에는 트랜지스터나 릴레이를 사용하십시오.
- 전체 전류 소모를 고려하십시오.
전압 레벨: 3.3V 로직
- ESP32는 3.3V 로직을 사용합니다.
- 연결된 장치들이 호환되는지 확인하십시오.
- 필요하면 5V 장치에는 레벨 시프터를 사용하십시오.
문제 해결
일반적인 문제
1. 핀 응답 없음
- 코드에서 핀이 활성화되었는지 확인
- 하드웨어 연결을 확인
- 단락이 있는지 확인
- 핀 모드(입력/출력)를 확인
2. 웹 인터페이스가 업데이트되지 않습니다
- WebSocket 연결 상태를 확인
- 브라우저 페이지를 새로고침
- 네트워크 연결 상태를 확인
- 시리얼 모니터에서 오류를 확인
3. 일괄 작업이 작동하지 않음
- 핀들이 출력으로 구성되었는지 확인합니다
- 하드웨어 제한을 확인합니다
- 전원 공급 용량을 확인합니다
- 과전류 상태를 모니터링합니다
4. 잘못된 상태를 표시하는 입력 핀들
- 적절한 풀업 및 풀다운 저항 확인
- 입력 신호 수준 확인
- 전자기 간섭 여부 확인
- 핀 구성 확인
디버깅 팁
디버그 출력 활성화:
void debugPinStates() {
Serial.println("=== Pin States ===");
for (int pin = 0; pin <= 13; pin++) {
if (webDigitalPinsPage.isPinEnabled(pin)) {
Serial.print("Pin ");
Serial.print(pin);
Serial.print(": ");
Serial.print(digitalRead(pin) ? "HIGH" : "LOW");
Serial.print(" (");
Serial.print(webDigitalPinsPage.getPinMode(pin) == WEB_PIN_OUTPUT ? "OUTPUT" : "INPUT");
Serial.println(")");
}
}
Serial.println("==================");
}
프로젝트 아이디어
홈 자동화
- 제어실 조명 제어
- 창문 블라인드 작동
- 난방/냉방 시스템 제어
- 보안 시스템 연동
정원 자동화
- 관개 시스템 제어
- 재배용 조명 관리
- 온도 조절
- 습도 제어
워크숍 제어
- 공구 전원 제어
- 조명 관리
- 환기 시스템
- 안전 인터록
교육 프로젝트
- 논리 게이트 시연
- 교통 신호등 시뮬레이션
- 경보 시스템 프로젝트
- 원격 제어 실험
통합 예제
모션 감지 조명
void setup() {
webDigitalPinsPage.enablePin(2, WEB_PIN_OUTPUT); // LED
webDigitalPinsPage.enablePin(3, WEB_PIN_INPUT); // PIR sensor
pinMode(3, INPUT);
}
void loop() {
if (digitalRead(3) == HIGH) { // Motion detected
webDigitalPinsPage.setPinState(2, HIGH); // Turn on LED
delay(5000); // Keep on for 5 seconds
webDigitalPinsPage.setPinState(2, LOW); // Turn off LED
}
}
온도 제어 팬
void loop() {
float temperature = getTemperature(); // Your temperature reading function
if (temperature > 25.0) {
webDigitalPinsPage.setPinState(4, HIGH); // Turn on fan
} else {
webDigitalPinsPage.setPinState(4, LOW); // Turn off fan
}
}
다음 단계
WebDigitalPins 예제를 숙달한 뒤에 시도해 보세요:
- WebSlider - PWM 및 아날로그 제어용
- WebJoystick - 방향 제어용
- WebMonitor - 디버깅 및 모니터링용
- MultipleWebApps - 모든 기능의 결합


