ESP32 WebSocket 서버 실시간 통신 튜토리얼

웹 서버와 웹소켓 예제 - 실시간 통신

개요

이 예제는 ESP32에서 실시간 WebSocket 통신이 가능한 고급 다중 페이지 웹 서버를 만드는 방법을 보여주며, 브라우저와 ESP32 간의 양방향 데이터 교환을 가능하게 합니다.

특징

  • 실시간 WebSocket 통신으로 즉시 양방향 메시징
  • 간단한 문자열 기반 명령어 (ping, hello, time, led on/off)
  • LED 제어 WebSocket 명령을 통해
  • 내장 HTTP 서버가 WebSocket 테스트 인터페이스를 제공합니다
  • 에코 기능으로 메시지 전송을 테스트합니다
  • 연결 상태 모니터링 및 자동 재연결

준비물

1×ESP32 ESP-WROOM-32 개발 모듈 쿠팡 | 아마존
1×USB 케이블 타입-A to 타입-C (USB-A PC용) 쿠팡 | 아마존
1×USB 케이블 타입-C to 타입-C (USB-C PC용) 아마존
1×(추천) ESP32용 스크루 터미널 확장 보드 쿠팡 | 아마존
1×(추천) Breakout Expansion Board for ESP32 쿠팡 | 아마존
1×(추천) ESP32용 전원 분배기 쿠팡 | 아마존
공개: 이 포스팅 에 제공된 일부 링크는 아마존 제휴 링크입니다. 이 포스팅은 쿠팡 파트너스 활동의 일환으로, 이에 따른 일정액의 수수료를 제공받습니다.

라이브러리 설치

다음 지침을 단계별로 따라가세요:

  • 이 ESP32를 처음 사용하는 경우, Arduino IDE에서 ESP32용 환경 설정 튜토리얼을 참조하십시오.
  • ESP32 보드를 USB 케이블로 컴퓨터에 연결하십시오.
  • 컴퓨터에서 Arduino IDE를 실행하십시오.
  • 적절한 ESP32 보드(ESP32)와 COM 포트를 선택하십시오.
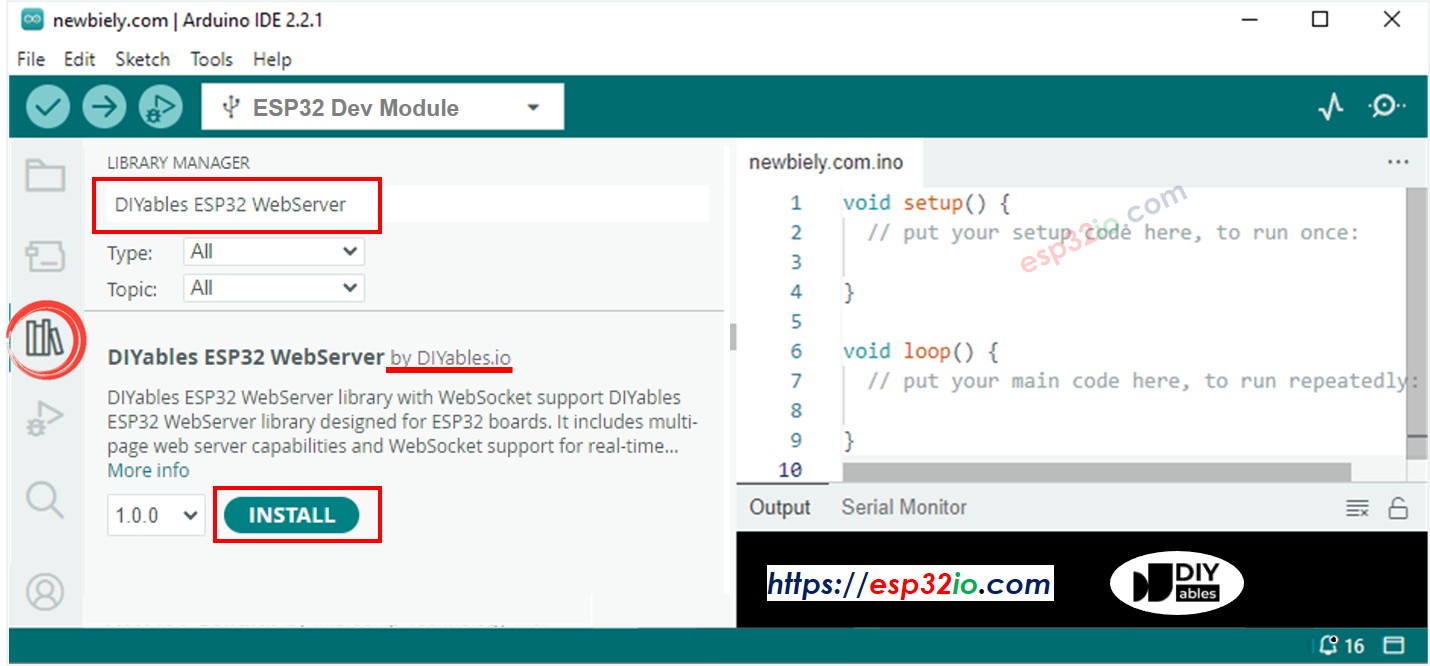
  • Arduino IDE 왼쪽에 있는 Library Manager 아이콘을 클릭하여 라이브러리 관리자를 엽니다.
  • Web Server for ESP32를 검색하고 DIYables의 mWebSockets를 찾으십시오.
  • Install 버튼을 클릭하여 mWebSockets 라이브러리를 추가하십시오.
ESP32 웹 서버 라이브러리

웹소켓 예제

  • Arduino IDE에서 File 예제 ESP32용 웹 서버 WebServerWithWebSocket 예제 코드를 열려면

코드 구조

프로젝트는 두 개의 주요 파일로 구성되어 있습니다:

  1. 웹소켓_html.h:

웹 인터페이스용 HTML, CSS 및 JavaScript 코드가 포함되어 있습니다. 이 파일은 WebSocket을 통해 ESP32와 상호 작용하기 위한 사용자 인터페이스를 정의하며, 명령을 보내는 버튼, 메시지 로그, 연결 상태 표시기를 포함합니다.

i. WebServerWithWebSocket.ino:

ESP32에서 주요 서버 로직을 구현합니다. 이 파일은 HTTP 및 WebSocket 서버를 설정하고 WiFi 연결을 관리하며 수신된 WebSocket 메시지를 처리하고 수신된 명령에 따라 하드웨어(예: 내장 LED)를 제어합니다.

회로 연결

외부 부품이 필요하지 않습니다. 이 예제는 핀 13의 내장 LED를 사용합니다.

웹소켓 통신

연결 세부 정보

  • 웹 서버 포트: 80 (HTTP)
  • 웹소켓 포트: 81 (웹소켓)
  • 프로토콜: RFC 6455 호환 웹소켓

메시지 유형

실제 구현은 간단한 문자열 명령어를 사용합니다:

  • : "ping" → 응답: "pong"
  • 인사말: "hello" → 응답: "ESP32에서 안녕하세요!"
  • 가동 시간: "time" → 응답: "가동 시간: X초"
  • LED 제어: "led on" / "led off" → 응답: "LED 켜짐" / "LED 꺼짐"
  • 에코: 그 외의 텍스트 → 응답: "에코: [당신의 메시지]"

설치 지침

1. 네트워크 구성

WebServerWithWebSocket.ino 파일에서 Wi-Fi 자격 증명을 직접 편집하세요:

const char WIFI_SSID[] = "YOUR_WIFI_SSID"; const char WIFI_PASSWORD[] = "YOUR_WIFI_PASSWORD";

2. 코드 업로드 및 출력 모니터링

  • ESP32를 컴퓨터에 연결하세요
  • Arduino IDE에서 올바른 보드와 포트를 선택하세요
  • WebServerWithWebSocket.ino 스케치를 업로드하세요
  • 시리얼 모니터를 열고(9600 보율)
  • 와이파이 연결을 기다리세요
  • HTTP 서버 주소와 WebSocket 서버 주소를 기록해 두세요
  • 시리얼 모니터에 IP 주소가 보이지 않으면 ESP32 보드의 리셋 버튼을 누르세요
  • 웹 브라우저를 열고 주소창에 ESP32의 IP 주소를 입력하세요(예: http://192.168.x.x/). 아래와 같이 웹 인터페이스가 표시됩니다:
ESP32 웹소켓 인터페이스
  • 'Connect' 버튼을 클릭하여 웹과 ESP32를 WebSocket으로 연결합니다.
  • 연결 상태가 "Connected"로 표시되면 각 버튼을 하나씩 클릭하여 WebSocket을 통해 웹 인터페이스와 ESP32 간의 양방향 통신을 테스트합니다. 결과는 아래와 같습니다:
ESP32 websocket 데모

웹 인터페이스 기능

HTML 인터페이스( websocket_html.h에서 제공됩니다):

  • WebSocket 연결 관리를 위한 연결/해제 버튼
  • 간단한 명령 버튼으로 핑, 헬로, 시간, LED 켜기/끄기
  • 메시지 입력 필드를 사용하여 사용자 정의 명령 보내기
  • 실시간 메시지 기록에 보낸 메시지와 받은 메시지가 표시됩니다
  • 연결 상태 표시기가 WebSocket 상태를 표시합니다

코드 설명

웹소켓 서버 설정

#include <DIYables_ESP32_WebServer.h> #include "websocket_html.h" // LED configuration #define LED_PIN 2 // ESP32 built-in LED pin // Server configuration WiFiServer httpServer(80); constexpr uint16_t wsPort = 81; WebSocketServer wss{wsPort}; void setup() { Serial.begin(9600); delay(1000); // Initialize built-in LED pinMode(LED_PIN, OUTPUT); digitalWrite(LED_PIN, LOW); // Connect to WiFi manually Serial.print("Connecting to "); Serial.println(WIFI_SSID); WiFi.begin(WIFI_SSID, WIFI_PASSWORD); while (WiFi.status() != WL_CONNECTED) { delay(500); Serial.print("."); } // Start HTTP server httpServer.begin(); // Configure WebSocket server with lambda handlers wss.onConnection([](WebSocket &ws) { Serial.println("New WebSocket connection"); // Set up message handler ws.onMessage([](WebSocket &ws, const WebSocket::DataType dataType, const char *message, uint16_t length) { handleWebSocketMessage(ws, message, length); }); // Send welcome message const char welcome[] = "Connected to ESP32!"; ws.send(WebSocket::DataType::TEXT, welcome, strlen(welcome)); }); // Start WebSocket server wss.begin(); }

웹소켓 메시지 처리

void handleWebSocketMessage(WebSocket &ws, const char *message, uint16_t length) { Serial.print("[WebSocket] Received ("); Serial.print(length); Serial.print(" bytes): "); Serial.println(message); String msgStr = String(message); String response = ""; // Command processing with simple string matching if (msgStr.equalsIgnoreCase("ping")) { response = "pong"; } else if (msgStr.equalsIgnoreCase("hello")) { response = "Hello from ESP32!"; } else if (msgStr.equalsIgnoreCase("time")) { response = "Uptime: " + String(millis()/1000) + " seconds"; } else if (msgStr.equalsIgnoreCase("led on")) { digitalWrite(LED_PIN, HIGH); response = "LED ON"; } else if (msgStr.equalsIgnoreCase("led off")) { digitalWrite(LED_PIN, LOW); response = "LED OFF"; } else { response = "Echo: " + msgStr; } // Send response ws.send(WebSocket::DataType::TEXT, response.c_str(), response.length()); }

메인 루프와 WebSocket 처리

void loop() { // Handle HTTP requests WiFiClient httpClient = httpServer.available(); if (httpClient) { handleHTTPClient(httpClient); } // Handle WebSocket connections wss.listen(); delay(10); } // HTTP request handler void handleHTTPClient(WiFiClient client) { String request = ""; // Read HTTP request while (client.connected() && client.available()) { String line = client.readStringUntil('\n'); if (line == "\r") break; if (request.length() == 0) request = line; } // Serve web page or 404 if (request.indexOf("GET / HTTP") >= 0) { client.println("HTTP/1.1 200 OK"); client.println("Content-Type: text/html"); client.println("Connection: close"); client.println(); client.print(htmlPage); } else { client.println("HTTP/1.1 404 Not Found"); client.println("Connection: close"); client.println(); } client.stop(); }

자바스크립트 웹소켓 클라이언트

연결 관리

let websocket; let isConnected = false; function initWebSocket() { const wsUrl = `ws://${window.location.hostname}:81/`; websocket = new WebSocket(wsUrl); websocket.onopen = function(event) { console.log('WebSocket connected'); isConnected = true; updateConnectionStatus('Connected'); }; websocket.onmessage = function(event) { handleWebSocketMessage(JSON.parse(event.data)); }; websocket.onclose = function(event) { console.log('WebSocket disconnected'); isConnected = false; updateConnectionStatus('Disconnected'); // Auto-reconnect after 3 seconds setTimeout(initWebSocket, 3000); }; websocket.onerror = function(error) { console.error('WebSocket error:', error); updateConnectionStatus('Error'); }; }

메시지 처리

function handleWebSocketMessage(event) { const message = event.data; console.log('Received:', message); // Handle simple string responses (matching actual implementation) if (message === 'pong') { console.log('Ping response received'); addMessageToHistory('Received: pong'); } else if (message.startsWith('Hello from ESP32')) { addMessageToHistory('Received: ' + message); } else if (message.startsWith('Uptime:')) { updateUptimeDisplay(message); addMessageToHistory('Received: ' + message); } else if (message === 'LED ON' || message === 'LED OFF') { updateLedStatus(message); addMessageToHistory('Received: ' + message); } else if (message.startsWith('Echo:')) { addMessageToHistory('Received: ' + message); } else { addMessageToHistory('Received: ' + message); } }

명령 전송

// Simple string-based command sending (matching actual implementation) function sendCommand(command) { if (isConnected) { websocket.send(command); addMessageToHistory('Sent: ' + command); } else { alert('WebSocket not connected!'); } } function controlLED(action) { if (action === 'on') { sendCommand('led on'); } else if (action === 'off') { sendCommand('led off'); } } function sendPing() { sendCommand('ping'); } function sendHello() { sendCommand('hello'); } function getUptime() { sendCommand('time'); }

HTML 인터페이스 특징

웹소켓 테스트 인터페이스

포함된 HTML 페이지는 완전한 WebSocket 테스트 인터페이스를 제공합니다:

  • 연결 제어(연결/해제 기능 포함)
  • 자주 사용하는 명령 버튼(핑, 헬로, 시간, LED 제어)
  • 메시지 입력 필드(사용자 정의 텍스트 명령 전송용)
  • 실시간 메시지 로그(모든 통신 표시)
  • 연결 상태 표시(시각적 표시기 포함)

자바스크립트 내장 함수

HTML 인터페이스에는 ESP32 명령 구조와 일치하는 JavaScript 함수가 포함되어 있습니다:

// Send simple string commands to ESP32 function sendQuick(msg) { if (connected && ws) { ws.send(msg); addMsg('You: ' + msg, 'sent'); } else { addMsg('Not connected!'); } } // Handle WebSocket events ws.onmessage = function(event) { console.log('WebSocket message received:', event.data); addMsg('ESP32: ' + event.data, 'received'); };

구현 노트

단순화된 아키텍처

실제 구현은 기본적인 접근 방식을 사용합니다:

  • 분리된 서버들: HTTP용 WiFiServer와 WebSocket용 WebSocketServer
  • 수동 WiFi 연결: 통합된 서버 관리 없이 표준 WiFi.begin() 설정
  • 문자열 기반 메시징: JSON 프로토콜 대신 간단한 문자열 명령
  • 람다 핸들러: 인라인 람다 함수로 정의된 WebSocket 이벤트 핸들러
  • 기본 HTML 제공: 헤더 파일에서 HTML 콘텐츠를 직접 client.print()

현재 구현의 한계

  • 센서 데이터 스트리밍 없음(문서 예제에 표시된 대로)
  • JSON 메시지 파싱 없음
  • 다수의 클라이언트에 대한 브로드캐스트 없음
  • 기본 연결/해제 외의 연결 관리 없음
  • 하트비트 또는 유지 연결 시스템 없음
  • 메시지 큐잉 또는 신뢰성 기능 없음

사용 가능한 명령어

실제 구현에서 작동하는 명령어들:

  • pingpong
  • helloESP32에서 안녕하세요!
  • time가동 시간: X초
  • led onLED ON (LED_PIN을 켭니다)
  • led offLED OFF (LED_PIN을 끕니다)
  • 그 외의 텍스트 → Echo: [당신의 메시지]

문제 해결

일반적인 문제

WebSocket 연결 실패

  • WebSocket 포트(81)에 접근 가능한지 확인
  • 방화벽 설정이 포트 81을 차단하지 않는지 확인
  • 브라우저 개발자 도구를 사용하여 WebSocket 오류를 확인
  • ESP32의 IP 주소가 올바른지 확인

수신되지 않은 메시지

  • 시리얼 모니터에서 WebSocket 이벤트 및 메시지 수신 확인
  • 명령 문자열이 정확히 일치하는지 확인합니다(대소문자 무시)
  • 먼저 'ping'과 같은 간단한 명령으로 테스트합니다

LED가 응답하지 않음

  • 사용 중인 ESP32 보드에 대해 LED_PIN이 올바르게 정의되어 있는지 확인합니다(일반적으로 GPIO 2).
  • 시리얼 모니터에서 명령 처리 메시지를 확인합니다.
  • 정확하게 "led on" 및 "led off" 명령이 전송되었는지 확인합니다.

디버그 명령어

WebSocket 기능을 테스트하려면 다음 명령어를 사용하세요:

  • ping - 간단한 연결 테스트
  • hello - 인사 응답 테스트
  • time - ESP32 가동 시간 테스트
  • led on / led off - 하드웨어 제어 테스트
  • 다른 텍스트는 통신 테스트를 위해 에코됩니다

현실 세계의 응용

기본 사물인터넷 제어

현재의 간단한 구현은 다음과 같은 경우에 적합합니다:

  • 원격 LED 제어를 위한 기본 장치 상태 표시
  • 장치 상호 작용을 위한 간단한 명령/응답 시스템
  • 개발 목적의 WebSocket 연결 테스트
  • 기본 실시간 통신 시연

가능한 개선점

이 예제를 프로덕션 환경에 맞게 확장하려면 다음을 추가하는 것을 고려해 보십시오:

  • 구조화된 데이터를 위한 JSON 메시지 파싱
  • 센서 데이터 스트리밍 기능
  • 다수의 클라이언트 연결 관리
  • 인증 및 보안 기능
  • 오류 처리 및 재연결 로직

다음 단계

  • ArduinoJson 라이브러리를 사용한 JSON 메시지 파싱 추가
  • 실제 센서(온도, 습도 등) 통합
  • 다수의 WebSocket 클라이언트에 브로드캐스트 구현
  • 보안 접속을 위한 인증 추가
  • WebSocket 연결을 사용한 모바일 앱 인터페이스 생성